Autumn is the time to go for a walk with your children and stock up on natural materials. After all, nature is a real treasure trove for children and needlewomen. Let's make a pumpkin house with our own hands.
Of course, in order for such a craft to stand for a long time, it needs to be repaired and dried, but such work is quite painstaking and will take a considerable period of time. And the kids and I urgently need a craft for kindergarten. Therefore, let's take an ordinary round pumpkin from the garden.
We will need:
Some materials may not be used or replaced.
- real pumpkin;
- chestnuts;
- a square of USB board (sold in all hardware stores), or a piece of plywood, or any other dense backing;
- green corrugated paper;
- acrylic paints;
- foamiran;
- red and white satin ribbon;
- cotton buds;
- salty dough;
- floral wire and aluminum;
- scissors, heat gun.

Cut a square from a USB plate. We wash it and dry it well. We do the same with pumpkin.

We mark the place for doors and windows on the pumpkin; you can do this with a water-soluble felt-tip pen.

We make a sketch on a sheet of paper (according to the required dimensions).

We transfer the sketch to foamiran. For the doors, we cut out additional hinges and a handle.

We paint the shutters at the window with acrylic paint. Let it dry.

Meanwhile, knead the salt dough, the recipe is standard: salt, flour, water. We make a stork out of it: take a piece and give it the shape of a bird. We bend the floral wire according to the shape of the bend of the head and neck, and insert it into the body. Like this.

Take two more pieces, flatten them and form them into a drop. These are our wings. In the same way, we make a ponytail.

Let's take two steps. First we try them on the pumpkin and form the bends.

We also cut out a small rectangle for the bench.
Place all parts in the oven and dry for about 3 hours at a temperature of no more than 100 degrees.
Meanwhile, glue the pumpkin to a board, which we cover with corrugated paper. Paint the area where the window will be with black paint. Glue the foamiran parts.
Remove the dried salt dough parts from the oven and cool. Glue the threshold.

We insert two pieces of aluminum wire into the stork - legs, glue the wings and paint with acrylic paint.

Glue chestnuts to the top of the pumpkin. Insert the finished stork.
Good afternoon, today I will show you which children's You can make your own pumpkin crafts for a competition or exhibition at school or kindergarten. There will be crafts here, accessible for the youngest children, and works that a schoolchild can handle and pumpkin compositions that will require adult help. I have selected the most kid-friendly pumpkin ideas. Here is the most complete selection autumn crafts from pumpkin vegetables for both girls and boys. Here's what you'll find in our article...
- painting pumpkin markers.
- Pumpkin decoration using decoupage technique.
- Autumn crafts from pumpkins with figured carvings.
- Cartoon characters from pumpkin.
- Robots and techno-men from pumpkin.
- Fairy houses from pumpkin.
- Owls and peacocks like pumpkin crafts.
- Cupcakes and donuts made from pumpkin.
There will be a lot of interesting things. Plus, I will tell you TECHNICAL POINTS creating such crafts with your own hands. So that you can create such masterpieces at home, without much mental strain, easily and with pleasure.
The simplest type of craft
DECOUPAGE from a napkin on a pumpkin.
Take the pumpkin and spray it with a can of white paint (auto paint for a dollar and a half). Let's dry it. And then we transfer the picture from the table napkin onto the pumpkin ( using decoupage technique)
Decoupage is when the pumpkin is smeared with PVA glue and put a thin layer of napkin on the glue - the one with the picture on it, and again apply PVA glue on top and dry it. This is a very simple craft for kids. The technique does not cause difficulties even for first-graders. If you are making a craft for the garden, then help your gardening child place a thin piece of paper napkin without wrinkles on the surface of the wet and sticky pumpkin.

Children's pumpkin craft
PAINTING WITH MARKER.
A drawing with a black permanent marker looks beautiful and stylish - it is sold in the same department where CDs are - this is a marker for signing disks. It does not wash off, dries instantly and does not stain your hands.
This owl drawing is very easy to create. And you don’t need to be an artist to make this pumpkin craft - thanks to the small elements and colorful pattern, all the unevenness and crookedness of the novice artist are not visible.

You CAN first draw a drawing with a regular thin felt-tip pen (as if practicing, and erasing unsuccessful lines as you go), and then instruct the children to trace these lines permanent black marker for signing CDs. The patterns consist of simple elements - sticks, arcs, hooks and simple curls, which are repeated many times. And therefore, such an autumn children's craft is suitable for your child.

CRAFTS “OWL made from pumpkin”
- for a competition in kindergarten and school.
You can make these funny owls from pumpkins and vegetables for the “Autumn Crafts with Parents” exhibition for the school. The owl's eyes are made of paper mini cupcake tins. Or from paper candy coasters in a box. And if you don’t have such molds, you can use plastic cups - cut them off not high from the bottom and glue them with glue.
Can decorate pumpkin owl eyes using seeds. We simply glue them onto plasticine. Or hot glue.

You can cut out the eyes of such an owl craft from cardboard - in the form of a multi-layer frame (as in the left photo below).
Or, as eyes, you can attach small patties to a pumpkin craft (prick them on a wooden skewer and stick them into the pumpkin). And you can use small unripe zucchini as a beak.


Let your child choose the owl model for their children's garden craft.
And some elements of the owl can be cut out with a knife. It is more convenient to work with a knife with a short sharp blade.

An owl can also be made from two pumpkins at once - one for the body, the other for the head. For plumage, you can use cutting strips of cardboard, or you can use various vegetables in the craft (orange skins, green skins of hard, thick-skinned cucumbers, nut shells, dried dried apricots, cinnamon tubes, etc.).
Crafts for the garden from vegetables
PEACOCK BIRD.
Here everything is even simpler: from cardboard (or thick felt) we cut out the elements of the head, beak, eyes, beard, and paws. You can cut out the tail, or you can collect beautiful autumn leaves in the park and decorate it like this leaf plumage the tail part of our pumpkin bird.

You can cover the pumpkin with feathers. You can cut these feathers out of paper if you don’t have any ready-made ones.
You can also make a very elegant blue peacock, with brilliant plumage and even with real peacock feathers (you can order them on the Ali-Express website for $1 and you will receive a whole package, although you need to place an order in advance - the delivery time can be 2 weeks). This craft will be a winner in a competition in kindergarten.

Crafts from pumpkin and vegetables
in the form of ANIMALS.
Here are the cute little animals that are most beloved by children. You can make a monkey out of a pumpkin. Make the ears from cardboard, or from two halves of an apple, potato or small pumpkin.

Using white and black paint you can turn a pumpkin into a panda or a purebred cat. This is the simplest pumpkin craft that you can completely entrust to your child - just mark all the lines in advance with a marker - and let the child decorate. A simple and quick to implement children's autumn craft.

Or you can buy a can of pink paint and make a funny Piggy Pig. The nose-piglet is made from potatoes and is pinned onto the nose of the pumpkin. You can also duplicate the fastening using wooden skewers (prick them onto the potatoes and stick them into the pumpkin).

But you can make such a teddy bear if you have a lot of small pumpkin fruits at your dacha. If the pumpkins are different colors, it doesn’t matter - you can then paint the entire bear the same color. You can also make a barrel of honey for him, also in the form of a pumpkin craft.

Insects You can also make your own pumpkins – ladybug ones. A butterfly, bee, bugs, caterpillar can be made from a chain of small pumpkins. The craft is accessible to the youngest visitors of the kindergarten group.
The wings can be cut from thin file folders - they are just hard and transparent. Cut it out and insert it into the slot on the pumpkin - and it will be inexpensive. 
CAT AND MOUSE
Fun fall pumpkin crafts.
And this cat-and-mouse theme can be embodied in pumpkins in a variety of ways. We make a cat out of a large pumpkin. And from small pumpkins there are mice with tails and mustaches. Here are several options for how to make a cat out of a pumpkin.

Here’s an interesting idea for an autumn pumpkin craft in the form of a box with kittens. Ears can be cut out from pieces of fabric or cardboard.


Here’s another great and simple pumpkin craft idea – CHEESE AND MICE. Simply cut out round holes in the side of the pumpkin. And we put toy mice in it. To make the hole round, you can cut it out not by hand, but hollow it out with a hammer (we put a metal cup or tube on the pumpkin and hit the other end with a hammer - the tube cuts into the pumpkin and knocks out a round hole).
And the mice for this pumpkin cheese craft can be crocheted or sewn from rags. Or mold it from plasticine.

You can also make a mouse house out of a pumpkin. To this pumpkin craft, you can attach a cross-shaped lattice to the windows, made from stick twigs. And make a gate with your own hands (put two sticks HORIZONTALLY, coat them with instant glue, and quickly place VERTICAL sticks on these two steel sticks.
And we make a ladder of steps using the same principle as a gate-door.

And since we’ve already reached the topic of houses, here are a couple more housing ideas for pumpkin crafts.
PUMPKIN HOUSES
children's crafts for kindergarten and school.
If the pumpkin is elongated in height, then you can make a two-story mansion. With hanging balconies. Decorated with flowers. We cut out balconies from quartered apples, or quarters of small watermelons. Decorate the pumpkin house with flowers and branches of decorative dried plants.

But overall it’s gorgeous idea for an autumn pumpkin house with brick and stone cladding (photo below). We will make these gray bricks ourselves - from ordinary square BREAD CRUSTS.
You can buy crackers ready-made in the store, or cut the bread into cubes and dry in the oven. After complete hardening we these paint the crackers with WHITE AND GRAY paint. In two bowls we dilute paint (gray and white) - it is better to use acrylic paint, but gouache is also possible. Paint is a must mix a little flour, so that it turns out to be a mixture thick dough like pancakes.
Quickly dip the cracker into the sticky paint and set aside. While the crackers are not yet wet and sticky, we lay out our PIPE from them on a smooth board... PORCH and DOOR PORTAL cladding. And leave until completely dry. We attach the dried elements with instant glue to the side of the pumpkin (you can cut openings in the pumpkin so that our lining fits into them like grooves).

The flour should hold the parts of the building together - but if it comes loose somewhere, then we fasten it with regular instant glue (or hot glue from a gun). Melted caramel also glues perfectly (pour a little water (1 mm) into the bottom of the saucepan, put candy canes and melt them over low heat - it makes excellent glue.
We make doors from small twigs and wood chips - we connect them with glue, or we put them on a PLASTICINE PLATE.
You can come up with your own model of a FAIRY HOUSE made from a pumpkin. Use your imagination. Let your pumpkin craft be the embodiment of the creative power of your brain.


PUMPKIN CRAFTS
with metal things.
You can make a TECHNO-MAN from a pumpkin. Rummage through the tool cabinet, rummage through the box on the balcony, ask your grandfather what of his supplies you wouldn’t mind using to create an autumn craft for school. And based on the received equipment, create your own fantasy pumpkin face.

And if you buy a can of auto paint in a noble bronze shade, you can get a gorgeous robot pumpkin.

Or you can make such a funny pumpkin craft in the form of workers who are carving and crushing pumpkin rock.
Continuing the topic of HUMANIZING pumpkin heads, I offer a few more options that are worth attention. The tail of a pumpkin can be thought of as a NOSE. And then you can put glasses on this nose, and pick up other parts of the pumpkin image: an old lampshade, a bathing cap, an old wig from a children's party, pendants from a chandelier, buttons and other trinkets from the drawers of the table.
You can make cute old ladies with difficult characters out of pumpkins. You can make a charismatic bespectacled man with a broken nose.

The main thing is to prevent the character from resembling a school principal, the head of a kindergarten, or another person respected in the country.
Or you can try to recreate a resemblance to a mussel character - like Elvis Presley in the right photo below.

Or pirates with a moderate degree of bloodthirstiness. A pumpkin pirate is a craft that boys will love. They will proudly carry this formidable head to the autumn crafts exhibition at school. And such a character is simply obliged to take prizes at a school-wide competition.

Pumpkin crafts
in the form of CARTOONS.
Cartoon characters are those media personalities that are recognized by all children. We may not know such a bug. But any child can tell you many interesting facts from his cartoon adventures.
Try to look at your pumpkin more carefully and see in its shape the BODY OF A FUTURE CARTOON HERO.
This cute fly came from an oval pumpkin, thanks to inspiration from a little book.

Or a character from your favorite book about OLIVIA PIG... a book with wonderful illustrations.

But everyone’s favorite minions – and also in the form of a pumpkin craft. You need white and blue paints and a black marker.

You can make a family of Angry Birds from a pumpkin. You can also make green pumpkin pigs.

Or an orange fish from the cartoon about Captain Nemo.

But here are two green cartoons - one is called AM-NYAM (a fact obtained from my daughter) ... and we cannot remember the second ONE-EYED ... like from the Academy of Monsters.

Here are the characters from the cartoon about SPONGEBOB. You can cut off all the skin from the pumpkin and use a round spoon to cut out holes to create the effect of a porous sponge.
And to create PATRICK (a starfish, SpongeBob's friend), you need to put additional material on the top of the pumpkin. This can be plasticine (but then you need quite a lot of it), you can make a sticky mass from wet newspaper and PVA glue. Dry and paint.

And this is Humpty Dumpty, who was sitting on the wall and fell in his sleep... A simple and easy children's craft for the garden. We make a wall from an ordinary cardboard box - we cover it with colored paper and draw bricks on it with a marker. We make the cylinders from cardboard, and the arms too. A pumpkin ninja turtle is also a craft for boys.

Here’s another cartoon character that seems painfully familiar to me - but I can’t remember where I know this funny face from... In some ways, the style of it reminds me of the characters in the cartoon “The Koloboks Are Investigating”... and also a clown.
And by the way, here’s an idea for creating a cheerful clown in a hat and bow from a pumpkin head.

You can make a Mad Hatter from a pumpkin, a Queen of Hearts, and a pumpkin Cheshire Cat with a big smile - excellent pumpkin art crafts for an autumn exhibition at school.

But here is an iron woodcutter with a loving heart. For this pumpkin craft, you need to buy a can of silver spray paint.

CRAFTS FOR GIRLS made from pumpkin.
Girls will love the cuter and gentler characters made from pumpkin. For example, cute Kitty.

Or girls from the country LALALUPSIA. Hairstyles can be made from knitting yarn, or cut into bangs from strips of cardboard.

And here are the characters from the cartoon FROZEN HEART.
OLAFA the Snowman can even be made with his head torn off; throughout the entire cartoon it was regularly torn off from him. Craft for school in the spirit of “tearing off the head.”

And here is the princess herself from the cartoon - also made of pumpkins - in a homemade wig and dress.
You can also make a children's CRAFTS WITH AN EDIBLE THEME out of a pumpkin. This can be a delicious cupcake, covered with chocolate glaze (it can be made from flour, water, salt, PVA glue and brown paint - the proportions are by eye, so that it is thick, then roll it out with a rolling pin, put it on the pumpkin and smooth out the edges figuratively, with the effect of leaking chocolate).
You can also make donuts from flat, flattened pumpkins.
You can also use several pumpkins to create a three-tier ice cream.

You can make an apple from a pumpkin - poured or nibbled.

CRAFTS FROM PUMPKIN AND VEGETABLES
FOR BOYS.
Here are children's crafts in the theme of THE SUFFERING PUMPKIN... a baby pumpkin is swallowed by a lizard... or a pumpkin has contracted a rotavirus infection. Of course, this option is doubtful for autumn crafts at school. But if you are brave and daring and are used to shocking teachers with an unconventional approach to the material being studied, then you need to live up to it at the exhibition.

And here is a craft made from a pumpkin with false eyes. You can buy the eyes at a weird odds and ends store (look online). Or you can make your own eyes from table tennis balls. These are such cute vegetables. You can put wigs on them from tangled threads, You can make cute hats with flowers from cardboard. That is, make them as friendly as possible.

You can insert a plastic toy jaw into the pumpkin man. You can take other vegetables and give them a similar facial expression. Let's get a family of saber-toothed vegetables.

But the UFO flying saucer with aliens is made of patisona.

And here is a flying saucer made from a ROUND pumpkin - the edges are cut out of cardboard and threaded into a horizontal slot on the equator circle of the pumpkin. Aliens can be made not from pumpkins, but from completely different vegetables. You can take small cucumbers and stick eyes on them. make antenna horns from nails and place them vertically on six legs made from matches.

You can show your imagination and make other mobile modules from pumpkins and zucchini. Any large vegetables can become wagons and trailers on your train.

Pumpkin CARVED CRAFTS.
These children's autumn crafts from a convenient and large vegetable, pumpkin, are very easy to make. First, draw a picture on paper. Then we press the paper against the side of the pumpkin. And with nail scissors (they are sharper and smaller) we pierce point-holes directly through the paper. Thus, the DOTT LINE of the future drawing is transferred to the pumpkin. Next, using a knife, we make cuts along these points, the outlines of the design. And then we remove the crust from the pumpkin INSIDE THE BORDERS OF THE FIGURE.

You can make a floral autumn craft from a pumpkin with flowers. Just drill holes and insert flower stems into them.
Here's an idea for beautiful crafts from pumpkins and vegetables that you can make with children's hands for a competition for school or kindergarten.
Good luck with your creative incarnations.
Olga Klishevskaya, especially for the site
Pumpkin is a versatile material from which you can create many interesting crafts. A pumpkin house looks especially attractive. It can be done in various ways, and it will always attract attention.
Pumpkins and Halloween
Many people associate products made from orange vegetables with the famous holiday - Halloween. But not only for this day you can make a pumpkin house with your own hands. It can be created at any time and decorate the interior. On the windowsill, the craft will look mysterious and attractive. Houses can be varied, the design depends on your mood.
Some people prefer to carve mysterious locks with complex patterns. There are also those who imagine the pumpkin as a cute house for gnomes. Huts, huts and strange witch dwellings are made from this malleable material. To begin creativity, it is necessary to carry out the preparatory process.
Materials for working with vegetables
Before carving a pumpkin house (a master class is given in this article below), you need to prepare materials for creativity. To get the job done accurately, be sure to purchase:
- Knife with a long blade. It will be used to cut large diameter holes.
- An awl used to create small holes in the skin of the pumpkin.
- You can prepare drills of various diameters.
- All outlines and desired patterns are drawn with felt-tip pens.
- Stencils with drawings. You can make them yourself. First, draw a picture and cut out the middle using
- Acrylic paints for coloring and drawing.
- Glue, it’s better if you can use it to make decoupage. This effect will allow you to create the most unusual pumpkin house.
You may need beads and fabric. Coming up with funny decorations is always interesting and entertaining.
Preparing the pumpkin for work
Before creativity, vegetables need to be properly processed. For the base, not the usual garden one is chosen. If you do not make preliminary preparations, the pumpkin will lose its attractive appearance. It might even just rot.
The vegetable should be washed and dried well. Cut off the top in such a way as to remove the pulp. You can pull it out with the most ordinary spoon. The pulp must be completely removed. Otherwise, the fruit will begin to mold. Residues from the walls are removed with coarse sandpaper. Place the peeled pumpkin in a ventilated place, stuffed with old newspaper. The paper filling is changed until it stops absorbing moisture. Preparing the pumpkin will take several months. Therefore, you need to approach this issue in advance. This is the only way you will get a high-quality pumpkin house. The craft will serve you for a long time.
Camper
Look at the photo provided. This pumpkin house is made using squash. They should also be prepared and dried. Of course, if the structure is only supposed to last a few weeks, then it doesn't have to be tedious to cook the vegetables.

Windows and doors are cut out with a knife. Before you start working with a sharp object, draw approximate outlines of future windows. A carnation bud is used for the door handle. Every housewife has a bag of these spices in her seasonings. The wheels are attached on both sides; you can use wooden skewers. The most difficult thing is to choose squash of the same size. This is the only way they will look harmonious in the overall composition.
Cutting unusual locks
A pumpkin house can be absolutely anything. There is no perfect home or structure. It all depends on your endless imagination. Imagine your pumpkin castle and feel free to get to work. It is not necessary to build windows and doors. You can simply cut out the desired house (its outline) on one side of the vegetable.
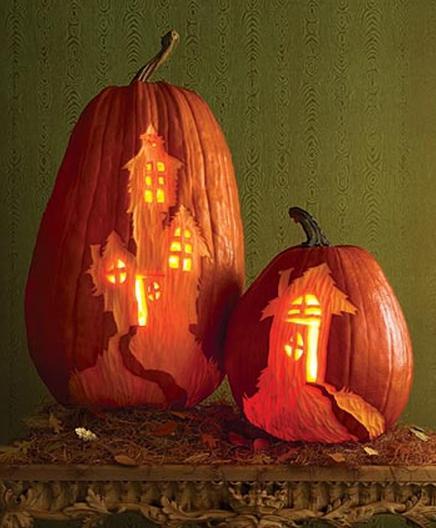
You can, for example, cut out fairy-tale huts. Of course, to create such a masterpiece, you need to be patient. Before starting work, draw a rough sketch. You need to place a candle in the center of the vegetable. As soon as twilight falls on the earth, feel free to light the wick and enjoy the light.
A sweet home for a gnome
This craft can be done by the whole family. Let everyone create their own masterpiece, organize a competition and display your pumpkins on the windowsill.
If you work in a kindergarten, then use this idea to keep the kids busy. For example, create a home from the fairy tale "Cipollino" - Pumpkin's house. Kindergarten is a great place for creativity, but you must bring vegetables, already with holes. Give each child an orange blank and begin collective creativity. Of course, in the book, the Pumpkin's house was built from bricks, but you can get creative and create it from such an unusual vegetable material.

Kids will need to be given a variety of decorative items. Bright markers, colored or self-adhesive paper, pieces of fabric and colored beads are perfect for this. With their help, blanks will turn into real masterpieces. Such crafts will decorate any home.

We use cones and moss as decorative elements. These materials must be prepared in advance. Take a walk with your charges in the park area and dry the gifts of nature. If you place a candle in the center of the vegetable, light will be visible in the windows. It’s as if cute gnomes live in the house. By the way, you can use characteristic figures to create a complete composition.
House for mice
Gnomes are definitely cute creatures. But a pumpkin house can also be for little mice. In order to decorate a table or window sill with such a composition, you need to make holes for the door and window. A gate made of twigs is used as a door. Just tie a couple of branches of the appropriate size. Install improvised bars on the windows. You can buy mice at a toy store or sew them yourself. The second option is welcome, since in this case your residents will be distinguished by their originality.

The product can be decorated with curtains and steps. Show your imagination and transform an orange vegetable into a real masterpiece with which you can decorate your interior.
Other vegetable houses

You can make your own pumpkin house using felt. Just cut out the necessary parts and glue to the peel. You will only need to make holes to imitate windows. Place a hero near each window. The craft will immediately become more lively. Use multi-colored fabric to make the craft bright and juicy.

The simplest option is to use acrylic paints. Just draw your house on the pumpkin. It will also look original and unique. In this version, only black paint was used. But, nevertheless, the craft looks interesting and atmospheric. Only by experimenting will you get interesting orange houses from the most ordinary pumpkin.
With the onset of each spring season, I start fidgeting in my chair and scratching my hands))), I also do this on a bench in the garden. I would like to switch from needlework to decorate the interior to creating crafts that can decorate and add zest to the garden. In terms of the near future, I have many publications on this topic, but now I want to show works from which to say that I am completely delighted is to say nothing! Amazing fairy-tale houses for gnomes and forest fairies are created by an American craftswoman - Anna from Missouri. It’s just amazing how polymer clay, pumpkin and pine cones come together! I have cones, polymer clay too (yesterday I published a post on choosing polymer clay), and the pumpkin can be replaced with papier mache, if you don’t have it. I wish you a pleasant viewing, or rather admiration, and below I attach a photo of a master class from the author. Good luck!


I would like to note: for the work you will need polymer clay, which requires baking in a stove or oven, especially if you will use fairy-tale houses as garden figurines. By the way, about stoves))) Spring is in full swing, and summer is ahead... but don’t forget about the cold season, which will come, and much faster than we think) If you haven’t purchased a heating stove yet, then right now you can buy it much cheaper than in winter. On the company website "Shulepov and Partners" You can purchase Termofor stoves; in the online store catalog there is a huge selection of heating stoves, of various designs, from the best Russian manufacturers. Take a look)
So, for work we need:
For one fairy house - 2 pumpkins
polymer clay
acrylic paints of different colors for sculpting small details
gold acrylic paint for decoration
cones and scissors or wire cutters
water-based sealant varnish
modeling tools

Pumpkins need to be emptied and thoroughly dried before starting work. We trim the pumpkins - we cut off the top of the first one, it will be the base of the house, we cut off the second one just above the middle from the bottom, we need the top for the roof of the house. We prepare the cones for the house tiles, cut them with scissors or wire cutters

The author fills the pumpkin with sand to give it heaviness and stability. Glue on the roof, then glue on the pine cones. Add a window made of polymer clay. You will need three colors of clay: black, brown and purple. The window, like all other details of decorating the house, is first baked in the oven, following the instructions for the clay used

Here's a closer photo. Please note: the pumpkin is painted and varnished, the leaves are lightly coated with gold acrylic paint


