DIY flowerpots made of cement and fabric for the garden are an original find that can decorate any backyard landscape. Despite the fact that they appeared in private courtyards only a few years ago, the history of the existence of such decorative elements began quite a long time ago.
The use of outdoor flowerpots made of concrete in landscape design dates back to ancient gardening art, the works of which were placed in palaces. In the front alleys and parks, exquisite bowls made in the Baroque style were a mandatory attribute. Little by little, such flowerpots began to take pride of place in the landscaping of city parks and gardens, public buildings, and front doors. Concrete street flower stands are widely used to decorate the entrance to housing, areas intended for recreation, open terraces. In gardens, they serve as small architectural forms - their use in the landscape makes it possible to somewhat dilute the monotonous unity of the green grass carpet and create attractive visual accents.
- 1 Pick up necessary materials. In addition to the concrete solution, you will need old towels (terry or waffle) or a piece of any thick fabric of the required size. To begin with, you can take an unnecessary bucket as a form. You will also need a piece of polyethylene. When working with cement mortar, protect your hands with gloves.
- 2 Dilute the cement with water to a consistency reminiscent of liquid sour cream. Turn the bucket on which you will dry the flowerpot upside down and wrap it with polyethylene, otherwise it will not be easy to remove it after the mixture has hardened. Immerse the towel in a container with the prepared solution. Then take it out and straighten it. It should be completely saturated with the mixture, without any residue; do not leave dry spots on it.
- 3 Throw a towel over the bucket turned upside down, then smooth the bottom better so that there are no wrinkles, otherwise the future vase will turn out to be unstable. Arrange the falling folds of the fabric the way you like it best. Leave the resulting structure to dry for a couple of days. After the fabric has hardened, remove the bucket from the outside. Now your flower girl is ready.
- 1 Prepare a large, thick piece of cardboard. Lay greenhouse covering material on it and straighten it so that all folds are smoothed out.
- 2 After soaking the fabric with the solution, it should be spread on cardboard and smoothed well so that the towel adheres better to the surface.
- 3 Then the bucket chosen to create the shape is placed in the center, after which the entire structure must be carefully and very quickly turned over, while holding it by the cardboard. The fabric should stick to the bucket along with the film.
- 4 Form the folds of the future product to your liking. You cannot make deep creases - it will be difficult for you to get the film out of them. From the already frozen structure, you can try to burn out the pieces of film stuck there with a lighter.
- 1 Cardboard with film is coated with silicate glue. Fabric, newspapers, and wallpaper chosen for the design are placed on it. Everything is smoothed out.
- 2 The reverse side of the paper material is coated with silicate glue. The glue should saturate the material well - this will take about 10 minutes. If there are dry areas left, coat them additionally.
- 3 Place the cement-impregnated fabric over the design. Everything needs to be smoothed out well, then the cardboard with the resulting “sandwich” should be thrown onto the mold and left to harden. Straighten the folds.
- fine gravel;
- sand;
- cement;
- water.
- Transportability. Thanks to their easy movement around the territory, you can create new compositions, and during bad weather or in winter, transfer plants to the attic or veranda.
- The ability to decorate a yard where the ground is covered with concrete or tiles and planting plants in the ground is impossible.
- Fencing function. With the help of outdoor containers, you can divide the area into zones and create a cozy corner.
- Possibility to create favorable conditions in each flowerpot for a separate plant: special soil, fertilizer, watering.
- Low cost. Compared to many other garden décor items, containers save money. Handmade products allow you to do this twice as much.
- Space saving. In containers you can place not only flower beds, but also cultivated plants, use them instead of beds for growing cucumbers, tomatoes, herbs, and berries. This is especially true for small areas in order to save space.
- Fragility. Applies to products made of plastic and wood.
- Plastic flowerpots are harmful to health as they can release hazardous substances into the air.
- Ceramic products are very fragile.
- Plants in ceramic and metal containers require frequent watering due to the soil drying out too quickly.
- Heavy weight. Products made of concrete and stone have this disadvantage.
- You need to drill several holes on the surface of the stump. The more there are, the closer they are located to each other, the easier further work will be.
- Scrape out the inside of the stump to the desired depth.
- Place a container of soil in the hole.
- Treat the entire surface of the wood with a special anti-rot agent.
- You need to prepare a form, most often it is plastic, that suits all parameters.
- Prepare the mixture to fill the mold. It consists of cement, agroperlite and peat in proportions 2: 1: 2. All components are poured into a suitable container and diluted with water to a thick consistency. There is a lot of mixture, it is very difficult to stir such an amount, so this should be done in several approaches, dividing the solution into parts. To make the flower container colored, dyes are added to it when mixing the solution.
- Line the bottom of the mold with cellophane. The main thing is that its surface is smooth, without wrinkles. Any unevenness will be imprinted on the finished flowerpot.
- Place the prepared mixture on cellophane. First, fill the bottom, making it about 5 cm thick. You can use a toothpick or straw to control the depth. A cork wrapped in polyethylene is first placed at the bottom of the future flowerpot to provide a drainage hole.
- Then spread the solution over the entire remaining surface of the mold.
- When the mold is completely filled, it must be left for 10 days to harden. If the mixture dries out, it needs to be moistened with water.
- Pass the finished container with a metal brush over the entire surface to remove all unevenness and give a slight relief to any too smooth areas.
- After this, the flowerpot should be rinsed with water, dried, wrapped in film and left for about a week.
- When the product brightens, you can remove the film and place it on Right place. The weight of such a flower girl is very large, so it is better to start the process of making it immediately at the place where it is planned to be located further.
- Draw the desired outline on the sidewall of the tire.
- Cut out the part along the contour. To do this, you can use a rubber knife or a jigsaw.
- Next you need to turn the tire inside out. To do this, cuts are made throughout the tire every 5-10 cm.
- The flowerpot is ready. All you have to do is decorate it as you wish, cover it with soil and plant a plant.
- Petunia. These are easy to care for flowers of various colors that bloom all summer.
- Pansies. Their flowering continues for a long time. They are unpretentious, come in a variety of colors and varieties, and grow short but fluffy.
- Ageratum. It has a long flowering period and is unpretentious in watering.
- Fuchsia. Thanks to its cascading appearance, it creates the impression of being in a blooming, fragrant garden.
- Verbena. Suitable for planting in containers, has a modest root system, can be combined with other plant varieties.
- fabrics, napkins, filled with concrete and frozen forever;
- rubber boots in bright colors and different sizes as original flowerpots;
- ordinary bowls attached in rows to a wooden fence or strung on a metal pin like a herringbone or pyramid;
- you can even build an alpine slide from tires;
- Broken ceramic bowls should not be thrown away; the shards can serve original decor;
- old galvanized watering cans, buckets;
- mosaic from old ceramic dishes;
- a box made of boards with a trellis for climbing plants.
- water resistance, an outdoor vase must withstand natural humidity for more than one season;
- strength, in such a container you will need to replant plants, loosen the soil, and, if necessary, move the mini-flower bed to a new place.
- Option one. For work you need to prepare: peat or expanded clay - 2 parts, coarse sand - 1 part, cement - 1 part, water. Water is gradually added to the solution until a viscous mass is formed. The resulting mixture is poured into the mold and allowed to harden.
- Option two. Composition of the mixture: cement - 1 part, medium-grain sand - three to five parts, water. The solution is poured into a prefabricated plywood structure, which is disassembled after the composition has hardened.
- do not work in the scorching sun;
- do not rush to remove the product from the mold;
- use durable decorative elements.
- The inner walls of the mold are treated with vegetable oil.
- For drainage, you need to prepare 4 pieces of pipe, five centimeters each.
- The solution is mixed according to one of the above recipes. You can add dye to the solution during the mixing process.
- The solution is poured onto the bottom of the mold in a layer two to three centimeters thick. Pieces of pipe are installed in the bottom - these will be holes for drainage.
- After the first layer has set, the inside of the mold is installed and the walls are poured.
- After a day, the inner part of the mold is removed, and the larger part remains for another week. Throughout this period, the mold must be periodically moistened with water.
- After seven days, the pot can be removed from the outer part of the mold and filled with potting soil.
- To drill drainage holes in a concrete pot, you need to use a special stone drill.
- Before painting the concrete surface, it is necessary to level and plaster all defects. To paint a flowerpot in light colors, you will need to first apply white primer.
- Cut a piece of the desired size. If you need smooth edges, then round them;
- We wet the material generously in the solution;
- We attach polyethylene to the prepared bucket;
- Lay the fabric soaked in the solution on top and smooth it out;
- After 2 days, the cement will set and the bucket can be removed;
- The product is lightly moistened with water and left to dry completely for another 5 days.
- Flowers in pots retain their popularity due to their portability. During the season, they can be rearranged around the area, decorating entrance group, then a recreation area.
- As a rule, plants for outdoor flowerpots are chosen that bloom profusely throughout the season. Therefore, they are great for decorating concrete or asphalt driveways.
- Hanging flowers for hanging flowerpots will add unique sophistication open veranda or decorate the handrails of the steps of the front entrance to the house.
- There is also a practical side to this method of growing flowers in the country. Plants planted in closed, tall flowerpots are less susceptible to attack by pests and diseases. In addition, there is no need to weed.
- By properly preparing the soil for plants, you can grow even complex and whimsical flowers in flowerpots that would not be able to survive in open ground.
- With the onset of autumn cold weather, the beauty of flowers can be extended by bringing them into the house.
- The soil for flowerpots must be selected in accordance with the requirements of the plants that will be planted in them. Most often, fertile purchased soil is used for this.
- Due to the small volume of the pot, the soil in it dries out very quickly, so it is recommended to add hydrogel to the soil.
- The flowerpot must have drainage holes for drainage excess moisture to prevent flower roots from rotting. The only exceptions are openwork metal pots with inserts made of coconut substrate or straw.
- A drainage layer of at least 3-4 cm is required. It is made from expanded clay, small crushed stone or any other material.
- After planting flowers in a flowerpot, mulch the surface of the soil from drying out. Coniferous bark, peat or small pebbles are used as mulch.
- Zinnia is a heat-loving plant that should be planted exclusively in sunny areas.
- It can only be kept in outdoor flowerpots during the warmest summer months, as even slight frosts can destroy it.
- For lush flowering, in a flowerpot with limited volume, you need to properly prepare the soil. Zinnia prefers fertile soil rich in organic fertilizers. Acidic or alkaline soils are not suitable for it.
- Zinnia is quite picky about watering. She cannot tolerate drought, but too much watering is detrimental to her. That is why it is necessary to organize a drainage layer in the flowerpot and regularly water the plant.
- For longer flowering, faded inflorescences are immediately removed.
- If the soil is rich in nutrients, fertilizing is not necessary.
- In outdoor flowerpots it creates a dense flowering carpet. The flowerpot with it will not need to be brought into a warm room for the winter; it will overwinter just fine outside.
- After winter it needs to be cut, but not completely, but only the dried shoots.
- The awl-shaped phlox should be planted in a sunny place; it does not require fertile soil.
- If flowering is sparse, you should not immediately feed the plant; it can further worsen the condition of the phlox subulate. The reason may be either poor lighting in the area or too dense soil.
- This is a ground cover plant with deep purple flowers. It is highly frost-resistant and is not afraid of the first frosts.
- To grow aubrieta in a flowerpot, choose a sunny place.
- It feels great on neutral and light soils, but on acidic clay soils it will only “survive”.
- For planting it, it is especially important to equip a good drainage layer, otherwise the roots will quickly rot.
- Fertilizing too frequently will affect the active growth of green mass, but flowering will become more sparse.
- During the summer, it is advisable to mulch the soil three times with sand, the layer of which is 4-5 cm. mineral supplements only needed in spring and autumn.
- After spring flowering, it is recommended to prune the plant (leaving small stumps). This will allow the aubrieta to bloom again in the fall. Therefore, it is advisable to place it in group plantings.
- For central Russia, heliotrope is excellent for growing in small flowerpots, which are taken outside only in the warmest months.
- It should be planted in a sunny place. The soil must be fertile.
- The soil should not be allowed to dry out, but it is also not advisable to over-moisten it. But heliotrope responds well to morning and evening spraying.
- It is also recommended to apply mineral or organic fertilizers for abundant flowering.
- Lavender requires regular watering. During the dry season, it is necessary to water twice a day - morning and evening.
- The plant needs pruning after each flowering.
- The color of lavender flowers is very diverse and depends on the variety. The timing when lavender blooms also varies. For example, narrow-leaved lavender has a flowering peak in early to mid-summer, while the Spanish variety begins to bloom in the spring.
- Plants can be planted in outdoor pots only when the threat of return frosts has passed. The height of the flowerpot should not exceed 40 cm.
- Before planting, you need to prepare the seedling itself (if it has an open root system). First, it is soaked in water for an hour, after which all excess roots are removed and the plant itself is pruned.
- In a flowerpot, seedlings should be located at a distance of 30 cm from each other (for low-growing varieties).
- For lavender, the soil chosen is alkaline sandy loam with a good drainage layer. Fertile soils not recommended for use.
- But in any case, in order to achieve abundant flowering in the first spring, they need to be planted exclusively as seedlings, planting the seeds at the end of February.
- When growing viola in a flowerpot, you will need to water it regularly, as it does not tolerate drought well.
- Abundant flowering pansies will respond to fertilizing with complex mineral fertilizers.
- Dead leaves and flowers should be removed promptly. This is important not only for decorative purposes, but will also extend the flowering period.
- It is important to provide drainage in the flowerpots, otherwise the viola will begin to rot.
- Best suited for outdoor flowerpots low-growing varieties marigolds.
- The greatest decorative effect is achieved when grown in a sunny place, since in partial shade the abundance of flowering is significantly reduced.
- You can plant them outside only after the threat of frost has passed.
- Frequent watering is unfavorable, as it leads to rotting of the inflorescences. But the plant is drought-resistant and undemanding to care.
- Marigolds respond well to feeding with mineral or organic fertilizers.
- Flowering is long - from June to October. To increase flowering time, faded flowers should be cut off regularly.
- In the fall, marigolds can be brought into the house, where they will delight with flowering for some time.
- They are highly resistant to various diseases and pests, so no spraying is required.
- A characteristic feature of marigolds is their pronounced odor, which has bactericidal properties. In addition, it repels pests from the site, so it is often recommended for preventive control of aphids.
- This light-loving plant It can also thrive in partial shade. Growing it in a flowerpot will require regular but light watering and fertilization.
- It is also important to ensure good drainage in the pot and remove any wilted flowers.
- To increase the splendor of flowering, you can apply the following fertilizing:
- Dissolve 1 drop of iodine in 1 liter of water and mix well. The resulting weak solution is watered not on the plants themselves, but on the walls of the flowerpot so that the roots gradually absorb the fertilizer. It is important to water moderately so as not to burn or kill the geranium. Therefore, a medium-sized pot will require only 60 ml.
- When planting homemade geraniums in an outdoor flowerpot, you don’t have to be afraid of changes in the color of the foliage. It becomes more pink - this is the norm.
- In autumn, at a temperature of +3 degrees, pelargonium should be pruned, transplanted into small pots, and left to overwinter at a temperature of 10 degrees.
- With insufficient watering, the edges of the leaves begin to dry out.
- With excessive watering, the leaves begin to rot and become limp.
- When there is insufficient light, the stem of the geranium becomes bare, shedding its leaves.
- Aregatum has a long flowering period, which is why it is also called ageless or long-flowering. Despite the fact that there are a huge number of different varieties, the Houston variety is the most popular in Russia.
- This herbaceous plant up to 20 cm high, it is a perennial, but is grown in flowerpots as an annual. It can also be trimmed regularly.
- The flowering period is very long - from late spring until frost.
- It will require a sunny place and regular watering. With a lack of moisture, Houston's aregatum will slow down its growth.
- Mineral fertilizers are used as fertilizing. Fresh manure is not suitable for these purposes. And you can’t overdo it with other organics. Since this will lead to the development of a powerful bush, but will negatively affect flowering.
- In a flowerpot it will look great in a composition with low-growing marigolds.
- They thrive in sunny areas and can tolerate short periods of drought. But they will also feel good in partial shade under the canopy of trees.
- It is best to plant indoor balsams in outdoor flowerpots in July, which will allow for less painful acclimatization. But with the threat of the first frost, they again need to be removed to a room with a temperature of at least 15-16 degrees.
- To plant them in outdoor pots, you need to create a drainage layer and add compost to the soil. Mulch the planted plant.
- To increase the bushiness of the plant, the tops of the shoots are pinched off. Impatiens do not need to remove wilted inflorescences.
- It is a moisture-loving plant, and on hot days it requires regular but moderate watering. At air temperatures above 22 degrees, it is advisable to spray daily.
- Fertilizing balsam with complex fertilizers should be carried out at least once a month. It is recommended to apply them in liquid form, watering the plants in a circle, but without flooding the root collar.
- During flowering, do not feed with nitrogen fertilizers.
- She is pleased with the demanding lighting. So, in the shade its shoots become bare and it stops blooming, and in direct sun it can get burned. Therefore, you need to choose a place for it in partial shade.
- Frosts are detrimental to ampelous begonia, so you can plant it in an outdoor flowerpot only when the threat of repeated frosts has passed. IN middle lane In Russia, this is not earlier than June 7-8.
- The flowerpot must have good drainage, since waterlogging leads to rotting of the roots.
- The soil for begonias must be fertile and contain organic matter (humus). It also requires adding nitrophoska and superphosphate.
- For the winter, pruning is done (a couple of the strongest shoots are left) and the plant is brought into a room with a low positive temperature.
- Lobelia blooms from June to autumn. At the same time it is quite unpretentious plant, which feels great both in illuminated areas and in the shade.
- Flowers in flowerpots are planted in small bunches at a distance of 10 cm from each other.
- All care consists of regular watering (especially during dry periods). And in the application of mineral fertilizers.
- When growing an equal-leaved bellflower in a small outdoor pot, you must annually remove the spring growth, which is about 35-40 cm. This will allow you to maintain the compact size of the plant.
- Despite the fact that this is a light-loving plant, it will do better in partial shade or shade during the hottest afternoon hours.
- In autumn, the equal-leaved bellflower should be brought into the house already at a temperature of +10°C.
- Water frequently, but do not over-water it. Fertilizers are applied in liquid form once every two weeks.
- It is quite unpretentious in care and has a long flowering period. The first inflorescences appear a couple of months after planting the seeds, and the last ones fade only with the first autumn frosts.
- Fertile and well-drained soil is suitable for nasturtium. It should be placed in the sun, but it will also do well in partial shade.
- It is advisable to fertilize with nitrophoska twice a season.
- To grow ampel fuchsia you will need fertile and loose soil with a drainage layer. The best option are open flowerpots with coconut substrate.
- Fuchsia is fed at the end of March with any complex fertilizers for blooming flowers.
- It is best to place it under the roof of the veranda, as it does not tolerate direct sunlight.
- In autumn, fuchsia should be severely pruned and the flowerpot with it should be brought into a room where the air temperature will be approximately 10 °C. Additionally, it is recommended to fill the boxes with sawdust.
- Ampelous petunias grown in outdoor flowerpots can easily withstand minor frosts.
- But for beautiful flowering, petunia should be planted exclusively in sunny areas. In shade or partial shade, green mass actively grows to the detriment of inflorescences.
- Ampelous petunia in outdoor flowerpots responds well to regular potassium fertilizing. Also likes moisture, but not excessive watering. It is best to apply fertilizer in liquid form.
- Unfortunately, petunia is susceptible to fungal diseases, therefore, as a preventive measure, all wilted inflorescences should be removed immediately.
Show all
Manufacturing of concrete products
To make concrete flower stands yourself, you don’t need any special labor-intensive steps. You will need to first stock up on ingredients for making a working solution and select containers where the concrete will be mixed. Select the forms with which the product will be made.
Making decorative flowerpots for your garden with your own hands is not that difficult if you have imagination and a desire to create. Wonderful garden decorations are made in any shape - they can be made round or square, rectangular, abstract.
There are many materials that are suitable for castings. These include plastic bottles with different capacities, children's rubber balls, and metal or plastic basins. Plant pots made of fabric and cement can turn out to be amazingly beautiful - you can create a real masterpiece with your own hands.
The first flower beds made of fabric and cement with your own hands probably turned out by accident. After all, many people, after repairs, simply throw rags soaked in cement mortar into a landfill. But if you slightly conjure the fabric and fix it with a solution, it will turn out unusual and very beautiful.
How to make a container for flowers
The simplest version of a concrete flower girl can be obtained as follows:

You can make a flowerpot for the garden with your own hands exactly the way you intended it. The resulting product can be painted with bright colors or simply left as it turned out.
How to decorate your vase?
If you like the idea of making decorative flower pots and definitely want to build such flowerpots for the garden, you can safely get to work. Handicrafts always attract a lot of attention; you can proudly show them to friends and acquaintances. But sometimes you want something more unusual or bright. You can decorate homemade flower beds the way you want.

For example, you may not like the rough outer surface of a homemade flowerpot. You can turn it into glossy after a little modification. To do this, when preparing the mixture, choose cement and sand of fine fractions or add Rotband dry plaster to the mixture. To dilute the mixture, use silicate glue instead of water.
Polyethylene is used to form a glossy surface. The following additions to the basic manufacturing method will be needed:
The desired gloss has been achieved, but the product still has some minor defects. How can this be fixed? Take a brush and coat the dried vase with silicate glue without diluting it. This way you can hide all the defects. You can additionally add paint to the adhesive composition - this way you will get a pot of the desired color and add shine to its outer surface.
Option with print
During the process of making a flowerpot, you can perform decoupage. To make the outer decorative layer, you will need thin printed fabric or loose paper with a pattern. For example, wallpaper and old newspapers work well. No need to use glossy magazines, posters, or vinyl wallpaper.

During manufacturing, the sequence of actions is the same as when making a glossy surface. You just need to add a layer with a pattern. The step-by-step procedure is as follows:
If, after the mold has dried, there are protrusions that you do not need, they should be trimmed using a hacksaw. The resulting roughness can be sanded using a large emery cloth - it is easy to find in hardware stores.
How to prepare the solution?
To make the flowerpots beautiful, it is advisable to pay more attention to the preparation of the working solution.

This will allow him to required density and hardening rate.
To obtain a concrete solution for work, the following substances are needed:
Portland cement, white cement, works well. Gravel choose fractions of 3-7 mm, fine-grained quarry sand is suitable. Everything is mixed in a container in the ratio of 2 parts sand, 1 part cement and gravel. Water is added in small portions until the consistency of liquid sour cream is obtained.
To make the finished product lighter, fine expanded clay is added to the batch. When using such ingredients, it is better to replace part of the gravel with it.
After pouring, the molds must be covered with film or a wet cloth - hardening in this way occurs much more slowly. This will prevent cracks from forming when the concrete dries. The structure should be dismantled no earlier than 3-4 days later. The surface of the resulting product is cleaned using a brush and sandpaper, and irregularities are trimmed.

You can independently prepare a material that is an imitation of tuff or sandstone. To do this, prepare a solution from 1 part cement, 1 part sand, 2 parts peat. Dilute the mixture with water until the consistency of mashed potatoes is obtained. Using modeling, the mass is given the required form. You can also use art concrete for cooking - it allows you to make durable, elegant and lighter products.
How to beautifully paint a flowerpot?
The most convenient way to decorate concrete planters is by painting. Suitable for this acrylic paints: They are the most weather resistant. When making a concrete mixture, you can add a coloring pigment to it.
Before painting, the product is dried and a primer is applied. In order for a painted flowerpot to look beautiful, it is better to choose colors that are not very bright, close to natural - the main point for focusing the eye should be the plants inside the flowerpot, whose task is to create a natural frame for them. Can be arranged on the surface decorative painting in several colors, floral compositions, geometric patterns, abstract drawings.

How to prepare soil and plants for decorative flower beds
A layer of gravel, expanded clay, and crushed stone is poured onto the bottom of a concrete product for drainage. A layer of nutritious soil is poured on top, which should include microelements and mineral supplements. The soil for annual flowers should have a lot of organic matter. To provide organic fertilizers peat, compost or rotted manure are added to it.
Those summer residents who are seriously planning to grow flowers in outdoor flowerpots should know that before the onset of winter, it is necessary to prepare flower beds for the next season. In winter, when it’s cold, the soil in the flowerpots completely freezes. Therefore, in order to create flower arrangements in homemade flowerpots, it is better to choose annual plants.
It’s easy to paint annual seedlings with your own hands. In flower beds, to achieve the desired effect, it is worth planting plants that have bright colors and leaves with a decorative appearance. These can be marigolds, annual dahlias, begonias, coleus, snapdragons. Ampelous plants make a good visual impression - these are nasturtiums, petunias, and nasturtiums. In concrete flowerpots, you can thicken the plantings to quickly achieve the desired effect. It should be understood that with such a small volume of soil it will dry out quickly and it requires regular watering.
You can place interchangeable compositions in flower beds. In spring, it is better to make them up of multi-flowering bulbous plants- these can be daffodils, hyacinths, crocuses, tulips. For summer compositions, cineraria, lavatera, and viola are suitable. In autumn, beautiful flowering is provided by asters, heliotropes, and petunias.
The area around the house is the calling card of any site. Its design is always given Special attention. An excellent decorative option are outdoor flowerpots with a variety of plants. With their help, you can create entire compositions of flowers, or place accents throughout the area.

Advantages and disadvantages
Flowerpots in quality landscape decor, which involve making with your own hands, have positive and negative sides.
The advantages include:


Flowerpots for the street have practically no disadvantages, however, depending on the material, several of them can be distinguished:

Shapes and sizes
Outdoor flowerpots can come in a wide variety of shapes, sizes and colors. By making them yourself, you can be sure that you will get a product that meets all the required criteria. And its appearance may be determined by the material used and manufacturing technology.
When choosing the size for a future flowerpot, you should take into account the space on the site.


In a small area, large, massive containers will look awkward and cumbersome. Bulk compositions of plants should also be avoided. At the same time, in a spacious area, small, modest containers will get lost and will not fulfill their decorative function.
The container can be of any shape. It is limited only by technical capabilities and imagination. If the site is planned to be decorated in a certain style, then it will dictate the appearance of the street decor.


Choosing material
The choice of material is determined by such factors as the cost of the finished product, features of its manufacture, availability necessary tools for making and skill of the craftsman. Decorative flowerpots for a summer house or garden can be made with your own hands from wood, concrete, stone, plastic, ceramics, metal or from scrap materials.

Tree
It is a short-lived material, since outdoors the product is constantly exposed to moisture. Such a product must be treated with a special agent that prevents rotting. In this case, it can be used for several years. The most common option for a container for flowers made of wood is to make it based on a stump. The inside of the trunk is scraped out, holes are made for drainage, and the plant is placed inside. It is better if the earth is first poured into another container and then placed inside the stump.


Concrete or plaster
Simple and inexpensive materials at work. Concrete and gypsum products are durable, practical, and resistant to impact environment. With their help you can make almost any shape of flower girl. However, it will have a lot of weight, so it is better to do it immediately at the place where it is planned to be further located on the site. As a variation when mixing concrete, peat can be added to the cement. In this case, the product will be made from hypertufa, which in appearance is practically no different from real tuff or sandstone.


Stone
Stone flowerpots are heavy and expensive. They look very presentable, different for a long time services. The process of making a container from stone is quite complex, so it is better to purchase such a product ready-made.


Plastic
Plastic products have a short service life and simple appearance. However, they are inexpensive and come in a wide range of colors, shapes and sizes. Plastic containers are usually purchased ready-made.


Ceramics or clay
Such flower beds are fragile and break easily. You can make a ceramic or clay product with your own hands if you follow the technology correctly, including firing.


Metal
Metal flowerpots are durable and will last a long time. They look very original Forged Products, although they have a fairly high price. The process of making a metal flower box is labor-intensive and requires special equipment.


Available materials
The choice of available tools for making a flowerpot is limited only by imagination. A container for flowers can be made from a huge number of things that are usually unnecessary in the household: tires, bottles, old barrels, carts, baskets, buckets, tires, polystyrene foam, rubber boots and bicycles. Such products will be distinguished by originality and uniqueness.


Master classes
You can make a beautiful flower pot from scrap materials.


Made of wood
The easiest way is a flowerpot made from part of a cut down tree or stump. Birch is best suited for this. Tools for work will require a drill and a chisel.


In addition to a stump, you can use ordinary boards or timber to make a wooden flower box. In this case, you will need a hacksaw and a hammer.
If the source material is boards, you need to put together four separate panels from them and connect them together. This results in a rectangular container that needs to be processed protective agent and decorate as you wish.
If the material is supposed to be timber, the flowerpot is assembled according to the principle log house, as a designer.
The bars are cut to the required size, and a cut is made on each side to half their thickness.


Then the entire structure is assembled and secured using nails and self-tapping screws. The finished product is sanded and coated with a protective agent.
Made from concrete
Using cement, you can make flower boxes of a wide variety of shapes and sizes. For this:


To increase the strength of the structure, a metal frame can be inserted into the concrete layer.
In addition, crushed fiberglass can be added to the mixture for the same purpose.

From car tires
Car tires, not used for its intended purpose - material that often lies idle or thrown away as garbage. You can easily make bright and original decor for your garden or cottage from them. It is better to choose winter tires without studs, they are softer and thinner.
To make a flower container in the shape of a flower, you need:


From plastic containers
A very simple way to make a flower pot is to use a plastic bottle, barrel or any other container as a base. It is enough to cut a hole in it for planting a plant, make several drainage cuts and fill it with soil.
However, in the case of a plastic pot, you should take care of its stability. If the container is small, you can simply fill its bottom with small stones or pebbles. If we are talking about a large container, it is better to make it stationary.
To do this, you need to dig a metal pin in the selected place.
The bottom of the bottle is cut off. Then the bottle is “put on” the neck of the metal pin and goes a little deeper into the ground. The finished flowerpot can be decorated as desired and covered with soil.


From pipes
The original idea is to use plastic and metal pipes for making flower beds.
Pipes can be installed vertically. In this case, only their upper part is used for planting. If you install several pipes nearby, different in height and diameter, you will get an interesting composition.
You can install the pipes horizontally by making holes for plants on the surface.
Such original flower pots look beautiful along paths, lawns, along the perimeter of houses and greenhouses.


Finish options
For large outdoor flowerpots, you can choose original decor that will be the finishing touch to their design.
The easiest way is to paint the product with paint. You can use one shade for all the flower girls made, or you can create a multi-colored composition of all the colors of the rainbow. The main thing is that the planted plants harmonize in color with the painted container.
For areas with houses in ancient styles, artificially aged flower beds are suitable. To do this, they are coated with the chosen paint, and a layer of craquelure is applied on top.
In order for the paint to last for a long time, the surface must first be coated with a primer.


Another way to design an outdoor planter is to decorate it with various available materials. The decor can be created from cones, branches, small stones or pebbles, broken tiles, mirrors or colored glass, creating a mosaic effect. To do this, you only need special glue.
If it spills or stains the surface, it must be removed immediately, otherwise, after it has hardened, it will be impossible to do this.
After this, the pot should be allowed to dry. If tiles, glass or stones are used as decoration, the surface can be additionally treated with grout to complete the work. Except natural stones, you can use artificial ones, which will be perfectly sized and look more aesthetically pleasing than natural ones.

How to register a summer cottage?
When choosing containers for flowers as decoration for your site, you should first of all evaluate their safety for people. For example, commonly used tires from car tires- not the safest option. They can release toxic substances into the air and be dangerous, especially if there are small children in the family.
In addition to safety, the flowerpot must meet the requirements for appearance: Match the size and style of the site.

Its size should fit harmoniously into the space. In addition, if the house and the entire site are decorated in a certain style, the flowerpots must correspond to it.
Not all plants are suitable for planting in outdoor pots. To decorate an area with flower arrangements, it is worth taking into account the characteristics of their root system, watering and need for sunlight.

The following plants are suitable for planting in flower beds:


Beautiful ideas for inspiration
What designers and gardeners themselves have come up with:


We will send the material to you by e-mail
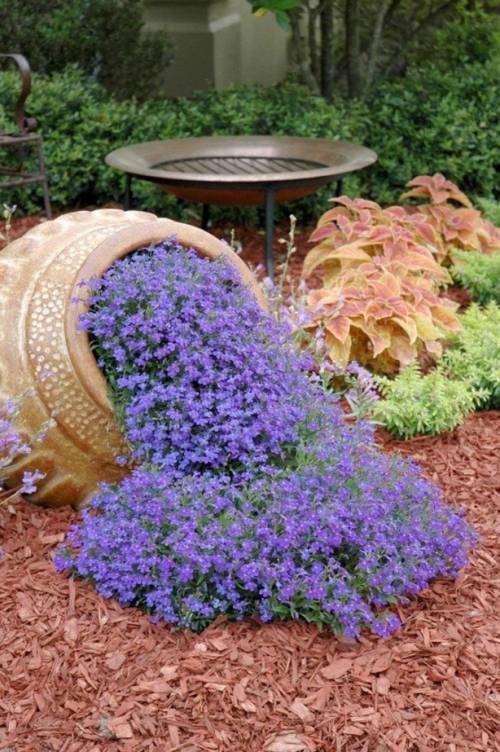
A beautiful garden plot should be fragrant with flower beds and delight the eye with intricate plant compositions. In this regard, concrete outdoor flowerpots are a necessary item garden design. Unlike concrete, plastic containers not so resistant to temperature changes, frost and scorching sun. In addition, large massive pots will add solidity and prestige to any flower arrangement.
Vases with flower arrangements can become garden decorations
Concrete plant pots retain moisture well and do not dry out on hot days. At the same time, concrete does not heat up like metal or ceramics; it keeps the roots of flowers at a comfortable temperature for them. If you wish, you can make outdoor flowerpots with your own hands.
In order for the flowerpot to last long enough, you need to select high-quality concrete for its manufacture. Main requirements for the material:
For production, you can use two methods:


When working on the manufacture of concrete outdoor flowerpots, you should follow several recommendations:
The composition hardens in shape for at least twenty-four hours. If you rush and remove the product from the mold before the deadline, cracks and chips may form. After the pot is removed from the mold, it is advisable to lower it into a container of water and keep it in it for five to seven days.

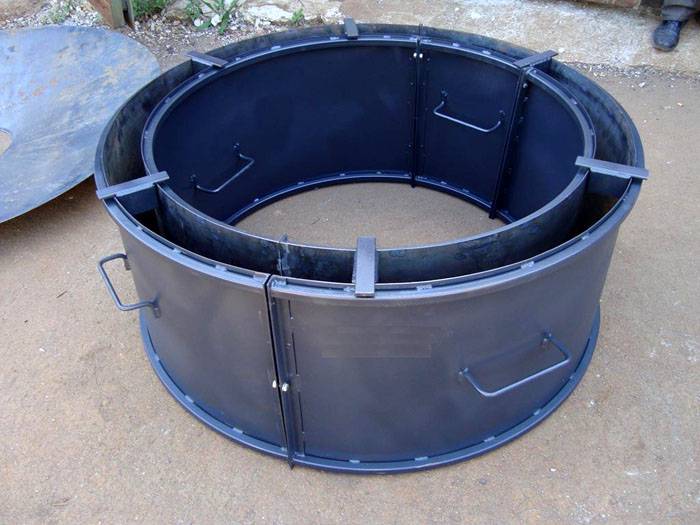
Molds for large concrete flowerpots
It’s not difficult to buy molds for making flowerpots from concrete or make them yourself from used containers: basins, buckets, jars.

Algorithm for making concrete flowerpots
Video: how to make a concrete flowerpot with your own hands
Decorating street flowerpots
The easiest way to decorate a concrete container is with paint. The surface should be treated with a primer deep penetration, for example, betokontakt. For painting outdoor products, waterproof acrylic-based dyes are used. You can give the flowerpot the desired color during the pouring process by adding the desired pigment to the solution.

For outdoor pots it is better to choose not too much bright colors, otherwise they will distract attention from the plants. The vase should only act as a frame for the flower bed. You can paint flower beds with a pattern or ornament.

Flowerpots with carved ornaments look unusual and airy. It is applied with a knife while it hardens. cement mixture. For this purpose, you can also use a power tool, such as a drill.

Another decoration option is bas-relief. The simplest design can be made using large leaves of burdock or other plants. They are fixed on inside forms for filling. After the mixture hardens, it will leave a mark. Remains of leaves are removed with water, and the print is highlighted with light tinting.

Helpful information! Directional direction will help to focus attention on a street flowerpot. garden lighting. At night, solar-powered lanterns will illuminate the mini-flower bed and create an original composition.
Concrete outdoor flowerpots can be elegantly decorated with mosaics made of colored glass, ceramics or pebbles. Decorating concrete containers with shell rock or jute rope looks original.

In principle, you can buy flowerpots made of concrete of standard, square or round shape quite cheaply and turn them into real masterpieces using your imagination and available materials.

Having a summer cottage, you always want to arrange it, and in some special way. However, garden decorative elements They are not cheap, and they are not durable.
People with a developed imagination can make original crafts for the garden from cement, which is not only highly resistant to various types of influence (frost, hail, sun, water), but also accessible (you can buy it at any hardware store for a reasonable price).
For decoration and design additions, you can use flower pots, flowerpots, figurines of fairy-tale characters or objects flora made with your own hands from cement. This material cannot be called capricious, and most have a large or little experience work with him. Still, there are several important rules that must be followed to ensure that crafts made from cement mortar are of high quality and durable.
The technology for preparing the mixture is as follows:. The main components are prepared: cement, construction sand, water and tile adhesive (for better ductility and reducing the risk of microcracks). For 1 part of cement, take 2 parts of sand (for greater strength, you can take 1 part) and 1 part of glue. Lastly, add water in small portions to the consistency of thick sour cream. It is convenient to work with such a mixture: it does not flow and at the same time is quite plastic.
All cement products require prolonged drying. Hardening can last up to 7 days. To prevent the surface from cracking, the finished creation is covered with polyethylene. To give the product a beautiful and correct shape, the base is placed on a mound of sand or buried in it (depending on the idea), but not on a flat surface.
After complete hardening, the figure must be coated with a primer and only after that can paint or varnish be applied. If the craft has roughness and other irregularities, it is modified before priming sandpaper and a file.
In addition to cement mortar, concrete is sometimes used, which is characterized by the presence of large fractions (pebbles or crushed stone) and increased strength. Crafts made from concrete for a summer residence can be represented by large monolithic boulders, and this material is also convenient to use to create the basis for various compositions (a platform for a fountain, a pedestal for a sculpture, a terrace for flower pots And so on).
Another material similar in its application is gypsum. It is not as strong as cement, but more plastic and decorative. It can be used to create hollow shapes. For garden creativity, molding (sculptural), acrylic and architectural types are used. When working with this material, you need to take into account its rapid hardening. It is often recommended to add it to cement mortar when creating sculptures.
Having no experience in using cement for decorative purposes, it is better to start with something simple that does not require modeling skills and obtaining the desired consistency. The first exhibits in your garden can be cute mushrooms, colorful balls or original flower pots.
To make a mushroom you will need an old rubber ball (the size of the cap will depend on its size), a plastic bottle (it will become the basis for the stem, its size should be proportional to the cap), a metal rod to attach the cap to the stem. The ball is cut into two halves, one of which is placed in a bucket of sand and pressed evenly. Next, cement mortar is poured into the resulting form and leveled.

The bottom and neck of a plastic bottle are cut off and inserted into the filled form in the center, immersing it by 1 - 2 cm. Then, using a long iron rod, the future stem and cap of the mushroom are connected and the cavity inside the bottle is filled with the solution. The product should harden for several days, after which you need to remove the piece of the ball and the plastic cylinder.

After a few more days, the product can be coated with paint and decorated. different elements. Mushrooms of different sizes look impressive on the plot in the form of a small clearing. It is also worth noting that your imagination may tell you to use other containers (bowls, jars) and methods for making garden mushrooms.
It’s enough to just make an openwork ball that seems so light and airy. For the base, use a balloon (the size of the future shapes depends on how much you inflate the balloon). Next in ready solution Place any rope and then wrap it around the ball.

Do not wrap the base too tightly; you need to leave enough holes for further removal of pieces of the burst ball. When the product is dry, you can begin decorative coating.
If you cover balloons with cement mortar with the addition of small quantity gypsum for faster hardening, you can get original garden lanterns or flower pots.

Using this technique you can also make vases for dried flowers. In this case decorative painting Not only the outside, but also the inside is exposed.

If you pour the solution into a small hole in rubber balls, you can get monolithic balls of different sizes. Painted in different bright colors and randomly scattered around the garden, they will become a laconic and stylish decoration.

Using plastic containers, you can make a flower pot for Crassula and Crassula Ovata cacti. The container is wrapped plastic bag, and a bag of clay or sand is placed inside so that the container holds its shape. Next, it is covered with cement mortar. After everything is completely dry auxiliary materials are removed, made in the bottom using a drill drainage holes, the product is primed and painted.

It's very easy to make a flowerpot using a plastic bucket or vase and another suitable container.

One container is inserted into another, and the solution is poured into the space between them. The result is a high-quality product that can be further decorated by showing your imagination to the fullest.

Flowers planted in flowerpots made from crossed palms look attractive. To create such a masterpiece, use ordinary rubber gloves, which are evenly filled with the solution. For rigidity, you need to insert a thick wire rod into each finger. To ensure a high-quality product, air bubbles must not be allowed to form.

When the gloves are filled, they are given the desired shape and fixed. After a few days, the rubber is cut and removed. If you need to connect two palms, then use the same solution. At the final stage, the surface is polished with sandpaper, primed and painted.
Complex figures with a frame
It’s more fun to decorate your country house with sculptures of animals and mythical characters. Such creations involve the preliminary production of a durable frame and layer-by-layer application of cement mortar.

Interesting flowerpots can be made using buckets from building mixtures. At the first stage, a container of suitable size is wrapped plaster mesh and covered with a thick layer of cement. At the second stage, until complete hardening, decorative adjustments are made, making an imitation of an old stump with natural wrinkles on the bark.
A monolithic figure of a hippopotamus would look appropriate near artificial reservoirs. The place for it must be determined immediately and carefully leveled, since in the future the figure will be stationary.
Two elongated plastic basins, which must be fastened with wire, are suitable as a frame. Another option is also possible: a thick cement solution is covered on top of a pile of broken bricks or crushed stone.

The figure itself does not contain complex elements and is easy to perform. After hardening, the product is treated with fixing impregnation and dry pigment for concrete, rubbing the powder with a hard sponge.

More complex sculptures are made in several stages: 1) making a frame from wire and foam plastic or containers; 2) covering the workpiece with a plaster mesh; 3) applying the mixture in several layers; 4) formation small parts(facial features, special texture, folds of clothing, etc.); 5) priming and painting the finished work.

Flowerpots in the shape of swans will become an elegant decoration of the garden. The body frame is an old plastic basin, the neck is woven wire. The head, wings and imitation plumage will have to be made from a cement mixture, showing the skills of a sculptor.

Monolithic figures have a significant weight, so as an alternative there is a way to create lightweight large objects. You can decorate your garden with boulders of different sizes.

To make them, any unnecessary and light material (trimmings) is tied into a tight lump with wire polyurethane foam, plastic bottles, foam).

The resulting base is wrapped in a plaster mesh and covered with thick cement mortar. The more irregularities and protrusions there are, the more natural the “stone” will look.
Small garden figurines are made from a mixture of cement with the addition of gypsum or Portland cement.


Here you can use the manufacturing methods described above, as well as any basics: old toys, items of clothing, household utensils.

Step-by-step manufacturing instructions: 3 master classes
To examine in more detail the nuances of the creativity presented in the article, we will consider the best master classes with a step-by-step explanation of the work being carried out.
1. Spectacular flowerpots made of cement and fabric
To make flowerpots for the garden from cement and fabric, use either pure cement or Portland cement. In this case, the mixture with water should be quite liquid. You will also need a bucket or other container for the frame, a piece of polyethylene and a piece of fabric.
The material must be dense enough and absorb liquids well, i.e. synthetics will not work here. It is better to use cotton fabric.

Even large-sized plants can be planted in a ready-made flowerpot.

Experiment with the shape and coloring of flowerpots and create your own unique compositions.

2. Funny cat for the garden
First, we prepare a frame from a cut plastic bottle and wooden slats which are fastened with wire.

The solution is prepared from cement and sand in a 1:1 ratio; additionally (directly into the hand) gypsum is added during the work. By gradually applying the solution, all the details of the sculpture are created.

The finished figure is polished with a damp hand and left to dry for 4 days. The final touch is painting with water-based emulsion or enamel.
3. Large leaf drinker for birds and pets
An equally successful and versatile garden decoration would be a sheet of cement. A plastic film is placed on a mound of sand, and then a large sheet (the mound will allow you to get a shape with a depression, rather than a flat one). If there are small holes in the sheet, they should be covered with small leaves so that the cement mortar does not leak.

Cover the workpiece with film for several days until it dries. Then the sheet is removed, primed and painted.


If desired, you can make a fabulous fountain from several similar blanks.

Most garden plots still have the flavor of Soviet vegetable gardens for planting vegetable crops. But over time, this tradition gives way to cultural country estates for relaxation from everyday life and big city. Creating a beautiful one at the dacha landscape design, you can’t do without street flowerpots or hanging planters With flowering plants. With their help, a special atmosphere of sophisticated style is created, harmoniously combined with nature. In this article we will look at which flowers to choose and plant in outdoor flowerpots.
The benefits of planting flowers in outdoor flowerpots

Features of planting flowers in outdoor flowerpots
Low-growing flowers for a flowerpot at the dacha
Zinnia

Phlox subulate

This is a low-growing phlox whose peak flowering occurs in spring.
Aubrieta
Heliotrope

Although this flower is quite demanding to care for, it does not lose its popularity thanks to its delicious vanilla aroma. It requires a lot of sun and heat, which is why it is quite difficult to grow it in northern latitudes.
Lavender

This is a low and unpretentious plant with a fragrant smell. Annual varieties are suitable for growing in outdoor flowerpots.
Pansy (viola)
An undemanding plant with beautiful flowers. It is thanks to this that the viola gained wide popularity. This crop can be either annual or biennial. When growing pansies in the northern regions of Russia in flowerpots, it is preferable to opt for annual varieties.
Marigold

Geranium (pelargonium)

Geranium has been a favorite house flower for many years, but in open ground it will show all its splendor.
Improper care and consequences
Ageratum

This low-growing flower with blue fluffy flowers has a pleasant aroma. Therefore, it is especially successful to place flowerpots with it near recreation areas.
Balsams

Annual varieties of balsams are best suited for growing in outdoor flowerpots. They will delight you with flowering from early summer until late autumn.
Ampelous flowers
Begonia ampelous

Ampelous begonia with long hanging stems will look great in outdoor flowerpots on a high stem or in hanging flowerpots. This is a plant with powerful shoots, densely strewn with foliage and small flowers.
Lobelia

Some varieties of lobelia feel great in outdoor flowerpots and in pots on the veranda. The most popular ground cover is Lobelia erinus. Depending on the conditions and care, it can have a spherical shape or droop like an hanging plant.
Equal leaf bell

This is a profusely flowering hanging plant. You can prolong flowering throughout the warm season by promptly removing faded inflorescences.
Tip: for an equal-leaved bell, the diameter of the flowerpot or pot should not exceed 30 cm.
Nasturtium

This popular flower is found in almost every garden. It is great for growing in an outdoor pot.
Fuchsia ampelous

Ampelous petunia

Ampelous petunias grow faster than representatives of other types of varieties. They come in a wide variety of colors and abundant flowering. It is because of this that they are bright accent garden, terrace or entrance area.


