Bench for resting on fresh air should be on any local area. They take it for her different materials, but more often we're talking about about the symbiosis of metal and wood - a strong frame is made from the first, and a flooring for it is made from the second.
Benches from profile pipe popular, this material has many advantages, and the result is of high strength and quality.
A simple do-it-yourself metal bench covered with wood
| View of the bench, photo | Description: |
 Bench made of profile pipe square section |
With low metal costs, structures of varying complexity can be built. |
 Bench with flower bed |
Metal structures can be different types. Many come up with additional functionality for them, for example, building in a small flower bed in which you can grow real flowers. |
 Bench made of metal and wood |
Metal is practically not used in garden furniture. It is usually supplemented with less thermally conductive materials. |
 Bench with backrest made of metal bed |
For this bench, an old iron bed was used. Metal has received a new life. |
Bench from an old cast iron bathtub |
Here an old cast iron bathtub was used for a bench. Original solution. |
 Transformable bench made of metal |
Benches can have a complex and even movable design, allowing them to be folded out from a bench with a back into a bench with a table. |
Benches can be different shapes- with or without a backrest, be wide or narrow, combined with a table into one design. Simple and cheap options can even be welded from rebar or angle steel.


Pros of using metal pipes as a frame
For profiled pipes, low-alloy carbon steel is used, which has good elasticity. She has tall performance characteristics, used for both industrial and private construction.
This material is easy to bend, weld or cut; structures of any level of complexity can be made from it, if you have ideas about correct construction frames and have knowledge of the basics of working with metal.
In private construction, such pipes are usually used for arches, fences, gates, stairs, greenhouses, and so on.


The products have the following characteristics:
- Low overall weight due to frame structure design - this parameter depends on the size of the profile pipe and the thickness of its walls.
- The dimensions can be any, the main thing is to accurately calculate the possible loads.
- They are much cheaper than analogues made from other materials.
- The structures are durable and resistant to high mechanical loads.
- At proper care and regular updates protective coating metal pipes have a long service life.
There are profiled pipes different sections: diamond-shaped, round, rectangular and square.
For frame construction Usually the last two options are used, since the process of joining parts is significantly simplified - they can be connected at different angles, making only accurate and even cuts.
 Welded frame for future country furniture
 This material is easy to work with if you have the necessary tools at hand.
The connections were made using a welding machine, which means you need to know how to work with it. This process requires compliance with safety precautions, and includes many subtleties that make it possible to obtain products with the correct geometry and reliable connections.
For frames of garden furniture, they are mainly used rectangular pipe cross section 20*40 mm. Its average price for linear meter is 70-80 rubles, with a metal thickness of 2-3 mm.
For a powerful and durable frame you will have to pay no more than 1500-2000 rubles. Finished bench in the store good quality will cost at least 10,000 rubles.
Many people prefer step by step instructions production with drawings and photos can be viewed on our website.
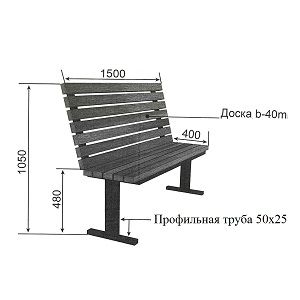
Drawings with dimensions of benches and benches made of profile pipes
Before you start making something similar, it would be a good idea to find or develop drawings according to which all the work will go.


When choosing a drawing, you need to focus on your personal requirements. The material is selected so that the structure can cope with the maximum possible loads, fits in the designated space, and is simply liked.


The size of the frame parts must be correlated with finishing material, for which beams, slats and boards are most often used, but plastic and WPC can also be used.
Some people like it completely hardware, but they are not so convenient, because metal conducts heat well and will become very hot under the sun or freeze in winter.
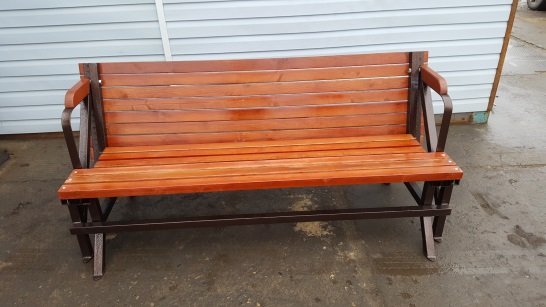
 Benches with a metal back for a summer residence
 Knowing the dimensions of the finish, the parameters of the main parts of the bench (back and seat) are calculated and their shape is set. Data is also entered into the drawings.
 Scheme of a simple bench
 It is necessary to provide for ways to connect parts - at what angles the ends will cut, and so on.
Drawings of other bench options:


Additional materials for the bench
If we talk about the full production of a bench, then you won’t be limited to just metal and wood. There is also a small list of materials and consumables that will be needed. They are listed in the following table.
| Materials, photos: | Description: |
 Primer paint for metal |
The final coating of the metal may vary. Primer enamels are often used, which do not require surface preparation, apart from cleaning it. This paint is applied in several layers. You can even cover rusty areas with it, but we do not recommend doing this, since the service life of the protective layer will be reduced. |
 Grinder circle for cutting metal |
For frame structures metal constantly has to be cut to design dimensions. Used for cutting abrasive wheels, mounted on an angle grinder or similar tools. Wheels made of the same material are used for grinding metal and processing welds. |
 Wire brush |
Before painting, the metal must be cleaned. The task is to remove all the rust and expose its shiny surface. On this basis, even primer paint will adhere much better. |
 Degreaser |
Before painting, the metal is degreased. This will seriously increase the adhesion of the material and promote even application of paint layers. As a degreaser, you can use universal compounds, which are ordinary kerosene, or its light varieties, for example, white spirit. |
 Electrodes for welding |
Electrodes are also consumables. Without them, the benches definitely cannot be assembled. |
 Set of metal drills |
You will need to drill a little, but have a few drills in stock required diameter always necessary. Holes are made for bolted and screw connections. The wooden part of the bench is fastened in this manner. |
 Bolts and screws |
Again, necessary to secure the wooden parts of the frame. Sometimes they are used to connect metal parts, although welding is the preferred method. |
 Wood processing materials |
We have combined them into one line because they may apply different variants. Note antiseptic impregnations, which significantly increase the service life of wood under open air, impregnations for changing the color of boards (this includes stains, glaze, wax, etc.), protective compounds and paintwork materials that create a waterproof film on the surface. These properties may be combined in some materials. For example, oil from water qualitatively protects and transforms the color of wood, making it more saturated. |
Sandpaper for random orbital sander |
The surface of the wood must be carefully treated to make it smooth, safe and pleasant to the touch. To do this, it is polished with abrasives of different fractions. |
This variety is accompanied by the following set of tools:
- Bulgarian.
- Carpenter's square.
- Electric drill.
- Sander.
- A hammer for knocking down scale after welding, and indeed this tool is always required.
- Clamps for preliminary fixation of parts.
- Brushes or a small roller for a more even application of paint.
- Welding machine.
- Tape measure, pencil, marker.
- To create curved parts, a pipe bending machine is required
 Pipe bending machine
 Other small things can also come in handy, which you will learn about yourself when you start assembling your bench.
DIY metal bench
Frame assembly
In the example under consideration, the master used a 20*40 mm profile pipe bent into an arc as the main material, which remained unused after assembling a small polycarbonate gazebo. Here's how it happened.
 Do-it-yourself garden bench from a profile pipe - the source material for making the bench
 The use of bent parts made the final result interesting and elegant. If desired, several figured forged elements can be included in the structure.
First of all, it is necessary to cut off the crease that forms after the pipe bender from the bent tube. You can also cut off the second end of the pipe, which remains straight.
 Trimming a crease from the end of a pipe using a grinder
 Next, marking and cutting of the parts from which the base will be made is carried out. As you can see, this required a section 1 m long. By the way, in fact, the pipe section will be longer, since the tape measure is installed without taking into account the rounding.
The cut of the pipe must be clearly perpendicular - to mark it correctly, use a carpenter's square. First, one part is made, after which it is used as a template to measure the second.
 Marking the meter base part
 Shorter parts are noted - there will be 4 of them, exactly 40 cm long. Keep in mind that you now need to measure the length of the pipe clearly along the radius, and not directly, as was done earlier.
We assemble the side parts of the bench frame from the obtained parts, as they will be installed after welding. At this stage, you can adjust the position of each element, achieving the most convenient one.
 This is what the base of the frame will look like
 Let's take on again measuring tool and Bulgarian. Now we need to check the length of the front legs, which in the example under consideration was 46 cm. In your case, you may get completely different values, since they will be influenced by the steepness of the bend of the pipe and in general your own dimensions, maybe you are 2 meters tall and an oblique fathom in shoulder
After the described manipulations, the fitting of the joined parts begins. The main difficulty is to make cuts under right angles, otherwise the finished product may be fragile and even damaged.
When working with curved parts, it is impossible to use special tools for these purposes. You have to rely only on your own eye. An example of work is shown in the following photo.
 Marking the connection of metal parts
 We advise you to measure and cut the parts one by one. Before you take up the grinder, double-check it several times, not forgetting the well-known saying. After making sure that there are no errors, we try to make the adjustment. In some places, part-time work may be required. We are not afraid to do them while we are assembling the first side; now we have much more room for maneuver. The second part of the base will have to correspond exactly to the first.
This is what happened in the end.
 Parts ready for welding
 Parts of the first side of the base are used as templates for the second. The parts are made identical, otherwise there will be irreversible distortions during installation.
The parts of the base are welded exactly according to the markings. It is recommended to first secure them with clamps.
First, spot welding is done in order to only grab the joints without allowing the metal to warp. After this, the seams are completely welded.
We remind you that when performing welding work, you must protect your eyes and skin. Clothes are used only with long sleeves, since due to the abundance of emitted ultraviolet radiation, the skin receives unpleasant burns. We work in a mask, not glasses.
 Carrying out welding work
After welding, the metal must be prepared for further work. Parts are cleaned and polished. Scale is knocked off the weld seams, and untidy deposits of metal are removed with a grinder. The main thing here is not to overdo it and not to damage the integrity of the seam.
The rest of the surface is treated with a wire brush. In principle, such processing could have been carried out in advance, since some faces of the structure may be inconvenient to access.
Next, two pieces of 155 cm each are cut from a straight profiled pipe. With their help, both sidewalls will be connected to each other with a plow. The details will give the bench the necessary rigidity. They are welded front and back to form a closed frame, as shown in the following photo.
 Frame assembly is almost complete
 Welded joints also need to be cleaned of scale and made as smooth as possible.
The boards will be installed on top of this frame. The outer ones will be supported along the length of the metal frame, while the central ones can sag. To prevent this from happening, you can weld one short cross member in the middle, or two, dividing the frame into three equal segments.
The back in the middle should also be strengthened. Fortunately, there is still a piece of bent pipe left for this. The reinforcement is installed without legs.
The tops of the backrest also need to be connected with a piece of profiled pipe. We measure its length after the fact and weld it into an almost finished structure.
 Reinforced with jumpers both seat and back
 Since the seat and the sides are connected by only two points on each side, there is no need to talk about the reliability of the bench yet. To increase strength, it is worth adding at least one bevel. They are also made from bent parts, if you still have any at your disposal.
Plates should be welded to the legs to increase the stability of the structure. To create them, you can take cut out walls of the same pipe, but it is better to find metal of a larger area.
In our situation, the master showed ingenuity and used old brake pads, ground to evenness, as thrust bearings.
 Thrust bearing made from the metal part of the brake pad
 Frame covering
To cover the frame, profiled boards 25 mm thick were purchased. If you want to save money, you can use any convenient lumber, but then you will have to spend a lot of time processing it.
 Trying on the board - if the calculation is done correctly, everything falls into place
 All that remains is to estimate the position of the boards and screw them on; when working with rough lumber, perform the following steps:

Let's return to assembling the bench. Having completed the preliminary layout, we accurately mark the position of the boards so as not to accidentally displace them. We drill holes with an electric drill, simultaneously going through the thickness of both the metal and the board. It's easier to mark a tree with a pencil
We leave 10 cm overlaps of the board along the edges of the bench. This way it will look more beautiful and the usable seating area will increase.
We do the same with the back - the gaps between these boards may be larger, since there will not be such a load on them as on the seat.
Further processing of metal and wood
When the parts are ready, the bench needs to be disassembled, so there is no need to tighten the bolts in advance - they are simply inserted into the holes. We do this for the convenience of painting both the frame and the wooden parts of the structure.
- The last metal treatment that was performed was wire brushing. Next, it should be washed with a degreaser. To do this, the composition is poured onto a soft rag and rubbed over all parts of the structure.
- Then the metal frame is painted. The paint chosen is hammer paint, which means the coating will be durable and aesthetically pleasing. The composition must be applied in two layers, allowing time for intermediate drying.
 Painting the bench with hammer primer-enamel
 The advantage of paints with a hammer effect is that it creates not a simple one-color coating, but an iridescent surface, somewhat reminiscent of granite. This can be seen upon closer inspection.
 Coating from hammer paint– beautiful and durable
 Next we process the boards. They can be coated with dark varnish, which will give the material a noble shade. If you want a deep color change, we advise you to saturate the wood with stain before applying varnish, which will color it thicker.
 Lumber transformation
 Benches made from profile pipes are reliable and unusual furniture, but they are created much less frequently than wooden or plastic benches. The reason for this is the fear of a complex construction task, because many do not know how to hold in their hands welding machine, and have no idea how to connect metal pipes into a specific structure. However, this problem can be solved: you just need to prepare the drawings and strictly follow the instructions.
Metal profile as a material for a bench
At the shops made on the basis metal pipes, note several advantages:
- relatively light weight, in contrast to cast iron and concrete products, suitable only for parks;
- low cost and wide design possibilities, which cannot be said about structures made of stone;
- extraordinary strength, which distinguishes it from wooden benches that deteriorate under the influence weather conditions, bugs and mold.
A significant disadvantage of the metal pipes used to create the bench is their unaesthetic appearance. However, you can ignore this drawback, because there are many ways to decorate a metal product. It is not for nothing that the most popular benches are those made from rust-resistant steel pipes and complemented with wooden elements. The seat is usually made from wood, so the bench does not heat up under the sun.
Gallery of benches made from profile pipes
Bench frame - metal, seat and back - wooden  The seat is made of boards laid vertically
  The frame of the structure can only be made by a master
  The back and seat are made of wide, painted boards
  The product is decorated forged elements and a drop-shaped back
  Almost all elements of the bench, except the seat, are made of metal profiles
  Armrests added to this product
  The design resembles an open book
Drawing up drawings indicating dimensions
The manufacture of the bench begins only after the drawings are ready. Schematic images will help you decide on the type of bench and find out how much material is needed. To avoid mistakes when making a bench, dimensions are indicated in the drawings.
A metal bench without a back, the production of which takes little time, is created with supports - three rectangles, soldered together with two pipes - the seat frame. This design can be 2.3 m long, 60 cm wide and 45 cm high. If desired, a bench made of metal pipes can be made shorter, narrower or higher.
If you plan to make a bench with a back, then you will need a different drawing. A design with an element that allows the vacationer to tilt the body back requires much more effort to be put into the construction process. To build a bench with a back you will need a lot of materials. However, most often this is what is made, convenient option benches.
Selection of construction raw materials
The main material required for the manufacture of a metal bench is profile pipes. They can have any shape, but the frame of the bench is best made from profiles with a square or rectangular cross-section. Pipes with flat outlines can be easily connected to any parts. It is desirable that metal profiles be cast from carbon or low-alloy steel - the most durable raw materials.
In addition to pipes, the materials for creating a bench are:
- timber beams with dimensions 50x80 mm, from which the back and seat are constructed;
- screws having a diameter of 7 +/- 1 mm and a length of about 10 cm;
- self-tapping screws fixing wooden elements;
- enamel and primer that protect metal products from rusting;
- antiseptic composition;
- finishing agent for wood and metal (for example, varnish and paint).
Calculation of the quantity of materials
Usually, the production of a medium-sized bench takes at least 11 m of profile pipe with a cross-section of 30×30 mm, because to create a bench without a back you need the following parts:
- 6 pieces of profile 60 cm long (long elements of rectangular supports);
- 6 pieces of 45 cm each (short fragments of the structure);
- 2 blanks of 2.3 m each (frames for the seat and fastening the supports).
In addition to metal parts, when creating a bench without a back, you will need wooden blanks:
- 8 bars rectangular shape 6 cm wide;
- bolts with a flat round head and nuts (16 pieces each).
If you want to make a bench with a back, you will need to purchase hardware store boards 25 mm and 30 mm thick and at least 8 m of profile pipes with a cross-section of 25×25 mm.
A pipe is a material for cutting fragments of the skeleton of a bench, that is, the following parts:
- crossbar located between the supports and equal to 1.55 m;
- 2 pieces 35 cm long, from which the base of the seat is created;
- 2 bent parts with a height of 78 cm and a bending span of 10 cm, necessary to create the back and rear fragments of supports;
- 2 metal parts 39 cm long - pieces for the front supports;
- 2 pieces of 20 cm each, serving as clamps for supports located in front;
- 4 support heels measuring 40x40 mm - ordinary metal plates;
- 2 bent metal strips 45 cm long, which solder the supports on both sides.
The following materials will be needed to create a bench seat with a back:
- 3 boards 1.6 m long, 60 mm wide and 25 mm thick;
- 3 wooden blanks 1.6 m long, 60 mm wide and 30 mm thick;
- nuts and bolts with a round head (24 pieces each).
Tools
To make a bench from profile pipes, it is customary to arm yourself with several tools:
- angular grinder, equipped with wheels for cutting and sharpening;
- electric drill with drills of different diameters;
- a welding machine with electrodes with a diameter of at least 3 mm, which will allow you to easily solder metal parts thickness more than 2 mm;
- hammer;
- electric jigsaw;
- a machine sanding wood with sandpaper;
- measuring tape;
- a marker to make notes;
- core
If you plan to create a bench from curved pipes, you will need a pipe bender. In addition to it, you will need a template of a rounded metal profile made from a piece of plywood - a tool that allows you to control the bending of paired parts.
Guide to building a bench from profile pipes
A bench without a back is a simple structure that is created in stages:

If the seat is intended to be made of metal, then rectangular pipes are used instead of bars. They are welded to the skeleton of the structure and treated with a coloring emulsion.
Other actions are performed when making a bench with a back:
- The crossbar is connected by welding to two pipes 35 cm long. The pole, fixed between two supports, is placed perpendicularly. It should be in the middle of both sections of profiles;
- Bent pipe segments 78 cm long are attached to the metal structure. According to the rules, welding seams are created in places where the profiles bend;
- The frame is supplemented with the front parts of the support, while the soldering point for the base of the seat and the supporting elements is made at a place 9 cm away from their front zone;
- The structure is strengthened by connecting the crossbar with profiles that serve as front supports;
- 2 arc-shaped pipes are welded between the supports, after which pads are soldered to the edges of the legs;
- The areas that have been welded are sanded with a machine, and all frame parts are coated with a primer. After it dries on metal surface apply anti-corrosion paint;
- Boards are placed on the metal frame. From thin wooden elements the back of the bench is created, and the thick ones are used to create a seat. The boards are attached to the frame with bolts.
Wanting to make the bench comfortable and original, armrests are attached to it. They are 2 pipes of 75 cm each, bent with a special tool. The armrests are welded to the seat frame.
The easiest way to decorate a bench made of profile pipes is to cover it with paint. To do this, you can use not only the standard black paint. It all depends on wishes and possibilities. An additional decoration for a metal bench can be planted around it. climbing plants, for example, grapes.
If it is assumed that the bench will be an element of the recreation area, then next to it you need to place a table made of plastic or wood. It is recommended to place the bench itself near a pond, fountain or flower bed. Good option designing a metal bench means creating and placing it near a structure made from hedge profiles.
When creating a bench for children's corner A swing or sandbox should be placed nearby. If adults need a bench, then it should be placed in a gazebo or covered with a canopy. It is recommended to lay a blanket on the seat, which will make the metal bench soft. In addition to the bench, you can place a table and barbecue in the recreation room.
Video “Making a simple bench from metal profiles with your own hands”
A bench welded from profile pipes looks no worse wooden product. But in order for it to meet expectations, you need to take the choice of materials seriously and not violate a single point in the manufacturing instructions.
Greetings to lovers of country holidays.
When settling in personal plot First of all, they focus on their taste preferences, but besides them, we must not forget about functionality and comfort. Garden benches, tables and benches made of corrugated steel will not only decorate your garden, but will also allow you to have a good time with friends.
How to make a bench with my own hands and what you need for this - read below.
Profile products are widely used in both private and industrial construction. Low-alloy and carbon steels are used for their production. From a profile pipe you can make swings, carousels, horizontal bars, gazebos, tables, benches, pergolas and much more.
Advantages of a professional pipe:
- low weight of the structure;
- affordable price;
- durability;
- resistance to mechanical stress;
- Great technological capabilities (corrugated pipe can be welded, twisted, bent, etc.).
For the manufacture of garden furniture (benches, benches, tables, etc.), it is better to use thin-walled corrugated pipe - from 1 to 4 mm thick. The metal is easy to process hand power tools. Profile metal constructions require a mandatory and high-quality multi-layer coating: primer, 1-2 layers of main paintwork. It is the complexity and high cost of the coating that is the main disadvantage of professional pipes.
Model selection
Deciding on a bench is not easy, because there are many interesting, original and budget-friendly designs made from corrugated steel pipes. To make your choice easier, don't look at the design, but ask yourself a few simple questions:
- Why do you need a bench? – For relaxing with a group, to bask in the sun and drink coffee with your wife, etc.
- How often will you use the shop? – Every day, occasionally, etc.
These questions will help you decide on the size of the product, whether your bench will have a back or without a back, what size corrugated pipe is best to use, and how to decorate the finished furniture.
When making a bench, table or bench, corrugated pipe of both rectangular and square sections is used. The average thickness of their walls is 2 mm. The cross section is determined depending on the design. The most popular and inexpensive options professional pipes: 20*40, 30*30, 40*40, 60*40 mm.
In addition to the professional pipe, you will need to select:
- Paints and varnishes: primer for wood and metal, finishing impregnation or varnish, enamel;
- galvanized screws and other fasteners;
- wooden blocks for seat and backrest.
When choosing, be guided by expediency and economy. However, don't forget that good materials can't be cheap.
Pay special attention to the choice of paints and varnishes: the durability of a table, bench or any other product made from corrugated pipe will depend on them.
Calculation of the quantity of materials
To make a standard garden bench you will need at least 2 pieces of 6-meter corrugated pipes with a cross-section of 30*30 mm. Approximate cutting for a bench without a back:
- 2 pcs. 2 meters each for the base of the seat, to which the transverse blanks and legs will be attached;
- 6 pcs. 0.45 m each - transverse blanks from corrugated pipe for seating;
- 6 pcs. 0.6 m each for the legs (supports) of the bench.
From wooden blanks you will need bars with a length of 2 to 2.2 m and a rectangular cross-section of 30*60 (20*50) mm. The bars are attached to the corrugated pipe using bolts with flat heads. Their length is determined by the height of the bar.
If you plan to do garden bench with a back, then additionally buy a board with a thickness of 30–35 mm and a corrugated pipe with a section of 25*25 mm, about 6–8 m.p. Don't forget to purchase plastic plugs to protect the corrugated pipe from the accumulation of rainwater. For stability, metal heels measuring 40*40 mm are welded to the bottom of the legs. The supports themselves are connected to each other either by a metal strip or by a thin corrugated pipe.
To calculate paintwork materials, calculate the area of metal and wood blanks. Based on it, you can determine the volume of primer, varnish and enamel. On the packaging, each manufacturer indicates paint consumption in grams or milliliters per 1 m2.
What are the requirements for a shop?
Before developing a sketch, it is worth considering several important design features:
- The height of the bench legs varies from 0.45 to 0.5 m from ground level.
- The height of the back of the bench is 0.5–0.55 m - this is the value that is considered comfortable.
- The pitch of the seat crossbars can be 0.5–1.2 m.
When developing a working drawing, think over and sketch the joints of the parts, the angles of the legs and back, and methods of attaching wood to metal. If you do not think through these nuances, then during the installation of a bench made of corrugated pipe, problems may arise that will entail unreasonable time costs.
Step-by-step instructions for making a bench with your own hands
Before you begin assembling a garden bench, bench or table, you should prepare all the necessary materials, tools and equipment.
Required materials and tools
Standard set home handyman who wants to quickly and easily make a garden bench consists of the following tools:
- pencils, markers and marking markers;
- tape measure, at least three meters;
- kit sandpaper with grain size: 100, 180 and 200 for manual finishing of wood;
- a grinder or grinder with an attachment for sandpaper, as well as a set of wheels and sanding tape;
- electric drill with drills;
- welding machine with a pack of electrodes;
- grinding wheels for an angle grinder (angle grinder) for processing profiled metal pipes;
- jigsaw with files.
If the shop will use curved elements, then you will also need a bender. Before installation, it is advisable to cut all the material into necessary preparations. To make your work easier, you can prepare a table and order cutting of corrugated pipes at a metal warehouse. It will be more expensive, but faster, the main thing is not to make mistakes in the calculations.
Drawings and dimensions
I will give several visual drawings of the simplest and most reliable garden structures made of corrugated pipe and wood.


Preparation of supports
First, prepare the legs of the bench by welding the heels to their bottom so that the bench does not go into the ground under load. Then the lower and upper jumpers from the corrugated pipe are welded, which ensure the rigidity of the structure. When the side elements are ready, they are connected to each other by longitudinal crossbars.
Making the frame and seat
Transverse crossbars are mounted between the longitudinal supports, to which the seat board will be attached. If the bench has a backrest, a frame for it is made in the same way. After welding, all seams on the corrugated pipe are cleaned with a grinder, then primed and coated alkyd enamel in 2 layers.
Board processing
Before assembling the seat and back boards, they are sanded with at least two types of sandpaper: coarse-grain (80 or 100), then finer-grain (180 or 200). The areas near the knots are finished by hand to obtain a smooth and safe surface. For beauty, it is recommended to remove the chamfers. After sanding, the boards for the future bench are primed and coated with enamel or impregnation.
Bench assembly
Before assembling the bench, the corrugated pipes are carefully inspected to identify deficiencies in the coating. They must be removed, otherwise rust will appear on the bench. Assembly begins with the installation of wooden blocks on the seat supports. You should first make markings with a core or marker on the crossbars in order to maintain the spacing of the boards. Holes for mounting screws are also drilled in the boards.
At the end of installation, if the boards were impregnated and not painted with enamel, they are varnished. It gives aesthetic completeness to the product and serves additional protection for wood.
For decoration garden bench from a professional pipe does not require significant costs, it is enough to use your own ingenuity. The easiest way is to paint the bench in different colors, more sophisticated - artistic decor of the bench.
How to decorate a bench with a pattern
Patterns can be applied to the bench in several ways, using available tools:
- Paste the pieces ceramic tiles or broken glass (they are used on the side elements so that the person sitting on the bench does not get scratched).
- Cut out patterns using cutters.
- Make the decor using pyrography (burning with a pencil or a special device) or pyrotyping (stamping patterns).
No less interesting and original are the patterns made from the wire that weaves around the legs of the garden bench.
Photos of finished benches and benches


Metal benches are quite practical and reliable option arrangement of recreation areas not only in in public places, but also on private farms.
At the same time, significantly less money is spent on welding it than on purchasing a finished product. It should be added to this that the maintenance of such unpretentious structures will not require too much time and high expenses.
Even a novice master can weld a simple bench. The material for it is quite accessible, and the demand for the finished product is beyond doubt.
Benches made from profile pipes, which are easy to manufacture, have a number of advantages:
- comfort and ease of use (you can even lie down or seat several people on the bench) and the possibility of decorative design;
- safety associated with the high reliability of the materials used (subject to compliance with the manufacturing process technology);
- metal resistance to climatic factors (to sharp fluctuations humidity and temperature, in particular).
Due to the characteristics of the metal, it is possible to weld reliable and durable decorative benches. They will last for several years without needing repair. The most you have to do is wipe off the dust from them and paint or prime them once a year.
Design Features
 Before welding and installing a metal bench on your site, you need to clearly understand typical device these devices used for outdoor recreation.
The basis of the bench design is a metal frame. It can be welded from cut round or profile pipes or from a corner. Wooden blocks or plastic parts are used for seating.
Before welding a comfortable bench, it is necessary to prepare a sketch of the future product, which should reflect not only its main dimensions, but also the shape of individual elements.
A pre-prepared drawing allows you to predict consumption necessary materials on the bench. With a drawing it will be possible to weld it faster.
Another feature of hand-made benches is the ability to combine materials with different characteristics and properties. You can make a seat, backrest, handrails, and decorative elements from other materials.
In this case, the shape of the frame base is chosen according to the taste of the manufacturer and can vary from a simple U-shaped to an attractive semicircle with several kinks. In this case, it is necessary to take into account what to weld from metal weird shape more difficult than a straight line.
The most practical and universally applicable options include frame benches with a backrest, for more comfort complemented by a wooden seat.
Types of benches
 There are many types of benches for relaxation, but preference is most often given to those models that best suit the interior of a private building and fit perfectly into the surrounding landscape. Often they also choose the simplest option, which can be welded from scrap materials.
Particularly in demand are ordinary frame benches equipped with a backrest, corner benches and oval (round or semicircular) benches with and without a backrest.
The first of the models under consideration are suitable for typical garden plots and will fit perfectly into any surrounding landscape. Their convenience and practicality are explained by the simplicity of the design and the reliability of the constituent elements.
Such a bench can be placed almost anywhere in the recreation area, including a small gazebo, the shore of a reservoir or other elements of park landscaping.
Metal, wood and partially - decorative rock. Standard benches without a back are universal products.
Practical corner benches are intended for installation in areas of limited size that do not have the opportunity to place a full-fledged structure (in the corners of park gazebos, at the junctions of fences, etc.).
Round models of benches can be welded for installation in the center of oval-shaped gazebos. They look great in an artificially organized centerpiece. garden plot or in places specially designated for this purpose.
Such models can be installed in the middle of a children's sandbox or lawn. The choice of installation location for most benches is determined only by the imagination of the master.
Preparation for production
 Regardless of the type of blanks (corrugated pipes or corners), before welding them, you should take measurements and prepare a sketch of the future bench. Such forethought will allow you to obtain a strictly verified frame base and estimate the approximate amount of starting materials.
You can weld a bench only if you have welding equipment and the ability to use it. It is necessary to take into account the features of metal welding technology and worry about preparation in advance consumables(electrodes, various additives).
The level of classification of the welding performer is also important, on which the quality of the future bench ultimately depends. Even in the manufacture of such a simple structure, handling metal workpieces during welding requires increased attention and the right choice current mode.
When preparing for welding, you should worry about the safety of the activities being carried out and prepare workplace in compliance with basic safety requirements.
Required Tools
Upon completion of the preparatory operations, you need to decide on the tool kit with which you plan to weld the product.
For high quality workmanship a metal bench made from a profile pipe will require the following set of tools and auxiliary processing materials:
- grinder with cutting discs metal blanks and grinding protruding corners of the structure;
- welding machine of any type suitable for assembly work. The best option is a regular transformer unit for electric arc welding. With its help, it will be possible to weld the frame of the future structure, consisting of supporting front legs, an inclined back and stiffening ribs. It is also convenient to use an inverter;
- special mechanism for bending pipes (pipe bending machine);
- measuring tape and drill, indispensable when working with raw materials;
- anti-corrosion and decorative coating, designed to protect metal and wood from the damaging effects of bad weather.
If the design of the bench has a backrest combined with the rear legs, even a slight bend in the frame shape will add grace and attractiveness to it.
In this case, the most ergonomic angle is considered to be no more than 12°-15°. Therefore, pipe bending is required. But you can do without it if you weld a simple structure.
After preparing a complete tool kit, you can proceed directly to welding and assembling the bench.
Final assembly (welding)
 General procedure self-assembly benches according to any scheme chosen for this will be approximately the same.
First, cut the profile to the required length. The finished sections of the profile pipe are assembled together and laid out according to the sketch.
In this case, the backrest elements are bent using a special machine until they are given the appropriate shape. It is easier to bend a pipe than a corner, so the backs of a corner are often made straight. And to make it comfortable to sit, they are tilted at a slight angle back.
At the first stage, it is necessary to weld a rectangular U-shaped structure from profile pipes, which will be the frame of the seat.
After that to her in the usual way Pre-formed elements of the front legs and back are welded. If the bench is long, then you can also weld the support in the middle.
The metal structure of the bench is necessarily tested for strength by applying a certain force to the joint areas.
After welding, the seams are cleaned and ground, the entire metal frame is processed protective compounds, allowing to extend the life of the bench. Wood and metal have their own protective compounds.
It is best to prime the profile with an anti-corrosion agent, cover the wood with drying oil, and only then apply paint.
Once drying is complete, you can attach the boards for the seat and backrest. To do this, first drill holes in the wood, then attach the boards to metal frame and mark the metal.
Only after this the metal is drilled. Secure the boards or bars with bolts with a semicircular head and a square head. Plugs are placed on top of the profile pipe. The bench is ready.