Every man in the house would benefit from a convenient sharpening machine. After all, the owner is often judged by how sharp this kitchen tool is.
There are many techniques for sharpening knife blades. For example, for a process carried out at home, only a turning block or ready-made devices with an angular gap shape will be sufficient.
To adjust expensive hunters' knives, European manufacturers produce devices in the form of solid bars, the basis of which is a high-strength alloy.
This article will describe how to make a machine for sharpening knives with your own hands.
Why do knives get dull?
What is the reason why a knife becomes dull when cutting? This can be explained by the fact that the cutting edge has a negative impact abrasive particles, which are present in the cut material. For example, they are present on vegetables and paper. Speaking in simple language, the blade is subject to gradual wear.
The next reason is the inability to hold the blade in the desired position all the time. Any trembling of the hand causes the knife to tilt, which entails a lateral load.
Sharpening technique
The sharpening technique consists of unified, but at the same time quite labor-intensive methods. The main task is to eliminate damage to the blade. It should be noted that for many, such a procedure as sharpening knives provides a good mood and peace of mind.
The main rule in this process is to maintain a precisely specified constant angle. No force required here. The main thing is that the block and blade meet at a certain angle. This is the basic rule of the sharpening technique.
What needs to be done to maintain a constant angle?
In order for the angle to have a constant indicator, there are two ways. The first is to acquire the sharpening skill. The angle indicator can be controlled using a regular marker. They should paint over the connections and, after several sharpening cycles, see how well the paint is preserved. If it is worn unevenly, then the blade is not processed well.
If the knife being sharpened is decorative, then you should seal the blade with tape so that only the cutting edge remains open. Even if you misdirect your hand, there will be no scratches on the blade.
An important point is that the direction of the blade along the block is perpendicular to the edge at the points of contact. This is actually quite difficult to do. It is acceptable for the angle between the edge and the blade to be less than 90 degrees. But when directed along cutting edge this indicator is not suitable.
The abrasive particles of the stone can leave grooves on the blade that will never be sharpened, but will play a positive role when cutting. If the grooves are oriented along the cutting edge, then they will be of no use during cutting. The worst thing is that the cutting edge may break off altogether.
It is important that the bar is long. It should be one and a half or two lengths of the blade. It is allowed for the diamond block to be somewhat shorter, as it grinds faster and better. Its width does not play a significant role. If it is wider, then it is more convenient to work on it and there is less chance of the blade moving beyond the limits of the device. This may damage its side surface or the blade.
There are homemade devices for sharpening knives different designs. All that is required from the manufacturer is availability the required material and tool skills.

The operating principle of such a device as manual machine for sharpening knives with your own hands, is to hold the knife blade in a vertical position and drive it along a fixed under the right angle bar. This is much easier than placing the sharpening stone horizontally and holding the knife at the desired angle.

In order to make a machine for sharpening knives with your own hands, you need a piece of laminate, a wooden strip, sandpaper and a pair of bots with wings. Chipboard or plywood can serve as a replacement for laminate.
To make a knife holder, you need to cut off some of the material. To prevent the block from touching the holder when sharpening, you should sand its edge at an angle using sandpaper.
It is necessary to mark and cut off the top of the vertical post, which will serve as a support for the block. The angle chosen is half that at which the knife will be sharpened. For kitchen knives It is recommended to take an angle of 10-15 degrees.
A machine for sharpening knives with your own hands, the drawings of which are prepared in advance, requires the correct calculation of the length of the base of the racks. Please note that the height indicator will be affected by the subsequent installation of the transverse support. After this, all parts are trimmed and the edges are cleaned.

Holes are marked and drilled in the base and plate for pressing the bolts that secure the blade. When marking, the distance of the holes from the edge of the base is maintained. This is necessary for the versatility of the device, since all knives have their own width. The pressure plate is secured with bolts.
Vertical posts are secured with screws. It is also taken into account that the load on the bottom is small. In this case, it is better to resort to using thermal glue. The horizontal crossbar is attached in exactly this way. The sharpening device is almost ready. All that remains is to make the block.
To make it, a strip of the required length is cut. Sandpaper is glued to one edge with the right size abrasive To optimize the result, you can resort to making several bars with different grain sizes. The range P600 - P2000 is considered the best. To protect your hands from cuts, you need to screw the handle on the top side of the rail.
In the end it turns out homemade machine for sharpening knives with your own hands, characterized by high functionality and practicality. When working, the device rests against the edge of the table, which is quite comfortable when using it.
There are also other types of machine for sharpening knives with your own hands. IN in this case it is based on an M8 threaded rod. Two large washers and nuts are used, which serve to hold a bar 200 mm long.

Covers the thread. A pair of paper clips serve as clamps for the guide stand on the required height. This ensures smooth adjustment of the sharpening angle. The base is made of timber, the thickness of which is 40 mm. It is supported by hand.
How to sharpen jointing knives with your own hands
Every owner who has a plane or jointer has probably encountered the problem of sharpening their knives. It is expensive to purchase new ones periodically. Knives can be easily sharpened with your own hands. In this case, specialized machines are used, or if it is used constantly, it would be better to make a machine for sharpening knives with your own hands.
Do-it-yourself machine for sharpening a jointer knife
To sharpen a jointer knife, special sharpening equipment is used. The machine for sharpening knives with your own hands has a compact size. It can be installed in a garage or on a personal plot.
Many people are interested in how to make a knife sharpening machine with their own hands. To make a device you need to find certain parts. Perhaps similar spare parts are lying around in your barn or garage. They can also be purchased via the Internet.
A machine for sharpening jointing knives with your own hands consists of:
- faceplates;
- table;
- engine;
- vacuum cleaner;
- casing.
The first thing you should do is find the faceplate. This is the most important component of future equipment. She is the one responsible for the sharpening process. The jointer knives are narrow, and the faceplate guarantees complete and safe sharpening. You will have to buy this part new, but the rest can be used even as old ones.
It is better to purchase faceplates of German or American production. The average cost of a part is 25,000 rubles.
The next step is to find a motor whose power should be 1-1.5 kW. There is no need to buy it. Anyone will do, even old ones washing machine. But everyone probably has a table, a casing and a vacuum cleaner.
Main stages of device manufacturing
When the table is selected, the engine is fixed directly below it. A faceplate is attached to the moving part. The engine must initially be equipped with a button that turns the unit on and off. It should be conveniently located.
For reliable protection the faceplate is covered with a casing square shape with one corner cut out. It is this area that needs to be sharpened.
A hole of the same diameter as the vacuum cleaner hose is made on the lower surface of the table in the sharpening area. The presence of a vacuum cleaner is not essential, but it is advisable to install it. It removes unnecessary dirt from blade processing.
What do you need to know?
The engine mount under the base of the faceplate is not prerequisite. You can make sure that the parts are connected using a belt. In this case, the design will be more complex.
A do-it-yourself jointer knife sharpening machine is also suitable for saws and axes.

Ice screw sharpening
The sharp knives of the ice drill enable the fisherman to quickly make holes in the ice of reservoirs. However, over time, any cutting tools become dull and require sharpening.
For fishermen, a high-quality ice auger is a great source of pride. Often, true competitions on the speed of drilling ice holes are held on reservoirs. And victory does not always smile on young and strong fishermen who are armed with imported equipment. There are times when experienced fishermen, equipped with simple tools Soviet made. The reason for the high hole drilling speed lies in the good sharpening of the knives and the correct settings of the device. Beginner fishermen, having bought new Swedish devices, do not even have time to blink an eye before their knives become dull. Tiny grains of sand and pebbles in the ice contribute to the formation of chips and gouges on the blade.
Sharpening of devices is carried out in a variety of ways. Many of our ancestors did not even know what professional sharpening was. In most cases, sharpening was performed using hand-made devices.
Homemade ice drill machine: what will you need to make it?
To make a device such as a knife sharpening machine, you will need two strips of steel, the thickness of which is 4 mm, the width is 60 mm, and the length is 200 mm. A spring from a car is often used as a strip. But it is very difficult to bend.

Progress
First you need to make the device case. The steel strips are bent in such a way that the chamfers of the knives pressed to the ends of the arc are not only parallel, but also in the same plane.
After making an arc from the same steel strip, a pressure plate is bent, which serves as a clamp for the knives being sharpened
Holes for M12 or M14 bolts are drilled in the body and pressure plate. Having tightened the body and the pressure plate using a bolt and nut, we clamp the knives between them and check the strength of their adherence to the surface of the end of the emery circle.
If the knives are not located at the required angle (the chamfers do not fit exactly to the circle), then the device is modified by bending the body arc to the appropriate level. If the knives are positioned correctly, then the structure is disassembled, and stiffeners are welded to the body arc on both sides.
Sharpening knives is best done on a knife that rotates horizontally. In this case, when wetting the knives with water, the latter remains on the blade and stone longer, ensuring their safety. Dip knives in water frequently. This will help prevent the steel from overheating.
Disadvantage of the device
The disadvantages of the device include the impossibility of sharpening knives with different cutting chamfer angles. But each ice drill manufacturer offers its own models. In this case, a universal device is suitable.
Making a universal device for sharpening an ice drill
The universal design allows you to sharpen knives at any cutting edge angle. By smoothly changing the angle between the arms of the unit, on which the knives are fastened with screws, you can fix the desired position of the knives in relation to the plane of the grindstone.
To make this device you need to find door canopy with minimal backlash, as well as an M8 or M10 screw with its own nut. Holes are drilled in the canopy arms. Their diameter is 6-7 mm (for attaching knives to them with screws).
A fixing plate with a slot for a fastening screw is made from a steel strip, the thickness of which is 3 mm. The plate and screw are welded to the canopy arms.
It happens that knives are sharpened, the location of the holes does not correspond to the holes in the canopy. In this case, additional holes are drilled in the arms for non-standard knives. In this case, the device has greater versatility.
How are planer knives sharpened?
Tools such as planers and surface thicknessers can often be seen in country houses. Through them, raw lumber is brought to the desired state. The knives of these devices, like any other, become dull. If you use them often, then the best solution would be to sharpen your planer knives yourself. To make sharpening equipment at home, you will need various materials: metal, aluminum or wood.

A knife holder can be made from wooden block. Made through circular saw cuts at 45 degrees, you can sharpen knives with a belt grinder or a large block. If the latter is not present, then smooth surface made of metal, wood, chipboard or glass, sandpaper is attached.
Knife holders can be made from scrap materials. The optimal solution will be used metal corners, which have an indicator of 90 degrees. When placing two knives on the sides, the sharpening angle of each will be 45 degrees. Using screws, you can secure the knives with a second corner.
Greetings, Samodelkins!
Today I want to show you how you can use the materials that are (or at least should be) in almost every workshop to make an excellent device for sharpening knives evenly.
Initially, the master wanted to buy a ready-made device for sharpening knives in China (namely in the Aliexpress online store), but he thought why not try to make such a sharpener himself. Moreover, the prices for this product from Chinese friends are rather high.
For self-made You will need the following materials and tools:
1. Ordinary board;
2. Sandpaper;
3. Screwdriver;
4. Hammer;
5. Thick electrode 1 pc;
6. Jigsaw;
7. A piece of laminate;
8. Bolts and nuts;
9. Wooden handle;
10. Hex key;
11. Fluoroplastic or textolite (fiberglass).

Let's get down to actually making the sharpener.
First, let's take an ordinary board and cut a piece out of it. Then you need to process the resulting wooden blank, namely, polish it using sandpaper.


It will serve as the base for our homemade sharpening device.
In terms of size, we get it to be 26 cm in length, the width of the workpiece is 6.5 cm, and the height of the wooden base is 2 cm.


You also need to make holes in this board. In total, this part of the future product will have 6 through holes. We drill 2 holes for the stand itself (more on that a little later). Nearby we drill another hole of a smaller diameter, and also on the other side of the board we drill 3 more holes that will serve to attach the pressure plate.

Insert nuts into the holes made.

In the future, these nuts can be placed on glue so that they do not fall out, but for now everything seems to be quite tight.
Then we will start making the guide post itself. The master made it from an ordinary thick electrode. It needs to be bent in half. Next, using a hammer, the author knocked off the entire upper part of the welding electrode and ground it. By the way, you can also grind using an ordinary screwdriver. To do this, simply insert the electrode into the screwdriver chuck and, holding sandpaper in your hand, grind the product.


At this stage, we insert the resulting workpiece (guide post) from the electrode into these two holes.
We insert it not at a right angle, but at a slight angle. The guide angle is somewhere between 65 and 70 degrees.


Everything fits quite tightly, but also for greater reliability of our design, in the future it will be possible to attach the guide post with epoxy glue, or with some other glue, or with something else.


But perhaps the master is mistaken and this is not fluoroplastic. Fluoroplastic is most often white and somewhat slippery. Most likely it is textolite or fiberglass. But in essence it’s not that important. The main thing is that this material is quite hard and does not wear off.
From this piece (fluoroplastic or non-fluoroplastic), the author cut out a kind of pressure plate. He made holes in it, as well as small recesses, so that the caps would extend slightly into the depths of the plate.


Then we place this plate on the previously made wooden base. Secure with screws.


The author took the screws with a hex key. The master also made a small hole in the base of the future knife sharpener so that this key would always be in this sharpener.


The whole thing is clamped and they (the screws) are actually not visible on the plate.
But here, the master did not do the countersunk work, since the sharpening part of the tool will not touch this screw.

Next, the author made such a plate from the same fluoroplastic.

In this plate I made 2 holes for the same hexagonal screw.
Next, the whole thing is placed here and pressed with the help of a lamb.


Then the master made just such a guide for the sharpening stones.

The length of the guide is 57 cm. The author made it from an ordinary steel rod. Also cleaned it up. And on one of the ends I put this handle (it looks like it came from an old Soviet file).

You can also strengthen this connection by placing the wooden handle of the file on the glue, but it fits in quite tightly here and nothing falls out.
Regarding the attachment of the sharpening stones themselves. The author took a small piece of the clamp, cut it and made holes. As a result, we got corners like this, two identical ones.


And here I put a nut with a thread and a clamping screw.


The master also installed a spring on the guide so that sharpening stones could be changed without unscrewing the nut with the clamping screw.

The author made the sharpening stones themselves, or rather the base for these stones, from an ordinary piece of laminate. Just cutting it into strips.


The width of the strips is 2.5 cm, and the length is about 20 cm.


The pieces of laminate already have ready-made grooves, which is where the corners of the guide part of the device will go.
The author then glued the sandpaper onto the laminate pieces using double sided tape and signed which one is where. And, in fact, this is how it all turned out:


This whole thing is quite easy to set up. Using the groove of the laminate we get into one corner of the guide, and with the help of a spring we press the sharpening stone with the second corner.


All. Nothing falls out anywhere. Everything lies flat and quite tightly.
Let's continue assembling our device. We insert the guide with the sharpening stone attached to it into the hole prepared in advance for it, and you can safely begin the process of sharpening the knife.


The stroke is quite large due to the fact that here the author removed a small chamfer on both sides.
IN household There are always cutting, sawing and planing tools. During the work, the sharpness is lost, and the blades have to be restored. You can give knives and planes to a workshop, but this costs money and takes up extra time. Therefore, home craftsmen prefer to sharpen the tool.
Important! Only blades with a certain degree of hardening can be sharpened. If the cutting part has a hardness above 55 HRC, it cannot be sharpened with improvised tools.
You can buy a device for sharpening knives or other household utensils at the store. Save time, but spend a considerable amount - good sharpening are expensive.
By the way, there are different opinions about what the knife sharpening device is called. Emery, whetstone, whetstone, sharpener, musat...
These definitions may refer to the same thing, or various products? We will talk about this and how to make such a device yourself in the article.
Since the advent of cutting objects (weapons, knives, axes), man has been looking for a way to restore the sharpness of the edge. In the Bronze and Copper Ages it was easy.
The introduction of the Edge Pro sharpening machines was, without exaggeration, a revolution. The prices are really high, but no one is stopping you from copying the principle and creating a similar device yourself. We offer design simple machine for sharpening knives, chisels and any other blades that you can make with your own hands.
Machine base
Most parts for a sharpening machine can be made from literally anything, following general principle devices. As an example, let's take laminated or polished box plywood 8-12 mm thick, which was widely used in the manufacture of Soviet radio equipment housings.
The base must be heavy - about 3.5-5 kg - otherwise the machine will be unstable and unsuitable for sharpening heavy chopping tools. Therefore, the inclusion of steel elements in the design is welcome, for example, the base of the case can be “forged” with a 20x20 mm angle.
From plywood you need to cut out two parts in the shape of a rectangular trapezoid with a jigsaw with bases of 170 and 60 mm and a height of 230 mm. When cutting, leave an allowance of 0.5-0.7 mm for processing the ends: they must be straight and exactly match the markings.

The third part is an inclined plane made of plywood boards measuring 230x150 mm. It is installed between the inclined sides of the side walls, while the trapezium of the side walls rests on the rectangular side.
In other words, the base of the machine is a kind of wedge, but the inclined plane should protrude 40 mm from the front. At the ends of the side walls, use a surface planer to mark two lines with an indent of half the thickness of the plywood. Drill three holes in each board to fasten the parts with screws. Transfer the drill bit to the ends of the inclined part and temporarily connect the base parts.

In the back side walls They are connected by a 60x60 mm block, which is attached to the end with two screws on each side. You need to make a 10 mm vertical hole in the block with an indentation of 50 mm from the center, that is, 25 mm from the edge. To be sure of verticality, it is better to drill first thin drill on both sides and then expand. Screw two fittings into the hole from the top and bottom with internal thread M10, and in them - a 10 mm pin with a length of 250 mm. Here you may need to slightly adjust the bottom fitting if its threads do not line up with the stud.

Tool support device
Remove the flat inclined part from the base - it needs to be modified by equipping it with a device for fixing and pressing the tool being processed.
First, set aside 40 mm from the front edge and along this line, use a matching hacksaw to file a groove about 2 mm deep. Using a sectioning knife or a shoemaker's knife, chop off the two top layers of veneer from the end of the board to form a recess into which you can insert a 2 mm steel plate flush with the common plane.

The handrail consists of two steel strips 170x60 mm and 150x40 mm. They need to be folded together along the long end with even indentations along the edges and make three through holes by 6 mm. The strips along these holes need to be tightened with bolts, placing the caps on the side of the upper, larger plate. Arc welding bake each cap, welding it to the plate, then remove the beads of metal and grind the plate until a perfectly flat plane is obtained.

Attach the narrower striker plate to the notch on the edge and transfer the holes with a drill, then secure the rest with bolts. It can also be magnetized before installation DC, this will help in sharpening small blades.
Locking mechanism
The second part of the tool rest is the clamping bar. It is also made of two parts:
- The upper L-shaped bar is 150x180 mm with a shelf width of about 45-50 mm.
- Bottom striker rectangular shape 50x100 mm.
The parts need to be folded in the same way as the parts of the tool rest were folded, placing the counter plate at the far edge of the upper clamping area. We make two holes in the center with a distance of 25 mm from the edges of the small part, and through them we tighten the parts with two 8 mm bolts. They need to be wound in opposite directions, with the head of the upper (near) bolt located on the side clamping bar. The bolt heads are also welded to the plates and pre-ground to obtain neat roundings.

On an inclined board with an indentation of 40 mm from the edge, draw a line with a thickness planer and make one 8 mm hole 25 mm from the top and bottom edges. Connect the edges of the holes with markings and use a jigsaw to make a cut with an allowance. Finish the resulting groove with a file to a width of 8.2-8.5 mm.

Fasten the clamping and strike strips through the groove in the board. Tighten the bolt protruding from above with a nut so that the bar maintains minimal movement, then secure the connection with a second nut. To press or release the strip from below (in the niche of the base), screw a wing nut onto the second bolt.
Adjusting the sharpening angle
Throw a wide washer onto the pin screwed into the base bar and tighten the nut so that the rod does not rotate in the fittings.
The adjusting block must be made from a small block of hard material measuring approximately 20x40x80 mm. Take carbolite, textolite or hardwood.
15 mm from the edge of the block, we drill a 20 mm end on both sides, the hole expands to 9 mm, then we cut a thread inside. A second hole is drilled at a distance of 50 mm from the axis of the hole made, but in the flat part of the part, that is, perpendicular to the previous one. This hole should have a diameter of about 14 mm, in addition, it needs to be flared strongly with a round rasp.

The block is screwed onto a pin, so it is possible to relatively accurately adjust the height of the eye without complex system screw clamps as in the original machine, which in practice is a little more difficult to implement. In order for the block to remain motionless during operation, it must be secured on both sides with M10 wing nuts.
Carriage and replacement bars
For the sharpening carriage, you will need to coaxially weld 30 cm sections of an M10 pin and a smooth, even rod 10 mm thick. You also need two solid blocks measuring approximately 50x80 mm and up to 20 mm thick. A 10 mm hole should be made in each bar in the center and at a distance of 20 mm from the top edge.

First, a wing nut is screwed onto the rod, then a wide washer and two bars, again a washer and a nut. You can clamp rectangular sharpening stones between the whetstones, but it is better to make several replacement sharpening stones.
As a basis for them, take a light aluminum profile with a flat part 40-50 mm wide. This could be a profile rectangular pipe or pieces of old cornice profile.

We sand and degrease the flat part, and “Moment” glue strips of sandpaper of different grain sizes from 400 to 1200 grit onto it. Choose a cloth-based sandpaper, and glue a strip of suede leather onto one of the bars for straightening the blades with abrasive paste.
How to sharpen correctly
For proper sharpening, make several templates from plywood with angles of 14-20º for cutting edges and 30-37º for chopping edges; the exact angle depends on the grade of steel. Fix the blade parallel to the edge of the tool rest and press it with a bar. Using the template, adjust the angle between the planes of the sharpening block and the inclined board of the table.

Start sharpening with a large (P400) whetstone if the edge does not have correct angle. Make sure that the descent strip takes the form of a straight strip without bends or waves. Reduce the grit and go along both sides of the blade first with a P800 stone, and then with a P1000 or P1200 stone. When sharpening the blade, apply the whetstone with slight force in both directions.

After sharpening, the blade must be corrected with a “leather” block on which a small amount of GOI pastes. When editing blades, the working movement is directed only towards the edge (towards you), but not against it. And finally, little advice: if you sharpen knives with polished blades and engraving, glue them masking tape so that the crumbling abrasive does not leave scratches. It also wouldn’t hurt to cover the surface of the tool rest with vinyl self-adhesive.
We will send the material to you by e-mail
Regardless of what guarantee the knife manufacturer gives that they will not require sharpening during use, sooner or later this question will still arise before the user. It doesn’t matter whether this applies to kitchen utensils or camping accessories, because... sharp knife– this is the key to success in fishing and hunting, while traveling and when cooking. Devices for sharpening knives - types and rules of use, as well as how to make them yourself - this is the topic of today’s review by the site’s editors.
The simplest sharpening device cutting tool is a block, and the device for its use is a clamp for the angle of the surface to be sharpened
Knives can be classified according to the following indicators:
Whetstones and whetstones
A whetstone (sharpening stone) is an abrasive tool used to sharpen cutting edges household appliances and kitchen utensils, carpentry and plumbing tools.
The industry produces four types of stones for sharpening knives:
- natural– novaculite and Japanese water stone, which are expensive and difficult to use;
- diamond– the most popular type of product, it is distinguished by its diversity in both geometric dimensions, and by grain size. They are characterized by wear resistance and efficiency of use, as well as low cost;
- ceramic – modern type sharpening tool, characterized by its combination positive qualities natural and diamond analogues;
- artificial– everyone known species electrocorundum or carbide, they are low in cost, but during use they crumble and are not suitable for finishing cutting edges.

Hand tools
- Must for sharpening knives.
Almost everyone knows what musat is, but many don’t even suspect that this is the name of this product. The reason for this is that musat, as a rule, comes with sets of knives offered for sale through trade organizations.
Musat is a rod made of various materials, equipped with a handle and characterized by the roughness of the working surface.

The roughness of the drawing is the size of the notch applied to the rod, and it is this that determines the degree of roughness of the cutting surface of the knife after processing. The musat is equipped with a rod that has a certain degree of magnetization, which ensures that metal particles formed during use reach food and kitchen utensils. Musats are classified according to:
- rod shape– round and oval, flat and tetrahedral;
- materials used– ceramics and metal, diamond and mixed designs.
Each type has certain advantages and disadvantages that determine the possibilities of using the device and its purpose.

- Manual machines.
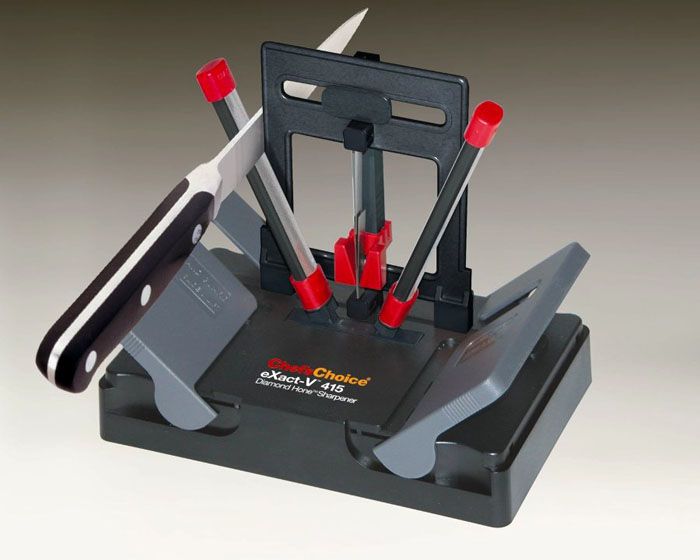
Household manual sharpening machines for sharpening knives vary in their design, but in any of them a whetstone or whetstone acts as the main element. The impact of the abrasive tool on the cutting surface is carried out using the efforts exerted by the user. The main task performed by a manual machine is to create and maintain an optimal sharpening angle of cutting edges for the entire period of work, which is achieved by rigidly fixing the knife in a given plane. Produced by industry various models similar equipment, differing in size and methods of fastening abrasives and knives being processed, as well as the materials used and cost.

Household electric sharpeners do not take up much space and are very functional, because... their design, as a rule, provides various fixed sharpening angles for different types knives and other cutting tools (scissors, screwdrivers, etc.). The ability to quickly and efficiently sharpen the cutting edges of knives is very important for enterprises Catering, where the speed and quality of cooking depends on sharpening. Professional machines for sharpening knives are functional devices equipped abrasive tool High Quality execution, allowing not only rough sharpening, but also fine-tuning the cutting edges of knives for various purposes.

Professional models, in addition, as a rule, have several operating modes that allow sharpening with different efficiency, necessary for knives made by them. various metal or ceramics.
How to properly sharpen a knife at home
Everyone knows that a knife must be sharp, and for this it needs to be sharpened, but how to do it correctly is often not known to every user. It should immediately be noted that for correct execution work required:
- Know the sharpening angles for each type of knives and other cutting tools.
- Be able to work on a variety of equipment or using available tools.
Sharpening angle of knives for various purposes
For knives used for various purposes, the sharpening angles of the cutting edges are different, which is determined by their purpose and nature of use.

This value is for:
- table knives - 55–60˚, because ready-made dishes are quite soft and cut easily; moreover, with a smaller sharpening angle, there is a possibility of damaging the dishes during eating;
- hunting and folding models – 40−45˚, which is explained by their versatility;
- kitchen knives – 30−35˚;
- used for professional cutting of vegetables - 35˚;
- used for professional cutting and deboning of meat – 25−30˚;
- used for professional fish cutting - 25˚.
Some types of knives are sharpened with different sharpening angles, such as those intended for slicing bread (the angle is 15˚), but this is a narrowly targeted use in which sharpening must be done quite often, because with a decrease in this indicator, the durability of the cutting edges decreases.

How to sharpen a knife at home with a whetstone
In order to properly sharpen a knife using a whetstone, you must follow several rules for performing the work:
- must be selected optimal angle sharpening corresponding to the purpose of the knife;
- the blade must be positioned in relation to the plane of the block strictly within the specified sharpening angle parameters for the entire period of work;
- Sharp and jerky movements should not be allowed, they should be smooth and sliding;
- When performing work, the block should be moistened generously with water diluted with soap or detergent.
How to sharpen using musat
The process of sharpening a knife using musat is shown in the following figure.

The work is carried out as follows:
- The musat is installed on a flat surface strictly in a vertical plane;
- the upper part of the device is combined with the sharpened edge of the knife near its handle, after which the knife moves along the rod of the grinder in an arcuate movement directed from top to bottom;
- the movements are repeated several times on both edges of the knife.
I would like to note that experienced users can perform this operation in weight, without rigidly fixing the rod of the device used.
How to properly sharpen a knife on an electric sharpener
When using models equipped electric drive, basic requirements for the performance of work that allows correct sharpening, are the same as in the case of using a whetstone or whetstone.

But, besides this, there are additional requirements that can be formulated as follows:
- It is not the abrasive that should be moistened with water, but the surface of the knife being processed, which is explained by the fact that water is not retained on a rapidly rotating wheel;
- the blade must not be allowed to overheat, which can lead to its damage, which occurs when the edges being processed are strongly pressed against the abrasive surface;
- can be used to rigidly fix the sharpening angle additional accessories, mounted rigidly to the body grinding machine or in the hands of the user;
- when working on sharpening machines industrial purposes must be used by individual means protection, such as gloves and safety glasses.
When using small devices intended for home use, the main requirement for sharpening is the time it takes to complete the operation; all the rest (fixation of the sharpening angle, protection, etc.) are performed by the machine itself, according to its design.

Typical mistakes when doing DIY work
When sharpening knives on their own, many users allow typical mistakes, which can be formulated as follows:
- Creating an incorrect sharpening angle prevents the knife from being used for its intended purpose or reduces its functionality.
- Excessive pressure when working on electric models or incorrect direction and nature of movements when using a whetstone or sharpening stone contribute to damage to the surface of the knife and destruction of its edge.
- Sharpening cutting surface without pre-cleaning from dirt and foreign substances leads to lathering of the abrasive and its damage.
- Using only one grinding stone when sharpening cutting edges. This device It is intended only for finishing or straightening knife blades; it is not intended for basic sharpening.
- Failure to complete the sharpening operation again leads to rapid dulling of the cutting edges.
- Using an abrasive (whet stone or whetstone) of only one grit size.

Making a machine for sharpening knives with your own hands
Although nowadays you can easily buy necessary equipment and equipment designed for sharpening knives and other cutting tools, however, handicraft citizens continue to make knives with their own hands in their free time. When making a knife sharpener with your own hands, you need to decide on its type (manual or electric) and the type of abrasive materials used (block, wheel, sanding belt), as well as the available materials that will be used to make the body of the assembled device and its frame. Consider the option of a manual sharpener using an abrasive stone and plywood as a structure frame. Appearance The assembled device is shown in the following figure.