I have long dreamed of a transforming table; in our Khrushchev-era buildings it cannot be any other way. All rooms are always filled with furniture and all sorts of things. I wanted to somehow reduce the amount of furniture, but not lose functionality. I found the answer to this question a long time ago in transformable furniture, but it was expensive to buy, and I didn’t dare make it myself.
There was a period when I collected all the materials and was already planning to make a table, but when faced with the first problem - making or buying a transformation mechanism - I immediately abandoned the idea. And I suddenly returned to the idea of assembling a transformer table with my own hands - the living room was undergoing renovation, it was assumed that after the renovation a 350-liter aquarium would move into the room, and it was clear that there could no longer be any question of having a full-fledged table in this room. An old dream of a transformable table popped up in my head and everything started spinning.
Description of the master class
Selecting a table transformation mechanism.
I selected a suitable mechanism for transforming the table. First I chose how the table would be laid out, I really liked the Acrobat mechanism, but it is not supplied to Russia. Well, the only alternative available on the market was the mechanism of the following principle:
This mechanism is produced both in Russia and there are analogues from Europe and China. Supported Russian manufacturer! The mechanism comes with springs or a gas lift, which are needed to help unfold/fold the table - for a softer ride. Without a doubt, I chose the option with a spring, because... how simpler design, the more reliable it is. In addition, the spring is hidden in the mechanism body and is not visible when unfolding the table, unlike the gas lift which is too noticeable.

Designing a transformer table.
I made a layout of the future table in the PRO100 program. I used this program for the first time in my life, I figured it out in 1 evening. I made the layout in about 2 evenings. I took a picture from the Internet of a similar table as a standard and calculated the dimensions myself. It turned out to be nothing complicated. Many recommendations were sent in advance of the purchase of the mechanism, I was guided by them when calculating the sizes.

Cutting and edging laminated chipboard.
Ordered cutting laminated chipboard. In fact, there is an application for the PRO100 program that makes a cutting map, but since... I was too lazy to search and figure it out - so I made a cutting map manually and quite quickly.

There are also third-party elements on my map, because... I ordered another cabinet with the table. These extra elements are marked on the map with an X. The color of the laminated chipboard was wenge, the thickness, as recommended by the manufacturer of the transformation mechanism, was 22mm. The tabletop should be at least this thick. The mechanism is designed for such a load; the table body itself can be made from 16 laminated chipboards. But order 2 sheets of different thicknesses with big amount Not everyone will have scraps) I ordered edging immediately with cutting, table top PVC edge 2mm, the rest is melamine standard edge.
Initial fitting of parts.
I brought sawn and framed chipboard. I bought all the necessary hardware for assembly. I tried to fold the elements to exhale and make sure that I had not made a mistake with the sizes. Everything worked out, I was right with the sizes.

Assembling the table frame.
We assemble the table frame into confirmations using a special drill. We mark on dark-colored chipboards using stickers. This idea came suddenly after I tried to apply markings with a pencil on a dark laminated chipboard: nothing was visible and the pencil reflected and glare. The sticker solved the situation - the markings are accurate and there are no traces of glue left on the chipboard. In addition, the solution is quite cheap.


Well, the actual assembly of the table frame for confirmations:


We will fasten the mechanism through the end-to-end method, because The weight of the mechanism is impressive - 8 kg. every. There is no need to be afraid because... We have everything calculated and the overhead legs will hide all the technical holes and fastenings. We make markings for fastening the mechanism in the same way

Drilling through holes under the bolts and then using a Fosner drill we prepare a place for the bolt heads to recess them.

Well, we bolt the mechanism. You shouldn’t be afraid of the number of bolts, they are all necessary, they fasten the walls of the table together even more firmly and make them self-supporting.


Assembling transformer table legs.
Assembling the table legs. The legs must be very strong to support the weight of the table (which is approximately 45 kg) and the weight of the dishes on it. Therefore, it was decided to fasten the legs together with ties.


Screw the legs to the table. To do this, you need to very accurately mark the leg fastenings. To keep things simple, I drilled in place. We will install it on these metal bushings

For them, we drill holes in the legs according to the mark.

This is the position in which all the legs were screwed. The legs hide all the technical holes in the table frame.

Assembling the tabletop.
The tabletop must be assembled with particular precision, because the tabletop folding hinge must be strong and ensure smooth folding/unfolding of the tabletop. When I bought it, I doubted the hinges and for good reason. In principle they work, but it’s hard to hold the hinge in its sockets, and the screws that are supposed to do this don’t do the job. Therefore, I advise you to look at other hinges for the tabletop. Marking holes in countertops:


Assembled the countertops

I have long wanted to make with my own hands both a magazine and transformable dining table. The idea of creating such furniture is that the assembled table can instantly turn into a full-fledged kitchen or dining table. I decided to make my own transforming coffee table from wood. As a project, using my experience in drawing, I drew a diagram for assembling furniture. Before starting work, I prepared the appropriate tools and purchased the necessary materials.
Tools
Before making furniture, I prepared the following tools in my workshop:
- jigsaw;
- drill;
- screwdriver;
- sander;
- brushes;
- tightening belts;
- tape measure and ruler;
- pencil.
Materials
All necessary materials I bought it at a construction supermarket. I had some in stock. The list of all materials turned out like this:
- edged pine board 4100 x 400 x 25 mm;
- screws 20 mm – 40 pcs.;
- screws 50 mm, 70 mm – 10 pcs.;
- metal corners 40 x 40 mm – 4 pcs.;
- stain 0.5 l.;
- furniture varnish PF 170 – 0.5 l.;
- wood glue “Stolyar” - 125 g;
- wooden dowels 30 mm - 24 pcs.;
- round self-adhesives – 8 pcs.;
- piano hinge 400 mm – 4 pcs.
Step-by-step instructions on how to assemble a coffee table - transformer
- I sawed a board 400 x 25 mm, 4100 mm long, with a jigsaw into pieces:
- table top and sides 800 x 400 mm – 4 pcs.;
- legs 900 x 50 mm – 4 pcs.;
- 2 crossbars 700 x 50 mm and 650 x 50 mm;
- triangular struts with sides 5, 10 and 11 cm – 4 pcs.
- I cleaned the entire surface of the wood with an emery wheel and a sander.
- The boards were covered with stain.
- Then the wood was coated with furniture varnish in two layers.
- I cut the ends of the table top and the adjacent ends of the other two boards with a jigsaw at an angle of 45 0.
- At the ends of one side of two 80 x 40 cm boards, I drilled mounting holes for wooden dowels with a drill.
- I smeared the dowels and ends of the adjacent sides of the two boards with wood glue and connected them into one tabletop.
- He tied the tabletop with straps and left it alone for a day.
- A day later, I removed the tension straps from the tabletop.
- I installed a folding mechanism in the form of piano hinges, connecting the side boards with the tabletop.
- I attached legs to the sides of the table with steel corners, the ends of which were cut at an angle with a jigsaw. The fastening was done with screws using a screwdriver.
- I installed struts, connecting the tabletop and legs with them. To do this, I made holes in the adjacent sides of the parts. I inserted dowels into them, coated with wood glue.
- The legs on each side were connected by crossbars. I secured the crossbars with screws using a screwdriver so that when folding the table they would not interfere with each other.
- The screw holes in the legs where the crossbars are secured were covered with self-adhesive tape.
- I glued pieces of felt to the ends of the sidewalls, which become supports when folding the table. This will prevent abrasion of the surface of the supporting part of the sidewalls.
- I also glued felt nickels to the supporting surfaces of the legs. The table will not scratch the floor with its legs, and it can be easily moved on any floor covering.
- He opened the small table and set it on its legs. It turned out to be a comfortable dining table, which I placed in the living room.
After I assembled the transforming table with my own hands, I summed up how much money I spent and how long it took to assemble the furniture.
Cost of materials
- edged pine board 0.04 m 3 x 4200 rub. = 170 rub.;
- screws 2 cm – 40 pcs. in stock;
- screws 50 mm, 70 mm – 10 pcs. in stock;
- metal corners 4 x 4 cm – 4 pcs. x 2.5 rub. = 10 rub.;
- stain 0.5 l. = 100 rub.;
- furniture varnish PF 170 – 0.5 l. = 50 rub.;
- wood glue “Stolyar” - 125 g = 70 rubles;
- wooden dowels 30 mm - 24 pcs. in stock;
- round self-adhesives – 8 pcs. in stock;
- piano hinge – 400 mm – 4 pcs. = 4 x 44 rub. = 176 rub.
Total: 576 rub.
Labor costs
The time spent on assembling the transforming table was reflected in tabular form.
This is pure time spent only on performing individual operations. Taking into account technological breaks and rest, I assembled the table in 2 days.
A table of this design, when assembled, can serve as a convenient surface on which newspapers and magazines will be placed. The table is suitable for serving breakfast or dinner. When folded, the structure takes up a minimum usable area. If necessary, the transformer can be “turned” into a fairly spacious dining table.
Folding furniture is attractive for use in the country, in summer pavilions and on picnics. The table easily fits in the trunk of a car.
Have you been dreaming of a folding table for a long time? Can't find suitable model? Do not despair. After all, it is quite possible to do
Advantages of transformable tables
The modern world is full of technical innovations. This applies not only to electronics, but also to furniture. Transformable furniture is at the peak of its popularity. This is especially true for tables. They can be placed in any room: living room, kitchen, dining room. Thanks to the compactness of this furniture, you have a great opportunity to save a lot of space. In addition, it can perform several functions at once. For example, today a transforming table-bed is in great demand. You can also do it yourself. During the day you can seat all your friends at it and have a meal, but at night this table turns into a bed on which you can rest peacefully. Interesting, isn't it?
Transformable tables are especially relevant for a small kitchen. Their functionality depends on the mechanisms that are most important aspect such furniture.
Often these tables change not only in size, but also in purpose. So, for example, a small box that can serve as a chair can easily turn into a festive dining table. Now you can organize a feast and not worry that you will have nowhere to seat your guests.
What is the secret of the mechanism of transforming tables
The mechanism for the transforming table is so simple that even a child can handle it. It works with the help of special built-in iron parts that drive certain parts of your desk, thus making it powerful and large.
As a rule, today stores offer a wide selection of modern folding furniture. It is durable and can please everyone with its long service life. In addition, transformable furniture can please you with its wide choice V color scheme. Thus, you can choose the shade that suits your interior.
The only drawback is the high cost. Not every average citizen of our country can afford to purchase this element interior But for those who want to get one, we suggest making a transforming table with your own hands.

How to make a book-table yourself: materials and tools
Before you make a transforming dining table with your own hands, you need to make all the calculations correctly and prepare a drawing. Exist certain parameters of this product: height - 75 cm, width - 80 cm, tabletop length - 152 cm. Therefore, whether you make a table with exactly these dimensions or deviate slightly from them, you need to build on these parameters.
For the basis of such furniture, you should opt for moisture-resistant laminated chipboard, although non-moisture resistant ones are also allowed. Fasteners in in this case consists of 12 pieces of butterfly loops measuring 4.5 cm.
To attach the tabletop to the sides of the table, 4 corners are needed. In addition, 2 limiting corners are also needed here.
Assembling a book-table
The first thing you should do is process the cuts. To do this, use a simple iron. Remove any excess material using a sharp construction knife.

After that, start assembling from the legs. Attach the hinges using special modern screws. The mechanism for the transforming table is ready. For an aesthetic appearance, the confirmations are closed with plugs.
Take the bottom edge, which should be at the bottom of the table, and two side walls. Fasten them so that the edge is 10 cm from the floor. In this case, the edge must be between the walls. Take the second crossbar and fasten it to the side parts parallel to the first. It should be about 40-45 cm from the floor. Here it is worth considering the point that the distance from the ends of the internal ribs to the side ends of the side walls should be approximately 3 cm less. Otherwise, the wings of the tabletop will not fit tightly and freely to the base of the table when folded.

After this, on the sides, first attach a small one in the middle, parallel to the internal ribs, and then two large parts of the tabletop on the sides.
Strengthen the legs and tighten all the mechanisms.
One transforming table, made with your own hands, is ready.
What is needed for a folding table for the kitchen
A transforming table for the kitchen is a leader in space saving. It is ideal for small spaces as its base is attached to the wall.
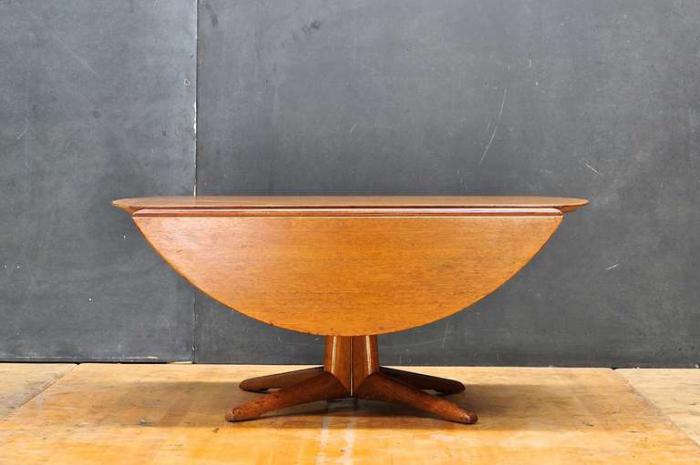
In order to make such a round transforming table with your own hands, you need to have the following components on hand: a load-bearing part, 2 struts, shelves and a tabletop rounded on one side.
To begin, also prepare a drawing with the dimensions you need. It is better to take for the material laminated chipboard with a thickness of at least 1.5 cm. But if you don’t have one, then it can be replaced with planed boards. But in the latter case, they must be rubbed down using fine sandpaper. In addition, such material requires painting or varnishing.
Assembling a kitchen folding table
The base is attached to the wall using the hanging method. For this, experts advise using special anchors. And its parts themselves are assembled using screws and This process is less labor-intensive than the previous one, but still requires a lot of effort and attention.
So, the mechanism of a transforming table, made with your own hands, in this case consists only of fastening the moving elements to the base, which is already tightly adjacent to the wall. After the ends are glued with edges, staple the back surface and attach the shelf parallel to the small upper part of the tabletop, secure it with self-tapping screws. After this, follow the instructions above and continue attaching the table parts one by one.
Selecting a mechanism and designing a transforming coffee table
Before you do transformable coffee table with your own hands, you need to decide on its functionality, which fully depends on which mechanism for the transforming table you choose. After all, its type (with a spring or gas lift) directly affects how your table will fold and unfold.

The second stage of assembling folding furniture is its design. As a rule, here you should follow the recommendations that come with the mechanism itself. The design of a coffee table can be different. The most simple option is an ordinary small table consisting of two halves of tabletops, which are later moved apart and another part of the tabletop is inserted in the middle. Thus, the transforming coffee table, which almost anyone can make with their own hands, increases in size.
Assembling a folding coffee table
After all the parts have been cut out of the laminated chipboard, their ends must be covered with an edge. After that, try on all the details. Make the markings with a pencil. If your product is dark in color, then it is recommended to use a sticker for this purpose. In this case, the previously made marks will not be erased and will be clearly visible on the surface of the laminated chipboard of any color.
We assemble the transforming table with our own hands using a special confirm drill. After assembling the base, proceed to fastening the mechanisms. To do this, do in in the right places through holes and secure the parts with special bolts.
What is it needed for coffee table? Most often, drinks are placed on it while we watch TV, or laptops are placed on it for work or entertainment. In addition, it is desirable that the coffee table has a place to store some household items, and can also serve as a stand for tired feet. It doesn’t sound very aesthetically pleasing, but who among you doesn’t do that?
It is not always possible to purchase a ready-made table of exactly the height and shape you want. This means there is only one option left - to make the coffee table of your dreams with your own hands.
What you will need
Screwdrivers or electric drill with a set of drills;
Wood panel for lids and shelves;
Bolts;
Nuts;
Dismantling old elements


We remove the table cover, unscrew the rollers (if any), remove the edging elements that tie the walls of the table together. The legs, as a rule, are glued, so they can be removed with a hammer. We also remove and put away all the drawers and handles.
Further actions

There are several options for how to secure the tabletop:
You can make a hinge on which it will rest on one side;
You can make it move back and forth as if on rails;
You can divide the tabletop into two halves and secure it on both sides;
Great solution will be the use of cantilever hinges. In this case, the table will open or close as you wish; when closed, the tabletop will be flat.
The storage boxes require a little modification; initially there is too little space in them.
We disassemble the loops


Unattended wooden planks will make excellent hinges. Their shape is clearly visible in the photographs presented. Please note that it is the short parts that will move.
The moving parts are fixed on the long part at the same distance and height. The moving parts are the same length.
The first photo shows exactly how the holes should be drilled. The second photo shows the hinge in the open state.
The third photo shows the sinking bolts. Well, on the fourth we see approximately completed loops.
Storage boxes


To support the boxes, the entire structure must be strengthened. After this, carefully examine the table and remove all excess nails and staples.
Surface preparation


It's time to work on the countertop and return it to its place. By using grinding machine remove the old coating and level the surface. If there are uneven spots on the countertop, they can be smoothed out using a fine finishing putty intended for wood.
Reconstruction


Put the tabletop back in place and check how everything works.
Coloring


Before treating the surface of the table, it needs to be sanded. sandpaper, clean from dust and dirt, level and degrease. After this, the table can be painted or covered special composition for wood - matte or glossy. Pay special attention to the end sides, sides, and internal surfaces.
Final result
Make a transforming table- an excellent alternative to bulky furniture in small apartments.
Economical, functional and comfortable they are release space for various things (books, computer, etc.) and space for outdoor games in children's room.
Model a number of transformable tables are so wide, that can satisfy the most demanding taste.
Types of transformers
Furniture, which most often acts as a transformer:
- sofa;
- table;
- cabinet;
- rack;
- chair(child, etc.).
Some examples transforming tables:
- -transformer

- Round transformable table
![]()
![]()
- Table- sofa bed

- Computer table transformer
![]()
Important! When choosing a transformer Special attention You should pay attention to the safety of the product to eliminate any possibility of injury during assembly and disassembly of the structure. Sharp edges and protruding metal elements are not allowed.
What can you make a transforming table from?
![]()
- Tree
The most advantageous and easiest to make are made of wood. For this, simple solid wood and sheet wood panels (plywood, chipboard, MDF, fiberboard) are used. - Plastic
Possible for a transforming table, but not a very aesthetic option. - Metal
The tables are strong and durable, have various options decor, are made of hollow structures. - Glass
More difficult option Tempered glass will be used to make transformable tables. Such tables are aesthetically pleasing, safe and have an original appearance.
Chest of drawers
 For making a small chest of drawers (4 drawers) necessary following:
Materials and accessories
- handles for all boxes (including two false ones) – 6 pieces;
- wheels furniture - 8 pieces;
- supports for wheels - 8 pieces;
- loops ombre - 4 pieces;
- loops and hinges for table top;
- guides ball (400 – 2 sets, 450 – 4 sets);
- dark colored wood boards for the tabletop, external side legs (on wheels), internal side legs, the middle wall (between the drawers), the bottom of the chest of drawers, the walls of the drawers and 2 long walls along which the upper false drawers will slide to the sides;
- wood boards light color for the front of the drawers (+ 4 fake drawers on both sides) and the back of the chest of drawers. The length of the back wall is equal to the length of two drawers. The remaining space on both sides of the chest of drawers is occupied by a long wall along which false drawers move;
- thin wood board For bottoms all boxes.
Tools

- pencil, square, roulette;
- jigsaw or a hacksaw for wood;
- screwdriver or screwdriver;
- hexagons;
- drill with various attachments (including a 15 mm Fostner cutter);
- minifixes(for eccentric couplers) – 40–50 pieces;
- European confirmed screws – 50–60 pieces;
- self-tapping screws(14 mm – 20 pieces, 30 mm – 50 pieces);
Drawings with dimensions

Stages of work
Step 1. We draw and cut out all the details of the future chest of drawers.
Step 2. On the side walls we draw and attach retractable ball guides(400). On the middle wall we screw the guides on both sides.
Step 3. Screw it on average wall exactly in the middle of the bottom of the chest of drawers.
Step 4. We fasten the side internal walls, back wall and bottom of the chest of drawers.
Step 5. Collecting all the walls boxes, We screw the handles-brackets to the front sides (including fake ones).
Step 6 We attach two corners of all drawers to the inner ones (which will be inside the chest of drawers) 2 balls from the guides (along which our boxes will roll).
Step 7 We screw the guides (450) onto the wall for false boxes and reverse side false boxes. We attach the long walls to the side ones internal walls.
Step 8 We screw furniture wheels to the bottom of the chest of drawers and to the side outer legs.
Step 9 Fastening outside false boxes to the outer legs of the chest of drawers and push them into folded position (we place it next to the functional drawers).
Step 10 Let's get started tabletop. We fasten the three parts together using loops


For lunch this design is enough for a table complex. Most often, a chest of drawers is used when it is not possible to purchase kitchen or dining table or during manufacture huge transformable table (more than 2 meters long).
 Second option chest of drawers differs not only in size (700 x 900 cm when folded, 2100 x 900 cm when unfolded) and the number of drawers, but also mechanism transformation.
 Side inner walls maximum laid out at a distance of the length of the false boxes.
Tabletop when unfolded it consists of 3 parts – left, middle and right. When folded, the left side rests on average.
The table top rotates 90 degrees.
Right part goes down on the back wall of the chest of drawers (hangs parallel her), and the parts stacked on top of each other form the upper surface chest of drawers
Wheels are attached for ease of movement of our chest of drawers, but they are not required. When the table top is rotated into working condition, it falls into position
Interesting idea portable folding transforming table – ironing board, built into the closet, is presented in this video: