Nowadays, washing is not a problem at all. As you know, people go to baths not only for hygiene. The main goal here is a special atmosphere, because you can’t go to an ordinary apartment shower with friends and then sit peacefully, talk, drink delicious kvass or foamy beer. However, some people prefer hot tea and homemade cakes – it’s a matter of taste. Such visits to the bathhouse are often practiced in order to forget about problems for a while, relieve stress, and improve your own body.
How to wash in a bathhouse: procedure
Let's figure out how people usually behave in a Russian bathhouse. What procedures are taken here, in what order does all this happen.
This ritual looks something like this:
- A person goes into the dressing room, takes off all his clothes (which, as a rule, are already quite sweaty);
- Next, you need to stand in the washing room for some time - there is a shower installed here. Here people prepare their bodies for the most basic procedure – going to the steam room. We have already discussed in detail how to decorate this room;
- Now you can take a steam bath. They start doing this on the bottom shelf (this is what experts recommend). You can climb to the second shelf about 10 minutes after you rest outside the steam room. Then they take a break again for 15-20 minutes and go up to the top shelf. The human body is currently as relaxed as possible, the pores on the skin are open - all toxins and salts smoothly leave the body.
This is why, by the way, it is recommended to go to a Russian bath exclusively on an empty stomach. Even better before the hike: drink compote, herbal infusions, tea, juice.
- If you have a bathhouse, finishing the washing room is a relevant topic for you, because this room has its own special purpose. Here you can quickly cool your body in the shower, or simply douse yourself with a bucket of cold water after the steam room. Many people, taking into account these features, even organize a small swimming pool here. And here you can;
- Such buildings are usually made exclusively for oneself - that is, it is quite possible to cope even on one’s own. Only then do they take into account everyone else - who may also visit your bathhouse at your invitation. By the way, you can ask these people for help with finishing. It is not so difficult for several adults to build a pool, and the pleasure when a person lies in cool water after a steam room is incomparable to anything else;
- It is customary to look into the relaxation room in the intervals between the pool and steam room. Here you can talk about something with your guests, chat, sit on a sofa or bench.

And never forget the basic rule - no bathhouse likes to rush. So you will have to devote a sufficient amount of time to a visit here. Plan such trips in advance, put aside all urgent matters so that nothing interferes with the process.
What kind of washing area should a bathhouse have?

High air humidity is a specific feature of the washing compartment in any bathhouse. At the same time, the temperature here remains optimally low. A person is quite comfortable in such an environment; he can stay here for a long time.
As an example, any bathhouse can be considered: the finishing of the washing area should be such that air circulates well. All waste materials must leave the premises without any problems, and instead of them, fresh air must flow.
If the ventilation in the washing room does not work correctly, the pleasure of staying in this room decreases. There will simply be nothing to breathe there; it will be impossible to wipe the body dry. Fungus and mold will also begin to appear in the sink, and after some time you will notice an unpleasant odor - which will arise due to the high concentration of moisture.
What to do here:
- Usually forced ventilation is installed - it has the format of an exhaust and supply pipe, their size is the same. The pipes also have valves - it is with their help that circulation is regulated air masses;
- The direction of air flow will go to different secondary rooms. For example, it will start flowing from the washing room into the vestibule, etc.
- The exhaust pipe must be installed above the roof - in this situation, a more efficient air outlet will be provided;
- A supply pipe is installed two meters above the ground;
- Your forced ventilation will work more efficiently if it is driven by an electric motor. This motor will usually be configured so that it starts to work the moment the light turns on (to do this, it must be connected to the electrical wiring in the bathhouse);
- Your washing room will definitely not be complete without cold and hot water - keep this in mind when decorating it. Great option here - install a water supply in the bathhouse (for this you need to install a centralized water supply);
- As in the old days, in bathhouses today a container of water is often placed on the stove - even when a small container with a ladle is enough in the steam room. It is profitable to supply the washing room with water - the storage water heater will be provided with resources;
- Various types of massage, rubbing the body with different compositions - due to all this you will be able to lose weight and solve problems with cellulite. All of these tasks are best performed in the washroom. That is, a small massage trestle bed is often placed here specifically for this purpose;
- On those days when you go to the bathhouse, a massage table placed in a space where there is free access to it from any side. At all other times, you can move the trestle bed to the wall so that it does not interfere. To make these tables, it is customary to use lightweight materials, although everything is individual and you can use those that you like.
We finish the washing area in the bathhouse

First you need to start finishing the floor, and only then pay attention to the walls. In general, the floor in such a room is very important element, because a person here can easily get injured, fall and receive serious injuries as a result.
For walls and floors in the wash compartment, they are often chosen:
- Marble;
- Glazed ceramic;
- Granite tiles.
However, it is not at all necessary to limit yourself to tile materials. You can always install a self-leveling floor in your sink. And to avoid slipping here, you can simply put stands (wood gratings). Some people prefer to install rubberized mats; slates are also often used here.
Watch a video about how to cover a sink area in a Russian bathhouse. Perhaps this lesson will help you when doing your work and will allow you to look at the situation from the outside.
Even the floor in the washing room can be made of wood.
That's right: today, moisture-resistant floors are made from wood, which can easily cope even with significant loads. You can easily decide what is suitable specifically for your bathhouse: just check out the photographs and videos on various thematic resources.
Water drainage - how to arrange it?

So, the bathhouse is the finishing of the washing room. If you are doing this, it’s time to figure out how to properly arrange the water drain. For any type of floor, it is recommended to drain the drain outside the bathhouse - no less than three meters. The simplest option, which is very popular among people, is to dig a hole.
In detail, this problem is solved in this way:
- You need to step back about 50 cm from the foundation and dig a hole. The depth of this hole should be at least 150 cm - so that on frosty days drain water did not freeze;
- A trench of a certain length is dug outside the hole. At the end of this trench there is a drain well, the volume of which is 1.5 m³ or more;
- The surface of the pit (as well as the trench) is usually treated with a thick layer of clay (at least 100 mm). Then everything is leveled and carefully smoothed.

It is best to give the trench the shape of a tray - the slope should be outward: so that water can flow freely into the well without any problems.
The trench and hole inside the washing room must be filled with sand - completely, or with gravel - halfway (and then with sand). Outside, the drainage well and trench should be filled with sand or gravel to a height of 100 cm.

Why do we need sand and gravel here anyway? It's simple: these materials act as a natural filter - they will purify your water from soap, as well as other compounds that may be harmful to the environment. The cost of such a design is not at all high; almost everyone can afford it.
To build a more complex structure to drain wastewater, certain financial investments will be required. But it’s worth it - because the cleaning will be done more efficiently.
Let's look at the instructions for its implementation - it is possible that you can do this for yourself:
- Water first enters the drain - from the inclined floor covering. You can always make the box of this ladder either from concrete or stainless steel;
- Water flows from the drain to the outlet pipe;
- The box must be equipped with a pipe. It is raised from the bottom by 10 cm, a steel plate is also installed - obliquely, the distance from the bottom is 40-50 mm. The side and top parts of the plate must be secured tightly, and the top of the drain passage is covered with a lid. Holes should be made in the lid;
- Water lock - excellent protection against all unpleasant odors, which you can feel from the blooming water. Thanks to this lock, cold air will also not get inside your room. That is, the floor will be very warm;
- The junction of the outlet pipes is minted, coated with cement mortar - and a very decent drainage system is obtained.

To make it easy to remove blockages from pipes, a special inspection well is usually made. The main thing in such work is to place it no closer than 200 cm from the foundation of the bathhouse.
Ceiling and wall cladding
Bathhouse, washing room finishing - this is what we are talking about in detail today. Everything related to drainage was discussed above. Now is the time to think about the ceiling and walls.
Bathroom washing areas are often finished with tiles. This material is chosen because it has a reputation for being practical, durable, and hygienic - because it is not difficult to care for during use. Tile It has been used for decades, it has successfully passed all strength tests - no one will argue with this.
And still, why you should use ceramic tiles and their different types?
Finishing washing bath the inside involves the use of moisture-resistant materials. Hygienic standards assume that the walls in the washing area are covered to a height of at least 180 cm. The entire space above is usually whitewashed, plastered, and painted with various water-repellent compounds.
The good thing about tiles is that their design is perfect for the most different interiors. The room takes on a solid appearance - and this catches the eye.

- You can tile the sink in your bathhouse, either completely all the walls, or combine this material with other available ones;
- For wall cladding in the washing department, wooden slats are often chosen, which are treated in advance with antiseptics;
- In this case, it is customary to lay all the elements closely so that moisture inside the skin is excluded, and therefore the appearance of mold is prevented;
- If we talk about wood, then the interior finishing of sinks wooden baths often performed with coniferous materials. At the same time, larch can be called an ideal choice - it does not rot at all in a humid environment. Pine and spruce will also last a long time - if you care for them properly, ventilate the room in a timely manner and dry it if necessary;
- The ceiling in the washing compartment should also not be left without due attention. To decorate it, you can choose the same materials that were used for the walls. It is customary to insulate the ceiling from the outside;
- There should be no moisture in the attic; it should not accumulate in the upper part of the structure under any circumstances;
- The ceiling in bathhouses made of timber is usually covered with boards, the thickness of which is at least 62 mm;
- The top is finished with foil, and paper with wax is also used here. Everything is covered with soft clay, then insulated with sawdust or mineral insulation.
After all this, you can perform the final screed with sand and cement. And at this point, it is quite rightly noted that the finishing of the washing room in the bathhouse is completed and the room is completely ready for active use.
Any water-repellent facing material is suitable for washing.
Modern baths have several compartments at once. The steam room and washing room are made separately. This way the humidity in the steam room is always low and steaming is easier. But I want to make the washing department high quality. The question arises of how to decorate the washing area in a bathhouse if it is traditionally built of wood. And as you know, wood and water are a bad combination. We will discuss with our readers what material is suitable for lining a sink.
 The washing area in the bathhouse can be anything convenient size.
The washing compartment in the bathhouse must be at least 4 m². Regular bathroom sizes, like those in an apartment, will not fit. The washroom is used not only as a shower, but also as a place for massage or applying various cosmetic masks. It’s not bad if there are 1-2 benches in the room. In order to save money, you can make it into a washing machine with your own hands from natural wood. The length of the benches must be at least 180 cm, so that the tallest member of the family can fit on it while lying down.
In large baths, the washing department is combined with a swimming pool. In this case, several cabins are installed, and the pool is used for relaxation and diving after the steam room. It is convenient to place the exit from the steam room directly into the washing room, only from there to the rest room. People take a shower not only to wash themselves, but also to wash off sweat and cool down after the steam room, before relaxing and drinking tea.
There will not necessarily be a shower in the washing section of the bathhouse. You can hang several tubs for running in cold water. But in this case, it is necessary to equip a separate place for placing basins for washing.
In small baths, the washing room can be combined with a bathroom. In such a washing room you can install a regular shower stall. In this case, the water will not come into contact with the wall decoration as much.
The material for finishing the washing room is chosen based on the main design in the bathhouse and a number of other criteria, which we will discuss below.
Features of the material for washing
The washing compartment is not exposed to high temperatures, but constant contact with water makes it unfavorable for wood. If after all overall design the baths are wood, and you don’t want to disturb it, then they use lining or imitation timber made of larch or aspen. But the material will not be cheap.
Finishing materials for a bath are selected according to the following criteria:
- High water-repellent characteristics.
- Environmental friendliness.
- Easy to install.
- Washing design.
- Price.
Unfortunately, it is difficult to find combinations of all indicators. Among the most commonly used are: ceramic tiles, natural or artificial stone, wood, water-repellent paint and plastic panels. They are divided according to their purpose: for cladding ceilings, walls and floors. Each of the options has positive and negative qualities; let’s consider them in more detail.
Ceramic tile
 Washing finished various materials looks aesthetically pleasing.
 Ceramic tiles are moisture-repellent materials. It is used for finishing floors and walls of the washing compartment. If the walls in the bathhouse are wooden, then before cladding you need to lay waterproofing and level the walls. The tile adhesive used is moisture-resistant. The size and color scheme are selected individually, and a large assortment in construction stores makes ceramic tiles accessible to any budget.
Ceramic tiles are most often used for floors. In the washing department, it is important to properly organize the drainage and perform the screed. The floor should have a slight slope towards the drain, which is discharged under the bathhouse or into the general sewer system.
The advantages of ceramic tiles include:
- Does not allow water to pass through.
- Durability.
- Does not lose strength over the years.
- Does not change color.
- Environmental friendliness.
- Easy to care for.
- Price starts from 120 RUR/m²
- More than 200 colors.
The cons are mainly taken from user reviews:
- The floors in the wash bay slip and it is easy to get injured.
- The walls stop breathing.
- It is difficult to do the installation yourself without a certain skill.
- May break if hit by a heavy or hard object.
If the floors in the washing room are tiled, there should be an overlap on the walls, at least 40 cm, so water will not get to wooden structure walls Above the tiles, you can use water-repellent paint on a natural basis.
Wood - pros and cons
Wood in the finishing of the washing room is used for walls. If all other rooms are finished with imitation timber, clapboard or block house, then the washing room can also be finished with this material. But use better cladding from coniferous wood. A high resin content will make the walls more resistant to moisture.
Larch and aspen are considered the most resistant, but the price for panels made from this wood starts from 350 rubles.
Pine and spruce can be coated with water-repellent compounds and their service life will increase. The following are used as water-repellent compositions:
- Natural oils.
- Wax.
- Water based paint.
 Wood, if well processed, will be an excellent finish in a washing bath.
 Oils are impregnating compounds and penetrate deep into the wood. Before application, the surface is sanded and cleaned of dust and dirt. It is necessary to apply oils in the washing machine in 2-3 layers. After complete drying, the walls will become less susceptible to moisture. The durability of an oil coating is less than, for example, that of wax.
Wax is one of the most expensive coatings for wood. It is applied by rubbing movements using a special soft cloth. Wax creates a film on the surface of the wood that reliably protects the wood, but does not block the penetration of oxygen inside. At the same time, the appearance of the wood only improves, the pattern becomes more expressive, and the shade is deeper.
Paint is used only on a natural basis, but water-repellent. It can be matte or glossy. In this case, the color scheme depends only on the owner’s imagination. Apply with a brush or roller in 2 layers. Dries within 12 hours. The only negative is that the surface wears out quickly, so the treatment must be repeated once a year.
Will count well wood trim with natural or artificial stone.
Stone in the finishing of the sink
You can use stone to decorate walls and floors in whole or in part. They combine the walls by laying artificial or natural stone in the area where the shower is located. Natural stone is expensive and has a number of advantages:
- Eco-friendly.
- Beautiful appearance.
- Durable.
- Not afraid of mechanical influences.
- Does not allow water to pass through.
The main disadvantages include:
- Heavy material.
- It is difficult to do the finishing yourself.
- A flat surface is required for installation.
- High price.
But the disadvantages can be compensated for by using artificial stone. It is not as environmentally friendly, but lighter. And if you take the right shape, then laying it is no more difficult than tiles. The price of artificial turf is 2-3 times lower than natural turf.
Plastic lining and panels
The most economical way to finish a washroom is to use plastic panels. Moreover, they are wide with a tongue and groove, which makes it possible to create the most airtight finish. Color solutions are different. The use of thin plastic panels resembles the appearance of a painted wooden lining. used for cladding walls and ceilings. The main advantages of the material include:
- Easy installation.
- Lightweight material, therefore easy to install on lightweight sheathing.
- Price from 70 RUR/panel.
- Does not absorb water.
- Aesthetic appearance of the walls after finishing.
The cash in question has a number of negative qualities, which users mention more than once in reviews:
- Afraid of mechanical influences.
- Not environmentally friendly.
- Prevents oxygen from getting inside.
If you purchase poor quality material, it will emit caustic persistent odor.
When installing plastic panels, you need to install thorough waterproofing of the walls and ceiling. To do this, a foil film is attached to the surface or PVC as a cost-saving measure. It is necessary to leave a gap of 1-2 cm between the panels and the waterproofing, otherwise condensation may accumulate under the panels and the walls will begin to rot.
Installation of plastic panels in the washing compartment is permissible only after the house has completely settled. Otherwise, they may become distorted and the seal will be compromised, and in rare cases the finish will crack.
How to choose the right PVC panels can be seen in the video:
Sink finishing paint
The easiest way to finish a washing gypsum lining and paint it with water-repellent paint. But this method is short-lived and must be done once a year. renovation work. In addition, when installing gypsum fiber boards, part of the room area is lost. This method is not the best, since it is recommended to use it if a separate closed shower stall is installed in the washing room.
Paints can only be used on a natural basis, and their main disadvantage is their fragility.
Any of the listed finishing materials can be used for interior finishing of a washing room in a bathhouse. But choosing the right material is only half the battle; it is important to carry out the installation correctly and efficiently. If experience is not enough, it is better to entrust the work to professionals.
The washing room is one of the main rooms of any bathhouse. In the process of arranging this room, the key requirements of construction and finishing technologies and a number of additional nuances must be taken into account: any omission, even the smallest, can lead to significant deterioration in the future performance characteristics premises.
Floors deserve special attention in the process of arranging a washing room. The operating conditions of the washing room are such that the floor here is constantly exposed to moisture and frequent temperature changes, which must be taken into account during the design of the structure and its subsequent construction.

In order for the floor in the washing room to serve as long and efficiently as possible, it must meet the following requirements:
- promote rapid and effective removal of moisture. For this purpose, floors are usually made with slight slope in the direction of the drain hole or are equipped according to the current technology;
- fully ventilate and dry quickly;
- withstand operation under conditions high humidity and temperature changes;
- be laid in such a way that there is no possibility of drafts in the room.
Main types of floors for washrooms
The most widely used in private construction are wooden (additionally classified into leaking and non-leaking) and concrete structures.

The simplest option. On a pre-prepared foundation (lower crown, concrete base, support pillars, etc.) logs are fixed, serving as the basis for the subsequent placement of the boardwalk.

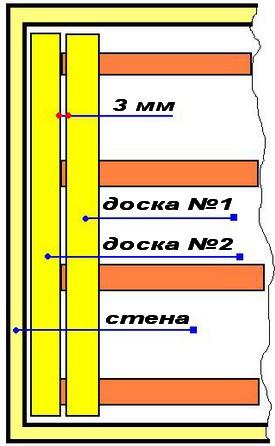
The boards are laid with gaps of 3-5 mm - through them there will be unhindered drainage of water from the washing room.

As a rule, such floors are made collapsible, which allows, if necessary, to remove the boards and take them out of the room for better drying.
The method is inexpensive and easy to implement, but has a significant drawback - it is impossible to insulate this kind of floor.
In the case of leaking wooden floors, the structure can be built without observing a slope: the water will flow into the spaces between the flooring elements, and then into the ground under the bathhouse.


The boards are laid without gaps. The possibility of disassembling such a floor is not provided.
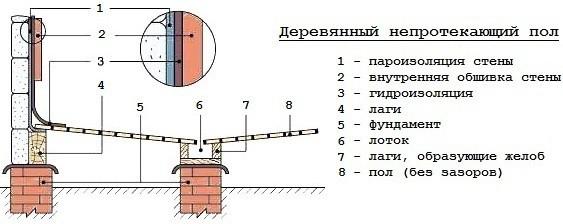
The system is installed with a slope towards the drain hole - through it the water will flow into the drainage basin, and then through a pipe it will be diverted beyond the boundaries of the building.
The design includes a “subfloor” and a thermal insulation layer.
When arranging a non-leaky floor structure, special attention should be paid to solving the issue of ventilation of the underground space. As a rule, to ensure sufficient ventilation, a hole (or several, depending on the area of the room) is made in the floor and a plastic pipe. Pipes with a diameter of 50 or 100 mm are optimally suited.

Concrete floors

A relatively simple design, durable, reliable and easy to maintain. In practice, pouring a concrete floor often requires a much more modest financial investment compared to constructing a wooden structure.
The concrete floor has the only drawback- he's cold. There are several options to solve the problem:
- walk in flip flops;
- qualitatively insulate the floor. The most popular option;
- install a floor heating system. Requires significant financial investments and the involvement of third-party specialists if the private developer does not have the appropriate skills.
The procedure for arranging a wooden floor in a washing room
The procedure for arranging a wooden floor consists of several main stages. First, the base is prepared, then the flooring is arranged (the technology is somewhat different for leaking and non-leaking floors), and then ventilation issues are resolved
Laying a wooden floor begins with the installation of joists. Typically larch or pine timber is used. If possible, the flooring should be made of boards, the material of which is the same as the log wood. As noted, the floors are installed with a slope in the direction of the drain hole (in the case of a leaking structure, this rule can be ignored).
Installation of logs is carried out according to the width of the room, i.e. the smallest distance between opposite walls. If the room is square (for example, 4x4, 6x6, etc.), the joists can be installed in any direction.

Important note! The logs are mounted transversely to the drain.
For greater ease of perception, the information is divided into several steps, supported by diagrammatic illustrations and presented in table format.
Table. Installation of logs
| Work stage, illustration | Description |
|---|---|
Let's start arranging the support chairs. Preparation, planning | To ensure sufficient rigidity and stability of the logs, a support chair is installed in the center of each of them. To make such supports, you can use wood, brick or poured concrete. In the case of using wood or brick, a support platform with a thickness of 200 mm or more is pre-filled with at least reinforcement with a chain-link mesh. Make the dimensions of the platform such that it protrudes approximately 50 mm from all sides of the future support. |
| Dig a hole for the base of each of the areas being developed. Recommended depth is 400 mm. Compact and level the bottom of the hole and its walls. Fill the bottom of each depression with 10 cm of sand and compact it well, pouring water for better quality. Pour 15 cm of crushed stone on top and compact it thoroughly. Install formwork, previously assembled from edged boards, into the prepared pit. You can use screws to fasten individual boards together. The height of the formwork should rise at least 50 mm above the ground level. Lay waterproofing material, such as roofing felt, along the edges of the pit. Prepare concrete from 1 share of cement, 3 shares of clean sand and 4-5 shares of crushed stone. Water - approximately 50% of the weight of cement. The consistency of the mixture should be quite thick. Fill the formwork with a 10-15 cm layer of concrete and compact it. On top of the fill, place a piece of reinforcing mesh, previously cut to fit the dimensions of the formwork. Pour the next layer of concrete on top of the mesh to the upper edges of the formwork and compact it thoroughly. Give the pads at least 1-2 days to dry. |
| Apply preheated bitumen to the surface of the equipped concrete area, and place a layer of roofing material on top. If the bathhouse is built on a strip foundation, the height of the concrete platforms must correspond to the height of the strip, i.e. their “tops” should be located at the same level. |
| In the case of a columnar foundation, the supports must be erected to the level of the top of the embedded beam, on which the logs will rest in the future. |
| In the photo you can see the finished concrete pad. For better understanding, the structure is shown with a brick support already erected and a joist laid on top. In the same photo you can estimate the size of the brick support. Traditionally, it is laid out in dimensions of 2x2 bricks, and the height is selected individually in accordance with the conditions of a particular building. Usually 4 rows are enough. Laying is carried out using a standard solution of 1 part cement, 3 parts sand and water. Lay out supports for each joist. The number of supports is determined by the cross-section of the beam. So, if you are making logs from timber/boards measuring, for example, 15x10 cm or 15x8 cm, one such support in the middle will be enough. Installing supports every meter will allow you to reduce the cross-section of the timber/board used to 10x5 cm or even 8x5 cm. |
| After erecting the planned number of supports, you can move on to the stage of preparing the underground, or rather, the ground in this part of the structure. If you plan to install a leaking wooden floor, and the composition of the soil on the site allows it to pass moisture well, fill the underground with 20-25 cm of crushed stone and compact it thoroughly. As a result, water will flow into the gaps between the flooring elements, pass through the backfill layer and be absorbed into the soil. In this situation, crushed stone will take on the functions of a kind of filter, ensuring normal removal of moisture, eliminating siltation of the underground and helping to maintain a normal level of humidity. |
| If the soil is not in the best possible way absorbs water, the work will become somewhat more complicated: you will have to build a tray in the ground, through which in the future the water will be drained into a catch basin (pit), and from there outside the building. To implement the mentioned idea, you make a clay castle with a slope in the direction of the water pit. Some developers resort to constructing a castle from concrete mortar, but this solution leads to an unreasonable increase in financial costs. A clay castle is made in the following order: you pour about a 10 cm layer of crushed stone on the ground of the underground space, pour a 15 cm layer of clay on top, and then level it so that a gradually increasing slope is provided from everywhere in the direction of the tray to remove moisture. The recommended parameters are shown in the diagram. |
| If you plan to install a non-leaky structure, at the same stage you can insulate the underground using expanded clay, maintaining a minimum 15-centimeter distance between the installed joists and the backfill to ensure effective ventilation of the space in the underground. |
| Dig a pit near the wall in the washroom. A height of 300 mm and a width of 40-50 cm is usually sufficient. Compact the walls of the pit and further strengthen them with clay. From the equipped pit, lead a pipe to remove moisture from the catchment area to the planned location (sewer, drainage ditch, etc.). Use a pipe with a diameter of at least 11 cm - through it the liquid will be drained as quickly as possible. The pipe is laid with a slope, as can be seen in the diagram. |
Let's start installing the logs | Fixing lags is traditionally done with anchors. When installing a non-leaking system, the first log is laid near the wall located opposite to the water collection pit. In accordance with the technology, the installation of the outermost joists should be carried out in such a way that they are at the greatest elevation in relation to the other elements - this will ensure the correct slope to the catchment area. |
| Those logs that are installed along the edges are not equipped with notches. In other logs, notches are created. Maintain a bevel of about 0.2-0.3 cm. Similar cuts can be prepared in the areas where the lags come into contact with the supports erected for them (the width of the cut is ensured according to the width of such a support). The total slope of the finished surface should be about 10 degrees. When determining the depth of the cut to be created, focus on the number of logs to be installed. For example, if your washroom has small area and 4 logs are enough to build a floor; make deeper cuts than in rooms with six logs and big amount such elements. |
| When constructing leaking wooden floors, you can start installing the joists from any convenient wall. The slope in this case is not necessary, so the elements can be installed at the same height. Cut the timber for the logs according to the dimensions of the washing room. Keep in mind that between the installed joists and the walls of the room there should be approximately a 30-40 mm ventilation gap. |
| Before installing the logs, the embedded crown/support must be covered with waterproofing material. Roofing felt is usually used. You are already familiar with the technology for arranging such insulation. Additionally, the timber for making lags is impregnated with an antiseptic. |
| Be sure to check the horizontal position of the joists. If the control bubble in the level deviates from the center, trim the areas where the joists come into contact with the beam/support. Cut until the joists are level with the horizon. |
| To check the correct fastening of the lags in relation to each other, also use a level. For greater convenience, place a flat board on the installed joists and place a control device on it - a level. Control is carried out near the walls, as well as in the center of the joists. If necessary, trim the installed joists or level them using wooden pads. |


The flooring of the mentioned structures will be carried out in a slightly different sequence, as a result of which there is a need to individually consider two technological operations.
Prices for wooden beams
wooden beam
Laying a leaking wooden floor
To perform this work, an unedged board is used. Pre-plane the flooring elements. The most even surface should be ensured at the ends of the boards. If you wish, you can immediately purchase an edged board.
Proceed with the arrangement of the leaking floor, following the technology presented in the table.
Table. Flooring with leaky structure
| Stage | Explanations | Illustration |
|---|---|---|
| Cut the boards according to the dimensions of your washroom, keeping in mind that there must be at least a 20mm ventilation gap between the flooring elements and the walls. |
|
|
| You can start from any wall convenient for you, erected parallel to the chosen direction of the flooring. Step back from the selected wall about 20 mm, place the first decking board on the joists and nail the decking element. Select the length of the fasteners according to the thickness of the board being laid. So, for fastening 4-centimeter boards, 8-centimeter nails are optimal. |
|
|
| Nails are driven in approximately 1.5 cm from each edge of the board. Important note! When driving nails, set them at approximately a 40-degree angle. To attach the board to the joist, use at least 2 nails. Try to recess the fasteners a little (about 1 mm) into the material. |
|
|
| Having nailed the first board, proceed to fastening the second. The minimum recommended distance between flooring elements is 3 mm. For greater convenience and to ensure the same gap width, you can use templates with the necessary parameters, made, for example, from fiberboard. Secure all boards in accordance with the technology discussed. |
|
|
| As a rule, people refrain from painting the floor in the washing room - without paint, the material will dry faster. It is enough to limit yourself to a coating in the form of 2 layers of drying oil. |
|


The procedure for arranging a non-leaking floor in a washing room

For this flooring, a tongue and groove board is used. Arrange the flooring elements with the groove facing the inside of the room - the fitting process involves tapping the end with the groove with a mallet. Otherwise, the tongue may simply break in the process of performing this activity, because it is 2 times thinner than the main board.
The procedure for arranging the flooring is discussed in the following table.
Table. Non-leak flooring
| Work stage, illustration | Explanations |
|---|---|
| Flooring technology involves the preliminary arrangement of a “subfloor”. Nail the installed joists from the bottom, along the edges, wooden blocks dimensions 5x5 cm. Lay the “subfloor” boards on the fixed bars. You can lay down scraps of boards, grade 2-3 material, unedged board and so on. Secure the boards with nails. |
| Lay a waterproofing material, for example, a special film or roofing felt, on top of the subfloor boards. |
| The technology involves the arrangement of a thermal insulation layer. Expanded clay is suitable for insulation. It is enough to fill it in between the lags. A second layer of waterproofing material is laid on top of the insulation. |
| After arranging the “sub” floor, proceed with the installation of tongue-and-groove finishing flooring boards. The basic recommendations are the same as in the case of a leaking floor, but the boards are laid without gaps. If you wish, you can refuse to fasten the flooring elements with nails - this way you can remove the boards and take them out of the washing room to dry. In this case, the following method of fixing the flooring is used: the boards are secured at the edges with 2x3 cm bars. The bars themselves are attached to the joists with wood grouse screws. If necessary, the screws are unscrewed, the bars and boards are removed and taken out to dry. |


Prices for vapor barrier membrane
vapor barrier membrane
Solving ventilation issues
The simplest option for organizing ventilation of the space between the “subfloor” and the finished flooring was mentioned earlier - holes are prepared in the floor and pipes leading out of the room are fixed in them. A diagram of such a system is shown in the following image.

Another option for ensuring ventilation is the arrangement of multi-level floors. In this case, the height of the floors is different rooms will be different. So, in the wash room the floor is made on average 3 cm lower than in the dressing room.

The first option has gained the most popularity among developers. The procedure is extremely simple: during the process of arranging the floor in the corners of the washing room, special holes are left in the base for further installation of ventilation pipes. Pipes with a diameter of 5-10 cm are mainly used. The material used may vary.

The ventilation pipes are installed directly after finishing the walls of the room. Ventilation pipes with a diameter of 5 cm or less can, if desired, be disguised under the casing. More impressive pipes are usually mounted in corners and attached to the surface of the walls with special clamps. It is advisable to install pipes with a diameter of more than 5 cm in baths that are visited more than twice a week.
Prices for different types of ventilation pipes
ventilation pipes
The procedure for arranging concrete floors
A concrete floor will last more than 25-30 years, while the service life wooden flooring and the lag is limited to an average of 6-10 years, however independent device a capital structure will require more significant labor costs - you will have to prepare/purchase a concrete mixture, pour it with reinforcement, lay thermal insulation and perform other related activities.
Instructions for independently arranging a concrete floor in a washing room are given in the table.
Table. The procedure for arranging a concrete floor
| Stage, illustration | Description |
|---|---|
| Moisture from the washing room will flow into the pit. Dig a hole for its arrangement. A pipe with a diameter of 15-20 cm is laid in the pit and discharged into the sewer system, drainage ditch or other appropriate place. The diagram shows the optimal pit dimensions for a small 4x4 bathhouse. Change the recommended values in proportion to the dimensions of your room. |
| We level the soil and fill it with about a 15-centimeter layer of broken brick. Pour a 10-centimeter layer of crushed stone on top and compact it thoroughly. Can be used more traditional version backfill, replacing broken bricks with sand. Some developers first fill in crushed stone, and then sand. In general, each option is correct. |
| On top of the backfill we lay a layer of roofing felt or other suitable rolled material with approximately a 10-centimeter overlap on the walls. We coat seams and joints with bitumen for complete sealing. |
| We pour a layer of expanded clay on top of the waterproofing material for insulation. We select the thickness of the layer in accordance with the climatic characteristics of your region. In the case of a washing station specifically, they are often limited to 5-10 cm of backfill - and the costs are minimal, and walking on finished floor not so cold. Lay a reinforcing mesh on top of the expanded clay. Some developers limit themselves to the use of chain-link mesh - for a compact room it is usually quite enough. A more reliable option is a mesh with cells of about 15x15 cm, assembled from 10-12 mm reinforcing bars. To fasten the rods at the intersection points, standard flexible binding wire is used. The mesh can be fixed with cement mortar. Often strips are made that simultaneously serve as guides. |


The main work is done. All that remains is to level the filling with a cement-sand mixture. The composition is evenly distributed over the surface and smoothed with a suitable device, for example, a piece edged boards with straight ends. To prepare the solution, it is best to use perlite, i.e. expanded sand – screed will help improve the reliability of the structure and its thermal insulation properties.

When using perlite, it is very important to maintain the correct proportions. Pour 2 buckets of expanded sand into a concrete mixer or trough for manual preparation of the solution. Pour about 10 liters of water into the container and mix everything thoroughly. After this, you will notice that the volume of the mixture has decreased by approximately 30% - these are the properties of perlite.

Next, add half a 10-liter bucket of perlite and stir the mixture for 5-10 minutes, then add 5 liters of water and continue kneading until smooth. Then add a bucket of perlite and about 2 liters of water to the mixture. Continue stirring until the mixture is almost free-flowing. Don't add water. Let the solution stand for about 10 minutes and resume stirring - the composition will gradually gain plasticity.
Prices for perlite
perlite 10l
For greater convenience, before screeding, you can attach guides to the base, for example, from a profile for drywall - it will be easier to navigate along them. In large rooms it is impossible to do without guides, but in a compact washing room you can manage without them, controlling the evenness of the surface with a level.
Place the plastic mixture on the floor and level it. Do not make a layer too thick - 10-15 mm is quite enough. Do not forget to maintain the slope in the direction of the water intake. The mixture hardens within 4-5 days. You can put it on top floor tiles. Use non-slip lining - this way you will minimize the risk of injury to your washroom.


The photo shows the location of the beacons when forming a slope in the shower room


Now you have a complete understanding of the procedure for arranging floors in washing bath on your own. Follow the recommendations received, and you will be able to cope with the implementation of the considered activities no worse than a professional master, significantly saving on the services of third-party workers and doing everything in the best possible way, because every technological operation will be controlled by you personally.

Good luck!
Video - Floors in a bathhouse in a washing room
The bath complex includes a steam room, a dressing room, a washing room and a relaxation room. In more primitive, compact designs, the last two rooms are absent, but rest will be deprived of a certain comfort. There are many traditions associated with the Russian bathhouse in our country. The benefits of steaming were highly valued back in the days of Ancient Rus'. Even any poor person washed himself in the bathhouse every Saturday; perhaps it was precisely this regularity that determined the heroic health for which the Russians were famous. The structure was always erected on the outskirts, away from residential buildings. Although the explanation for this is easy to find in folklore (dirt and the concentration of unclean spirits), it is more likely that our ancestors followed basic rules fire safety. There were no icons in the bathhouse; they tried not to bring utensils from it into the house. Superstitions said that it was chosen as a home by a small dirty trickster - a bannik, who, like the brownie, had to be constantly appeased with food.
All ritual fortune-telling took place in this building, because the holy images here did not keep an eye on the young girls eager to find out the name of their betrothed. Although modern alternatives to baths have now appeared - saunas ( Finnish version), jacuzzi, Japanese barrels, they still remain relevant. The most “soulful” holiday is spent here. Moreover, the process of steaming with birch brooms and herbal steam takes up only a small part of leisure time, and special attention is paid to friendly conversations in the relaxation room after the procedures. The washing area in the bathhouse is necessary for rinsing after the steam room. Some people think that you need to come here washed, because on clean skin the pores open better under the influence of steam, because the procedure is more designed for healing. In the article we will look at examples of arranging washing stations and the rules for their design.
Advantages of the washing compartment
In the spacious baths there is a separate room for washing. If the building is small and does not have central heating, then this functional area combined with a steam room, and separation from it is carried out using a partition. Both location options have their pros and cons. A separate washing room allows you to:
- Create unique interior premises.
- Use durable and durable materials for finishing (tiles).
- Provide simultaneous washing for several people at once if it is equipped with a pair of shower stalls.
- Simplify shower maintenance.
Among the disadvantages of this option, only the need to connect central heating for heating is noted separate room and water. Washing rooms combined with a steam room are also not without advantages:
- Space saving.
- A practical interior if the stove with an elongated firebox is located in the middle.
- Fuel savings, since technically only one room will have to be heated.
Unfortunately, combined option has one significant drawback - the room becomes less convenient to use if a whole group of people are steaming at the same time.
Requirements for washing
The washing room in the bathhouse must be equipped correctly. Particular attention should be paid to:
- Ventilation;
- Plum;
- Carrying out electrical wiring;
- Water supply system;
We are talking about the features of arranging a separate room. If the washing room is combined with a steam room, then the list of necessary equipment may differ.
Water supply system
The water supply system in the washing room must operate uninterruptedly. In this case, the resource reserve can be calculated by the number of people who on average visit the bathhouse. This nuance applies to those buildings to which water has to be delivered manually by filling the tank. To simplify the calculations, you can use average values as a basis. In one session, an adult requires about 40 liters, of which 1/4 is hot water. In such washrooms, as a rule, there is only one shower. Even at the construction stage, the foundation of the water supply system is laid and pipes are laid. Heaters use electric or gas or both. In this case, one will be the main one, and the second will become a spare one. If you plan to visit the bathhouse in large groups, then it is better to choose a floor-mounted water heater, since the volume of its tank will be at least 100 liters of water.
If there are problems with electricity in the room, then you can use a modern stove-heater with a heat exchanger. Unlike its counterpart with a built-in tank, this unit allows you to remove heated water to water intake devices located in other rooms.
Ventilation
In wooden baths in washing rooms, the humidity level changes and strong temperature fluctuations occur. Naturally, it is necessary to install a ventilation system that will provide the room with high-quality air circulation. In its absence, the body of a person staying in the washing room may overheat, the appearance of mold, the spores of which can enter the lungs, and the concentration of unpleasant “stagnant” odors. Ventilation can be natural or forced. In the first case, air circulation occurs due to pressure difference. The air duct network is created and installed manually. Forced ventilation of the supply type can be used if it is impossible natural system cope with the volume of air masses or in the absence of any at all. In this case, the main driving force is the fan, which pumps air, and the filter system cleans it.
Types of drainage systems for wastewater
The best option would be to connect to a centralized sewer network or integrate it with the system of a residential building. If this is not possible, then there are several ways to remove wastewater:
- Installation storage tank. Wastewater will have to be systematically pumped out.
- Drainage system. Not the best reliable option, which is used for small baths. The basis of the drainage system can be a well or a “pillow”. Water will go into the ground naturally. This sewer system is considered the simplest to install, but a mistake can be costly, including the destruction of the floor of the building.
- Cesspool. It is placed at a distance of 2-2.5 m from the bathhouse. The pipe without bends for draining is brought in at an angle. The size of the pit is calculated based on the average number of people and the frequency of their visits to the bathhouse.
- Septic tank. The construction will be quite expensive. The main difference in arranging a septic tank for a bathhouse from a similar unit for a home is the depth of the pit, which is almost half as much. You can make your own inner tubes from KAMAZ tires or concrete rings.
When settling in sewer system There are three main aspects to consider:
- Depth of groundwater.
- Soil type and characteristics.
- The depth of soil freezing.
For example, on clay soils cannot be equipped drainage system, and for sandstones in which water does not stagnate, it is optimal.
Electrical wiring - safety first
Steam is an excellent current conductor, so the general switch, panel and distribution boxes must be installed in the waiting room. Lamps for the washing room, as well as for the steam room, require special ones. Their design must include a heat-resistant lampshade, a ceramic cartridge and wooden lampshade. If the owners are confident in the quality ventilation system, then this rule can be ignored. But it is not advisable to place sockets in the washing room. The safest place for them, where the risk of short circuiting is low, is the dressing room. Switches can be used as usual, as in a simple shower in a house, but this again depends on the quality of ventilation.
In wooden bathhouses, the entire electrical wiring system must be open. But they do not stretch it along the baseboards, but through the attic for greater safety.
Stylistic direction and features of finishing materials
To make the interior of the washing room look beautiful and complete, you need to choose the right design style. The design does not impose any restrictions on the choice of direction. Among the popular and unusual options note:
- Traditional Russian style with logs or beams for finishing. If the area of the room allows, then shower cabins are supplemented with a cold water plunge pool.
- Luxurious, modern loft with high ceilings and an open system of communication lines.
- Experimental and unusual for a bathhouse neoclassicism, which organically combines traditions and trends of modern interior fashion.
- Laconic Mediterranean style With ceramic tiles in decoration and calm color scheme, in which white, jade, green and blue shades predominate.
- Roman style with columns or pilasters, arched vaults and decorative moldings.
Also used for decoration are traditional Provence, Scandinavian, eco style or conceptual trends: minimalism, high-tech, chalet.
Wooden panels and lining
To emphasize the style of a log bathhouse, the interior decoration of the premises is done using wood, and the sink is no exception. The lining is classified according to the type of material used into coniferous (pine, cedar, spruce) and deciduous (linden, aspen, oak, alder). For finishing the steam room and washing room, the second type is used. Conifers release resins when the air is heated. The lining is divided into four grades, among which “extra” is considered the highest quality and most expensive. By profile type, we can note euro, soft-line, calm, American and imitation logs (block house) or timber. Lining is one of the varieties wood panels. According to this classification, there are two more types: MDF and chipboard. They are not recommended for finishing the washroom, since the materials contain adhesives that can release when heated. Lining has a number of advantages:
- Easy to install.
- Eco-friendly and pleasant smell of forest indoors.
- Aesthetic beauty.
- Resistance to mechanical damage.
One of the disadvantages is the presence of micropores in the wood, which, when filled with moisture, can cause deformation of the panel and become a breeding ground for mold.
Ceramic tile
Tiled floors and walls can only be decorated with a washing room, but for a steam room this option is taboo, since the tiles can get very hot and burn a person. Ceramics has a number of advantages:
- Strength and durability.
- Increased resistance to mechanical damage.
- A wide range of designs, ornaments and color palettes.
- Possibility of replacing one element without compromising the integrity of neighboring ones.
- Easy to care for and non-sensitive to aggressive household chemicals.
One of the disadvantages is the fragility of the tiles before installation: if a fragment is accidentally dropped on the floor, it will most likely crack.
Artificial and natural stone
Natural stone masonry in the washroom will create a unique natural pattern and emphasize the originality of the interior of the room. The main natural minerals used for interior decoration of rooms are marble, sandstone, granite and travertine. The surface polished to a glossy shine with small inclusions of quartz will become a magnificent decoration of the interior composition and will be in harmony with the metal.
Artificial stone is classified into acrylic, polyester, cast marble or onyx, quartz agglomerate. The imitation is inferior to the original in strength. Composite compositions may contain resins that become unstable when heated, so this material cannot be used to decorate a washing room combined with a steam room. Both artificial and natural stone have high thermal conductivity, so again they are prohibited for decorating surfaces in rooms that are systematically heated.
Heavy natural stone You can finish sections of the wall not exceeding 0.5 m in height. If you use material higher, the masonry may collapse.
Plastic panels
PVC panels have long been used for finishing bathrooms. A separate washing room is not much different from these rooms. Polyvinyl chloride is not at all afraid of moisture. There are no micropores in the material, like in wood, so water does not linger in them, which means there is no place for mold and fungi to multiply. Plastic panels are easy to clean with a simple soap solution. The material boasts an affordable price and a wide range of color variations. Stories about the dangers of everything synthetic are only partially true. While creating quality PVC substances harmful to the human body are not used. Unfortunately, polyvinyl chloride quickly wears out, acquiring a “non-marketable appearance”, is sensitive to mechanical stress, and the panel can crack from an impact. Installation and replacement of a damaged fragment is easy. Unscrupulous manufacturers may offer low-quality products, so you should not chase extreme savings, as it can cost much more if the material turns out to be toxic.
A bathhouse is a specific building characterized by high humidity and temperature conditions, as well as the specifics of its operation. These factors determine the choice of finishing materials for its premises. In the steam room, wood paneling is preferred and traditional. In the washing room, the choice of finishes is much wider and is limited mainly by conditions of high humidity.
Room wall material
At the moment, baths continue to be built mainly from wood; buildings made of brick and blocks are often found. The enclosing structures of the washing room, as a rule, are the external walls of the structure and the partitions between it and other rooms, in particular, always a steam room. This neighborhood has special requirements due to the presence of high temperatures when using a bath here and the danger of toxic substances being released when heated.
The material for internal structures is usually used similar to external walls, but other options can be used:
- The log house must be built simultaneously with the main structure in order to connect with the external walls, since subsequently this is practically impossible;
- Timber in one row or in the form of a double structure with an air gap;
Advice! When the partition is located parallel to the main load-bearing structures floor requires the installation of an additional beam under it.
- Gas- and penobton can be used in brick buildings or wooden, provided that the foundation for the partition was built in advance;
- Brick, preferably red, characterized by high fire resistance and good ability to retain heat;
- Glass is the most effective option, but requires ordering the manufacture of a structure from a heat-resistant type of material to specific dimensions.
Important! The finishing of the partition adjacent to the sink and the steam room is done only with heat-resistant materials! If there is a stove protruding into the room, it and adjacent sections of the walls are covered with tiles that meet special requirements (see “Tiling walls in a bathhouse - types of materials and instructions for carrying out work”).
Selection of finishing material for washing
The peculiarities of the processes taking place in the bathhouse and the specifics of its operation dictate a number of requirements for the design of the room:
- Resistant even to extremely significant temperature changes;
- Immunity to long breaks in active use;
- High resistance to constant exposure to moisture;
- Compliance with all modern sanitary and hygienic requirements.
Wood
Preferred use coniferous species, since due to the resin content they have high moisture resistance. The best cladding is considered to be clapboard made of aspen and larch, but these are quite expensive materials. Installation is carried out in horizontal, vertical or diagonal directions, as well as their combinations.
Most often, spruce or pine finishing is used and they are treated with water-repellent compounds to increase durability:
- Natural oils are a deep penetration impregnation, which is applied in 2-3 layers to a cleaned and sanded surface.
- Wax is the most effective and expensive remedy. After treatment, a water-repellent but breathable film is formed on the surface of the wood, which at the same time makes the shade of the material richer and the texture more expressive.
- The paint with a water-repellent effect and an exclusively natural base is applied in 2 layers. Requires updating annually.
Important! Varnishes should not be used to treat wood in a washing room, since when heated they release environment toxic substances!

Ceramic tile
The material is characterized by high moisture resistance, durability, ease of maintenance, a huge range of colors and shapes, and the ability to implement non-standard design solutions. Disadvantages - fragility, the need for certain skills for high-quality installation and airtightness.
Important! When tiling wooden walls, it is necessary to first perform waterproofing and fastening metal mesh and plastering the surface with cement mortar.
Natural or decorative stone
Due to the high cost, complexity of installation and the heaviness of products, natural wood is rarely used for full wall cladding - usually this extremely durable, moisture-resistant, beautiful and durable material is combined with ceramic tiles or wood. Decorative rock has properties similar to natural ones, but is lighter in weight and quite affordable in cost, and is easy to install, which can be done independently.

Plastic lining panel
The most budget-friendly and easiest-to-implement way to finish a sink. Moisture resistant and lightweight material mounted on the sheathing. Visually, plastic lining is practically indistinguishable from natural wood, and the panels are produced in a wide range of design solutions. Significant disadvantages of such cladding are the ease of causing mechanical damage, airtightness, non-environmental friendliness, and the ability in some cases to release toxins.
Advice! Installation of plastic panels requires careful waterproofing using foil film or PVC. In this case, it is necessary to provide an air gap of 1-2 cm between them to prevent the accumulation of condensate.
Painting washroom walls
Only water-repellent, natural-based paint can be used. The walls are preliminarily sheathed with sheets of plasterboard along the frame, but these preparatory measures reduce the area of the room. This is the simplest and most short-lived finishing method, the use of which is only possible if installed in a washing shower stall.
Important! Prohibited use of chipboard, fiberboard and treated wood, producing toxic fumes when heated!

Principles of work
The finishing is carried out using the technology of laying the selected material, but for the washing room there are several main points:
- Installation of high-quality insulation of external structures;
- Carrying out measures for thorough vapor barrier of walls;
- The wood must be treated with an antifungal compound.
Smart choice finishing material for washing and compliance with work technology is a guarantee of long and comfortable operation of the bathhouse.


