Baby crib: diagram, photo, dimensions. How to make a baby crib with your own hands.
The question of how to make a crib yourself usually arises among future parents waiting for a new addition to the family. Of course, you can buy a crib for a baby in a store, but in fact you can make it yourself from natural wood and it will be no worse than the purchased version. After all, for the future dad, a hand-made crib will also be a source of pride.
We drill holes in the mattress frame with a diameter slightly smaller than the diameter of the screw so that the screw is screwed tightly into the wood. We tighten the screws with a polyhedron wrench.
Then we fasten the side panels in the same way; we will need 8 screws, 4 screws per side panel.

A little effort and the crib for a newborn is ready, the crib does not need to be painted or varnished because when the child grows up a little and starts teething, he will inevitably try to gnaw the sides of the crib, so varnish and paint will not the best option for covering a baby crib.
If a person has a desire, basic skills, as well as a set simple tools, then a do-it-yourself children's bed is not a problem for him. Yes, you can buy ready-made furniture for your child. But there is an option to save money by making a sleeping place for your baby yourself.
In this article we will tell you how to make a crib for a child yourself. preschool age and show you the whole process step by step.
Making a baby crib with your own hands must comply with the following rules:
- Only natural and environmentally friendly materials;
- the crib has a reliable design;
- free from potentially traumatic corners, protrusions, and parts;
- the surface is perfectly smooth, without roughness or chips;
- corresponds to the child’s parameters;
- completely eliminates the possibility of falling.

Benefits of making a bed yourself
The advantages of a homemade children's bed are:
- Confidence in the materials used to make the crib. In the case of store-bought products, information about the parameters is not always available.
- The design is developed according to your own parameters and requirements.
- During the manufacturing process of the product, you can independently verify its strength, which is especially important in the case of children jumping on a mattress.
- A baby crib made by yourself significantly saves the family budget.
- You get incomparable pleasure from furniture made for your child yourself.

Bed design options: choose the right one
There are a large number of modifications of sleeping places, but we will focus on the most popular:
- with and without sides;
- loft bed;
- transformer.
Below we will look at the process of making a regular baby crib with legs with a headboard and footboard with our own hands. Option without tricks, doesn’t mean anything special complex work and it won't take much time.
Also, having understood the principle of operation, you can, by analogy, make a crib for a newborn, baby or child over 3 years old.
How to make a crib with your own hands
Before you start purchasing materials and tools for a children's bed made of plywood or other materials, you need to carefully consider the entire creation process of this element furniture, understand the basic elements.
- Frame. The parameters depend on the size of the bed and the mattress used accordingly. The main material for production is dry board.
- Lamels. The product supports the mattress and is a base in the form of lattice strips or plywood with ventilation holes.
- Sidewalls. Lattice or solid safety fences.
- Byltsa. Made from solid wood, chipboard or plywood. The height at the foot is traditionally lower than that of the headboard element.
- Legs. Can be made independently or purchased in a store. They can be integral with the main structure or attached separately.
Drawings and diagrams
Start work by preparing a drawing according to which the structure will be cut. Below we offer you options for ready-made drawings and diagrams that you can use.
To view the drawing in full size, right-click on the image and select the “open image in new tab” command.


Materials and tools
The outer parts of the bed, visible to the eye, are made of MDF. You can choose wood based on the finances at your disposal. If the bed will often be moved or carried, you should give preference to light wood species. A children's bed can also be made from plywood, which is installed on a frame. You will need edged and planed lumber in the form of boards and beams, whole or in sections.
The following tool is also required for the job:
- saw for woodworking;
- milling cutter;
- grinding machine;
- drill;
- corner;
- self-tapping screws;
- fasteners;
- screeds;
- screwdriver.

The first stage is making the legs
We start with the legs, making blanks from the timber. You can also contact a lumber shop and order them to be made according to your dimensions. You need 4 pieces of each length.
Remember! The legs of the bed are longer at the head of the bed and shorter at the foot of the bed.
We connect the blanks using glue and self-tapping screws.
The screws should be well sunk into the wood and covered with putty. After the product has dried, all irregularities and joints are sanded.

We begin work by making the legs. To do this, take the blanks in pairs, glue them evenly and twist them with self-tapping screws.

These are ready-made crib legs. All that remains is to putty it.
Second stage - holes for dowels
To install the backrests, a groove should be made. Its width is 2.5 cm. Use a router or, if you don’t have one, contact a carpenter. It’s easier to take ready-made dowels by choosing a drill of the appropriate diameter.
Having previously measured the exact distance and level on the planks, drill holes for dowels at the ends of the planks. Monitor the immersion depth of the drill using a beacon attached to it.

The third stage - the head and foot of the crib
From a 2.5 * 5 cm board, you need to cut boards of equal length to fill the headboard and footboard with them. Next, insert them into the groove filled with glue.
We drill a hole in the leg, then mark the middle, attach and align the back. Then we mark the areas where the holes for the dowels will be drilled. We put a little adhesive material in them and insert the back. The canvas should fit tightly, avoid gaps.

We attach the legs to the back of the crib.
The same process is duplicated on the other leg. If an unaesthetic joint is formed, it is masked with a board, secured with self-tapping screws.

Finished footboard and headboard of the crib
The fourth stage is the basis for the mattress
We take two boards 5*10 cm along the length of the mattress, use self-tapping screws and glue to attach a plank that is 10 cm shorter. We drill holes closer to the edge. The hats should ultimately be completely hidden.

Installation of crib slats
We cut the slats and attach them to the slats with a stop in 10 cm increments along the width of the mattress with two self-tapping screws. The holes for fasteners are covered with putty and subsequently sanded.

Fastening the cross bars
In the outer slats you need to make cutouts for the legs of the crib.

Fifth stage - assembling the crib
Now we finally eliminate all defects in the wooden parts of the crib (chips, cracks, etc.) by sealing with putty, then sanding until smooth.
The next step is priming and painting all the parts.
All. All we have to do is connect the backrests and the base for the mattress. Our crib, which we made for the baby ourselves, is ready!
For fastening, use furniture fittings that are sold in stores.


Ideas for decorating a baby crib
After finishing the main work, it's time to start decorating to give the bed a finished look.
In terms of decorative implementation, the sides provide a wide field for action. The decoration can be an original ornament or pattern, a print depicting your favorite characters. Using harmless acrylic or silicone paint in in this case will allow you to add unusual touches.

You can upholster the product with furniture fabric, having previously made the pattern a couple of centimeters larger than the dimensions of the parts. The material is leveled to avoid bubbles and secured with a furniture stapler. This option will look harmonious on a do-it-yourself crib for a girl.
You can paint the crib with a special furniture paint that is safe for humans.

Coating the frame with varnish can also be classified as a finishing method. To do this, it is recommended to use products that dry quickly. All parts are sanded and polished.
So, we have looked at the process of making a baby crib with our own hands. If anything remains unclear or you have any questions, ask in the comments below. We will definitely answer them.
The modern market offers a sufficient selection of children's furniture, including cribs.
A child will be able to sleep in his crib for a maximum of four years, then he will have to change it to a more adult-sized version. And the price of furniture is not cheap at all, so there is an option to make a comfortable crib with your own hands. It's not as difficult as it seems at first glance!

It is not at all necessary to be a professional in this field and spend a lot of time on assembly.

The first thing you need to do is purchase exclusively high-quality environmentally friendly materials and take this issue seriously, considering the entire upcoming process.
The photo of a do-it-yourself crib shows how to make one for a five-year-old child, but all of the specified parameters can be increased to a larger size.

The benefits of a self-made bed
When you go to a furniture store, you can find a lot of options for children's beds from various materials(plastic, fiberboard, chipboard, wood). The best material, of course, wood, which provides safety, durability and is the most durable option.

A finished wooden crib is quite expensive. Not every family can afford such costs, especially since it will only last a few years.

The cost of a hand-made design will be several times less and has the following positive aspects:

- reliability in use of the design. Children often love to play and jump on the bed, and you won’t have to worry that it will break under the load;
- can be made strictly individual bed. Which will suit the style and interior of the children's room and has individual sizes;
- The creation process will help you spend time with interest with your child, who will probably not refuse to help his parents.
Purchasing the necessary material and preparing tools
To begin with, you should carefully prepare the room in which the planned process will take place. If it will take place directly in the room, it is wise to cover the floor and furniture with film, since a lot of dust and sawdust will appear during the work.

Then you need to competently prepare an exact drawing of a crib for a newborn with your own hands, or find a suitable sketch on the Internet.

You will need a number of materials:
- self-tapping screws of different diameters;
- wooden panels for furniture;
- special wheels with which the drawers will be pulled out;
- a sheet of plywood or a metal grid for the base of the bed;
- sandpaper for processing cuts.
The set of tools is absolutely minimal: electric jigsaw, grinder and regular drill.

It is important to first, before drawing up the drawing, measure the mattress that will be placed in the crib, since later it will be more difficult to choose the right size!

Step-by-step making of a baby crib with your own hands
Having decided on the size and design of the children's bed, you can begin the actual work:

- All necessary markings are carefully applied with a pencil, not forgetting about the edges.
- Then, using a jigsaw, you need to carefully cut out all the parts.
- Needs to be cut metal corners the right size, immediately drilling holes in them (maximum five), into which self-tapping screws will be mounted in the future.
- To make the base of the mattress, you need to screw the corners to the bottom of the sides.
- Having conveniently placed the crib on its side, you need to assemble all the necessary parts.
- Use sandpaper to smooth out possible irregularities and sharp corners.
- There are spacious drawers at the bottom of the furniture.
- It is wise to coat the crib with varnish or a similar coating, which will give it an aesthetic appearance.
- The final stage: place the mattress on the bottom of the bed and spread the bed linen.
Accessories for baby's bed
A crib for a small family member must be equipped with sides that will serve as protection for the baby. It’s very easy and fun to sew the sides of a crib with your own hands.

Their most popular type is the option that protects all four sides and is secured with regular ties.

Note!

When choosing fabric for children's bumpers, you should opt for lightweight materials with not too “pretentious” patterns, since the baby will have to study the patterns around him for quite a long time.
A cape over the crib protects the child from insects and possible drafts. It is also possible to make an original canopy for the crib with your own hands by choosing the right fabric.

It is better to buy two different cuts (quite wide for allowance) of natural material: weightless, light, summer fabric and a denser one for winter. First, you need to purchase a frame that attaches to the bed. Then draw a pattern according to size, cut out the parts and sew them in the right places.

With imagination and minimal skills, you can make an original, unique crib that will serve and delight both you and your baby for several years!

DIY crib photo


Note!


Note!


Any children's bed, created with your own hands for a baby, is not only convenient and inexpensive, but also a great memory. Although modern manufacturers They offer many models of ready-made cribs; many parents want to create a sleeping place for their child on their own. Those who do not have practical skills in this matter will need expert advice.
Factory models have standard sizes, which mainly determine the dimensions of the sleeping place. The height of the backs and sides should be sufficient to prevent the child from falling and comfortable for the mother leaning towards the baby.
In order to decide how to make a children's bed optimally suitable for both the child and the mother, standard sizes must be adhered to:
- The width of the backs is 60-70 cm.
- Back height – 90-100 cm.
- The length of the side rails is 125-130 cm.
- The height of the rear side is 65 cm.
- The height of the front side is 50 cm.
Knowing the dimensions, prepare necessary materials it won't be difficult.
Selection of materials
In order for the bed you make to be safe for your baby, you must use environmentally friendly clean materials, not harmful to health.
The best option would definitely be natural wood(array):
- Linden;
- birch.
MDF can also be used on a budget and safe for the child. The visible parts of the future crib are mainly made from this material.

To make the structure you will need:
- bars at least 5 cm wide and 3 cm thick;
- slats 1.5 cm thick, width 2.5-5 cm.
For ease of movement, the crib can be additionally equipped with wheels..
Necessary tool
The best option for making crib parts would be to have carpentry or lathe. If such equipment is not available, you will have to use hand tools:
- Chisel, hammer and construction knife for removing wood from holes for installing vertical elements in horizontal guides.
- File and sandpaper for grinding parts.
- Construction meter and pencil for marking.
- A hacksaw with a miter box for cutting workpieces. A miter box will be needed to ensure that the cuts are even. If you use a triangle with a right angle when cutting material, you can do without unnecessary equipment.

It’s easier to assemble a crib with your own hands, the drawings of which do not include chamfers and other elements created professional tool. How simpler scheme, the less you have to think about how to make and what the completed element will look like.
You will also need:
- wood glue;
- wood screws;
- putty;
- steel corners;
- stain or paint;

Assembling the base for the mattress
The minimum size of children's mattresses is 120 by 60 cm. Based on this, the base is made with a small allowance; it is assembled, like the rest of the bed elements, from 2 bars, between which transverse slats will be located. To secure the base, in the middle longitudinal elements grooves are made into which the slats will be inserted.
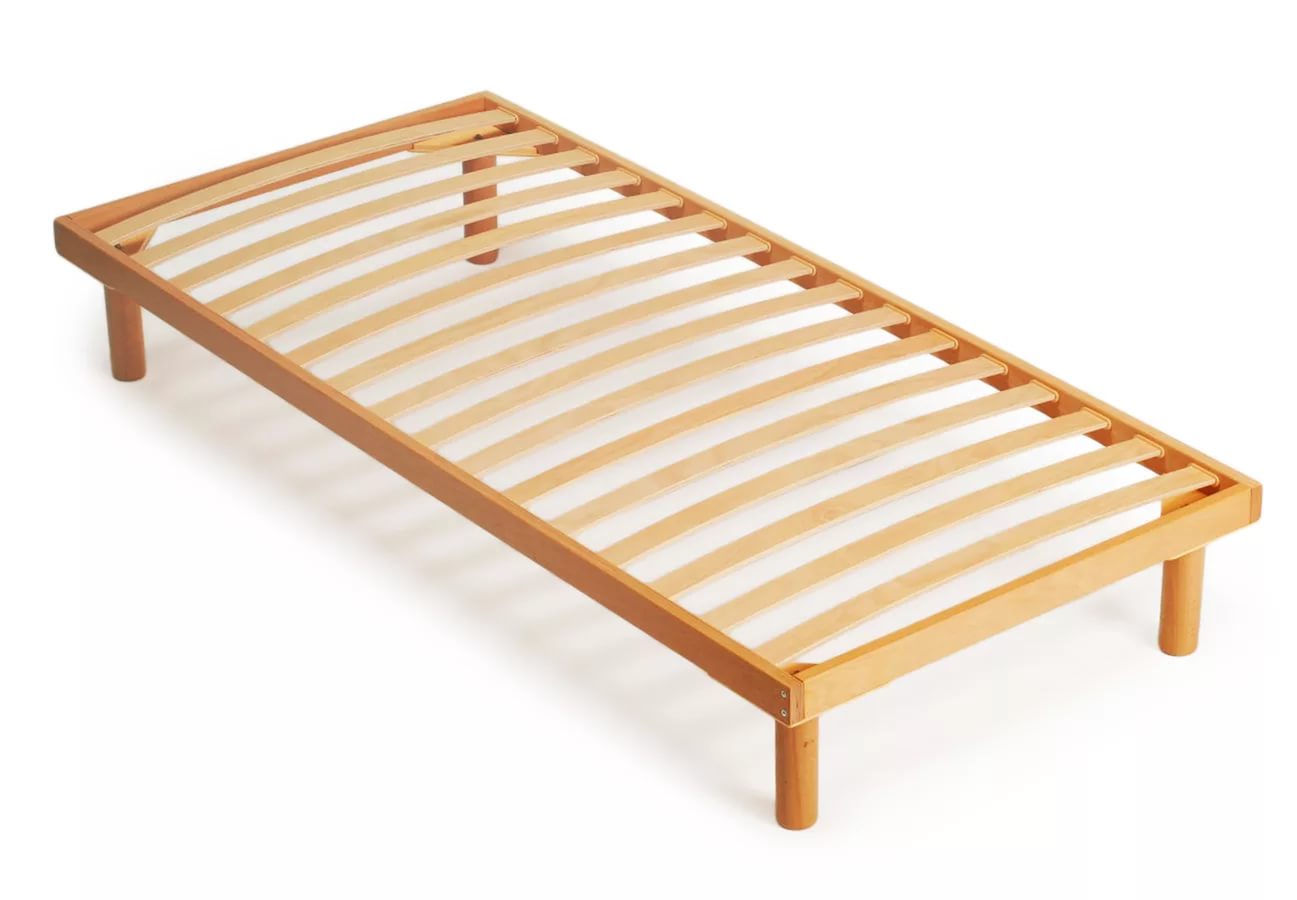
This is the only part of the crib where continuous recesses can be used. To secure the slats, wood glue must be used. Short self-tapping screws can be used as additional fasteners. Their length should be less than the width of the bar. The length of the longitudinal elements of the mattress base depends on the chosen pattern. In some cribs, their length corresponds to the sides; they are secured to the vertical elements of the back with long screws or bolts. In others, where the base is placed on the transverse elements of the backs, allowances of 1.5-2 cm are made on each side.
Assembling the backs
Both backs are done the same way. Between the two bars, assembled gratings are placed, consisting of two transverse and several vertical elements. Holes are cut in the transverse upper and lower thick slats according to the size of the slats. The ends of the slats coated with glue are inserted into the grooves. The lower and upper elements of the resulting lattice are fixed between the bars. To add rigidity to the structure, another wide element is attached 5-10 cm below the grille.

The sides are assembled in the same way as the backrest lattice. They are also attached to bars that serve as the legs of the child’s bed. If you plan to put the crib on wheels, then before attaching the sides, you need to drill holes at the bottom of the bars. The pins of the rotating wheels will be inserted into them. Another design of furniture wheels is fastened with two screws, but they are static and only drive straight.
Painting a wooden product
When the crib assembly is completed, all that remains is to give it a finished look. To do this, you need to decide how to paint the crib and how to decorate it. For coloring, it is best to use stain, as it is relatively safe for the child’s body after drying. It happens different colors, but one of its qualities is unchanged - it does not hide, but emphasizes the texture and protects the wood from rotting. Despite the fact that the stain is absorbed well, the surfaces of the product will have to be coated with it in several stages to get the maximum effect.

Depending on the type of stain you use, it may have a specific odor that is difficult to get rid of. Therefore, it is better to carry out work on outdoors. After treatment, the crib should be varnished, which will protect the wood from moisture.. Instead of stain, you can use acrylic and acrylate paints.
On video: how to cover wood.
It will also give the bed a beautiful appearance varied decor. You can use almost anything as it, for example, ribbons, textiles, etc. Don't limit your imagination to create sleeping place The child has a complete, logical and individual appearance.
Advice. For coloring, it is best to use stain, as it is relatively safe for the child’s body after drying.
Original cribs made of wood

Having the skills to work on woodworking machines, the simplest bed for a child can be turned into a masterpiece. Photo of a self-made children's bed using milling machine CNC, shows that a crib made according to a standard design can become an interior decoration. By choosing multi-layer thread for the wide elements of the crib, thanks to computer program, it is easy to repeat. It will take from 30 minutes to several hours to make the elements, depending on the complexity of the design. When compared with the time that our great-grandfathers spent masterfully wielding hand tools, this is mere nonsense.

For home craftsmen who only have an electric jigsaw at hand, you can try their hand at cutting ornaments. A heart, a clover trefoil, a bell are the simplest shapes, but they will become a wonderful decoration for the crib..
Typewriter
For older children, you can make a bed with a more intricate shape. For example, today a model in the form of a typewriter is very popular.

Using a woodworking machine you can make the contours of a future bed. Such a car will be made from several separate parts:
- The outer end part is the bumper, headlights, and radiator grille.
- Side elements – wheels and side rails that imitate car doors.
- A simple board headboard will be decorated with a wooden spoiler.
Such a frame can be built by fathers and grandfathers who understand the intricacies not only of woodworking tools, but also of cars. To make this crib comfortable so that the mattress does not slip, a mattress base installed below the sides of the machine will help.
Drawings of children's beds show that the ideal base for any external design is a wooden lattice mounted on legs.

I can't help but rejoice at how quickly our children are growing up. So my daredevil has grown to four years old and no longer fits into his crib, which is one meter and twenty centimeters long. What kind of “pull-ups” are there now?!
This is what should happen.
As everyone well knows, a comfortable crib for a baby is the key to his harmonious development. Children spend much more time sleeping than adults. And if also living space small, the crib can serve as an excellent help instead of a playpen. No wonder they top the list of must-have purchases for a child.
My wife and I looked around several furniture centers in search of a new crib. However, we came to the conclusion that we would make it ourselves, since not a single model met our requirements:
- Exceptional solid wood, without MDF and chipboard, in extreme cases, use plywood. Personally, I even have some kind of genetic distrust of super-ecological imported chipboards;
- Mandatory presence on the crib to prevent the child from falling (well, at least small ones);
- The dimensions of the baby bed must be no less than 160x70 cm and no more than 190x80 cm (the dimensions are determined by us taking into account the space allocated for the crib and common sense);
- The bottom of the crib should be equipped with spacious drawers (since one-room apartment have to fight for rational use every square centimeter);
- If available, the price of a bed should not exceed twenty thousand rubles (a personal amount allocated for these purposes from the family budget).
For a long time we looked closely at all kinds of folding sofas, cribs, and discussed options with a sofa. But they couldn’t decide on a purchase: either the presence of chipboard, or the lack of sides, non-removable mattresses, tiny drawers, or “exorbitant” prices.
I eventually went to hardware store and purchased the following tools and materials from the list:
- furniture panels;
- aluminum corners;
- different-sized screws;
- wheels for drawers;
- drills and other household items.
This purchase cost me 8,500 rubles. For another 7,500, I also purchased a lattice base from an online store for 1,600 rubles (although I could have gotten by with a sheet of plywood). Total expenses amounted to: 17,600 rubles.

Here they are, my initial materials. The size of the mattress and lattice base is 180x80 cm. There will be a royal bed for my tomboy!

I'm making markings.

I use a jigsaw to cut the designated areas, although maintaining a perfect straight cutting line is not as easy as it might seem at first glance. I sealed the cut areas with paper tape so that the fibers would not lift up as much (I read about this on specialized websites).

To my great surprise, the tape tends to run out quickly. Therefore, we had to work further without it, the main thing in this matter is not to saw the stool!

For drawing complex shapes I actively used improvised means. I came up with a recess in the front side so that my son could climb into the crib himself. And it wouldn’t hurt for me to take a break on it!

This is what happened, although before cutting it was a monolithic shield measuring 200x60x2.8 cm.


I made the holes and didn’t forget the rivet (it will be hidden under the head of the screw).

This inner side the front part of the sidewall, and the base of the mattress will be located on this corner. To begin with, I installed it on 4 self-tapping screws, but after thinking about it, I added four more for greater reliability. Fortunately, I bought self-tapping screws with a reserve!

He carefully laid the structure on its side, fearing that it might accidentally crumble at any moment. I carefully drill holes and fasten the panels together. Your own eye and a perfectly made mattress lattice are responsible for the straightness of the corners!

I fasten it with furniture ties, for which I prudently purchased a special drill, which saves a lot of time.

The first hole for the screed.

The first screed itself.

This is the result after all the twisting and fastening work is completed - an excellent, solid bed base!

I installed the bed in a specially designated place and laid out the mattress. I placed a panel at the bottom of the crib so it wouldn’t get in the way, and left everything as is for a while, since I can only afford to do construction and household chores on weekends. Our son had to sleep in an unfinished crib for a whole week, and during this time some flaws in the design became clear.
It turned out that sleeping without a headboard is not entirely comfortable, or rather very uncomfortable:
- in a dream, the child tosses and turns and, raising his head above the pillow, can accidentally catch the side, since its height is only 10 cm;
- a child can easily throw a pillow over the low side;
- the absence of a headboard means a lack of comfort; as soon as I lay down, I was immediately convinced of this.

It’s not pleasant when you contemplate bumps or bruises on your child’s head. I went to the store and bought two more small furniture panels for assembling the headboard. I sawed them as follows: for the back - one large leaf and two smaller ones for the sides (the smallest one in the photo is just a trim).

This is me in a creative search to decide on the design and shape of the future headboard.

For symmetry, I cut out another part according to the shape of the back of the headboard.

According to Wikipedia information, emery (grinding) abrasive material is intended for processing surfaces of various compositions (wood, glass, metal, plastic). Oh, I had a lot of trouble with this abrasive material!

I cut out a window in one of the sidewalls, which will serve more of a technical function than a decorative one. So I'm going to make an attachment to the side of the crib.

I make cuts in the bathroom. My wife (I give her a lot of credit for being patient) had to put up with a thick layer of fragrant spruce dust on all the toiletries.

To draw curves and bends, I again used all sorts of available tools.

It is very important to follow exactly the intended cutting line and not deviate even a millimeter from the course.

I twist, fasten, tighten, adjust

Since it is not possible to use a drill from inside the window, I had to drill a hole from the bottom up. Place for a hat furniture screed done by hand (lucky that spruce is a fairly pliable wood).

While creating graphic ovals, I felt a tremendous sense of satisfaction from my own artistic achievements, but after cutting, my masterpiece ceased to be an elegant, presentable design. But the ovals served their functional purpose very well, and the child enjoys looking at them before bed. He even uses them in his new fun: he covers himself with a blanket along with the headboard and, with the feeling of creating a personal reservation, waves to us through the side windows.

At this stage, construction work had to be postponed again until the following weekend.

The long-awaited weekend has arrived, and we are starting to make legs for the crib and assemble drawers. To do this, I needed a scrap about 20 cm wide from the end panel.

My imagination told me to make legs like this.

It is necessary to file the corners to the legs.

This is exactly how I originally envisioned attaching the legs to the crib base.

IN amazing world Our consciousness sometimes leads us into riddles and secrets (and it actually frolicked over me)! I still can’t find intelligible answers to the question: “Why did I decide to attach the legs of the bed in such a bizarre way?” This whole process could have ended with the elementary use of long self-tapping screws. But, apparently, at that moment I did not want to take a shortcut to achieving my goal.

Now it’s time to use the part of the front side that was simply temporarily attached to the bed. From 12mm plywood I cut the bottoms and sides for two drawers. For clarity, I somehow put this whole structure together.

Our bathroom has undergone a makeover again, this time in decorative coating aluminum dust (wood dust was heroically eliminated by my other half within a week).

I twist and fasten.

I install wheels with a diameter of 4.5 cm.

The fitting process without facades. We make sure that rotation occurs without any difficulty, even in the presence of a heavy load.

We complete the work by hanging the facades.

Sweet dreams, my baby!
P.S. The entire process of assembling and installing a crib will take you only a few days (in my case, three Saturdays). Advice for those who decide to follow my example:
- if possible, carry out construction and installation work outside the house (at the dacha, in the garage), since it is very difficult to get rid of traces of three-layer dust (wood, aluminum and emery);
- think and plan carefully first, then do (unlike my sequence);
- Order cutting of plywood and panels directly in the store, having previously indicated the exact sizes and shapes.


