Cooktops save space in the kitchen, and they work just like bulky stoves. In addition, installation hob It’s not at all difficult, it happens quickly enough, and any adult can handle it if he has the right tools.
For those who have started a kitchen renovation, there is an opportunity to replace the stove with a surface. You can also do a combination of surface and separate oven, and thus you will lose absolutely nothing.
Sawing a hole
If you have already renovated a house or been involved in some kind of construction work, then the process of installing a hob into a countertop should not be difficult for you. So, let's begin.
- To install a surface into a countertop with your own hands, you first need to know its dimensions. All required dimensions are indicated in the diagram in the instructions, there is no need to invent anything. This speeds up work and significantly reduces the likelihood of errors in measurements. You can take measurements yourself by turning the panel over and using a tape measure to determine its width and length along the inner edges.
- Please note that the instructions indicate the minimum distances from the edges of the tabletop. You can only change them upward, since an edge that is too narrow may break off over time.
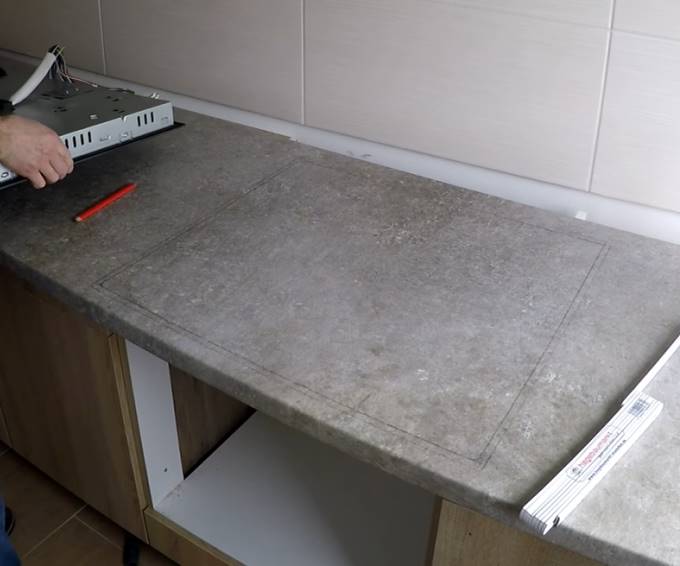
- Make markings on the countertop according to the dimensions of the hob. It will be built into this place. To ensure that the lines do not rub off and are more visible on a dark surface, glue strips of paper tape and transfer the lines to it.
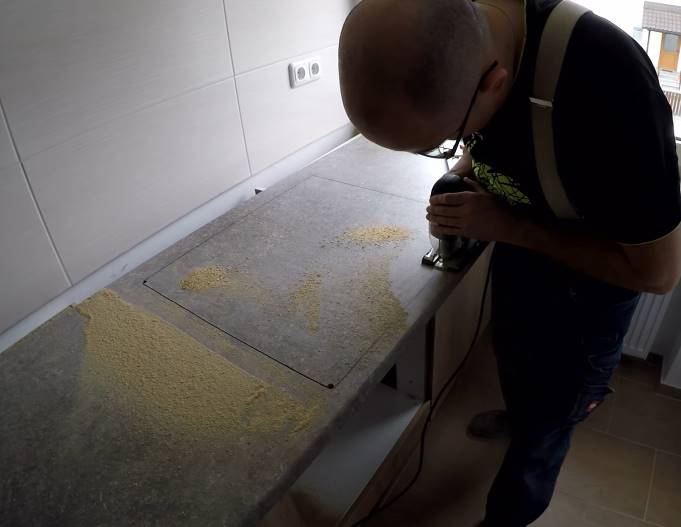
- Next, drill a hole where the cutout will begin. The cut is made using electric jigsaw. To ensure an even cut without crumbling, it is recommended to use a file with fine teeth, not dull. It's even better to use manual frezer, round the corners with a radius cutter, and grind the cuts.
- The resulting sawdust can be collected using a vacuum cleaner.
When the hole is ready, try on the hob to make sure everything is done correctly.
Sealing and sealing
Treat the cuts with silicone sealant or nitro varnish. This will protect the tabletop from dirt, getting wet, swelling and premature damage. You can also use a self-adhesive sealant, which performs the same function. It is glued on top so that the edges of the panel rest on it.
You can also use aluminum tape to seal the edges, which, among other things, will protect the tabletop from temperature changes. Having a quality seal will ensure that your countertop will last a long time and will not require repair or replacement.
Electrical Panel Connection
Modern electrical panels are very convenient; if they are well assembled, they rarely fail, which means they will not need repairs for a long time. If repairs are still required, the panel can be easily disconnected and taken to the workshop on your own, thereby saving on calling a technician.


Before installing an electrical surface, you must place it on the countertop, turn it over and connect it according to the diagram. The diagram is shown directly on the panel on the reverse side for your convenience. When doing this procedure on your own, be careful. If the wires are connected incorrectly, you will not be able to control the activation of the burners and the heating temperature.
If a separate wire from the panel is provided to connect the electric hob, then a plug and socket are not needed. Simply connect the wire to the panel.
Turn the panel over and install it in the hole. It is already ready to work, all that remains is to check whether it turns on and heats up correctly.
Gas panel connection
When installing a gas hob, first look at how it is attached. Install the panel, align it with the edge of the table and secure it. Typically, brackets are included with the panel for mounting from below. The electrical cord must be plugged into an outlet.
To connect the gas yourself, you need to know the safety rules. Turn off the gas and connect the hob to the pipe using a flexible hose. Be sure to put paronite gaskets in the nuts. Open the gas, turn on the burners and check the hose connections for leaks. To do this, they need to be soaped. If the foam does not bubble, then there is no leak, you did everything right. You can also use a gas analyzer to check.
I still chose the induction hob. Because I don’t have gas in the house, and I didn’t want a regular electric one. The panel is from the manufacturer HANSA, there will definitely be an article about it, but that’s not what we’re talking about today. Today I need to install this cooktop into the countertop! Moreover, I’ve never done this before, I’ve only seen how masters do it. But I didn’t really want to pay 2000 - 2500 rubles for installing a surface, so I decided to install it myself. In principle, I succeeded, and I think you can too...
The article will have pictures, so read and watch everything step by step.
Guys, for starters - . Be sure to read the article so that you don’t have to redo the wiring several times!
1) Tool. To install (insert) the hob, we need a jigsaw, drill, tape measure, marking pencils and a flat board, about 1 meter (I had some left over from furniture) or a large ruler.
2) We determine the place where we will embed the panel; I have this place above the void for the oven. Of course, the panel can also be embedded above cabinets with dishes and kitchen utensils, but in my opinion this is not very correct.


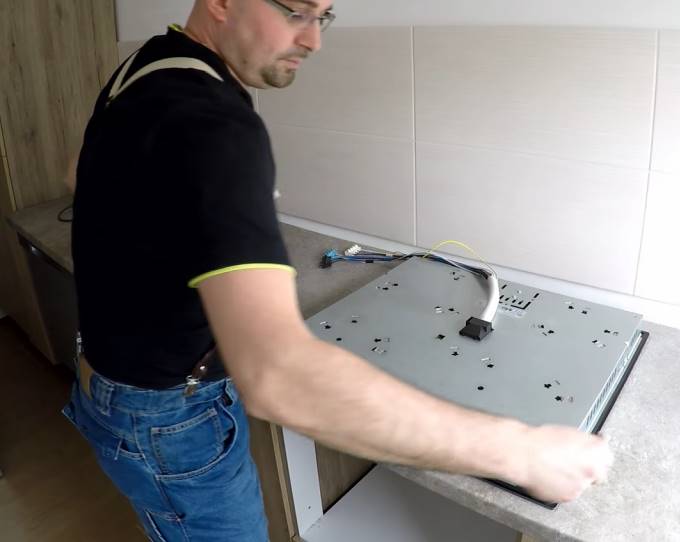
3) Try on the panel by eye. The main thing is that there is enough space around the edges.

4) Now the hardest part is marking the dimensions on the countertop. To begin with, I determined the center, simply measured the distance (where the installation will be made) and marked the center.


5) Now we take the book, it contains all the necessary dimensions, we need to try to comply with them. First, I determine the horizontal gaps. That is, what size should be set aside from the wall and what size should be left to the edge of the countertop. Moreover, these sizes are already indicated by the manufacturer, here they are in the picture - X and X1. X – 50 mm (to the wall), X1 – 60 mm (to the edge). Set aside these dimensions. I have a corner attached, it is 30 mm, so I set aside another 20 mm from it and then 50 mm. At the end there is exactly 60 mm left, you don’t even need to measure there.


6) Now what is important to us is Dimension “A” - this is the width of the slab, for us it is 560 mm, that is, 280 mm from the center (which we set aside). From the center at a distance of 280 mm we draw two parallel lines. And in the end we get all the sizes. Look here.


7) Now take a drill, insert a drill 8 - 10 mm (so that the jigsaw file fits) and drill. We need to drill three to four holes (three is possible, then we don’t drill the last corner in which we will cut to it). Here are my three holes.


8) Next, take a jigsaw and start cutting the tabletop, everything is strictly to size. It is necessary to note the dimensions that are in the instructions already with gaps. You'll have to sweat, the tabletop is difficult to saw, but after 20 - 25 minutes everything was ready.


9) Afterwards we simply take out the cut out slab and put it away.


10) Remove the sawdust and try to insert the panel into place, everything should be fine! They did it according to the manufacturer's measurements. The stove moves a little, that is, you can move it slightly to the right - left, and also up - down.


An integral attribute of the kitchen is gas stove, behind which in ideal A husband is standing and preparing breakfast for his wife. Non-classical gas or electric stoves, and cooking surfaces. Their convenience lies in their compactness and ability separate installation oven. But installing them on a countertop will make an inexperienced craftsman sweat. Is it possible to install such a module yourself and what will be needed for this? This will be discussed in the article.
Types of hobs
All hobs can be divided into two large groups. These groups are united by a power source; its role can be:
- electricity;

By appearance hobs that connect to the gas mains are practically no different from conventional stoves. An option for such modules may be an automatic start system, which can be autonomous or dependent on electricity. In the first case, it is represented by a piezoelectric element, which supplies a spark at the right moment. Burners on gas surfaces may vary in size for greater ease of use.

Electric hobs can be of two types:
- classical;
- induction

In a classic hob, the role of a burner is performed by a heating element or other a heating element. This module costs less and is not particularly economical. Induction hobs are the dream of any modern housewife. The essence of the product’s functioning is to heat the product due to the electromagnetic field. However, if you put your hand on a working burner, you won’t feel anything. For normal functioning The product requires a metal pan with a thick bottom. In this case, the material from which the dishes are made must be magnetic. The installation process for each of these surfaces is very similar. The difference lies only in the need to connect a gas hose for the first version of the stove.
Installation tool

The entire installation process does not take much time and requires a tool that you may already have in your arsenal home handyman. Among the main tools are:
- screwdriver or drill;
- electric jigsaw;
- roulette;
- marker or pencil;
- silicone sealant.
Additionally, you may need a level or a long metal ruler to make it easier to draw straight lines.
Preparatory stage

If we're talking about about the hob, which is powered from the electrical network, then preparatory stage will consist of power supply. The average power consumption of such modules is within 3.2 kW. This means that a regular but good outlet will suffice for connection. If the socket was not installed in advance, then you can purchase a surface-mounted version, since it will be easier to install and will not be needed additional tool in the form of a hammer drill or drill with a crown. The cable for such an outlet must come directly from the distribution panel.

This step is being taken in order to provide such a powerful device with a separate circuit breaker, who would control its work. The rated current for which the machine must be designed is 16 amperes. The best solution There will be installation of a differential machine that is capable of detecting the slightest leaks. The socket is mounted slightly below the tabletop. This is done not for greater ease of connection, but to ensure that moisture and fats do not get on it during cooking. The outlet must be grounded in case of a short circuit.
Note! It is worth noting that a standard outlet can withstand a load of 3.5 kW and a current of 16 amperes.
Step-by-step instruction
An important step when installing a hob into a countertop is marking. Typically, the manufacturer, in the technical documentation that comes with the hob, indicates what the dimensions of the installation hole should be. One option would be to make a sample from cardboard, which can be used to draw the outline of the future hole. There is another option for marking, it can be seen in the photo below.

You need to place the hob on the countertop, but turn it upside down. She will be the model. It must be located in the place where direct installation will be carried out. The photo clearly shows that it is important to make a small gap from the edge of the countertop to the hob. Usually it is about 5 cm. It is done so that the edge of the cooking surface is not damaged by constant interaction with it.
The next step, as shown in the photo, is to apply markings. To do this, the hob is simply outlined in a circle with a pencil. The lines must be accurate so that they do not have to be redrawn several times, as this will only confuse you later.

The photo shows that the hob has a small protrusion, thanks to which it is fixed in the hole. This protrusion has a certain size that must be taken into account. It is also important to mark it on the outline of the future hole, as shown in the photo below.
In this case, it is necessary to make a small gap. If the protrusion has a length of 15 mm, then the size of the hob should only deviate 10 mm from the main line. A five-millimeter gap is required for smooth installation of the hob into the prepared hole.

After marking for the hob, you need to prepare holes to make it easier to cut necessary part. Holes are drilled with a drill or screwdriver in the four corners. In this case, it is necessary to ensure that the drill does not cause damage to the facade or other elements kitchen set. The diameter of the drill should be such that the nail file fits freely into the hole.

To continue the hob installation process, you will need a jigsaw. His file is inserted into the prepared hole and the cut is made. It is important to remember that you need to cut along the inner, not the outer line. If a mistake is made, then the surface will simply fall into the hole without fixation.
During the work process, it is necessary to promptly remove sawdust so that it does not block the cutting line, as it can easily come off and damage the tabletop. When cutting, you must ensure that the file does not damage the walls of the cabinets or their surface. Before going through the last side, it is necessary to provide the tabletop with sufficient support so that the nail file does not bite, and also so that part of the tabletop does not fall on your foot.

Once the hole is ready, you can try on the hob to make sure it fits as needed.

The process doesn't end there. The tabletop is most often made from particle board. If moisture gets on it, it swells and becomes deformed. When cooking on a hob, this scenario is inevitable, so it is important to protect the area that has lost the laminated layer. To do this, a special sealant is applied to it, which is used when installing the panels. It simultaneously acts as a fixing basis for the entire structure. The layer should be sufficient to cover all areas accessible to moisture.

An adhesive sealant is applied to the back side of the hob edge, which will additionally secure the product to the countertop. After this, the panel is inserted into place and gently pressed until contact with the surface of the countertop is felt. The sealant that has come out must be removed immediately, because after drying it will be more difficult to do. It is important to check that the connection is the same over the entire surface. If this is not done, the pressure from a heavy pan may cause the glass to burst.
Advice! If the hob is glass, then it is important to be careful when applying pressure so that it does not break.
The fixation doesn't end there. The surface comes complete with special metal plates, as seen in the photo above. They must be screwed in such a way that they provide support and prevent the panel from lifting off the tabletop. A video about installing the hob can be seen below.
Network connection
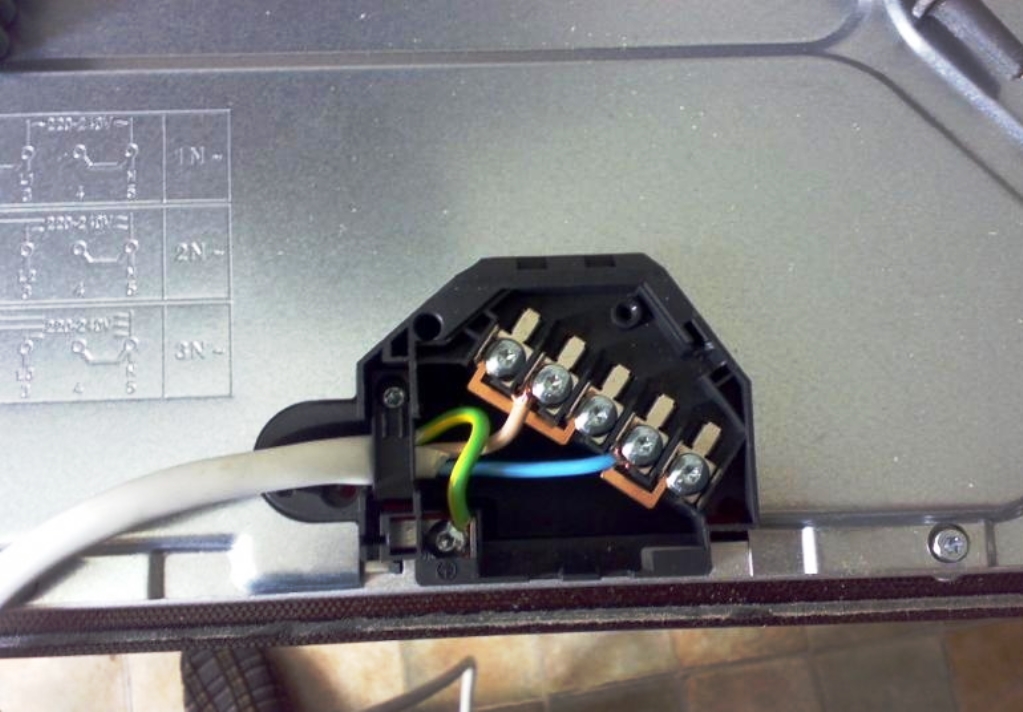
After completing the installation process, you can proceed to connecting the electrical part. Most often, hobs are supplied in a single-phase version, but they can also be three-phase, which will be useful if three phases come into a house or apartment. Usually the hob has a built-in power cable. But if you don't have it, you will need to buy it separately. To connect, you will need a wire marked PVA 3x4. Each core of this cable is designed for a rated constant load of 8 kW.

This is necessary for a small margin, which will prevent overheating of the conductor. The wires are stripped on both sides. A plug is mounted on one, which must correspond in current strength to that specified for the hob. If this is not observed, then it may simply melt. The wire is not monolithic, so you will need to crimp the wires with lugs. Markings are usually applied near the terminal block where the connection to the hob will be made.

The Latin letter L denotes the cable through which the phase arrives, the letter N denotes zero, and there may be a third letter E, which denotes the location of the ground wire connection. Most often, instead of the third letter, a drawing is applied that indicates grounding. It is important to secure each core that is crimped with a ferrule firmly with a bolt. The service life will depend on the quality of the contact. If an oven is to be installed under the hob, then a separate outlet must be provided for it. The total power consumption of the surface and cabinet is twice as high as permissible for a single-phase outlet.
Summary
As you can see, installation of the surface can be done independently without significant skills. During work, all precautions and safety precautions must be observed. When drilling and working with an electric jigsaw, you must wear safety glasses on your eyes to protect you from flying sawdust. When installing the socket and connecting the electrical part, it is necessary to use tools that have dielectric handles that protect against breakdown electric shock. Before starting work, it is necessary to de-energize the machine, which is attached to the prepared wire in the kitchen.
Installing a hob is convenient and practical option for your kitchen. Thus, you can significantly save space, which is very important for standard small kitchens domestic Khrushchev buildings. Plus, hobs work on the same principle as solid stoves - so why not replace them with a better one? convenient option. It is important to note that installing a hob into a countertop is a completely simple process and anyone with a certain set of tools can handle it.
In order to understand the installation process and correctly implement it, it is worth taking a closer look at each stage of the repair work.
Creating a hole
Those who have ever dealt with similar work should know that there is nothing difficult about installing a hob into a countertop. The video about this work, which is at the end of the article, is real confirmation of this. In order to highlight all the nuances of installation, it is worth considering the process in detail.
- The first thing you should know before installing a countertop is its dimensions, which will allow you to avoid possible errors in measurements. In order to make them yourself, you need to turn it over and determine the width and length using a tape measure;
- We make markings on the tabletop. It must correspond to the parameters of the hob;
- Using an electric jigsaw, we drill a hole from which we will begin cutting. To prevent the cut from crumbling, it is better to use a jigsaw with fine teeth.
Sealing process
The sections that were formed after cutting should be treated with sealant. This is necessary so that the tabletop does not swell, and also to prevent dirt from getting into it.
Important! You can always use aluminum tape to seal the edge. In addition to its basic protective qualities, it can protect the countertop from sudden temperature changes. Please pay attention Special attention the choice of sealant, since the preservation of the appearance of the countertop and its functionality depends on it.
The installation method will also depend on which hob you purchased - electric or gas. Let's consider both options separately.
How to connect the electrical panel?
Demand for electrical panels is at an all time high. This fact can easily be explained by the fact that such devices are very reliable, high quality and durable. However, if such a stove needs to be repaired, it can be disconnected without any problems and taken to a workshop.
Before you begin to install the electric hob, it must be turned over and placed on the countertop. WITH inside The reverse connection diagram will be drawn on the plate. Be especially careful if you have to work with connecting the stove yourself. It is important to connect the wires correctly here.
If there is a separate panel wire to connect the electrical panel, then there is no need for a plug and socket. Simply connect the wire and install the panel into the countertop. After this, she will be completely ready for work.
How to connect a gas panel?
Initially, you should pay attention to how the panel is attached. Install it into the tabletop, then level and secure. For this purpose, special brackets are provided at the bottom of the model and turn on electrical wire into the socket.
Important! Before independent connection gas, you should definitely familiarize yourself with the basic safety rules. The gas must be shut off. Make sure of this and only then connect the hob to the pipe using a flexible hose.
It is worth putting paronite gaskets in the nuts. Then, open the gas and turn on the burners in order to check the strength of the connection and eliminate possible gas leaks. For ease of checking, use a gas analyzer.
Rules for installing a hob above an oven
An induction hob has many positive characteristics. Among them:
As you can see, this option has a lot of advantages. Therefore, it is not at all surprising that you also wanted to install this kind of stove at home. How to do it right? Installing a hob above an oven has a certain sequence and rules. In order to understand this issue in more detail, it is worth considering all the features of installing the panel.
- If you have started a process such as installing an induction hob over an oven, you should know that it must be equipped with forced ventilation and cooling system;
- Remember that fastening must be done on a perfectly flat surface. Otherwise, deformations may occur that interfere with proper operation. hob.
Installation procedure
- Take short, blunt screws and screw 4 springs into the holes that are located on the sides of the device;
- We insert the hob into the kitchen module, level it and lightly press on the center - this will ensure the most even installation;
- If it has side profiles, then after you insert it into the kitchen module you need to insert 4 fastening hooks. Make sure that the center spring screws remain accessible.
Important! When installing the hob above the oven, electrical connection and the cabinet itself must be built in separately. This must be adhered to based on the safety rules when working with electricity.
Before connecting the electrical, you need to check:
- condition of the outlet: it must be grounded and comply with all technical norms and standards;
- the socket corresponds to the required voltage when connected;
- whether the socket matches the plug.
Remember that installing a hob into a countertop with your own hands or installing a panel above an oven requires extreme care from you. You must definitely take into account a large number of requirements that will help you install it correctly, quickly and efficiently. Following the instructions described above, you will not need to involve specialists to carry out this operation.
Before the connection is made, it is worth carefully checking the voltage and frequency of the current in the outlet and compliance with all established standards for safe operation. self-installation panels.
Installing a hob with your own hands is a test of strength for both a beginner and a seasoned master. Hob - an alternative to the overall kitchen stove. It performs the same functions, but takes less space. Today we’ll figure out how not to go crazy during the installation process.
How to install the hob yourself? Mandatory installation rules
As a rule, the product is mounted above the oven. A hole of suitable dimensions is made in the countertop and the device is placed on top. When every meter counts, is it possible to install them above the dishwasher or without a countertop?
Types of hobs
Gas
Electric
Combined
The panel can be:
- gas;
- electrical;
- induction;
- combined.
Each of them can be:
- dependent;
- independent.
The first include devices that can only function in conjunction with an oven.
Control is carried out using a panel mounted on the cabinet - very rarely it is located on the hob.
IMPORTANT! Not all hobs and ovens can be used together. Sometimes even products from the same manufacturer are incompatible.
The second category includes hobs that require their own control panel. They are completely independent of the oven: this means complete comfort and placement in any corner of the kitchen.
This allows them to be placed separately, as opposed to dependent ones.
Popular brands
The installation principle from different manufacturers remains the same. Below we list brands that will not let you down.
| Model | Description |
|---|---|
 Electrolux (Electrolux) EHG 96341 FK Electrolux (Electrolux) EHG 96341 FK |
Material: glass ceramics. Dimensions: 59 x 52 cm. Rated power: 6.6 kW. |
 |
Material: glass ceramics. Dimensions: 60 x 51 cm. Rated power: 7.2 kW. |
 |
Material: strained glass. Dimensions: 10.2 x 73.3 x 50 cm. Rated power: 5.9 kW. |
 |
Material: glass ceramics. Dimensions: 60 x 51 cm. Rated power: 6 kW. |
 |
Material: glass ceramics. Dimensions: 59.5 x 51 cm. Rated power: 6.8 kW. |
 |
Material: glass ceramics. Dimensions: 59 x 52 cm. Rated power: 6.5 kW. |
 |
Material: glass ceramics. Dimensions: 58.3 x 51.3 cm. Rated power: 7.6 kW. |
 Midea MC-HF602 Midea MC-HF602 |
Material: glass ceramics. Dimensions: 59.0 x 52.0 x 5.5 cm. Rated power: 6 kW. |
Correct installation: steps
Electrical panel
Models with electric ignition made of glass ceramics delight with convenience. If the assembly is good, then the product will not require repair for a long time. However, if the surface breaks, detachment will be as simple as possible. It is quite possible to remove the electric cooker yourself and take it for repair.
Let's start embedding. General algorithm:
- Put electrical panel on the countertop, turn it over and connect according to the diagram. For convenience, manufacturers post instructions on back side products. Connection requires care - in case of an error, control of the burners and heating temperature will be impossible.
- After this, you can turn the panel over and mount it in the hole. Check that switching on and heating are working correctly. The panel is completely ready for use.
The installation process yourself is not difficult. Especially for those who have ever made repairs or carried out construction works. Detailed algorithm:
- Determine the dimensions. Before installation, please read the instructions. It contains a diagram showing the installation dimensions and how to install the panel correctly. This speeds up the process and minimizes possible mistakes during measurements and installation.
- You can take measurements yourself. To do this, you need to turn the panel back and, using a tape measure, measure required parameters. Be careful: the installation depth is determined by the installation location.
- Decide on indentations. The instructions indicate the minimum distances from the edges of the tabletop, so we do not recommend making them smaller. This may cause the edge to become damaged and require repair. You can only increase the size.
- Make markings on the countertop based on the measurements of the hob. To ensure accurate and simple installation, ensure that the markings are stable. If you draw it with chalk, the lines will be erased, and this will create inconvenience during installation. We recommend gluing strips of paper tape and then applying markings on it.
- Make a cutout. At this stage you need to drill a hole where the cutout will begin. Using an electric jigsaw, cut out the outline of the top of the tabletop. For an even cut, use a sharp file with fine teeth. Ideally, it is recommended to use a hand router and round the corners using a cutter. In this case, the cuts need to be sanded. After this procedure, sawdust is formed, which is better to immediately collect with a vacuum cleaner.
- Try on the hob. Check that the cut is correct and try on the panel. This will ensure that you can proceed to the next steps.
Sawing a hole
For installation you will need an electric drill and a jigsaw. If you don’t have them, you’ll have to purchase or rent them, since you can’t do without them.
IMPORTANT! The structure of the glass-ceramic surface is quite fragile, so when installing you need to be as careful and attentive as possible, and also objectively assess whether it is worth doing the installation yourself or whether it is better to leave the matter in your hands experienced craftsmen. If you still decide to do everything yourself, then move on.
When buying a hob, it will be convenient to do individual order for the manufacture of furniture. You can simply tell the furniture makers the measurements of the device and they will make the cutout themselves. This is the simplest and convenient way installation (then you can go straight to the sealing/sealing point).
Step 2 - Cut a hole in the countertop Step 4 - Place the panel over the holeSealing and proper sealing
To extend the service life of the countertop and protect it from premature wear, it is necessary to use silicone sealant or nitro varnish. This treatment prevents the entry of moisture and dirt. Self-adhesive sealant (sealing tape) is also perfect for these purposes.
It is glued on top so that the edges of the built-in model rest on it. Aluminum tape- one of the alternatives to sealing and sealing. This the best option, as it protects the countertop from temperature changes. Thanks to the high-quality seal, the product will last long years without repair.
Step 7 - Connect the hob to gas pipe. Depending on the type of built-in panel, the connection method changesGas panel
The instructions contain information on how the product is attached. Place the panel into the countertop, align it with the edge, then secure it. As a rule, the kit includes special brackets with which fastening is carried out. Then plug the electrical cord into the outlet.
All that remains is to connect the gas. First turn off the gas, and then connect the hob to the pipe using a flexible hose. Equip the nuts with paronite gaskets. You can turn on the gas. Make sure that there are no leakage areas at the connection points. To test this, lather them with soap. There is no leakage if the foam does not bubble and vice versa.
If you have a gas analyzer, you can use it.
Hob socket: where to install?
Before installing the equipment, it is better to move the outlet under the countertop. This will ensure maximum ease of use and add aesthetics to the appearance - neither the socket nor the plug will be noticeable. It is also necessary to make a hole through which the wire will pass on the way to the electrical network.
IMPORTANT! If you do mark it under the hob and oven, it is recommended to get a hood.
Step 9 - This is what the installed hob looks like