When asked what a bath should be like, any person will answer the same: hot and “light”. This is an obvious fact for everyone. Therefore, most people approach the insulation process with all responsibility, using all kinds of methods and materials to ensure maximum heat retention inside. It is not surprising that this creates the effect of a thermos.
They don’t take care of providing the second component of an excellent bath, they miss it and then wonder why the “steam” didn’t work, and instead of a healing effect, the opposite result was obtained. Unfortunately, even experienced people forget about such an important point as.
But its importance should not be underestimated: during the heating of the furnace, oxygen burns, and instead of it CO2 is released, under the influence of which high chance of getting burned. Our blood becomes oversaturated with carbon monoxide, and there is a possibility of disorientation or loss of consciousness (not to mention more tragic consequences). Therefore, a system is needed that provides oxygen supply and additionally regulates the temperature inside the steam room.
In addition to the functions of replenishing oxygen, ventilation allows you to dry the structure, stopping the negative effects of excess moisture and steam, which can lead to the appearance of mold or rot on structures, as well as an unpleasant odor or a feeling of mustiness. Lack of exhaust hood can destroy wood in just 2-3 seasons.
A ventilation device is required in any bathhouse, not only brick and block; wooden ones are no less demanding when it comes to drying. An exception may be bathhouses with slots, but here they can no longer be called bathhouses: they will not retain heat.
REFERENCE. Of particular note is the possibility of using natural ventilation, which does not require the use of expensive materials and equipment (however, it is also not worth leaving gaps on purpose). We will tell you how to organize this process in this article. We will not ignore the design of a forced supply and exhaust system.
Ventilation in a steam room: why is it necessary?
 Above, we have already talked about the dangers of a closed environment from the point of view of exposure to carbon monoxide, and also mentioned the need to create a microclimate for drying the steam room after use. Ventilation in a bathhouse or steam room will definitely increase the comfort of staying there and extend the life of the building.
A distinctive feature of the Russian bath is wet steam. At the same time, the temperature regime also differs, which is lower than that of a sauna. However, warm air saturated with moisture warms up the human body much faster and has a softer and more gentle effect (it does not have a spasmodic effect on blood vessels, it can be visited by elderly people and children).
The design of the furnace is quite specific: as a rule, the stones are placed inside and can be accessed by opening the door. This ensures that the stones retain heat for a longer period of time and are more difficult to fill, even with inappropriate water consumption.
Ventilation in the steam room of a Russian bath. The most important thing is to maintain balance, because the steam has a “shock” character, escaping from the stove immediately after water is splashed on the heater. If it is not designed correctly, you can lose all the steam.
In Russian steam rooms, vents are most often used, which are installed in the lower part of the walls and ensure the safety of the heat that accumulates near the ceiling.
Ventilation in the steam room: requirements
 When designing ventilation in a steam room, the requirements for it are simple. The following rules must be adhered to:
- coolness should be near the floor, and heat near the ceiling;
- even temperature level, without fluctuations;
- “exhaust” air must be replaced with fresh, oxygen-enriched air.
Ventilation in the steam room: device
It is based on the laws of physics: influx fresh air below displaces hot air from above through the corresponding openings, thereby ensuring air exchange. In this case, a vacuum of air occurs (the pressure decreases), and cool air is drawn in. It, in turn, gradually heats up, rushes upward, and further along the cycle. This is how ventilation works in a steam room; its design is quite simple. More .
Natural or forced?
In order to answer the question: natural or forced ventilation for a steam room, you should look at each type.
Natural the microclimate is formed independently in the presence of planned vents (openings) or cracks when the air convection processes described above are started in the building.
The advantages include: low cost of implementation, absence of extraneous noise/vibrations from operating devices and the use of natural features. Possible difficulties: errors in the placement of holes, as a result: lack of draft (the opposite - the appearance of excessive drafts); penetration of foreign (most likely unpleasant) odors from the street.
Forced ventilation system uses equipment and materials that create artificial air movement in the required direction. Regulated by special control units. This is a very expensive solution that requires competent design and further implementation. At correct placement guarantees smooth circulation of air flows.
 There are combined types for a bath: steam room ventilation, which combines both of these directions and has the pros and cons of each option.
If you decide to do ventilation yourself, it’s better to stick to natural ventilation – it is more in line with the spirit of the bathhouse than the use of intricate devices. However, we do not dissuade you from using forced air supply exhaust ventilation.
Ventilation in the steam room of the bath: diagram

Ventilation in the steam room of a bathhouse - system diagram. It consists of two openings: one of which is supply, and the other is exhaust (several exits can be made). When choosing the size of the exhaust opening, you must follow several rules:
- the largest should be at the maximum distance from the stove(so that the heat does not go outside in a direct flow);
- the rest can be placed around the perimeter of the ceiling;
- The hole size is calculated based on 24 square meters. cm for each cubic meter of room. Most often, the diameter does not exceed 30 cm, but the number is 2 or more.
The traction force is determined by the height difference between the supply and exhaust openings.
IMPORTANT! Do not place the holes exactly opposite each other, this will inevitably cause drafts.
Ventilation in a Russian steam bath: diagram

Ventilation in the Russian steam bath is ensured by a scheme in which there are vents with adjustable plugs, taking into account the above rules. Either by using burst ventilation, which we will discuss below.
Bathhouse: steam room ventilation (if the stove is in the dressing room or rest room)
For a bathhouse or steam room ventilation, where the stove is located in a room other than the steam room, you will most likely have to think about forced ventilation, which will ensure the flow moves in the right direction.
As shown in the diagram:

Bathhouse: ventilation of the steam room (if the stove is in the steam room or the steam room is connected to the washing room)
It is ensured by heating cold air coming from outside from the furnace and repelling it from the heat source, and returning it back after hitting the walls. Air movement can be stimulated by the use of additional fans.
For bathhouses and steam room ventilation, organizing the drying of the bathhouse is especially important, since water in the washing room can have a truly destructive effect on finishing materials and the floor. In addition to the main one, enhanced floor ventilation is required: by installing an exhaust opening between the finished and subfloor, the installation can be accompanied by the installation of a fan.
REFERENCE. Make sure that no water comes into contact with the fan to avoid the risk of a short circuit.
More than 10 different schemes bath ventilation.
Where to place supply and exhaust openings
 There are several simple rules– where to place the supply and exhaust openings:
- the supply air (from which freshness comes) should be located below, closer to the floor;
- exhaust - placed away from the stove, closer to the ceiling.
Wherein It is advisable to locate the inlet opening near the stove so that during the cold season the air warms up a little before entering the steam room.
The height at which the holes are placed is about 30 centimeters: from the floor or ceiling.
It will be effective installation supply valves into the foundation (under the floor). Using a valve system or installing an additional protective grille on the opening will protect you from possible penetration of rodents. In this case, it is better to lay the floor with small gaps for more free access of oxygen. If you want a smooth and even floor, then you can get by with special ventilation windows, which can be covered with decorative wooden grilles.
IMPORTANT! When placing the valve on the foundation, it is necessary to ensure that fresh air is taken from the street, and not from the underground, otherwise unpleasant odors will come along with the air.
Common layouts include:
- for baths with a constantly running oven: the inlet opposite the stove is 30 centimeters from the floor, and the firebox vent will act as an exhaust hood;
- for baths with pouring floors: the inlet hole is 30 cm from the floor behind the firebox, and the “working off” leaves after cooling through the cracks in the floor;
- location of both holes on the same wall: opposite the stove, but one is near the floor and the other is near the ceiling. A fan is installed at the outlet. Justified where the wall with holes faces the street.
- hole location at the same height, but on opposite walls(do not put it in one line!), the fan is installed in the same way. It is considered not very effective, since the heat will almost immediately escape outside, and the room will dry out faster due to the open door.
Ventilation of walls in a steam frame bath

Frame wall pie. More about insulation frame walls look .
This is done by leaving a ventilated gap between the finishing materials and the vapor barrier, which can reach 5 cm. Ventilation of the walls in a steam frame bath is provided by a counter-lattice. The corrugations of the ventilation system should be designed in advance in order to place the insulation, taking into account the space for the pipes.
What should not be used when ventilating in a steam room?
Avoid using plastic elements:
- corrugation;
- boxes;
- stubs
 This is something that cannot be used for ventilation in a steam room - they cannot withstand high temperatures and will melt, releasing harmful substances and acquiring an unaesthetic appearance.
But their use in the wash room or dressing room is not prohibited.
Only wood can be used as plugs for vents or hatches: metal can burn from heat or rust when exposed to moisture.
Economical solution: burst ventilation in a Russian steam bath
If you are not sure that you can correctly calculate the size of the entrances (exits) or their location, you can use a long-tested method - an economical solution: burst ventilation in a Russian steam bath.
The essence of its application is to quickly ventilate by opening windows and doors wide. They are opened for a short time (no more than 1-2 minutes), for maximum effect It is best to use opposite windows and doors.
This method does not require any financial costs: you use the elements that are in any bathhouse.
IMPORTANT! Do not overdo it with ventilation, you can make the bath too cold. This method is especially good for Russian baths, which are heated in black.
Is it necessary to hire specialists for calculations and design?
 If you want a proper, “easy” and trouble-free sauna, ventilation in the steam room plays an important role: from the longevity of the sauna to your own safety.
If the bathhouse is combined with the house, has a rest room or dressing room into which the stove is installed, or there are other reasons for using forced exhaust, then the answer to the question “is it necessary to hire specialists for calculations and design” will be clear: it is necessary.
Otherwise, you can make a mistake in a minor detail, and the purchased calculation equipment will not be suitable for this reason. And this in turn will cause additional expenses.
In addition, in order not to disturb the structure of the building, It is better to design the ventilation of the steam room in advance, before the sauna is built, this is especially true for situations where the air flow inlet must be located on the foundation. Installing a ventilation system in an already constructed building is a troublesome and time-consuming process. It will be necessary to disassemble almost all finishing materials, make room for corrugations, etc.
During construction brick bath without preliminary preparation and not at all, because not only wooden finishing materials are required, but also wall material - brick, which (some types, for example, silicate) is prone to absorbing large amounts of water.
Conclusion
Ventilation and renewal of the internal climate are necessary in any case - this is the final conclusion; this is necessary, among other things, to ensure comfort when using the bathhouse. The choice of natural or forced is yours. We hope that, taking into account our material, you will be able to find the most suitable solution for yourself.
For completeness, check out: and.
Setting up a sauna is a very interesting, but troublesome process. You need to take into account a hundred little things to make it not only cozy, but also safe for health. The latter also depends on air exchange - improperly equipped ventilation in a sauna can create a draft or, conversely, lead to excessive heating of the room!
The steam room is a key place for ventilation
The most important room of any sauna or bathhouse is, of course, the steam room. And in a steam room, the high temperature largely depends on ventilation, and not only this, but also the quality of rest. What is the use of hot air if it is stagnant and saturated with the smell of dampness and sweat products?
In addition, we must not forget that any steam room is a place with high humidity, and therefore an increased danger for all elements (especially wooden ones) to become a breeding ground for mold and mildew. And what kind of sauna can do without electrics these days? Even with a minimum of electrical equipment, you need to install a banal light, make a switch - and there is a risk of getting an electric shock in high humidity!
To avoid having to constantly think about high humidity, it is better to think once about high-quality ventilation. Thinking, of course, will not be enough - you also need to implement the plan correctly! Since our school days, we all know that hot air has one distinct feature - it always tends to rise upward, pushing cold air downward. Thanks to this, the natural circulation of air in the atmosphere on a global scale and in each room in particular is ensured. Applicable to the steam room, thanks to this law of physics, we get the hottest places on the upper shelves and relatively cool ones on the lower ones.
According to generally accepted standards, the air in the steam room should be renewed at least three times per hour, but the optimal recommendations are seven times! Such air exchange can be ensured using conventional supply and exhaust ventilation - hot air, rising to the ceiling, exits through the outflow vent, as a result of which a slight vacuum is created in the inflow air duct, and fresh air enters the room. This system is applicable to the ventilation of the bathroom and toilet, but, unlike them, it has its own characteristics.
But the task is complicated by the fact that the hottest steam, which is located on the upper level of the steam room, should not immediately escape into the hood, otherwise you will be left in a cold sauna, which urgently needs to be heated. If this happens, it means that the hood is not installed correctly! Sometimes this is due to the impossibility of correct arrangement of elements due to the architectural features of the building, in which case it is necessary to consider ventilation options combined with mechanical means.
Supply and exhaust ventilation in the sauna - arrangement diagram
First, let's look at the classics - natural supply and exhaust ventilation. This type of traction law is correct location supply and outlet openings. The correct one is when the supply hole is located near the stove-heater or under it (if we're talking about about the electric version), while the outlet is located on the opposite side. Also, cold fresh air will penetrate into the steam room through a specially left 5-7 cm gap under the door.
The supply openings should be located strictly at the bottom so that the cold air can have time to heat up before it enters the area where people are staying.
For proper air circulation, one exhaust hole will not be enough. On the opposite side of the inflow, the first hood is located at a height of about a meter, the second - under the ceiling. Both openings must be combined by an exhaust duct, which is discharged either into the main ventilation system or into the chimney. If the air duct runs separately, then you need to remember that the higher the pipe rises above the roof level, the more draft there will be in the system - it is important not to overdo it!
In order for you to regulate the intensity of air exchange, it is imperative to install shutters on the air vents. How does such a system work? Let's imagine a standard steam room with a heater on the far wall and a door on the nearest one. As expected, a gap is left under the door, and the hoods are located on opposite walls: near the stove and at the door.
Before heating the steam room, it must be properly ventilated so that there is fresh air in the room. The doors and outlets are then closed, leaving only the inlet valve open. The steam room will heat up quickly enough, since the hot air will soon have no place to go out, which means there will be no vacuum in the air inlet.
When the sauna has warmed up, we still leave the upper channel closed, while we open the lower channel slightly - thanks to this, air circulation in the steam room will begin, while the upper layers of the heated air will not leave the room. Cold air will again begin to enter through the supply channel, but thanks to the proximity of the heater to the resting people, it will enter already warmed up, gradually rising upward and replacing the stagnant air.
Thanks to this air exchange, the room will have fresh and warm air. Vacationers may not even notice such a change, enjoying the process. This system ensures economical handling of already heated air, which means you will also save on coolant consumption. In addition, problems with mold and mildew will not affect you - thanks to such circulation, all elements will be properly dried.
Combined system - when there are no other options
The structural features do not always allow us to provide ventilation strictly according to the scheme described above. For example, a steam room has three adjacent walls with other rooms, and the entrance and exit openings have to be placed on one wall. In this case, the correct location must be observed: the supply opening should be located at a distance of 20 cm from the floor, while the outlet should be located at the same distance, only from the ceiling.
Cold air currents entering the room will pass through the stove, heat up and rise upward, refreshing and warming the room. The disadvantage of this method is that the air circulation is too intense, which must be strictly regulated using valves on the holes.
There is also an option in which the inlet opening is located not below, under the stove, but above the heater. If the outlet channel is located at a higher level on the opposite wall, we will get relatively normal movement of air masses. True, it may not be enough, so in such cases a fan is placed in the outlet to circulate air. This will be combined ventilation.
Classic mistakes - what not to do
The most common mistake when arranging supply and exhaust ventilation is the location of the ventilation holes at the same level. As a result, we get a draft below, and the hot air at the upper levels will practically not take part in the air exchange.
If you make only one hole for the air outlet under the ceiling, even with the correct placement of the entrance and exit, the mixing of hot and cold air flows will be too fast - the steam room can cool down in a few minutes! Typically, the top hole is used only in cases where you want to quickly reduce the temperature or completely ventilate the room.
A well-equipped ventilation system, all other things being equal, guarantees, firstly, a long service life of the building and finishing materials used in the arrangement of the serviced premises, and secondly, the comfort and safety of visiting the latter for the user. The issue of arranging complete and sufficiently effective ventilation is especially relevant in the bathhouse, due to the characteristic temperature and humidity conditions and additional requirements requirements for buildings of this kind.


Prices for bath fans
bath fan
Video - Requirements for ventilation in the bathhouse
Choosing the optimal type of ventilation system for servicing a bathhouse is a topic for many hours of discussion. For example, there is natural ventilation. The expenditure of money, time and effort on its arrangement is minimal - the work literally comes down to drilling holes in the walls, installing boxes/pipes and valves/grids.

 Ventilation valve and grille
  Ventilation grilles for baths and saunas

However, it is impossible to use natural ventilation to service all rooms of the bathhouse. Of course, it would be possible to save money, but the disadvantage of such a solution will become obvious with the arrival of the first winter: along with the influx of fresh air from the street, cold will come in, and everyone knows the combination of frosty air with humidity - everything around will simply freeze. Therefore, natural ventilation in some rooms must be combined with others. existing options in other rooms of the bathhouse.
If the bathhouse is equipped with a washing room or even its own swimming pool, natural ventilation will definitely not cope with the maintenance of such premises - you will have to equip an exhaust system. And in general, the presence of a forced inflow/outflow of fresh air will be useful both for visitors to the bathhouse and for its premises. Recommendations regarding the optimal composition of the air exchange system are given in the table.
Table. Choosing a ventilation system for different rooms
| Room | Recommended ventilation type | Scheme | Description |
|---|---|---|---|
| Steam room, dressing room or relaxation room | Aeration should be understood as organized natural air exchange. The option is most optimally suited for use in a bathhouse: air enters from the bottom of the stove (for other rooms - 25-30 cm above the floor), exhaust is discharged through an opening in the upper part of the room. The work of air exchange is based on elementary physical laws: cold air from the street displaces warm air masses, which have less weight, to the top of the room. Aeration is ideal for use in rooms with high heat output. The presence of additional humidity contributes to an even more pronounced increase in the efficiency of the system. |
||
| Wash room, bathroom, room with swimming pool | The system is equipped with a fan and, if necessary, cleaning filters. Mechanical exhaust ventilation is ideal for use in the washroom, pool room and other wet and frequently visited areas of the bathhouse. Mechanical suction ensures effective removal unpleasant odors and excess moisture, which makes the air in the serviced area safe and clean. It is impossible to use exhaust ventilation alone - air rarefaction is formed. To compensate for the vacuum, an air flow from the street or other rooms is arranged. Along with this, the presence of supply ventilation will eliminate the likelihood of drafts. The supply ventilation system can be either natural or mechanical. In combination with mechanical exhaust ventilation, it is more advisable to use mechanical supply system, because the possibilities of natural inflow may ultimately be insufficient to compensate for the resulting rarefaction. Mechanical supply ventilation is based on a blower fan. Additionally, it can be equipped with an air heater, which will eliminate inconvenience and solve the problems of ventilation of serviced premises during the cold season. Additionally, the supplied air can be humidified or purified using appropriate devices. A mechanical system is more complex in arrangement compared to its counterpart, which operates according to the laws of physics: in addition to fans and air ducts, the system may include optional equipment and accessories (diffusers, air distribution grilles, automation equipment, noise suppressors, etc.). This provides an excellent opportunity to design an air exchange system that fully meets the user’s wishes. |
Natural ventilation is provided in vestibules, warehouses and other similar premises.
Regardless of the type of ventilation system chosen, the bathhouse must have conditions for simple ventilation. Install adjustable windows in all rooms, the location of which allows this to be done.
Video - Types of ventilation systems
Instructions for self-calculation of air exchange
An elementary formula is used for calculation:
W (required volume of fresh/exhaust air) = k (coefficient indicating the frequency of air exchange) x V (volume of the room served, determined by multiplying the width of the room by the length and height).
That is, first you must calculate the volume of each room and find for it the required indicator of the volume of clean air (in calculations it is usually denoted Wpr, i.e. inflow) and a similar indicator of exhaust air (denoted as Wout, outflow). In this case, multiplicity factors must be taken into account. The calculated values are rounded upward - the last digit in the number must be 0 or 5.
Next, the summation of all Wpr is performed. A similar action is carried out for the found Ww. The resulting amounts are compared. If the total value of Wpr exceeds the total value of Wpr, you need to increase the exhaust volume for rooms with a minimum air exchange value, if, on the contrary, increase the inflow by the missing value. That is, at the output, the sum of all Wpr should be equal to the total value of the found Wt.
The results of the calculations will allow us to determine the optimal cross-sections of the installed air ducts and select suitable look ventilation system. Thus, there will not be any special problems with calculating the volume of premises and other related data. For greater convenience of subsequent processing, enter the found values in a simple table, as in the example presented.

In the example given, the total value of Wpr is less than the sum of all found Wt by an indicator equal to 110 m3. In order for the balance to be maintained, it is necessary to ensure an influx of clean air in the missing quantity. This can only be done in the waiting room. Thus, the value of 55 m3 for the dressing room given in the table must be replaced with an indicator of 165 m3. Then the balance will be maintained.
Start calculating the air ducts to be installed and drawing up the structure of the ventilation system being installed.
The ventilation system is designed in such a way that the air moves through the installed air ducts at the following speeds:
- ≤ 5 m/s in main ducts and ≤3 m/s in existing branches – for ventilation systems mechanical type;
- ≤ 1 m/sec – for air exchanges operating on a natural principle;
- 2 m/sec – for natural air exchange directly in the steam room.

When choosing the cross-section of air ducts, take into account the above indicators. As for the profile of the duct/pipe, this point is determined by the design features of the air exchange and the bath itself. For example, air ducts with round easier to install compared to their rectangular “brothers”, and the required connecting fittings for round ducts much easier to pick up.
The relationship between the diameter of the air ducts and other significant indicators is demonstrated in the following tables.

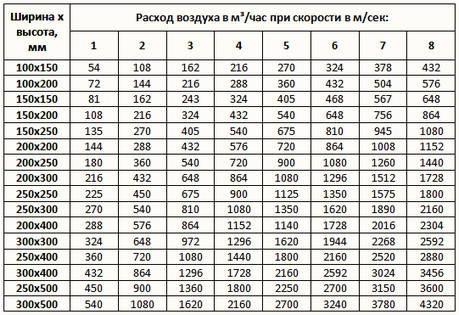
For example, we will work with round air ducts. We select the required sections according to the appropriate table, focusing on the indicators in the table Example of ventilation calculation.
The calculated air flow was 165 m3/hour. The air flow at this flow rate should move no faster than 5 m/sec. In accordance with the table above for round air ducts, we select the cross-section according to the specified data. The table value closest to ours is 221 m3/hour. The air duct cross-section is 125 mm.
 Air duct with insulation
  Flexible ducts
In the same order, we determine the optimal sections for all branches of the system in the serviced premises, remembering that the air flow in them should move at a speed not exceeding 3 m/sec (in vestibules and storage rooms - 1 m/sec, in the steam room - 2 m/sec sec):
- steam room: calculated Ww is 60 m3/hour, which requires the installation of an air duct with a cross-section of 125 mm;
- shower room - Ww is 50 m3/hour, air moves at a speed of 3 m/sec, a 100 mm air duct is suitable;
- toilet – indicators are similar to the shower room;
- pantry, vestibule, etc. – indicators (except for air speed) are similar to shower and toilet.
Important! In the shower room (wash room, room with a swimming pool) there is an increased level of humidity. When determining the cross-section of the air duct for this room, it is necessary to make an adjustment towards increase (in this example - 125 mm).
For greater convenience, enter all the information received into the table. You can use the template below as an example.

Important note! In the table above, the exhaust volume exceeds the volume of incoming clean air. This happened for the reason that the sections were determined by the nearest flow rate, and the diameter of the air duct in the washing room was intentionally increased. In practice, such an approach will only be beneficial - the margin for outflow and inflow will not be superfluous.

SNiP 2.08.01-89. Residential buildings. File for download
Sanitary and epidemiological requirements for residential buildings and premises. Sanitary and epidemiological rules and regulations SanPiN 2.1.2.1002-00. File for download
Building regulations Russian Federation heating, ventilation and conditioning SNiP 41-01-2003. File for download
The cross-sectional area of the ventilation window is determined in accordance with the volume of the room served: 24 cm2 for every 1 m3.
All that remains is to figure out the optimal height of the ventilation holes:
- for the flow of fresh air - on average 25-30 cm above the floor (in the steam room - near the stove);
- for exhaust air outflow - approximately 15-20 cm below the ceiling, usually on the opposite wall to the supply wall.
Popular bath ventilation schemes
Only options for arranging ventilation in the steam room deserve special consideration - in the remaining rooms everything is done according to the standard scheme, for example, like this:

Air exchange in the steam room can be organized in accordance with 4 main schemes presented in the following image.

Scheme "a". The most popular option. The window for air flow is next to the stove, at a distance of about 25-30 cm from the floor. The incoming clean air gradually displaces the waste warm air upward to the opposite wall. There is an exhaust hole on it, approximately 15-25 cm below the ceiling.
Scheme "b". Both holes are on the same wall. The circuit will only work if you install an exhaust fan. Fresh air enters through the lower hole, located in the wall opposite to the stove. The air will rush in the direction of the stove, and then, covering the space of the steam room in an arc, move to the hood and be discharged outside the bathhouse.
Scheme "c". This option is suitable for steam rooms with leaking floors. The inlet hole is located as in diagram “a”. Having warmed up in the upper part of the steam room, the air descends to the floor, passes through the gaps in the plank flooring, facilitating more efficient drying of the boards, and is then discharged through an exhaust vent, usually located in another room. Exhaust can also be carried out through a separate isolated channel.
Scheme "g". Option for baths with a constantly running stove. IN in this case The exhaust function is performed by the furnace ash hole. The supply window is located under the shelf, in the wall opposite to the stove. The height of the inlet opening must correspond to the height of the furnace vent. Fresh air rushes towards the stove, displacing the air masses heated by it to the ceiling. Cooling there, the air descends and is removed from the bathhouse through the ash pan.
To ensure that the air exchange system operates as efficiently and as efficiently as possible, before starting its installation, study and remember a few simple tips.
If your bathhouse has a bathroom or even a kitchen, equip them only with exhaust ventilation - this solution will eliminate the possibility of unpleasant odors spreading to other rooms. As an alternative, you can install fresh ventilation in other rooms, and equip the bathrooms with natural exhaust - in this case, the air will move towards the bathrooms.

When calculating the performance of fans, it is recommended to reduce the total power of the supply units by 5-10% of the total capacity of the exhaust units. In this case, the exhaust air will be completely replaced by incoming air. air masses, and a margin of 5-10% compensates for the flow of air entering through windows, cracks, etc., which will allow you to maintain a balance.

In rooms with only natural ventilation, it is recommended to make opening windows - this will increase the efficiency of fresh air supply and reduce the risk of fungi, mold, rot, etc.

Important! If your bathhouse has a non-standard configuration, the design of the ventilation system will also be individual. When compiling it, the features of the composition of the premises, their design, design features and so on.
The main stages of independent installation of a ventilation system
Any ventilation system in any room is installed in approximately the same sequence. The differences are present only in the characteristics of the air duct openings and their locations, as well as the configuration of the system (mechanical, unlike natural, are supplemented with various types of devices).
For example, the following arrangement of ventilation elements can be used.
Or its slightly modified analogue, shown in the following image.
Recommendations regarding the choice of the location of each opening, the type of air exchange system for different rooms of the bath, as well as the procedure for determining the characteristics of ventilation elements, were discussed earlier.
Along with this, the procedure for arranging ventilation may vary depending on which design option you prefer. There are few solutions available:
- independent ventilation in each room. A simpler option. Work is limited to the installation of transoms, vents, fans and other necessary elements, if provided for by the project. Fans can be mounted both in windows and in separate ducts led outside through the wall;
- centralized system. A more complex option. Requires gaskets ventilation ducts. Used mainly in private homes - in the case of a bathhouse this option will be too costly and labor-intensive;
- "hybrid" option. Some rooms are ventilated individually, others are combined into a joint system.
An appropriate option for use in a bathhouse is independent ventilation - the owner can choose the optimal characteristics of fans and other elements for each room, saving money, time and effort on carrying out the activities necessary to combine the channels into a single system.
Important! The location of some bathhouse rooms may not allow for independent supply and exhaust ventilation. In this case, it will not be possible to avoid laying ventilation ducts. Alternatively, the box can be placed on attic, A ventilation holes arrange it in the ceiling or connect it with channels installed in the walls (the option is more complicated if the laying of such channels was not provided for by the project at the stage of construction of the bathhouse).
In most cases, the first option is used: ventilation pipes of the required length are taken out through holes in the ceilings of the serviced premises and are either equipped with their own fan, if necessary (easier to implement for an untrained user, the procedure is similar to that shown in the following table), or they are connected into a single circuit and connected to a common hood (may require the involvement of specialists).
Remember: maximum efficiency The operation of the ventilation system is ensured by using the shortest and straightest air ducts possible - up to 3 m when arranging natural air exchange and up to 6 m when using electric fans.

The procedure for installing an independent ventilation system is given in the following table.
Important! The example describes instructions for arranging a mechanical ventilation system using fans. The installation procedure for natural air exchange remains almost the same: only the stages of laying wires and installing fans are excluded.
Table. Ventilation arrangement
| Work stage | Explanations |
|---|---|
| The operating procedure remains the same for the supply and exhaust openings. Only the height of their arrangement and location changes ( possible options discussed earlier), as well as the type of fans used (supply or exhaust). The characteristics of the latter are selected individually, taking into account the volume of the room served, the required speed of air movement in the air ducts, the required air exchange rate, etc. – all these points were covered in the theoretical part. We arrange the holes in the following order: - outline the center and contours. We make the markings so that the resulting diameter of the hole slightly (usually a 2-3 mm gap is made) exceeds the diameter of the pipe being installed (recommendations for choosing the diameters of air ducts were given earlier); - using a puncher we make a hole in accordance with the markings. We hold the working tool horizontally, but with a slight downward tilt; - carefully take out the cut material (a hammer and chisel will help us with this), after which we carefully clean the finished hole from dirt and dust. |
| The ventilation pipe (ventilation duct body) is placed in the prepared hole, but before that it (if mechanical/forced ventilation is planned) must be equipped with a fan. Useful recommendation! Initially, buy ready-made kits for arranging ventilation, including, in addition to related additions, a ventilation duct/pipe and a fan with a housing of the appropriate size - this way you will avoid difficulties at the assembly stage. The pipe with the fan is placed in the prepared hole, and the remaining cracks are filled with foam. |
| The fan is electrical appliance, therefore, it needs to be connected to the network. Let's do this while the mounting foam dries (at least 10-12 hours). The procedure is standard: - the contours of the groove for the cable are cut out in the wall using a grinder. Excess material is removed using a bumper; - a hole is prepared in the wall for installing the switch box (for example, you can use a hammer drill). The box is installed (pre-read the instructions specific to your switch). The switch itself will be mounted after finishing; - the wire is laid in the groove. To fix the cable we use alabaster; - connect the wire to the switch and the fan. First, be sure to study the connection diagram recommended by the fan manufacturer in the attached instructions, because For different devices it may differ. As an example, one of the most commonly used schemes is given. |
| All that remains is to bring the entire structure into proper form. To do this we do the following: - get rid of excess dried polyurethane foam using a knife; - putty the grooves; - we install adjustable ventilation grilles on both sides of the pipe. For fastening we use self-tapping screws. If provided, at the appropriate stages of work we install additional elements(for example, air heater, filter, etc.). Each of these devices is installed individually - we first clarify these points in the manufacturer’s instructions. |


Video - Arrangement of ventilation holes
Video - Ventilation in a bathhouse with your own hands - diagram
Kirill Sysoev
Calloused hands never get bored!
Content
Creating an oasis of harmony among hot steam, water flowing like a river from showers or mini-pools is not easy. The operation of the bathhouse requires compliance with some subtleties even at the construction stage. To high humidity did not spoil the structure, and the stale air did not interfere with bath procedures, it is necessary to choose and make the right ventilation.
Ventilation in the bathhouse - diagram and device
Air inflow and outflow – the most important condition, since air exchange is based on the balance of supply ventilation (fresh air) and exhaust - the output of waste air. The movement of air flow can occur in a natural, forced or combined way. From the right choice The ventilation system will depend on the level of air humidity, flow circulation, and heat exchange. If the ventilation scheme and arrangement in the bathhouse is disrupted, the microclimate will be disrupted, it will be difficult to breathe, and mold will appear on the walls. Expert advice will help you avoid this:
- The exhaust vent should be higher than the supply vent because cold air is heavier than warm air.
- It is not recommended to make an exhaust vent on the ceiling, since this place warms up more slowly than others.
- The classic location of the inlet is near the stove and close to the floor.
- The ventilation of the bath should be built according to the principle: the supply openings are located on the opposite wall from the exhaust ones, and dampers should be installed on the latter.

Ventilation in the steam room
To pick up the right system, prolonging the life of the structure and finishing materials, you should understand the characteristics of each type, and steam room ventilation can be of the following types:
|
According to the operating principle |
Peculiarities |
Is it suitable for a bath? |
|
Natural |
The convection flow is formed due to the pressure difference between the street and the room, and the location of the supply and exhaust openings will interfere with normal heating. |
|
|
Combined |
Using air extraction devices; the absence of strict recommendations for the placement of vents makes this method one of the best. |
|
|
Mechanical |
Fresh air supply, temperature maintained special devices, but despite all the convenience, the disadvantage of this method is considered to be high cost. |
Ventilation in the waiting room
The steam room, with its high temperature, is often surrounded by functional rooms. To dry the furnishings, maintain comfortable conditions, and ensure the flow of oxygen-enriched air - these are the main functions of ventilation in the dressing room. If the steam room is used all year round, then care must be taken to install a fan, perfect option– forced (mechanical) system with exhaust air exhaust through the toilet or washing compartment. The natural way– keeping doors and windows wide open is an unreliable way to ventilate the dressing room.
Ventilation in the bathhouse sink
Installing the stove correctly and distributing the flow of cold and warm air is just as important as taking care of other bath procedures. The desire to wash yourself by rinsing with water will require a careful approach to the arrangement of this place. To prevent moisture from accumulating under the floor or in the walls, ventilation is needed. washing department baths The simplest option is to make a combined steam room and sink, and if these rooms are separate, then you will need special equipment to remove condensate.

Ventilation in the relaxation room of the bathhouse
After active bath procedures, when the superheated steam air relaxes the muscles, you want to relax. The ventilation device in the relaxation room of the bathhouse is almost no different from general principles. At small size In a room where there are a couple of shelves and there is no contact with water, drafts can be created periodically. If the room is large, then ventilation for the bath is necessary. combined type. Among the latest technical developments, it is better to give preference to compact devices - ventilators.
Ventilation in a frame bath
Wooden floors will rot within a couple of years if you do not take care of the ventilation system and drying. Even antiseptic treatment will not cope with this as well as ventilation in frame bath providing a flow of fresh air. The design of a natural ventilation system includes: ducts, a pipe from the stove, a through recess, vents, and doors. The vent in the bathhouse is located at the top, closer to the roof, and to regulate the flow it must be equipped with a valve or damper. Forced ventilation in a frame bath is used where only one of the walls is external.
Exhaust hood in a log bathhouse
A wooden beam makes a traditional Russian steam room, and if the vents are positioned correctly, the direction of the air flow will create comfortable conditions. To ensure complete ventilation, the hood in the log bathhouse will still have to be equipped. Classic version assumes device natural scheme air exchange. The special feature of the stove-heater vent, a damper with a valve for the chimney, mounting fans to speed up air exchange - all this is necessary to prevent the formation of a layer of condensation and drafts.

How to make ventilation in a bathhouse
Even at the construction stage, it will be necessary to provide for the creation of a ventilation system. How to make a hood in a bathhouse to maintain the microclimate? The logs of a traditional steam room are laid with a gap, so the cracks of the log house allow fresh air to pass through, and ventilation can be done using a draft. Ventilation system in a bathhouse made of brick, foam block or other modern building materials, will require the installation of a ventilation system with required quantity supply and exhaust openings before the construction of the building begins. Preference should be given to a combined or mechanical scheme.
Ventilation bastu
So that dry steam gives a warm embrace, heats floors and protects walls from rot, installation of ventilation is done as follows:
- There is no need for special holes in the foundation of the building; you can make a wooden floor with slots. Equip the room glass door with three canopies, good sealing, magnetic latches.
- Install an electric convection oven, which will ensure air flow circulation according to the principle of an inverted glass.
- Make an inflow under the stove, and an exhaust hole under the shelf 30 cm from the floor. Warm air will rise up the box under the lining and be discharged outside through a hole that should be made on the opposite wall from the inflow (diagonally and as far as possible).
- The heated air will fill the steam room, pushing the cold air to the bottom. If you make a channel with an adjacent room, the steam room will transfer some of the heat to it.
Sauna ventilation
It is necessary to lay the foundations of a ventilation system at the construction stage, because remodeling a finished building will cost more. Brief instructions according to the design of the bathhouse ventilation system it looks like this:
- Free placement of vents is allowed, so a combined or mechanical system, including hoods for baths.
- For a continuous flow of fresh air, make an vent at the level of half a meter from the floor near the stove, and an exhaust hole on the opposite wall.
- Be sure to install adjustable dampers (gate, gate) on the inflow and outlet to maintain the microclimate.

Ventilation in a Russian bath
In order for natural ventilation in the steam room of a Russian bath to promote a healing effect, when arranging it, you must adhere to the following scheme:
- Take care of the possibility of ventilation: window, door, vents.
- The upper levels of the window and door should coincide, and above this is a place for a heat pocket. For burst ventilation of small steam rooms, simple ventilation is enough to quickly renew the air.
- A stove with a chimney is natural exhaust for a bathhouse: exhaust air will flow upward through the duct, and the inflow will be through the cracks at the bottom of the door.
- For air exchange, arrange vents: an exhaust hole under the ceiling, equip it with a door (damper), and make an inflow next to the stove and install a ventilation grille.
Video: how to properly ventilate a bathhouse
Found an error in the text? Select it, press Ctrl + Enter and we will fix everything!Right organized ventilation helps improve the quality of bath procedures and increases the durability of a hygienic building. We will tell you below how to perform inexpensive and reliable ventilation of bath rooms and achieve the necessary air exchange.
Content:
Bathhouse ventilation is a well-organized exchange of exhaust and fresh air in the premises without compromising their temperature conditions and the safety of the entire building. It helps ensure comfort from staying in the steam room, eliminates carbon monoxide poisoning and promotes economical consumption of heating oil. The installation of ventilation in a bathhouse requires a responsible approach to this issue and is one of the most difficult stages in the construction of such facilities.
Types of ventilation in the bath

Ventilation is needed not only for a hot steam room, but also for other rooms in the bathhouse - changing rooms, showers and rest rooms. For each of them you can choose an individual type of air exchange.
The three most popular types are:
- Natural ventilation. It is based on the principle of air circulation due to the difference in its pressure inside and outside the room.
- Forced ventilation. Its effect is achieved through the use of electrical equipment and devices in homes that pump or extract air.
- Combined ventilation. Combines the principles of both of the above types.

We will consider further what type of ventilation is most optimal for a bathhouse.
With mechanical, i.e. forced air exchange can create a comfortable environment in any room. However, such ventilation installed in a steam room will subsequently lead to considerable financial costs.
In combined air exchange, the outflow of contaminated air occurs using an exhaust electric fan, and fresh air flows in naturally through a special channel, usually located at the bottom of the wall of the room. Such a ventilation system has the right to life, but its use in a steam room will entail possible inconveniences, namely:
- To regulate the intensity of air exchange, the valve on the exhaust channel will have to be closed periodically. This action creates additional load on the fan, which is undesirable.
- If the exhaust ventilation in the bathhouse is too intense, then to maintain high temperature in the steam room you will have to additionally “feed” the sauna stove. But for quick ventilation and drying of a steamy room, an exhaust fan is very useful.
Important: the selected ventilation scheme in the bathhouse must ensure a fivefold exchange of air in one hour, regardless of its type.
How to make ventilation in a bathhouse
Let's consider the organization of natural air exchange in the bathhouse with two options for the location of the furnace firebox: if it is located in a room adjacent to the steam room, and when it is present in the steam room.
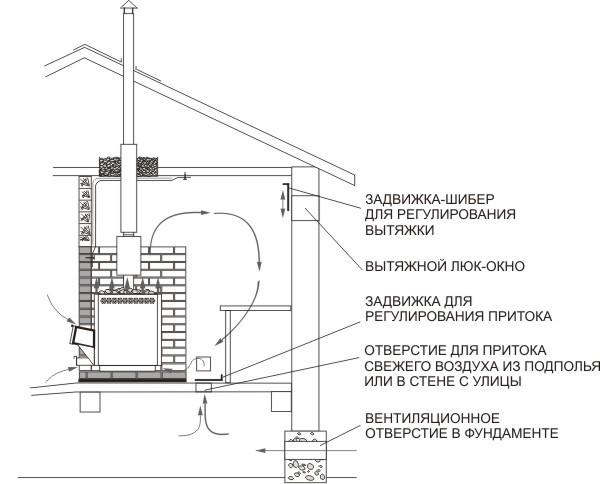
Ventilation in a bathhouse with the firebox located in a room adjacent to the steam room

Firebox outlet sauna stove into a relaxation room or dressing room has quite obvious advantages:
- There is no burning, smoke, dirt or debris from firewood in the steam room.
- The steam compartment is not cooling open door when servicing the oven.
- The firebox heats the adjacent room without disturbing the temperature regime of the steam room.
- There is always a place to store and dry a supply of firewood.
- Using heat-resistant glass instead of a metal oven door, you can enjoy watching the beautiful play of flames in the relaxation room, which has a beneficial effect on the psyche.
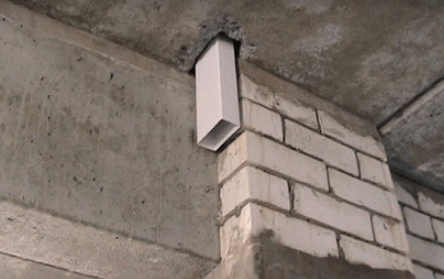
Then you need to lay an air duct to bring fresh air into the bathhouse from the street. The air duct is made in the form of a box or pipe, the end of which is equipped with a mesh that prevents insects and small rodents from entering it. The other end of the air duct is introduced to the bottom of the firebox and is located at a distance of several centimeters from metal sheet, attached to the floor and serving as its protection from accidental fire. The ventilation ducts of the stove and the supply air duct form a single system connecting the steam room space with the natural flow of fresh air.

Depending on the design of the bathhouse and its interior decoration, such an air duct can be located in the space under the floor or along its surface along the wall. The principle of placement of the exhaust duct is no less important. Its design is equipped with windows equipped with special shutters. Air quality, temperature and humidity depend on their location. Good place for ventilation hood- this is a wall removed at a distance, located opposite the stove.
At a distance of 30 cm from the ceiling, you can embed a ventilation valve into the air duct and use it to regulate the intensity of air exchange. Pretty simple, isn't it? But in this case, hot steam will come out along with the exhaust air. To reduce its outgoing flow and temperature drop, the valve will need to be closed. As a result, the flow of fresh air will decrease, and difficulty breathing will appear. Two valves enclosed in a vertical air duct will help eliminate this unpleasant moment. One of them should be placed on the wall under the ceiling, and the other below under the shelves.
We open the lower valve in the process of taking paired procedures. Fresh air heated by the stove rises to the ceiling. When it encounters an obstacle, it changes direction and ends up on the receiving end of the lower valve. Here, one part of it enters the air duct for exhaust, and the other part of the steam continues to circulate. The resulting vacuum is compensated by the supply ventilation box, supplying a certain volume of fresh air. As a result of the “circulation”, we get healthy air exchange while preserving precious heat in the steam room. If it is necessary to heat the bathhouse, the supply valves are closed, and when ventilating the steam room, they are opened for drying.
When calculating air exchange, it is important to determine the cross-sectional area of the air ducts. The transverse dimensions of supply ventilation ducts are usually taken to be 20% more sizes chimney and by 10% smaller sizes cross sections of exhaust ventilation ducts. The exhaust duct must be connected to a ventilation riser, which is led to the roof of the building and equipped with a diffuser. The height of the riser above the roof determines the traction force in the furnace: the higher, the stronger.
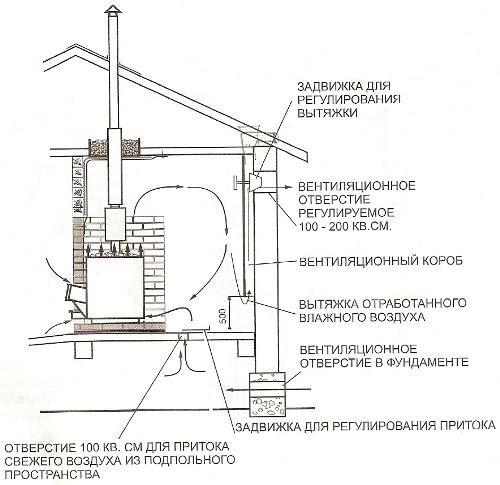
Ventilation in a bathhouse with the firebox located inside the steam room
The operating principle of air exchange with the furnace firebox inside the steam room does not differ much from the previous one. Here, fresh air is also supplied and exhaust air is extracted, and the rules for minimal heat loss through the hood are observed. But the main difference still exists. Namely, the pattern of clean air flow changes. It is complemented by the installation of a supply ventilation channel, which is necessary to maintain the fuel combustion process in the furnace.
In this case, the heating process of the steam room is controlled by two doors located one above the other. When the oven begins to warm up, only the bottom door opens, while the top door is tightly closed. This position prevents the intake of cold air from the street. After the initial heating of the sauna stove with the top door open, part of the steam room air will enter through the hole below, heat up again and exit into the steam room through the door located at the top of the box.

After the steam room has warmed up sufficiently, the bottom door should be closed and the top door should be left open. When the room is subsequently heated, cold air from the supply air duct enters from below into ventilation ducts oven, it heats up there and goes out into the steam room through the top hole.
After the air in the steam room has completely warmed up, both doors are closed. The room adjacent to the steam room can be heated by opening the door located on the corresponding wall.
A video about ventilation in the bathhouse is presented below:
So, we have studied the main points of the correct organization of healthy air exchange in a bathhouse. If you really want to, you can do the ventilation in the bathhouse yourself, but you can’t do this without the help of an experienced stove technician. Construction of a furnace is a process that requires thorough knowledge and significant skills. After all, not only the heating of the steam room, but also the efficiency of ventilation, and therefore our health, depends on its quality.


