Ventilation in the basement is necessary for the normal functioning of any building. Norms and standards for the installation of ventilation systems are developed taking into account the structural features and purpose of the basement.
The basement of a private house usually has a specific purpose: it can be used as a workshop, a training room, or even a sauna. But traditionally, the basement is equipped for storing food. Stocks of healthy and environmentally friendly vegetables, fruits, and home canned food are still in demand in every family today. Products are stored in the basement for long-term storage and consumed as needed.
Ensure proper ventilation in the basement
To preserve supplies in the room, it is necessary to maintain the required temperature and humidity - this is the main task of ventilation systems. A clean, dry, temperature-controlled basement can be designed before the home is built, but can also be installed in an existing structure.
The room ventilation system is arranged on the basis of simple and well-known laws of physics: warm air masses tend upward, they are replaced by cold air flows coming from outside. All types and types of ventilation systems are based on these laws.
Purpose and types of basement ventilation systems
There are two types of ventilation systems:
- Natural ventilation involves the spontaneous movement of air flows under the influence of natural forces. Additional devices and equipment are not used for this type of ventilation: naturally, various parameters of pressure, air temperature and wind force work.
- In a compulsory system, the main thing and required device to organize air movement - a fan. Basement rooms with a large area or with a significant concentration of people must be equipped with forced ventilation.
In this video we will look at ventilation in the basement:
Organization of natural ventilation of the basement
The most economical and simplest basement ventilation is the installation of special holes in the basement of the house, vents.
A clear example of natural ventilation in the basement can be seen in apartment buildings, where along the perimeter of the building. For a private house, it is also better to do it during the construction process, but it is quite easy to cut holes in the basement of the wall of an already finished building.
Air enters and exits through holes in the base. The air temperature inside and outside the room is different, this forces air currents to move, thereby ventilating the basement.
It is more difficult with circulation in the summer, when in certain periods there is no temperature difference, and the air in the basement stagnates: in such situations a fan is needed. The only significant drawback of the vent design is the dependence of circulation on wind and precipitation.
Requirements for the installation of vents:
- The holes are located at a level of at least 30 cm from the soil surface.
- The cross-sectional size of the holes is usually equal to or a multiple of standard size single simple brick.
- The larger the basement area, the larger size and the number of breaths.
- The vents are equipped with protective grilles against the entry of animals.
- To regulate temperature and circulation, dampers or valves are installed on the openings.
Vents in the basement are considered the simplest and most inexpensive ventilation system, but this option does not always provide normal functioning premises.
Supply and exhaust ventilation system
When the basement is only partially immersed in the ground and separated from the outside space only by a basement wall, then it is possible to install an inexpensive and fairly simple system for ventilating the basement, called a supply and exhaust system.
This design is based on the use of two pipes: one for air supply, the other for air outlet.
Basic parameters and system requirements:
- Cold air is located in the lower layer - which means that a pipe is supplied here to supply air from the street.
- Bottom part supply air duct located at a level of 30-50 cm from the floor, the top one goes out.
- The best option for placing the inlet pipe is on the north side, preferably in the shade.
- The lower opening of the hood should be located at ceiling level.
- The top opening of the exhaust pipe is located as high as possible: the best solution The hood will be installed strictly vertically and 1.5 m above the roof ridge.
- A deflector installed at the upper end of the pipe can significantly increase draft.
- Ventilation pipes should be located on opposite walls at the maximum distance from each other so that air flows ventilate the entire room.
- To protect against the influence of bad weather on the system, you can place a fan in one of the pipes.
A simple system of two pipes solves all problems with ventilation for a basement of 30-40 m2, for larger area a coercive system is needed.
 Get rid of excess moisture in your basement
 Forced ventilation of basements
Natural and inexpensive ventilation of the basement is impossible in the following cases:
- The ground floor consists of several rooms with different functional tasks.
- The area of the basement is significant or has its own levels.
- It is not possible to arrange vents due to the peculiarities of the base or the topography of the site.
- The basement is completely buried in the ground.
In such cases it is necessary forced ventilation, when the movement and direction of air flow in the basement is regulated by a system of air ducts and fans.
In addition to fans, a forced air exchange system may include:
- humidity and temperature detector;
- relay for automatically turning off and turning on fans;
- periodic switching timer to save energy;
- electric heater (heater);
- air conditioners, humidifiers;
- filters or their systems in ventilation ducts to purify air coming from outside.
IN country house with a basement area of more than 50 m2, it is rational to use a general house ventilation system for ventilating the basement.
How to calculate and install ventilation in the basement with your own hands
The design of a house with a basement necessarily includes calculations ventilation system. But sometimes ventilation is installed much later than the construction of the house, often independently and without a project.
The main issue when installing a ventilation system on your own is the choice of pipes and correct calculation their diameter.
Pipe selection
Pipes for ventilation ducts can be metal, plastic, asbestos-cement and even wood:
- From the point of view of ease of installation, PVC products are best suited; in addition, the necessary couplings, bends, gaskets and various types of fasteners are available for sale.
- The cheapest option can be considered the production of wooden pipe boxes.
- Metal pipes are the most durable, but difficult to install and quite expensive.
- Asbestos-cement products are heavy and are not environmentally friendly, but they are not inferior in durability to metal ones.
Exhaust pipes from the basement are often made in the form brickwork along the house. Such ventilation duct is done to ensure ventilation of the entire building and is connected to the general ventilation system.
Preparation
To install natural ventilation in the basement, it is necessary to carry out a number of preparatory work.
One of the most important preparatory stages is considered drying, which is usually carried out in the summer in an empty basement and can be done in different ways:
- All open possible ways for the penetration and exit of air, thus the room is ventilated for the time necessary for complete drying.
- A container with hygroscopic substances is installed in the basement, which intensively absorb surrounding moisture. This could be a box of dry lime or regular coarse salt.
- To speed up drying, you can place it in the home cellar household fan. Two or three days of fan operation with open hatches and dampers is enough for complete drying.
- It is possible to dry the basement using various heating and heating devices, For example: heat gun, electric heater or small portable wood stove.
The second, mandatory stage after drying, should be waterproofing the walls and floors. There are many options for protecting basement surfaces from moisture; their choice depends on the purpose of the room and the financial capabilities of the owner.
Walls in the simplest brick or concrete design are impregnated waterproofing compounds, the choice of which is very large in trade. Waterproofing floors can be done in an effective and inexpensive traditional way:
- The floor surface is covered with a layer of stones with a tamper.
- A thick solution of approximately equal proportions of clay and sand is mixed.
- The mixture is applied in a layer of up to 10-15 cm to the floor surface with tamping and careful filling between the stones.
- The layer is leveled and covered with a compacting layer of coarse sand.
Clay insulation naturally dries within 30 days. For food storage, clay packing is the best option in terms of environmental friendliness, safety and cost.
You can begin installing ventilation in the basement yourself after complete drying and waterproofing.
How to calculate pipe diameter
The diameter of the pipes is determined based on the area of the basement. The cross-sectional area of the air duct must be at least 26 cm2 per 1 m2 of cellar area.
A practical calculation for a 20 m2 basement would look something like this:
- total area of inlet supply pipes in cross section 26 X 20 = 520 cm2;
- the total area of the exhaust pipes should be 15% larger than the supply pipes 520 X 1.15 = 598 cm2;
- cross-sectional area of a pipe with a diameter of 150 mm = 177 cm2;
- the need for supply pipes with a diameter of 150 mm will be 3 pieces, and for the exhaust - the same plus one pipe per 100 mm.
The length of the inflow pipes depends on the location of the inlet openings. The length of the exhaust pipes is calculated based on the height of the house plus 1.5 m.
Installation
For a cellar small area There are several basic rules and regulations for ventilation design that have been tested in practice and are easy to understand and implement:
- Compiled general scheme ventilation system.
- Holes are punched in the base or elsewhere for air flow.
- An inlet duct is installed with the lower opening located near the floor no higher than 0.5 m.
- If necessary, turns of no more than 90° are made in the channel.
- The pipe is attached to the wall or in another way, the joints in the opening are hermetically sealed.
- The upper end of the supply pipe is flush with the outer surface.
- Exhaust products are mounted under the ceiling at maximum height.
- Several exhaust pipes will be connected into a common channel over the total area.
- The outer part of the pipe is arranged strictly vertically, at least slightly above the roof ridge, and a deflector is mounted on top.
Accurate calculation of diameters, reliable pipe fastening, protective grilles, correct location air inlets and outlets guarantee reliable air circulation.
Launch and commissioning
An indicator of a well-designed ventilation system is good draft of the exhaust vent. It is enough to light a match under the hood to see how the system works: the smoke should go into the chimney.
Sometimes fans are inserted into the pipes to increase air flow - in this case, fewer pipes themselves will be needed, but the ventilation itself will become partially forced. The final assessment of the system can be given some time after the ventilation is put into operation. The absence of stale and musty air, mold, good condition of food, stable temperature and humidity are indicators of a well-functioning basement ventilation system in a private home.
People who run their own households know how much physical effort and time it takes. I want to store the rich harvest from my land carefully and for a long time, so that nothing is lost, and titanic work is not in vain. Such people are wondering how to make a hood in the cellar with their own hands. It does not require a lot of effort and money, and such a thing as a cellar is very useful on the farm.
In fact, there is nothing complicated about it. The main thing is that fresh air got into and out of the cellar, creating the necessary circulation air masses in a confined space. Otherwise, with high humidity in the room, the products will rot, and mold, fungi and pathogenic microorganisms may appear.
Therefore, a properly functioning ventilation system in your cellar will prevent such phenomena.
Pipe placement for efficient ventilation
The supply pipe should be placed so that its end is at a distance of 20-30 centimeters from the cellar floor. The upper end of the pipe is located on the surface at the base of the soil. There is no need to raise it very high. It is important that it is located in a ventilated place and air can easily enter there.
The exhaust pipe must be placed at the other end of the cellar, the lower part of the pipe is located on the contrary at the top, 20 - 30 centimeters above the ceiling and goes out onto the roof. It is important that the exhaust pipe is insulated, as condensation can form on it, which increases the humidity in the room. This arrangement will keep the ceiling dry. And the location at different ends of the room will allow air to pass through the entire cellar. If you install the exhaust pipe below 30 cm, the ceiling will be damp and mold or mildew will form on it.
In addition, you need to fence off the pipes from the penetration of moisture, insects, rodents, birds and other debris that can enter the cellar through the pipe. To do this, the end of the supply and exhaust pipes located on the street is covered with a grill.
If desired, instead of a grille, you can use a device called a deflector. The deflector is installed at the end of the exhaust pipe facing the street and provides greater protection against moisture penetration into the cellar, and in strong winds, due to the pressure, air will come out of the pipe faster, which will enhance ventilation in the cellar.
You need to take care of how to properly make a hood in the cellar even before the start of construction in order to avoid unwanted mistakes.
If you do build using two pipes, do not place them close to each other, otherwise the air entering from one hole will immediately exit from the other and ventilation of the cellar will be minimal. Please note that both pipes are same size. Inconsistency can cause air to stagnate in the room, creating an ideal atmosphere for rotting. Before starting construction, you should have a cellar ventilation scheme in order to calculate, think through everything in advance and avoid mistakes.
Cellar ventilation with one pipe
The only conditions necessary for ventilation with one pipe are a small cellar area. A large room will not be able to be properly ventilated if there is only one pipe and problems will begin.

Scheme for organizing simple cellar ventilation: two pipes are built into one
For such ventilation, they take a pipe divided into two compartments, through which air enters from one shade and leaves from the other. It is extremely important to place the ventilation in such a place that it is well blown by the wind, otherwise even for a small cellar one pipe will not be enough. Therefore, a diagram of the hood in the cellar is needed in order to understand and measure everything in advance.
After installing the hood, air circulation is checked. For example, you can smoke a room and see how quickly the air clears. You can also attach sheets of paper to different ends of the pipe - one sheet should fit tightly, since air escapes through it and blocks the process, and the other sheet, on the contrary, will not be able to fit tightly.
Fragrance in the cellar
The exhaust device in the cellar is capable of maintaining optimal humidity air (90%) and eliminate high humidity. But if a situation occurs when water gets inside the cellar and the humidity is increased, it is necessary to correct this.

Organization of condensate collection in the cellar ventilation system
Ventilation alone will not save the situation here. Proper waterproofing of the walls and floor of the cellar is necessary. And, if necessary, install a tank with a tap on the ventilation pipe to collect condensate.
To do this, place containers in the cellar with substances that can absorb moisture from the air - rice, salt (coarsely ground), lime. Even special adsorbents for such purposes are sold. If there is a lot of water, then you must first pump it out, and only then install adsorbents to remove residual moisture in the cellar.
To control air humidity, install an alcohol thermometer. This way you will control changes in air humidity. And if the cellar with large area, place two - at different ends of the room.
Exhaust fan
The essence of its installation is to forcibly increase ventilation in the room. The fan is installed inside the exhaust duct. Thus, enhancing the removal of air to the outside and, accordingly, increasing the flow of air into the accessory pipe. A cellar hood must be effective and keep food fresh for as long as possible.

The fan power is selected according to the size of the room. Too much powerful fan will create too much draft and will cool the food too much.
You can install two fans in both pipes, but this requires consultation with a specialist, because for large and complex rooms, everything needs to be specially calculated and thought through so that the hood in the cellar is as efficient as possible.
How to determine the required pipe diameter
If not complex design premises, it is possible to calculate the required diameter for cellar ventilation. You need to know that for one square meter you will need 26 square centimeters of ventilation.
Thus, we multiply the area of the room by 26 square centimeters and get a number that must be divided by 3.14. The resulting number is the pipe diameter we need.
How to install an exhaust pipe with your own hands
If the cellar was made first, and only then the exhaust device is installed in the cellar, then first you need to make a hole of the appropriate size. After this, install the pipe at the required distance from the ceiling.

Seal all gaps in the cellar ventilation pipes hermetically
Make sure that there is no excess space left after installing the hood. If this happens, seal the gap hermetically.
If the cellar is built under the house, then the hood can be installed in the fireplace chimney. Thus, the difference in temperature will increase the ventilated air output.
If the hood goes outside, it should be much higher than the supply pipe.
What kind of pipes are used for cellar ventilation?
There is now quite a large assortment ventilation pipes, but most often used are asbestos-cement or polyethylene. Because of their composition, asbestos-cement ones are much heavier than polyethylene ones, but both are equally durable. When installing polyethylene pipes You may need to boil them; this may not be possible for everyone. Therefore, most often, a specialist is invited to install polyethylene pipes to do this work.
When the question arises - “how to make a hood in the cellar yourself” there is nothing complicated. It’s quite easy to do it yourself with minimal expenditure of money and time. Proper hood in the cellar will help the food be stored for a long time and make you happy on the table.
When you hear the word “basement”, many probably have associations with a dark, damp and cold room in which food or something not very necessary is stored. This is the microclimate that is often maintained in cellars. And it is this that greatly harms both the building itself and what will be stored there.
To ensure a favorable microclimate in the basement, you need to organize a properly functioning ventilation system in it. We'll look at how to do this below.
We will consider the arrangement of ventilation in the basements of small buildings: in a private house, barn, garage.
Is ventilation needed in the cellar, and why? (+video)
Yes, it is necessary and mandatory. Any room (not only residential, but also basement) needs air exchange.
In the basement, the ventilation system maintains normal humidity. In the basement it increases very quickly, especially if:
External waterproofing and insulation of the basement are absent or poorly performed;
it rains heavily;
there are cracks in the walls of the cellar (through which moisture can penetrate inside);
Due to the strong temperature difference, condensation forms on the walls inside.
What happens if there is no ventilation system in the cellar, or it does not work well?
If the ventilation system in the cellar does not work at all, or does not work well enough, the cottage owner will face the following problems:
the air in the basement will be damp and stale - being in such conditions will be both unpleasant and harmful for a person;
Will deteriorate quickly due to humidity interior decoration basement (if there is one) and flooring on the floor of the first floor;
the basement walls and the ceiling between the basement and the first floor will collapse faster;
the floor on the first floor may be wet (if the ceiling is thin and there is no insulation and waterproofing);
if food is stored in the cellar (for example, potatoes, apples, carrots, and other crops), or products made of wood, fabric, metal, they will deteriorate faster due to humidity;
V rooms on the first floor may appear bad smell due to rotting food in the cellar).
Basement ventilation standards
SNiP regulates only the design of ventilation systems for apartment buildings. SNiP 31-01-2003 “Residential multi-apartment buildings” contains the following information:
In the external walls of basements that do not have exhaust ventilation, vents with a total area of at least 1/400 of the basement area should be provided. Vents should be evenly located around the perimeter of the external walls. The area of 1 vent must be at least 0.05 m².
The air exchange rate should be 1.5. That is, if the basement area is 100 m², then in 1 hour the ventilation system must move at least 150 m².
These same standards can also be relied upon when constructing basements in low-rise buildings.
How to make cellar ventilation with your own hands: types of schemes
Any ventilation system consists of 2 components: inflow fresh air from the street and removal humid air from the premises.
The process of air passing from the street into the basement and then removing it from there can be stimulated in 2 ways:
Natural. Air exchange occurs due to pressure differences. The difference is created due to the different heights of the pipes. The exhaust pipe must be installed above the roof ridge. The method is not very successful - such ventilation will work unstably and will largely depend on the weather.
Forced. The best scheme any ventilation system is precisely a mechanical design: when air exchange is created by a fan. For a basement, 1 fan standing on the hood is enough.
Below we will consider in more detail how to build both types of ventilation systems.
Natural
For natural ventilation, 2 pipes are supplied to the room (one for supply, the other for exhaust). Their openings should be located at different heights: supply - low, exhaust - as high as possible (but always above the roof canopy).
Its huge disadvantage is that productivity (the amount of air passing through the basement) is highly dependent on weather conditions. If it is cold and windy outside, the air exchange will be good. If it's warm and there's no wind, it's bad.
How to properly organize natural ventilation yourself:
For inflow, vents are drilled around the perimeter of the basement. If the room is completely buried in the ground and does not protrude above the surface, you will have to make a pipe leading from the surface.
For exhaust, a second pipe is installed on the opposite side of the room. It is installed above the roof ridge so that nothing obscures it from the wind.
It is advisable to install a deflector on top of the exhaust pipe to improve draft. The supply pipe is covered with an umbrella (and if it is vents, with a ventilation grille).
P forced (+video with example)
A more stable and efficient option for ventilating damp rooms.
Do-it-yourself organization looks like this:
An influx is made: through vents (if the basement “protrudes” above the surface) or through a pipe (if the cellar ceiling is below surface level).
For exhaust, a pipe is installed on the side opposite the inflow. One end of it should be under the basement ceiling, the other should go outside. It is not necessary to display it above the roof, but it is possible.
A fan is installed in the exhaust pipe, which will drive air from the room to the street.
If you remove the pipe as in the first case (above the level of the visor), then the ventilation will work even natural principle, even if the fan is turned off. If the hood is not vented above the roof, it will only work when the fan is on.
Where should the inlet and outlet openings be located?
The location rules are:
The inlet must be located opposite the hood.
If the inflow is organized through a pipe, ideally it should extend to a level of approximately 0.3 m above the basement floor. If air flows into the upper part of the room (as happens when installing vents), the air exchange in the lower part may be weak or even absent.
If the inflow is organized through vents, they should be located around the perimeter of the room so that there are as few “dead” areas as possible (near which there are no inflow points).
The exhaust duct opening should be located immediately below the ceiling so that the air does not stagnate in the upper part. Ideally this should be an angle. If it is not possible to make a ventilation duct in a corner, then it is advisable to place inflow points in the corners (so that there is also air movement there).
Nuances of arranging a ventilation system depending on the size of the basement
Usually in private houses (both in cottages and dachas) basements are not very large in area and volume, and consist of 1 room (that is, they do not have rooms). In this case, you can use all the data and rules that are given in this article.
But if you have a large basement, or if it is divided into several rooms, or if it consists of several “floors,” then the ventilation system should be more thoughtful.
The main nuances in brief:
If your cellar is divided into rooms (even if there are 2 of them), each of them should have its own inflow point and a “path” for removing air (at least 1 each). Both supply and exhaust can be organized either through a ventilation duct (run 1 pipe across the street for supply and exhaust, and inside - distribute them throughout the basement), or make vents in each room.
If your cellar has more than 1 floor, a ventilation system must be installed in each of them. In this case, it is recommended to use only mechanical ventilation(and it is advisable to install a fan on the supply side as well).
If the basement consists of 1 room and is large in area (conventionally - from 20-25 “squares”), then it is advisable to use at least 2 inflow points. If you don’t want to make several holes in an existing building, you can make 1 hole, run a pipe through it from the street inside, and run it along the wall. In the pipe - make several holes at a distance from each other (so that air is supplied through them to different parts of the basement).
Example of a ventilation system for a basement at a depth of 3.5 meters (video)
Service Questions
Below we list several basic issues related to improving and maintaining the system.
How to automate the system?
The microclimate (humidity level and temperature) in the basement can vary over a wide range - since no one constantly controls it, heaters and other climate control equipment are usually not installed in the basement.
Therefore, for more efficient and economical operation of the ventilation system, it is worth automating it.
Automatic ventilation is organized using sensors:
Temperature sensor. Useful in winter to avoid manually closing the ventilation in cold weather. The temperature sensor can control the motorized damper, closing it, or the speed of the exhaust fan, reducing it or turning off the device completely.
Humidity sensor. Useful at any time of the year (in winter, moisture can penetrate through the soil, in the warm season - due to rain). The humidity sensor can control the exhaust fan by increasing or decreasing its speed. If the humidity rises, the fan will spin harder, removing more air. And vice versa: if the humidity is normal, the fan slows down or even stops so as not to waste electricity.
Is it worth closing the cellar ventilation for the winter? (+video)
In winter, basement owners are faced with the question: should they close the ventilation ducts during frosts, or leave them open?
The bottom line is this: at low temperatures, the difference in air pressure outside and indoors increases. Because of this, air exchange accelerates (more air passes through the ventilation system). And since the air is frosty, and there are usually no heaters in the basement, the room quickly gets cold. This occurs at temperatures from -5-10º and below, especially if the house is located in an open area.
It turns out that with open ventilation ducts in severe frost, owners are faced with the following problems:
food stored in the basement may freeze;
with the onset of cold weather, rodents and insects look for a warmer shelter, and through vents they can enter the cellar;
it is difficult to be in the basement without warm clothes (due to the low temperature);
the exhaust pipe may become clogged with frost (since the air in the basement is warmer and more humid, when rising through the pipe, moisture from it can condense on the walls, and the walls from the inside will gradually become overgrown with frost);
cold can be transmitted through the ceiling to the rooms on the first floor.
To prevent this, you need to either install a heat source (heater) in the basement or cover the ventilation ducts. There is no specific temperature at which it is necessary to close the cellar ventilation (but if the temperature during the day remains stably below zero, and at night drops below -5º, then you need to pay attention to the ventilation openings). But there is also a serious nuance: you need to look not at the thermometer, but at the microclimate in the basement.
Depending on the microclimate, the following measures should be taken:
If the weather is rainy and there is damp or condensation inside(a common problem in the fall, especially in November)- That ventilation must be left open. If you close it, the humidity in the basement will increase even more, and this will lead to mold.
If there is no condensation and the humidity is normal, but around ventilation holes frost has appeared - they need to be covered.Since precise adjustment cannot be achieved, you can first cover the holes by 50%, and after 1-2 days see again if there is frost on them. If there is, then you need to cover the ventilation even more, leaving a small gap.
What exactly needs to be blocked - air flow first(vents or supply ventilation ducts). Ideally, the supply openings should be adjustable: a damper or adjustable blinds. If this is not the case, the owner will have to close the holes with improvised means. The easiest option is to use a sheet of metal that is attached to ventilation grille wire.
How to check cellar ventilation?
If you bought a house and do not know the condition of the ventilation system, or have not been in it for a long time, or simply have not been interested in the operation of the ventilation before, it is recommended to check it.
How to improve air exchange?
If the basement ventilation system is not working well enough, you can correct the situation in the following ways:
Clean the exhaust duct and vents (or supply pipes). Over time, ventilation ducts can become clogged with leaves, poplar fluff and other small debris. This can either worsen or stop air exchange altogether. Therefore, if there are problems with ventilation, it must first be inspected.
Install the fan in the exhaust duct. Most effective way: forced extraction is always more effective than natural extraction.
Extend the exhaust pipe if possible. The higher the exhaust pipe, the greater the pressure drop, and the better the air exchange. The method is not very convenient and simple. It can help if there is some kind of “obstacle” next to your building: more high buildings, or tall trees, or the house itself is in a low place.
Install a deflector on the exhaust pipe. This is easier to do than extending the pipe.
Most The best way increase draft - first check the condition of the ventilation pipes, clean them if necessary, and then install a fan in the exhaust pipe.
Which pipes to choose for the cellar ventilation system?
Selection rules:
Material. D For ventilation ducts you can use either plastic pipes, or galvanized. Galvanization is slightly more expensive than plastic.Because for small rooms There is not much difference - you can take what you like.
Section shape (round or rectangular). Rectangular ones can be mounted end-to-end along the walls - which is convenient if the cellar is very small.
How to calculate a ventilation system for a cellar?
The calculation must be carried out to determine 2 indicators:
The total air flow in cubic meters that must pass through the basement in 1 hour. Based on this value, it is necessary to select the fan power if exhaust ventilation will be mechanical.
Cross-sectional area of air ducts. Based on this value, it will be possible to determine the diameter of the exhaust pipe.
Calculation of air flow (+ determination of fan power)
For any cellar or basement, the presence of ventilation is considered mandatory; if there is a lack of regular air flow from the street, it will be constantly damp. The article discusses how to make ventilation in the cellar, which can maintain an optimal microclimate and prevent the appearance of mold.
If you carefully study the scheme of their arrangement, it becomes obvious that the ventilation of the basement is not complicated. There are several types of such systems:
- natural;
- forced;
- combined.
The choice of the specific appropriate system will depend on the size of the basement. For a basement with an area of up to 50 m², the power of a natural ventilation system will be enough. Let's look at these types in more detail.
Natural type exhaust system.
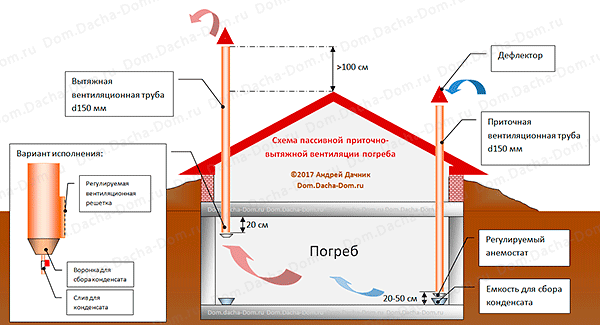
This ventilation in the basement is based on the principles of temperature differences between indoors and outdoors, as well as pressure differences. The effectiveness of such a system depends only on how well the pipes are positioned. Natural ventilation ensures the flow of fresh air from the street and the removal of old air. To organize such movement, you need a pair of pipes:
- for hood;
- for influx.
The arrangement of these pipes must be done near the walls of the cellar opposite each other. Such a ventilation device in the cellar makes it possible to maintain the maximum distance between pipes. The outlet of the inlet pipe is made at the bottom of the wall, at a height not exceeding 20-50 cm from the surface. Accordingly, pulling, at the top of the basement no more than 10 - 20 cm from the ceiling.
Why is it done this way? This mutual arrangement of pipes is due to this. A warm air flow rises upward, because it is lighter, and a cold air flow, on the contrary, falls down. In such a system, cold air from the street tends down the pipe. Once in the cellar, it warms up and tends to escape into the street up the exhaust pipe. A deflector can be installed on the top of the exhaust pipe. Its special shape creates additional vacuum. This improves cellar ventilation.

The main disadvantage of such a ventilation system is that the air whirlpool stops if the outside temperature is higher than the inside one. In such cases proper ventilation a cellar involves installing a combined or forced system.
Forced type of ventilation.
The design of the air ducts of such a system is practically indistinguishable from the natural one, which was discussed earlier. The main differences lie in such nuances. Both pipes can be installed externally at a height of about 50 cm above the surface. Internal pipes Cellars must be equipped with fans. One electric fan works for exhaust, the other for supply. Such ventilation in the basement of a private house is preferable if the basement is more than 60 m² or it is not possible to raise the hood above the roof ridge.
The design of a forced ventilation system must be thought out in advance, just like projects for other types of ventilation. The design must include calculations of the quantitative volume of air exchange in the room and its frequency. This will be needed when choosing fans.
The air exchange rate is taken to be 2 m³ of air per cubic meter of volume per hour. By calculating the volume of your basement and multiplying by the factor, you will find out the required performance of electric fans.
Forced ventilation is installed in large basements. Typically part of common system air circulation in the building. Miscalculations and implementation of such a hood require special knowledge and great experience. If you do not understand how to make ventilation in the basement, do not undertake to do everything yourself, turn to professionals.
Combined hood.
The most versatile and suitable different rooms, both in size and operating conditions. It is functional regardless of temperature environment. This system differs from others in the presence of a small electric exhaust fan on the air duct pipe. Stable operation of the hood will be ensured. Prices for fans are quite affordable, energy consumption is low. This ventilation in the basement of a private house will be appropriate if the basement is medium in size and the budget is limited.
Specifics of basement ventilation under different buildings
A good hood in the cellar under the house is designed to significantly extend its service life. Contrary to this, many people pay little attention to ventilation during construction. Some are scared by the cost of expensive systems, others simply do not know how to make high-quality and inexpensive basement ventilation, and others provide only the minimum. For example, shifting the functions of basement ventilation to the most banal vents.
Ventilation in the basement of a private house performs two tasks simultaneously: providing necessary conditions storing food and preserving the possibility of comfortable living for people living in this house. Lack of basement ventilation can negatively affect health, as well as comfort and coziness. Mold from the basement and damp air will eventually find their way into rooms and other areas. And all residents of the house will be forced to breathe this.
Features of arranging a basement in a private house:
- the suction pipe is passed through the base of the building. Further, passing the basement, to the cellar. Position it so that inner part was at a height of 30-40 cm from the floor, and the street hole was at a height of 40-50 cm from the ground; the inlet pipe should not have narrower or wider places, expansions or bends other than those necessary;
- In winter, you need to regularly clean the pipe from sticking snow;
- in cold places, the exhaust pipe must be insulated to prevent ice formation;
- The exhaust pipe for the cellar is installed inside the house in a special channel shaft, passing, for example, through the kitchen. For convenience, it is better to make a cellar under such a channel;
- the exhaust pipe starts from the ceiling and extends upward - a few cm above the ridge.

When the hood is planned before construction begins, a minimum of consumables will be required. Most are PVC or asbestos pipes and fasteners to secure them. To do this, it is necessary to provide holes in power frame Houses.
If the hood is installed in finished house, then you need to punch holes for installing pipes. A simple option is to dig up a small fragment of the foundation of the house, build holes in it and run pipes into the basement. This completes the basement stage of installation.
The ventilation pipe is brought above the roof ridge and fixed to the wall using clamps, following the example of drainpipes. The suction pipe must be protected metal mesh from rodents and pets.
When the cellar is located under the garage.
The purpose of ventilation of such a cellar is to preserve the products stored there. long-term storage, and preventing the formation of excess moisture in the garage itself. Natural ventilation will be budget option hoods. And forced is the most expensive.
The nuances of arranging ventilation for such a cellar:
- the supply pipe is pulled as close to the surface as possible;
- exhaust pipe - as high as possible above the roof - to a height of 80-100 cm above the ridge. This pipe arrangement improves traction;
- the outer parts are equipped with a casing or deflector, which increases traction.

Air circulation is adjusted using special dampers built into both ventilation pipes. Dampers are a must in extreme cold. At this time, it is advisable to limit the flow of cooled air.
Forced ventilation will make the air exchange process independent of meteorological conditions. The exhaust pipe is equipped with an electric fan. It draws air from the cellar, and the vacuum draws in air from the street through another pipe. Air circulation is also possible using one double pipe.
Ventilation in the cellar is easy to organize with your own hands. For independent work you will need:
- hammer drill;
- screwdrivers;
- chisel and hammer;
- fastener
First you should read this material and calculate how to properly do ventilation. It would be more logical to do all the calculations during the design and construction of the facility. Regardless of the type of system, you still need to correctly calculate the cross-section of the pipes. The calculation scheme used by specialists is very complex. However, to calculate the diameter in a small cellar, you can use a simplified method. You can make your calculation by assuming that 1 m² requires 26 cm² of pipe section. For example, here is the data for calculating the cross-sectional diameter of the ventilation pipe:
- area 10 m²:
- multiply the area by the coefficient - 10 × 26 = 260 cm²;
- pipe radius - square root of the area divided by 3.14 - (260/3.14) ≈ 9 cm;
- supply pipe diameter 18 cm = 180 mm.
For a reserve, take a pipe for the ventilation duct with a diameter 10 ÷ 15% larger than the calculated one, approximately 200 mm.
To combat air humidity, the cellar must be ventilated before the season. You can also put a box with ordinary salt or quicklime in the cellar (they absorb excess water and disinfect the room - that’s a house secret).
When designing any exhaust system, it is necessary to take into account various key factors. Determine the purposes and operating conditions of the cellar. Pay attention to the nuances of the weather in the area where the cellar is being built. Do your work thoughtfully and slowly. Be smart and careful at any stage of work or design. Good luck!
Basement ventilation, like ventilation of any living space, is necessary to ensure that exhaust air is replaced with fresh air. Thanks to organized air exchange, the cellar or ground floor becomes suitable for use as a pantry, storage for vegetables or fruits.
If you take the improvement of the basement more seriously, then in this area you can place a swimming pool, garage or home gym. However, basement ventilation in a private house has its own characteristics. We will talk about them in more detail in our article. Let's look at the rules for arranging ventilation in the basement when natural air exchange, as well as in the case of using forced ventilation.
Reasons to install a complete, properly functioning ventilation system basements a bunch of. They concern both the preservation of the building structure and the provision of a favorable atmosphere for living.
Stagnation of air masses and lack of ventilation lead to the fact that fungus and mold affect all objects in the room - from things and products to walls and foundations.
Fresh agricultural products stored in the cellar require special conditions. In addition to a certain temperature and humidity, air change is also important to prevent the appearance of rot or mold.
To create a comfortable microclimate in the cottage, it is important that both the attic and all other technical and living spaces are equipped with a ventilation system. Therefore, methods for its construction are thought out during planning, when a house project is being drawn up.
Among the most rational techniques– arrangement of supply and exhaust ducts, as well as openings in the walls, ensuring natural air change.