Wooden products in our country are especially loved by the population. With external simplicity, wood attracts with warmth, good quality and reliability. Of course, no one will argue that metal is both stronger and more stable, but if metal or profile barriers are found at every step, then wooden gates are piece material, practically design work, even if made from unpolished boards. How to make a wooden gate with your own hands, what design to choose, how to avoid the main problems when working with wood - all this is in our article.
Design features
With the relative density of wood, the gate frame should still be made of metal. This will keep the shape and geometry of the gate unchanged for a long time and will not allow the edges of the wood to dry out, which are usually the first to be damaged during prolonged contact with precipitation.
The sashes themselves can be made directly from wood, and the already assembled structure can be fixed with transverse lags. If the sash length is less than 150 cm, then there is no point in lags, the fixation provided by the holding frame is enough.

The length of the gate, excluding the gate, should be calculated based on the features of operation. If they are designed for small cars, 250-300 cm is enough, for large or several cars it is worth doing from 300 cm.
Gates made of wood can also be retractable. In general, this is a relatively simple system that ensures the movement of the gate leaf along the guide. Structurally, the guide is a metal rail welded to the main frame, into which roller carts are inserted. It is on them that the sash is attached and holds it rigidly. You can control the retractable mechanism manually or set up automation that is triggered from the remote control.
What wood is better to make a gate

It is easier and cheaper to make wooden gates from pine
Experts advise using the wood that grows in a particular region, including conifers. Of course, the most common tree in Russia is pine, and it is this tree that is most often chosen for finishing works, for street and load-bearing structures. There are several reasons for this, but the main two are:
- low cost of material compared to hardwood;
- pine perfectly tolerates natural precipitation, dries out a little due to the high concentration of resins and has an absolutely straight trunk, which is all the more important for large canvases, for example, gate leaves.
Larch is denser, therefore, more difficult to process and more expensive. But such material has a larger assortment of textures, which means that the protective structure will look brighter and more original.

Some choose oak for the manufacture of wooden gates with their own hands, but it is for such a structure that it is not the most profitable investment. The rich texture, quality of wood attracts, in general, it is visually more advantageous, but in terms of quality and duration of operation in outdoor conditions there is no fundamental difference between larch and oak, which means why pay more?
How to treat wood before sinking into the ground
Someone will begin to doubt the expediency of such an event, arguing this with a tendency to rot. But if authentic gates and a gate are planned, that is, completely wooden, then concrete pillars will look like a foreign body. So, how to process:
- The part that will be immersed in the ground, plus another 15-25 cm (for the gap between the ground and the frame) is burned on all sides with a burner until it is slightly charred.
- With melted tar (1.5-2 liters, depending on the number of pillars and the depth of immersion), the charred part is tarred and, while still hot, is tightly wrapped with roofing material. You can use burlap, but it's better to take roofing felt.
- After complete cooling, such pillars can be buried in the ground - even after 30 years they will not have the slightest trace of decay.
Production of wooden gates
AT this case we are talking about hinged construction with a separate section for the gate. In total, you will need 3 support pillars.
.jpg)
The height of the gate is chosen according to personal preferences. Recommended - from 180 to 220 cm. This is enough to hide what is happening in the yard from prying eyes, to ensure quality protection, but not to recreate the semblance of an impregnable fortress in the courtyard.
For a gate height of 180 cm supporting pillars are immersed in the ground to a depth of at least 100 cm (taking into account the level of soil freezing) and must be concreted. On average, it takes from 7 to 15 days to solidify the solution, depending on the ambient temperature.
So, lumber:
- fence for finishing the frame of the gate 20 x 40 mm and more;
- bar 40 x 40 cm for the frame - 4 parts 180, 180, 100, 100 cm;
- support beam 100 x 100 cm - 3 pcs. 280 cm.
For supporting pillars, you can use larch, oak or pine - the strongest. Processing by roasting, tar and roofing material is required.
- handle and lock for the gate;
- locking mechanism - lock, beam or latch;
- stops for fixing the gate;
- hinges for sashes and gates;
- cement M300;
- river sand;
- rubble.
Tools:
- jigsaw;
- to work with unpolished boards, you will need a planer and a rasp;
- screwdriver;
- drill;
- drill for preparing holes;
- plumb;
.jpg)
Approximate list of tools
Additionally, you will need buckets and other containers where concrete for the pits will be mixed.
How to make calculations and draw up a project
Before you start making wooden swing gates with your own hands, you need to decide on their dimensions and make detailed drawing. It takes into account - the height, size of the wings, the method of opening, the size and location of the gate.
For example, we give several drawings of wooden gates, from which you can choose the most suitable for a particular area.
.jpg)
Drawing of wooden swing gates - with a right-handed gate

Drawing of a wooden swing gate - with a left-sided gate

Drawing of wooden swing gates - with a separate standing gate
.jpg)
Wooden gate drawing - retractable design

Main characteristics:
- height - 180-300 cm;
- width of each leaf - 150-220 cm;
- gate width - 100 cm;
- the number of transverse bars (lag) - 2-4, depending on the height.
Work order
- Site clearing
Before you make a wooden gate, you should clean the area from large stones, stumps and other objects that may interfere with the work and installation of the structure.
- Marking the location of the supports
In order for the entire structure to be rectilinear, drive pegs into the ground along the entire length of the future structure, pull a cord between them and check the horizontal with a building level
- For supporting pillars, you dig 3 holes 100-120 cm deep. The upper level above the ground must be absolutely even, so you try to level them in depth, and if it doesn’t work out, then you will have to cut off the top.
- At the bottom of the pit, sand mixed with rubble is poured, it will be a conditional pillow, filled with water and rammed with a stick or any other improvised object. Next, strictly vertically (check by a plumb line), a beam or a concrete pillar is inserted and poured with pre-prepared concrete mortar 2 parts sand and 1 part cement.
.jpg)
There is no need for reinforcement, since a meter depth is enough for a strong and reliable fastening of the entire structure of a wooden fence.
- After 5-10 days after the concrete has completely dried, you can fasten the gate frame or hang the leaves directly on the hinges.
.jpg)
- At the top, the support pillars are fastened with a horizontal cross member, which will work by analogy with a stiffener, giving stability to the entire structure.
Sash assembly features
The frame of each sash is best assembled in a horizontal position. According to the size of the frame, boards, a saw cut or a picket fence are selected, which are convenient to assemble with the help of wooden dowels.
For reference! Wooden dowel - fastener in the form of a large wooden nail. Used to connect boards and beams.
After the canvas is assembled, it is finally fixed with self-tapping screws along the edges of the frame. Additionally, a jumper is installed, which strengthens the sash as a whole. The jumper is usually located in the center and looks either like the letter "Z" or crosswise.
It is better to supplement large sashes with jibs so that over time the edges do not go beyond the frames and do not loosen the entire structure.
The final step will be the installation of the heck, the loop.
.jpg)
Be sure to open the entire structure with varnish to give a noble shine and increase the operational life.
.jpg)
Lacquer can be colorless or tinted
VIDEO: How to make a wooden gate with your own hands
- This is a simple and stylish structure that looks great on the site. The popularity of the design is facilitated by the ease of processing and combination with other materials. Other advantages include: environmental friendliness and availability. In addition, wooden gates are decorated with beautiful ornaments.
Variety of models
wooden gate For private households, there are several types:
- Swing structures are traditional version. They are made of two canvases that open in a certain direction. A functional option is the design when the wings open inward. At the same time, the view of the road is not obstructed.
- Retractable structures are suitable for areas with small space. The product is a canvas that moves along the wall with the help of special guides.
- are made from one plate, opening up with a cord.
Selection of materials and tools
Performed spot welding. In order not to break wooden surface, thin metal is placed.
Surface finish
Creating a wooden gate to the cottage with your own hands, they should be processed. In this case, varnish and primer are used.
For application to wood, alkyd varnishes are used. They are of high quality. Are considered environmentally friendly acrylic varnishes. They are used for outdoor work, although they are intended for indoor use.
Finishing includes the following sequence of actions:
- The wooden surface is sanded with sandpaper. You can grind well with a grinder.
- Irregularities on the surface are puttied with a special putty.
- The top layer is tinted and polished. This will create a beautiful shade of wood.
- A primer is being produced.
- A layer of varnish is applied. After drying, a second layer should be applied. It will take a whole day to dry the varnish.
Forged gates with wood look great. To do this, a variety of forging elements are mounted on the structure. This is done before painting.
Before applying varnish, the places of contact between metal and wood are treated with a sealant. This will ensure a good seal.
When performing work, the surface is covered with a metal sheet. This will help avoid damage. The lacquer coating will create a unique gloss of the surface and at the same time will not affect its color.
Doors are painted after they are in place. To paint the product you will need: paint, brush, gloves, cloth and a broom.
When painting, move from top to bottom. The top of the board is processed, and then the bottom. Wooden gates are more expensive than metal gates. The decoration elements used affect the cost.
The cost of the gate consists of the size, quality of the material and the shape of the leaves. The price of a wooden fence varies from 1000 to 3000 rubles per running meter. It should be borne in mind that specialists guarantee the quality of work.
Naturally it will be cheaper. self-assembly designs. Just remember to use quality materials and have some building skills. In addition, you need to have free time.
It is difficult to imagine a modern garden plot without a fence - beautiful, durable, protecting from prying eyes. The most critical part of the fence is the installation of the gate in entrance area. You can buy ready-made products, make your own or order in a workshop for individual drawing. Convenient option- wooden gates, which are in no way inferior to metal ones, and even surpass them in some parameters.


Peculiarities
Wooden gates look traditional for Russia, they can be combined with other fences adopted in the area. Thus, it will be possible to achieve the appearance of the fence, similar to dozens of others. If you want to stand out and show your status, you can use tinting or woodcarving. To achieve harmony, it is enough to make a fence in the same style as wooden house standing on the site.


Many masterpieces of wooden architecture stand for centuries under snow, rain and different temperatures. If you follow the technology correctly, the gate will last a long time. It should be borne in mind that for windy areas, solid canvases are not the best option. Styling can have many variations, for example, the bottom is solid, and the top is openwork or lattice. So you not only decorate the fence, but also reduce the wind load that constantly acts on it. As a result, after a strong storm, you will not have to raise a tilted fence.


Advantages
Wood is a traditional building material used for thousands of years. It is easy to process and relatively inexpensive.
Wooden gates have the following advantages:
- Low cost compared to metal models.
- High strength characteristics.
- Long service life (more than 10 years) if treated with wood protective impregnation it will last even longer.
- Environmental Safety- the tree does not emit harmful fumes into the atmosphere.
- Usability various kinds decor in order to add personality.
- Self-manufacturing using inexpensive building materials is allowed.


Flaws
The design is not without some drawbacks:
- Susceptibility to rotting - the material is destroyed under the influence of water.
- Fire hazard - the tree catches fire easily, in case of fire the gate can burn out cleanly.
- Strength characteristics are lower than those of metal.
- Large weight - fences sheathed with polycarbonate or corrugated board weigh less.
- Low level of protection against vandals - traces of marker or spray paint will not be easy to remove from the surface.


Kinds
For the manufacture of gates, resistant to high humidity types of wood. Pine, larch and oak are mainly used. It is now rare to find fences made entirely of wood. Mainly used metal carcass, and the boards are used for sheathing the sashes.


But first of all, models are distinguished by the type of construction, today only 4 varieties are common.
Swing
A universal solution, the sashes are mounted on hinged hinges, if the doors are heavy, bearing fittings are used. One door may be wider than the other. Among the advantages of swing models is the low price for square meter and easy installation. The recommended width for the passage of vehicles is 3.5–4 m, the height is at least 2 m.
Support posts should be at least 20 cm higher than the doors. If you plan to install a visor, it should be borne in mind that it will prevent trucks from leaving. To deliver building materials, you will have to put a visor on supports about 4 meters high. Since fences often warp precisely from the wind, a moving pin will have to be fixed between the two leaves. It will go into the ground or a special cylinder and fix the doors.
To simplify operation, it is convenient to install automation, with the help of which opening and closing is carried out. For control, you only need a remote control with a few buttons.


Swing gates also have disadvantages:
- they require free space to open;
- ground leveling will be required, otherwise the doors will cling to every bump;
- strong supports are needed that can withstand the weight of the structure, otherwise the gate may fall from the wind load;
- in winter, you will have to clear the snow in order to get to the dacha, otherwise the snowdrifts will not allow you to open the doors.


Rollback
When opening, the door moves to the side, that is, the gate works on the principle of a wardrobe. exist as mechanical sliding gates as well as automatic. This option is often chosen for a warehouse or construction site, since it is more convenient to use this model. The maximum span is 11 meters, which makes it easy for large trucks to pass through. Even after a snowfall, you won't have to worry about clearing the snow.


The disadvantage is that:
- you can not plant plants close to the fence. The sash will move to the side, there should be free space on the side near the fence;
- for mounting the rail, a prepared concrete base is required, otherwise it will warp, the carriage will not be able to move freely;
- only experienced master will undertake the installation of a rollback model, not everyone will be able to cope on their own;
- this mechanism with a carriage will cost much more than the usual hinges. The price can reach 30,000 rubles.


lifting
Previously, such modifications could only be seen in ancient castles. But now they are being released again, only the heavy door is lifted not due to physical strength, but with the help of electrical mechanism. Products with wooden elements are rare, metal ones are more common. Due to the large weight, these models are only used when connected to the mains.
If there is no electricity in gardening, it is unlikely that you will want to raise and lower the heavy frame by hand. The price of such a structure is high, installation should be carried out by a specialist.


Gate with wicket
Any of the modifications described above can be equipped with a gate. In this case, an opening is cut out inside the canvas and a door is mounted inside. Another option is to install the gate as a separate sash.
To improve this structure, you can make a viewing window in the door, install a visor and intercom.


Mounting
You need to start the installation from the foundation, since the gate will have dynamic and static loads, the foundation must be very strong and heavy. The foundation can be a large wooden log, which you need to dig in, and hang the doors on top. But a tree in dampness with temperature changes will rot one way or another, even if it is impregnated with bitumen. It is best to make the base of concrete with reinforcement metal mesh or a rod.
The depth of the foundation on heaving soils should not be less than the freezing depth. This value can be found in the tables, for example, in the North-West of the Russian Federation, this parameter is approximately 1.7 meters. For a reliable foundation, you need to dig a rectangular hole of sufficient depth. A roofing material or film is placed at the bottom of the hole, large boulders are placed on top, then poured with concrete.


The pillars on which the gate will be held are laid out from ordinary solid bricks, reinforced concrete ones are also suitable. Metal supports to strengthen the door leaves also need to be poured cement mortar to prevent rocking of the structure.
To metal poles hinges or places for fixing them can already be welded at the factory. If used solid brick, it is necessary to fix the loops even when laying. To wooden modifications, the hinges are screwed onto nuts, it is advisable to pre-coat the wood with an antiseptic. The shutters must be installed at a distance of at least 50 mm from the ground, otherwise, if there is any snow or even fallen leaves, the gate will not be able to open.
The frame for the gate can be made of wood or picket fence, connecting its elements to metal corners or without them. In the second case, it is desirable to connect opposite corners with braces. It is possible to connect the tree to a spike or dovetail.
A welded structure is more reliable; a similar product can be made from a metal profile using welding.


How to make a swing gate for a summer residence with your own hands, see the following video.
Decor
You can decorate any gate with your own hands, even old ones, and you don’t have to spend a lot of money.
Basic design methods:
- Coloring- ordinary stain or "Pinotex" can turn ordinary pine wood into oak or ash. Also, the coloring layer will protect the surface from atmospheric influences and pollution. For the effect of aging, in addition to paint, you will need copper sulfate, which will give the tree a grayish tint.
- Antique painting- usually the pattern is placed with inside. But if you need to decorate the entrance to any institution, the decoration can be outside. Most likely, you will need the help of a professional artist, to create an unusual effect, you can use Khokhloma painting.


- Forged trim- attracts attention, creates a sense of respectability. If the upper part of the doors is made of metal lace, the gate will transmit light better and be less exposed to wind load.
It is worth noting that forged elements resistant to corrosion, but in the country, few dare to use them. Such decorations are expensive and will attract intruders unless the homeowner lives on the country estate year-round.


- Thread- allows you to turn an ordinary product into a work of art. Only an experienced person can handle threading, but he will need a set of chisels - special tools. It is advantageous to order threading in the workshop, where it will be performed on a CNC machine, which will bring to life the most complex relief. Handmade it will cost more, besides, now few masters own this technique. But in the store you can buy ready-made carved panels and attach them to the canvases with your own hands.
- wood paneling- if the gate has a metal frame, and it is planned to close it with wood from above, there are many decoration options. You can fix the boards horizontally, vertically, diagonally or fancy, alternating between different directions for laying the material.

Even with today's abundance of the most diverse building materials many home craftsmen make wooden gates with their own hands. Their love for wood is understandable. Hardly any modern material will surpass her in beauty and ability to revive appearance any design. Of course, wooden crafts not without drawbacks, including:
- high fire hazard;
- low moisture resistance;
- relatively short service life;
- low surface strength;
- big mass.
In addition, wooden gates need frequent maintenance (for example, painting). Nevertheless, there are many tools that relieve wood from most of its shortcomings. These include:
- flame retardants;
- antiseptic impregnations;
- various paint finishes.
Don't forget about right choice wood for building gates. Coniferous trees are most suitable for this purpose, but the best performance larch has moisture resistance and strength. At the same time, its wood is also the heaviest, so larch structures, gate frames and support pillars must be especially strong. A cheap alternative to it is pine. It is less durable, but much lighter than dense larch.
Once upon a time, wooden gates were made practically without the use of other materials. Even logs dug into the ground were used as poles. Only awnings, nails, or some decorative elements. And today, forged parts are in demand, but it no longer makes sense to install wooden poles. Instead, it is more expedient to put steel or brick. In extreme cases, pipe supports can be masked with wooden linings, but they will only perform a design function.
Wooden gate on a metal frame
Do-it-yourself sash frames and wickets for gates made of wood can be made from both wood and metal profiles.

Figure 1. Drawing of a wooden gate.
What does it look like combined design, shown in the diagram (Fig. 1). First, we will make such a structure, such a project is the easiest to implement, especially for a person who knows how to handle a welding machine.
For the construction of the gate, you can use the presented scheme. You may need to make some changes to it regarding the height of the structure and the width of the wings. It is necessary to start work with measurements and drawing up a drawing not only in order to perform it qualitatively, but also to purchase the right amount Supplies:
- profile pipes 80 x 80 mm for poles;
- profile pipes 40 x 40 (40 x 20) mm for sash frames and jibs;
- boards 100 x 25 mm for sheathing the door leaf and wicket;
- ball loops with a cross section of at least 25 mm;
- self-tapping screws for metal;
- lock fittings;
- steel plates for plugs on the ends of the pillars;
- cement, sand and gravel;
- various impregnations for processing metal and wood.
You will also need:
- grinder;
- welding machine;
- jigsaw (hacksaw, circular saw);
- drill driver;
- square;
- level;
- plumb;
- roulette;
- shovel or drill.

Mark the locations for the supports and dig or drill holes. The diameter of the pits must be at least 20 cm larger than the cross section of the pipes. The pillars must be dug into the ground by at least 1/3 of the length. A pillow of sand and gravel is poured into the pits. Its thickness is 10-15 cm. The bedding is rammed and soaked with water. Pillars are installed in the pits, but before digging them in, you should:
- plug at the ends (the bottom plug must be larger than the pipe section);
- remove rust;
- treat with an anti-corrosion compound;
- cover the lower third of the column with bituminous mastic.
Supports are installed on the level or plumb. Reinforcement is laid in the pits and concrete is poured. While it hardens, gate frames and wickets are made.
Making and hanging sashes
The ends of the profile pipes are cut at a right angle or an angle of 45 °. Racks and horizontal lintels are assembled together on a flat surface. The square checks how correctly the sashes are assembled (more precisely, the assembly quality is checked with a tape measure, which measures the diagonals of the structure). The vertical and horizontal frame elements are finally welded. The jibs are cut out and also welded to the frames. The installation of shutters and gates is carried out only 2 weeks after pouring the foundation pits under the supports with concrete.

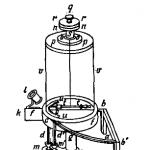
Retainer open position gate: 1 - stand, 2 - latch, 3 - sash frame.
Before hanging the hinges, all frames should be securely fixed between the posts. After that, the places for installing canopies are marked. Then they are welded to the supports and frames. Locking fittings are mounted on the sashes and the gate. All structures are cleaned of burrs, scale, rust and covered with an anti-corrosion compound, primer and paint.
Now the frames remain to be sheathed with planed boards. You should know that it will not work to make a wooden gate with high quality if the wood is not pre-dried in a place inaccessible to direct sunlight place (the drying time of the boards is 1.5-2 weeks). After drying and trimming to size, the lining is successively impregnated with an antiseptic and flame retardant.
Before screwing the fasteners, holes are made in the boards. After screwing in the screws, they are treated with an antiseptic. Boards do not need to be stacked close to each other. Leave a small gap between them to compensate for the expansion. An equal gap between the skin elements will be obtained if strips of the same thickness are laid between them. After its installation, the wood is covered with paint or varnish.
The shape of the gate sheathing does not have to be rectangular at all. In addition, boards can be placed inside steel frame from professional pipes or corners. The supporting pillars can be lined with bricks. In this case, mortgages are welded to them, to which hinges will be attached when the gate is installed. Under the brick pillars, you need to build a foundation, and the cavity inside the masonry is filled with concrete.
wood frame
Building wooden gates with your own hands, in which not only sheathing, but also frame elements are cut out of wood, is somewhat more difficult than combined ones. In this work, the main thing is to ensure the maximum accuracy of measuring parts. Shortcomings in their processing are immediately evident, and it is very difficult to eliminate them.

Scheme of the corner connection of the gate frame with a hinge: a - gusset frames of wooden gates, b - hinge on reinforced concrete pillars, 1 - reinforced concrete pillar, 2 - sash frame, 3 - barn hinge, 4 - overlay, 5 - slab, 6 - nails.
It is quite difficult to ensure sufficient rigidity of the structure of beams and boards. The connection of the crossbeams and the racks of the sashes must be carried out in a tenon-groove. Spikes are arranged on horizontal elements, and grooves - on vertical ones. Additionally, the frames are reinforced with jibs and central crossbars.
- For racks, jumpers and the central crossbar, you need to use a bar with a section of at least 50 x 70 mm.
- Bars 50 x 50 mm will go to the jibs.
- For sheathing boards 100 x 25 mm are used.
Installation of wooden gates is carried out after:
- digging in pillars;
- planing of wood;
- sawing it into blanks;
- frame assembly;
- clapboard lining;
- hinge installation.
After planing and sawing, all blanks are treated with an antiseptic and flame retardant. Joints in the tenon-groove must be fixed with dowels. To do this, holes are drilled through the thorns-grooves in the wings, wooden rods of a larger section are hammered into them. Additionally, at the points of adhesion of the frame elements in advance drilled holes screws are screwed in. The diameter of the holes should be slightly smaller than the cross section of the fastener. Before the final tightening of the elements, the frame is checked for squareness (the verification method is described above). If necessary, it is restored by lightly tapping on the end parts of the frame with a mallet.
After assembling the racks and crossbars, the jibs are attached to the frame. They go from the corner parts of the frame to the central crossbar. Marking before trimming the jibs is best done by attaching the bars to the assembled frame. The corner parts of the bars will be cut in the shape of the letter "L", and the ends at the crossbars will be cut at an angle of 45 °. The boards are attached to the doors with self-tapping screws. Hinges are screwed to the horizontal bars. Now the gates are hung on poles.
If you decide that the gate supports should also be wooden, install larch or oak beams. In addition to treatment with an antiseptic and fire retardant, the part of the pillars immersed in the ground must be coated with melted bitumen.
Gates are not only an integral part of protection, but also a decorative element of the site. Significantly reduce the cost of work can independently manufacture structural elements and directly installation. Various materials are used for production, new processing methods, ways of functioning appear. Wooden gates are suitable for a cottage, a summer residence, a house, a garage. If you decide to make the gate yourself, below is information on how to prepare and protect the wood, how to calculate the consumption of materials, draw up a work plan, install and sheathe the structure.
Advantages and disadvantages
Until recently, wood was the most common and available material. Wood is easy to process, has a low cost. Basic skills in using tools were enough to make wooden structures - fences, gates, gates. Raw wood fencing is rare these days. Usually, they are used as temporary limiters of the site during the improvement of the site, the construction of a house.


Wood is a versatile material that is used for retractable, swing, lift-and-turn structures. The gate is the first thing guests notice. Therefore, they have become an indicator of the status, impeccable taste of the owner. Garage Doors wood is usually made of a lift-and-turn type. The only limitation in the use of the material concerns the lamellas in roll mechanisms. The wooden canvas has a low strength in this case. Often a metal frame is sheathed with wood. Wooden sliding gates in this way of sheathing the base increase the thickness of the leaves and the total weight.
Wood as a material for gates has the following advantages:
- ease of processing;
- speed of installation;
- affordable cost;
- beautiful texture;
- reliability.
Purchase wooden blanks cost less than metal ones. Various varieties wood and board sizes are presented in construction stores buyers of any financial ability. In addition, in the Russian Federation you can get from 50 cubic meters of wood for free, depending on the region, you can learn more about this from the video:
Woodworking tools are available and do not require special skills. While for processing metal parts you will need a welding machine, an angle grinder. Properly processed quality wood will last more than one decade, even in harsh weather conditions. When broken, a wooden canvas can be easily repaired by replacing the board. The easiest to make and self installation- swing wooden gates.
There are also disadvantages to using wooden gates:
- low mechanical strength;
- with poor processing - a short service life;
- high flammability.
For gates, they are usually used not valuable breeds expensive wood, but larch, pine resistant to moisture and decay. Increase the strength and durability of the structure inner frame from metal.
Preparatory work
Before starting the processing of the material, it is necessary to draw up a schematic structure of the structure, taking into account the location of the elements. Preparing a diagram and accurately measuring the opening is important in calculating the expected material consumption and will save time during installation. It is possible to make wooden gates and gates on your own. Need basic knowledge in woodworking, skills in working with carpentry and joinery tools, patience.


After measuring the gate opening, you need to draw up a drawing of the future structure, observing the proportions of the height, length of the leaves, the distance between the supports, the location of the gate. It is taken into account in the scheme of the place of attachment of constipation, canopies, decorative elements. Door leaf boards are suitable for sizes 100 by 25 mm, frame - 80 by 60 mm. The blanks will decrease in size as a result of processing by 5-10 mm. Calculations must take into account technological gaps from 10 mm, possible deformation, expansion of the material. When purchasing boards, you need to clarify their purpose, the degree of drying. For the production of gates with your own hands, carpentry is best suited edged board. Such lumber is less prone to deformation and delamination. It is enough to dry fresh boards for one year in a well-ventilated area.
Preparatory work should include the manufacture of special supports from logs or wooden beams. Reliable supports deepen into the ground to a depth of 1 m.
From longitudinal elements frame, it is recommended to leave a distance of 200 mm to the edge of the board. Canopies are attached at the same distance. Gates with a height of more than two meters are additionally reinforced with an average vein. If the gate frame is made of wood, be sure to use braces to maintain strength and geometry. When sewing the canvas, the boards can not be placed close. Leaving gaps will prevent buckling, deformation of the canvas due to increased humidity. If the gaps between the boards are unacceptable, you need to buy a grooved board.
Required Tools
You will need wood for the gate:
- bars for the frame of the gate with a section of 40 by 40 mm;
- slats for sheathing the frame 20 by 40 mm;
- round or square bar for supports with a diameter of 100 mm or more.
For the processing of lumber, assembly and installation, you need:
- wood saw or electric jigsaw;
- plane;
- drill with a set of drills;
- drill garden;
- plumb lines;
- rasp;
- a hammer;
- screwdriver, screwdriver;
- self-tapping screws;
- components for concrete mix(cement, sand, gravel);
- basin for mixing concrete;
- roulette, level;
- marking pencil;
- sandpaper;
- blowtorch;
- primer;
- brush;
- antiseptic for impregnation.
Required metal parts designs:
- canopies for gates - 2 pcs.;
- hinges, latch for the gate;
- loops for a padlock (if the gate will be closed from the outside).
Manufacturing and assembly process
In order to make a wooden gate with your own hands, you need careful preparation. Only after drawing up a design scheme, collecting necessary materials and tools, you can start production and installation.
Installation and installation of poles
Post installation steps:
- Clearing the site and determining the location of the pits.
- Digging holes with a drill or a bayonet shovel to a depth of at least 1 meter, with a diameter of 10 cm more than a pillar.
- Cutting pipes with a grinder and inserting them into prepared pits.
- Backfilling the gaps with crushed stone.
- Checking the verticality of the support with a plumb line.
- Compaction of crushed stone to strengthen the foundation.
- Mixing a liquid solution (1 part three-hundredth of cement to 3 parts of sand).
- Pouring mortar into pits. Wait for complete drying.
- Brick cladding. If added to the mortar when laying washing powder, this will not allow the composition to settle. The correctness of the angles is periodically checked with a plumb bob.
- After installing the pillars, their tops are equipped with caps (ready-made or cut from galvanized steel). This improves drainage performance and looks aesthetically pleasing.
- Folded brick rows are embroidered after drying.
Parts of the wooden supports that will be underground must be treated with a water-repellent resin or bituminous mastic to prevent destruction.
The gates are mounted on poles. Therefore, they must be installed correctly, securely, with rigid fasteners. For the normal functioning of the structure, sagging is unacceptable. To prevent violation of the geometry of the gate, it is important to observe the perpendicularity of the supports in relation to the ground. Strengthening them into half a brick will not allow the pillars to warp. This width must be taken into account when drawing up a preliminary drawing.
Instead of wooden poles you can install metal, brick or concrete supports. As an additional stiffener at the top of the support, it is recommended to fasten it with a horizontal beam.
Frame erection
The basis for the frame can be made of wood, metal profiles. In the second case, you will need a welding machine to connect the parts. If the gate frame is wooden, the timber is cut into the necessary parts and laid out on a flat place in the form of future gates. After checking the verticality and horizontality, holes are drilled in the bars. Details are fastened with self-tapping screws. It is fashionable to additionally strengthen the center and corners with the help of a cross beam and metal corners. Beams for reinforcement are attached across the frame crosswise at an angle of 45 degrees.
For fastening, you can take self-tapping screws or use dowels from dry wood. Nagels must first be coated with epoxy glue. To fix the skin in the center of the frame, a jumper is additionally installed. In the corners, jibs are attached - bars of 30-40 cm. When erecting a frame, its size should be taking into account the protrusion of the sheathing boards by 20-25 cm. It is convenient to collect and sheath in a horizontal position on the ground.
Sash manufacturing
The sheathed frame must be hung on the installed supports. After preparing the sashes, they are attached metal hinges. They are hung on the frame or on support poles. The optimal location of the loops is calculated in this way. From the top and bottom of the support, a distance of ¼ of the total height is planned. After marking, lancet hinges are attached, on which the sashes are installed.
The lower edge of the leaves must be at least 5 cm from the ground. Otherwise, snow or ice that has fallen will prevent the gate from opening. To prevent the sashes from opening from the wind, they need to be adjusted. When marking the attachment points, it is advisable to use a level.
Gate installation
Before installing wooden gates, the hinges are screwed to the leaves. At the same time, "capercaillie" are inserted. Before screwing in the bolts, holes are drilled to a depth of several centimeters in pre-marked places. Their diameter should be less than the diameter of the screw. This trick will make it easier to screw in the bolts. It is important to keep the distance from the ground to the sashes from 5 cm. After installation, the closed sashes are fixed padlock or a metal pin. The coating on the wooden surface is applied after the installation of the gate structure.
Structural sheathing
The frame is sheathed with boards, slats or a picket fence. The elements are attached to the base with self-tapping bolts. use various options fastening elements. For example, a picket fence is fastened without gaps vertically or boards with clearance diagonally.
The cladding elements are cut to the right sizes in the required quantity. Pine boards are often used for sheathing. This type of wood is the most protected from climatic influences. After trimming, the elements are planed on all sides and attached to the frame.
When installing boards with gaps, use wooden lath as a template. The rail is taken equal to the length of the board and the width of the gap step.
Boards fixed with screws are cut in a straight line. The place of cut and unevenness on the surface is polished with sandpaper. The edges of the sashes can be insulated for better sealing and better thermal insulation.
Impregnation and coloring of wood
Installed sashes it remains to cover with a primer, antiseptic solution, varnish. Wood coating products must be designed for outdoor use. Processing sequence:
- Sanding wood with sandpaper or grinder, including the processing of side surfaces.
- Sealing the pores with putty and re-sanding after drying.
- Toning for the appearance of the shade and texture of wood.
- Applying a primer.
- Coating with the first layer of varnish.
- After drying, apply a second layer of varnish.
If iron forging is used as a decor, decorative elements are attached before grinding and painting. To protect the wooden canvas during the fastening of forged parts, a thin tin sheet is used. After varnishing, the joints of iron and wood are treated with a sealant.
Finally
For self-manufacturing and installation of wooden gates will require minimal skills in working with construction tools and your patience. All steps are simple and can be done if desired with your own hands. Like any construction works, a quality result is a combination of strict adherence to the recommendations of professionals, the use of high-quality materials, accurate measurements. Wooden gates, as the face of your home, with a competent approach and periodic maintenance, will last for many decades.