Country furniture do it yourself from wood (47 photos): making stools, rocking chairs and tables
- Choose production materials
- Methods for making country stools
- Making a rocking chair
- Assembling the table
- Conclusion
In this article we will talk about how to make a simple practical furniture for a cottage made of wood with your own hands. Interest in making your own furnishings is always high and this is not surprising. Just go to any supermarket and see the price of seemingly cheap tables and chairs made of plastic and you will see that it will be cheaper to do everything yourself.
Manufacturing instructions country table Making stools or benches for the courtyard is not difficult, the main thing is to decide on the choice of materials.
Chaise lounges are similar to armchairs, but lower and more stable. You can sit in a semi-lying position, allowing the spine and all muscle groups to rest.
Another advantage - garden chair can be folded as needed by adjusting the angle of the backrest for a sitting or lying position.
The best material for making a sun lounger is wood, as it is the most environmentally friendly, economical, and also easy to use material.
They are very good for observing nature, and they are light and comfortable, so they are often placed in your garden or dacha. It is good to take such a chaise lounge out into nature in the summer, and keep it somewhere indoors in the winter, for example in a closet or in a shed.
The following materials are used in production:
- plastic;
- tree;
- rattan

Popular drawings

A rocking chair made of wood, which you can assemble with your own hands, would be very good. This chair is an excellent option, thanks to it you can relax all the back muscles while reclining and at the same time sway (back angle 200).
The rocking chair must have great strength and in no case become loose during rocking; for this it is necessary to strengthen the structure of the chair with the help of crosses and corners.
In order to increase stability, it is best to leave the rear legs straight and do not round them. This garden chair has a rather small swing amplitude and to enhance it, you need to make the radius of curvature smaller and the runners wider.
You can also add a rocking chair with a pendulum (for this we attach a load weighing 2 kg). You can additionally create a removable table. But still this type a garden chair is not fully a chaise longue, since you cannot change the angle of the backrest to a semi-recumbent state.
But imagine how amazing a rocking chair looks in the garden and how comfortable it is to read a book, light a pipe, drink tea and enjoy the nature around you; such a chair will stand spectacularly by the fireplace in winter - imagine these pictures again and you will understand that this type of chaise lounge is just a fairy tale.
These drawings with dimensions will help you make a high-quality sun lounger with your own hands:
Creative sun lounger with canopy
The drawing shows a creative chaise lounge, which is easy to make with your own hands and which will definitely become a wonderful decoration for your garden.

The design of this lightweight garden chair consists of smooth lines and radii, thanks to which every muscle in your body is completely relaxed. But the most important thing about this chaise longue is that thanks to the roof it creates a shadow that protects you from the scorching heat of the sun.
There are also additional amenities such as a small pillow made of natural fabric and a comfortable mattress; it also combines the advantages of a rocking chair.

There are many sun loungers that you can make yourself: like beach loungers or cozy seats. Let's look at a few of the most simple options.
How to build a simple chaise longue for a summer house with your own hands:
Fabric chair on frame
Let's consider one of the most convenient options– a fabric seat on a frame that can be moved from place to place and folded almost flat.
In order to make a sun lounger you need to prepare the following details:
- furniture bolts and nuts D8 mm;
- round slats (length – 65 cm, two 50 cm, two 60 cm);
- slats rectangular section(length – 65 cm 25x60 mm);
- line segment durable fabric 200 x50 cm;
- round needle file and fine-grained sandpaper;
- PVA glue;
- slats are best made from species that have hard wood: oak, beech, birch.
In order to make a chaise lounge, you need to use fabrics that are abrasion-resistant and have increased strength: teak mattress, tarpaulin, denim, camouflage, canvas.
The process has started
We cut the slats to the required length and carefully sand them.
We make slats of the required length and carefully sand the surface using sandpaper.
At a distance of 70 and 40 cm from the corners of the structure, we drill eight-millimeter holes, and then grind them using a round needle file. In order to be able to change the position of the backrest, at a distance of 7-10 cm we make 3-4 cutouts in frame B.
Then, stepping back from the two ends of the slats, we drill holes with a diameter of 2 cm in order to arrange the seat. Then we take round slats (lubricate the ends with PVA) and install them in the holes.
After assembling the frame, you need to sew and cut out the seat. The length of the material depends on the possibility of folding. In order to understand what cut length is needed, you need to fold the chaise longue and at the same time measure the fabric, and do not forget to make sure that the fabric is slightly stretched.
Then, we nail a piece of fabric, the edges of which have already been processed, to the round slats that are located on parts B and A.
We wrap the crossbars with the edge of the cut and secure them with small nails with thick heads. An option is possible when the cut is attached to the crossbars thanks to peculiar “loops”.
This garden chair is very good because it can be used instead of a bed - what else could there be for an afternoon rest?
How to make a wooden sun lounger with your own hands - video instructions.
Kentucky chair
Let's consider original version– a Kentucky chair, which is assembled entirely from bars. If necessary, the chair can be folded at any time and put away where it is needed for storage.

In order to make a chair you will need the following material:
- Galvanized wire with a diameter of 4 mm and 16 galvanized staples to secure the wire.
- Hammer and wire cutters.
- Fine grit sandpaper.
- You also need to take 50x33 mm bars, which are obtained if you cut a 50x100 mm board into three equal parts. If all the bars are put together, you should get 13 meters.
Build process
When the bars are ready for assembly, they need to be processed for strength (and protection from ultraviolet radiation, moisture, weathering) and to give them additional beauty.

To do this, the tree is treated with a stain called Beitz. To treat a sun lounger, you need to buy an external stain, the best of which are based on oils and wax). Among other things, you can use parquet oils, which are ideal for all wooden products.
You can apply a protective coating to the bars either with a brush or with a spray gun (the most the best option).

The diameter of the holes should be made one and a half to two millimeters larger than the thickness of the wire used.

After preparing the required number of bars, it is necessary that the edges be carefully processed sandpaper with fine grain. We begin to assemble the structure.
You can also use galvanized studs (the edges are secured with eight nuts and washers) instead of staples and galvanized wire.

After assembly, carefully lift the chair.
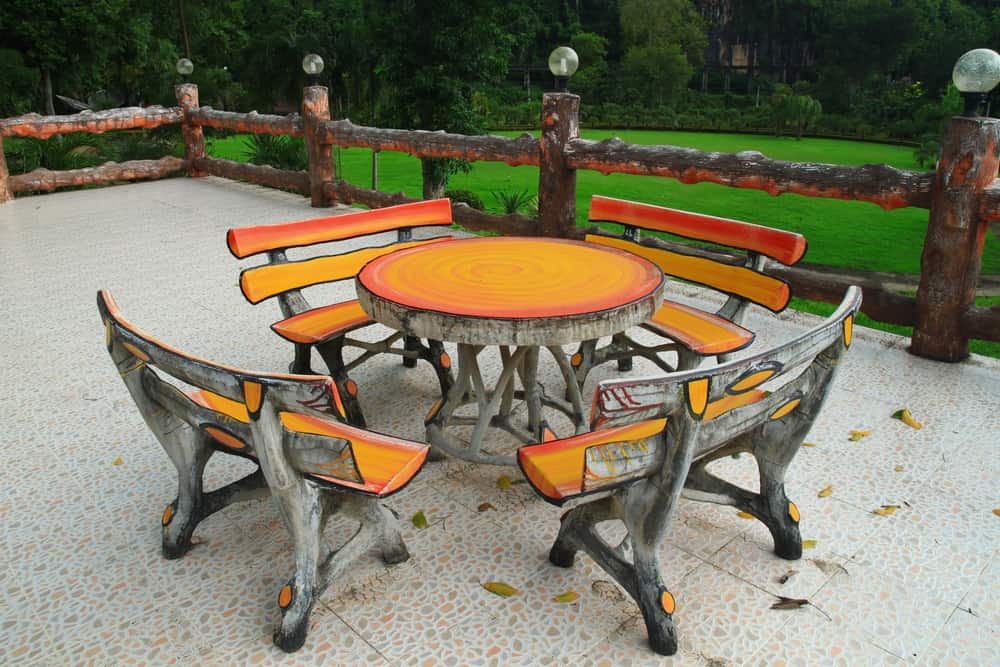
Wood is the best material for making garden furniture
Greatest success Summer residents use outdoor garden furniture made of wood. However, not all types of wood are suitable for these purposes. For example, experts advise against pine materials, due to the fact that this raw material is very delicate and sensitive to external factors. It is better to choose furniture made of oak, ash or hornbeam - their wood is hard, durable and easy to care for.
Besides distinctive feature wooden furniture is that it is an absolutely environmentally friendly product, striking in its beauty and variety of textures. Garden furniture is made from wood quite quickly, the main thing is to use high-quality material for these purposes.


Fits harmoniously into overall design summer cottage- dinner table. It will perform well in the garden, both in brown color, and more bright colors. In addition to a large table, the set should include comfortable chairs, in which you will feel quite comfortable.
To make the seats comfortable, it is worth bandaging them with removable cushions. It's also good when the chair can be folded. Unused, they will occupy less space, and in winter they can be easily hidden in the garage or basement.


The easiest way to make furniture is from finished material. When disassembled, the boards are easier to process, impregnate and prepare for painting. All you have to do is assemble all the parts into a single structure, according to the drawing.
There are many ways to make garden furniture. The Internet will help you choose the right option for you, where in its vastness you can easily find exactly what you need. Stylish chairs, beautiful tables, comfortable loungers, swings, armchairs - this is just a small list of what you can do with your own hands. Of course, for this you will need some carpentry skills and good tool, as well as the presence of fresh ideas in the head.

How to choose the right style
The most fashionable sets of garden furniture are those made in modern or French style; hi-tech, country and minimalism styles are also quite popular. Country music is characterized by an uneven, rough structure. Often they combine wood and cast iron, finished with metal-plastic.
Forged furniture is appropriate in romantic gardens French style. If you want to introduce a subtle note of Provence or shabby chic into a green corner, it is best to install whitewashed rattan furniture.


Comfortable furniture is one of the main items in any green corner. It can be a companion for morning coffee or lunch - barbecue. Daily rest for fresh air, especially on sunny days - this is a balm not only for the body, but also for the soul!

Leisure furniture
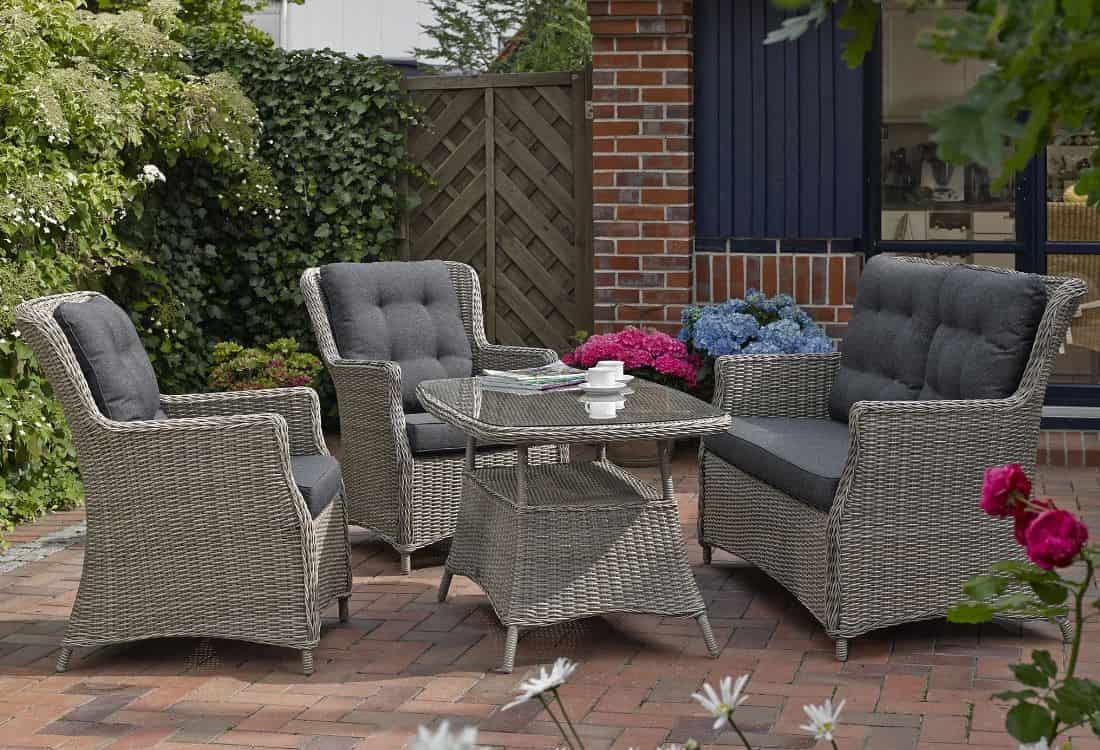
Garden dining furniture isn't everything. To fully enjoy a pleasant holiday among blooming greenery, you also need to buy a complete set of furniture. Sets include a sofa, two armchairs or chairs, plus a low coffee table. The most fashionable designs are those made of rattan, strewn with large pillows.
Soft accessories are mainly covered with cotton. Underneath the fluffy covering fabric is highly elastic polyurethane foam. Armchairs, sofas and chairs often have a cubic shape, making them voluminous and very comfortable.


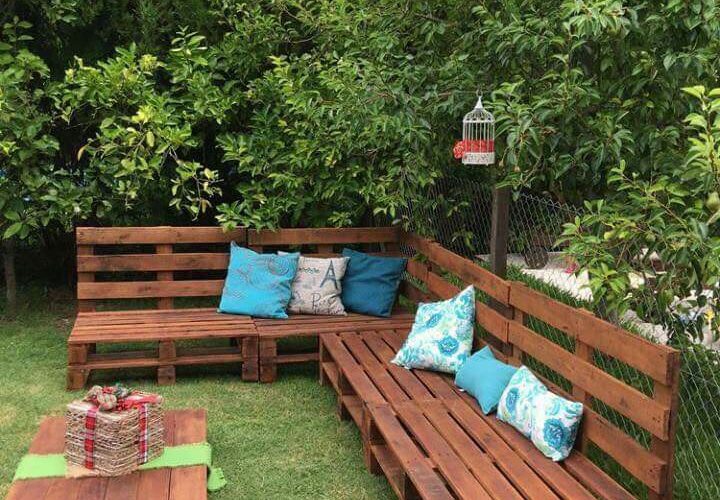
Garden set made from pallets (pallets)
Wooden furniture made from pallets is also quite popular. This design is very easy to knock down, paint and impregnate. You can also sew pillows yourself or buy them at a garden accessories store.
Produce furniture from wooden pallets(pallets) is quite simple, and most importantly fast. Just 2-3 pallets will be enough to fold one on top to get a coffee table. Impact-resistant glass with machined edges is placed on top of the table. That's it - the coffee table is ready, all that remains is to make the chairs. You can also make them from the same material, only here carpentry skills will come in handy. Using a hacksaw or chainsaw, cut the pallet into two parts, one of which will serve as a seat, the second as a backrest.


The presence of a sofa, armchair or lounger made from pallets in the garden will emphasize the individuality of the landscape design of your site, creating cozy atmosphere, will make it truly extraordinary and worthy of attention.


If you have a large number of pallets (the material can be purchased for a small amount in construction stores), you can use them to organize a full-fledged recreation area where you can relax big company. In this case, from building a gazebo or open terrace and you can refuse altogether.
Construction pallets (pallets) can be used both painted and unpainted. Their design feature allows you to store something useful between the rows of boards. This space can also be occupied by drawers, providing them with a special mechanism and beautiful handles.


The simplest pieces of furniture that you can make in a day with your own hands
Even if you just knock down a frame for chairs and a sofa from boards, putting pillows on them, you get good furniture, you can see an example in the photo.

If you think through all the dimensions of the parts in advance, you can make comfortable garden chairs:
You might be interested in: Dark furniture in the interior of an apartment: where to put it, how to zone the room with its help 
It is possible to use ordinary hemp as stools or as tables. You just need to sand them thoroughly. Example in the photo.


You can also make furniture from different branches and twigs, like wicker:


If you get a little creative, you can make furniture from pallets:

You can also make a bench from cinder block and wooden beam. Its main advantage is that it is easy to assemble and disassemble for relocation to another location. And if you no longer need the bench, it can be easily disassembled and stored in the shed.

If you combine materials to make furniture, such as wood and metal, you can achieve greater strength. Also at the same time improving the appearance of products.
Making outdoor furniture: step-by-step instructions
We will need a tool, namely a drill and a plane.
You can make furniture from a variety of materials, such as pallets, tree trunks, branches and roots. But we must not forget that the entire tree must be well soaked protective composition. One of the main factors is that such furniture does not require a lot of money. You may be interested in: Wicker furniture from artificial rattan with your own hands
Having decided what furniture you need, it’s easy to calculate required amount wood and screws. The length of the round pieces used in the manufacture of legs ranges from 410 to 760 mm. They are cut so that the edges at the end have a right angle. This angle is easily made with a regular hacksaw.

The edges of the legs are processed on a grinding machine. Next, a special fastening is made from two bars. Next, holes are drilled in the blanks for the legs for the fastening rod. This part of the manufacturing process is not difficult, but it does require attention.
To make it comfortable to sit, the seats are made with slight slope.
How to make furniture from old pallets
Currently, furniture made from pallets is very popular. with my own hands. It is easy to make, painted and impregnated with a special protective solution. To make a small table, a couple or three pallets and glass, which is placed on top, are enough.
To make a chair, you will need to cut the pallet into two parts. She will be the seat, and the other will be the back. 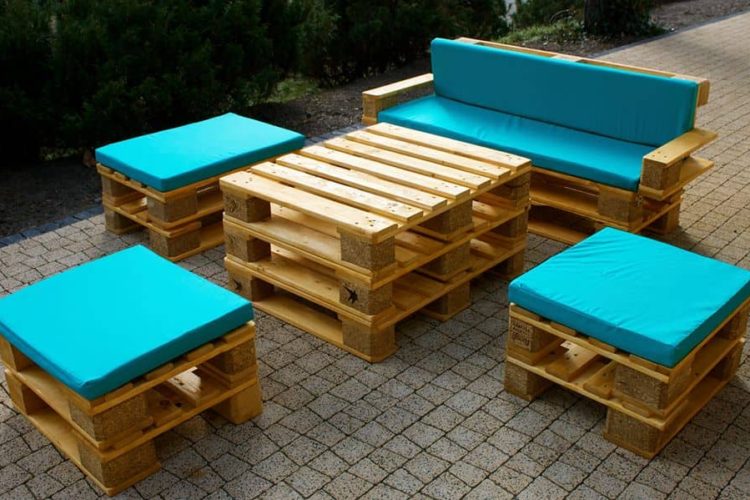
And if you also decorate it with pillows, it will look just great.
You may be interested in: Walnut-colored furniture in the interior of an apartment: decoration and design 
Furniture made from pallets can create a cozy atmosphere in your home. garden plot. Examples in the photo.

We make tables and chairs from ordinary boards
Making beautiful and elegant furniture yourself is much more difficult. First you need to prepare a project for future furniture. You can make the drawings yourself, or you can use ready-made ones. The principle of making furniture in different versions same.
Commonly used chair designs:
- Four legs. They can be made round, and beams and boards can also serve as legs.
- The frame is the base, the legs are attached to it.
- The upper part can be either a tabletop or a seat for chairs.
Instructions for performing the work:
- According to the drawing, the parts are shaped. In order to give the desired shape to the parts, you can use a regular file.
- Holes for fasteners are made.
- Everything is assembled according to the selected drawing, and the parts are adjusted.
- The screw heads are covered with special putty.
- The product is sanded with fine sandpaper.
- Next it is coated with varnish.
Types of hammocks
If you think that a hammock is a piece of fabric tied to nearby trees on both sides, then this is a big misconception. Modern buildings are real works of art that you can buy in a store, or you can try to make them yourself.
They are distinguished by types of fastening:
Hanging;
Frame;
In the form of a chair;
In the form of a swing.
By country of origin:
Mexican;
Brazilian;
Colombian.
And now a little more detail.
Suspended structures are those that are attached to trees or concrete pillars.
It’s quite easy to make such a hammock with your own hands. You will need a minimum of tools and basic knowledge of sewing.
Frame ones are convenient for both apartments and cottages; they can be moved and carried. In the form of a chair, you can’t lie down in them, but you can sit very comfortably with a book.
Hammock swing - the name speaks for itself. Although almost all structures can be called swings, since they swing easily.
Such devices were called Russian during Soviet times. They were a coarse mesh that left deep imprints on the body after lying down. Not exactly convenient, but super cheap.
A Mexican hammock for a summer house is light but durable synthetic fabric. They are very durable, manufactured in a factory, so they are cheaper. The colors hardly fade in the sun. The usual decoration for them is various trinkets in the form of national amulets.
Brazil presents hanging stocks made of Brazil nut wood (thread) or cotton threads, richly decorated with fringe. They are durable and comfortable. Hammocks without such decoration are much cheaper; in Brazil they are called “poor man's beds.”
Wicker hammocks from Colombia (ITALICS) are made from agave vines or the bark of the hammock tree. They are dyed with natural dyes. Nobody knows the production technology!
Is there any benefit from such a device?
The benefits of any of the listed types are simply enormous, so you can safely make a device for your dacha:
Complete release of all types of muscles, including the neck, lower back and shoulders.
You can sleep and relax in this device.
In a large hammock you can lie as you please - either along or across.
It can be used not only as an important attribute for a summer residence, but also as an original interior solution in an apartment.
Making a hammock yourself
In large stores and supermarkets you can buy anything. Therefore, once again analyze your artistic and financial capabilities. It may be much easier for you to buy a ready-made design.
So, you’ve thought it over and come to the conclusion that you can buy a hammock, or you can make it yourself. The first option is an expensive pleasure. But having money, purchase a unique design unusual looking is quite real. The second option is to develop your design flair, make your garden or apartment interior unique by building hanging hammock with your own hands.
Suspension
Why suspended? It's simple - any hammock, frame, swing or chair, is suspended. Simply put, it hangs on one or two fasteners or on a frame.
For simplest design(for the dacha) we need very few materials - strong natural rope (non-synthetic), two strong wooden bars(sanded, without knots), dense natural fabric with a length of at least 2.5 meters and a width of at least 1.4 meters. That's the whole set.
Can't do without yet sewing machine, sewed and thread with a needle. You can do without wooden blocks, so the hanging hammock will be more resistant to turning over.
Brief instructions next:
We sew the fabric on both sides, making a hem of 4 centimeters. It is better to put two lines, for reliability.
Now let’s thread the rope through this “drawstring” and make large knots at the ends.
To hang our structure, you need to take hold of the knots and collect the matter in a bundle. Now all that remains is to secure it where we need it.
The described design is one of the most primitive; it can be easily done with your own hands, even without much imagination.
Here is one mounting option if there are no suitable trees nearby:
We wall up two strong pipes (diameter - 3 cm) into the ground. We install them at an angle of approximately 30° and to a depth of almost a meter. The distance between them is the length of the hammock plus 0.3 meters.
We take two metal rods and bend them to make something like hooks.
We string our hammock onto rings (we tie the rope to the rings).
We thread them through the bend of the rod, compress the rod and place them in our metal pipes. Inside the pipe, the rod expands and firmly fixes our structure.
Now you can enjoy your holiday, swaying in the shade of the trees, and knowing how to make a hammock with your own hands.
Frame
It’s easier (but also more expensive) to buy a frame hammock in a store. There you can find both the simplest designs for a summer house at a fairly reasonable price, and real works of art - single and double hammocks, with a unique design and a chic canopy. But you can try to make such an interesting item with your own hands.
First you need to decide what kind of structure you want to see in your dacha. You can assemble a fairly simple metal frame, making it also collapsible. Another option is a permanently located hammock on a heavy frame made of wood or welded metal.
The first thing to do is draw a drawing. The second is to order the material. The third is to cut the metal and weld it or saw the wood into the required pieces and assemble a frame from them. Everything further is a matter of technology. It can be decorated with carvings or paintings, creating a work of art in your dacha.
The part in which you will lie or sit can be made of any dense fabric, decorated with lace or fringe. You can weave a unique design from threads (such as macrame), giving it a bright, memorable look.
For a dacha whose garden is designed in accordance with the requirements of landscape design, the best solution there will be a handmade hammock. Finding such masters is quite difficult, but the Internet can help in almost any situation.
Hanging Rules
There are several such rules:
The distance between the supports (trees, poles, frame posts) is calculated simply - 0.3 meters is added to the length of the hammock.
If there are two suitable supports, but they are located a little closer than necessary, you can hang the “lounger” higher. You also need to take into account the possibility of some stretching of the material from which it is made.
If trees are used as supports, do not be lazy and measure the diameter of their trunk. It must be more than 0.15 meters.
The height of the structure above the ground is from one and a half meters to 1.7 meters (depending on the convenience of the owner and his family members).
Check out others interesting articles:
- How to choose a filter for water purification
- How to choose an air purifier for your home and apartment
Now you know how to make a hammock with your own hands. Before you take on this important task, watch the video below. Perhaps an easier solution for you would be to purchase a ready-made design in a store or order an exclusive model self made.
Selection of materials
One of the most complex issues, which is where most novice masters “stumble.” The nuance is that, unlike many other pieces of furniture, there is such a peculiarity in the manufacture of a chair - not every wood is suitable for this. And the point is not in its strength, texture, degree of humidity, but in the specifics of operation. The chair experiences dynamic loads in different directions. This is precisely why it differs from the same cabinet, table, bedside table.
Experienced craftsmen It is not recommended to assemble coniferous wood for chairs, even of the highest quality. The reason is that it has a straight-layer structure. Constant loads in the horizontal plane (who doesn’t like to “squirm” on the seat, especially kids) will lead to the formation of numerous chips. As a result, the service life of the chair is sharply reduced; it will simply have to be repaired quite often. The only one structural element, where the use of such wood is allowed - plywood seats (made from sheets for which coniferous veneer was used for gluing).
- Children's - birch.
- “Clamshells” - aka or plywood made from this veneer.
- For all other models - hardwood, but only fine-grained and durable. These include rowan, walnut, oak, elm, hornbeam, and beech.
- When choosing plywood, you should consider not only the cost of the sheets, but also their toxicity. If you focus on relatively cheap products, then the choice is small - FC or FSF. What is the difference? The main difference is the composition of the glue used in production. Without delving into the details of technology and “chemistry” issues, it is enough to note that FSF category plywood is not recommended for use for interior work. The reason is the release of harmful fumes when the material is heated.
- The wood for the chair should not have visible defects. For example, for a tabletop, some of them (curls, cross-layers) can be turned into an advantage if you know how to process them. But for a chair that experiences various loads that change in direction and magnitude, all this is unacceptable. The same knots that transform the appearance of the table, making its texture original, will quickly fall out of the chair.
Specifics of wood preparation
- If it is possible to dismantle the array yourself, then making furniture will cost much less.
- The moisture content of the workpieces is no more than 12%.
- Mandatory impregnation with biocides. Options - water-polymer emulsion, furniture oils (or wax-based compounds), acrylic compounds.
Features of structural parts
General – they are made only from solid wood. It is unlikely that you will be able to make complex, shaped elements at home. And it’s not just a matter of cutting the material. You will have to change the angles (and before that, calculate everything correctly) at which the connecting tenons should be located. In addition, accurate sampling of wood (for grooves) requires not only special tools and devices, but also great experience. Deviations from the dimensions will lead to the fact that the chair will constantly “play”, and with practical point The visual benefit from such furniture is zero.
For this purpose, all similar elements should be prepared in this order. First, for example, one front leg. After processing it, it is used as a template for the second one. The same applies to the drawers, crossbars in the stacked backrest, and so on. The meaning is clear - to achieve complete identity of the parts, so that later you don’t have to adjust them.
It makes no sense to consider more complex options (curly, openwork, combined). The reason is noted above. In addition, if you are to master the profession of a furniture maker (like any other), then you need to start according to the principle “from simple to complex.” Having made your own, albeit not entirely “decorative” chair, in the future you can master more elegant models. The main thing is to understand the design principle and all the features of working with wood.
Chair assembly procedure
You will have to do this at least twice. The first is done “dry”, and its task is to check the fit of all structural parts (whether the dimensions of the jibs, crossbars, drawers at the installation site match). At this stage, you can still eliminate the mistakes made, correct something, and so on.
The second assembly is final. Here, all the elements of the chair are tightly fastened, and further alteration, as a rule, is impossible.
Algorithm for assembling a chair: “apron” – drawers – “apron”.
That's it in short. Although all work is divided into large quantity stages.
Assembling the rear legs and backrest
- All elements are adjusted in place and tongue-and-groove connections are made. The parts are fastened using wood glue. It’s easy to make at home; anyone interested can find detailed recommendations here.
- The gluing areas are tightened with a clamp, and the chair blank is left in this position until the composition dries completely. This process should not be accelerated artificially (with a hair dryer, reflector, etc.). The result will be negative, since the adhesive mass will dry out unevenly in depth, and the strength of the connection will decrease.
Assembling the front legs
The drawers are inserted into the grooves, the parts are joined, and then everything is the same.
Connection of front legs and back legs
At this stage, the side drawers are installed.
Chair "screed"
You will have to decide for yourself what to use. If you don't have large clamps at hand, a cord will do. The task is to ensure that the glue dries completely at all points where it was applied.
If necessary, you can further strengthen the gluing areas by fastening the parts with self-tapping screws. To do this, “channels” are drilled and chamfered so that the head of the fastener is completely buried in the wood. You can disguise it with putty (furniture) compound or decorative plugs (available for sale in a variety of shades).
Seat mount
There are several options. For example, attach prepared wooden stops to the side drawers, and to them (from the bottom side, through through hole) pull the seat. One of the best options that ensures good maintainability of the chair.
All the beauty independent work- the ability to realize your own ideas. Therefore, all photos, drawings, recommendations should be considered only as a basis for creating something of your own, unique. And if the meaning of the main technological operations, this is not at all difficult to do, as is developing your own drawing.
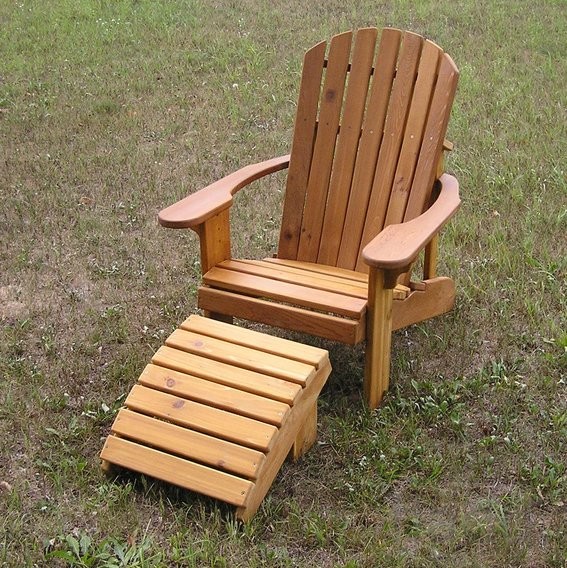
The Adirondack is a classic garden chair that has become a cult item for many. Its name comes from the mountain range of the same name in the USA, where the inventor lived who created the first model of such a chair in 1903.
The main feature of the Adirondack is its unique ergonomics. You can sit comfortably in a reclining position, completely relaxing your body. It is quite spacious and, thanks to its special design, is stable on any terrain. The wide armrests can be used to place cups and plates. With the help of a simple addition in the form of a wooden attachment, the Adirondack turns into a folding chaise lounge chair. In the design of this ingenious furniture, everything is thought out in such a way that a person can relax and indulge in carefree contemplation.
What tools are needed to make a chair?
It is not difficult to make a wooden garden chair with your own hands if you have a jigsaw, a screwdriver and a hand sanding block. But for faster and quality creation It is still better for the craftsman to have access to a band saw, edge router, screwdriver, and grinder.
Fastener selection
The chair is assembled using 3.5 x 35 mm self-tapping screws, of which about 70 pieces will be needed. It is recommended to drill holes for fasteners using a countersink (d 3.5 mm). To create a garden chair, as well as other outdoor furniture, you should use stainless steel fasteners, hot-dip galvanized screws or other options with protective coating. Regular steel fasteners are not designed for this purpose; over time, they will cause dark spots to appear on the wood and accelerate its deterioration.
The choice of lumber is purely a matter of taste, provided that the product will be covered with a protective finish. Otherwise, the wood for outdoor furniture must be resistant to the outdoor environment. In this case, both deciduous (European chestnut, acacia, oak) and conifers(false suga, pine). To create a chair you can use wooden elements pallets and pallets.
It is better to choose wood based on the available tools. Work with hard rocks without a finger cutter, band saw or grinder it will be much more difficult: cutting and processing of parts will take longer and will not be of such high quality. Don’t forget that garden furniture needs to be moved often, so the weight of the material is also one of the important factors when choosing wood.
General project drawing

The detailing of the American garden chair includes 33 elements. Most of the parts are simple rectangular shape. Making this garden chair with your own hands will not be difficult even for a novice craftsman, having at his disposal the presented drawings (to open the drawing in a large size, right-click on it and select “Open picture in a new contribution”).

Drawings of figured parts:


Step by step guide on how to make a garden chair
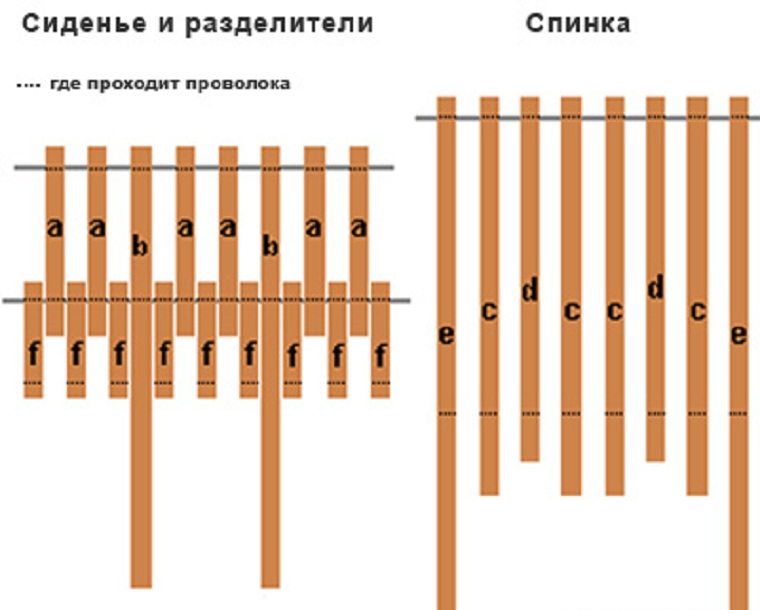
Start by creating rectangular elements by cutting with a jigsaw or band saw boards according to the dimensions indicated in the table. Using the 1:1 drawing, transfer to wooden blanks contours of the figured parts, check them with the dimensions in the diagram, and only then cut them out with a jigsaw or band saw. Pay special attention to the quality of the bevels made in parts No. 1 and No. 3; These are best made using a plunge-cut saw.

Grinding . The cut edges on all parts are ground and rounded by hand or mechanical method. For convenience, paired elements are connected together during grinding. The surfaces of the parts are treated in the same way. The last pass is made with P 180 abrasive. To avoid wasting extra time and effort on sanding, apply the markings to masking tape glued to the parts.

Assembly . Start by creating the base by connecting the side piece (#1) to the front (#2) and back (#3) legs. Next, proceed with installation cross members No. 6, No. 4, No. 5 and top cross member No. 7.
Screw all the back slats (No. 8) in sequence, observing the intervals indicated in the diagram. Next, screw all the seat rails (No. 9) at intervals of 8 mm. Mark the location of the supports (No. 11) and secure them. Install the armrests (No. 10) and secure them with self-tapping screws.

Rounded upper back - characteristic feature all modifications of the Adirondack. To create an accurate and symmetrical rounding of all slats, use the following tip. Secure the rope strictly in the center of the outer seat rail, fixing a pencil at its end (as shown in the photo). Having chosen the optimal radius, draw a semicircular marking on the slats. Cut them with a jigsaw and sand the cut edges.

Wood is a natural and environmentally friendly material. It pleases users with its beautiful texture and high technical characteristics. Thanks to this, wooden gardening is in great demand.
You can buy them in a store or make them yourself. The second option is suitable for people who have patience, have necessary tools and know how to work with wood.
The main advantages of garden wooden furniture include:

Choosing a tree species for the garden
Since garden furniture is used outdoors under unfavorable conditions, the choice of wood type should be taken with full responsibility. Good choice will become:


Important: when choosing wood for making garden furniture, preference is given to hardwoods that are resistant to negative factors environment.
Diagram and drawing in centimeters

When making any piece of furniture, it is necessary to make a preliminary drawing with all dimensions in advance. This drawing indicates not only the exact dimensions of each individual part, but also the materials of its manufacture and fasteners. You can make a drawing in different ways:
- draw on graph paper yourself with a pencil;
- take advantage computer program, which will calculate the dimensions of each individual part with millimeter accuracy;
- find suitable option garden chair on the Internet and add your own ideas to it.
Tools and materials
The tools you will need to prepare are:

Materials needed:
- 30 pieces of hardwood veneer measuring 2.4 by 6 cm;
- screws;
- sandpaper;
- glue;
- furniture varnish;
- drying oil;
- scotch.
How to make an Adirondack yourself?
We will make a garden chair from 2 cm thick cedar planks. To make it, you need to prepare the following parts:
- 2 rear legs and 2 front;
- back;
- armrests (2 front supports and 1 rear);
- jumper;
- 2 strips – inserts.
Attention: the back legs, back, seat and armrests are cut out of wide panels.
When cutting out the rear legs, you must use a cardboard stencil. It is applied to the wood and outlined with a pencil. Next, the parts are cut out using a router or plane.
Back and hind legs
After all the parts have been prepared, you can begin assembling the back and rear legs:

seat
Now let's start assembling the seat:
- We cut out the front legs and screw them to the rear ones with screws. For the strength of the product, we additionally use glue.
- We make a jumper between the legs to make the chair stable and durable.
- We apply the workpiece to the front legs and mark the fixing grooves.
- Select a groove to a depth of 9 cm.
- We connect the jumper to the front ends of the legs with glue and screws.
Armrests
Let's start assembling the armrests:

Important: All screw heads are closed with wooden plugs and sanded.
Finishing of country furniture
After manufacturing and assembling the garden chair, you can begin finishing it. To make wood attractive, it can be painted with stain or treated with drying oil.. When using a piece of furniture outdoors, the wood is treated with antiseptics to prevent rotting and damage by pests. Next, the chair is covered with several layers of varnish. For these purposes, it is better to choose a water-based, moisture-resistant varnish.
Photo
As a result, you will receive aesthetic and functional furniture:


Useful video
The detailed manufacturing process is shown in the following video:
Conclusion
In conclusion, it is worth noting that by making a garden chair with your own hands, you will delight your friends with an original and aesthetically pleasing appearance with high technical qualities. To prevent wood from deteriorating under the influence of an aggressive environment, it must be treated with antiseptics and varnished.
In contact with
Making chairs for your garden with your own hands is both a way to demonstrate your skills and an opportunity to further decorate the area. Such furniture will come in handy when you want to sunbathe in the garden, or for relaxing in the shade of trees with your favorite book. Using these products, you can feel comfortable anywhere in your summer cottage. And when organizing family holidays and picnics, the problem of accommodating guests can be easily solved. Thus, homemade chairs are excellent helpers and organizers of relaxation.
Even the most inexperienced craftsman can make a chair for a summer house.
Their design should be chosen taking into account where they will be used. For example, a garden chair is suitable for relaxing in the garden, and a rocking chair is suitable for relaxing on the open veranda. If furniture installed indoors can be made of any materials, then for use on outdoors We need chairs made from materials that are resistant to the vagaries of nature. Several typical designs for dachas are discussed below.
Homemade garden chair

Furniture of this type has been known for a long time and quite well. Most often it is assembled from planed boards without glue, using self-tapping screws or bolts. The material can be any boards, even old ones. In order to make a chair, you will need the following tools and materials:
- hand saw, circular saw or miter saw;
- hand or electric drill;
- screwdrivers or screwdriver;
- bolts with nuts and self-tapping screws.
The popularity of such designs is explained by their simple device, convenience and reliability during operation. For example, by placing pillows on the seat and back, you can easily turn the chair into a soft one. It can stand both in the house and on the street, and in the latter case both in the open and under a canopy.
As already mentioned, can be used various boards. Below are the approximate dimensions of the parts. In any case, it is recommended to make a sketch with the dimensions indicated on it. Approximate dimensions of parts and their quantity:

- front leg (section 15x2.5 cm, length 60-85 cm) – 2 pcs.;
- horizontal rail of the seat frame (section 15x2.5 cm, length 118 cm) – 2 pcs.;
- front cross rail of the seat frame (section 10x2.5 cm, length 55 cm) – 1 pc.;
- rear cross-bar of the seat frame (section 10x2.5 cm, length 60 cm) – 1 pc.;
- horizontal rail for collecting the back (section 10x2.5 cm, length 60 cm) – 1 pc.;
- horizontal rail for collecting the back (section 10x2.5 cm, length 74 cm) – 2 pcs.;
- vertical rail for the back (section 12x2.5 cm, length 120 cm) – 5 pcs.;
- armrest (section 15x2.5 cm, length 90 cm) – 2 pcs.;
- support under the armrest (section 12x2.5 cm, length 20 cm) – 2 pcs.;
- seat slats (section 10x2.5 cm, length 58 cm) – 5 pcs. (their number can be increased by reducing the width accordingly);
- self-tapping screws 4.5-5 cm long.
Chair assembly sequence:

- The bars of the seat frame are 118 cm long required form– their front parts are rounded and bevels are made on the back parts.
- These bars are bolted to the front legs. The distance from the ground to the lower edges of the bars is 18 cm. Washers should be placed under the nuts.
- The two resulting parts are fastened using self-tapping screws with transverse slats of the seat frame. The front one is end-to-end, and the back one is overlapped.
- The back is assembled on three horizontal slats (short in the middle). Then its upper end is sawed off according to the template. The lower part of the backrest is screwed to the rear transverse rail of the seat frame. Its angle of inclination should not exceed 30°, and the depth of the seat should be about 50-55 cm.
- The frame of the structure is rigidly secured by two armrests.
- The seat of the chair is covered with slats using self-tapping screws. You need to pre-drill holes in the slats and countersink the entrance.
- All elements are carefully sanded and impregnated with antiseptic; it is better to putty the screw heads. For final finishing, stains, moisture-resistant impregnations or wood varnishes are used. The product can also be coated with opaque paints.
The dacha plot serves not only for growing vegetables and fruits, but also for complete recreation in nature. This is best done in a luxurious and in a safe chair, made independently. We’ll talk about how to make it, what materials, tools and knowledge you’ll need below in the article.
If you like to tinker with wooden crafts, it will not be suitable for you to install on own plot standard plastic chairs. Not only do they not fit into the natural atmosphere of the kingdom of plants and flowers, but they are also unreliable.
In addition, their design does not always contribute to proper rest. Therefore in in this case we offer you a simple model of a wooden garden chair that will fit organically into the landscape suburban area. Special skills, such as forging or welding metal products, you will not need it, although knowledge of carpentry is desirable.
Requirements for country wooden furniture
Special conditions of use require that the design meet certain parameters. Then it will last long enough in its original form.

Let's look at them in more detail:
- Immediately count on the fact that the chair needs to be made transportable, then in case of bad weather you can quickly hide it under. Of course, special antiseptics and paints used to protect wood will allow the structure to withstand atmospheric influences, but we advise you not to test it in such cases.
- Choose hardwood for garden furniture, including oak, beech and walnut.. Although the price of such materials is higher, the quality of the construction will be excellent. Aspen, larch, cedar and pine are also less susceptible to rotting, but the disadvantage of the latter is its sensitivity to impact. Even a small one is enough to create a dent on the chair, which will then be difficult to remove.

- Particular attention should be paid to protecting the material from atmospheric influences.. This is due to the fact that it can be exposed to sunlight for a long time and is often exposed to heavy rain, so you need to protect it from such tests.
Preparation for protection begins at the stage of harvesting wood for furniture making. Place the boards under a canopy in a stack, press them heavy on top and leave them to dry. It’s very good if you were able to immediately buy dry, high-quality lumber.
During operation, the workpieces must be sanded, impregnated with an antiseptic, and then with hot drying oil. At the next stage, dry them and coat them with varnish for exterior use.

- The texture relief and decorative cut of the tree will depend on the number of undeveloped branches and knots, i.e. the more there are, the better. Such a polished surface can resemble strolling grape snails.
Tip: when collecting wooden chair for a summer residence, the fasteners should be embedded in the material, then you will avoid puffs on clothes and scratches.
How to prepare for work
First of all, it is necessary to collect in advance all the tools that may be needed, as well as the material. In our case, all blanks, with the exception of the insert strips, will be cut from cedar boards, the thickness of which should be at least 20 mm.
| Details | Dimensions in mm:
|
| Material |
|
| Tools |
|
Manufacturing process
Preliminary stage - cutting out the main elements
Let's start work by cutting out the parts. To do this, we will prepare a detailed drawing, this will make it easier for us to continue making the chair.

Prepare the parts that will later become the back legs and back. To do this, try to carry out all work based on a detailed drawing with explanations, where there are appropriate tips. After checking it, mark and cut out the necessary blanks.
Cut out the rear legs, backs, seats and armrests from wide panels.
Get them by gluing boards that need to be matched to the color and texture of the wood.
Tip: select the grooves for the keys in advance, positioning them so that they are invisible after finishing cutting the parts.
- Cut out the back legs using a cardboard stencil. Attach the template to the blank that will be used as a leg and trace it with a pencil. Connect and tighten the two blanks together with masking tape so that you can cut both at the same time.
Carry out cutting with a small margin. To adjust parts to size, use a router or plane.

- Cut out the back. To do this, cut the workpiece so that the glue line falls exactly in the middle between the boards. Bevel the bottom end of the backrest at an angle of 12.5° to match the profile of the back legs. Round the top edge to a 9mm radius.

Having completed this work, you can begin assembling the product; for this you will need to cut out and adjust other parts in place.
We continue to work
Below are instructions for assembling and cutting the remaining elements.
Back and hind legs
- Drill holes for fasteners in advance to prevent the workpieces from cracking.
- To attach the rear legs to the backrest, use screws (50 mm) and glue.
- Connect the side ends of the backrest to the legs at an angle of 12.5°.
- Close the gaps between the parts with insert strips by making them of the appropriate profile. The ends of the planks and the opposite ends of the legs must coincide, which will mean correct position backrests
- Screw the inserts to the back with screws (l = 50 mm).
Tip: Keep in mind that the strength of the seat will depend on the arrangement of the boards, which should be placed from one leg to the other.
- Take circular saw and cut the piece to width.
- Mark the sides of the seat, which are located at an angle.
- File the workpiece from the sides along the outer marking line. You don't have to clean the raw ends just yet.
- Select a groove at the rear end of the workpiece, tilt the bottom at an angle of 12.5°. This must be done because the seat will be located at an angle to the back. The joint will be tight, which is what we need.
- Round the front end of the seat.
- Screw the seat to the legs, sand its side edges, and adjust them flush with the back legs.
Seat

Front legs
- Cut out the front legs by bevelling their bottom and top edges 6˚.
- Screw them to the rear ones using screws (l = 32 mm), strengthening the connection with glue.
- Make a leg - a jumper between the legs so that the garden chair receives additional reliability and stability.
You need to cut it to size:
- attach the workpiece to the front legs and mark the fixing grooves. In this case, make the bottom of the groove at an angle of 12.5° to the face;
- select a depth of 9 mm from the high side of the groove;
- attach the jumper to the front ends of the legs using glue and screws (l = 32 mm).
Armrests
- Cut out wedge-shaped supports for them, bevelling their upper edges by 6°.
- Screw the supports to the front legs using glue and screws (l = 32 mm).
- Cut out the armrests, as well as the back support for them.
- Clean the ends of the parts with sandpaper.
- Cut the ends of the support at an angle of 30°, the top edge at 31.5°.
- Press the rear support piece to the back with clamps.
- Reinstall the armrests and loosen the clamps.
- Level the position of the rear support element, ensuring that the armrests are strictly horizontal.
- Tighten the clamps and screw the rear support to the backrest.
- Screw the armrests to the rear support, then to the wedge-shaped supports, and then to the front legs, using glue and screws (l = 50 mm).

Cover the recessed screw heads with wooden plugs and sand them flush. Take hot drying oil and saturate the wood with it, dry the product and varnish. You will end up with a comfortable, classic design with a beautiful texture that your family will appreciate.
Conclusion
A wooden chair for a summer cottage, made independently, will add the necessary flavor. The main thing to remember is that it is necessary to protect the structure from atmospheric influences so that it lasts for a long time. Only familiar tools and materials will be used in the work. The video in this article will help you find Additional information on this topic.