There is no money to build a bathhouse from timber or brick, which means you will have to use cheap technology for constructing a frame building. And although a frame bathhouse is small cash investments, it will still meet the assigned tasks. Of course, if you approach the construction process itself correctly. So, for those who want to build a bathhouse with their own hands frame technology, we suggest you familiarize yourself with its main stages and some nuances.
Step-by-step instructions for building a frame bath with your own hands
Like any construction process, the construction of a frame bath is divided into several stages. Each stage has its own moments and requirements.
Foundation construction
First of all, you need to choose a foundation for a frame bath. Since this structure is lightweight, we can offer two options:
- Columnar.
- Tape (shallow).

The construction of a columnar foundation for a frame bath is based on making the right choice places to fill them. Usually these are places at the corners of the bathhouse and several intermediate foundations on which the load-bearing walls will rest. The distance between the pillars is 80-150 cm. This indicator is determined by several factors:
- Pole dimensions;
- Soil condition;
- Weight of frame bath;
- Number of floors of the building.
If you make an expanded space at the bottom of the well under the foundation, which is called the fifth, then you can reduce both the number of pillars and their sizes. The thing is that this shape of the foundation pillar doubles its load-carrying capacity. To create this shape you will have to use a special drill.
So, the installation locations for the foundation supports for the frame bath have been determined; now it is necessary to dig holes for them. To do this, you can use a garden auger with a diameter of 200 mm. Even a teenager can perform this operation with his own hands. Well depth - 1 m.
- Either sand or fine crushed stone 10-15 cm thick is poured into the prepared wells.
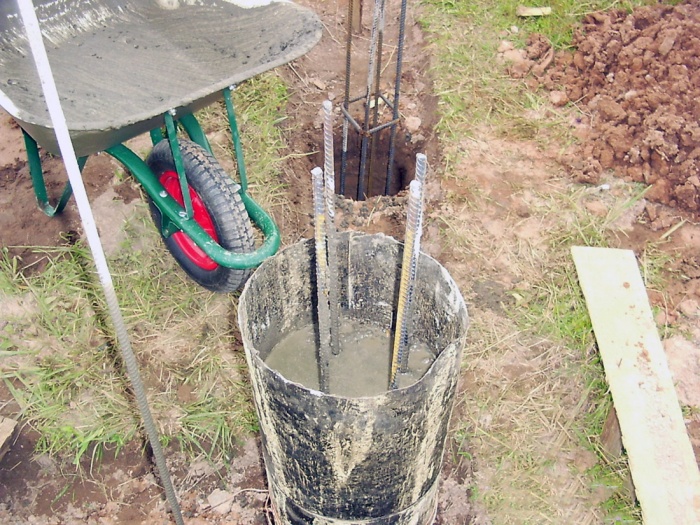
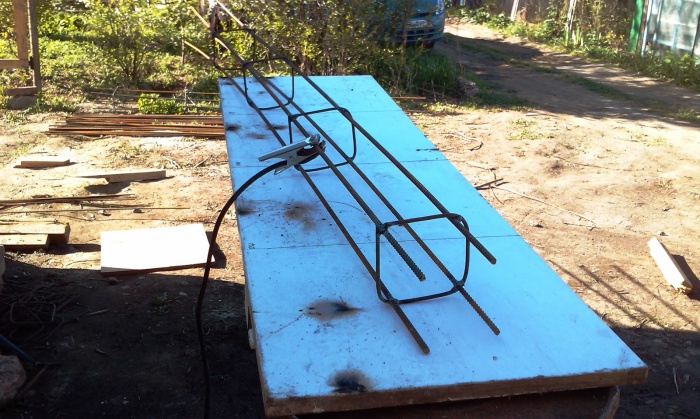
- A pre-prepared reinforcing frame is installed in the form of a structure with a triangular or rectangular cross-section from reinforcement. It should rise above the edge of the soil to a height of approximately 20 cm.
- A cylinder is made from roofing felt, which is lowered into the well. This is a kind of waterproofing layer and a forming element smooth surface supports.
- On top of the well it is necessary to install a small formwork with a height equal to the height of the projection of the reinforced frame. It can be made from a plastic sewer pipe with a diameter of 200 mm. By the way, this formwork can work as permanent.
The concrete solution is poured with your own hands, which, as it is poured, is bayoneted with a piece of metal reinforcement or a pipe. Here it is important not only to compact the material well with your own hands, but also to remove the maximum amount of air that gets into it during the kneading process. It is the air after the concrete hardens that will determine the number of pores, and they negatively affect the quality of the concrete structure.
Attention! An anchor board must be installed in each pillar during concrete pouring. Its length is at least half a meter, and it should protrude 25 cm above the surface of the support.
At this point, the construction of a columnar foundation with your own hands for a frame bath can be considered complete. You can load it only after 28 days.

As for the construction of a shallow strip foundation for a frame bathhouse, this design works great on sandy and soft soils. To do this, a trench 500 mm deep and 300 mm wide is dug along the perimeter of the future building.
- The cushion is filled with coarse sand or small crushed stone. You can use gravel. The thickness of the pillow is 150-200 mm.
- A reinforcing frame is installed. In principle, these can be any metal profiles connected to each other by knitting wire. Can be used flat frame in one layer. It must be installed on supports, for example, on bricks. It is very important that the grating is inside the concrete layer and not between the pad and the foundation.
- If the soil is sandy, you will have to install full formwork. If it is clayey, then you can get by with formwork located above the ground.
- Concrete is poured using the same technology as with columnar foundation for a frame bath.
Don’t forget to install anchors at the corners of the foundation structure and in the spaces between them.
Assembling the bath frame
First of all, the Mauerlat is installed (see video). These are beams with a cross section of 200x200 mm. They are installed on the foundation of the bathhouse, the upper plane of which is waterproofed. This can be done using roofing felt, laying it in two or three layers, or using bitumen mastic. Through holes are made in the beams for fastening with anchors, so it is worthwhile to accurately determine the location of these holes. The Mauerlat is secured with a nut and washer for each anchor. The beams are fastened together with metal corners using self-tapping screws.

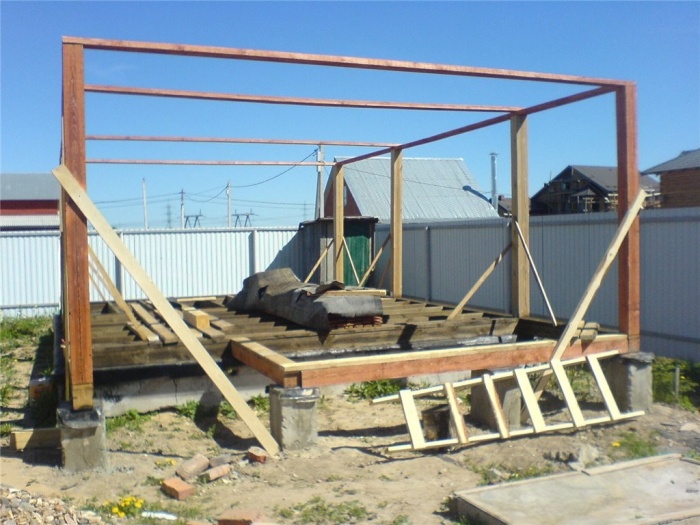
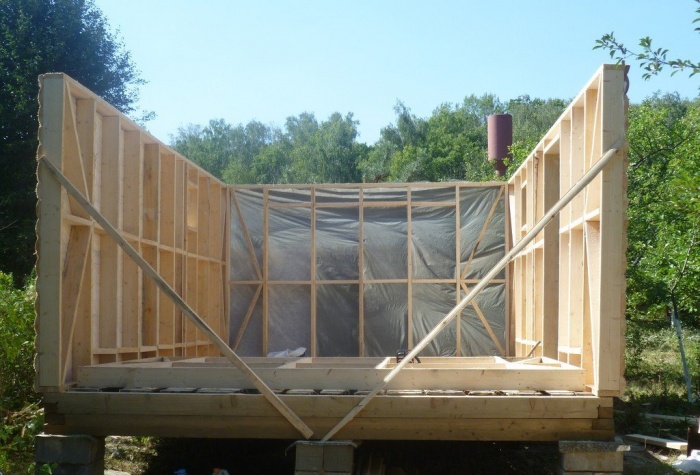
Now, vertical racks made of beams with a cross-section of 150x150 mm are installed at the corners of the Mauerlat, and intermediate racks will also have to be made from them (see video). The risers are fastened with the same corners and screws. To ensure that the racks do not move away from the vertical position when assembling the top screed, they must be additionally secured with jibs and gussets made of beams with a cross-section of 100x100 mm or 80x80 mm.

Now you can install the upper Mauerlat from timber with a section of 150x150 mm or 100x100 mm. It is also fastened with corners. In principle, the bathhouse frame is ready. As you can see, it was not difficult to build a frame structure with your own hands.
Installation of floors in a frame bath
It is necessary to understand the point that the rooms inside the frame bathhouse carry their own specific loads, that is, each has its own purpose. Accordingly, the floors in different rooms will have to be constructed differently. For example, wooden floors will look good in the locker room, relaxation area and steam room. But in the washing room, where in large quantities water is pouring, it is better to install a concrete base with slight slope towards drainage and disposal of dirty water.
A frame bathhouse is a structure in which you need to take care of thermal insulation, so wooden floors will have to be insulated.
- Logs are installed, whose ends will rest against the elements of the Mauerlat. Fastening - steel corners and self-tapping screws. As logs you can use boards with a thickness of 40 or 50 mm, or timber 50x100 mm.
- Along the joists along the lower edges, longitudinal slats are made.
- Installed on slats sheet material: plywood, moisture-resistant chipboard, metal, corrugated sheets and so on, can be used.
- Insulation (mineral or glass wool, polystyrene foam, polystyrene foam boards) is placed in the space between the joists.
- Lays along the joists waterproofing membrane, which is attached to them with metal staples, they are nailed with a stapler, you can use nails with a wide head.
- Installation of tongue and groove boards.
The concrete base in the washing room of a frame bath must also be insulated, so the soil in this place is removed, perlite is poured (fine river sand, this is the insulation in in this case), waterproofing (membrane or roofing felt) is laid, concrete solution is poured, forming the floor in the washing room. By the way, this may not be done if the frame bathhouse will be used infrequently. You can simply lay boards along the joists, leaving 5 mm gaps between them. A small amount of water will be absorbed into the soil, and so that there is no unpleasant odor, in the foundation of the frame bath it is necessary to leave two through holes, through which both moisture and odor will be removed outside to the street.
Construction of walls of a frame bath
As for the walls, their main task is not only to create conditions indoors, but also to do interior spaces warm with minimal heat loss. This is especially important for a frame bath, plus it’s a cost-saving aspect Money by reducing fuel consumption.

You can start finishing the frame both from the inside of the bathhouse and from the outside. For external cladding For a frame bath, it is best to use sheet material: moisture-resistant plywood or chipboard, OSB boards. You can use lining, boards, and so on. For interior decoration of a frame bath best option- lining.
For example, sheathed with outside bath frame, go inside, where the process of thermal insulation of the walls is carried out. In order to increase the strength of wall structures, sheathing can be mounted between the posts.
Attention! The insulation must be laid so that there are no gaps or cracks between it and the elements of the bathhouse frame.
These are one hundred percent cold bridges, which will affect the quality of the building in terms of heat loss. Let us add that for frame baths it is better to use insulation with a foil side. This is another characteristic that will help reflect thermal energy inside the bathhouse.

Do-it-yourself installation and insulation of the ceiling of a frame bath
The ceiling can be built using the same technology as the floors - using logs. The inside of the logs is lined with boards or moisture-resistant plywood. It is better not to use plywood in a steam room; it contains glue, which at high temperatures begins to release harmful substances.

Insulation will have to be carried out from the attic. Before sheathing the ceiling of a frame bathhouse with boards from the inside, you need to lay a vapor barrier membrane on top of the logs with your own hands. The insulation is laid in the space between the joists without gaps or cracks, a waterproofing layer is installed on top, and with the last layer the structure is covered with durable material - the same plywood, chipboard, boards, etc., can be used.
Do-it-yourself construction of a frame bathhouse roof
The shape of the roof of a frame bath can be any. The simplest one is single-pitched. Therefore, on the upper Mauerlat on the side of the façade of the frame bathhouse, you need to install several racks made of timber with a cross-section of 100x100 mm. They are attached to the Mauerlat with metal corners. The number of racks determines the length of the facade of the frame bath at the rate of every 1.2-1.5 m. The height of the racks is up to 1 m.
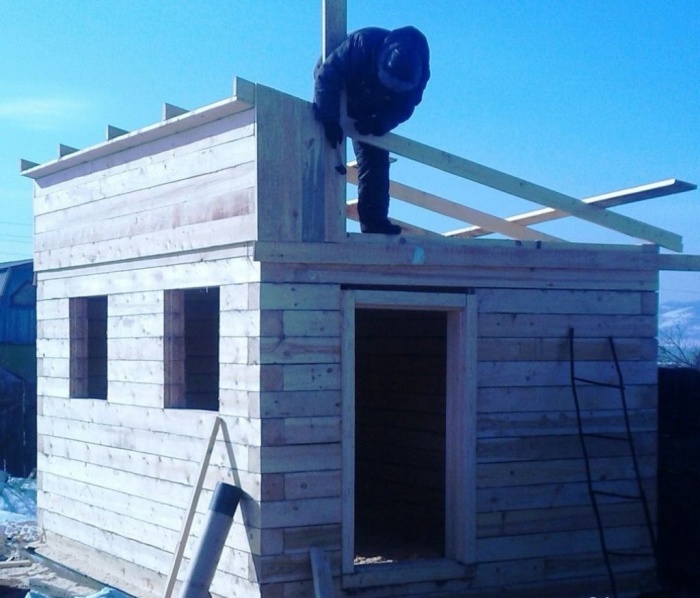
A beam is laid on top of the installed supports, on which one end will rest rafter legs, in fact, these are boards 40-50 mm thick. The second end of the rafters rests on the back of the upper Mauerlat of the bathhouse frame. All this can be secured with corners, nails, and wire. The distance between the rafters is 80-150 cm.
The next stage is laying the sheathing. The sheathing elements can be slats with a cross-section of 40x40 mm or 50x50 mm, or boards 30-50 mm thick and 100 mm wide. Fastening is done with self-tapping screws or nails. And the last thing is the installation of roofing material. The choice of coverage is up to the customer.
Conclusion on the topic
Like this step-by-step instruction How to build a frame bathhouse with your own hands. Let's face it, this process is simple when compared with the construction of baths from more fundamental materials. But in any case, you will have to familiarize yourself with all the nuances of building a frame bath. Therefore, we suggest watching the video that is posted on this page of our website. This path will be like a video instruction for you.
A good bathhouse, made of high-quality material, designed and built individually, taking into account the personal needs of the owner, is the dream of any summer resident. Taking a steam bath, improving your health, or just having a good time in the company of friends or relatives is a real Russian tradition.
Nowadays, unfortunately, it is not possible to build a bathhouse from most building materials due to the state of the general economy of the state. Therefore, we suggest you consider the option of building a bathhouse with your own hands based on a wooden frame. It is easy, quick and inexpensive compared to building from natural wood, timber or stone.
This article provides step-by-step instructions for constructing a frame bathhouse, starting with the rules for choosing high-quality material, ending with the internal lining of the bathhouse premises, as well as several tips and recommendations from professionals.
Construction options
The construction of any bathhouse implies the presence of four main functional rooms:
- verandas (dressing room);
- rest rooms;
- shower;
- the steam room itself;

Sometimes owners combine several rooms, increasing their functionality without losing the level of comfort. The size of the bathhouse depends mainly on the number of people who will use it. The most common options:
- 120x250 cm. Ideal sauna for one person. It consists of two rooms: a steam room (120x150 cm) and a dressing room (100x120 cm). You can change clothes in the dressing room. If necessary, you can arrange a corner with a shower in the steam room.
- 250x250 cm. This option is suitable for two people. It again consists of two of the same rooms (steam room 250x150 cm and dressing room 100x250 cm). If desired, it is possible to arrange a place to store fuel for the stove.
- 300x300 cm. This sauna is suitable for use by three people. The space inside can be organized in different ways. For example, make a steam room 300x150, and put a shower stall in it, 100x150 cm. The remaining space can be equipped as a relaxation room, which will simultaneously serve as a dressing room.
- 400x400 cm. The most perfect option, if it is planned that the bathhouse will be used by four or five people at the same time. You can leave it on the steam room itself square meters. In this case, the dressing room will be 200x150 cm, and the rest room will be 400x200 cm. Part of the area of this room can be allocated for a shower by placing a stall in one of the corners.
Please remember that these are just a few of the many options available. You have the right to change the parameters of each room, depending on your personal preferences and financial condition.

Preliminary work: planning and material selection
First, you need to draw a sketch, create a drawing of the future bathhouse, and also draw up a work plan that will help give coherence and organization at each stage of construction.
It is important to conduct a small analysis, studying all the nuances of constructing a frame bathhouse, the advantages and disadvantages of both the bathhouse itself and the materials used. It is also necessary to take a soil sample to find out its composition: construction work will take place on it, and if the soil is clay, which tends to settle quickly, then in any case you will need a foundation (in rare cases you can do without it). The bathhouse can be either an extension of the house, in which case the entire space can be equipped as a steam room, the bathroom will serve as a shower room, or separately. The drawing must indicate, in addition to appearance future construction, as well as its features: the location of windows and doors (usually this concerns supporters folk signs and Feng Shui), general dimensions, interior design premises, number of floors and so on.

According to Feng Shui, the windows should be directed to the east, and the door, in order to improve the circulation of Qi energy, should be located in the south direction, and it should open into the room. The number of windows should not exceed three for each doorway.
The main advantages of a frame bath are:
- relative cheapness compared to others building materials;
- ease of installation. You don't have to resort to command help professional builders. Everything is quite simple, you can build a bathhouse alone;
- no need for a massive foundation;
- ease of wiring of all communications;
- no shrinkage;
- high speed heating rooms with proper insulation.

The disadvantages include:
- poor sound, vibration and waterproofing;
- the need for additional thermal insulation of all premises. This is necessary in order to prevent heat loss, as well as to create some kind of tightness;
- Difficult to maintain and operate. Due to the fact that moisture penetrates into a frame bath more easily, for example, during rain, the wall insulation can quickly become unusable, and replacing it is quite problematic, since the wall covering will have to be dismantled.
Mineral wool, glass wool, polystyrene foam blocks and many others can be used as insulation. Usage liquid glass Not recommended!

From the materials we will need:
- cement (can be M400 grade for building a foundation);
- sand (coarsely sifted, quartz, quarry or purified river sand is suitable for building a foundation);
- insulating material(steam, hydro);
- insulation (about 5 cm thick);
- roofing material;
- gravel;
- timber 10x10 cm (for assembling the lower trim);
- timber 5x15 cm (for mounting the frame);
- beam 4x5 cm (for arranging struts for racks);
- plastic pipes(diameter from 5 cm for water drainage);
- clapboards or any other material for interior cladding.
Since a frame bath is a very lightweight structure, the foundation can be built using a simplified system. Both a strip foundation, which is poured under all load-bearing walls, and a nested foundation are suitable, but the second requires stable soil, otherwise the building may fall apart.

Foundation
This article will discuss two main foundation options: nested and strip. For the first option, you need to purchase special piles for the foundation; they can be made of metal, cement, or other materials, or you can make them yourself. There are two types of piles: bored and driven. For the first, holes are drilled around the perimeter into which wooden formwork and metal are inserted. support pillar, then a concrete solution is poured inside, after some time the formwork is removed, and the resulting space is filled with sand, gravel or a mixture of them. If you chose the second option, then below are step-by-step instructions for you.

Step-by-step instruction:
- Immediately before building the foundation, the area on which the bathhouse will be built must be cleared of debris and dug up with a shovel upper layer land.
- We drive small wooden pegs into the ground at the corners of the perimeter, and stretch a thread between them to prevent displacement when installing the piles.
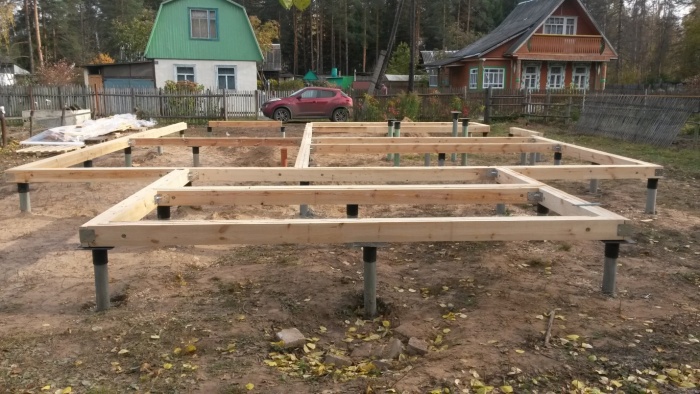
- On the market you can find metal piles already equipped at one end with a small drill, which will help you easily penetrate the ground. The rods should be about 10–30 cm in diameter, this depends on the thickness of the future walls, and about a meter in length. This is necessary so that each support sinks 50–70 centimeters underground to the level of soil freezing, and rises another 30–50 cm above the surface. All rods are coated with primer or special compounds, preventing oxidation and corrosion of the metal. The supports should be placed at a distance of 1–1.5 m from each other. On top, if this is not provided by the manufacturer, to increase stability, you can stuff a square hat also made of metal 20x20 cm and 0.5–1 cm thick. Use a plumb line or a spirit level with a magnet to ensure the pile is perfectly level.
- Holes are drilled in the metal caps, which are later filled concrete mortar, with their help the grillage will be attached. As a grillage, you can use thickened beams 20x20 cm (then there is no need to drill holes in the supports), or channels, or reinforced concrete slabs.

For greater stability, you can build a strip foundation. Of course, this option will cost a little more, but you will be calm and confident that the bathhouse will last for many years.
A strip foundation is a very good option for small buildings if the soil in your garden area does not tend to move, and with high-quality hydro- and thermal insulation you do not have to worry about the floor and walls being too cold.

Step-by-step instructions No. 2 include the following points:
- Identical to the first step in construction pile foundation.
- Identical to the second step in the construction of a pile foundation.
- Next, you need to dig a trench 60 cm deep and 40 cm wide around the perimeter, as well as under the load-bearing walls (indicators may vary depending on the design of the bathhouse).
- The bottom is covered 1/3 of the depth with sand, which is filled with water so that it “sits” better.
- A layer of gravel or stone/broken brick is placed on top of the sand.
- It’s worth going over the top with a construction vibrator, which will help fill the resulting voids efficiently.
- The gravel layer is again covered with sand and carefully compacted. As a result, the height of all layers should correspond to the ground level.
- A wooden formwork 20–30 cm high is built on top, inside which is laid reinforced belt. The whole space is flooded cement mortar in a ratio of 1:3:3 (for each bucket of liquid cement there are three buckets of cleaned and sifted sand and three buckets of crushed stone).
- After all manipulations, when the solution has hardened sufficiently, the formwork is dismantled. For the first few days, and in hot weather for about a week or a little more, the foundation is watered to prevent cracks from appearing. The solution will finally become durable, turning into a monument, in a month.

When building the foundation, do not forget to dig a trench into which you need to place a drain pipe - it will connect the floor of the bathhouse and the drainage well. In this case, the floor should be equipped at a slight angle, and also additionally insulated, for example, with roofing felt.
The floor can also be insulated by compacting the soil, adhering to the angle of inclination flooring. Next, a pipe is laid in the trench and covered with sand or gravel. A layer of crushed stone (10–20 cm) is laid on top, and a lower concrete screed (2–5 cm) is poured on top of it and laid on the screed bulk insulation, for example, expanded clay, which is covered with a layer of waterproofing on top. After all insulation work, the last layer of the subfloor is poured - compacted reinforced mesh upper concrete screed (5–6 cm). A finishing floor is laid on top of the subfloor, most often boards are used for this. ceramic slabs, porcelain stoneware or soapstone slabs.

Important! Please note that if you are planning to build a heater in a steam room, then you need to allocate a place for it at the construction stage and equip a separate foundation there, which ideally should not be in contact with the main one, since due to a large temperature difference, its destruction may occur.
Walling
After building the foundation, you can begin building the walls. For frame walls, a new base is created, which is constructed in the same way as a grillage using tenon and grooves. At the corners you can use the same beams as for the base; they must be walled up in concrete.

Step-by-step instruction:
- To begin with, all material is pre-dried. For the frame, it is not recommended to use coniferous species, since when heated they release a resinous substance, due to which there is a chance of ignition of the entire building, and birch, since it is more susceptible to rotting processes than other species. For these purposes, the ideal choice would be material made from deciduous trees(aspen, linden, oak, larch), because these raw materials have high level thermal insulation, which is so important for the construction of a bathhouse.
- The lower trim must be tightly secured using anchor bolts.
- Further construction wooden racks start from the corners along the load-bearing walls. The beams are fastened using galvanized corners (the most reliable option), or grooves are cut out in the lower frame, into which the edges of the beam are then inserted and nailed using nails, bolts or special construction staples. The distance between the beams is usually 60 cm; if an opening is planned in the wall, then the number can be increased by 40 cm, but no more.
- Temporary slopes are installed between the beams, which prevent the movement of the racks during construction work.
Do not forget to check each installed support using a plumb line or building level.
- An upper harness is mounted on top, which helps to secure it better. support posts and is the basis for the roof rafter system, also using metal corners.
- A special groove is cut in the beams at the corners of the top trim, and they are secured with 2-4 nails (depending on the thickness of the walls).
- Then they begin to install permanent supports. Boards with a cross-section smaller than the racks themselves are used as slopes. They are most often attached with inside baths, four for each support: two upper and two lower.
- Next with outside All beams are treated with furniture varnish in 2-3 layers, and the internal beams are treated with an antiseptic; only the counters in the steam room and shower should not be treated.

External wall cladding is an important procedure. The service life of the entire building depends on how well you take care of it.
- After all the construction work on the construction of the walls is completed, we proceed to cladding the walls from the outside. To do this, it is attached from the outside around the perimeter waterproofing material using construction staples on OSB sheets.
- A frame of small boards is mounted on top of it (not always), and on top of them - facing material, often clapboard boards, block house. This creates some ventilation. Looks beautiful, stylish and elegant. The lining is attached horizontally. To prevent moisture from getting into the seams between the boards, we recommend installing them overlapping.
- Insulation blocks are laid under the waterproofing. In places under the slopes, blocks of the same mineral wool should be carefully cut and inserted.
- The insulation is covered with another layer of waterproofing on top.
- The last layer are OSB sheets, they can also be used to mount a wooden frame, on which the internal lining will be installed in the future.

Roof arrangement
Despite the fact that usually installing a roof is a very labor-intensive process, which is simply impossible without the participation of professional builders, in a small bathhouse of 6x6 m, or even less, it will not be special labor.
The roof can be either single, double or hipped. The choice again depends on the personal preferences of the owner and his financial capabilities. Let's consider the option gable roof.
Step-by-step instruction:
- The first step is to install the Mauerlat - supporting structure, on top of which the roof rafter system is attached.
- After the rafters, in order to make the structure more reliable and stable, vertical supports are installed, which are secured using the same galvanized corners. If necessary, at the stage of installing the rafter system, an exit to the attic is made.
- A sheathing of boards 15–20 cm thick is installed on the front boards, and roofing material is already placed on it. This procedure is usually carried out starting from the roof ridge.
The roof must be insulated. First, waterproofing is attached, under which blocks of the same mineral wool are installed, and a vapor barrier is placed under the insulation, which can be used as compacted foil. Additionally, for greater tightness, the insulation is closed plastic film. Next comes work on the interior lining.

The finishing touches. Interior decoration
At the final stage, the floor, walls, and ceiling are installed and insulated (more on this above), windows and doors, and interior furniture are installed. Special attention is given to the stove, because the stove is the soul and heart of every Russian bathhouse. You can make it yourself or buy it ready-made. The stove can be laid out independently from brick or soapstone, but this design takes up a lot of space, so it is better to replace it with modern electric analogues.
As already mentioned, it is better not to use for ceilings and walls. conifers trees, but deciduous ones. All electrics in the bathhouse must be covered with moisture-proof material. Buy wiring that is double braided and covered non-flammable material, be sure to use corrugation for the wires to prevent mechanical damage, because dismantling the wall or ceiling covering, repairing it, and then putting it back in place is not easy or quick.
Take the quality of ventilation seriously. Take care to install special valves and ventilation anemostats that will help remove accumulated moisture after water procedures.

Let's summarize
As you may have noticed, there are a huge number of options for building a frame bath, the choice of which depends only on you. Use quality materials, do not skimp on the thoroughness of the work - and then your bathhouse will last for many years, delighting you and your loved ones.
Building a Russian bathhouse, or rather assembling a frame structure for yourself, is not a difficult task and is even interesting. But you can’t do it on your own, because any private construction requires at least one partner.
With a frame structure, the number of auxiliary workers is directly related to the speed of construction, so we will tell you in detail how to quickly plan the frame, select materials and drawings.
Let's start with the project
Let's calculate the square footage offhand: how many families or companies will visit the building? The standard for an average family is a design of 4X6 or 3X6 meters. Let's look: 
A classic for a healthy holiday.
Option with terrace: 
Classic, compact 4X3: 
Let's organize the basis
Having decided on the project, we proceed to. Naturally, we make a pit of the required width and depth.
Important! Exactly belt type The base is needed only for the washing part and the steam room.
It is more profitable to install a dressing room, rest room or terrace on metal supports or poles.
It makes sense to make a strip type foundation if you plan to build more than one floor. After all, the structure will be several times heavier.
In some cases, on the contrary, they save on everything, including support. The frame is assembled using whatever is needed. Such a building will begin to dampen in the first season! But it is allowed to make the following foundations for the frame:
- Tape;
- Columnar;
- Wood;
- Reinforced;
- Screw;
- Block or brick.
The normal basis is done like this:
- Clean and level the area.
- Mark the points of the pillars and the planes of the trenches.
- Dig holes or trenches.
- Provide waterproofing.
- Concrete solution is poured.
- Cook the grillage.
Advice! It is customary to determine the specific type of foundation by the kidney. After all, in a swamp, even a belt with reinforcement will soon “float”.
Thinking through the drainage system
Yes, sometimes they simply prepare a pit under the building, but if the room is used several times a week, then it is advisable to figure out a drain according to the type: 
Expensive device. But otherwise, stagnation of dirty water cannot be avoided, especially in winter.
Usually they dig right under the washing room, but the design does not always allow the size to be maintained, and it is impossible to pump out excess waste.
Remember about floor insulation
The future construction is almost outdoors, a draft will definitely follow your feet if you don’t provide warm floors in the dry parts of a Russian frame bathhouse. It is advisable to do this:
- We nail timber onto the joists. A section of 5x5 cm is sufficient.
- We lay it on it rough plank floor.
- Must be on top of boards we lay roofing material.
- Insulation (mineral wool, polystyrene foam).
- We lay the finishing floor.
For a wet area (sink, steam room) is required foundation closed type . In the process of laying the flooring, you need to maintain a distance between the boards, 1 cm is enough. Moisture-saturated boards should be nailed, but not to the frame or base. Metal supports are specially provided for them, otherwise the building will rot.
Assembling the frame

Step by step process:
- Start with the bottom strap. We fasten it to anchor bolts, but it is advisable to add a steel bracket to each connection - it won’t be superfluous.
- We put poles on the harness. Fastening - 2 bolts.
- In the interim We install corner posts. It is more convenient to use a steel corner for even and reliable fixation.
- Next we put intermediate racks. It is better to maintain a distance of 50-60 cm.
- Let's finish top harness And constant jibs for rigidity.
- Finish - floor beams and rafters.
We organize the walls and their insulation correctly
Good for work only seasoned wood.
Please note: do not use birch beams or boards. This material rots the fastest.
We line the inside with hardwood, and the outside with pine or larch.
The process of creating walls itself can be performed either on a frame or using the panel method, followed by lifting each block onto the “skeleton” of the bathhouse. Moreover, outer part must be treated with antiseptic agents. The interior part is sanded and impregnated with compounds that are resistant to temperature changes (stain, for example).
We always start with insulation, we work like this:

It is important to know! We never use varnish inside. It produces harmful fumes during temperature changes.
They usually start installing insulation not from the walls, but from the roof. But to do this, first we do rafter system. What next.
How to properly assemble a roof onto a frame
Required material for work: board 15X5. Place it on the edge and secure it. We maintain a distance between the boards of 10-15 centimeters. We collect the so-called “triangles” and connect them with timber.
For floor beams important condition– the protrusion should be maintained no more than half a meter from the level of the walls. At the very end we arrange a sheathing of non-woven edged boards(thickness no more than 2.5 cm). Place one at a time from top to bottom, starting from the ridge.
Our “triangles” or “kerchiefs” are measured like this: 
Advice! It is easier to assemble the parts of the rafter system separately, on the surface of the ground, and only then lift them onto the frame.
For the roof we take soft tiles or metal tiles. As a last resort corrugated sheet. But before that, you need to do some insulation. We work from the outside, starting with the following list of materials:
- Vapor barrier.
- Insulation.
- Wind-moisture-proof membrane.
- Tile or corrugated sheet.
For your information! Three items from the list are perfect for working with bathhouse walls.
More information about the gable roof option on a frame:
Construction of floors and roofs with explanations.
The work is carried out in sectors between the rafters. And after installing the protective membrane they put counter-lattice with tiles. Example for reference: 
What to use for wall decoration besides wood
Apply modern materials for cladding it is now more profitable, more beautiful and sometimes faster. And with such an abundance of competitive goods, it’s more difficult to find good lumber.
We take for a frame bath:
- Lining;
- Thermal panels;
- Facing brick;
- Vinyl siding;
- Block house.
More about the steam room
This is the most important room, since the microclimate in the steam room is the very essence of the building. To do this, we increase the amount of insulation. If a layer of 10 cm was applied to the walls, ceiling or roof, then at least 15 centimeters are needed for the steam room. It is also important that steam sediment (condensation) does not accumulate inside the walls, so You can’t do without a heat insulator.
We purchase necessarily foil and install it so that the foil layer is outward, that is, “looking” into the steam room itself. And on top of the insulation and heat insulation there must be linden. It doesn’t matter whether it’s clapboard or regular board. The main thing is that the wood fibers be useful. We do not treat with varnish or paint under any circumstances..
What's the best way to set up a stove?
It’s good if you can heat the bathhouse at the same time and wash at the same time. Therefore, a stove made of stone, iron or brick is placed with a firebox in a washing room or dressing room, and the main structure is closer to the steam room.
Moreover, it is better to equip stoves for country frame baths with two water tanks at once in order to save money. 
Build a similar one a heating element very simple. You will need:
- sheet metal;
- welding machine;
- a pair of taps;
- pipe;
- stones.
And a primitive potbelly stove will perfectly heat the stones to high temperature. It is this design that will not burn out for a long time, because temperatures from iron frame furnaces are used for tanks and stones. There is simply nothing to get red hot.
Don't forget about the dressing room
For frame type construction, the dressing room is the premises of a classic Russian temporary bathhouse. They always saved on this “half-room” by simply attaching an improvised shed made of boards to a 3 by 3 log house. Although now frame project a bathhouse of 3 m by 6 m already implies an insulated relaxation room covering half the area. 
So there are two types:
- Warm. Requires insulation of all areas - from floor to ceiling. It is advisable to place it on a strip foundation. You also need to take care of ventilation. And for this they usually buy more asbestos pipes 10-15 cm and make a hood. Provides comfort at any time of the year.
- Cold. Regular extension. This type is very convenient for the summer cottage period, since the lightweight structure is naturally ventilated. The work does not require a lot of expensive material. And it’s not difficult to assemble a frame bathhouse with your own hands and in a short time.
Both types can be nicely represented by doing interior decoration. But for winter holidays and Epiphany bathing the cold option is excluded. It is customary to place benches, beds, a table and several hangers for equipment in the dressing rooms.
Conveniently, from the very threshold it is through the dressing room that you can bring in or pump water, as well as heat the stove.
First we think, then we act
Construction of a frame bathhouse is not an imitation of Western technologies. After all, part of the plan can always include an ordinary modest log house for a steam room, and the rest of the area can be made of modern material.
The main thing is that everything is done according to technology, otherwise the walls will begin to “collect” moisture. Therefore, you should not neglect any material in order to save money - repairs will be much more expensive.
Frame bathhouse made of timber:
A fairly durable and at the same time inexpensive construction option. The author used everything that can be adapted for budget construction.
Construction of a bathhouse frame method one of the cheapest options. And modern Decoration Materials, for example, imitation timber or a block house will give the structure a look almost indistinguishable from the real thing wooden bath. Material consumption for installation is 2–3 times less. Our experts will tell you how to build a frame bathhouse with your own hands step by step.
Frame small sauna economical and easily fits into any area.
A frame bath has advantages: low price, speed of assembly, lightweight foundation and disadvantages: moisture can easily get into the frame, the structure must be carefully insulated and external and internal finishing done. But problems can be solved if construction is taken responsibly.
Landscape designer Vera Nikolaevna, Moscow, will tell you where it is better to put a frame bathhouse on the site
 Vera Nikolaevna is a specialist in the field of planning wooden baths.
 Vera Nikolaevna has a higher education in architecture and a second degree in landscape design. The main specialization is planning a wooden bathhouse, linking the project to the site. She has been working in this field for more than 10 years.
What are the main factors to consider before building a bathhouse?
Before building a frame bathhouse, you need to plan and select a project. You can carry out construction without it, but it will be wrong. The choice of project depends on several factors:
- What kind of bathhouse will it be: free-standing or attached to the main house?
- Plan a place on the site. Moreover, it is important to think about how to supply water, electricity, etc. to the bathhouse. The location of communications influences the choice of location in the first place.
- Find out what geodesy is on the site; the design of the foundation of the frame bathhouse will depend on this in the future.
- It will be determined how many floors the building will have, the size and internal layout.
- Where the stove will be installed in the bathhouse will determine how the ventilation system and chimney will be designed.
- It is necessary to choose a roof; this will affect the rafter system and the structure of the roof.
 Typical design of a frame bath 5400x6300 m
 Only after this is a bath project developed. As you compose, you can correct and supplement the design with various details. The more detailed the project, the easier it will be to build a frame bathhouse on your site.
In order to save money, it is convenient to purchase a standard project, of which there are many in construction companies. It’s safer to choose one that has a lot of finished photos.
Choosing suitable sauna Do not forget about the design of neighboring buildings: houses, gazebos. Everything should be in a single harmonious ensemble.
After choosing a project, you can begin installing the foundation.
Viktor Leonidovich, foreman of the company “Building Together” in St. Petersburg, will tell you how best to carry out the installation of frame construction.
 Large foreman construction company talks about the intricacies of building a frame bath.
 Viktor Leonidovich built more than 400 frame bathhouse projects at personal plots and on private property. His baths have been serving their owners for more than 15 years.
How to properly assemble the foundation for a bathhouse with your own hands?
There is no need to build a complex foundation for a frame bathhouse and there is no need to maintain it for a year before assembling the box. The easiest way for clay or heaving geodesy is to assemble a tape that is not buried. Carry out work as follows:
- According to the project, the perimeter of the foundation is marked, pegs are simply stuck in the corners.
- A trench is dug 60 cm deep and 40 cm wide, this is enough for frame construction.
- Sand is poured into the trench to a depth of 10-15 cm and water is poured with a tamper. The next layer is filled with gravel or broken red brick and again a layer of sand to the ground level.
- Formwork is installed on the trench. It’s easier to do it yourself from 40x40 mm boards and bars. The height of the formwork must be at least 50 cm and width 35 cm.
- A frame of reinforcement is assembled into the formwork. To save money, you can use various iron elements, for example, old pipes from the heating system.
- The structure is filled with concrete. Filling can be done at once or in stages, but the bottom layer should not have time to set.
- The foundation is waterproofed on top with 2–3 layers of roofing material or 2–3 mm of liquid rubber. The sides are coated with bitumen mastic.
Before you start assembling the box, you need to make sure that the foundation is mature and dry. Proper drying is carried out gradually, covering the structure with old plastic bags or film for 2-3 days. Then open it and let it sit for another 1-2 days.
What are the features of assembling a bathhouse box?
 The frame bathhouse is finished with a block house.
 The frame of the bathhouse must be assembled from timber with a cross-section of 100x100 mm and edged boards with a width of 450 mm. The lumber must be dried before installation or taken ready-made chamber drying. The second option is more expensive. The wood can be any: larch, pine, spruce, aspen. In any case, the inside of the bathhouse will be finished and there will be no resin leaks.
All material is treated with antiseptics before assembly. To do this, it is better to use special ones, such as Senezh or TechnoNikol. There are old-fashioned methods: with the help of working out machine oil or copper sulfate. But the first will emit a liquid odor, and the second is poisonous.
 Ready frame large sauna from chamber-drying timber.
 The first step is to lay out the lower trim. The beams in the corners are connected with special metal staples or using nails in gusset without remainder, for example in half a quarter. The strapping is not laid directly on the foundation, but on two narrow slats, which must be laid along the entire perimeter of the foundation.
Mounted at the corners to the harness vertical beam equal in size to the height of the box. It is best to attach it to the foundation using special fasteners per pin not less than 200 mm. One side of the fastener is screwed to the foundation, the other holds a vertical beam. The structure is connected from above with an upper harness.
To add additional rigidity, racks made of the same timber are placed between the corners. Corner posts additionally secured with at least 8 braces. Then they begin to assemble the subfloor.
It is easier to assemble logs for a subfloor with your own hands from paired 50x150 mm boards. Lay logs on the protruding part of the foundation. A subfloor is laid on top of the joists. The floor pie in the rest rooms and dressing room is made with insulation. To do this, slats are nailed onto the joists from below and boards are laid on them. Waterproofing and insulation are installed on the boards. Then a vapor barrier and a finishing board or screed are installed.
In the steam room, for ease of assembly, it is easier to assemble the floors with your own hands, but they must be brought down from the slopes to the middle. Otherwise, moisture will accumulate near the walls and the frame structure will not last long.
Frame walls it is necessary to sew up the outside with boards. Then waterproofing is laid from the inside; it is better to use a special membrane. You should not use roofing felt for a bath; when heated, it will emit a strong odor. Insulation is laid on top. A bathhouse involves the use of environmentally friendly and fireproof materials, such as mineral wool (stone, glass, etc.).
 The linden lining is mounted on additional sheathing from the inside of the frame bath.
 The insulation should be laid tightly between the beams. It is necessary to lay foil insulation on the inside. It will perform two functions at once: protect the insulation and create the effect of a thermos in the steam room. The joints are carefully taped with special foil tape. The foil insulation is covered with a sheathing made of timber and a lining made of linden or aspen is inserted.
The roof is assembled like all structures, according to the selected project. We have already talked in more detail about how to install a bathhouse roof.
What material is best for finishing a frame bathhouse on the outside?
 The wall of a frame bathhouse is covered with a block house.
 The facade of a frame bath is finished with any material. They choose based on general design all buildings on the site. If the main house is made of brick, then you can cover the bathhouse with panels made of tiles underneath it or line it with half a brick. Moreover, by laying it in half a brick, you can once again insulate the building from the outside. The basic design of the pie will be slightly expanded, but the steam room will become warmer.
Natural imitation timber and block house look good. They are made of wood and the bathhouse will not lose its environmental friendliness. And it will be difficult to distinguish a structure from a bathhouse made of timber or rounded logs.
If you perform reinforcement, you can use decorative plaster. It is also environmentally friendly, and the range of colors and textures in stores is huge.
The most inexpensive option is siding or plastic lining. The first option is more durable.
Is Canadian technology a breakthrough in frame bathhouse construction?
 Frame bathhouse assembled using Canadian technology.
 Frame baths using Canadian technology appeared in Russia relatively recently. Canadian technology has a number of advantages:
- The service life of a bathhouse is 2–3 times longer than any frame one.
- Repair work has to be done less frequently.
- Environmental friendliness and aesthetics.
- The price is slightly higher than the traditional frame one.
- Assembly can be completed in 3–4 days.
- It is good to tolerate negative environmental influences.
- A light weight the buildings.
The basis of the frame of the Canadian bath is made of metal frame or from chamber-drying timber. From above and from the inside, the entire structure is covered with slabs of cement and shavings. The bathhouse is insulated with mineral wool between the slabs and sealing vapor-tight materials. Thanks to the design, the bathhouse is completely sealed and moisture does not get inside. Canadian frame baths are made only in large factories according to pre-designed drawings.
Any frame construction, and especially the baths seem uncomplicated. But the work takes no less effort and time than to build a steam room from solid wood. Just finishing and insulation is expensive and labor-intensive. Which bathhouse is best to build with your own hands for a family is decided by everyone for themselves.


