To create the mood not only for work, but also for relaxation, you definitely need beautiful furnishings in your home or garden. They can be not only purchased, but also homemade. I'll tell you how I decorated a simple tabletop with colored mosaics.
What do you need
Materials and tools. A table with a removable glass top, waterproof glue, grout for tiles in a tone lighter than the mosaic or a neutral color (beige, gray, etc.), special disc cutters for mosaics or a tool of the same purpose for ceramic tiles, rubber or latex gloves.
Mosaic. The best and a budget option- mosaic from construction supermarkets for finishing bathrooms. It can be purchased in separate sheets, choosing the desired colors.
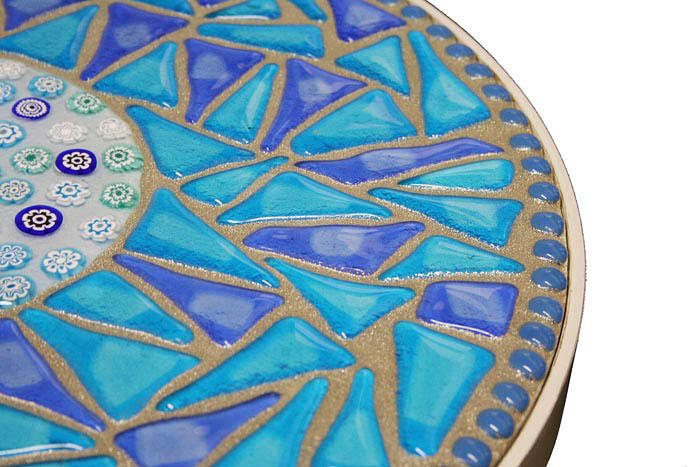
It is better that it has a thickness of no more than 4 mm, since thicker ones do not prick easily. I bought stone and glass mosaics for my table. Stone as a base for a countertop looks ideal: it is pleasant to the touch, warm and does not have very sharp corners. Against its background, the glass begins to play with color favorably.
Photo: From personal archive/Yulia Korsakova
Preparation
If the countertop is old, you need to clean and level its surface, and if necessary, degrease it with alcohol. Then we choose a pattern for the table. I settled on a simple pattern of repeating circles with alternating colors. I separated the mosaic from the grid and tried to beautifully arrange the elements on the surface in such a way that not too many pieces had to be split into pieces.
Manufacturing
After the final version was formed, I put on gloves and, spreading glue on each element, fixed the mosaic on the tabletop. True, next time, for greater density of the drawing, I would fill the middle not with circles, but with horizontal rows.
After gluing the mosaic, I left it for a day to harden. Then she took the grout, spread it exactly according to the instructions and applied it to the surface with a gloved hand, without missing a millimeter. The remaining grout was put aside for a while. Waited 30-40 minutes until dry ( exact time indicated on the package) and wiped off all excess with a damp sponge. All discovered bubbles or cavities were covered with grout using my finger. After the mixture had dried, we installed the tabletop on the base and immediately set the new tea table.
Yulia Korsakova, Ivanovo
Adriatica (Natural Mosaic, China)
Even at the stage of choosing the material, I decided not to make the countertop from laminated chipboard, since it has an unusual shape and in some places it turns out to be quite wide. Artificial stone looks beautiful, but is very expensive, plus you can’t put hot things on it, it’s easy to scratch with a knife. It also looks good, but they shouldn’t be difficult to veneer curved shapes. So I decided to make a mosaic countertop with my own hands. I came across a Chinese mosaic from natural stone Adriatica Natural Mosaic. The size of each element is 25x25 mm, so it is convenient for it to form the end of a tabletop 5 cm thick.
Quick navigation through the article
Base


Essentially it is extruded polystyrene foam, reinforced with fiberglass on one or both sides and covered with a cement layer. This material is used to make benches in Turkish saunas. In terms of price, it is much more expensive than ordinary polystyrene foam, but it seems to me that for such a task it is worth the money. Instead of panels, you can use thin DSP, but they are heavy, and it is no longer possible to achieve a tabletop thickness of 5 cm.
Mosaic laying and grouting

I calculated everything in advance down to the millimeter, and began laying it: first on the countertop, then on the ends.
The mosaic was trimmed using a grinder with a disc on the tiles. In my case, I can’t do without an angle grinder. Even if you cut the sheet into separate strips and increase the size of each seam by fractions of a millimeter, you still won’t be able to make a beautiful connection on the window sill, since the slopes are not at a right angle.


Expenses
The total length of the tabletop (and table) is 5.3 m, area 3.5 m².
- Plywood 12 mm (2 sheets) - 1000 rub.
- Dulux Golden Teak stain (0.75 l) - 700 rub.
- Wedi building panel 2500x600x30 mm (2 pcs) - 4600 rub.
- Litoacryl Plus glue 5 kg (2 buckets) - 3260 rub.
- Mosaic made of natural stone M068-25T (3.5 m²) - 11,400 rub.
- Epoxy grout Mapei Kerapoxy Design No. 734 3 kg (3 pcs) - 6900 rub.
- Colored metallized additive MapeGlitter No. 214 (6 pcs) - 3160 rub.

Total: 31020 rubles. Cheaper than 42 thousand rubles are countertops of similar sizes from artificial stone I couldn't find it. I made the base in 1 day, laid the mosaic in 2 days and did the grout in 3 evenings. Plus 1 day preparatory work(marking for trimming, holes for hob and a sink). I think it's a good alternative. Once a quarter I recommend polishing the countertop with Mellerud marble polish.
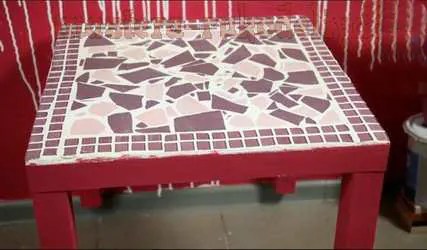
In this article, the News Portal “site” wants to invite you to make your own table, the tabletop of which will be decorated with mosaics.
Making a mosaic table can be in an inexpensive way recovery old furniture, as well as a simple and cheap activity that you can do in free time.
 To create a table you will need following materials, which you can easily buy at any craft store:
- old tabletop (suitable old table);
- small tiles (as an alternative, you can use broken plates);
- grout for tile joints;
- cement-based adhesive;
- rubber gloves to protect your hands .
Table preparation
 In order to properly adhere the tiles to your future table, you must make sure that the tabletop is completely clean of any dirt that may have accumulated on the table.
Use a soft sponge and a small amount of warm soapy water to thoroughly clean the countertop, then dry it thoroughly. If necessary, sand the surface.
Before you start gluing the tiles, you should think carefully about where you are going to place the tiles. You may want to create some kind of pattern or even a design.
Application of tiles
You can use small tiles, or you can beat large ones.
 To glue the tiles to the countertop, you will need to use a cement-based adhesive. Don't forget to wear rubber gloves to avoid getting glue on your hands.
 Once all the tiles are glued to the countertop, you will need to use a soft tile grout to seal any gaps between the tiles. You can apply the grout with a spatula or with your hands wearing rubber gloves.
 After applying grout, wipe off excess as quickly as possible. Do not wait for the solution to dry as it will be very difficult to remove.
 Your mosaic table is ready.
 Do you want to be original? Then instead of tiles, try using tin beer bottle caps or wine corks. In a word, any materials and your imagination are suitable for decorating the table.

From Kate Riley who teaches you how to make this gorgeous mosaic table in just one day! We give the floor to the author and get inspired by a great DIY idea.
DIY mosaic table for the cottage and garden
So, you've already seen the mosaic table I made this week for the seating area in my garden. This was just the kind of DIY project where I couldn’t find what I was looking for, so I decided to do it myself, combining it with a “I’ll figure it out as I go” strategy. I knew what length, width and height the table I needed. And I also wanted it to be unique and luxurious. So I just came up with it and began to implement what came to mind.
I call it a "coffee table" but this design would work great as a bench too. You can make the frame whichever you like best and would be better suited to your style, such as tiles or treated wood. The benefit of making something yourself is that you get the exact measurements you want as well as a completely unique piece.
I made the table, painted it and decorated it with mosaics in just one day, starting with buying lumber. I used pine and mahogany only because I was in a hurry: the store had huge selection, so I just grabbed the pieces in the size that suited me.
Wooden parts for a table measuring 46 x 127 x 46 cm:
- two pine boards 19 x 127 cm;
- one pine board 7 x 127 cm;
- two bars 245 cm long and 5 x 10 cm wide, cut into the following parts: 2 elements 36 cm long for the upper support, 4 legs 33 cm long, 2 elements 38 cm long for the lower support.
I used a saw to cut the pieces and wood screws to join the boards together (see photo).
After that I started working on my legs. I wanted the table to be stable, and I planned to make cross-shaped legs (in the letter X), as in this master class, but in the end I settled on a more simple design"Roman numerals". To make the table 46 cm high, I subtracted the height of the top and bottom legs and the thickness of the tabletop from this value, resulting in a length of legs of 33 cm, and attached them to the top of the table with wood screws at an angle of 45°.

This is what it should look like wooden base assembled table/bench. As you can see, this is a very simple design: boards joined together form a tabletop and rest on two legs on each side. We did not put a board between the legs to stabilize it because it is a relatively small product with a strong construction. But if you're making a longer piece, consider installing a board like this for maximum stability.
If you want to decorate your craft with a mosaic, choose the size of the surface of the table/bench so that it perfectly matches the size of the mosaic, then you will not have to cut it with a tile cutter. I bought a mosaic with a combination of blue and green for $9 per sheet and calculated the sizes wooden elements, knowing in advance the length and width of the mosaic sections, and also taking into account that I can fill small seams with grout.
I primed the legs and then painted them with the same brand of super durable white paint. I came to the idea of decorating surfaces with mosaics gradually, thanks to several successfully implemented projects, but the basic principle of work is always the following: first, the mosaic is glued to white glue for stone and ceramics, which is applied with a spatula to the surface to be decorated. Sometimes I buy glue in large packages (you need to mix it yourself), but this time for convenience I used already ready mixture.

Since learning how to lay tiles is a very useful life skill, I involved my student in this activity.
We cover the rough ends of the tabletop with mosaic strips - masking tape fixes them in in the right place until dry. Tip: instead of long ribbons of 12 tiles, I cut the mosaic into strips of 4 elements so that they become lighter in weight and do not slide down.

When the glue has dried, apply the grout with a special spatula (for small products I use a narrow spatula). Use a sponge to remove excess grout and let it dry.
I really love the color combination and rainbow sparkle that this unique piece added to the seating area. This is how the “we’ll figure it out as we go” idea turned into an elegant and bright mosaic table in our garden!

Original text and photos: Kate Riley (centsationalgirl.com)
Mosaic is one of the oldest ways to decorate a room. Traditionally, the material is used to decorate walls and floors; less often, paintings are made from it. The range of applications of the technology has expanded significantly over time; mosaic tiles have recently been often used to cover tables. It is worth noting that making a countertop with your own hands is not difficult; it requires minimal skills and a lot of patience.

There are quite a large number of varieties of mosaics. The most common are the following:
- Glass;
- Ceramic;
- Stone;
- Metal;
- Wooden;
- Porcelain stoneware.
Most the best option According to experts, the combination of colored glass with flexible tiles is considered. Flexible tiles are products made from crumbs processed to match a certain texture of brick or stone.


Advantages of flexible tiles:
- Moisture resistance;
- Long service life;
- Mechanical strength;
- Frost resistance;
- Resistance to aggressive environments;
- Preservation of color under the influence of moisture and sunlight.
The spectacular artistic image of the mosaic is ensured by its aesthetics and ease of installation; the material is ideal for covering the tabletop with a mosaic with your own hands.
Features of mosaic countertop finishing


Mosaic looks great in the kitchen; this decoration option perfectly refreshes the interior and makes it more original and bright. With proper care, the countertop will retain its original appearance for many years. Mosaic tiles It is not recommended to glue on not very new headset– it is better to replace the old tabletop with a new one.
You can purchase a new countertop at a building materials store. It can also be used as a board made of polyurethane foam of different thicknesses.
To make measuring and cutting easier, a centimeter grid is sometimes applied to the board.
A profile made from of stainless steel, which is glued to the edge of the product using the same glue as the mosaic. The glue used is a standard elastic composition; for glass mosaics, transparent or white glue is used, which is suitable for installing tiles of any color. This adhesive also functions as a sealant, which is ideal for kitchen furniture. Mosaic flooring involves many joints, which can lead to the formation of mold. To avoid this, special anti-fungal cleaners are used to clean the countertop.
How to decorate a countertop with mosaics

There are three main ways to make a tabletop with your own hands:
First way:
- Stage 1. The tabletop is cut out of the slab according to the dimensions, and its profile edge is also prepared. The edge with the perforated part up is placed on the edge of the board;
- Stage 2. The selected adhesive is applied to the surface and leveled using a notched trowel; the adhesive should also be applied to the upper edge of the profile;
- Stage 3. The upper perforated profile is laid on glue, which forms the edge of the tabletop;
- Stage 4. After the glue has dried, pre-cut tiles in the form of squares are laid on the surface. The same glue can be used as a sealant; a small part of it is rubbed over the surface of the countertop to grout the joints;
- Stage 5. Excess dried glue is wiped off with a damp cloth.
The finished tabletop is polished to a shine with a soft cloth; no additional coating is required, you only need to comply with the conditions for the care and use of mosaic surfaces.


Second way:
If the decor of the tabletop with your own hands does not involve complex artistic compositions, it is recommended to use the method of transferring drawings from paper to the tabletop.
- Stage 1. The mosaic sheet is carefully laid on a pre-prepared adhesive base, the paper layer should be on top;
- Stage 2. The paper is carefully blotted with a damp cloth until it begins to easily separate from the surface of the mosaic;
- Stage 3. Remains of paper are removed without unnecessary effort, which can cause a shift in the position of the elements;
- Stage 4. After removal paper base the drawing must be left for a day, after which the joints are grouted;
- Stage 5. Excess grout is removed with a damp cloth.

Third way:
This method is considered the simplest; it involves laying mosaics using a mesh.
- Stage 1. The mesh base is immersed in the adhesive solution; this must be done so that all its parts are evenly immersed to the same depth;
- Stage 2. The pattern hardens over the course of a day, after which grout is applied;
- Stage 3. To remove excess grout marks that cannot be removed with a sponge or damp cloth, it is recommended to use light solvents (such as White Spirit). Solvents should be used a week after completion of work;
DIY mosaic installation in the kitchen (video)
All methods of making a countertop with your own hands have their advantages; with their help you can decorate any kitchen. It is not necessary to buy a mosaic; a beautiful pattern or painting can be created from fragments broken tiles or bottles.
Examples of mosaic countertops in the kitchen (photo)


_Stoleshnica_iz_mramornoy_mozaiki_.jpg)