The bow is rightfully considered the most popular simple homemade weapon. Its improved modification with mechanical tension retention, that is, the crossbow, is also very popular. You can make a crossbow with your own hands without special labor according to the drawings, while it is the most convenient, powerful and accurate throwing weapon.
What materials are suitable for making a crossbow?
For designing and assembling a crossbow, available tools are suitable. You can assemble a crossbow at home from junk in the garage. Its main materials are
- wood for making a frame
- metal arc
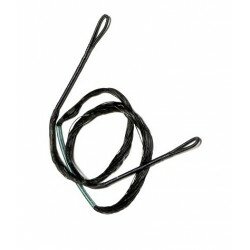
- thin steel cable for the throwing part
Fasteners can be made from bolts and glue, or wooden pegs and rope. For the manufacture of crossbow bolts, thin and even sticks and aluminum for the tip are suitable.
Required elements and tools
To make a crossbow at home you will need:
- A board with the dimensions of the desired dimensions of the crossbow;
- plywood for adjusting the stock;
- car spring;
- thin steel rope, for example from the brake lever of a motorcycle.
The main structural elements are a frame with a stock, arms with a bowstring and a trigger mechanism. The frame is any wood turned into in the required form. You should take a long board, which is enough to cut out the shape from the butt to the shoulders of the crossbow. The stock is cut to fit the owner's shoulder. A guide for projectiles should be provided on top. It can be cut into the wood itself, but it is more convenient to glue plywood on top.
IMPORTANT! The tools you will need are a jigsaw or any other sharp object for turning wood, glue, rope, a hacksaw and several large bolts to connect the structure.
After making the base, you can move on to the throwing mechanism. Most often, an old car spring is used for a bow in a crossbow. A section of the spring of the required length is sawed off. A string of cable 1.5-2.5 mm thick is stretched between the ends of the arc. The arms are fixed to the frame and fastened with bolts. After this, the main part of the crossbow is ready, all that remains is to make the trigger mechanism and prepare the shells.

Drawings and dimensions
There are several types of crossbow trigger. All of them are designed to release the bowstring when the trigger is pulled. It is not difficult to assemble the lever with your own hands, just follow the given drawing. It should be noted that the given dimensions can be increased or decreased to assemble more or less powerful weapons and for your own convenience.

Step-by-step instructions for making a crossbow
A crossbow at home is made in stages from the following elements:
- Crossbow stock;
- guide;
- bow and shoulders;
- bowstring;
- trigger mechanism;
- shells (bolts).
How to make a bed
The stock is cut from a solid wooden beam. It is advisable to choose viscous, moisture-resistant, smooth and aesthetic wood species. These include beech, oak, ash, birch and oak. In principle, any type of wood or board can be used, since the choice of material for this part is purely aesthetic. Optimal sizes– thickness is approximately 3 cm, and length – 90 cm.

A recess for the bow is cut out in the front part of the stock. At a distance of 8-10 cm from the edge, a hole is drilled for attaching the bow. A bolt is then inserted into it, to which the throwing mechanism is tied with ropes. At the back of the crossbow, the butt is cut to the shape of the owner’s shoulder, for ease of aiming and accurate shooting. You can carry out optional additional decorative works, so that the shape of the crossbow looks more attractive.
REFERENCE: For ease of aiming, an aluminum or wooden cross. It should be screwed on top of the bow fixed to the stock. Additionally, the scope can hold the crossbow's arms, which will slightly increase the power.
Guide chute
A guide for throwing bolts should be placed on the top edge of the stock. It should be at least smooth, and ideally slippery. Modern crossbows use fiberglass and metal linings. At home, you can use plywood with a recess to fit the diameter of the bolts. The standard shape is a semicircle, but when working with plywood you can make a triangular notch, which is somewhat simpler and will increase accuracy. Cutting corners are carefully ground.
Spring shoulders
The choice of shoulder material depends on the desired power of the crossbow. If the product is manufactured to fulfill decorative function, old skis are suitable for the shoulders. For a historically accurate product, a branch of a strong and elastic tree, ideally hazel, has been pre-dried for at least 4 months.

If you want to assemble a crossbow at home that you can not only show off, but also use for sport shooting and even hunting, you should use a metal bow. Popular and available material
is a car spring. It has optimal flexibility and elasticity, providing excellent tension and high shot power.
Bowstring The crossbow string must be both strong and thin.
IMPORTANT! To ensure a powerful shot, it is recommended to use a thin steel cable. Overclocking it will require less energy, and its durability will be sufficient for long-term use with a reserve. Attachment to the shoulders can be used standard, with tying.
if you plan to use the crossbow for shooting at long-range targets and hunting, it is better to prefer a block system. To do this, rollers are welded to the ends of the arm arches, between which the bowstring is wound. Roller system
significantly increases the acceleration of the bolt, thereby increasing the power of the shot.
Trigger The organization of the trigger mechanism is final stage making a homemade crossbow. The standard release option is the lever type
. The moment you press the bracket, the pin holding the bowstring lowers and the bow fires an accelerated projectile. It is recommended to assemble this mechanism strictly according to the above diagram.
This video shows in detail the manufacturing process with all the subtleties:
Types of homemade crossbows
A crossbow is a weapon with a long history, and throughout its existence, mechanical weapons have had many modifications. The most effective and interesting ones are still used today.
Block In modern crossbows, to increase their power, an improved type of bowstring fastening on rollers is often used. IN standard version

a reversible bow, the projectile was fired with acceleration corresponding to the elasticity of the shoulders. When using a block trigger mechanism, acceleration increases many times over and, accordingly, such crossbows, even homemade ones made at home, are suitable for hunting and sport shooting.
Repeating crossbows first appeared in China. Their specificity is in the original guide and in the simplified charging mechanism. The power of such a crossbow is much lower than that of a standard one and it is not suitable for accurate shooting, much less hunting. It can be assembled as original craft made of wood. The projectiles used are lightweight, without feathers or tips.
The bolts are placed in a cell above the stock and fall onto the guide as they are used. The trigger mechanism is an ancient goat's foot system, where cocking is accomplished by simply pulling a lever.

Underwater
Underwater crossbows are structurally almost no different from conventional ones. Due to its design, any crossbow can be used for underwater hunting. For more convenient operation under water, the guide can be closed in half plastic pipe, and also use bolts with harpoon tips.

Mini crossbow for a child
Mini crossbows are smaller copies of weapons. They are usually made for fun and for children, using less durable materials, such as paper projectiles, rubber bands instead of strings, etc. Due to their design, the power of a crossbow directly depends on its dimensions, so mini-crossbows are significantly weaker in terms of shot power. You can also use a spring mechanism instead of a bowstring, but it will not be a crossbow.

How to make crossbow arrows (bolts)
When all the elements are manufactured, assembled, installed and fixed, the crossbow is ready for shooting. All that remains is to prepare shells for him. Crossbow bolts are a shortened version of arrows. They are distinguished by a length of about 30 cm and a short tail. It is not necessary to make a tip; it is enough to sharpen the ends of the bolts.
But for repeated use and increased penetration power, the sharp tips can be wrapped in aluminum. Also simple option is to buy ready-made crossbow bolts, which are sold separately and are inexpensive.
Is a crossbow suitable for hunting?
Most self-assembled crossbows have a tension of 30-40 kg, which allows them not to be considered a weapon and still be used for hunting small game. The crossbow can be used for shooting birds. When hunting small game such as hares and foxes, a shooting license will be required. Once you receive it, you can register your crossbow without any problems. A crossbow is not effective for hunting large game.
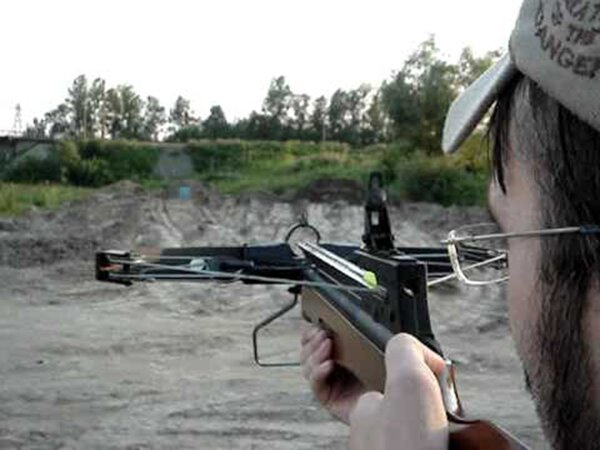
In this video you can see with your own eyes how accurate and powerful a crossbow is:
Conclusion
The main purpose of a crossbow is sports shooting. It can also be collected for the purpose of reconstructing historical scenes. Assembling and using for legal purposes a crossbow with a tension force of up to 42 kg is permitted in Russia without restrictions. It should be noted that the law prohibits the sale of uncertified crossbows with a tension force of more than 42 kg, but there is no liability for their manufacture, storage and transportation.
Do you want to make a real crossbow that will not only look like it, but will also shoot? Then don’t pass by and read our article on the topic of how to make a crossbow with your own hands. In the article we will not only talk about the intricacies of this matter, but also show the whole process in the photo. The topic is especially relevant in summer time when you can go out into nature and shoot at targets. And a thing made with your own hands will delight not only the eye, but also your friends or acquaintances, who, having seen such a product, will certainly set a goal and desire to own it!
How to make a crossbow with your own hands
Among simple tools created with one's own hands, the bow definitely wins. However, crossbows are also very popular. If you want to make a crossbow with your own hands, you just need to read the instructions below. A medieval design was chosen as an example due to its simplicity. Such a crossbow does not require metal welding; it can be made at home; it also does not require the presence of springs, as in its other, more advanced variations.
All that is needed to make a simple medieval crossbow is the desire to craft. Initially, you need to find a suitable stick for the base of the structure. It is recommended to use bird cherry, since after drying the wood retains good characteristics elasticity. When a suitable branch is found, you should carefully saw it off, completely remove the bark and leave it to dry in a warm place.
Typically the drying time is about 5-7 months.
Step-by-step instruction:
In addition, it is recommended to immediately bend the stick so that it does not crack during processing and fixation, as well as during use. If bird cherry is not available in the area, you can use elm or other alternative wood.
It should be remembered that for good strength, durability and elasticity of the launching part of a home crossbow, you need to stand it well. Moreover, in in this case the chances of a crack during crossbow operation will be significantly reduced.
To have the opportunity to practice and to avoid the need to wait again, it is recommended to prepare several sticks at once.

You can use any type of board or dry wood on the stock of a homemade crossbow. It all depends on how accurately you want to replicate the medieval model of the weapon.

Once the wood has been selected and processed, a notch needs to be made in the front of the wood to accommodate the crossbow bow. You can make a notch with any tool from a metal file to a regular knife.
The next step in making a crossbow with your own hands at home is to drill holes for the bow bolts. They are placed at a distance of 8-10 cm from the front of the bed. Previously, holes were made with red-hot metal, so you can also use this method if you don’t have the right tools at hand.
Moreover, if you don’t have any bolts at hand, you can use the same wood.

The upper plane of the stock should have a groove in which the crossbow bolt will be placed. Often this groove is made round, but it is recommended to plan it triangular to increase the accuracy of the bolt.

When everything is ready, you can fix the bow. This is applied to the cutout made in the front of the stock and tied tightly with rope to the previously installed bolts or their wooden alternatives. This will be enough, but for a tighter fixation it is better to use glue.

The last element of a homemade crossbow is the organization of the trigger mechanism. Usually the simplest one is used lever type. The crossbow drawing below shows how such a system works.

When the bracket-lever is lowered, the pin instantly launches, and it launches the bolt forward. It is important that this system does not have any safety mechanisms, so the bolt must be installed only before firing.

The created crossbow must have a tension force of about 40 kg, so the design will not be included in the list of edged weapons. The bowstring is tensioned by hand, so additional mechanisms are also not required.
Drawings for making at home

The photo above schematically shows a crossbow with all required sizes. Its main value is to understand what size its parts should be in relation to each other. Its entire length is 732 mm, with a height at the sight mounting point of 223 mm. The drawing shows a “pistol” handle (shaped like a pistol), for a reliable and comfortable grip.
The second hole is made to facilitate the construction, since the total thickness of the plywood handle (can be made of wood) is 30 mm. The arms are 302 mm long and are a universal option; their total length is 532 mm. For the first time, it is enough to make exactly according to the dimensions indicated in the diagram, and after testing, make adjustments.
Reading time ≈ 8 minutes
Today, making a crossbow with your own hands at home is not so difficult if you have the necessary drawings and the desire to work hard. Having in hand modern materials and tools can be made as hunting weapons, as well as tournament and sports weapons.
What have we gained and what have we lost?
Unfortunately, the centuries-old experience of our ancestors in making crossbows and bows was largely lost. Many secrets remained forever in the abyss of time. But the current generation has finally realized the importance of crossbows and bows. The ability to make such weapons is returning again. More and more people are becoming his fans, joining the ranks of modern Robin Hoods. Now everyone can make a crossbow. Next, we revealed all the features and detailed instructions creating a crossbow at home.
Features of creating a crossbow at home
Today on the Internet you can find a lot of offers for purchasing a ready-made crossbow. There are many models for different tastes, but it is worth noting that the price will vary. Nevertheless, there are a lot of people who want to make throwing weapons with their own hands. Initially, a beginner may get lost in a series of actions, but now we will tell you how to make a crossbow with your own hands at home and provide drawings so that everything is as correct as possible. This is very important, because even small manufacturing errors can lead to unpleasant and unexpected surprises in the future, including injury.
Before you begin the process of manufacturing the device, you should dwell on two important points.
- On the territory of our country, the crossbow is used exclusively in entertainment or sports competitions and events. Using it as a hunting weapon is strictly prohibited! All types of throwing weapons that have a tension gain of 43 kg and more are combat types, as in the photo. In this case, you must have a special permission for use, which can be obtained from the Ministry of Internal Affairs.

Combat crossbow
- A crossbow is a special design that is subject to incredible loads during use. That is why it is important to follow all the rules for its manufacture and not allow even the slightest mistakes and errors. Otherwise, you may be injured during operation. Do not forget about the multiple safety margin that absolutely all structural elements must have.

It is very easy to get injured with an incorrectly made crossbow.
Making a bow
One of the main components of the entire structure and the engine of the crossbow was the bow. This is a plate with great elasticity, which has complex shape. This plate has a bend. For greater functionality, one more bend is created at both ends.
Making a crossbow should always start with a bow. The remaining components should simply be selected to suit it:
- stock parameters;
- what will be the release mechanism;
- Which tension option is better - block or recursive type.

The bow is the main link of the crossbow
How to choose material for manufacturing?
A crossbow can be made from several materials - wood, metal or composite. But what is better to choose is up to you:
- wood - it is better not to use it as the main material. The wood that can be found in the yard is not of sufficient quality for a self-made crossbow. A branch from the forest will eventually lose its original appearance and properties due to drying out. Although this option is suitable for short-term use. For example, play shooting games at the dacha in the summer. Despite this, ready-made models of Scorpio and Tarantula crossbows, which consist of wood, have become quite popular;
- composite – consists of fiberglass, which is joined together with an epoxy binder. This material at first glance it seems simple and ideal. But only at first glance. The downside is the mandatory perfect adherence to all the nuances of the manufacturing instructions - accurate calculation of the proportion of the mixture, compliance with drying conditions and correct exposure. Create and save such important conditions It's almost impossible to live at home.

Crossbows can be made from anything
Metal
It should be given a separate place among all materials. It has no alternatives or competitors. Owners of old Moskvich cars with leaf springs will definitely win.
You only need 1 sheet - the 2nd in size. If size is not a problem for you, then you can make a crossbow from the first sheet. The first one is even more profitable to use due to the presence of tubes on the edges. We can say that the bracket on which the bowstring or blocks are attached is ready.
To attach the bow to the stock you will need a block. It is shaped like the letter P and seems to hug the stock from the front. Its fastening can be of two types:
- Weld tightly to the spring leaf using welding. But this option is unsafe and impractical. Each time, excessive load will be applied to the welds, which will sooner or later lead to the part being torn off;
- use of a ball joint on the block. This part from a VAZ2108 or 09 is ideal. You need to fix the bow on the pin itself. The ease also lies in the fact that the sheet has a hole suitable for this.
Important: A connection with bolts, and ideally with rivets, is many times better than a conventional weld, since this part of the crossbow experiences enormous vibration overloads. Homemade pulleys can also be found among Moskvich spare parts. Elements of window lifters are suitable for this.
Special attention should be paid to the manufacture of the bowstring. To avoid searching for a suitable element for a long time, many people use a metal cable (very thin). But this option It is better to replace it with a durable climbing cord, with a cross-section from 5 to 8 mm. The cable is unreliable due to the fact that it cannot withstand incoming changing loads for a long time.
The cord will allow you to use the crossbow for a long time and safely
When you have chosen the material of the string and attached it to the bow, it does not hurt to test it for bending. It is best to use a dynamometer for these purposes (100 - 150 kg). After such tests you will decide important parameters, which will be useful in the further manufacture of the crossbow:
Crossbow test
Creation of a lodge
No less important element is the stock of the crossbow. In this case, you can’t do without wood as the main material. But not all wood can be used. For example, you should give up aspen, spruce, alder and pine. A good option considered oak, beech, elm. For a good crossbow, such a blank must be perfectly dried for a couple of decades, which is, in principle, unrealistic for ordinary home production.

Lodge drawing
For a homemade crossbow, 7–9 mm plywood with moisture-resistant properties is suitable. Then from this material you should cut out 3 - 5 contours of the future part and connect everything epoxy resin. Despite the external unpresentability, such a part will be unusually reliable and strong.
Before making a stock, pay attention to some features:
- shape: it is better not to choose a half-pistol shape. A straight English stock is optimal. The advantage was not only ease of creation, but also increased strength;
- When you assemble all the elements of the stock, take into account the course of the bowstring and the resulting load. The stroke of the bowstring is the distance from the release groove to the block itself. Load – the thickness of the false walls where they are fixed. In a straight English stock there is no such thinness between the fore-end and the butt as in the semi-pistol version;
- The arrow guide is the main element of the stock. Make sure it is smooth and strong enough. No need to worry about how to make such a detail. A plate that is framed by Moskvich glass or furniture fittings is suitable;
Creating a crossbow trigger
It is almost impossible to make such a link in the house structure, even if you have required diagram. The exception is if you are a professional locksmith and you have the necessary equipment.

Crossbow trigger diagram
It’s great if you have a trigger for an air rifle. By modifying it a little, you will get finished part for your homemade crossbow.
A casing should be placed above the mechanism itself, the height of which is 2–5 cm. It is needed to protect against moisture and debris. In addition, it will become the basis for devices that increase the aiming of fire - rear sight, optics.
The front of the casing (placed above the trigger mechanism itself) has the shape of a tail, the length of which does not exceed 10 cm. It is this that will hold the back of the arrow on the guide itself.
You can make arrows yourself or buy them in a specialized department. Congratulations, you were able to make a crossbow with your own hands at home, using ready-made drawings with instructions. If you did everything correctly, it will serve you for many years. And even more practical advice look in the video.
The crossbow is one of the inventions that changed history. Before its invention, an archer needed to train for many years before becoming an effective warrior. With a crossbow, even the average peasant could be a soldier. Additionally, thanks to the use of a cocking mechanism, cross force is no longer a limiting factor.
Here are my instructions on how to make a crossbow from wood with photos and drawings.
Be careful because a crossbow can kill or injure you, your dog, etc.
Step 1: Crossbow Arc


All you need is to decide on the sizes.
The overall length is 125 cm with a width of 6.5 cm in the center, tapering to 1.25 cm at the edges. The thickness is 1.1 cm.
I made the string mount from hardwood pins.
I also covered the arc with denim. I just put a piece of jeans and soaked it in glue, rolling it out with a rolling pin.
Step 2: Crossbow Stock


The stock was modeled in ProE. Essentially, these are two rectangles - one is 7.5 x 50 cm 14 x 37 cm, the other is 14 x 37 cm.
Take the dimensions from the picture and cut two pieces from 2 cm plywood (I used plywood because I had it on hand).
Once the two pieces are ready, they are connected to each other with wood screws because they will need to be taken apart several times.
At this point it will be helpful to use a plane to line up the top edges of the two pieces. If you don't have a plane (I didn't), screw the stock to the board and smooth the edges with a saw. The top edges must be flat and even.
Step 3: Trigger

- Disassemble the stock into two parts.
- Work for inside one of the parts.
- Measure 50cm from the long part and then go down 5mm. This will be the center of the circle. Using a compass, draw a circle with a diameter of 4 cm.
Draw a line from the bottom of the circle 6mm long, then lower this line down to the end of the stock. Make an orthogonal line from the end of the line inside the circle to the end of the stock.
Inside this area will be your trigger. You can see in the picture where I sketched out lines to indicate the hole.
The hole is the pivot point for the hook.
Step 4: Continuing the Trigger


Here I used milling machine on wood to cut through the wood 6 mm deep. I subsequently placed a piece of paper over the cutout and made an outline to transfer the cutout onto the second piece of the stock. At this point it is important to drill a hole in the center of the circle as your marks will be on the inside once assembled.
Step 5: Assembling the Crossbow Stock


Glue and screw the two parts of the stock together, being careful not to get any glue on the trigger mechanism. Attach a 0.5cm piece of hardwood to the top of the stock, I used maple. Once the glue has dried, use a hole saw to make a 4cm hole where the trigger will be.
Then use grinder or sandpaper to remove burrs.
Step 6: Nut


The nut will hold the bowstring in place when the crossbow is cocked. It must be strong and strong. I made the nut out of red oak plywood and glued the layers together with epoxy glue. Honestly, five coats is not enough and we could do better here.
In any case, once the crossbow stock is dry, you need to insert the nut into the hole.
The width of the nut should be the same as the width of the stock.
The bottom half of the nut is cut off to make the trigger. The top half is cut in half to make the notches that will hold the bowstring. An additional cut is also made so that the arrow can make contact with the bowstring.
The nut will be held in the stock by blocks on both sides.
Step 7: Trigger


You need to take the piece of paper on which you marked the cutout on the stock. This will help determine where the trigger will sit.
The top edge of the trigger should be straight. Just make the hook strong enough and small enough to support the weight of the crossbow and make the nut rotate.
I used a piece of hardwood plywood. This is a bad choice because it crumbles. To fix this, I reinforced the piece with a carpet nail.
Once you have made the trigger just like in the photo, finish drilling the pivot hole and make sure the trigger can rotate.
Step 8: Attaching the Crossbow Bow


To make it easier to attach, I use a bolt that goes through the bow into the stock and secures it with a nut hidden in the cross.
Step 9: String

I made a hemp bowstring with 16 threads, 122 cm long. It's not a very good bowstring, but it will do for the first time.
Step 10: Conclusion
The wooden crossbow made by yourself is ready, what’s left to do?
- Since it's plywood, I'll probably paint the crossbow.
- There are no security mechanisms.
- Front sight to shoot straight.
- Make an arrow holder, if you tilt the crossbow the arrow will fall out.
- The bowstring needs to be made better.
- Various fasteners.
- I measured the kinetic energy. The shot produces 28 J of energy, which is below the recommended minimum of 33 J for hunting, so a stronger crossbow needs to be made.
In addition, it will be interesting to shoot from such a weapon yourself. Everything is done quite simply, you can get by quite well here hand tools. The crossbow turned out to be quite powerful, as for target practice. Double limbs are used here, which increases the rigidity of the bow and allows you to throw with high speed arrows made of wood. The author uses self-tapping screws as arrowheads, but you can use your imagination and come up with something more interesting.
Materials and tools used
List of materials:
- timber;
- PVC pipe;
- two self-tapping screws;
- strong rope;
- wooden rods for arrows;
- adhesive tape (for feathers).
List of tools:
- hacksaw or pendulum saw;
- jigsaw;
- belt grinder;
- drill;
- marker;
- roulette;
- screwdriver;
- construction hair dryer;
- vice;
- oil for wood processing;
- paint for painting onions (optional).
Crossbow making process:
Step one. Cutting out blanks
First of all, let's cut the wooden beam, it will be used to make the base. We also need to cut the pipe. You should have two parts, long and short. See photos for dimensions.


Step two. Making a bed
We make the bed from a wooden beam. First of all, we will make the necessary markings using a marker. Well, then we cut out the extra parts using a jigsaw; a jigsaw will cope with this task perfectly.


Step three. Let's make a bow
Our bow consists of two parts, which increases its rigidity. Everything is made from PVC pipes that need to be made flat. To do this, we will need a vice with a wooden insert so that there are no marks left on the pipes. Heating the pipe construction hairdryer until it becomes soft, and then squeeze it in a vice. Step by step we heat the areas and compress them. Finally we form desired profile Luke.


Step four. Bow mount
To attach the bow, look for its center, and then drill two holes, like the author. For fastening we use two self-tapping screws and washers. But don’t fasten the bow tightly yet, it still needs to be modified.


Step five. Finalizing the bow
The essence of the modification is to make grooves at the ends of the arms, to which the bowstring can be tied. We make markings and cut out excess parts using a jigsaw. As for the short arm, you need to make grooves at the ends so that the string does not fly off.


Step six. Installing the bowstring
We use synthetic strong rope as a bowstring. Cut two pieces of the required length and melt the ends using a lighter. Well, then we tie the main string to the ends of the shoulder with a slight tension. As for the additional shoulder, in order to use it, you will need another rope. You can see how everything connects in the photo.


Step seven. Arrangement of the trigger mechanism
The trigger mechanism is of the trigger type. It consists of two parts, one is the trigger, and the second is a part with teeth, one of which holds the bowstring, and the other rests against the trigger. These parts can be cut from plywood using a jigsaw.


Step eight. Making arrows
We make arrows from wooden rods. To stabilize the flight, make plumage for them, the author used for this duct tape. Well, you need to install some kind of weight on the end of the arrow; the author put a self-tapping screw there. If desired, you can cut off the head and sharpen the rod.