The renovation of the bathroom is complete, its walls are tiled, and it seems that all the difficulties associated with arranging this room are behind us. However, after the renovation is completed, many owners want to install wall cabinets, shelves, mirrors and other interior items in the bathroom. In order to fix them on the wall, you need to drill a hole in the tile, and more than one. It will also be needed when you need to lay a pipe in the room, install a socket or mixer.

Sudden jerks and vibrations during drilling can cause cracking and chipping of the tiles.
Very often, in the process of drilling tiles, home craftsmen make annoying mistakes, as a result of which the fragile wall covering cracks or falls off the surface.
But these troubles can be avoided if you learn how to drill tiles correctly and with suitable tools.
List of tile drilling tools
Making holes in tiles is a simple process if you follow the basic requirements. carried out using:

“Ballerina” device: 1 – central pulley; 2 – guide drill; 3 – transverse support rod; 4 – cutter with carbide tooth.
- masking tape;
- marker or simple pencil;
- drills for drilling holes in tiles;
- hammer drill for drilling a wall;
- drills designed for tiles and concrete.
The choice of a drill and a drill for tiles must be approached very responsibly, because the quality of the entire work will subsequently depend on these two tools. It is most advisable to drill holes in tiles with a hand drill, because in this case the master will be able to fully control the pressing force and the speed of rotation of the drill. Thanks to the complete absence of vibration and low speeds at which it operates hand drill, it will be possible to avoid breaking and cracking of fragile finishing material. But if hand tools was not found on the farm, then it is permissible to use electric drill with the ability to operate at low speeds.

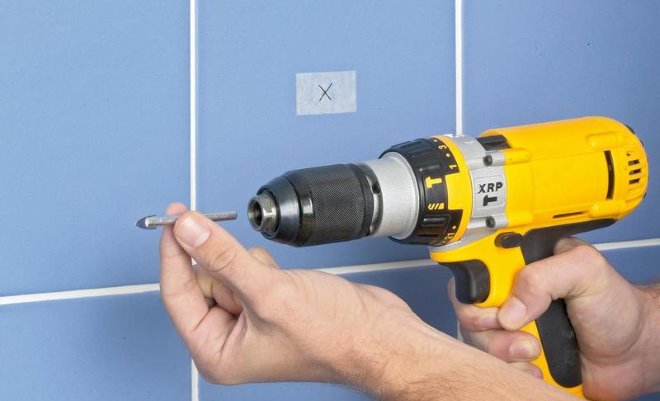
Masking tape prevents the drill bit from slipping.
Having resolved the issue with the drill, you can move on to choosing a drill. It is best to buy drills at the construction market that are specifically designed for working with tiled surfaces. There are two types of such tools: arrow-shaped and with a diamond edge. In order to drill several holes in the wall, it will be enough to purchase an affordable arrow-shaped drill. Diamond tool Although it is more durable, it is much more expensive than the arrow-shaped one, so buying it for two or three holes in the wall is impractical. If for any reason you purchase cutting tool for tiles it was not possible, it can be replaced with an ordinary Pobedit drill with a very sharp tip. To make large-diameter holes, instead of drills, use crowns and ballerinas on tiles.
Typically, recesses are drilled not only into the tile, but also into the wall behind it (for example, to install brackets). For these purposes, the master will additionally need a hammer drill and a carbide drill for concrete and stone.
Return to contents
Sequence of drilling tiles
Having prepared all the necessary tools and devices, you can proceed to the process of drilling tiles, following the recommendations below:

For drilling large holes Diamond cores are required.
- In the place where it is necessary to make a recess, attach a piece of masking tape. Mark the drilling point on it with a pencil or marker. The rough surface of the tape will prevent the drill from sliding off the slippery and smooth tiles and thereby make it easier First stage work. Holes on the tile should be made as far as possible from its edges, this will help avoid unnecessary chips and cracks during work.
- The drill is positioned at right angles to the working surface and drilling begins at the mark. They drill first at minimum speed, then gradually increase the speed to 200 rpm. It is advisable to press the tool onto the tile with minimal pressure, in this case it will be possible to avoid cracking.
- When drilling tiles with an electric drill, be sure to ensure that the drill does not start smoking during operation. If this cannot be avoided, then it is necessary to stop drilling and cool the overheated tool. Smoke is a sure sign that work is taking place at high speed, so the speed must be reduced. To avoid overheating of the contact surface, it is recommended to spray with cold water before work.
- After the tile and the layer of glue underneath have been drilled, put the drill aside, pick up a hammer drill into which a drill for stone and concrete is inserted, and begin drilling the wall. The drill size for this tool should be smaller size hole made in the tile. For example, with a tile drill diameter of 10 mm, the diameter of the drill in the hammer drill should not exceed 8 mm. If this requirement is ignored, then when working with a hammer drill, fractures and cracks will form on the surface of the tile. The wall is drilled to a depth corresponding to the size of the dowels.
- Dowels must be inserted into the recesses made. With bare hands It is impossible to insert them into the holes, so a hammer is used for this purpose. Tapping the dowels with a hammer should be done very carefully, as any incorrect movement can ruin the fragile surface of the tile.
To make a bathroom and toilet room more comfortable and convenient, they accommodate various accessories and furniture elements. For quality installation that should not cause deterioration decorative characteristics freshly finished surfaces, a tool such as a tile drill is ideal. Its use allows not only to obtain high-quality holes in ceramic tiles, but also perform drilling with maximum efficiency.
What to consider when drilling into ceramics
If you need to carry out drilling work on tiles, you should choose the right model of electric drill. Suitable models are those that can operate at low speeds and in which the impact drilling mode is absent or can be turned off. Thus, in order to drill a hole in ceramic tiles with high quality, the following devices are optimally suited:
- electric drills that can operate at a minimum rotation speed of the cutting tool;
- cordless screwdrivers, the maximum rotation speed of the cartridge of which does not exceed 800–1000 rpm;
- low-speed screwdrivers operating from the central electrical network.

A drill for tiles or ceramic tiles differs in its design from a tool used for drilling any other material. Processing of tiles using a special drill is carried out due to the frictional forces created by the abrasive material applied to work surface tool. The working part of a drill for ceramics or any other similar materials can have an arrow-shaped or crown-shaped configuration. In such situations, a tool with an adjustable processing diameter, which is commonly called a ballerina, is also often used.
When performing drilling work on ceramic tiles, it is important to adhere to certain rules that will allow you to obtain a high-quality result:
- It is necessary to constantly monitor the temperature of the drill and the ceramic tile being processed, since overheating can lead to failure of the tool and the appearance of cracks on the surface of the product. To prevent overheating, the processing area and drill must be periodically watered.
- The pressure exerted on the drill when working on ceramics should not be too weak (in which case it will not be possible to drill through the tiles) and too strong (this may lead to breakage of the workpiece).
- The drill should rotate slowly and only clockwise; reverse mode cannot be used, as this can lead to cracking of the tiles.
- In the event that it is necessary to drill not in the tile itself, but in the gap between two adjacent products, the drill should be placed strictly in the middle of the seam between the tiles. You should drill holes very carefully if they are located in close proximity to such a seam. In this case, the drill can easily slip into the seam, and it will not be possible to get a hole in the required place. It should also be taken into account that at the edges of the tile the thickness of the protective layer applied to it is minimal (or there is none at all), so when drilling in such places, pieces of material may break off from the tile.
Very often you can find advice on preliminary punching the surface of the tile in the place where it is necessary to drill a hole. The design of modern drills used for tile work is designed in such a way that there is no need to perform this procedure, which can easily lead to breakage of the product.
One of the main rules: no matter what drill you use, it should always be sharp.
How to make a small hole in a tile
Very often, in order to fix shelves or any other objects on the wall surface, a hole must be drilled in the already glued tile. A dowel is then inserted into such a hole, which should have a sufficiently deep depth, and a self-tapping screw is screwed in. Drills for ceramic tiles in such cases are used in conjunction with an electric drill, and after the tool drills through the tile and enters the wall, the hole can be modified using a hammer drill. Just as in all other cases, drilling tiles fixed to the wall must be performed at low speeds.

Drill selection
On modern market There are many drill bits available that can be successfully used for tile work. It should be kept in mind that right choice tool directly affects the processing result. In order to decide which drill to use to drill ceramic tiles, you should understand the types of cutting tools.
- The greatest efficiency when performing drilling work on ceramics is demonstrated by a tool with a diamond coating applied to the working part. It should be borne in mind that it is quite expensive, so it makes no sense to purchase it for one-time tile work. Such drills for ceramic work are usually used by specialists who often have to drill into tiles.
- For drilling tiles, spear-shaped drills are also used, the working tip of which is made of a carbide plate sharpened in the shape of a spear. Their use minimizes the risk of tiles splitting. The design of these drills is specially designed for such hard and fragile material like ceramics. The cutting edges of drills of this type are located at a fairly sharp angle, due to which the area of contact between the tool and the material being processed is reduced, so minimal pressure can be applied to the drill when using spear-shaped drills.
- The most simple option A tool that can be used for drilling work on tiles in cases where nothing else is at hand are concrete drills equipped with a carbide tip. When working with such drills, the design of which is not intended for drilling tiles, you should exercise maximum caution, since the risk of breaking the workpiece is very high.

Drilling small diameter holes in tiles is performed in the following sequence:
- A piece of adhesive tape or paper tape is glued to the place on the surface of the tile where it is necessary to drill a hole. In this case, the center of the future hole is indicated using a marker.
- At the initial stage of drilling, the drill is set to the minimum number of revolutions. They can be increased after the tool cuts into the tile at least to a small depth. In this case, as mentioned above, under no circumstances should you use the impact mode of the drill.
- After the tile has been drilled through and the cutting part of the tool has reached the surface of the concrete or brick wall, the drill for working on ceramics must be replaced with a more suitable one. To form a hole in the wall on which it is already fixed drilled tile, you can use the impact mode of a drill or hammer drill.
How to drill a large hole in tiles
The need to drill a large diameter hole in tiles arises in cases where it is necessary to install pipes or other plumbing communications, as well as prepare a place for installing an electrical outlet.
Basic Tools
For the above purposes, two main types of tools can be used:
- core drills;
- an instrument with adjustable cutters, better known as a ballerina.

- The most effective, but also the most expensive tool for drilling large-diameter holes in ceramic tiles is a core drill, the working part of which is coated with diamond. They work with a tool that needs to be cooled with water during the drilling process, also at low drill speeds, since drills of this type are very critical of overheating.
- More inexpensive option is a core drill, the working part of which is equipped with teeth made of carbide. With this tool you can drill a limited number of holes, after which the drill becomes unusable. Using a tool of this type, you can drill holes with a diameter of up to 15 cm. This is quite enough to, for example, install a sewer pipe. However, even if you take the utmost care, the edges of the holes made with such a drill will be chipped and uneven.
- An even simpler tool that can be used to drill large diameter holes in tiles is a ballerina. Its design includes a central spear-type drill, a bracket on which there is clamping device for the cutter. By changing the position of the cutter, moving it along the bracket relative to the central drill, you can create holes in the tile different diameters. This inexpensive tool is most often used to do tile work at home.

When working with such a “ballerina” with a protective basket, you don’t have to worry about splinters flying out
To drill a large diameter hole in ceramic tiles, you can use the following recommendations:
- The contours of the hole that needs to be drilled must first be marked, and a plaster or paper tape must be applied to the corresponding section of the tile. To solve this problem, you can use a stencil cut from a sheet of plywood or fiberboard.
- If a large diameter hole needs to be made in a tile that is not yet fixed on the wall, the product is laid on a flat and hard surface and fixed.
- Drilling of tiles begins at low speeds of the tool, making sure that its cutting part is parallel to the surface of the workpiece.
- When drilling with either a diamond-coated crown or any other tool, it is advisable to use water, which will not only cool the drill and prevent it from overheating, but also prevent the formation of dust during the processing process.
- When drilling a hole in a tile using a ballerina, keep in mind that the distance from the central drill to the working cutter is the radius of the hole, not its diameter.

Any owner may have a question: how to drill correctly without damaging it? Such a need may arise both when carrying out repairs and laying new material, or when it is necessary to install a shelf, hang a lamp, a boiler, or in other cases.
It is very easy to damage a tile if you make a hole in it incorrectly. If this happened during installation, it is not so scary, since the material is always purchased with a reserve.
In the case where you drilled into an already laid tile and damaged it, it will be difficult to replace it; this is a long and labor-intensive process. In addition, you may not find an element of the same shade and after installation, it will stand out unattractively from the main background.
If you need to drill through already laid tiles, first determine the location and mark it with a marker. Many craftsmen recommend that before drilling tiles in the bathroom, seal the work area with transparent paper tape, its presence will prevent the tool from slipping. You can do without adhesive tape, then you need to blacken it.
In order to prevent the drill from walking on the tile while working, the drilling site must be marked, that is, the enamel must be carefully beaten off.
The work can be done using a drill, but do not forget to disable the shock function in it or using a screwdriver. First you need to turn on the drill at low speeds, then you can switch to medium speeds.
The drill will heat up, so it must be periodically cooled and sharpened. When you pass the slab and reach the base, turn on the impact mode and make a hole to the required depth.
If you've never drilled into a slab before, it's best to practice on old tiles first.
It is much easier to drill into the tiles while they are loose. To make the work easier, it needs to be soaked in water for a couple of hours, after which it is placed on a flat and solid base and further work is carried out according to the already described algorithm.
If you have wide seams and need to make a hole, then It’s better not to drill into the tiles, but to do it in the seam. This will be much easier to do and the likelihood of damaging the material will be minimized.
Required Tools
To perform this work, you must have a certain set of tools and materials:
- electric drill;
- special drill for tiles;
- base tool;
- paper tape;
- pencil.
 To do large diameter hole, you will need carbide cutter or it can be drilled ballerina drill(the drill is centered, and the required diameter is set using cutters, which are adjusted with a key).
The cost of a ballerina drill is small; there are many varieties of this tool. How comfortable it will be for you to work can only be determined by experience.
A carbide cutter is much more expensive; it can be used to work not only with tiles, but also with concrete or stone. The disadvantage of this tool is that it has a fixed diameter, so it is used only by professionals.
If the tiles have already been laid, then first, using a tile drill, make a hole in it, and then, using a hammer drill and a drill, make a hole in the base.
What types of drills are there for tiles and tiles?
 For ceramic tiles, you cannot use drills for wood or metal, for this there are special tools that can drill durable surface tiles:
- a drill bit for tiles or glass, everyone should have it home handyman;
- Although a tool with a diamond tip is expensive, it can be used to make a hole quickly and accurately;
- a drill with a pobedit tip, cheaper, but with its help you can also get the job done efficiently;
- for large diameter holes it is necessary to purchase a diamond-coated crown;
- carbide tools with a spear-shaped tip are affordable;
- “ballerina” drill, it has the ability to adjust the diameter, so with its help you can make holes of various diameters.
After tiling a bathroom or kitchen, the tiles remain minor work: hang shelves and rails, secure lamps, install sockets. However, for all this it is necessary to prepare holes in the finishing, which in the case of fragile tiles is not so simple task. We will tell you how and what to drill into ceramic tiles so as not to split them.
You have to be very careful when drilling tiles - they do not have the same viscosity as metal and do not have bonds between the grains, which are easily broken when working on concrete. Ceramic tiles are monolithic in structure, and any point load can lead to cracking. Therefore, the tool should be selected very carefully.
- A hammer drill in impact mode disappears immediately, but when switching to a “drill” it is quite suitable for drilling tiles. In addition, for further training sockets for fasteners are already in concrete wall This is exactly what you will need, so all the work can be done with one tool.
- Drill – a good option at correct selection drill. However, to work on tiles, you need to set the regulator to low speed - no higher than 800 rpm. Moreover, the tool itself must be powerful enough so that even such a loss of torque does not prevent it from making a hole in a solid tile.
- A screwdriver (cordless or mains-powered) can be used not only for its direct purpose, but also for drilling tiles. Here it is easier to control the speed of revolutions, so the chance of splitting the tiles is minimal.
- Hand engraver - not every home craftsman has this tool, but if he has one, it will be easier to make square or shaped holes in the tile cladding.
Suitable attachments
Drill
When working with tiles, it's not the power tool itself that's important, but the drill bits you use. For ceramics, special drills with diamond or corundum coating are produced. Some craftsmen allow the use of a pobedit drill, but the strength of its tip is not enough to make holes quickly. However, when we're talking about just a couple of sockets for dowels, there is no point in overpaying for professional diamond consumables.

The shape of drills for ceramics is varied enough that you can find a suitable attachment:
- Spear-shaped
They look like a triangular wedge with two or four diverging blades. To prepare mounting sockets for dowels with a diameter of 4-12 mm, they are quite sufficient, moreover, this is one of the few types of drills that cope with ceramics even with Pobedit tips. The “spears” are relatively inexpensive, do not slip on the glaze, but work well only at low speeds and still quickly become dull. However, their low price completely reconciles this.
- Tubular
They are hollow tubes of different diameters (from 5 to 75 mm) with continuous coating along the cutting edge. Working with them is easier and more convenient - due to large area contact, such drills penetrate smoothly into the thickness of the tile and do not leave chips. However, you will have to purchase a separate nozzle for each hole. the right size, and the coating on them wears off quite quickly. When using tubular drills, the rotation speed should not exceed 500 rpm - they are expensive, and due to the burning of grains due to excessive heating, they can soon become unusable.
- Circular (ballerinas)
Universal drills that can be used to make holes of different diameters from 30 to 90 mm in diameter. They have a central wedge-shaped spear and a length-adjustable stem on which an additional blade is located. The disadvantage of the ballerina is that she literally starts dancing on the tile, trying to snatch the drill out of her hands - it will take considerable experience to drill a hole with it without breaking the tile. In addition, the blade knocks out fairly large fragments, leaving far from perfect edges.
Crowns
They are used to make a hole of the correct shape and large diameter up to 160 mm on the tile (for example, for a socket, switch or communication outlet). These are wide cups, similar to tubular drills, all with the same corundum or diamond coating on the edge and a centering tip in the middle.
Working with crowns requires special precision and correct installation cutting edge- strictly in the same plane with the tiles. But first, the central bit is drilled into the thickness of the tile. This allows you to create a rigid axis of rotation of the cup and align it parallel to the lining surface.
At the end of the work, the round tile is removed from the wall along with the crown. If it sits tightly on the mortar, you can pry it off with a screwdriver or knock it out with a chisel, being careful not to damage the rest of the finish.
Milling cutters
To cut a custom-sized hole in a tile, square or rectangular shape, easier to use by hand engraver, installing a disk cutter on it. Will fit cutting wheels small diameter from 18 to 50 mm with a non-segmented diamond edge.
How to drill tiles correctly

The most difficult and critical stage when drilling ceramics is the first penetration through the glaze layer. The surface of the tile is highly durable, and the drill can slip off the smooth surface at any time. To prevent this from happening, masters resort to various tricks.
The simplest and reliable way– seal a section of tile masking tape. You can also mark it for the future hole, especially if the tile is dark in color. This option is suitable for working with ceramics on vertical surfaces. You can also use office corrector and make a bold mark on the tile with the liquid. After drying, it will turn into a rough spot that will not allow the attachment to slip off.
Drill floor tiles This is done infrequently, but if there is a need for this, it is better to use a factory or homemade conductor. To make it, you can take a simple wooden block or a thick piece of plywood and make a hole in it the same diameter as the drill for ceramics. This socket will serve as a limiter for the drill and will help keep it strictly perpendicular to the floor. Of course, loose wood will not stop the drill, but you will feel it if you start to tilt the tool to the side, and you will be able to level it in time.
The first drilling through the glaze is done at high speed with a light touch of the tip. After this, you will need to stop and turn the drill or screwdriver to the minimum speed. When using tubular nozzles, they are first drilled with a slight deviation of the axis from the vertical - only after this the cutting edge is set strictly perpendicular to the cladding.
- The hole in the ceramic tile for the dowel should be slightly larger in diameter - this way you will not damage the tile when you hammer the expansion anchor into the wall.
- If a seat needs to be prepared in a tile joint, choose a drill of a smaller diameter. The ends of the tiles are less protected from mechanical stress than the front surface, and if you accidentally touch the edge, you risk leaving a chip on the cladding that will cause a crack.
- Under no circumstances make nests close to the edge of the laid tiles - the risk of ruining it here is almost one hundred percent. Move the hole either to the center of the seam or away from the edge (at least 2 cm).
- When drilling, do not press too hard on the cutting tool - the working head should “rub” the hole in the tile, and not push it through.
- Ceramic tiles may react by cracking to sudden temperature changes. To avoid creating excess heat at the drilling point, water the area with water. The instrument itself also needs to be cooled periodically, especially if you use diamond bits or tubes.
- As soon as the drill goes through the tile, replace it with a regular Pobedit bit of a slightly smaller diameter, and switch the drill or hammer to impact mode. This way you can finish the wall faster and extend the service life of consumables.
Of course, the easiest way is to drill holes in tiles that have not yet been glued, laying them on a perfectly flat surface, for example, on a sheet of chipboard or drywall. This way the risk of damage to the tile is reduced significantly. But even on the finished cladding, you can make neat holes for fasteners if you use a low-speed power tool and the right drills.


