Openings with an arch make standard apartment interiors stylish and elegant. The arched shape of the doorway visually expands the space and changes the interior beyond recognition. In city apartments, arched openings are not always left open, since it is necessary to ensure the possibility of complete separation of individual rooms. But the curved upper lintel creates difficulties when choosing and installing a door in an arched opening. There are several options for how to close such an opening with a door; they differ both in the complexity of execution and in the principles of approach to solving such a problem.
Options for closing an arched opening
There are two types of situations when the owner installs a door in an arched opening. The first is when the issue of installing the door is decided after the arch has been manufactured. In this case, the matter is complicated by the fact that the opening is already ready, and you have to rely on ready-made conditions.
The second is when the owner thought in advance about options for installing a door in the arch, and when making the opening prepared the necessary elements for this (niches for a cassette sliding door). From the options below, you can choose the best one, depending on your specific situation.
When creating arches, the opening was not enlarged, but roundings were made
An important factor when choosing the type of door and the method of installation in the arch is the method of making the opening with the arch. If the radius is inside a rectangular opening, then its actual height will remain the same, but visually it will appear lower.
Closing the opening on one side with a sliding door to the full height
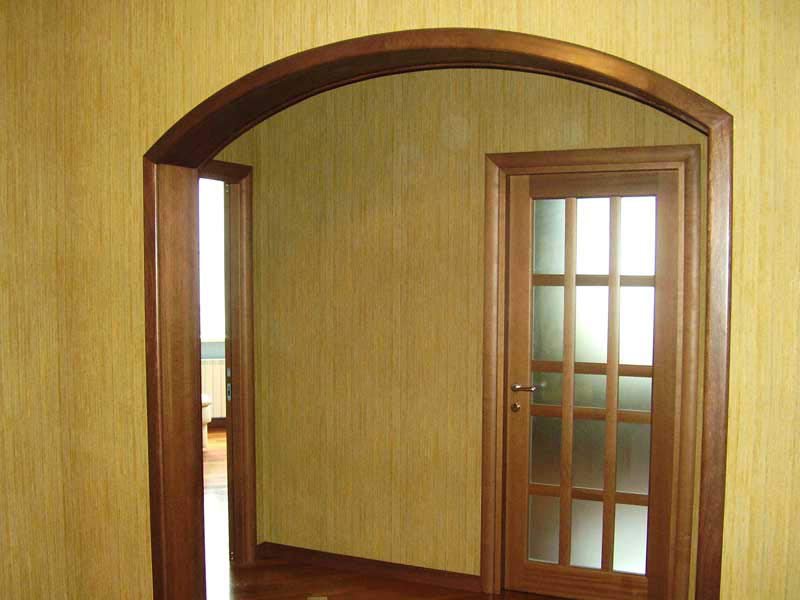
Sliding doors are installed on the outside, with the doors sliding along the wall. The size of the canvas is made according to the height of the opening at the top point of the arch. Thus, the sash will overlap the arch on one side of the opening. WITH reverse side the passage will remain open.

Important! In this combination of rectangular canvas and arched passage the sash should have a symmetrical pattern, either in the form of radius panels, or be made using arched glazing. In this case, all segments in the design of the canvas should have a vertical orientation, preferably without horizontal jumpers. This way you can visually raise the opening.
Cassette door installation
This best option, which is planned at the stage of creating the arch. An arch with a cassette-type sliding door is also a budget option compared to manufacturing cost door leaf with arched shapes. A rectangular canvas with the same pattern is used. This approach will allow you to close a non-standard opening with any shape.

Making a wooden door
If the door is installed in a ready-made opening, and sliding structures for some reason the owner doesn’t like it, all that remains is to go to a carpentry shop and order an arched door.

Can be installed in wide openings double door, each leaf of which is a folding door book.
The opening increased in height
Making an arched portal by cutting out the upper part above the opening in the partition - correct option from an aesthetic point of view. Such an arch will look proportional in the room. A high arch will give more room for imagination, and there are many more possibilities for installing a door into it. The main principle of closing a high arched passage with doors is the use of structures with transoms. With this approach, standard doors of any type can be installed in the opening.

Dear and at the same time luxury option- order a solid wooden panel with a solid wood box from the workshop. This method is used to close narrow arches designed for a single-leaf door. The cheapest option would be regular door with transom.
The most in an accessible way To close an arch with a door is to make a rectangular box without a threshold and install an accordion-type folding door into it. These systems are sold in kits, have a variety of designs, and are easy to install. After installing the folding door, you can evaluate how it looks in the interior, and in accordance with the impressions received, make an upper arched transom and complete the design of the opening.
In addition, folding systems are not designed for intensive use. This is exactly the mode that is usually assumed when installing in an arch, because only in the open state does it look impressive.
What are folding doors made of?
The bulk of folding systems in stores are made of MDF or plastic. The plastic is light and practical, but it lacks soundproofing properties, and the design itself is noisy and gives the impression of laxity.
Important! The plastic panels have stiffening ribs, so despite their external flimsiness they are rigid and durable.

The assembled plastic structure is lightweight, so no technician is required for installation. outside help. The plastic itself is easy to cut, and modern movable interlocking panels allow you to assemble and install the structure yourself in a few hours. In addition, the guide profiles in plastic structures They are attached via clips, which simplify the installation process.
Systems with MDF slats look solid, but they are more difficult to install. They look natural in arched doorway. Due to the weight of the structure, the guides are attached to the opening using self-tapping screws.
The standard folding design kit includes the following elements:
- Narrow panels. In addition to several identical panels from which the canvas is assembled, there are two half-panels that are installed at the edges, a starting and a locking strip.
- Guides. All kits have a top and two side guides. In systems for wide openings or with flexible slats, there is also a lower guide.
- Rollers, stoppers. In some designs, regular hinges may be used to connect sections.
Extensions and platbands for the box, locking mechanisms are not included in the package and must be purchased separately.
How to install a folding structure
First, the box is made and installed. It is assembled from additional panels that do not have the usual quarter for the door leaf. The box is made according to the height of the straight part of the sides of the arched opening.
After installing the box, you need to measure the height and width of the resulting opening and only then go shopping for a folding system. This way you can accurately calculate the number of sections and select them according to width.
Important! After purchasing a folding door, you must carefully read the installation manual. Each manufacturer provides their products with detailed instructions.
- IN budget models PVC lamellas are connected to each other through special grooves or using gaskets. The joining process looks like this: the panels are moved, one lamella is inserted into the groove of the other lamella and pulled to the end.
- The MDF sections have special eyes that fit together and a long pin (axle) is threaded through them.

- It is better to install the lock and handle in the lock panel before assembling the blade.
- The slats are cut to the required height. When suspended, they should be raised above the floor by 1.5-2 cm.
- After connecting the lamellas and half-lamellas, a locking panel is attached on one side, and a blind (fixing) panel on the other.
- The rollers are attached to the upper end of the sections one at a time, starting from the locking lamella. Before installation, it is advisable to treat them with technical petroleum jelly.
- The top profile is cut exactly to the width of the opening, and the side profiles are placed close to it from below.
- The procedure for installing the profile depends on the intended method of attachment to the opening. If the profile is attached to clips, you need to mark and secure the clips around the perimeter of the box. To do this, a line is drawn in the center of the upper jumper, and using a level it is continued on the racks. The clips for the locking vertical profile are smaller than the others. On the top jumper, clips are attached in increments of 5-7 cm, and on the sides it is enough to install 4 pieces. After trimming the guides, all that remains is to insert them into the fixed clips. If they are tight, you can use a rubber mallet.
- If the profile is attached to self-tapping screws, then first install the upper guide. It is screwed onto one screw in the middle. After this, the guide is unfolded so that the sash rollers can be inserted into it. Having inserted the sash, it is assembled in the center, the profile is turned back, finally aligned and the remaining screws are tightened. Only after this the side parts are screwed in level.
- At the end, the blind panel is snapped into the side profile and the mechanism is checked for smooth operation. A strike plate for a lock or latch is installed in the lock profile.
The finishing of the opening with platbands is carried out after the installation of the arched transom.
Installation video of the accordion-type folding system:
IN small apartments doors to an opening with an arch need to be planned before work on its creation begins. And you can close an existing opening without damaging the surrounding space using a folding structure.
In contact with
Comments
Unfortunately, there are no comments or reviews yet, but you can leave your...
New articles
New comments
S.A.Grade
SvetlanaGrade
SergeyGrade
SergeyGrade
AlexeiA few years ago, arched openings came into fashion. This design of the entrance to the room is beautiful, original and allows you to do without installing doors. Using modern materials, can be made and finisharched vaultwith your own hands. The work is not too difficult, but requires great care. In addition, you will need to think in advance how finishing will be done openings. You can complete the registration in different styles, considerhow to make an arch in doorway.
An arch is a very effective way to enliven the interior and make it more attractive. A beautifully designed arched opening in the vault will emphasize the beauty of the interior of the room and make the decor more original.
A huge variety of arch shapes and harmoniously selected finishes will transform the room. To verify this, just look at the photo of the room before the arch was inserted into the opening, and after the repairs were completed. Let's consider how you can create a niche in the form of an arch, install it in the vault of the wall and decorate it with your own hands.
Types of arches
When decorating interiors, arched openings are not only decorative, but also practical functions. Making a niche in the vault of a wall separating adjacent rooms, or installing a partition with an opening in the form of an arch in a large room can be used to divide the space into zones without using interior doors.
In most cases, semicircular openings are used; the following types of arches are distinguished:
- A classic arch is a structure in which the bending radius of the arc is half its width.
- Arch modern. It has an original shape, in which the arch is performed with some elevation.
- Romantic arch. This is an almost rectangular opening, the edges of which are rounded.
- Elliptical arch. In this case, it has the shape of an oval, with widening in the middle part and narrowing at the top and bottom.
Advice! You can see what different types of arches look like in photos in interior design magazines.
Getting ready to install the arch
Let's look at how you can install and decorate a classic plasterboard arch with your own hands.

Taking measurements
It is necessary to begin creating an arch by taking measurements from the opening. You will need:
- Take measurements along two diagonals of the opening. These measurements must match, otherwise you will have to first carry out work to level it.
- Take the width measurement. This measurement is useful for determining the bending radius of the arc.
- Measure the height.
We purchase materials
In order to install the arch you will need:
- Arched plasterboard sheets 6.5 or 8 mm thick. If there is an opening in the room standard size, one sheet is enough. This material is very convenient to use. You can use plywood, but it is more difficult to work with.
- Metal profile. You will need 2 pieces of guide profile 50x40 and 1 piece of rack profile 50x50 mm.
- Fasteners: dowels with screws (25 pcs.), self-tapping screws measuring 3.5×25 mm and self-tapping screws “seeds” 3.5×11 mm.

After construction is completed, the arch will need to be finished. To do this you need to stock up:
- Primer;
- Finishing putty;
- Perforated arched corners.
The rest of the material is purchased depending on the planned design of the opening and the adjacent wall.
Installation work
First, the frame is constructed. Steps to do this work yourself:
- We cut two sections of the profile along the height of the opening and one along the width and secure them in the opening using dowels and screws.
- Now you need to prepare the arcuate part of the frame. The length of the profile for this part is determined by adding two values - the radius of the arch and the height of the indentation from the top of the opening.
- To make it possible to bend the profile, you need to use metal scissors or a grinder to make cuts in the parallel side parts of the profile. The pitch of the cuts is 4-8 cm. After this, the profile is bent, giving it the required shape.
- We fix the manufactured part of the frame, having previously leveled it.
- We cover the finished frame with plasterboard blanks. First, the gable parts are sheathed, cutting out the parts according to the dimensions of the opening. Then it is made inner part arches. To bend a plasterboard blank with your own hands, you need to make cuts on the reverse side without damaging the outer layer. The prepared plasterboard part must be installed, secured to the frame using self-tapping screws.
Finishing work
The plasterboard arch is almost ready. But as you can see in the photo, without finishing it doesn’t look particularly attractive. Let's look at how you can design and frame an assembled arched opening with your own hands.
First of all, you need to putty all the seams and the locations of the screws. We attach a perforated corner to the outer edges of the putty compound so as not to bother with putting out the shape with putty.
Then apply a layer over the entire surface of the arch finishing putty, and after it dries, we grind the surfaces, achieving smoothness. All that remains is to prime the surface, after which finishing can be done.
How can you finish an arch? The chosen option should be harmoniously combined with the wall decoration. For example, if the walls are covered with wallpaper, the same material can be used to decorate the arch.
You can use other options that match the wall decoration. For example, finishing interior arches artificial stone, tiles, decorative plaster, you can use a combination different materials. You can see the photo to see how beautiful and original the decoration of the arch can be.
So, interior openings in the shape of arches are an original and very attractive way to decorate the interior and create an opening between adjacent rooms without installing a door. If you wish, making an arch yourself is not difficult. You can see how interesting it is to decorate an arch in photos in interior magazines.
You can make an arch in a doorway in various ways. Each of them is selected based on a specific situation. It is necessary to take into account the construction skills possessed House master, as well as financial opportunities.
It is worth noting that it is possible to qualitatively install an arch in a doorway with your own hands only when all the features of this design are taken into account. The fact is that this finishing option has its pros and cons.
The advantages include the following aspects:
- Visual increase in space. IN in this case two factors combine at once. The first is that an opening without a door unites two rooms, this erases some existing border. The second is based on the shape of the structure.
- An excellent option for zoning. Indeed, an arch can be an excellent solution to the problem of dividing a single area.
- Nice decorative look. This design can decorate any interior. It should be borne in mind that the overall design must be harmoniously thought out.
We must not forget about the existing shortcomings. They lie in the fact that the peculiarity of this product is openness, since there is no door leaf. Therefore, there is a complete lack of sound insulation, penetration of foreign odors, if we're talking about about the border with kitchen area.
 When designing an arch, you should think about the fact that the feeling of security will disappear
Existing options
What is special about installing an arch in a doorway? The fact is that there are different types of these structures:
- Ellipse. This configuration is considered to be classic. It is made round. All transitions are very smooth.
- Round. This option allows you to expand the opening. This method is suitable for cases where zoning is required.
- Trapezoid. Assumes the absence of rounded areas.
 Arch - various types of structures
 On a note! You can often hear that an arch and a portal are two different architectural elements. In fact, the portal is the most simple solution arched design. It is made in the form of a rectangle, sometimes supplemented with rounded corners.
Features of the construction of arches
You can make an arch in several ways, but you need to take into account the height of the openings.
For low openings
This method of creating an arch involves pre-marking the surface. The marked area is cut out (hollowed).

The general technology is as follows:
- The opening is being dismantled. Deleted old box. Part of the crumbling plaster is removed.
- The height of the future structure is determined. Lines are drawn along two vertical sides. They must be equal and made exactly at the specified height.
- To obtain the radius of the arch, the existing width is measured. This value is divided in half.
- A horizontal line is drawn between the vertical posts. It should be located at a level that will correspond to the beginning of the rounding.
On a note! It is important to consider that the distance to the ceiling should not be less than 30 cm.
- The center is marked on the drawn line. The self-tapping screw is screwed in. A cord is attached to the screw, which must be equal to a given radius. A pencil is attached to the end of the rope. This tool marks the bend.
- Trimming is done according to the existing markings. If the wall is strong enough, then chiselling is performed. To make the work easier, pre-drilling is done.
 It is necessary to comply with the requirements for the construction of the arch
 Thus it turns out required form. Next, you should process it carefully. This is done by grinding. The resulting structure is treated with putty or plaster. They can serve as final finishing material.
For high openings
Door arch can also be done in another way. It lies in the fact that plasterboard and a metal profile are used as the main material. The technology assumes that everything will be done along an existing opening. The following actions are performed:

On a note! The created sheathing should be recessed to the thickness of the gypsum plaster boards used. Minor errors may occur. They can be easily corrected with plaster.

On a note! If you need to install an arch very quickly, the best solution would be to use a ready-made structure. These products are made from various materials and have standard configurations.
After all the procedures, an almost finished design is obtained. All you need to do is install a fragment of a gypsum plasterboard that will close the open arc-shaped space. The procedure is performed as follows:
- The bending section is measured.
- The resulting size is transferred to the drywall.
- The required fragment is cut out.
- This part needs to be bent. To do this, it is cut from the wrong side into strips.
- Carefully place into place and secure.
 Finished plasterboard arch
 The completed design requires additional decorative finishing. It should be noted that drywall makes it quite easy to create an arch with your own hands. If you use wood as a material, you must have sufficient experience to correctly process and install such a product.
Fiberboards and plywood are used as substitutes for gypsum boards.
 Often to create arched openings use plywood instead of drywall
 There are some tips that will help you get a beautiful arched opening:
- The general appearance of the arch should correspond to the interior design.
- To get more original design- it is drawn up with different sides individually.
- Existing communications should be laid in advance.
Summarizing the above, it can be noted that there are various ways to make a door arch. You just need to be patient and adhere to certain rules and recommendations. Then everything will definitely work out.
In an effort to deviate from generally accepted standards and give the interior elegance, apartment owners and country houses change the usual doors to arches. This is no longer a new, but still popular design highlight. The arch in the doorway can be purchased ready-made or made with your own hands. It comes in a variety of configurations, so it allows you to realize any idea.
Shapes of arched openings
Interior door arches are selected not only based on taste preferences, but also depending on certain parameters: ceiling heights and . The structures are made of plasterboard, wood, MDF, PVC. The easiest way to work is with drywall, as it is the most flexible material.
Currently there are a large number different types arches that vary in shape. The most common are:
Arched openings also have various designs and based on this they are divided into several varieties:

Having looked closely at your interior and selected the desired arch model, you can begin the step-by-step work.
Step-by-step instructions for making your own
In order not to spend extra money on finished products, you can do the finishing of the arched opening yourself. To do this, you need to follow a clearly established scheme.
Carrying out the necessary measurements
Any construction process requires precision, which is achieved by taking preliminary measurements. You need to start from the opening itself, so first measure its width and height. The size of the span between the walls of the opening is equal to the width of the arch. In order to make a semicircle as accurately as possible, this indicator must be divided by two.
Before making an arch, you need to decide on its future configuration. If you are going to do it in classic style, then pre-level the walls. Otherwise, the design will look ugly. You can remove all defects from a vertical surface with putty or plaster using beacons.
Creating a load-bearing frame
To install the frame, you should perform a series of sequential steps:
- Along the lines of the opening, a contour of metal profile. Vertical guides are installed indented from the surface of the interior wall. The size of the indentation is equal to the thickness of the drywall sheet and the plaster layer (about 0.2 cm).
- We install two such profiles parallel to each other on each side.
 To construct the frame, two profiles are installed in parallel
 - Having finished working with the profiles, we begin installing the first sheet of drywall. If its thickness is 1.25 cm, then it is recommended to screw it with 3.5x35 self-tapping screws. If the thickness of the gypsum board is no more than 0.95 cm, use smaller screws.
 Drywall is secured using self-tapping screws
 - Cover the second side of the frame with plasterboard.

- Make a metal profile in the shape of an arc. To do this, cut with special scissors side walls profile every 7 centimeters. As a result of these actions, it is easier to give it the required shape. For an arched structure, two such blanks will be required.
 An arched arc is made from the profile
 - Install and secure the arched profiles to the main part of the frame.
 The arcuate profile is attached to the main part of the frame
 - To ensure that the arches are securely fixed, they are attached with hangers to a straight guide located on top. The number of hangers depends on the width of the opening. Usually three pairs are enough.

- In increments of 0.4-0.6 m, attach reinforcing crossbars around the perimeter of the frame, fixing them on the guides of two contours.
- As a result of the above actions, a reliable metal structure in the form of an arch from a profile. In the future, it will be covered with plasterboard or plywood.
If it is assumed that the columns of the arches will not be too thick in thickness, then 2 arches can be replaced with a wide profile. Cutting and folding is done in exactly the same way. Only in this case the installation of crossbars is not required.
Sometimes instead of a metal profile they use wooden slats. The frame installation technology does not change significantly.
Bending plasterboard sheet
After installing the frame, they take on the bending of the gypsum board. Experts recommend using drywall designed specifically for arched structures. He accepts easily the required form, if the material is wrinkled in the longitudinal direction.
If you decide to use regular drywall, you will have to tinker with it. The installation element is cut to the required size in the form of a rectangle. They bend it in two ways: wet and dry.
 Bend manufacturing diagram
 The wet method takes a lot of time and cannot be rushed. To prevent the material from cracking when bent, it is moistened with water and punctures are made. In this form, the sheet of drywall is left to lie for some time, and then it is bent onto a template of the desired configuration.
The dry method refers to the application of cuts parallel to each other on the back side of the plasterboard. The cut goes deep into the sheet, affecting the outer cardboard layer and plaster. The cardboard layer on the front side remains intact.
With the dry method, the bend of the installation element takes the correct shape. It is important to know that cutting through gypsum boards is best done with a jigsaw rather than a hacksaw. Then the edges will not be torn.
Rough sheathing of the frame
If the bending was done using the wet method, then first of all you need to wait until the sheet of drywall is completely dry. The material is fixed first with adhesive tape and then with self-tapping screws. The minimum step between them should be from 5 to 6 centimeters.
 Perforated corner prevents edge chipping
 After fastening the sheathing, the edges of the plasterboard sheet are cleaned. And in order to prevent chipping of the curved edge, a perforated edge is installed on it. plastic corner.
Leveling with putty
To make the surface smooth, you need to finish the arched structure. First, apply a primer, and after it dries, putty. To reinforce the second layer and strengthen the corners, fiberglass mesh is used.
 Fiberglass mesh reinforces the corners of the arch
 The last third layer of putty is applied to the mesh. After about 10 hours, it dries, after which you can begin sanding the uneven areas. If the work is done well, the surface will be free of roughness and unevenness, and the heads of the screws will not be visible in it.
Methods for finishing arches
Those who want to decorate the arches themselves will have to work hard, cutting out each part separately. However, many do not look for complications and choose the simple path - they purchase factory-made structures from prefabricated elements.
Ready-made and prefabricated linings
There are two types of factory-made overlay: wooden and foam.
Foam elements
Foam arches are often preferred as an alternative to plaster products. The advantages of such designs are as follows:
- Quick installation. The installation speed is much higher than arched structures made of plywood or gypsum plasterboard.
- Low price.
- Easy transportation. Polystyrene foam is enough lightweight material, so you don’t need to hire movers to deliver the product to your home.
- Light weight. Arches of this type can be installed even on very weak structures.
- Various forms.
 Foam arches are made from ready-made elements and cut in place to fit the dimensions of the opening
 Negative sides arched foam structure are: fragility, toxicity, rapid flammability.
Wood elements
Wooden arched structures do not require advertising. They look rich and rarely do not fit any interior style. However, it should be understood that the word “wooden” does not mean that all components are made of pine, oak or other solid wood.
 The arch can be made of natural wood, MDF, chipboard or plywood
 Arched elements are also made from inexpensive MDF, laminated chipboard, plywood covered with veneer. The desired option is selected individually based on taste and wallet thickness.
 Wooden elements are ordered from a catalog and then cut to length before installation
 Installation wooden structures It's easy to do. IN construction stores arches are sold both assembled and disassembled. The first option is considered more reliable, since the work was performed by a specialist.
Decoration with finishing materials
Currently, there are many ways to do it beautifully and neatly. The decor is selected so that it is in harmony in color, texture, material with home environment. The most popular options are:
- Simple coloring. The arch will look elegant and complete if it is simply painted white, brown or to match the walls. This finish is often complemented with decorative elements and lighting.
 Plain paint looks great when combined with lighting
 - Wallpapering. This is the fastest, most affordable and easiest process. For these purposes, vinyl or non-woven options are best suited.
 Slopes highlighted with wallpaper are a very stylish design move
 - Finishing with wooden and plastic lining. The method guarantees not only a wonderful aesthetic appearance, but also ensures the durability of the structure, protecting it from moisture and mechanical damage.
 The option with lining is perfect for interiors with wall decoration made of the same material
 - Decorative plaster. The surface of the arch is beautiful, textured and durable. True, such finishing sometimes needs to be restored, and it requires some care.
 This method looks especially advantageous in deep arches.
 - Stone. An arch in a house made of natural or artificial stone can only be installed with the help of a professional. The decoration captivates the eye and makes the interior unusual.
 The torn edges of the arch can become the highlight of any interior
 - Cork- This is a fairly expensive, but environmentally friendly material. It is easily susceptible to mechanical damage, so to extend its service life it is recommended to cover the cork with wax.
 Cork finishing brings a sense of eco-friendliness and comfort to the interior
 - Clinker tiles. This finish will last long years. It does not attract dirt and does not require special care.
 Finishing with clinker tiles – limitless space for interesting solutions
Often the interior passage in an apartment is not closed with a door, but left open. This allows you to elegantly unite the space and make the interior design of the rooms more elegant. To do this, you can purchase a ready-made structure from assembled elements or cut out individual parts with your own hands and then assemble everything in the doorway. But how to make an arch yourself so that it looks smooth and beautiful? After all, there are a lot of materials and technologies for installation; you need to choose wisely.
Designer arch
What arches can be installed in an apartment?
Installation of the arched structure on site interior door can be done without involving professional builders. You just need to choose the type of arch and materials for its manufacture. Following the step-by-step instructions below will help you avoid mistakes and make an arch with your own hands.

Arch curves can be the most bizarre
Design features and significant differences
In construction, arched structures are supports for overlying elements of walls and structures. But in apartments, doorways to the corridor and between rooms are not load-bearing. In the first case, construction materials are selected based on serious external loads, and in the second they must withstand only their own weight along with the finishing.

Arch with bar counter
An apartment door arch, installed instead of a door, is an element of interior design. Its frame can be made from a lightweight profile for gypsum boards or bars with a cross-section of 20–30 mm. This design can easily withstand the weight of finishing materials. You just need to firmly fix it on the walls so that the decor doesn’t warp or fall off after a couple of weeks.
Reference! In private houses and city apartments, an open door arch between rooms serves exclusively decorative functions. Bearing loads in this case are placed on concrete walls on the side or a lintel above the opening.

Finished plastic arch
Shapes of arched openings and their capabilities
There are many options for arranging interior arches in shape:
- "Classic".
- "Romance".
- "Modern".
- "Ellipse".
- "Trapezoid".
- "Portal".

The most popular types of interior arches
The first option at the top has the shape of a regular semicircle, and the last one has strict rectangular outlines throughout its entire height. The rest are intermediate versions between them. But other variations are also possible with one side “support” or two curved posts.
The shape of the door arch and its design are chosen to match the design style of the room. This takes into account the height of the ceiling, the size of the opening and the features of the premises on both sides. They will look perfect in some homes classic shapes with a regular bend in the form of a semicircle, and in others - a rectangular portal. This is more a matter of the taste of the home owners and the general style of interior decor. Some people even prefer cone-shaped contours.

- It is recommended to choose the classic option only when high ceilings in the area of 3 meters and above.
- In typical panel high-rise buildings, it is better to design the entrance to the kitchen with a “MODERN” arch.
- For a wide doorway from the hall to the corridor, “ROMANTIC” with large wide racks is more suitable.
- The rectangular “PORTAL” looks best in an interior where clear horizontal and vertical lines predominate in the decoration. This type of doorway design is ideal for houses made of timber or logs. In such a home, its rectangular corners will look elegant and fit the theme as much as possible.

Classic in the interior
What to build a designer doorway from with your own hands
To quickly make an arch in the doorway of an apartment, it is enough to purchase a set of prefabricated elements made of plastic or laminated chipboard lumber. They need to be trimmed the desired height, and then secure it in the places specified according to the instructions. But such options are standard and quite expensive. Plus, not every opening can be fitted with a ready-made model with the required dimensions.

Components of an interior arched system
To make panels of arched posts and arches you will need one of the following materials:
- drywall;
- plywood;
Advice! It is better to choose plasterboard sheets for covering the frame. GCR can be finished in the future big amount various materials. However, thin plywood is much easier to bend.

Finished veneered arch
The frame for an interior arch can be made:
- from a metal profile;
- from wooden blocks 20x20 and 30x30 mm.

Brick decoration is ideal for connecting a balcony
You can also make an arch instead of a door from concrete, brick or aerated concrete blocks, and only then decorate them with one or another finishing material. But these options are more for those who like capitalism and solidity. Plus they weigh a lot, in old apartments apartment buildings It is impossible to build anything from them.
The use of metal is limited not only by its weight, but also by its high cost. Manufacturing of metal structures complex shape at home - this is a very difficult project to implement in practice. The easiest way to do it yourself is to work with drywall and its profile.
Step-by-step instructions for self-installation
The photos and recommendations below will allow even a novice master to cope with the improvement of a doorway. To do this, you first need to create a frame, and then sheathe it and decorate it. You can do everything yourself, you just need to do everything consistently and without mistakes.

Scheme of a plasterboard arch
Preparing the doorway
- First, the leaf and frame of the existing door (if it exists and is in place) are dismantled.
- Then the opening is expanded to the planned dimensions.
- There is no need to plaster the cut walls under the frame; they will still be covered with sheathing. It is enough to straighten them and remove everything that can fall off (plaster, pieces of concrete, falling bricks). The main thing is that the supporting profile can be secured securely and in a strictly vertical position without tilting.
- If you are planning a backlit design, then you need to install the wiring in advance.
- Measurements are always taken at several points in the opening so as not to miscalculate the dimensions.
- If the walls are uneven, then the thickness of the racks (depth of the arch) is selected according to the thickest place.
- To simplify marking and cutting sheet material To cover the arched frame, you need to make a life-size template from cardboard. This will allow you to avoid mistakes and preview how the contours of the structure being formed will look.
Important point! The upper part of the arch takes about 10–15 cm away from the height of the doorway. At least 20 cm should remain from it to the ceiling. When calculating and marking, these numbers must be taken into account.

Fastening the guides
Creating a load-bearing frame
- To make a frame for an arch, you first need to create a main contour from a profile around the perimeter of the opening, fixing it to the walls.
- Then the upper curved part of the frame system will be attached to it. Sometimes only a curved element is made on top, but this is only possible with perfectly smooth slopes.
- Vertical guides in the doorway are attached with an indentation from the plane of the interior wall by the thickness of the plasterboard sheet plus 2 mm for subsequent plaster on top of it.
- After plastering you should have a single, flat surface.
- On each side and at the top of the arch being created, you will need to secure two such profiles parallel to each other.
Advice! If the walls are made of wood, then self-tapping screws are sufficient to attach the guides, but in the case of concrete or brick, dowel screws will be required. The spacing between fasteners should not exceed 30 cm.


If the columns of the arch are made of small thickness, then two arches can be easily replaced with a wide profile. All cutting and bending manipulations in this case are carried out according to a similar pattern. However, transverse installation will no longer be necessary. When using wooden blocks instead of a profile, the frame for the arch is made using a similar technology. Only the original carrier material changes frame structure.

Two ways to bend plasterboard sheet
Rough sheathing of the frame
After completing the assembly of the arch frame, all that remains is to mount the gypsum board or wood board. To give plywood or fiberboard the desired shape, they will have to be pre-moistened, fixed on a template and steamed with a hot iron.
Ideally, you need to use special arched plasterboard, reinforced on both sides with non-woven fiberglass. It is enough to stretch it in the longitudinal direction and give it the desired shape.
Bend regular plasterboard sheet There are two ways: wet and dry.
- Wet technology involves soaking the back side of the gypsum board with water and gradually bending it onto a template of the required shape and fixing it on it. This process is lengthy; haste can lead to rupture of the cardboard layer of the sheet. And the resulting part can be installed and secured with self-tapping screws on the arch frame only after the plaster has completely dried.
Advice! It is possible to speed up the process of moistening gypsum board to give it elasticity using a needle roller.
- The dry method involves making parallel cuts on one side of the sheet, which affect the plaster and the upper outer layer of cardboard. But the front cardboard layer remains intact. The bend is smooth and of the correct shape.

Installation of the main element of the arch
Cutting sheet material is best done with a jigsaw. When using a hacksaw, the cutting edges will certainly be less even. The sheathing is fastened with self-tapping screws in increments of 5–6 cm. After fixing it, the edges of the plasterboard and plywood sheets are sanded. And then a special plastic corner with perforation is attached to the curved edge to protect it from chips.

GKL fastening
Putty for perfect surface leveling
The next stage of finishing a plasterboard arch is primer and putty. After applying the first one, you need to wait until it dries. And for reinforcing the second layer it is used fiberglass mesh. The corners are also reinforced and leveled using a mesh.

The edges must be smooth

Surface putty

Putty joint with wall

Mesh reinforcement

Edge reinforcement with mesh
Next apply the third finishing layer. The putty, hardened after 10-2 hours, is sanded sandpaper to remove excess and make the surface as smooth as possible. There should be no protruding screw heads or dents left on it.

This is what the arch should look like
Decoration of the structure and design techniques
You can finally decorate the arch in the apartment with your own hands and make it beautiful:
- painting in color with the walls;
- wood paneling or plastic panels;
- wallpapering or veneering;
- finishing with decorative stone on a gypsum base;
- decoration with mosaics and mirrors;
- decorating using stucco or ready-made columns.

Simple finish with backlight
Materials in finishing Interior arches are used both natural and artificial. The choice here depends on the overall design idea for the interior design of the apartment. To improve the doorway, you can use polyurethane stucco and even textiles. All options are acceptable, the main thing is that they are in harmony with the surrounding decor.

Shelves in the design of an arched passage to the corridor
The frame of columns made of clinker or decorative stone. Personal installation It will take time and diligence, but the result will definitely please the master. The uniqueness of the apartment with this method of decoration is guaranteed.

Artificial stone decor
Arch finishing natural wood will bring solidity and grace to the house, and the mosaic pattern invented by the owners will make the decor unique. The main thing is not to overdo it with the design, making the design a tasteless heap of elements. different styles. All interior details should be in harmony with each other and complement each other.

Stucco columns in an arched doorway with wide walls
Often, simple painting in white or brown is enough to complete the design, making the arch with your own hands beautiful and elegant. However, some require built-in lighting and additional decorative elements in accordance with the style chosen for the apartment. It will take more time to finish the arched opening, but it will be worth it.

Decor with corner and wallpaper
It’s not difficult to install and decorate an interior arch instead of a door yourself. For work, it is enough to have metal scissors, a screwdriver and a hacksaw in the house. But if you have no experience in handling these tools, it is better to trust professional installers.


