If the house has windows, then there must be window sills. Qualitatively installed window sill does not only decorative function- it serves as protection for the room from the penetration of cold. Structures can be wooden, granite or PVC. Installing a PVC window sill with your own hands can only be done after studying the technology for installing PVC products.
- Why PVC window sills
- Preparing the installation site
- General recommendations
Why PVC window sills
- Unlike wooden window sills, PVC products perfectly withstand sudden temperature changes.
- High resistance to impacts and scratches.
- Does not require anti-corrosion coating.
- The presence of chambers provides good thermal insulation qualities.
- Installation of the window sill can be done independently.
- Easy care during use.
- PVC perfectly resists long-term exposure to moisture.
- Possibility of installation for both plastic and wooden structures windows
Selection of tools and material
High-quality installation of a plastic window sill with your own hands can only be carried out with making the right choice source material, tools and accurate implementation of installation recommendations.
During installation you will need:
- Window sill made of polyvinyl chloride and caps for its ends.
- Corner, building level, marker and tape measure.
- Silicone sealant and polyurethane foam.
- Jigsaw, hammer drill and screwdriver.
- Cement mortar.
- A stationery knife and a clean rag.
Preparing the installation site
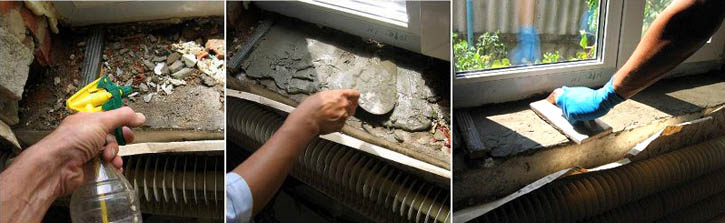
A new PVC window sill will look good if you carefully prepare the area for its installation. This is especially important when replacing old windows. After dismantling the outdated window opening, check for chips and cracks around the window. If necessary, the masonry should be restored. Remove fine debris and dust, and apply a primer to the base.
Important! Before installing a PVC window sill, check the quality of installation of the window frame to avoid cold penetration into the house.
Once the new window has been installed and the base for installing the PVC window sill has been carefully prepared, you can begin measuring the space and preparing the window sill for installation. Before installing a plastic window sill, it will have to be cut to the width and length of the opening.

The width of the window sill can be the same as the slopes or a little larger. The length of the product must be cut 4-6 cm longer than the distance between the slopes. Two horizontal cuts are made in the vertical slopes, into which the window sill will be inserted.
Plastic window sills can be installed in three ways:
- To fasten the product, polyurethane foam or special glue is used.
- The window sill is secured using brackets.
- To install a PVC window sill, a profile is used.
Instructions for working with glue

Step #1. On the side slopes of the window opening, cut two notches at the same level, and clean the window sill base well and, if necessary, deepen it.
Step #2. Before installing a new window sill, dry the surfaces and coat them with primer.
Step #3. Insert the cut-to-size window sill into the grooves under window frame.
Step #4. Use wooden wedges to wedge the window sill between the frame and the window opening. Insert wedges in the middle and edges of the window sill.
Important! There should be no gaps between the window sill and the window frame.
Step #5. Install pads between the window sill and the window opening so that the surface of the structure is horizontal.

Step #6. Pump polyurethane foam with a small expansion coefficient between the PVC window sill and the window opening. To prevent the window sill from rising, place a load on top of it.
Step #7. Install plugs on the side cuts.
Important! A window sill that protrudes strongly beyond the wall must be strengthened by applying cement mortar.
Step #8. 12 hours after foaming the window sill, remove the load.
Instructions for installation on a rigid base
This installation of a PVC window sill is considered the most durable and durable.
Step #1. Mark and trim the window sill as in the previous installation option.
Step #2. On pre-cleaned window opening execute cement screed. Adjust the height of the screed so that the new window sill fits exactly into the grooves of the window frame.
Step #3. To fasten the product use liquid plastic or silicone glue.
Instructions for working with brackets
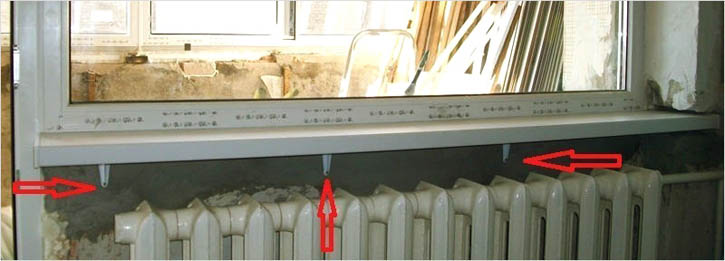
Step #1. A stand profile is installed under the window and securely fastened. At least 4 brackets are mounted in it with self-tapping screws. Maximum distance between the brackets there is 25 cm. Fastening is best done with self-tapping screws with press washers.
Step #2. The PVC window sill is being installed on brackets. When properly seated tightly, you should hear a click.
Step #3. The window sill and frame are connected using screws.
Step #4. The wide window sill is additionally fixed to cement mortar.
Instructions for working with metal profiles
Step #1. Attach to the window sill block in a horizontal position metallic profile L or U-shaped.
Step #2. Install the cut window sill into the groove and secure it with self-tapping screws.
Step #3. Blow out the free space between the new structure and the base with foam.
Step #4. The structure can be further strengthened using cement mortar.
- When working with a hammer drill, protect your hands with gloves and your eyes with special goggles.
- Polyurethane foam adheres much better to a wetted surface. Before foaming, wet the surface of the base and the back of the window sill using a spray bottle.
- It is best to pump the sealant in strips, leaving space between them.
- The protrusion of the window sill beyond the window slope line should not be more than 60 mm, and the length should exceed the width of the window opening by a maximum of 15 cm.
- If the length of the window sill must be strictly horizontal, then the width must be slight slope from the window. The slope should not exceed 3%.
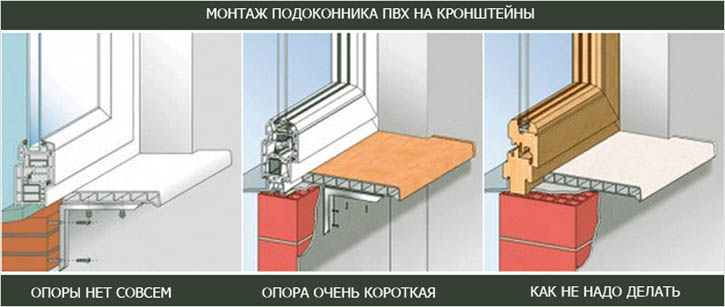
- When installing window sills, it is necessary to take into account the location heating devices so as not to worsen the microclimate of the room.
- The rigidity of a PVC window sill increases significantly when using a wooden backing. All bars must be same sizes. The length of the bar is equal to the distance from the window frame to the edge of the opening. The distance between the fixed strips is 25 cm.
- After the foam has completely hardened, its excess is removed. The wall under the window sill is puttied and decoration begins.
After reading the article to the end, you learned how to properly install a polyvinyl chloride window sill in several ways. Each installation method has its own advantages and disadvantages. With the right approach and high-quality execution, installing a new window sill is not as difficult as it seems at first glance.
Watch another video about installing a window sill. The apartment owner shares his installation experience.
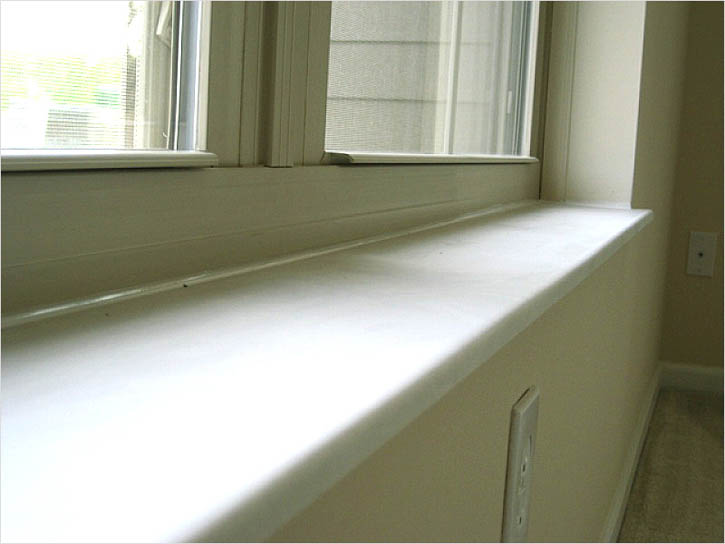
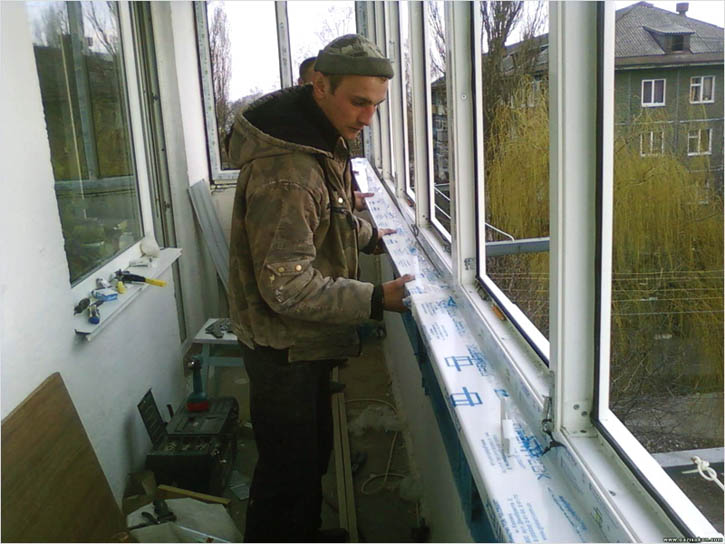
Photo 1 - Plastic window sill photo
Practical, attractive and inexpensive plastic window sills are most often installed together with the same windows, although others are also possible design solutions. Installation of window sills does not require special skills, but you need to follow the technology exactly and perform all actions carefully.
List of materials needed for installing a PVC window sill

What you need to know for a successful window sill installation
Before starting any work, you need to carefully study the accompanying documents for all materials and tools used, if you have not used them before. This fully applies to the installation of a plastic window sill.
For example, it is very important to know at what temperature you can work with polyurethane foam. This information is on the product label. When choosing this material, you should give preference to products with the lowest coefficient of expansion, which will prevent the window sill from rising. The ideal option is to use a spray foam gun. In this case, as a rule, it is applied professional material, which does not expand significantly.
If you are going to install a window sill in a window over 3 meters long, you will have to use additional details, which need to be carefully adjusted and glued, or special fillers for joints.
Preparing to install a window sill
In order for the window sill to serve for a long time, it is important to correctly determine its dimensions. The width is calculated taking into account the following components:
Window sill width :
- Desired distance from the inner surface of the wall. Experts do not recommend making it more than 15 cm, because it can become a hindrance. It is also important to consider the location of heating devices. Too much wide window sill may cause condensation to form on the side slopes and glass surfaces.
- Another 2 cm is added for the entrance of the window sill under the window.
To determine the length you need to measure the window opening using a tape measure and add another 10 cm to this value. This is necessary so that the cut edges of the window sill are not visible.
Important!
After taking all the measurements, check them again. It’s better to stick to the rule: measure seven times, cut once. In this way, you will be able to avoid annoying mistakes, which are quite difficult and sometimes impossible to correct.
All that remains is to cut off all the excess and you can begin installation.
Video installation of a PVC window sill. Main stages
First you need to clean the surface of the window opening from debris and dust. This must be done carefully so that subsequent foaming is successful. The next step is to try on a window sill that has already been prepared to size. If necessary, it is trimmed in the right places.

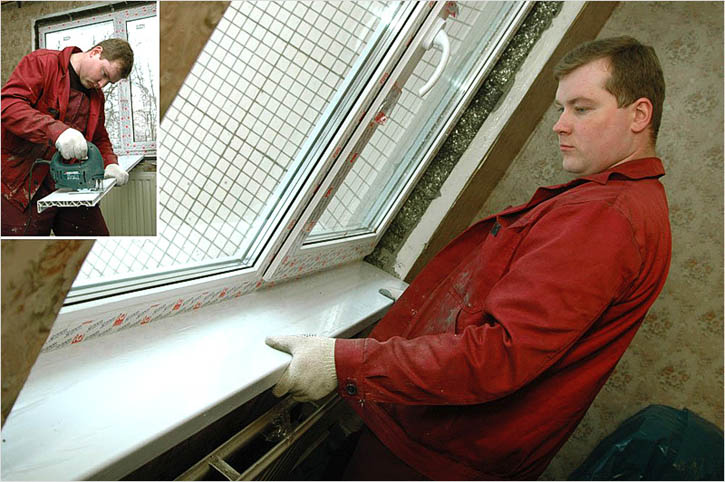
Photo 3 - DIY PVC window sill installation
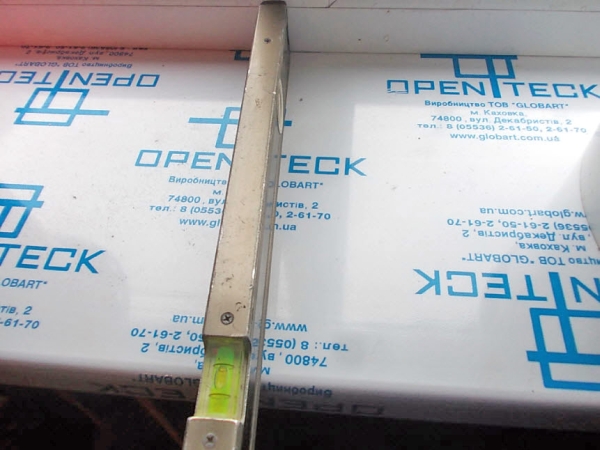
Next step- installation of a window sill. To do this, it is inserted into a special support profile located under the window frame by 2 cm. Using a level, the surface of the window sill is set and wooden supports are placed, which are necessary to ensure the design rigidity during operation of the window sill.
The window sill canvas is installed with a slight slope directed into the room. This is necessary so that when condensation forms or watering flowers, excess moisture does not stagnate, but rolls off the windowsill.

Photo 4 - Do-it-yourself PVC window sill installation
The next stage is foaming. It is quite important and must be performed with special care. Before proceeding directly to the process itself, the surface of the window opening must be moistened. This technique allows for improved adhesion and a more uniform distribution of the polyurethane foam.
First they cover with foam inner surface window sill and the junction with the mounting profile. This allows you to avoid the appearance of such an unpleasant phenomenon as cold bridges.
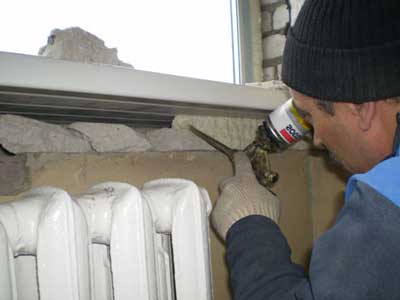
Photo 5 - Do-it-yourself PVC window sill installation
After this operation, experts recommend installing a small weight on the windowsill, which is removed after the foam has completely hardened.
Polyurethane foam is afraid of ultraviolet radiation, so it should not be exposed to sunlight. Even thin layer plaster or other material can protect it.
All that remains is to install the plug, cutting off the required length from the workpiece, lubricate it with cosmofen, and press it to the ends of the window sill. And on final stage needs to be removed protective film and fill all the joints silicone sealant, doing it very carefully.
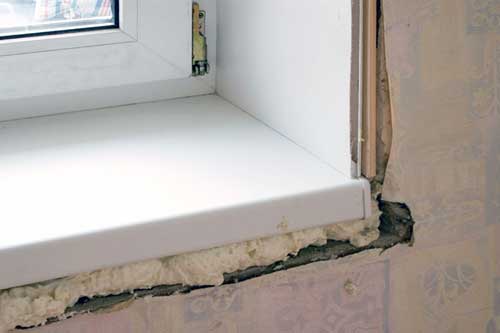
Photo 6 - DIY PVC window sill installation
From the above, it becomes clear that even those who have a minimum of knowledge and skills in this area can cope with the installation of a plastic window sill. It is only important not to allow technology violations and not to rush.
Plastic windows, which are usually carried out by professionals - the company where you ordered this window. However, installing a window sill is quite simple compared to installing the window itself, and it is quite possible to do it yourself, without special skills. We will consider installing a window sill made of plastic, since this material is quite popular - it is cheap, durable, non-corrosive and easy to clean.
So, we will need the following tools:
- jigsaw or circular saw;
- level;
- a gun for polyurethane foam and the foam itself (if you don’t have a gun, you can do without it);
- tape measure and pencil or marker;
- a hammer drill with a chisel (if you have to make holes for the window sill).
Getting started - measurements
Of course, any installation work of anything begins with careful measurements. Decide how wide your window sill will be - it depends on the thickness load-bearing walls and on how much it will protrude beyond the wall. The recommended protrusion is a maximum of 10-15 centimeters, otherwise it will simply get in the way. You need to add 2 centimeters to the total width of the window sill, since this part will be located under the window.
We add 5 centimeters on each side to the length of the window sill - this part will go into the side slopes of the window so that the cut edges of the window sill are not visible. By the way, if the slopes are already installed, you will have to break their lower part in order to insert the window sill there. If there are no slopes, you need to make grooves 5 cm deep.
Window sill installation
We measured, checked all the calculations - you can cut off the excess from the window sill, which you should have already purchased. Of course, you need to purchase it when you already know the dimensions, and you will only have to cut it in length, and certainly not in width. You can cut plastic electric jigsaw, and th - what is available on the farm.
At worst, take hand saw on metal. Before starting installation, clear the area under the window and install small wooden supports. Why is this done - the window sill should have a slight slope towards the outside, away from the window - so that moisture from watering flowers or condensation does not accumulate on it, but flows out.
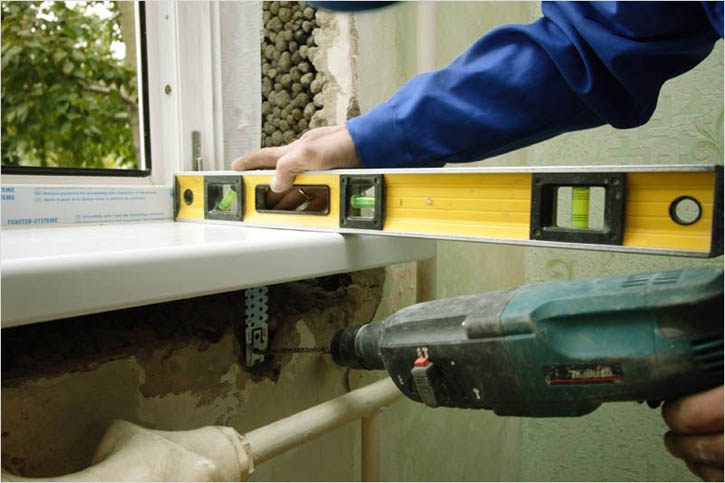
In order to set the desired slope, you need to install wooden wedges and place the window sill on them. Next, using a level, you need to level the plane along the length to prevent distortions, and set the desired slope in width by adjusting the pads. The recommended slope is 1 cm, no more is needed. By the way, there are special adjustable shims on sale, but if you didn’t buy them or didn’t find it necessary to do so, there’s no problem - you can adjust the slope simply by changing the height of the wedges, placing narrow wood chips under them, for example. Next, all this will be filled with polyurethane foam and there is no need to worry about the strength.

So, having adjusted the slope and leveled the plane of the window sill, we insert its ends into the grooves on the slopes, once again check the correctness of the position, and begin to foam. It is best to use low expansion foam to prevent the sill from lifting up. Ideal option will be used - professional polyurethane foam hardly expands, so it will be enough to place a load weighing 10-15 kg on the windowsill so that it does not lift. All voids must be filled carefully - the strength of the installation depends on this. At this point the work is almost completed, we place the load and wait 24 hours until it hardens completely. After this, you can begin installation.
As you can see, the process is quite simple and any owner can handle it. If you still have any questions, you can watch the video.
PVC windows have proven themselves well and are very popular, while their installation is mainly included in the cost of the product, which cannot be said about the window sill slab. Therefore, let’s look at how to properly install a plastic window sill yourself.
1
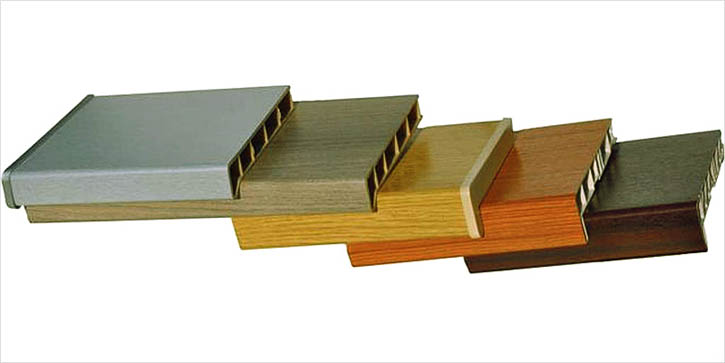
In fact, the choice of window sills is quite large. They are made from wood, natural or, as mentioned above, from plastic. So why should you give preference to the latter option? Of course, you can purchase any other, but it is PVC that will have perfect combination pricing policy and quality.
Thus, although wooden ones are considered environmentally friendly and natural, they nevertheless have quite serious disadvantages, which has led to a decrease in their popularity. For example, they are very picky about care, afraid of various chemicals and abrasive materials, and paintwork must be updated at least once every three years. Besides, they are afraid high humidity, fire, and most quality products have a very high cost. What about, their price is also not affordable for everyone. And the installation is quite complicated, so it’s very difficult to do it on your own.
Deprived of all these features modern type PVC window sills. Let's take a closer look at all their advantages, and, of course, their disadvantages. The first is ease of use. In principle, to return it to its original appearance, you just need to wash it clean water, but in case of more serious contamination, plastic is not afraid of exposure to chemicals. In addition, installation is very simple plastic window sills.
It is also impossible not to note the excellent strength characteristics of these products, their resistance to moisture, temperature changes, and fire. There is no need to worry about them turning yellow when exposed to sun rays, this won't happen. Despite the fact that white specimens are mainly in demand, you can order a PVC window sill of absolutely any color. The only inconvenience is that you will need to wait a little until this product arrives in your city. And, by the way, their price is significantly lower than that of analogues made from natural stone or expensive wood, while modern plastic is also considered environmentally friendly.

The disadvantage is the likelihood that after a few years various small cracks, creases and other defects may appear on the surface, although correct operation Similar problems arise after many years. You can still hear a theory about the dangers of plastic, however, this has not been confirmed by anything.
2
Before considering installation, it is worth making a choice, and for this you should know the entire range of such products. Products differ in the type of coating. The most common are window sill slabs covered with PVC film. They are characterized by not very good resistance to mechanical damage and thermal effects. In addition, over time they lose their appearance as they absorb dirt, dust and dyes, so they require careful care. But their main advantage is their low price.
The next type of material is laminated paper, which has excellent characteristics. This CPL coating, obtained by pressing paper sheets impregnated with melamine resins, is resistant to various mechanical influences, high temperatures, humidity, chemicals. Its only serious drawback is the impossibility of restoration.

But the option that has EPL coating can rightfully be classified as a premium class. This product not only has excellent strength characteristics (the surface is almost impossible to scratch), but it even has antistatic properties, so dust will have to be wiped off much less frequently than with its analogues. Also the window sill has the most different variants designer execution, and it is also very pleasant to the touch. It will be velvety and warm, even if the room is quite cool.
3 How to install a plastic window sill - let’s act
Having understood the types and features, you should pay attention to how to install a plastic window sill yourself.
How to install a plastic window sill - step by step diagram
Step 1: Measurements
To ensure that the work is easy and quick, and that the PVC plate fits harmoniously into the seat, you should take the measurements correctly. First, we measure the depth of the window opening, or rather, its lower part, which our window sill will subsequently decorate. To this value you should add 12–17 cm, since the element itself should protrude by about 10 centimeters, and by about 2 cm it will go under window frame. We add 10 cm to the total length, so that in the future it will go under the side slopes of 50 mm on each side.

Step 2: Surface Preparation
This stage is practically no different from others. preparatory work, so we take a brush and a vacuum cleaner in our hands and clean the surface from various debris, dirt, etc. Then we treat it with a primer and let it dry thoroughly. However, there are some individual points, for example, you should check how tightly the window itself is inserted. If there are gaps between the frame and the window opening, they should be eliminated immediately, otherwise heat loss in winter cannot be avoided.
We also pay attention to the slopes; if they are already completely done, then it is necessary to trim their lower part so that the window sill can fit there. However, keep in mind that the less you damage them, the easier it will be to restore them.
Step 3: Product Preparation
At this stage, pruning is carried out. When installing plastic window sills with your own hands, you are probably working with a product for which you also took measurements yourself. There may be a slight error in your numbers, and you will have to adjust the product to length. It is necessary that it fits freely into its seat, and its edges should not peek out from under the slopes. To solve this problem most best assistant there will be an electric jigsaw.
Step 4: Direct installation
It's time to figure out how to attach a plastic window sill, and what we need for this. In principle, nothing special: wooden wedges or special linings that can be found in any hardware store, low expansion foam and a construction gun. First, we do a fitting to adjust the height of the wedges. The fact is that you need a slight slope (no more than one centimeter) from the frame, then condensation and moisture will not flow into the junction of the window and the window sill, which could lead to the formation of fungus. We also check the level so that the slab does not have differences in length.

Then, having finally checked all the slopes, we blow out the space between it and the surface of the opening with foam. Why should it have a low expansion coefficient? Yes, everything is very simple, otherwise she will simply lift the product. Next, we place a weight on the surface, a weight of 15 kg will be quite enough, and wait until everything dries. Now you can admire the result, because the installation of the plastic window sill with your own hands is completed.
Hide
Plastic windows are a common thing in modern houses. They look organic, are easy to wipe clean and have affordable price. But recently, a wooden window sill has begun to gain popularity. plastic window. Often this procedure is carried out with your own hands, without the help of a specialist. What pushes people to make this choice?
Advantages of installing a wooden window sill
In their normal state they are not capable of harming humans. But in winter, when the heating is on, the polymer window sill heats up and can poison the room with toxins. Ventilating a room in the cold season is problematic, so a wooden window sill for a plastic window turned out to be great solution Problems.
The tree does not have toxic properties, has a pleasant structure, and looks more presentable. In addition, such products can withstand greater loads than their plastic counterparts, which are known for their fragility. All this has led to an increased demand for biologically safe materials. Nobody wants to put themselves and their family in danger.
Is it worth doing the installation yourself?
Installers are invited to replace a plastic window sill with a wooden one. But you can do the work yourself. Such an installation will not only save money, but will also serve as a symbol of your thriftiness and skill. Who doesn’t want to have a piece of personal pride with which they can impress guests and acquaintances, especially since the installation diagram is very simple.
It is also important that you can select material for installation wooden window sill themselves. In this case it will be used best wood, but not a budget option. Reliability and strength are the main qualities of a window sill. It should last a long time, so the choice of wood is key moment at work.
Which wood to choose for a window sill?
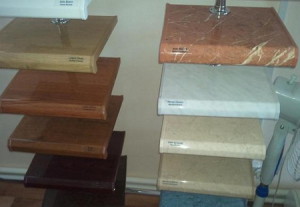
Material for wooden window sills is divided into several types:
- Budget. These include pine, larch, chestnut. These types of wood are not known for their beautiful texture and durability. If you want to install a window sill in wooden house(for example, in the country), then you can safely choose from this list. It is best to install such products where they are not too noticeable.
- Quality. These are primarily beech and oak. Elements made from these rocks boast an attractive texture, reliability and for a long time services. It is best to install them in a visible place where guests or yourself can admire them. The main disadvantage is the high price; you have to pay for quality. But such an investment will definitely pay off, because aesthetic pleasure will be provided to you.
If you choose wood yourself, inspect it for knots and cracks. The material that has been pre-varnished must be checked to see if it has any chips or scratches. The board must be dry and free of mold. It is better to find out the shortcomings of the product in advance.
Types of window sills for installation
The window sills themselves are divided into the following according to their structure::
- Wide. They are installed if something will stand on the structure, for example flowers.
- Narrow. Used to create an image and finish a window.
- Happy launch. The element goes onto the wall.
- No launch. The window sill does not fit onto the wall.
- Direct. Rectangular products of standard sizes.
- Any shape and size. These are window sills made by hand or to order. In the latter case, the price will be much higher.
DIY window sill installation
You will need tools:
- tape measure for taking measurements of products and materials
- level to determine the degree of inclination of the window sill
- square for precise cutting of workpieces
- brush for treating wood with antiseptics and anti-rotting agents
- spatula to remove excess fixing mixture
- polyurethane foam for filling voids and cracks
- cement, sand for fixing mixture
- antiseptic agents for wood (if the window sill is installed in a wooden house)
- cutting tool: saw, machine, etc.
Having decided on the type of wood and the product itself, proceed to trimming. Leave about 10-15 cm above the length of the window. The window sill should protrude 7-10 cm in width. It is advisable to sand and polish the workpiece so that it takes on an attractive appearance. 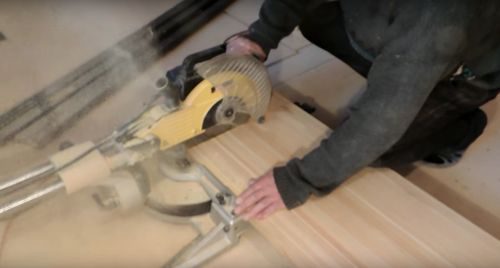
Attention: at a distance of 2-3 cm from the outer edge of the board on the bottom side you need to make a wedge - a groove for draining water. Condensation will flow down it.
The window sill can be made not only from solid material. It can be made from several parts. In this case, you will need wood glue, dowels (wooden nails) and dowels. Connect the parts of the product together using glue and dowels. The material must fit tightly together to prevent the possibility of subsequent disintegration into its component parts. Such a structural element is less reliable, but with the right approach it can be original decoration plastic window.
An important point in installing a wooden window sill with your own hands is to process the material efficiently. Any varnish for wood treatment is suitable, choose the one you like based on color and features. The coverage should be uniform and without streaks.
Window sill installation: stage 1
First you need to clean the installation site. To do this, remove all construction debris, dust and dirt. Using a level, determine the curvature of the surface, and if the result is unsatisfactory, proceed with leveling. Wedges can be used to correct minor unevenness.

If the window sill is installed on a concrete or brick surface, a fastening solution is applied to it. If you are installing a window sill in a wooden house, then it is enough to treat work surface antiseptic agents. This will prevent rotting and mold formation.
Window sill installation: stage 2
After preparing the surface, it's time to start installing the wooden window sill itself. Cement mortar is used to secure the structure. The bonding mixture is applied until the leveling wedges are hidden. If they are absent, the amount of cement is adjusted at your discretion.
After applying the solution, a wooden window sill is placed on top. When pressing part cement mixture may come out, remove excess with a spatula. An important point is to install this element level, it would be ideal to use a laser.

Advice: check the slope of the window sill with a level before the cement hardens. Adjust or remove it if necessary. To make the window sill more secure, you can use self-tapping screws. This method will work only for those who are going to install a window sill in a wooden house. WITH outside The frames need to be screwed in so that they extend into the installed product by 4-6 cm.
Window sill installation: completion
After the solution has dried, cosmetic operations are performed. All remaining cracks and holes must be filled with polyurethane foam and its excess must be trimmed after hardening. Remove drops of solution and stains from the window sill itself. Installing a wooden window sill with your own hands can be considered complete.
Features of installing a window sill in a wooden house
Installing a window sill in a wooden house has its own characteristics. If you decide to do the installation yourself, then you will need these tips.
- The working surface should not have traces of mold, deep cracks, or diaper rash. If any are present, it is better to replace the base of the window sill. Otherwise, it may not withstand the increased load and fail. Typically, such problems arise if the installation is carried out in an old house.
- When securing a structural element with self-tapping screws, it is better to use washers so that the screws do not fall through. This is important to consider, especially if you are not a master and install it yourself. In the absence of washers, the self-tapping screws will spontaneously screw into the wood over time, weakening the support.
- It is advisable to install a window sill in a wooden house on windows where there is already pigtail. This will avoid temporary deformation of the window opening, and with it the window sill.
How to trim a window?
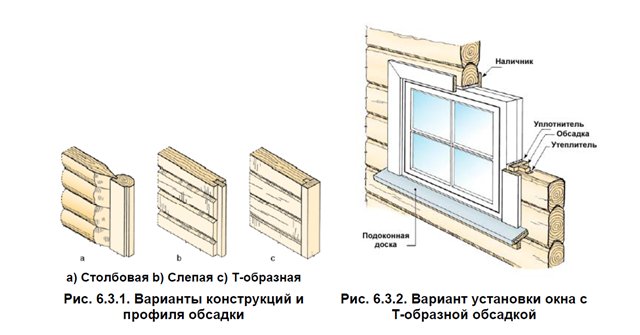
House trimming is carried out to prevent significant shrinkage wooden windows. First you need to choose the type of pigtail, which will determine the complexity of the work:
- into the embedded block (the prefabricated structure is attached to a block embedded inside the opening). Simple and effective, accessible to beginners.
- tenon-monolith - a casing with a tenon is installed in a groove cut in the opening.
- deck - the groove is located on the structure, the tenon - in the opening of a wooden house.
If you carry out this type of work yourself, you must strictly follow the technology. Neglect of details and a superficial approach will lead to the fact that the frame will not be able to contain the natural deformation of the wood and will make it impossible to install wooden window sills.
After selecting the type of frame, the opening is prepared, the structure is manufactured and the casing is installed inside the opening. Almost all types of sockets involve fastening with spikes and ridges, but it would not be a bad idea to use self-tapping screws.
Now you can install the window itself. Do not forget to take into account that the dimensions of the frame must be consistent with the casing structure, which takes up little space in the opening. Installing a window sill in a log house or wooden house on top of a frame is much easier, because you do not have to first level the surface. In addition, it is always nice to do it yourself, because you will realize all your wishes and receive moral satisfaction from the work done.


