A chick brooder is a box in which favorable conditions for raising young animals. The peculiarity of these structures is that they are equipped with a microclimate control system, which allows you to change the conditions of detention: temperature, lighting, humidity.


Purpose and types
People begin to think about building or purchasing a brooder when there are no hens taking care of their offspring. Many farmers do not breed purebred birds, but crosses, the representatives of which lack maternal instinct.
More often these are meat birds. For such crosses there are summer and winter options.

Therefore, to produce offspring, you need a brooder for broilers, which differs from the one intended for chickens only in name. Thanks to the special design and equipment, in any device it is possible to create the conditions that are optimal for a given breed or cross.
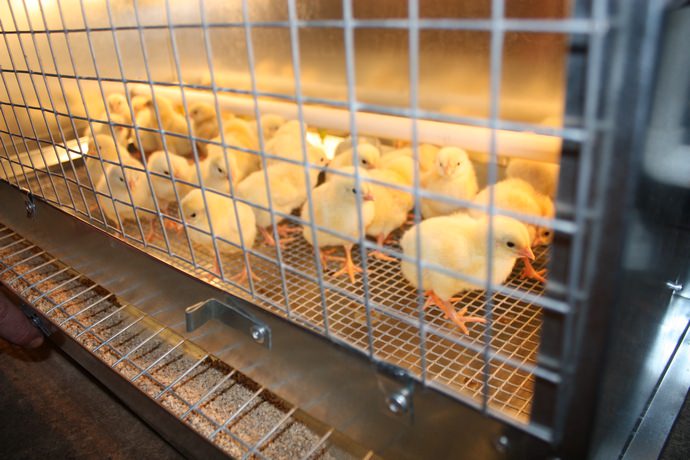
Chickens are kept in these houses for no more than a month. In one room measuring 100x50x50 cm you can keep no more than 35 chicks aged from 0 to 30 days.
Grown-up babies are seated in two brooders.
Cages for raising young animals vary in size and materials. The simplest structures are made from cardboard boxes.
Purchased brooders are more convenient to use, but not every novice poultry farmer has the funds to purchase them.
Device
All structures for raising young animals, both purchased and homemade, must consist of the following elements:
- Walls, floor and roof;
- Lamp for lighting and heating;
- Feeder;
- Drinking bowl;
- Openings for air exchange;
- Tray for collecting litter;
- Door.
An important element of equipment for a brooder is a thermostat. Universal devices for this purpose are equipped with sockets and temperature sensors. Can work in conjunction with cooling devices. You can buy an analog or digital thermostat.
Installation of equipment for microclimate control is simple: plug the device into an outlet and set the required temperature on the panel. Automation will monitor its maintenance. If necessary, the cooler or heater will start operating. The range of adjustable temperature in the brooder is from +16°C to +40°C.

How to build a brooder with your own hands
At the stage of designing and creating a drawing of the future house for raising chickens, its dimensions are determined. You can make a long brooder consisting of several rooms connected by holes with doors.
But a small house is enough for a novice poultry farmer. You can take the dimensions of the factory brooder model you like best as a guide.
Selecting wall material
For reusable structures, you need to choose wear-resistant and easy-to-clean materials. It is important that they do not absorb water and odors, do not change their properties under the influence of heat and light, and do not emit toxic substances when heated.
These requirements meet:
- Moisture-resistant plywood (it is recommended to use sheets 25 mm thick for constructing a brooder);
As connecting elements you can take bars with a cross section of 30x30 mm. All wooden materials covered with special antiseptic solutions.
To make the walls of the chicken room easier to clean, internal surfaces can be pasted over or upholstered with thin linoleum or polycarbonate.

Choosing flooring material
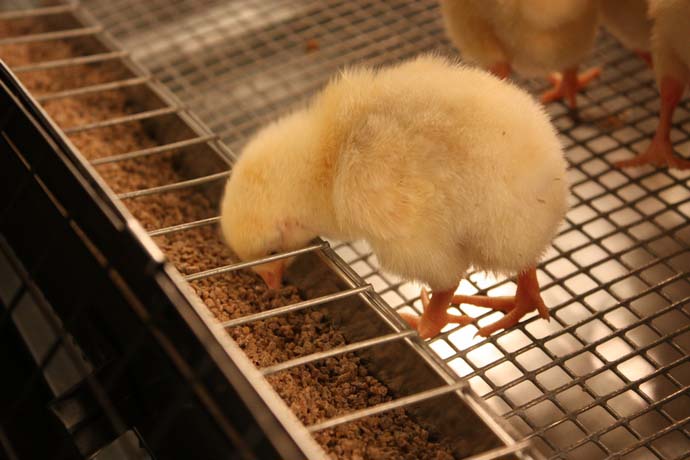
For the floor you will need a galvanized mesh with a mesh size of 10x10 mm or 12x12 mm. It is convenient for chickens to move on such a surface, and droppings and leftover food will fall down. This ensures cleanliness and reduces the risk of disease in young animals.
Those who are already quite experienced in keeping chickens are sure that the galvanized mesh proposed above is not the best choice for floor installation. For reasons:
- Due to the small cross-section, droppings often get stuck in the cells, which dry out and accumulate.
- It is difficult to remove it from metal rods and you have to use scrapers.
- The chickens will certainly begin to peck their droppings.
In this regard, experienced poultry farmers advise installing a floor made of mesh with a mesh size of 10x20 mm or 12x20 mm.
The rod should have a cross-section of 1.5 or 2 mm. Chickens move on this mesh without difficulty, and droppings easily fall through the holes.
Selecting pallet material
It is advisable to make the pallet from galvanized steel. To do this, all 4 sides of the metal sheet are cut and bent upward, forming the sides. You don’t have to weld the corners, but fill the gaps with a moisture-resistant sealant.
Suitable for tray and plastic devices. If necessary, you can simply place a piece of PVC panel under the mesh floor (used for wall cladding).

Ventilation
For chickens, an influx of fresh air and the absence of dampness are important. Therefore, high-quality ventilation is necessary in the house. It can be arranged on the principle of natural air draft, ensured by the presence of two holes in the walls of the room.
- One should be located at a distance of 5-10 cm from the floor.
- The second is on the opposite wall and at a distance of 5-10 cm from the ceiling (roof of the brooder).
- The cross-section of the holes is 30-50 mm.
Device forced ventilation relevant for large houses. To do this, you will need a fan, which is installed under the cover.
Lighting and heating
Infrared lamps are used as a heating element. To control the temperature, a thermostat is installed.
- For a standard size brooder (100/50/50 mm) a 250 W lamp is required. It is placed on one of the walls, in its upper part.
IN small space such a powerful lamp will get very hot and needs a heat-resistant socket.
- To control daylight hours, you will need a switch, which is installed on outside the wall on which the lamp is located.
How to make a door
The brooder door can be hinged or sliding. It is easier to make the first one, but it requires devices to hold it open. This could be a hook or latch.
The door can open in any direction: top-to-bottom or left-to-right and vice versa. This structural element must be made of durable material: metal, wood, plastic. But it's easier to do wooden frame and cover it with polycarbonate.

Installation
Equipment installation algorithm:
- Frame structure. The brooder must be located at a certain distance from the floor surface, so the structure requires legs 5-7 cm high. And also to install the frame, you will need 4 wooden blocks, the length of which exceeds the planned height of the house by 5-7 cm. The frame elements are connected to each other using metal corners and wood screws.
- Wall cladding. Parts corresponding to the dimensions of all walls are cut out of plywood sheets. The sides and back are attached to the frame using self-tapping screws.
- Floor installation. Using metal scissors, cut out a metal mesh sheet of the required size and attach it to the frame.
- Threshold installation. From wooden block a threshold is made, which is attached from the front side of the structure to the bottom of the frame.
- Door device. A sheet for the front wall is cut out of a sheet of plywood, taking into account the height of the threshold. They cut out an opening for the door. Install the hinges. A door is made and the corresponding parts of the hinges are attached. Equip the door with a latch or hook.
- Installation of lamp and switch. WITH inside the cells are mounted with a socket and a lamp, and on the outside - a switch. It is recommended to install a mirror reflector on the lamp, which will allow the space underneath to be heated more intensely. If the chicks are cold, they will gather under the lamp. If they feel hot, they will find a cooler place.
- Installation of thermostatic equipment.
- Making a pallet.
- Installing the front wall.
- Installation of feeder and drinker.
If desired and necessary, you can make several similar structures and build a battery out of them. It is most convenient for keeping chicks of different ages.
How does a metal brooder for 50-70 chickens work?
To create a brooder for chickens with your own hands, you need to study the design of popular models offered by manufacturers.
Most popular models are made from galvanized sheet steel. The choice of this material is not accidental: the metal does not rot and has an easy-to-clean surface. The litter collection tray is also made of galvanized steel.
Installed:
- Thermostat;
- Automatic drinking bowl, adjustable in height;
- Metal, easy to clean automatic feeder;
- Lamp.
The floor is made of galvanized mesh with a mesh size of 12x12 mm. Design dimensions (L/W/H): 750x450x450 mm.
It's easy to buy everything necessary materials for making your own chicken house. Temperature control equipment is a mandatory attribute of these structures. Low-power devices for small rooms inexpensive and able to maintain the desired temperature.
The word brooder is unusual for the ear of an uninitiated person. Having heard it, our brain begins to draw different pictures, trying to guess its meaning for ourselves.
Knowledgeable people they'll say it's just a chicken box or turkey box. That is, the place where they grow. The box should be heated, since the chicks should spend the first time only in it.
 In natural natural conditions the chicken raises and warms its chicks. But in modern conditions chickens became unable to look after their offspring. Therefore, when breeding poultry in industrial scale or for your own needs, you should get ahead of the problem and create an incubator. The incubator is the first stage in the life of chickens; then their life proceeds in the brooder, where they are fed, maintained at a constant temperature, necessary care. This device is used by all poultry farmers to maintain numbers and grow required amount adult birds.
If at poultry farms chicken corners are made to order or bought at enterprises, then at our own personal plot you can build a brooder with your own hands.
Requirements for brooders
The younger generation of chickens need more than just a place to sleep and food. There is a whole list of essentials, including:
- a house for a certain number of heads;
- bedding such as ottomans where the chicks sleep;
- a place for walking, fenced with a net (cage);
- small carrying cages;
- specially designed food and drink utensils;
- a bedding of hay, where the chick can sharpen its claws and simply rummage;
- heating and ventilation equipment.
The bulk of the necessary things are purchased. With the rest, you need to decide: make them yourself or buy ready-made ones. Based on this, some requirements apply to the houses:

After a couple of months, broilers will no longer need a brooder. Until that time, they should have their own insulated, heated and ventilated corner.
What kind of brooders can be?
Since we are talking about raising chickens on our own, it is possible various options. Summer residents, for example, start raising chickens in the spring when it’s cool outside. That's why they create the simplest houses in apartments. One of them is regular cardboard box. For two dozen chickens, the box should be like washing machine or refrigerator.
Ordinary light bulbs in a three-liter glass jar or a photo lamp with a reflector are used as heaters.
Ventilation is also the simplest - a box that is not tightly closed with a lid will provide sufficient air flow.
 You can also do plywood box and, if the room allows, place it in the bathroom. What’s good about such a house is that the bathroom has a constant temperature, and if there are heated floors, then even better. Plus, such a room must have separate ventilation.
Brooders with built-in heating and ventilation mechanisms are available for sale. But here, depending on the bells and whistles, the price immediately increases.
Under no circumstances should you take it two-story houses . They look good to everyone, but are suitable for solitary birds, such as quails. Chickens with the herd instinct, when released into the same cage, will treat each other as strangers.
So it turns out that there is not enough space in the apartment; store-bought ones are not always convenient and expensive. There remains one possibility - to make a brooder for chickens right away in your country house and equip it as expected and on required quantity chicks.


Do-it-yourself brooders for raising chickens
When starting work on building a bird house, you should prepare the right tool. The tools are the same as for any construction: hammer, screwdrivers (Phillips and flathead), tape measure and pencil, pliers and hacksaw.
The next step will be selection of materials for construction. You decide for yourself what to build a poultry house from, but some tips still won’t hurt:

Now let’s look at two ways to make a brooder for chickens with your own hands. In the first case, it will be a box measuring up to one and a half meters, the height and width of which will be half a meter each. We select the simplest materials.
- We draw drawings of a brooder for chickens with exact dimensions on paper. You can compose them yourself. Those who do not know how to draw can always find them on the Internet.
- The box is made of moisture-resistant plywood 10 mm thick. Three strips 1.5 m long and 0.5 m wide are cut out of plywood. These will be the upper and lower parts, as well as back wall. Next we will need two side walls size 0.5 x 0.5 m.
- There is a dung tray at the bottom of the structure. We make a double pallet. These will be two frames made of slats. One of them has a plastic bottom, and the second has a stretched mesh. Such frames are installed one above the other under the floor. As the chicks grow, the mesh floor is replaced with something similar only with larger cells and stronger.
- The doors at the front of the drawer are attached to a frame made around the perimeter of the drawer. The door frame is covered with mesh.
- An infrared lamp is attached to the ceiling inside. Such a lamp provides heating for the chickens and illuminates the inside of the house. If you don’t have one, two 60-watt ones will do.
The second method of producing a house is somewhat different from the first. We keep the same parameters.
- According to the drawing, we make a frame from bars. We place jumpers in the middle between the long bars.
- We cover the frame with plywood on all sides except the front and top. We screw the plywood to the bars. We staple the mesh in front with a stapler.
- We cut out four legs of the same length from the bars. The legs are attached to the assembled house.
- A door is made at the top and attached to the brooder on hinges. There can be either one or two doors. The doors are secured with a latch.
- The pallet is exactly the same as the first house.
- In this case, the heating lamp is attached to the inside of the sidewall. The power is set experimentally until the desired value is achieved. temperature regime.
Brooder for turkey poults
The principle of making a brooder for raising turkey chicks is similar to that described above, although there are some differences. The size directly depends on the number of chicks. Just like with broilers: the more heads, the larger the structure should be. There should not be more than 25 chicks per square meter.

To prevent any turkey from getting sick, the inside of the box regularly disinfected and litter changed.
- Disinfection is carried out with a manganese solution.
- The temperature during cultivation is maintained at 27 degrees Celsius.
- The conditions for keeping a turkey poult are similar to those for chickens: dampness, dirt, and drafts are not allowed.
- Lighting must be constant. The same lamp can provide both heat and light.
Advice: when making a brooder, try to use only new materials, since making it from old boards can bring an infection into the chicks’ house.
Attention, TODAY only!

The first drawing (top view) shows that the width of the brooder is 60 cm and the length is one and a half meters. On the sides, feeders designed to be 140 mm wide extend beyond the structure. A nipple drinking cup runs across the entire length of the brooder: along the edges of the drinking cup there are clamps by which it is held.
The second drawing is a rear view. Here you can see the ventilation gap running along the top. interior space.
The next drawing is a front view. The height of the brooder itself (both tiers) in accordance with the drawing is 180 cm, 13 cm is the height of each garbage tray. There is a viewing window at the front.
For some breeds it is the only method of breeding.
What diseases cause geese to fall on their feet and how to determine the disease? You can learn more about this by reading.
Is it profitable to organize duck farm and how much can you earn from this? Detailed calculations are available.
Manufacturing instructions
First option
The most common version of a brooder, one and a half meters long, is done like this: 
- The bars for the frame are being sawn. 6 142 cm long, 6 44 cm long, 4 vertical legs 60 cm each.
- All the bars are knocked together into a frame. The lower horizontal level of the bars should be located at floor level, the second horizontal level should be at a distance of about 15 cm from the lower bars (the distance remains for the installation of the tray).
- The mesh is attached to the second level of bars with self-tapping screws. If in some place it becomes necessary to join 2 pieces of mesh, another supporting bar is installed below in this place so that it does not sag under the chickens. Wire strings can be placed under the mesh at a distance of every 50 cm for support.
- We cut out the bottom, ceiling and side walls from plywood or OSB board.
- We fasten the ceiling to the frame with self-tapping screws.
- The bottom can be made in two layers. The first plane is made of polycarbonate. Polycarbonate is very comfortable material, easy to cut, conveniently attached and quickly wiped clean if debris spills from the tray. Polycarbonate must be mounted on top of the bars in such a way that it is stretched as much as possible. If the polycarbonate bottom will go like a wave, it may be difficult to pull out the tray. You can replace polycarbonate with plastic panels.
- We fill the bottom of the bars under the polycarbonate with plywood or OSB boards(you can even make walls plastic panel– they will be more convenient to wipe) just like the ceiling.
- The back and side walls are sutured.
- We make a door from bars and completely sew it up with mesh. The mesh must be attached to the outside of the door.
- The front side of the brooder can be sewn up with any available material: either plywood, or plastic, or the same mesh as the door.
- We hang the door on vertical bars made of bars on hinges and attach a handle to it.
- We make a tray for manure removal.
- We connect the heaters and lights.
Equipment
This completes the production of the brooder box. All that remains is to equip the room with lighting and a system. It is necessary to select the power of the lamps in accordance with the size of the brooder and its location: outdoors or indoors. In the finished brooder you need to install a thermometer, a feeder and a drinker. For newborn chicks, the bottom of the brooder should be covered with newspaper in the first days.
For one-day-old babies, a temperature of 29–30 degrees is required. After a week, it is recommended to reduce it to 26, and month-old young animals feel great already at 18. For broiler chickens, the temperature should be 2-3 degrees higher.Excessive heating for chicks is unacceptable, therefore useful device there will be an automatic thermostat. Heating is usually carried out by one or two ceramic infrared lamps. If they are missing, they can be replaced with ordinary incandescent lamps. Don't forget to attach a reflector on top to prevent heat from dissipating to the sides.
 In the first 2 weeks of life, chickens need 24/7 light mode. Then the duration of daylight hours is gradually reduced to 14–17 hours for broilers and to 8 for laying hens. If there is not enough light, the young animals will develop more slowly, if there is too much light - . To illuminate a brooder with the specified standard sizes, one 60 W incandescent lamp or its energy-saving equivalent is sufficient. During cool periods, you can close the mesh door from the outside plywood sheet.
Feeders are placed in regular or bunker type, to pull them out you will have to cut an additional slot in the wall. The advantage of such feeders is the ability not to disturb the chicks while feeding. To water chicks, it is better to buy drinking bowls with a sensitive nipple and a drip eliminator. In an ordinary plate or container, chicks can drown.
Nipple drinkers with drip eliminators will also help to keep indoors optimal level humidity. Chickens need air humidity of 60-70%. To prevent it from increasing, you need to pour out the water from the drip catchers in a timely manner, remove droppings, and the remains of wet food. The room must be ventilated.
Brooder from the drawing
To make a long-lasting brooder, you can make metal carcass from an equal angle corner measuring 25x25x4 mm, welded together. Make the floor from frames and mesh with a cell size of 10x10 mm. The mesh can be secured between the frames with a screw connection. Cut and bend the pallet from stainless steel sheet. Cut the walls from 10 mm moisture-resistant plywood and cover the frame with metal screws. IR lamps are mounted on the top wall, the thermostat is on the front. A polycarbonate viewing window needs to be embedded into the front wall. Feeders and drinkers are placed inside the cage or hung on the side walls.
The process of raising a brood of quails and day-old chicks, as well as broilers and turkey poults, involves creating comfortable conditions and high-quality heating. A brooder is used for these purposes. It is not too difficult to draw up a diagram and make such a design with your own hands, but it is best to use ready-made drawings.
In the first days after hatching, chicks experience increased stress and susceptibility to disease increases, which is why so-called “nurseries” are constructed.
As a result, there is an increase in mortality and a reduction in the uniformity of growth of young animals. To provide optimal conditions maintenance, a brooder is used, the design of which may vary slightly, but is most often represented by the following components:
- drinking bowl;
- feeder;
- maintenance equipment optimal temperature and humidity;
- lighting;
- ventilation;
- litter

It is very important that the brooder not only has a comfortable temperature, but also maintains optimal planting density. Only ideal starting conditions allow you to grow healthy and large bird with high productivity levels.
Recently, point brooders have been increasingly used in home poultry farming. In this case, the poultry houses must be preheated. The use of this design allows the use of special brooder fences that help control the movement of chicks. The technology requires strict adherence to temperature conditions, which will reduce the risk of overheating of young animals. As chicks grow and develop, the diameter of the spot brooder zone gradually increases. After a couple of weeks, the brooder can be removed from the house and the young birds can be moved into cages.
How to make a brooder for chickens (video)
How to make a brooder for raising chickens with your own hands
The type of structure and its dimensions can vary significantly depending on the type of poultry being raised, as well as its quantity. The floor should not be slippery or wet, and a tray should be placed under it. A prerequisite is the presence high-quality ventilation in the absence of drafts. The source of heating is most often a closed fluorescent lamp.
Select an option
Exist different variants brooders, which minimize the percentage of waste and provide chickens with full growth and development in the first days of life. The most budget option is a fenced part of the utility room and a lamp installed for heating.
The dimensions for 100 chickens are 200 x 100 cm with a height of 50 cm. This type of brooder, such as boxes and crates, does not always have a positive effect on the health of the young, so special designs are most often made.

Dimensions and drawings
It is very difficult to achieve comfortable conditions in cardboard boxes and ordinary boxes. Small chickens are extremely susceptible to any changes in external factors, including temperature fluctuations, changes in humidity, insufficient lighting or drafts, so building a simple structure with your own hands is very important.
A width of 60 cm, a length of a meter and a height of 45-50 cm is very convenient for keeping young animals. This area allows you to place sixty chickens, or a hundred quails, or forty ducklings. Depending on the scale of breeding, as well as the breed and species characteristics of the bird, different drawings can be used, as well as the most convenient sizes and brooder designs.
Tools and materials
Before you start self-production"house", you will need to prepare a high-quality and durable material, as well as all the tools necessary to perform the work.

Material:
- sheet plywood - two sheets measuring 1.5 x 1.5 m;
- metal corners;
- steel mesh with cells 10 x 10 mm;
- wooden slats – 50 x 15 mm;
- fasteners – galvanized self-tapping screws;
- door hinges- four pieces;
- lamp socket, 60 W electric lamp, plug and cable;
- feeders and ready-made drinkers.
Tool:
- wood saw or jigsaw;
- construction tape and level;
- hammer;
- drill;
- screwdriver or screwdriver;
- pliers and wire cutters;
- marker.
Depending on the design features, the number and type of tool may vary.
Brooder drawings for chickens (video)
Manufacturing stages
- to create a frame you need to cut the plywood sheet in half;
- one of the resulting halves is sawn in half again, which will allow you to get a pair of plywood squares, measuring 75 x 75 cm, to create side walls;
- the three remaining plywood pieces measuring 150 x 75 cm will be used to create the upper and lower parts of the structure, as well as the back wall;
- the frame is assembled using galvanized screws and metal corners;
- fasteners are inserted into pre-drilled holes;
- For the manufacture of the floor, a fine-mesh mesh and a frame made of wooden slats;
- the doors are made similarly to a mesh floor and are hung at the front of the frame.
The final stage is screwing guides made from slats onto the side walls and then installing the mesh floor. You need to install a metal tray under the mesh, which can be covered with paper or covered with small wood shavings.

Heating to maintain temperature
Ensuring a comfortable temperature regime inside the brooder is prerequisite raising chickens at home. For each square meter area should account for 0.28 kW of heating. You can evaluate the quality of heating by observing the behavior of the chickens.
At comfortable temperature The bird is actively eating and drinking. If the birds become too cold, they gather in large groups. Fever inside the “house” it causes difficulty breathing in the chickens and is accompanied by a large loss of poultry. Relative humidity plays a very important role important in ensuring thermoregulation, and during the first three days it should be 60-70%. During the first three days requires lighting for 23 hours a day.
What you need to consider when making a brooder for turkeys and quails
The standard dimensions of the structure for keeping and raising turkey poults should be slightly increased, but it is permissible to use a brooder for chickens, slightly reducing the stocking density. The size of the mesh floor cells depends on the duration of keeping the quails:
- when grown up to the age of two weeks and subsequent transplantation, the cells of the mesh floor should be 10 x 10 mm;
- when keeping quail chicks for a month, the cell size is 25 x 15 mm.
Poults can be kept in brooders with a larger mesh floor. The height of the structure also needs to be increased. The period of keeping young animals in nursery cages exceeds two to three weeks, after which the birds need to be transplanted into adult cages or transferred to free housing.
Criteria for selecting a finished structure
Today there is a fairly good selection of ready-made brooders, and their purchase allows you to solve the issue of placing chicks in the maximum possible short time. When choosing, you need to pay attention to the following quality criteria:
- assess the size of the structure, especially if you plan to keep fast-growing broilers or large turkey poults, ducklings and goslings;
- the best option is the presence of a so-called “two-tier” floor with a non-slip surface and a retractable metal tray;
- it is advisable to give preference to brooders equipped with an automatic drinker and a high-quality feeder;
- ventilation and heating must be at the proper level, and some modern models have built-in air conditioning and heating systems.
The average capacity of standard brooders is 50-80 day-old chicks. The simplest and most cost-effective option is a collapsible option with no automation or with a power-adjustable lamp.
A “dual-use” design is considered more convenient, the equipment of which includes a pair of feeders, a pair of drinkers, a plastic tray and lighting device with power regulator. Gender presented plastic mesh with 5x5 mm cells, which helps prevent paw injuries. It is best if a special ceramic heater is used for heating, which does not irritate the bird and warms well without drying out the air. High-quality brooders are made from environmentally friendly materials tested by veterinary control.
How to assemble a brooder for chickens (video)
Homestead poultry farming is simply impossible without the availability of high-quality and modern equipment, which also includes brooders. The cost of a ready-made, convenient and optimally adapted design for raising chicks is very high, so in this case it is recommended to make a brooder yourself, with minimal costs time and money.
It is impossible for farmers involved in poultry breeding to do without such a device as a brooder. This is where the chicks are placed in their first days of life to be raised. What is better: making it yourself or purchasing a ready-made one? Poultry experts do not advise incurring such expenses. Creating a design with your own hands will not be difficult. At the same time, the costs are minimal, and the survival rate of chickens is no less than in factory cages.
General requirements for a brooder
If the farm has a small number of poultry, then brood hens independently cope with the responsibilities of raising chickens. But if there are a lot of individuals, or the owner hatches them using an incubator, a brooder will definitely be required. It’s not difficult to make it at home; it’s important to know the basic requirements for the device:
- 1. Optimal temperature and humidity are the main parameters for keeping birds. It is imperative to provide for the possibility of constant monitoring and regulation of these indicators.
- 2. The floor is clean, non-slip, dry. To do this, a mesh is placed on the bottom, and a dung tray under it.
- 3. Certain parameters. One chick is allocated at least 0.1 m² of “personal” space if it is a future chicken and 0.5 m² for broilers and turkey poults.
- 4. Ventilation. In the cold season, when the bird is kept indoors, it is forced to be housed. IN summer period the cage with the chickens should be kept on fresh air. But you need to make sure there are no drafts.
- 5. Safety and reliability. All parts of the structure are polished, heating lamps are removed to a safe distance, etc.
- 6. Feeders and drinkers. The cage must provide extra bed for placing feeders and drinkers according to the number of chicks.
One brooder should have two temperature zones - if the chick overheats next to the lamp, it can cool down in another part of the cage.
Preparation for manufacturing the structure
Placing small chicks in boxes or crates is considered inappropriate. They are short-lived, and it is simply impossible to carry out cleaning and high-quality disinfection in a packaging box. Maintaining temperature and maintaining humidity is also a problem. And even wooden boxes do not protect against drafts.
Making a high-quality brooder with your own hands is not difficult, even for a person not familiar with carpentry.
Tools and materials
A good brooder is designed to last for many years, so the materials chosen are wear-resistant, durable, and do not change their properties either under the influence of temperatures or high humidity. Plywood or thin board (up to 2.5 cm) is suitable, fiberboard/chipboard - for the walls. Beam 3 x 3 cm - on the frame. The strength, durability and wear resistance of chipboard and fiberboard are much lower than that of high-quality plywood sheets.
The table will help you accurately navigate the materials:
| No. | Material | Application | Note |
| 1 | Several slats and wooden blocks | Cage base, frame, floor frame | Bar thickness 3 x 30 cm |
| 2 | plywood sheet | Ceiling, bottom under the mesh, walls | Thickness up to 2.5 cm |
| 3 | Fine mesh metal mesh, pallet | Suitable for both doors and floors. Through it, garbage, excess feed, and droppings will spill into the tray. | The metal is galvanized or painted. Cells 1 x 1 cm |
| 4 | Plastic mesh | Only for doors | Cells 1 x 1 cm |
| 5 | Infrared or simple incandescent lamp | For heating and lighting the brooder. Install on one side, the other side should be a little cooler | Power is about 60 W. Additionally required: cable, reflector, socket, plug |
| 6 | Automatic dimmer (thermostat), thermometer | For control and regulation of light and temperatures | Automatic dimmers are expensive and unprofitable for homemade brooders |
| 7 | Fasteners | Self-tapping screws are applicable if the structure will be disassembled for the winter. Nails are used to fasten a non-demountable structure. Using staples and a stapler, attach the mesh to the wooden frame | |
| 8 | Slate | To create a canopy or roof when chickens are outside | |
| 9 | Oilcloth | They line the pallet with it | |
| 10 | Metal corners and additional fittings | The corners securely fasten the structure. Additionally: door hinges, latch for locking the cage | Do not cover the brooder with a “stick” or a block with a nail. A simple store latch is suitable for many years of use. |
To build a brooder you will need tools that anyone can have. home handyman. An additional advantage will be the presence of email. jigsaw and metal scissors.
Making a brooder for chickens
When constructing any product, the first step is the production of a drawing with exact dimensions to scale. An additional drawing indicates the location of lighting and heating equipment.

The usual dimensions of a cage for keeping chickens are 1 x 0.5 x 0.5 m. The brooder is suitable for raising up to 70 birds for a period of 60 days. The room is conditionally (without partitions) divided into space for heating and food. Nipple-type drinkers and feeders will also fit here.
First option
There are two options for making a brooder - in the form of a box and on a frame base. Based on them, you can make your own: two-tier, with glass instead of a mesh on the door, etc.
Step-by-step instruction making a brooder in the form of a box:
| Step | Sequencing |
| 1 | Saw plywood into a rectangle with dimensions 0.5 x 1.5 m |
| 2 | From the remaining part, 3 parts with dimensions of 1 x 0.5 m are sawn off - this is the top, back wall and tray |
| 3 | Partitions 0.5 x 0.5 m are cut out. Everything is fastened in the form of a box using corners |
| 4 | A frame for the brooder is constructed from slats. Dimensions 98 x 49 cm. A sheet of pallet is placed under the bottom of the frame and adjusted to fit required parameters, the pallet is covered with oilcloth |
| 5 | The slats that support the bottom of the cage are attached to the side partitions. A galvanized metal mesh is laid on top of the bottom. |
| 6 | Two doors measuring 41 x 31 cm are made. They are knocked down from slats, between which a mesh is attached. It is secured from the inside. They hang the doors on their hinges and nail the latch. |
| 7 | Drill a hole in the ceiling plywood and stretch the cable; attach a lamp socket to it on one side (indoors), and a plug and dimmer on the other. Nailing the thermometer |
| 8 | Insert the lamp into the socket and install optional equipment: feeders/drinkers, reflector for lamp |
Second option
Step-by-step instructions for making a frame-based brooder:
How to build your own feeders and drinkers
The ideal version of the feeder is a bunker. This will allow you to add millet once a day. The design is easy to do with your own hands or purchase a factory version. Secure it in two steps:
- a hole of appropriate size is cut out in the front wall using metal scissors;
- the feeder is secured with sliding metal plates.

Experts do not recommend using vacuum drinkers in a brooder. They need to be cleaned regularly as there is an increased risk of spreading infection. If you just install plates, small chickens falling into them will simply drown. Nipple devices with drip catcher - more practical and convenient option. Water will not spill on the floor, causing excessive dampness and infection.

Correct Temperature for Raising Chicks
The brooder is designed for raising chickens from birth to 60 days. During this period, they need warmth, their further health, development and growth depend on this. In addition to a conventional incandescent lamp, a heating element is used. infrared lamp and film. The latter is carefully glued to one of the side walls of the room. In the first three days a heating element works almost continuously, switches off only for 1 hour.
Subsequently, the birds are heated at the rate of 0.28 kW per 1 m² at a humidity of 60-70%. The main indicator of proper heating is the behavior of the chicks. If they are cold, they gather in a tight flock; if it is hot, they suffocate and die.

Brooder temperature by chick age
Polycarbonate brooder
IN last years A material such as polycarbonate has gained popularity - transparent, durable, easy to work with, lightweight, and cost-effective. It has the only drawback– does not allow air to pass through. Therefore, you will have to build a ventilation system or make one or two walls mesh.
There are many more advantages:
- strength;
- even a beginner can work with it;
- easy to clean, subject to any type of disinfection;
- durable, it will raise more than one generation of chicks.
You can make the entire box out of polycarbonate, but experts advise using this material for the floor and as a transparent front wall. In this case, you can easily observe the chicks without disturbing them, and clean and disinfect with ease.
How to maintain a chicken room?
Building a brooder for raising chickens is not so difficult; it will be more difficult to learn how to raise healthy and strong individuals in it. To do this, it is important not to forget to follow certain rules for caring for the cell and its inhabitants:
- 1. Feed is added once a day.
- 2. When installing a nipple drinker, water is added as needed; in other cases, it is changed several times a day.
- 3. Temperature and lighting are adjusted according to the age table.
- 4. Cleaning is carried out regularly, no more than once every 5 days, but it all depends on the number of chickens.
- 5. It is important to constantly check that the floor in the brooder is dry; there should be no accumulation of droppings or splashed water.
Brooder – simplest design, requiring no carpentry or construction skills. Making it, if all the materials are available, will take only a few hours. The result is a warm, functional and durable home for more than one generation of chickens.


