A frame doll is an original toy that will be an ideal addition to a private collection or room decoration. The cost of such toys is quite high; some copies are even made to order. You can make a doll yourself, showing skills in needlework, imagination in creating an image, and enjoying the process. At the same time, the family budget is saved.
Making the “skeleton” of a toy
A frame doll is a toy whose base is made of flexible material. Wire is often used for these purposes, as it is strong, bends well, is easily deformed, and takes the required shape.
Experienced craftsmen use not just any wire, but a certain type in their work. It is convenient to work with copper, aluminum and steel. Often, material with a diameter of 4 millimeters is selected. This parameter can increase depending on the need for rigidity of the frame and the size of the doll.
To strengthen the overall frame, several wires are sometimes intertwined with each other. In order not to overload the “skeleton” with wire, it is worth strengthening only the most functional areas with several bindings: legs, arms, the torso itself.
Having decided on the dimensions, you should cut two identical pieces of wire from which the legs, torso and head will be formed. Having measured the length of the legs, you can begin to twist the workpieces. The place of twisting is the torso. Having reached the hand position section, you need to take the third piece of wire and intertwine it with the workpiece. After completing the skeleton for the arms, you should continue to form the neck and head in the form of a loop from the main strips of wire.
There are other techniques for forming a wire frame. Each master selects the option that is easiest to work with. Experienced craftsmen make the torso mobile and flexible, connecting all parts of the toy’s body using loops.
What material is suitable for finishing the body?
When the “skeleton” of the toy is ready, you can begin making the body. There are a lot of options here that involve the use of one or another execution technique, depending on the chosen material.

The body of a frame doll can be made from the following types of materials:
- Polymer clay is suitable for those craftsmen who have sculpting skills. A product made from polymer clay will be durable, but not flexible.
- The work uses textiles and synthetic padding; the process is similar to creating a soft toy: a base is sewn and stuffed with soft material.
- The metal frame can be tied using a hook or knitting needles. Creation is similar to working with textiles.
- The body, made using the papier-mâché technique, accurately follows all the lines of a person, but remains too fragile.
- Using the technique used to create motanka dolls, you can easily create a body. Threads, strips of fabric, and ribbons are wound around the frame.
- Forming the base using cotton wool and paper glue. Cotton wool is used to create volume, and paper glue fixes the soft base.
Sometimes several techniques are combined in one product; each element of the doll’s body is created from a certain type of material.
The design is formed with the help of little things: the color of the doll, clothes, hairstyle, jewelry. But the overall image needs to be thought through initially, when choosing a topic. The most popular option for frame dolls is Columbine, which can be found in any collection of a self-respecting collector.
No less interesting are the Harlequin, the clown, the gypsy, and the doll in the Gothic style. More romantic and lighter images are: fairy, angel, girl in a light dress, elf and other fairy-tale characters.
Hand-made frame dolls can have any theme and design that suits the master to complete the collection. To make the product bright, memorable and original, you should pay special attention to the costume, pose and face paint.
Secrets regarding details
In any product that is made by hand, it is important to think through the details and details of the appearance. To better understand the process of creating a unique toy, it is useful to familiarize yourself with master classes. In frame dolls, professionals mostly focus the viewer’s attention on making hair, eyes, eyelashes, and eyebrows.

Masters say that the hardest thing to do is eyes. There are several options for preparing this element: buy ready-made parts from plastic, glass, ceramics, or make your own eyes for the doll: from transparent beads, by drawing on the material, using embroidery.
Eyelashes and eyebrows are shaped in several ways. Most often, these details of a doll’s appearance are made from false eyelashes. Natural fur hairs are used. If the doll is made in a playful style, then the eyelashes are made from loose braid.
To make the doll look more natural, it is better to use natural or synthetic hair. In special departments you can buy hairpins, hairpieces, and strands. Less commonly used are fluffed threads and brocade separated into fibers. This option will distance the doll from resembling a person.
What is needed to crochet a doll
Creating a frame is quite simple for those who know how to knit. This product can be used to decorate the interior, give it as a gift, or use it for games.

To bring your idea to life, you should prepare the necessary tools and materials:
- To create a body, it is recommended to choose beige, white, peach and pink tones.
- To movably attach the arms and legs, you will need buttons.
- The hook number is selected according to the diameter of the thread.
- If the parts of the body are sewn together, you will need silk threads and a needle.
- Katon yarn is suitable for making hair.
- Beads and several colors of floss will become relevant when creating a face.
- Any knitting threads are necessary for the outfit.
- Decorative materials: ribbons, nylon, buttons.
- Prepared wire frame.
- Filler to create volume.
We crochet a small doll without breaking
The easiest option for beginners would be a crocheted frame doll (description of the process in the text below). The product is knitted entirely without joining parts. The height of the toy will be approximately 15-18 centimeters.
To create a frame you will need the following materials:
- 50 grams of beige cotton yarn.
- Hook No. 3.
- Sintepon.
- Wire with a cross section of 2 millimeters.
- Long skewers.
Let's get to work: crochet a frame doll
The manufacturing master class consists of describing the procedure. You need to start by knitting certain parts of the body, preferably from the hands. Scheme for getting started:
- Form an amigurumi ring from 6 single crochets.
- In the 2nd row, increase the number of stitches by 2 single crochets.
- We knit the 3rd and 4th rows according to the given algorithm.
- 5th row: 1 single crochet, 2 double crochets in 1 loop, 6 single crochets.
- 1 double crochet, decrease and knit 5 single crochets.
- Decrease the stitches again and knit 5 single crochets.
- Knit 3 rows with 6 single crochets.
- Single crochet, increase, 4 single crochets.
- 2 rows of knitting the resulting 7 single crochets.
- 2 single crochets + increase + 4 single crochets.
- Knit 14 rows with 8 single crochets in each row.
Knitting legs
Now for a knitted frame doll you need to make legs:
- Work begins with the right foot.
- The first row is the same as for the hands.
- Increase in 3 subsequent rows by 1 single crochet.
- Knit 3 rows of 9 single crochets.
- Knitting 4 single crochets, turn the work 4 times.
- In the next row, decreasing after the single crochet, knit 1 loop in the round.
- Add stitches until you have 12 stitches.
- In each subsequent row, decrease stitches until you get 9 loops.
- Knit 6 rows like this.
- Add 1 loop.
- 2 rows are knitted with 10 loops.
- Add 2 loops = 12 loops.
- Knit 7 rows with 12 single crochets.
- Decrease the column.
- Decrease the column again.
To create a knee, you should smoothly decrease the loops to 10, and then gradually restore the initial number again. To create the shape of the hips, it is better not to make any decreases or additions.

In the process of assembling the torso and legs, you will see exactly where to reduce and where to increase the number of rows. Sometimes such correction “by eye” is simply necessary, because knitting often has different densities.
We knit the body and head
Frame amigurumi dolls are very easy to knit if you follow the pattern. The next step will be making the body:
- One leg is attached to the first chain stitch, then 11 single crochets are knitted, adding 3 stitches. Make an air loop, which is the basis for the second leg. 3 more additions and again knit 11 stitches. Close the circle.
- Add one column in each subsequent row until the total is 19.
- Knit 12 rows with 19 stitches.
- Next, the arms are attached in the same pattern as the legs.
- Each row decreases twice.
- When moving to the neck, only 5 columns should remain.
Without looking up from the body, you should start knitting a transition for the head:
- In the next four rows add 5 columns.
- Knit 11 rows of 40 stitches without changes.
- Decrease 4 columns, and in 4 subsequent rows 6 columns each.
- After 12 columns remain, it is worth making another reduction so that 6 columns remain.

Assembling the product
For an experienced craftsman, a frame crocheted doll is made without seams if the knitting is done by crochet or knitting. During the process, sequential assembly occurs by attaching body parts to air loops.

On knitted dolls, eyes and other facial features are usually embroidered. The “hair” is threaded through with a hook. Next, the outfit is made and decoration is done. An outfit with textile elements will suit a knitted doll.
Creation of costumes and auxiliary equipment
The finished frame doll needs to be beautifully dressed. Sometimes making a costume takes longer than creating the doll itself. You can sew costumes by hand or on a sewing machine.
Some craftsmen sew the outfit directly on the doll. This eliminates a lot of problems:
- The outfit will exactly match the doll's size.
- The manufacturing procedure is simplified and accelerated.
- If you put on separately sewn elements, you can damage the doll.
There are many options and design solutions for creating outfits. Sections can be finished with ribbons, lace, braid, damage - it all depends on the design of the doll itself.
"Stage 1
We sit down at our desks, we have our first master class.
I hope that we are all not complete beginners (let’s at least consider it so in our close circle of lamers)) and there is no need to talk about what dolls are, materials and the basic technologies for their manufacture.
We all already know how to do something, our hands are golden, our heads cook, our engineering ideas work, and we have no shortage of talent and artistic taste)))
Therefore, we simply begin to make a doll without unnecessary equivocation))
Since each of us loves “our” material, each has his own experience in making a doll, his own scheme, I do not impose my version, but simply tell you how I do it
Creating a doll in stages is something like this
(classical doll, small, made of plastic material, in clothes, with hair, on a stand):
1)sketch
2) frame + stand
3) modeling
- heads
- hands
- other exposed parts of the body
+ revision (grinding)
4) body growth
5) painting
- faces
- other parts of the body
6)hair
7) suit
8) details
All these points do not necessarily go strictly in this order; everyone begins to make a doll with the element that prompted him to do so (Dima PZh, like many others, admits that he begins work on a doll by sculpting the head, this is the part helps him to immediately see the entire doll, its image, its idea). Many points go in parallel, many are simply missing (the doll may be without a stand, without clothes and hair, it may not be painted, that is, there are many options, but we will consider the maximum number of points so that in the future we will have the opportunity to vary them).
Stage 2: FRAMEWORK
As many people think, the frame is a simple design, without any pitfalls. But, having already made the third doll, you begin to understand that the frame is the basis of the doll, and shortcomings in its design cause further problems. When making a doll, you should never forget about your wonderful idea, about that magical image that hovered before your eyes and you dream about at night))) But how disappointing it can be when you have to redo everything again just because a couple of days ago you you were in a hurry to move forward and some things were not adjusted or taken into account and your doll does not stand on the stand, the center of gravity outweighs it and it falls to the side or back, and the arm falls off, and a wire sticks out of the neck, which you thought would not be visible under a layer of plastic or a cotton pad....
Therefore, the frame, this wire skeleton of the doll must be approached with all responsibility.
1) First you need to select a wire that will be both flexible and durable. I have already tried a lot of wires and have so far settled on two options. Let me remind you that our doll is 30-40 cm high, that is, it is not tiny and ordinary copper or aluminum wires will not move.
The first option: the so-called “knitting” wire. I found it at a construction site (but it is also sold in some specialized stores for builders), its cross-section varies, but the best option is 2.5-3 mm, I don’t really understand its composition, but apparently it’s an alloy steel and some flexible metal. As a result, it is flexible enough that you have enough strength to twist it in the right places, but not springy or brittle.
- Now I have run out of this wire and I took up another option: thick copper wire with a diameter of 2.5 mm. It does not break even with great effort, it is quite flexible, but its trouble is that it is springy. This may cause the plastic top layer to break. But in general, this option is quite suitable.
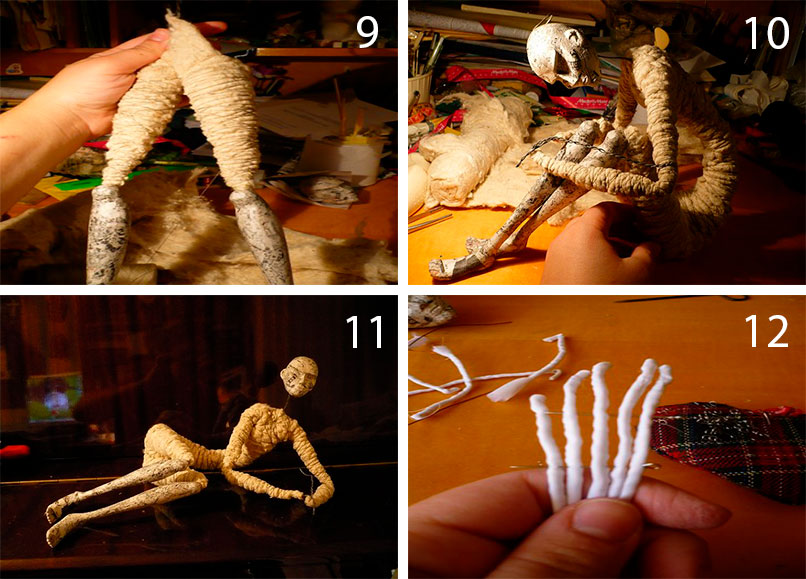
2) Next we knit your skeleton. Personally, I make the whole doll at once. According to classical standards, a doll is made according to its details, the head and arms definitely come separately (many puppeteers make a doll as if from a construction set). But since I’m telling you my version, perhaps you’ll tell me another one yourself))))
Next, look at the photos, and I’ll tell you briefly: we knit the knots tighter, we wrap them as hard as we can, because if your wire arms and legs move in the place where they will subsequently be covered with plastic material, it will crack. The immobility of the fasteners is also important for the overall stability of the structure. If your doll is sitting, standing, or even hanging, its center of gravity must be thought out by you with all the power of your engineering thought. Because a beautifully made doll that does not want to stand is a sad sight))) Therefore, remembering that a doll is a toy man, let’s remember where the center of gravity is for a real man? In the pelvic area. This is where you should weigh the doll down. Think through everything at once so that the pelvic area is heavier than the head. And also enlarge the feet if the doll is standing without a stand. And even if your doll is attached to some kind of platform, the head should still not be too heavy. And all the weight of the doll should flow downwards. The stability of the doll can also be enhanced with the help of some additional elements (a tree trunk, a staff in the hand, another figure nearby). In principle, all these techniques are known and a normal person feels what needs to be done so that everything is strong and stable. Hanging and sitting dolls are also made in accordance with your sense of gravity and the attraction of the earth and specific advice cannot be given here.
I additionally wrap the knots with a narrow strip of copper sheet. This holds them together tightly and I breathe freely and move on. Make hands. I especially love this thing, although many people shake just at the thought of this complex element of the doll. But I will tell you about this in my next message to you.
The stand had to be very heavy to hold the doll in this position firmly on the plane, so I made it from several layers of drywall glued together. For now, the doll is only inserted into the drilled hole for ease of work, and later it will be glued there with strong glue (I use Poxipol). The frame, without a doubt, can be made more complex, approaching the human skeleton in general: make a chest, pelvic bones, build a skull. But so far I don’t feel such a need for this; the increased cotton body fills these human volumes.


I can immediately say that as a result of further work, the following problems emerged in the given frame: the left arm turned out to be longer than the right, which was not noticeable when the arm was bent. I also had to extend the foot of the left leg and move the doll relative to the stand, so the pose became more correct 
regarding the center of gravity:
I additionally weight the feet (in the case when both of them are supporting) and the “pelvic area” by wrapping lead strips around the frame..
strips are obtained by flattening fishing weights.
if the composition allows, then a little lead can be hidden in some kind of counterweight accessory to give stability.
wire for frame: copper - cable 2.5 mm
I’m thinking about not stripping off the insulation, but I don’t know what the consequences might be
Stage 2: FRAMEWORK (hands)
The devil is not as scary as his little one))
In fact, making beautiful and graceful hands is quite simple. The main thing is to be patient and careful.
You will get beautiful and durable fingers if you make a frame for them correctly.
In my version, I don’t sculpt hands; I don’t like to make clenched fingers, fists, and fists. I love beautiful gestures, spectacular bends of the fingers and palms, as in Indian dances)))
The material for the frame is as follows: an aluminum or copper plate (as in the embossing set), tin beer cans are also suitable - for the palm. And the second element for the fingers is a thin but very strong wire, which I take from steel cables. Steel cables (sold in hardware stores, hardware stores, fishing stores)), if you look closely, consist of many thin, very strong wires, these are what we need. That is, if you have some similar wire from other habitats, then that will also work. The main thing is that it is thin and very durable. Here I don’t even have just steel wire, but with a brass coating, which makes it a little thicker and stronger (also from a hardware store). At first glance, it may seem that the wire is too thin, but after covering it with a layer of PVA, then a layer of paint, and in some places you will have to go through plastic material - the fingers become the most ideal sizes.
For thick fingers, such a frame is also easily suitable, you just have to build it up with more plastic material. Strength guaranteed!
We assemble the structure as in the photographs, give the desired position to the fingers and the hand itself, coat it in critical places with some super-glue for strength, and tie it to our main frame with a thread using one of the protruding wires. Now, if you did everything carefully enough, then after we go over the top with PVA glue, the unevenness and roughness, joints and seams will be smoothed out so that they will be completely invisible. PVA will also give elasticity and “rubbery” to the fingers, and even if the doll falls on them, nothing bad will happen to them.


as a result of further work

PVA is liquid and if you apply it right away it will run off in ugly drops. Apply, wait until it thickens a little and spread again.
After drying, the PVA becomes transparent. The top of the doll still has to be painted with acrylic using the technology that I use. The porcelain effect is due to the varnish.
You can paint over PVA using PVA and gouache of the desired color (shade). Stage 3: body growth
In fact, the stage of building up the body and the stage of sculpting the head (arms, legs and other open parts of the body) can change places, but in my version, building up the body comes first.
I build up the carcass with cotton wool, although it is always recommended to use padding polyester everywhere. I tried synthetic winterizer, but it is too springy and does not give the desired density. I use a synthetic padding layer on top of the cotton one, last but not least, to give it a neat appearance.
I simply apply the cotton wool in the required volume to the required places and stitch it with thread (sometimes I just wrap it around it), here and there coating it with Moment glue, where special precision in forming the silhouette is needed (the rubbery nature of this glue and its ability to dry quickly are very convenient). I simply wrap the arms, legs and other thin parts of the body carefully with thread so that the plastic material on top fits better, since it will slide along the wire. In some places you can increase the volume with a thicker thread.
In general, that's all I can say on this topic))) There are many ways to make a doll carcass: you can sew according to a pattern (I think this is a very interesting method, but it is more appropriate when creating large dolls, and also requires cutting skills and sewing))); Sometimes foam rubber is used instead of cotton wool and padding polyester, but foam rubber is short-lived and rough; You can also make a whole doll of plastic material, even if it is not visible under clothes.
I would like to clarify that this winding is suitable for a doll made of air-hardening plastic. If you bake the doll in the oven, then the base should be made of crumpled foil. But in general, the technology for making the doll is somewhat different: the head and arms and legs are not fixed to the frame and are convenient to take off and put on.


Stage 4: sculpting the head and other open parts of the body (+ processing and painting)
The next stage, after the stage of building up the carcass, will be the sculpting of the head and other open parts of the body.
Let me remind you that since I am giving this master class on my own behalf, the technology for making a doll may be very different from others you have seen. The plastic material in my doll is paper glue, but you can just as successfully use other self-hardening materials, as well as those baked in the oven, since it has been experimentally verified that even with an already wound carcass, plastic can be fired in the oven: the cotton wool can only darken a little , but it does not have time to heat up to such an extent as to flare up and burn (and if it is also wrapped in foil, then in general, I think, it will be completely protected).
Paper glue is convenient because even after it has completely dried, you can build up countless layers, bringing your facial features to the ideal (in your opinion))), and also diluting it with water to a paste-like state to smooth out irregularities and smooth out sharp corners. That is, paperclay is for those who love smooth and round silhouettes; small details are practically impossible for them to sculpt. But paperclay needs to be sanded, especially if you diluted it with water and smoothed out unevenness, since after drying it is not at all smooth, but rough (although this also turns out beautifully and is quite suitable for some effects). You need to sand it with zero sandpaper, and for final processing nail polishing (drip) is perfect, it brings it to a perfectly smooth state, but this requires hellish patience, I admit right away, I personally don’t have enough of it)))) Here Lopusova-Tomskaya has perfectly polished faces, like porcelain, but she won’t come and tell us how she achieves this, so we continue to sit in the dark))) but I think everything is achieved with patience and more patience...
I personally haven’t researched other plastic materials too much, because I admit that I don’t like to sculpt and I can’t physically digest efaplasts and fimoshki that stick to my hands))) But maybe someone will share their observations of these and other plastic materials.
The result can be seen in the photograph.

Coloring
Some paint only the eyes and tint the face a little, personally, I paint the entire face and other open parts of the body because I love decorativeness in the doll. But here it’s a matter of taste)) I like to apply acrylic from a spray can as a preliminary layer, it additionally smoothes the surface and strengthens it, and also evens out the color. But here you need to be careful so that there are no streaks, otherwise you can ruin the entire doll. because it’s difficult to scrape off these drips. Next, you can use any paint, especially for paper glue. And watercolor, and gouache, and acrylic, and oil paint, whatever you like. I use acrylic, sometimes I complement it with delicate shadows and blush from ordinary cosmetics, I love glitter for even more decorativeness))
The last layer is varnish, which, again, is for everyone’s taste. I found a very interesting matte acrylic varnish. It is water-soluble, non-smelly and dries quickly, unlike the pistachio varnish that I have used so far, and also does not give off unpleasant yellowness and streaks. Its strength is not so high, but it is enough to protect against moisture and dust.
My result is this: 
I do the eyes in a stupid way, I think it looks funny, but I like it, and for now I’m not going to deviate from what I like, although I think I fall outside of all the classical requirements)))
I simply insert colored transparent beads with a drop of color inside, and draw the pupil. But before that, I glue a loose ribbon into the eye socket, like eyelashes. And so, in general, eyes are the basis for imagination and the easiest way to the originality of your images. They can be drawn directly on the plastic formed under the eye. You can first make a base from a mother-of-pearl bead, which will play with highlights like the real white of the eye, and draw an iris with a pupil, you can insert ready-made store-bought eyes, glass and plastic, or you can make your own eyes from Fimo. There are thousands of options))))
Well, after coating with varnish, when everything is dry, I cover the carcass with nylon (you can use supplex, but it seems rough to me))) and that’s it, the basis for further creative work is ready:
We try on rags, form an approximate silhouette, select a color scheme and then sew a suit based on your fantasies. I can say that the final result is only about fifty percent reminiscent of what was in my head initially. I sew the clothes directly on the doll; you can’t take them off or put them back on. The so-called monofilament (and essentially a thin transparent fishing line) is very easy to use; the rest is up to you. Your skills and accuracy, and, most importantly, do not forget about imagination and the image that you would like to create.

I make hair from all sorts of threads... I tried to make it from doll hair, from 100% human hair (I also bought it at a hairdressing store), and I also tried the ones for dreadlocks. But it doesn’t roll!! due to the fact that the doll is so damn decorative - the real hair doesn’t fit at all! It looks alien. But the threads are very relevant. I had stocks of various threads, but they all ran out and I scoured the rag shops in search of similar ones, but I still couldn’t find them, and then I accidentally wandered into a VIP rag store and saw the perfect matching strings there, so I almost fell next to the counter and the colors are all so luxurious! but due to the fact that the store is VIP, the price is appropriate, although such threads are used almost for weaving fishing nets, they are so primitive, but here! and so I walk around and crush the toad in myself, so that, having crushed it, I can still make myself happy)) (somehow I blabbed))))
And the varnish is from the German company Nerсhau (their logo is with a multi-colored elephant with a brush on its tail), in Russian it is called silky-matte transparent acrylic varnish (Klarlack seidenmatt), very pleasant!
Although pistachio dries quickly, it still has stickiness for another month!!!
height 50 cm
paperclay (doll), papier-mâché and plasterboard (stand), wires, beads, fabrics and ribbons (clothing)
There are different dolls: collectible, for children to play with, souvenirs, created with your own hands. The latter, in turn, are also divided into many groups. These include textile Tildas, difficult-to-make articulated beauties made of polymer clay, and frame dolls with a rag body and paperclay limbs. The latter - paperclay dolls - combine the simplicity of a textile doll and the elegance of a jointed one.
Drawing a sketch of a future doll
 Any do-it-yourself doll master class recommends starting the creative process by making a sketch. And no wonder! After all, if you leave the idea in your head and are too lazy to transfer it to paper, you can inevitably encounter the problem of either a mismatch in body and head sizes, or asymmetry.
And in general, most likely, the result will not be what was expected at the beginning of the work.
Therefore, drawing a future creation on paper is one of the most important parts of the work..
So, if you don’t have any special drawing skills and don’t really want to understand the anatomy and proportions of a person (or any other creature - after all, a doll can be either a cat or half-man, half-horse), you need to find a suitable drawing on the Internet and print it in the required sizes.
There is no need to cut out the parts; they will only serve as a base to which you need to attach the body parts of the future doll. As you can see in the figure, a person's proportions vary depending on his age. Therefore, when creating a doll, you need to think in advance whether it will be an adult, a teenager, or even a baby.
Creating a Skeleton from Wire
 Next, you need to make a frame for the doll from wire in such a way that it fulfills its main function - the function of the musculoskeletal system, and in no case spoils the appearance of the product.
To make the frame you will need thick wire. It is necessary to cut the required amount of wire (attach it to the sketch) and twist a skeleton from it.
If you are planning a toy with plastic limbs, then the length of the skeletal arms and legs should be half as long (to the elbows and knees).
Next, the volume (muscle mass) is increased on the wire skeleton.. For this you can use thick jute threads, it is easier, but then the craft will be tough. Or you can use synthetic padding, which is a little more difficult, because you will have to tinker with it, but then the doll will be pleasant to crush in your hands. In any case, everything depends on the idea and imagination of the creator. You can also use foil or toilet paper.
 The muscle volume is wound so that the doll's body looks like a real one. To do this, it is important not to forget about the waist, hips, chest and, of course, about the sketch, to which you need to periodically attach the craft.
When the figure of the product has received the proper appearance, you can proceed to covering it with knitwear. It is better to take flesh-colored fabric so that it resembles real human skin. The doll must be placed on the fabric, the silhouette must be traced, cut out and sewn directly onto the figure.
To make it as neat as possible, you can use a hidden seam. But in any case, the parts with seams will most likely be hidden by clothing, so you don’t have to overdo it. If there is a lot of fabric, you can cut off the excess. The main thing is not to forget to stretch the material over the frame so that the skin does not become saggy or wrinkled.
If the idea and skills allow, the doll’s skin can be crocheted using flesh-colored threads.
Shaping the doll's head
 Since the head is the most visible part of the doll, it is very important to approach the process, as they say, wisely. The first thing you need to do is choose what material the head will be made from.. And there is a lot of choice here.
This can be textiles with synthetic padding (preferably the same color as the body), while the face can be painted with acrylic paints or embroidered with threads. It can be polymer plastic (self-hardening or baked in the oven), mixed media made of papier-mâché and plastic. In this case, you need to take one that does not need to be baked, otherwise the paper layer may catch fire.
Creative stores sell a great variety of baked and self-curing plastics of various brands, volumes and price ranges. It is better for beginning craftswomen to opt for a wonderful material - paperclay. First of all, because you can do it yourself. After all, starting from scratch, you can make a lot of mistakes, and the materials are expensive, and it’s generally difficult for those living in small towns to get them. Otherwise, it’s cheaper, and you won’t mind ruining something. In its properties, papakley is similar to self-hardening clay; it can be painted with acrylic paints and sanded with fine sandpaper.
So, in order to make paperclay at home, you will need:

First of all, you need to take 20 grams of toilet paper of the desired color (the color of the future product depends on it) - this is about a third of the roll, put it in a bowl and fill it with hot water. Next, squeeze out the water and tear the paper into small pieces.
Then pour in 75 grams of PVA glue, stir until smooth, carefully removing lumps and pieces of paper that are not soaked into the glue. After 125 grams of putty, pour into a container and mix with paper and glue. Then add 50 grams of flour, gradually stirring. The mass turns out to be loose, so you need to dilute it with oil - 20 grams will be enough.
 The last component is starch (50 grams). Gently stir it into the mixture. If it starts to crumble, add a little water. The resulting paper glue should be stored in a hermetically sealed container.
This could be cling film, a plastic bag, or a lunch box with a tight-fitting lid.
When the self-hardening clay is ready, you can begin the process of sculpting the head. To work you will need:
- paperclay or other self-hardening clay;
- foil;
- knife or stack;
- skin;
- acrylic paints, brushes.
You need to make the shape of the future head from foil; it should be slightly smaller than the sketch. Next, roll out a thin layer of paper glue and cover the foil with it, carefully pressing it with your fingers. In order not to be mistaken with symmetry, you can mentally draw lines along and across the future head, or dry it a little and draw the lines with a real pencil.
To make it more convenient to work, you can place your head on a pencil or chopstick.
 In the places of the future eyes you need to make symmetrical indentations with your fingers. Roll a ball from a separate piece of clay and stick it in place of the nose, apply it with wet fingers, and form the nose. Make lips from a small cylinder of clay, apply thoroughly using water. It is most convenient to stick the upper lip first, then the lower one, and separate them using a knife or stack. Make the chin in the same way.
Using additional pieces of clay, create a jaw, enlarge the cheeks, brow ridges and forehead. For the eyes, make small cakes, place them in the squeezed out holes, and cut them out using an arc stack. Separately attach the upper eyelid. Lubricate all parts well with wet fingers. Now you can dry your hair.
When the head is sufficiently dry (about a day), it needs to be sanded, and then it can be tinted with paints or cosmetics, or painted with acrylic paints.
To give your doll a chic hairstyle, you need to make a hole on the top of the head. For hair, you can buy ready-made tresses or make them yourself from mohair or wool. The strands are rolled up into a tube and placed in the hole using glue. This is how the top of the hairstyle turns out. The rest of the hair is carefully glued around the perimeter of the head.
Assembly of the finished product
Connect the doll’s body, made during the second step, to the head using glue. While the connection dries, you can secure it with adhesive tape. Now you can dress the beauty. The doll will look lifelike if you give it a human pose.
Attention, TODAY only!
Handmade dolls are gaining momentum in popularity. They are perfect as a gift and interior decoration. In this article we will look at how to make dolls from scrap materials with your own hands.
You will need: steel wire, pliers, scissors, plasticine, newspapers, PVA glue, sanding paper, superglue, toilet paper, filler (cotton wool or padding polyester), threads, thin fabric, thick fabric (calico or felt), needle, acrylic paints, thin brush, fabric for a dress, pieces of fur, transparent manicure polish, satin ribbon for creating hair, velvet cardboard, lace, false eyelashes, a simple pencil, stacks, toothpicks.
Master Class
- Decide on the size of the doll and twist the wire frame, adding 8 cm to the length of the neck and 5 cm to the length of the arms.
- Mark the locations of the elbows and knees on the wire.

- Make a head out of plasticine and apply 5 layers using the papier-mâché technique. (Tear newspaper into small pieces, dilute PVA with water in a 1:1 ratio, dip a piece into the glue mixture and cover the head blank in a secret way. Each layer must dry before applying the next one).
- Cover the legs up to the knees using the papier-mâché technique.
- Wait for the head and legs to dry.

- Cut the head blank in half, take out the plasticine and glue the 2 parts of the skull together.
- Sand the parts of the legs and head until they are smooth.
- Mix PVA with water in a 1:1 ratio, shred toilet paper, then add to the adhesive mixture and mix well.
- Form facial features from the glue mass, cover the resulting forms with thin strips of newspaper, dry, then sand.
- Wrap the wire frame with filler, securing with thread.

- Prepare 5 pieces of wire and form the palm and fingers, then cover them with fabric.
- Make the other arm in the same way, then screw them on.
- Cover body parts with felt or other dense fabric.

- Paint the head and legs with acrylic paint.
- Cover part of the body from the waist to the knees, neck, shoulders and palms with thin fabric.
- Hem the sleeves and create a dress.
- Make a boa and muff from pieces of fur.

- Paint the doll's face and wait until it dries.
- Apply varnish to the face, head and lower legs from the knees.
- Create stockings for the doll and put them on.


- Glue the eyelashes.
- Make shoes from velvet cardboard and lace, then put them on the doll.
Interior doll
You will need: flesh-colored calico fabric, filler, cotton fabric for clothing, scissors, cardboard, satin hair ribbon, pencil, superglue, wire, thread, sewing machine.
Master Class
- Decide on the size of the doll and make a pattern on paper as shown in the picture. It indicates the number of parts (of each body part). Don't forget to take a 5mm allowance for allowances.
- Make the head in this way: cut out the front part of the head, then the back of the head. Fold the pieces inside out, sew them together and leave an opening for stuffing. Turn it inside out and fill it with padding polyester, then sew the hole.
- In the same way, create the body of the doll, and fill the neck area tightly with padding polyester so that it is solid.
- Create the arms and legs in the same way, just insert wire before stuffing so that the arms and legs can bend.
- Sew arms, legs and head to the body.
- Draw the eyes.
- Prepare a satin ribbon and cut several pieces of the desired length of future hair.
- Unravel each piece, leaving a margin of 5 mm.
- Glue the hair at the unraveled section. Do this process in rows using superglue.
- Sew clothes and shoes for the doll to your taste.
Basically, dolls are sewn using the standard method described above. The shape of the doll depends on the pattern, size and clothing. We present to your attention 6 beautiful patterns for creating textile dolls with your own hands, which you can view in the photo gallery.
Waldorf doll
You will need: beige cotton fabric, cotton wool, a skein of thread, thread with a needle, a centimeter, scissors, sewing pins, a piece of chalk or dry soap, yarn or floss, materials for sewing clothes and shoes.
Master Class
- Print out the pattern. It consists of the following parts: 4 parts of the arms, 1 pattern of the head and 2 parts of the torso combined with the legs.
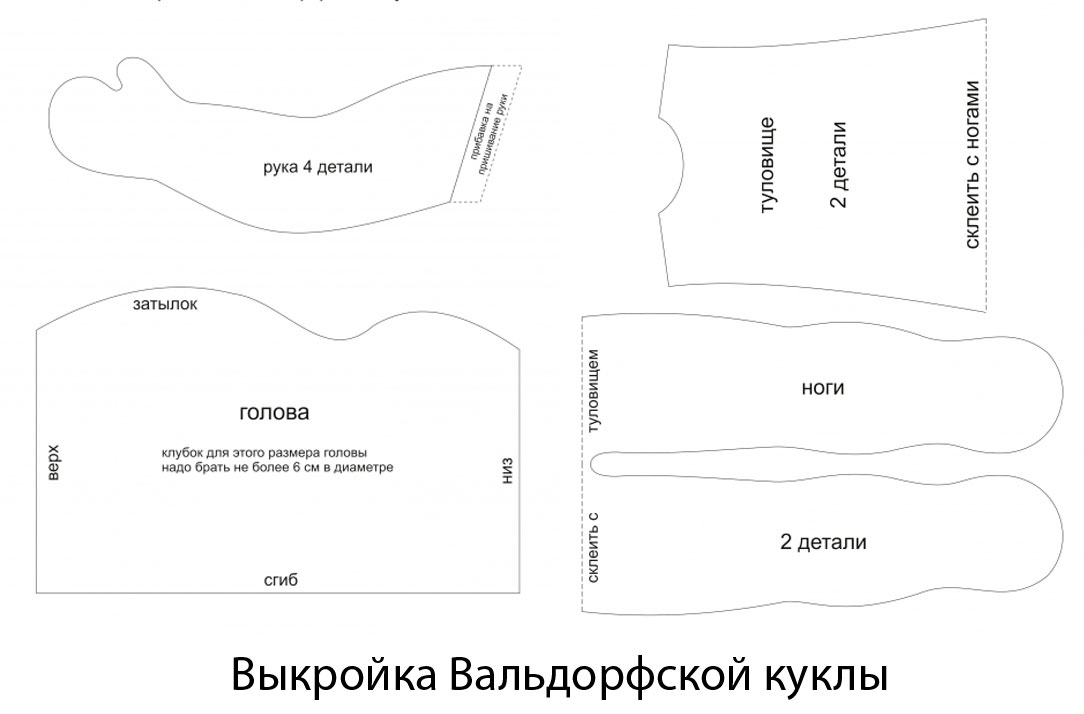
- When cutting parts, do not forget to leave seam allowances.
- Place 4 pieces of cotton wool of the same size and place a skein of thread in the center.

- Wrap the skein with pieces of cotton wool, tie with thread and cut off the tails of the thread.
- Measure the circumference of the ball.
- According to the size of the circle, cut out a rectangle of fabric, then sew the pipe and stitch the side. The side will be the bottom layer of the head on which the doll's facial features are formed.
- Pull the pipe up with a thread, turn the workpiece inside out and put it on the ball.

- Wrap the thread twice around the neck and tie on the side where the doll's face will be.
- Place the ends of the threads on the sides, then make a vertical draw and tie at the crown.

- Measure a long thread, twist it 2 times horizontally in the center of the head, then tie a knot near the vertical tie.
- Combine 2 yarn wraps with several stitches using a needle.
- Insert the needle into the center of the intersection, leave a few centimeters of thread near the same side and bring it out on the other side.

- Make a few joining stitches at the second crossing and leave a tail.
- Lower the threads down towards the back of the head near the ears, then tie them around the neck.
- Hook the back and vertical threads with a needle and pull them together. Repeat this process on both sides.
- Roll a ball of cotton wool and sew it on as a nose.
- Sew a head piece from the fabric along the top and side seams, then turn it right side out.

- Place the piece on the workpiece and pin off the excess areas with sewing pins.
- Remove the fabric and turn it inside out.
- Sew the seams where the pins are and trim off any excess fabric.
- Turn the part out and put it on the workpiece.

- Pull the thread in the neck area 2 times and tie.
- Pull the bottom edges of the thread seam first with the needle.
- Mark your hairline with chalk.
- Insert a thread with a needle at the intended growth line, stick it out through a centimeter and secure with a small seam back with a needle.
- Make an outer stitch back, bring the needle closer to the crown and secure the thread again.
- Repeat steps 23 and 24 in the opposite direction. This way you will get 2 hairs.

- Cover your entire head in a similar manner.
- Give the doll bangs in the same way, trim the haircut with scissors if necessary.
- Attach sewing pins to the eyes and mouth.
- Stuff your hands with cotton wool or other stuffing, then attach with sewing pins to the base of the head.
- Check the symmetry of the fastening by bringing the handles together in front.
- Remove the pins and sew on the handles using small stitches.
- Sew the seam allowances on the arms with coarse thread.
- Turn the body and legs inside out, then stuff the feet with stuffing.
- Sew the sides of the feet with a blind stitch.

- Add filler to the body to make it more dense.
- Sew the remaining holes with a blind stitch.
- Sew clothes and shoes for the doll to your taste. For a detailed photo master class on sewing shoes, see the photo gallery shown above. You will also find patterns for sewing sundresses and dresses. Choose a beautiful fabric and start creating a stylish outfit for your doll.
It is worth noting that the doll becomes truly beautiful only thanks to the outfit, hair, painted face and other accessories. Therefore, approach this matter creatively, creating chic dolls with your own hands. There are many different ways to create dolls, see how to make rag dolls
Agree, there is some kind of mystery in the homemade doll. After all, even the master does not always know what kind of toy the end result will be. Do-it-yourself wire dolls are very interesting, since they also use thread wrapping. Wire is a material from which flexible figures can be made, capable of changing poses and “making” very expressive gestures. They can be made together with children, since the process is absolutely simple.
Wire motanka doll
DIY wire dolls in a step-by-step master class
In order to make such a toy, you will need:
- the wire itself (take not very thin);
- thread (string) for winding;
- glue, double-sided tape or glue gun;
- pliers;
- wooden ball or bead for the head.
The wire can be taken without insulation, but then the frame will be rougher and it will be more difficult to give the doll the required position. If you don’t have a suitable ball on hand, you can roll it out of a piece of foil.
 Everything we need
 The wire length is arbitrary. It all depends on how big you want to make the doll. In this master class, the length of the pieces for the wire doll’s frame is taken to be 27 cm. The third piece of wire is slightly shorter and thinner (it is needed to secure the head). At the ends of the segments you need to remove approximately 0.5-0.8 cm of insulation and bend the cleaned wire into a ring. We also make a doll on a wire frame, only it is woven a little differently.
In this way we prepared a frame for a wire doll. All three pieces of wire are secured with your own hands in the area of the body with double-sided tape, and you get a figure like this.
 wire frame
 Then glue or double-sided tape is applied to one half, and the process of winding the thread begins. It is better to start from the foot, gradually applying glue and finish at the tip of the hand. The same is done on the second half of the figurine: as a result, the body is wrapped twice.
 We begin to wind the turns of thread
 Next, the head is secured: if a bead is used, then this is not difficult to do. We simply place it on the wire and secure it. The foil ball must first be pierced with a knitting needle. This must be done carefully so as not to crush it.
 “Preparing” the head
 Don’t forget that the wire doll we make with our own hands also has a neck, so we try to arrange all the elements of the product in proportion. You need to wrap threads around your neck and head to make it look like this:
 We wrap the neck and head with threads
 For hair we use yarn, which every needlewoman probably has in stock. We cut it into pieces of the same length and fasten it in the middle with the same thread: just stitch it with the seam forward with a needle.
 Making hair
 Using a glue gun, the hair or, more simply, the wig is attached to the head.

 Glue the palms and hands
 If we draw an analogy, our wire doll is very similar to a motanka doll (after all, we wrapped the wire frame with twine). But they are usually not painted, i.e. they do not have a face on them. But we will make an attempt and draw eyes, lips with felt-tip pens, and also blush our cheeks.
 Drawing a doll's face
 Well, your DIY wire doll is almost ready. Now we need to dress her up. To do this, we cut out a skirt and blouse from knitwear (at random). Using a hook, we decorate the bottom and the belt on the skirt.
 Doll outfit
 This is how the doll will look in summer in warm weather.
 Wire doll in summer outfit
 But it’s winter now, look how frosty it is outside!.. Let’s make her felt boots and a fashionable coat.
We will make boots for a wire doll with our own hands from felt or pieces of drape and sew them with yarn to match the finish. The front of the shoe is decorated with braid.
 Pattern of boots for a doll
  Sew on the ribbon
  These are the boots
 A short coat with a fashionable modern cut will reliably protect our doll from any cold weather.
 Super fashionable coat
  "Winter" doll outfit
 Is it true that we quickly managed to make a wire doll with our own hands? How are your kids? What happened to them? Maybe it’s easier for them to do it, like in our new MK?
 DIY wire doll “Vanessa”
 Well, today you learned how to make a doll from wire and another resident has settled in your doll collection. Let's call her Vanessa. Is the name suitable?
Thanks to Natalya Shanaeva for another master class on making dolls using different techniques. That's all for today. I’m sure you know what to do if you liked the master class... 😉 I’ll give you a hint - the buttons at the bottom of the article... See you!


