The main function of door frames is to mask the gaps between the door frame and the opening. Their choice depends on texture, width and color door leaf. In the production process of platbands, wood, steel, aluminum, plastic, MDF, fiberboard and PVC are used. If desired, you can buy laminated trim, lined with plastic and covered with veneer. They are installed after the door leaf is installed. Simple advice from experts will help you understand how to install platbands on interior doors.
What are the types of platbands?

There is a wide range of platbands on the building materials market different forms. When buying a door, it is important to check whether platbands are included or not.
Typically, the width of the casing is about 7 cm, the height and thickness are 210 cm and 1 cm, respectively.
When installing an interior door with one leaf, you will need to purchase 5 slats, while for a double leaf you will need 6. Two and a half slats are enough to frame the opening on one side.
Telescopic trims

In appearance they are similar to ordinary platbands. The difference is the protrusion that is required for connections. This option can be used if the door thickness is narrower than the wall thickness. A special protrusion is attached to the longitudinal grooves of the end door frame.

If you install the platbands correctly, the fasteners will be almost invisible. The design lasts for a long period. Otherwise, if the calculation is made incorrectly, a gap remains. As a result, the design looks ugly.
Decorative design

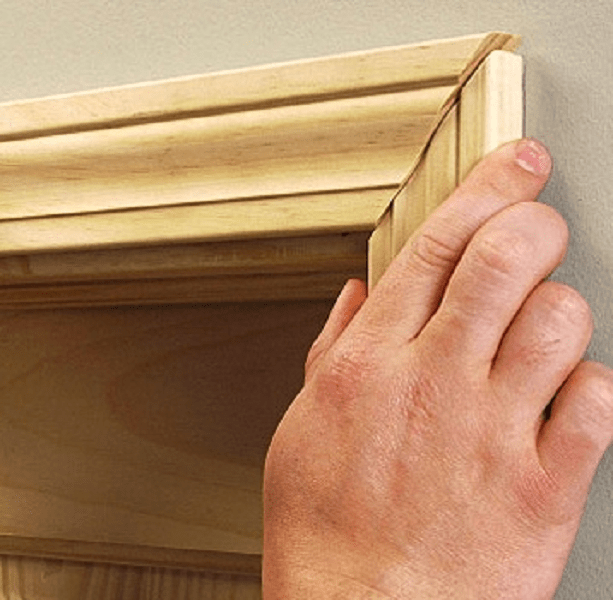
Platbands that have recently appeared on the building materials market decorative design doors are called capitals.
The material for the platbands is solid wood or MDF. They are distinguished by a variety of shapes and curly ruffles.
After installing such platbands, the door will take on a luxurious, finished look.
Methods of fastening the structure

Often the following are used to install door frames:
- liquid Nails;
- fastenings called “beaks”;
- finishing nails;
- self-tapping screws
Using finishing nails

This method is considered the most popular, as it has a number of advantages, including simple installation and dismantling if necessary. Even an inexperienced person can attach the structure using simple tips.
To work, you will need copper-plated nails with a narrow head. The nail should fit 2 cm into the door frame. On average, the length of the nail reaches 4 cm.
To carry out the work accurately, you can put points on the platbands along which the fastening will be carried out. The points are placed at an even distance from each other. A distance of 50 cm is considered optimal.
Liquid nails

Liquid nails are sold in tubes or tubes.
 Fastening is easy and simple.
- The product is applied to the platband and pressed for a few seconds. After the time has passed, the bar can be released.
- The advantages of the material include the fact that fastening is not only easy, but also does not leave marks on the front side of the plank.
- The disadvantage is the unreliability of fastening.
Fastening with self-tapping screws

This method is increasingly used due to its reliability. Even an inexperienced person can do the job by following simple instructions.
- If the platbands are made of wood, it is worth choosing self-tapping screws with a diameter of 6 mm and a length of 2 cm.
- Work begins with markings on the bar. They are placed at a distance of 50 cm from each other. Then holes are drilled. This is necessary in order to prevent cracking of the wood during fastening.
- To make the self-tapping screw invisible, its head must be recessed into the strip. It is better to drill the hole a little first.
Fastening with beaks

The advantages of the method include the attractive appearance of the fastening and the ease of the installation process.
The negative side of the method is that the platbands made of MDF may delaminate during the process of removing the “beak”.
To understand how to properly attach the trim, you need to read the instructions included with the product.
How to get the job done

- First of all, the platbands are applied in height to the door in order to correctly measure the required length.
- The plank is placed on a horizontal surface, and, using a square, the angle is measured and cut off.
- The platband with the cut out corner is applied to the door frame and alignment is performed along the bottom line and edges. It is also necessary to note the height that would correspond to the door frame.
- Taking into account the mark made, using a protractor, mark an angle equal to 45º. You need to cut off the excess and put the bar aside for a while.
- The same must be done with the other side. It is worth noting that the upper casing is marked last. Work with it is carried out after installing the side strips. This sequence of work will allow you to avoid mistakes when installing platbands and the formation of cracks.
- Having cut the strips, you can begin to fasten them. To do this, you need to hammer nails into the door frame and remove their heads with pliers. In this case, the length of the nail for successful fastening of the platband must be at least 5 mm. The distance between nails is 50 cm.
- You can ensure optimal adhesion of the door frame to the platband using glue that is applied to the strip. It is important not to overdo it so that the glue does not squeeze out during adhesion.
- A platband is applied to the door frame and tapped through a block wrapped in fabric, placing it on nails.
- Having nailed the trim on the sides, we begin marking the top strip. The corners are marked by placing a strip on top of the side trims, and the excess is removed. Install in the same way.
Important nuances

- A nail or screw can be made barely noticeable by using a wax corrector.
- If the platbands diverge at the joints, finishing nails can correct the situation.
- Small gaps are repaired with acrylic sealant. A wax corrector will also work if you choose the color.
- If the platband is installed on an interior door, its height should exceed the height of the opening by 10 cm.
Given simple rules, many people can do the work with their own hands.
Video
This video shows how to install door frames:
Photo


Door trims are used mainly to hide its shortcomings that arose during the work associated with its installation. They also simply ennoble her, making her more beautiful and attractive. If a person buys a new structure, then he must decide how to attach the trim to the door. There are actually several methods on how this can be done.
Next, 4 methods will be discussed. Each of them has its own advantages and disadvantages. Not all of them can be used in a given situation. How each of them can be used will be described in detail here. Door trims can become a real decoration of the interior or simply ruin it. It all depends on the right choice fastenings
Tools and materials
Of course, before you begin installing the door frames, you must prepare all the necessary tools and materials. So, for work you need to purchase:

- side cutters;
- drill or screwdriver;
- screwdriver;
- hammer;
- self-tapping screws;
- finishing nails;
- liquid Nails;
- wood drill;
- pencil;
- wooden frames on latches.
This set is quite enough to perform one of the proposed fastenings. Of course, in each specific case it is worth taking a closer look only at those things that are necessary.
Application of finishing nails
This method of fastening door frames is used quite often. This is because it is quite simple. Thanks to this method, you can remove the platband and install it in its rightful place at any time. The work is carried out quite quickly, if not primitively. Experts recommend using not ordinary nails, but those that have a flattened surface on top. Their length should be approximately 4 cm.

Platband diagram with dimensions.
In this case, the diameter is selected to be at least 1.5 mm. Here you can think about making your work a little easier. Driving nails directly into the frame is quite difficult. Moreover, this procedure can harm the structural element.
To prevent this from happening, you can use a drill. This will allow you to drill holes in the casing. They need to be placed at a distance of approximately 5-7 cm from each other. This is the only way to achieve an acceptable result. Many may think that nails that stick out from the outside of the structure can ruin the overall aesthetics. In fact, this defect can be gotten rid of quite easily. For this, side cutters are used. With their help, nail heads are removed. You can paint them over with a wax pencil.
This method is also quite effective. From a distance, no one will understand that the door frames are secured with nails. Now we can state the fact that the work is completed, which means that the first method has been fully considered. Now you can move on to the second option.
Using liquid nails
This method has certain limitations. It can only be used in cases where the platbands are made of MDF panels. In this case, the surface on which the fastening is made must be perfectly smooth. The work itself is quite simple, if not primitive.

You need to apply liquid nails to the back side of the platband, and then lean it against the wall with this side. Then you must press down so that both surfaces tightly grip each other.
After this, the platband must be removed from the wall. You should then wait about two minutes before proceeding further. After which the platband is again applied to the same place. It is not worth holding it, since one material will be attached to another for a long time. To fix door frames in their rightful place, it is best to use tape. It is worth immediately highlighting the main advantage of this method.
It lies in the fact that there are no traces of mechanical impact left on the front side of the platband. This allows you to preserve the aesthetics of the room, and often this is the main thing that is required from platbands. If a person decides to remove them, it will be extremely difficult to do so. The thing is that liquid nails have fairly high strength levels. However, if possible, then this method should be used as one of the most reliable.
Fastening with self-tapping screws

Fastening platbands with finishing nails is simple and reliable.
Fastening with self-tapping screws is a standard option. It allows you to create a truly high-quality connection. You will have to work with wood, which means that self-tapping screws should be used specifically for this material. Good, modern market offers a wide variety of solutions. As for the length of the fastener, it must be at least 2 cm.
For work, it is best to use a screwdriver or drill. With their help, screwing in screws will be much easier. To ensure that the fasteners do not stick out above the casing, you must make small holes using a pre-prepared drill. It is taken with a diameter large enough so that you can easily work with the surface.
Self-tapping screws do not always look attractive, so if possible, their heads should be hidden.
Various solutions are used for this. For example, you can buy special decorative overlays without any problems. A wax pencil will do the job perfectly. It will fix the defect in a few seconds. After this, the door will look very beautiful and attractive.
Application of clasp on latches
This fastening method has also become quite widespread. Outwardly, such a casing looks a little like the letter G. That is why it was nicknamed the casing with a beak. This is the simplest fastening method. The section of the part that has the largest dimensions is placed in a special recess. After this, it is snapped into place. This method, although popular, has some disadvantages.
The most important thing is that the casing itself can gradually delaminate. This occurs due to the fact that the fastening itself is damaged as a result of removal or putting on. This very often leads to the fact that the platband simply collapses at the junction. MDF panels are not as powerful as other options. After several such repetitions, there is a high probability that you will have to use glue as an additional fastening. This may result in a permanent connection. As a result of such manipulations, the appearance of the platbands also suffers.
So, four main options for fastening door trims were discussed above. As is clear, they all have the right to exist. Each of them has a certain set of advantages and disadvantages. It is very important in a specific situation to correctly determine best option fastenings
Installing platbands on the door frame is the final stage of constructing the entire door structure.
Cash-outs, first of all, serve as a decorative element that covers the interface between the entrance wall opening and the door frame. It will help to improve and give a decent appearance correct selection the color and texture of the element, which must be identical or as close as possible to the shade and material of the door being installed.
The final decoration of the doorway should be done on final stage renovation of the entire room - after whitewashing, painting and wallpapering the walls.
This, at first glance, simple work requires some attention and accuracy. The problem here is the precise fit and correct installation of the trim on the door - without any gaps or distortions.
Types and classification of platbands
A large assortment of platbands on the building materials market makes the choice easier, and its diversity allows for some classification of platbands.
They are divided:
- by material - wooden, plastic, metal, composite;
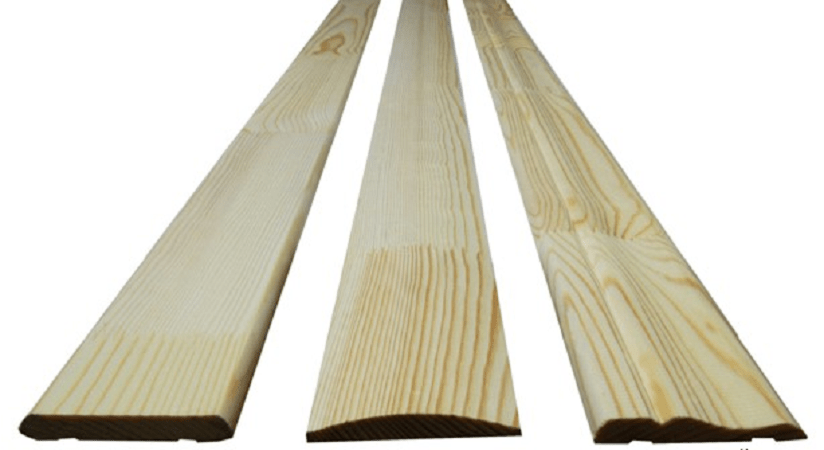
- in shape - flat, rounded, curly;
- according to the installation method - overhead and telescopic.
Door trim can also include a decorative element such as a capital.
It is made mainly from solid wood and decorated with a sophisticated engraving pattern, which gives the entire room sophistication and aristocracy.
When installing trims on interior doors, it is advisable to focus on the materials from which the door itself is made.
If the door leaf is lined with veneer or made of MDF, then you will not have to select material for cashing. In this case, laminated MDF trim will be the most suitable.

It is impossible to give preference to any form - it is a matter of taste.
However, it is worth remembering that classic flat strips for self-assembly will be more convenient to use and will help to avoid defects.
Installing overhead trim on the door involves directly attaching them to the door frame using glue or nails.
Installation of telescopic platbands, due to their design features, can be carried out without the use of any special elements.
Such cashing does not cause distortions and does not require additional fastenings.
Telescopic trims
Their design difference is the presence of a special splined protrusion, made at a right angle and inserted into the longitudinal groove of the door frame. Such platbands make it visually monolithic, leaving the fasteners invisible. They are intended for arranging non-standard openings.
For walls that are too thick compared to the door frame, the installation of additional extensions may be required.
By using them to correct the difference between the thickness of the enclosing structure and the width of the frame, you can achieve a perfectly neat appearance of the installed door.

Assembly and installation of platbands
To begin with, determine inner dimensions vertical cashing in one of the following ways:
- using a tape measure, measure the distance from the floor to the junction of the upper transverse and side longitudinal beams of the door frame;
- make a risk on the platband attached in place.
The resulting mark will become the starting point for the future cut.
Carefully, maintaining an angle of 45 degrees, the plank is cut so that its size on the outside is larger than on the inside.
Using a miter box will greatly simplify your work.

When determining the cutting lines on the platbands, it should be taken into account that with different sides door leaf, their direction will be different.
Don’t forget that each plank will require individual measurements. And one more thing - you should start installing cashing from the side of the hinges of the door that opens towards you.
The prepared side trims are not nailed tightly and only with two nails - one closer to the floor, the other in the middle. A blank for the top bar is inserted into the gap left on top and markings are drawn on it in place for future cutting. This will allow you to get rid of errors and the formation of large gaps as much as possible during the subsequent mating of all elements.
You can adjust the location of all the cash by lightly tapping the sides of the planks, previously attached to nails.
If the gaps are large enough, then one nail is removed from the plank, after which it is given the desired position. Final installation prepared door frames are possible only after carefully adjusting them to size and maintaining correct angles and minimum clearances of connected parts.
Fastening
To fasten cash, it is best to use thin nails, the heads of which are removed after being punched into the door frame with pliers.
A uniform step of about 15 centimeters will be quite sufficient for reliable fastening. If the adjacent walls of the doorway are smooth, then it will be enough to secure the platbands in the upper and lower parts with a pair of nails driven in the middle of the strip.
Copper or galvanized nails should be used, as over time they do not cause dark stains on the wood, even in rooms with excessive humidity.

To fasten MDF trim, a slightly different technology is required.
To work with them, you should first drill blind holes with a thin drill so that when driving a nail, you can minimize the risk of damage to the strip. The same additional preparation must be made when using self-tapping screws as fasteners. But they will require slightly larger diameter holes in order to recess the caps, which are subsequently covered with plugs to match the casing, or sealed with acrylic putty before painting it.
The use of adhesives or liquid nails is used only for perfectly smooth walls adjacent to the door frame.
Such fastening is not possible in rooms with high humidity, such as bathrooms and toilets.
Little tricks
When choosing wooden trims, you should pay attention to the quality of drying the boards. Poorly dried wood:
- has an uneven color;
- has blue spots on the surface;
- When tapped, it makes a dull sound.
In order not to spoil the workpiece, the length of the cashing should be measured with a margin of at least 1 cm, which will be useful when adjusting the corners of the parts to be joined.
It is easier to cut off the excess from the opposite end of the plank.
You should not use a moisture-resistant marker for marking on the front side. It will be difficult to remove the drawn lines by normal erasing.

Trimming trims is best done with a miter saw.
It will provide a clean cut without chipping. Carefully adjusting cut corners is easier than using tape grinder. With its help you can achieve perfect joining in the corners.
If gaps appear when installing trim on the door, they can be made almost invisible by using a beeswax-based mixture, which can be purchased at a hardware store.
Heated and brought to the state of a plastic mass, it will perfectly fill the resulting cracks.
Visually, a cash register that rises 10 centimeters above the doorway looks better, and the uniform style of the rooms in the apartment will be ensured by the same trim on all doors.
06/15/2015 at 10:06
Production of shaped products
No construction or repair is required without products.
High-quality, environmentally friendly wood, made from natural origin, is a complex, durable and functional building material, easy to install and able to maintain its performance properties for a long time.
Modern production of molded products is a long process that consists of several technological stages, which has been one of the key activities of our company for a long time.
The main direction of our production policy is the understanding that natural wood products have irreplaceable properties - they are environmentally friendly, durable, and have unique sound and thermal insulation properties. At the same time, the tree “breathes” the trees it contains, has bactericidal properties and creates optimal conditions for the person in the room.
Quality door frames, frames and transoms should not include wood defects - knots, rot and resin pockets, in addition to the consumer wanting to bring valuable necks of wood into their home doors that are not ready for painting.
He doesn't talk about the expense at all, the use of mass production of a range of valuable types of criminal waste natural resources, therefore the production of profiles based on modern technologies who can rational use natural materials to meet high consumer demand.
Firstly, we are talking about a competent production process using modern technologies and equipment that can provide minimum production products that meet market needs.
By using pine wood wraps, fine wood veneers, finished sheets, borders and door frames, they retain the best softwood capacity and combine their relatively low cost with decorative fine walnut, wenge, oak and other types.
Door beam manufacturing process
The quality of product processing using equipment from leading global manufacturers is immediately noticeable.
Modern production of frames and other profiles is carried out on automated production lines using four double-sided milling machines, specialized wrapping and veneer machines, phase rolling technology, and grinding machines. All stages of the production process, from drying the wood to entering the bar for the automatic production of color lines, are accompanied by control of production parameters and product quality.
Not all of them have realized the benefits of MDF products combined with real wood veneers.
How to install door trimmers - types of payment and installation rules
This material is completely processed, unlike natural wood, it is not subject to bending and rotting, and the main connection of the fiber with the MDF element - lignin - is an environmentally friendly product that is formed when treated wood is heated. Role interior decoration can often replace a high quality wooden pallet indoors.
Of course, the manufacturer’s high-quality design is favorable to the price and has a certificate confirming compliance with GOST and market requirements.
Our company, which produces a full production cycle, is a stable partner, whose production capacity allows us to continuously supply products in all required quantities.
 Finishing doorways- in fact, the final stage of construction, since it is necessary to attach platbands to interior doors after wallpapering the walls or otherwise finishing them. After installing the cash, all that remains is to lay the baseboards - and you can re-inhabit the room.
The process itself does not include anything complicated, but it requires accuracy and accurate calculations.
Installation of door frames
Otherwise, you can decorate the doorway in such a way that even the most elegant and exquisite design it will look terrible. However, you shouldn’t immediately get scared and look for the phone number of a good carpenter. Having studied the instructions, armed the right tool and with patience, installation can be done independently without difficulty.
How to attach platbands to interior doors? First of all, you need to start from the material that was used to make them.
However, the degree of evenness of the wall also has a significant influence on the installation method.
Ideally, during the previous repair, the slabs should have been leveled, but this is not always done: such manipulations are quite painstaking and it is better not to undertake them without experience.
Usually a plastering team is hired for this. But if there are money problems or the tenants are pressed for time, this is often omitted. As a result, problems may arise when installing platbands.

(banner_content)
How to mount: depending on the material
When purchasing platbands, people largely focus on their appearance and compliance with the overall design of the room, thinking little about the specifics of the upcoming installation.
However, it will have to be taken into account before installation begins.
Wooden trims. The most expensive, but at the same time the most solid and fit into any room design. They are usually fastened with thin nails without heads. If you have a construction gun, purchase special fasteners, which they shoot into the loot.
If it is not there, the head nails become clogged, the heads of which are then bitten off.
Or the fasteners are recessed deeper, and the caps are masked with sealants or wax pencils to match the main background of the tree. Fastening with liquid nails is also possible.
However, there are two objections here: firstly, the wall must be as smooth as a mirror, otherwise gaps will remain, and over time the platbands will deform and fall off.
Secondly, when they need to be dismantled (during the next repair or the need to hide the cable in a compartment), it will be difficult to remove the cash without damage.
MDF trim.
Outwardly they are very similar to their wooden counterparts, although they are cheaper and have design features. Because of them, in order to avoid damage to the planks, holes for fasteners have to be drilled in advance.
They should not be through and should not exceed 1.5 mm in diameter. You can also glue MDF cash on it. Comments regarding the evenness of the walls remain valid, but there will be much fewer regrets in case of damage.
Plastic. Most cheap option, however, has 2 advantages: you can choose almost any design and you don’t mind if it breaks. Therefore, plastic trims are almost always installed with glue. It can be noted that if the walls have a certain curvature, flexible casing will come to the rescue, which can be glued tightly on small bumps and holes.

Joining angle
Let's now figure out how the joints are formed.
There are 2 cutting options:
- 45 degree angle. The most commonly used, and in the case of embossed or rounded planks, the only possible one. However, it is also the most difficult: an incorrect calculation, a trembling hand - and you are the owner of ugly cracks that are difficult to correct;
- If the platbands are flat or a capital is supposed to be installed at the top, the planks are sawn at right angles.
The joining can be both vertical and horizontal. After fitting and before installation, the saw cuts are tinted with varnish or tinted;
We have become familiar with the theory, we can move on to practice.

Installation of platbands
- Work begins on the side of the door into which it opens (from the inside, so to speak) and from the cashing, which is attached to the side of the hinges;
- The length of the loop bar is measured.
With an oblique cut, the bottom point of the line will be the upper corner of the door frame. When installing at right angles, if the joint is vertical, the width of the casing is added to the resulting figure. When joining horizontally, the length of the strip is equal to the height of the box;
- The excess part is sawed off;
- A similar measurement is made for the second long strip.
Attention! Under no circumstances should you measure based on the first workpiece. Due to differences in floor height or unevenly cut doorway, its height on both sides may be different;
- The second strip is cut down;
- Both platbands are attached with two nails (in the case of using plastic ones, with double-sided tape).
The first fixation point is at the very bottom, the second is a meter higher;
- A short strip is placed under the loose upper ends of the long ones (if the cut is at an acute angle or the rectangular joint is vertical). The size of the third component is clearly measured, marked and checked;
- The excess is cut off from the plank. Without final fastening, the accuracy of the cut is checked on the baited verticals;
- If you measured everything accurately and sawed carefully, the parts fit tightly together, forming only barely noticeable gaps.
With the attached parts, the door needs to be opened and closed several times, checking that the cash does not protrude too much and does not cling to the canvas. If this check was successful, you can fix the platbands in the chosen way permanently;
- When using pins or nails, the recommended step between individual fasteners is half a meter.
If you are in the habit of slamming doors, experienced carpenters advise reducing the distance to 15 cm.
 Even with careful measurements and double-checks, it may happen that noticeable gaps remain between the cashing parts. The situation can be corrected if the planks themselves are not skewed.
To do this, mounting tape is glued to the platbands on both sides of the gap - it will protect them from getting dirty. Acrylic sealant is tinted; color matching is checked on scraps. When the shade matches, the sealant is poured into the cracks.
When it dries, the tape is removed.
After studying these instructions on how to attach platbands to interior doors, you can easily and accurately complete your renovation.
Any repair or construction of a house is unthinkable without the use of fasteners, in particular nails. Each type of work is performed using fasteners designed specifically for it.
With the help of various nails you can solve many problems: laying a plank floor, making a wooden staircase, installing door and window boxes, upholster furniture with fabric. At the same time, the nails used have different weights, lengths, weights, and different heads. For some work it is necessary to use nails, the location of which must be masked.
Self-installation of platbands on interior doors
For example, to secure door casings, fix skirting boards, glazing beads on window glass or parquet strips, use finishing nails for casings. Let's take a closer look at what kind of fastener this is and how to use it correctly.
What is a finishing nail and its types.
The main purpose of finishing nails is facing works, since their main advantages include stealth or complete secrecy.
It is achieved thanks to a small diameter cap, which, when hammered, flattens and becomes almost invisible.

Based on the problem being solved, use different kinds finishing nails:
- Uncoated (the most common type of fastener, made of low-carbon steel wire, not resistant to oxidation, suitable for indoor use only).
- Galvanized (has a silver color, suitable for clapboard upholstery in rooms with low humidity).
- Copper-plated (studs have a reddish color, anti-corrosion zinc coating allows use for finishing works in dressing rooms, bathhouses, on balconies, fastening external trim on doors and glazing windows).
- Chrome plated (designed for rooms with high humidity, has a beautiful silver color).
- Brass-plated (a decorative nail that is used in work where the requirements for anti-corrosion resistance and aesthetics are high - clapboard finishing, fastening decorative slats, in furniture production).
Technology for the production of finishing nails.
Finishing nails for platbands, also called carpentry nails, are produced on nailing machines using the method of volumetric cold stamping.
If used for production quality material, then the products are durable and wear-resistant. The marking of finishing nails refers to the diameter of their core and length, which most often varies between 35 and 100 millimeters with diameters from one and a half to three millimeters; nails of shorter lengths of 20 and 25 mm and, accordingly, with diameters up to 1.4 mm are less often required.
Caps are also found in different heights and diameters depending on the selected rod parameters.
For wholesale purchases, finishing nails are packaged in boxes from five to twenty-five kilograms, but in retail there are also smaller ones - from 10 pieces to 200 grams in plastic bags and small packs of 1 kg.
Unfortunately, finishing nails also have some disadvantages, for example, in terms of connection strength they are significantly inferior to construction nails and cannot be removed and reused.
Secrets of installation using finishing nails.
The scope of application of finishing nails indicates that they are mainly used for working with wood, less often with MDF or chipboard.
Although the installation itself is extremely simple - the nail is held at a slight angle with the left hand closer to the material, and the hammer is held closer to the head to control the force of the blow. The nails are driven in right up to the head, which is then flattened, making the joint almost invisible.
Installation of door frames is carried out in two ways: at a right angle (simple) or at an angle of 45 degrees (curly), each of which has its own characteristics.
If construction works are carried out independently, it is better to focus on the first method, which does not require the use of special tools to maintain the geometry of the connections.
When fixing platbands, never hammer a nail in the middle of the board; it is better to do it closer to the edge.
To avoid damaging the plank, you can use a special pin, slightly thicker in diameter than a nail. There is also this secret: sharp knife a small piece of wood is cut out at the place where the nail is fixed, the nail is hammered in, and a wooden patch is then glued in.
If you are working with wooden products, then using finishing nails for trim is easy.
It is more difficult if the platbands are made of MDF or lined with veneer. In order not to damage such a surface and at the same time securely fasten it, you should drill 5-6 blind holes (1.5 mm drill) along the platband with a drill, into which to hammer the nails.

Having secured the platbands, all remaining holes can be sealed using sealant or putty, matched in color.
Also using finishing nails they connect top bar with the sides, which is especially important if the platbands are slightly deformed in case of long-term storage.
Door trim is an important element of a finished door structure for a home or bathhouse, which performs decorative and protective functions.
Overlay strips are designed to stylishly frame a doorway, effectively hiding visual defects and gaps that exist between the wall surface and the frame.
Installation of door frames is the final stage of door installation various types. How to properly install platbands with your own hands to ensure the strength and reliability of the finished structure? In fact, this process is quite simple; the main thing is to know some of the features of individual types of products and methods of their installation.
Types of door frames
To find out how to install platbands for interior doors, it is recommended to consider their varieties. Finished products can be classified by configuration, material and installation option.
Configuration
According to the configuration, the platbands for interior doors are divided:
- Straight and flat. The standard version, which is distinguished by its simple design and attractive appearance. They are suitable for any type of door and can be combined with any interior design.
- Rounded. Externally, they are similar to straight decorative strips, but have a slightly rounded frontal part.
- Curly. Products are made to order in any shape and can be combined with original and designer door leaf options.
Material of manufacture
Modern versions of platbands are made from various materials with high performance indicators.
- Made of wood. Products are manufactured by milling wooden planks. For wooden elements well-dried lumber, jointed lengthwise, is used. Wood planks can be straight, round or shaped. Bathhouse, sauna or log house – the best choice for such buildings - these are wooden platbands.
- Made of plastic. Plastic door trims are made from safe polyurethane alloy or PVC. They are characterized by simplicity, ease of installation and low cost. In addition, such products can have different colors.
- Made of metal. Finished products are made of steel or aluminum alloy. They are durable, practical and wear-resistant.
- Made from composite. Products are made from MDF, plywood or pressed paper.
Installation option
As for installation, you can install platbands on interior doors as follows:
- Invoice. The products are mounted on the doorway using ordinary nails and glue.
- Telescopic. The planks are installed using the tongue-and-groove type, when special protrusions are inserted into the small slots provided.
To obtain a symmetrical doorway, during installation the appropriate dimensions of the main elements must be observed.
Preparing the doorway
Before installing interior door frames, you must carefully prepare the doorway. Preparatory work is carried out in stages:
- . Since the front strips act as a decorative and protective element of the structure, for this reason the installation of trim on interior doors is carried out only after installing the door frame and leaf.
- Removing excess polyurethane foam. Having completed the installation of the box, the remaining foam is cut off, which was used to fill the existing gaps between the wall surface and the door hatch. Cutting is done with a knife with a thin blade.
- Elimination of irregularities and defects. The installed door frame and leaf can cause minor unevenness and defects on the wall surface, which should be corrected immediately. In addition, the installation of platbands requires an absolutely flat surface in order to subsequently avoid deformation of the finished structure.
- Cladding of wall surfaces. Before installing the elements, it is recommended to complete all work on wall cladding using paint, decorative plaster, wallpaper, etc.
- Surface cleaning. All working surfaces must be cleaned of dust and debris, and degreased.
Possible installation options
How to attach platbands to interior doors with your own hands using improvised means? To get started, choose one of 3 available options installations.
Finishing nails
Finishing nails for platbands are one of the most affordable and popular installation options. If necessary, decorative overlays can be easily removed or damaged elements can be replaced.
To simplify the installation process, marks for nails are made on the front surface of the elements, located at the same distance from each other. The optimal distance between two nails is 45 cm.
It is better to use a compact hammer for driving nails. To grout the location of the nails, mastic that matches the color of the surface is suitable.
Liquid nails
The following method of fastening is carried out using a special adhesive composition in liquid form. Fastening with glue is reliable and safe. Fixing the front strip is carried out as follows: the adhesive composition is carefully applied with reverse side element that is pressed tightly against the wall surface for a couple of seconds. Excess glue is removed with a clean rag.
Installation of platbands involves an effective combination of these two methods, which will increase the strength and wear resistance of the structure.
Telescopic method
This method is suitable for fixing telescopic type slats. Installation is carried out according to the tenon-groove principle, when one part of the element fits into another part of it. This allows for correct alignment decorative items without the need to make a cut. The tenon of the finished element is carefully inserted into the groove in the box.
Carrying out the necessary measurements
Correct installation of platbands involves a preliminary calculation of the required length of the product. To cut down a plank, you first need to measure its width. Next, measure the same distance from the top. It is recommended to leave a small margin in length equal to the width of the bar.
The standard width of the interior door frame is 7 cm, thickness is 1.5 cm, height is 215 cm. For a standard-sized single-leaf interior door, you need to prepare 5 elements, and for double door– 6 elements.
Finished planks are produced in various sizes, therefore they differ in width, thickness and height.
Step-by-step installation work
To work you need to prepare:
- Hacksaw for wood.
- Fastening elements.
- Construction tape.
- Square.
All work is carried out in stages:
- The prepared products are prepared according to the height of the door leaf, and the required length is measured. The element is laid on the floor, measurements are taken right angle square, trimming is performed.
- The plank with an angle is applied to the box, aligned vertically and horizontally. The height mark is made, which is equal to inner corner boxes
- Based on the mark, an angle of 45 degrees is set. Trimming in progress.
- Using a similar scheme, the plank is prepared on the opposite side.
- First, the side strips are trimmed, then the top element. This will prevent errors from occurring when installing products.
- Having completed the preparation, you can install the bars. Small nails are driven into the door frame at a distance of up to 45 cm, so that a length of 6 mm remains on the surface for the strip.
- To improve the adhesion of the element to the door frame, special glue is applied to the surface.
- The finished plank is lightly pressed onto the nail. It is very important not to damage the front part of the product. To do this, a small block wrapped in a clean rag is used as a hammer.
- The platband is leveled and pressed onto the nail until it stops.
- After installing the side strips, you can begin installing the top element, which has angles of 45 degrees.
Now even a novice master knows how to nail trim on doors with his own hands. This process is quite simple, requiring a good eye, attentiveness and perseverance.
Few people think about why install platbands on interior doors. This and extra costs, and loss of time on decor installation. Experienced craftsmen claim that with the help cool decor, professionally made from natural wood, you can easily change old, already quite worn out doors beyond recognition. In any case, decorative door trims have de facto become an integral attribute of any interior door designs; in the modern interior of an apartment or house you can no longer do without them.
What are platbands
The appearance of this simple device is well known to everyone without exception. So good that we often don’t pay attention to door decor and have long considered it part door block.
Structurally, the trim on the door, photo, is an edging of the supporting frame in the form of a narrow strip, usually protruding above the plane of the wall and the outer surface of the door opening.

Overlays in modern form appeared relatively recently and were originally used for purely decorative purposes. Modern designs, in addition to purely decorative purposes, are used to solve more practical problems:
- Right installed platband visually aligns the interior door frame. Even if the frame was installed in the doorway with a slight error, you can always install the trim on the door at a right angle so that the entire structure looks perfectly level;
- Overlays on the frame of interior doors cover the gap between the wall trim and the outer edge of the door block. In this case, it is possible to cover pieces of polyurethane foam, fastening parts, wiring or television cable.
Important! With the advent of closed types door awnings with the help of overlays they mask the counter part of the hangers installed on the loot.
Simply put, with the help of overlay decor it is possible to correct and disguise all the irregularities and technological consequences of installing interior doors. But, even remaining a completely utilitarian and practical detail, the main function of the door edging remains its decorative qualities.
Modern technologies make it possible to install interior doors quite accurately and with very high accuracy. Why, in this case, does it occur to the owners to put figured platbands on the doors if the door leaf and frame are installed with millimeter precision? Because the interior door is part of the living space, and you always want its interior to be more comfortable.

Types of platbands for interior doors according to manufacturing materials
Today, quite a lot of options for decorative overlays have been invented and created. There is an option for almost any type of door block. best shape and dimensions of the interior door frame. The linings are made from the same materials that were used for the front part of the door leaf:
- Wooden decorative strips, like solid massif, and pressed from cellulose fiber and lined with veneer, film, textured paper;
- Plastic linings in white or brown with smooth surface from PVC or PP. Plastic can be textured like wood or any other type finishing material, depending on the design of the interior passage;
- Metal door trims made of anodized and painted metal. Typically, metal is used as a complement to glass and mosaic door panels.
Platbands are considered the most expensive self made. Custom works made from valuable wood with brass and polished copper inserts can cost more than an ordinary interior wooden door.
Such parts are planned and assembled only together with the door block and leaf. If, for example, the apartment’s interior is built in victorian style, then platbands for a heavy oak interior door will cost $30-40 per meter of length.
Wooden door frames
Fortunately, ordinary wooden trims for ordinary door blocks cost an order of magnitude less. But even in this case, in order to select the material for installing platbands on interior doors with your own hands, you will need to put a lot of effort into it. You will have to choose the shape, size and material of the wood.
To frame the interior door frame, wooden trims of four standard sizes are used - 40 mm, 50 mm, 60 mm, 70 mm. The width of the strip depends on the size of the door leaf and frame. For example, for a block 2050x680 mm with an interior door width of 2000x600 mm, you can use wooden planks with a cross-section of 40 mm. For wooden door 2000x900 mm with a block of 2050x900 mm use platbands 70 mm and even 100 mm wide.
Important! The cost of a set of strips for arranging a decorative contour is approximately 70% of the price of the door block.
Wooden frames are made mainly from high-quality young Karelian pine, oak, ash and walnut. Veneered options from MDF boards coated with a textured material will cost almost half as much. For example, oak material 70x15 mm costs $3.5 per square meter, while an interior door frame made of eco-veneer 64 mm wide will cost only $2.5. The exception is MDF trim coated with natural oak veneer. Such overlays cost an average of $5 per meter.

Metal door frames
It would be surprising if, with a large assortment metal doors For interior openings metal platbands were not used. The shape and profile of the linings are most often semicircular or flat. Metal overlays are installed together with interior doors on an aluminum frame with a glass insert - a window.
Structurally, the overlays are a stamped profile made of aluminum or thin-sheet galvanized steel, so decorative overlays serve perfectly in the most difficult places in a house or apartment. For example, for balcony door, at the entrance to an unheated room in a house or apartment.
Metal trims are difficult to mark and cut to size yourself, so most manufacturers complete the frames and blocks of interior doors with ready-made products. You just need to properly secure the material around the perimeter of the doorway.
Plastic trim on doors
Today, decorative plastic overlays are considered the most practical and easy to install. The plastic does not fade and does not lose its surface pattern. The profile of the plastic platband is not afraid of moisture and drafts, so polymer linings are used to equip interior doors leading to the bathroom and kitchen.
There are two types of plastic platbands. The first ones are cast in the form of a hollow profile with a large number of ribs and partitions. This material is easy to cut, but when cutting and attaching, it is necessary to handle plastic decor with extreme caution, due to the risk of cracks and chips. The second type is a dense monotonous material, in appearance and properties reminiscent of African oak or young linden wood. Such parts can be cut, sawed, drilled without any restrictions.
PVC trim for doors
Most decorative cladding for interior door frames they are made of polyvinyl chloride. The width of the PVC platbands corresponds to the dimensions of the wood overlays. The most commonly used plastic decor is 70 mm and 80 mm wide.

The most common is a rectangular hollow profile 80x16 mm, it is the lightest and cheapest of all models of PVZ-platbands, the average price of the material is 3-3.5 dollars per meter.

If the door frame of interior doors is made to look like wood, then a semicircular profile with a textured surface that imitates the pattern of alder, walnut or chestnut wood is best suited.
The platbands are made with a central groove on the back side of the profile, which greatly simplifies the installation of the material on the wall.
The special production technology of PVC decor frees up most of the internal volume, which can be used for laying cables and wiring. Such platbands are made detachable, with a lid and a bottom part. This material is inexpensive, $2.2 per meter, however, you will have to purchase additional elements for it to cover the ends on the interior door lining.
Polyurethane trim on doors
The design of a decorative frame made of cast polyurethane is fundamentally different from PVC overlays. Platbands are made not by extrusion, but by pressing foam material in cast iron molds.

This technology provides two main advantages of polyurethane platbands:
- You can make decor with a very complex surface that imitates wood carving, stucco molding or even metal casting;
- Polyurethane trims are very easy to attach to the frame of an interior door;
- The material is easy to cut, drill, and paint.
Important! Polyurethane trims can be glued with ordinary shoe glue, painted with alkyd and acrylic paints. For PVC decor you will have to buy special ones adhesive compositions and dyes.
Therefore, polyurethane platbands are used for interior openings in cases where it is important to recreate complex design doors, imitate stucco or stone carving.

Types of platbands for interior doors by type of fastening
Based on the installation method, door decor is usually divided into two independent groups:
- Simple, overhead or independent type of platband;
- Telescopic or assembled version of the lining.
The choice of shape and size of the decorative element is made based on the size of the doorway and the thickness of the walls. In the latter case, an additional strip can be installed to the platband, providing a smooth transition from the outer surface to the door frame.
Independent door trim
Overhead decorative element the structure resembles a regular polished, wooden or MDF plank. A slight difference between an independent casing and a regular board is the presence of a centering groove on the back side of the decorative overlay.
Polyurethane and MDF linings may have more complex shape, as in the diagram. This profile makes it possible to ensure an accurate and reliable fit of the material to the end plane of the box.
The material is cut to the size of the frame of the interior opening with an allowance for sawing in the corner areas. Structurally, the independent casing is very similar to the details of a wooden frame of a painting.

Telescopic platband for interior doors
The design of the composite lining differs only in the presence of an additional side shelf. In cross section, the telescopic platband resembles the letter “G”. Telescopic platbands and extensions for interior doors are used for installing and assembling the door structure in cases where the wall thickness significantly exceeds the width of the door frame.
Installation of telescopic platbands on interior doors is carried out only after selecting the required width of the extension and bringing the edge of the frame into the same plane with the wall surface.

How to choose platbands for interior doors
The main criterion that is usually taken into account when choosing is the design and method of decorating interior doors. Traditionally, frame linings are selected from the same material as the door itself.
For example, for a wooden frame and canvas, only wood trim is suitable. It is important that the texture and color on all parts of the door frame completely match.
In addition, it is important to maintain the proportions between the width of the vertical posts of the tray and the transverse size of the casing. Increasing the size of the lining to 100 mm is allowed only for interior openings with very thick walls.
Interior door frame width
The second criterion is that the size of the decorative trim matches the area of the door leaf. There are no exact ratios, but usually for narrow interior openings of a standard two-meter height, 40 mm material is used. If the door is more than 2.2 m, then the width of the decor is increased to 50 mm.
For interior openings standard width 70 cm today are most often used by europlates having a transverse size of 68 mm. For very large or high doors, the platband can be increased to 90 cm.
Advice! For novice designers, you can use the rule - the width of the decorative trim is taken to be 1/10 of the transverse size of the interior doorway.
How many trims are needed for one interior door?
Regardless of shape and size doorway, decorative finishing installed on both sides of the interior passage. On each side of the supporting box, three platbands will be installed, of which two are long, 2 m each, and one cornice, the length of which is equal to the width of the opening.
Wooden and plastic blanks are sold in lengths of 220 cm; in this case, five threads of material will be needed to cover the interior door. MDF trims can be sold in pieces of 2.5 m and 3 m, so for narrow door Four pieces may be sufficient.
How to attach platbands to interior doors
There are at least four main ways to attach decor to the end of the box:
- Using nails;
- Perform fastening using self-tapping screws;
- Glue with a special polymer composition;
- Assemble using a tongue-and-groove connection.
The latter option is used exclusively for boxes with additional elements and grooves for installing telescopic trims. In this case, it is necessary to cut the decorative trims to the size of the box, cut at an angle of 45° and install the strips in the groove on the supporting frame of the interior passage.

How to glue interior door trims
This is the easiest way to secure decorative strips to the frame. The only problem is choosing the right glue. Often, managers of construction salons recommend “Moment” or “Liquid Nails” as the most suitable option for sticking platbands. Convenient packaging in the form of a tube, you can insert it into a hand gun and seal all the parts of the interior door in 20-30 minutes. leisurely work.
In fact, both brands of glue are not entirely suitable for gluing platbands to a vertical surface. Firstly, the acrylic mass dries for a long time, and during this time the planks have time to sag or move out of the place of fastening. Secondly, “Liquid Nails” more or less glue platbands made of MDF or polyurethane; for wooden trims, polyurethane and polystyrene adhesives are better. For PVC parts you will have to use special composition from plastic sawdust dissolved in dichloroethane.
To prevent the slats from moving off the door opening, they are glued with a heat gun or narrow strips of tape.
Advice! If interior partition If the door is thin enough, and every time the door is closed, the wall with the frame shakes, then it is better to use transparent or white sanitary silicone as glue for interior door trims.
Its price is slightly higher, but the silicone material dries in just a couple of hours, and holds even PVC cladding much better, especially under conditions of strong shocks and vibrations.
How to nail trims to interior doors
Most quick way secure the decorative trim - nail it. Of course, not with simple carpentry fasteners, but specially designed for fixing the finish to wooden base. Finishing nails for interior door frames look like regular nails, but without heads.

After the fastener is driven into the body of the decorative strip, only a small, barely noticeable point remains on the surface. When choosing nails, it is necessary to control the length of the rod; to securely hold the decor, it is required that the metal extends into the wood of the box by at least 10 mm.
It is clear that fastening metal and plastic pvc planks using this method is impossible. On metal surface the finishing nail will not stay in place, and any attempt to drive it into PVC profile will only lead to cracks.
Self-tapping fasteners
Often there is simply no way to reliably fasten the platbands to the interior passageway box other than using carpentry screws. At first glance, the idea does not look very good - black or metal heads can seriously ruin the appearance of the interior door. But the situation can be easily corrected; you just need to use cut circles from veneer or film and seal the fastener heads with them.

The second installation method is used for collapsible models. It is enough to disassemble the profile, install its bottom part on the self-tapping screws, lay the cable and simply snap the cover.
Some decor models are made with mounting grooves on the back surface of the lining. In this case, it is necessary, using a template, to tighten the carpentry screws at certain points on the end of the box. After that decorative overlay it is put on with self-tapping screws and lowered a few millimeters down. The heads fit into the groove and securely hold the decor in the desired position without any glue or nails.
The most difficult stage of installing wooden planks is to correctly cut a 45° angle at the junction of the horizontal and vertical sections. You can file a corner using a square or template. This is usually done if you need to install telescopic platbands with extensions, or the plane of the box is perfectly aligned with the surface of the partition.

In other cases, the gash is performed as follows:
- Using a tape measure, measure the workpiece for the vertical casing, always with a margin for cutting down the connecting part. Using a square, a pencil and a hacksaw, cut the required angle line;
- The resulting blank is temporarily attached to the groove of the interior passage, a horizontal strip is applied, it is leveled, the markings are transferred and the mating part of the corner joint is filed.
After installing the overlays, the angle will be smooth, without cracks or misses. If you file a joint using a template, there will be a gap between the mating edges.
Conclusion
Selecting and installing trim on interior doors is not particularly difficult for a person who has at least a general idea of the sequence of work and knows how to handle carpentry tools. The only case when work with interior doors should be entrusted to a specialist is when installing a door block with hidden hinges. In this case, experience and knowledge of the operating features of complex suspensions will be required.


