Such necessary item interior, like a plinth, also called a cornice, fillet, border, molding, must be installed correctly. How to make the wall/ceiling joint invisible. How to fix the ceiling plinth?
Gluing technology, do-it-yourself installation, fastening features for plastic and foam products, for suspended ceilings, choice of glue, detailed video tutorials - this is what our article is about.
Installing ceiling plinth by gluing
Stage 1. Selecting a product for the ceiling
When selecting a bonded ceiling plinth You need to focus on the size of the room.
For your information: The higher the installation room, larger area, the more massive the cornice is attached by gluing.How to properly glue ceiling plinths with a variety of shapes and sizes
Laying a narrow ceiling plinth in a high room will not decorate the interior. A decorative item secured with adhesive will simply be “lost.” A wide ceiling cornice, glued in a low room, will “press”, lowering the ceiling even more.
Types of products installed by gluing according to the pattern:
- smooth;
- “under stucco”;
- with longitudinal relief stripes.
Stage 2. Calculation of materials installed by gluing
It is necessary to divide the perimeter of the room by the length of one fastener - usually 2 m. Round the resulting number to the nearest whole value. Add 1-3 more baguettes to the resulting figure, because when fastening by gluing, you can ruin the edging element.
Stage 3. Marking the ceiling for installation
How to mark before gluing:
- Inspect the mounting locations for unevenness.
- Determine the places of fastening with adhesive, taking into account that it is better not to glue long baguettes to places with large curvatures, since they may break during fastening.
- It is necessary to secure the skirting boards of the same length with adhesive. The joint of installed products of equal length looks “more presentable” than fastening long and short ones.

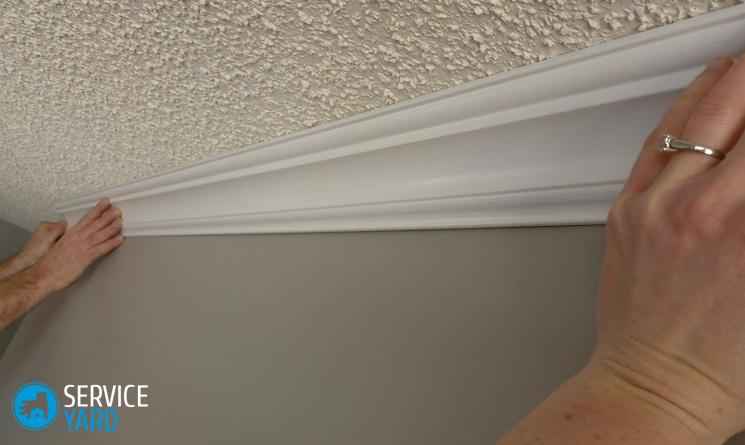
Photo - how to stick a plinth on the ceiling
Advice: Marks for fastening with adhesive must be placed so that they are “hidden” behind the ceiling molding after it is fastened.Step 4: Preparing for adhesive installation
List of tools for gluing installation:
- mounting gun;
- miter box for cutting at an angle;
- rubber spatula;
- pencil;
- roulette;
- sharp stationery knife;
- container for mixing putty.
List of fastening materials:
- ceiling plinth;
- corner mount;
- putty;
- glue;
- water-based paint;
- acrylic sealant;
- fastening strip.
Stage 5. Cutting ceiling fasteners
Cut the corner very carefully using a miter box - a device that allows you to cut the baseboard at the required angle.
Important: Follow the principle - corners are cut first. And then the ceiling product is cut.Having even 90° angles on the ceiling at the fastening points, there will be no problems with cutting. Place the cornice in the miter box and cut it off sharp knife at an angle of 45 o. The cornice is placed on the bottom of the miter box with the side attached to the ceiling. When cutting, you need to hold the product straight and not allow it to move, otherwise you will end up with an extra gap, which needs to be sealed when fastening it with adhesive.

How to glue skirting boards to the ceiling - mark for cutting the corner before fastening
Attention: The ceiling plinth is often asymmetrical in cross-section. It should be taken into account that the long side is attached to the wall, the short side is attached to the ceiling.Rules for cutting before fastening:
- at an internal angle, the front part of the cornice is cut off;
- at an external angle, the inner part of the fillet is cut off.

Before gluing the ceiling plinth, it must be cut correctly
Important: You need to start cutting the ceiling plinth from the outer corners. It is necessary to leave a few millimeters “in reserve”. The excess is then sanded off with sandpaper. The resulting gap at the inner corner is sealed with sealant.How to cut a right angle?
- Install the first baguette to the wall. Use a pencil to draw lines to the corner on both sides.
- Perform the same operations with the second plinth.
- Mark the intersection points for the top and bottom lines.
- Transfer these points to the baguettes.
- On each cornice there are two marks through which a cut needs to be made.

Installing a plinth with your own hands - trying it on before fixing it
Advice: If you don't have cutting skills, practice on scraps. Or purchase a ready-made corner ceiling mount, then there will be no need for precise cutting of corners before installation.Stage 6. Installation of ceiling plinth
Installation methods:
- wallpaper adhesive;
- wall adhesive;
- mechanical fastener.
The first method - installation by gluing to wallpaper - is most suitable for beginners.

How to install/glue - Moment Installation for ceiling skirting boards
Advantages of fastening:
- easy replacement with a new ceiling plinth instead of the glued old one;
- It’s easier to adjust the gaps before gluing;
- aesthetics – the “integrity” of the wall/plinth installation.
Gluing ceiling plinth video tutorial:
What else is the ceiling plinth attached to? Instead of glue, use finishing putty.
Cooking process:
- Pour into the prepared container required amount water - from the instructions for the putty.
- Pour in the required amount of dry mixture.
- Beat with a mixer adhesive composition until a homogeneous mass is obtained.
Further glue mixture take rubber spatula and apply to both edges of the baguette, the ends with a layer of up to 1 cm. Place in place, carefully fasten. First, use a spatula, then use a sponge to remove excess adhesive putty.
How to glue a ceiling plinth video - attaching it to putty:
Advice: If there are strong uneven surfaces for fastening, do not press the product too hard, bending it. It is better to seal the resulting cracks with the same putty.
Mechanical fasteners - 3rd installation method - used if the finish suspended ceiling made of plastic panels. PVC ceiling plinth is installed on a mounting strip.
How to glue foam plastic ceiling plinth
Installation of skirting boards using the first two installation methods, as the most used:
- Align uneven parts of the wall and ceiling.
- Apply primer.
- Apply glue - liquid nails - to internal corners installed, glued baguettes. You need to act as carefully as possible so that the glue does not get on the front part.
- Place the ceiling cornice in place. Remove it and wait 2-3 minutes for the glue to set. Install by pressing lightly, without squeezing, as a dent may appear or the baguette may break.
- Lay subsequent skirting boards, installing them by gluing them to the wall, ceiling, or the junction with the previous one.
- Cut off the ceiling molding, reaching the corner, using a miter box.
- Use adhesive putty to seal cracks, joints, and gaps around the entire perimeter of the ceiling.
- Paint after installation by gluing.

Fastening the ceiling plinth - sealing the gap with sealant
Laying plastic skirting boards
How to attach a plinth if the suspended ceiling is made of plastic panels? Answer: mechanically fastened installation.
- Install corner connections.
- Secure the installation strip using self-tapping screws. The fastening step is 30-50 cm.
- Install the outer decorative strip on the fixed structure.

Before installing plastic skirting boards, cutting is carried out mounting plate with snap-on external decorative element
Fastening the ceiling plinth in the case of a stretch ceiling
Installation of skirting boards video - mounting features for suspended ceilings:
What type of ceiling products to install if you choose for the interior suspended ceiling?
Types of cornices:
- polyurethane;
- plastic.
Criterias of choice:
- Lightweight materials are installed.
- The gluing plane to the wall should be wide.
- Possibility of using glue recommended for installation by gluing products under a suspended ceiling - Moment Montazh, Europlast or Orac.
- They do not glue to the ceiling, only to the wall.
- When gluing, it is possible to leave a gap for installing an LED strip - fastening skirting boards with ceiling lighting.

Backlight LED strip, fixed by gluing between the stretch ceiling and the baguette
Installation by gluing polyurethane products
Advantages of the material:
- flexibility;
- not subject to destruction when using solvents;
- moisture resistance;
- ease of fastening during installation.
Flaws:
- high price;
- heavy weight – when fastening/gluing it can sag under its own weight.
The technology of fastening by gluing is no different from the above, only it is taken into account that installation is carried out only on the wall. Therefore, it is worth choosing wide moldings with a large surface for gluing.
Advice: If the wall is not covered with wallpaper, then it is recommended to go over the plaster at the attachment point with a brush and primer. It will increase the strength of the installation and strengthen the plaster.Fastening by gluing plastic baguettes
Follow the installation steps above.
Advice: Surface tension fabric The product should be protected before installation. It is more convenient to use polyethylene film. It is simple to attach and then easy to remove.
Sealing the gap when installing a ceiling molding with a mounting gun
Ceiling baguettes, or fillets, as they are called in a professional environment, are optimal finishing material, with which you can mask most defects in the cladding of the ceiling, walls and connection lines between them. Also, this detail can emphasize the special style of the room. That is why information on how to properly organize the workflow of finishing a ceiling with plinths will not be superfluous. In this article we will look at the installation of ceiling plinths and everything related to finishing the ceiling with this material.
Variations of ceiling plinths
Manufacturers of these products produce baguettes in several versions, and each type of product has its own consumer demand. Next, we will look at the most common options for ceiling skirting boards, their advantages and disadvantages.
Polyurethane skirting boards:
- The most purchased product among finishing options, lightweight and easy to install.
- Despite the fact that the plinth is quite light, the product has a certain strength, so it can be easily installed by one person.
- Thanks to special staff, polyurethane skirting boards can be installed in rooms with increased level moisture.
- The plinth bends well, so it can be used to decorate a ceiling of any complexity.
Polystyrene foam baseboard:
- This type of plinth, like polyurethane baseboard, easy.
- Installing a ceiling plinth made of polystyrene foam will provide additional sound insulation of the connecting seams of the slabs.
- With prolonged exposure to artificial light, fillets lose their original rich color.
- The products are not particularly durable, so it is necessary to work with them with caution.

PVC skirting boards:
- PVC skirting boards are not intended for use in rooms with poor ventilation or high moisture.
- Finishing method PVC walls Craftsmen consider skirting boards to be the most budget-friendly.
- The color range of the products allows you to select baguettes based on the design features of the room.
- Disadvantage PVC use fillets have weak strength and elasticity. Minor efforts lead to the formation of dents, which greatly spoil the final result of the finish.
- Products should not be treated with paint - its components may cause the frieze to become deformed.
Important! If you are planning to install ceiling plinths yourself, we recommend choosing polyurethane products. The products are affordable, light material and have a long service life; high-quality raw materials are used for their production.
Where to begin?
Before you start painting or wallpapering the walls, you should think about the edging option for the room. If the walls require wallpapering, the ceiling plinth must be installed before this process.
Important! If you glue a baguette on top of the wallpaper, then in places where the wallpaper is poorly glued to the wall, unevenness may form. As practice shows, wallpaper is changed much more often than the shade of the ceiling is changed, therefore, in order to avoid frequent installation of ceiling plinths, it is better to initially install them first.
How to calculate the amount of plinth for a room?
Do you want to know how to properly attach ceiling plinth? To get started, first of all, before purchasing baguettes, you will need to correctly calculate the number of strips for finishing the room. In a calm environment, use a tape measure to measure the length smooth walls, as well as turns and bends. If you glue the wallpaper yourself, then such a calculation will not cause any difficulties:
- Calculate the perimeter of the room where you plan to install baguettes.
Important! To make the final finish look more attractive, use fillets of at least 2 m. This way you will have fewer joining seams.
- Next, the result obtained should be divided by the length of the skirting board you have chosen, for example 2 m, as a result we get a figure that determines the number of required baguettes.
Important! The result of calculations does not always result in an integer. If this happens to you, then you need to round the fractions up to a whole number.
- If, as a result of a miscalculation, you end up with a whole number, purchase one or two more units of plinth.
Important! Additional skirting boards may be needed if one of the strips is defective or a defect appears on the surface during installation.
- If the walls in the room are too curved, then you should not glue long strips of skirting boards, as this may cause them to break.
- To make the glued ceiling plinth look beautiful around the entire perimeter of the room, we recommend gluing strips of approximately the same length, rather than combining long and short ones.
Important! When marking with a simple pencil on the wall, draw a line so that after installing the fillets it is not visible.
Required tools for installation:
- A sharp utility knife or hacksaw for metal;
- Tape measure and pencil for marking;
- A miter box is a special tool that will help you cut the corners of baguettes efficiently;
- Container for putty or glue;
- Rubber spatula.
How to choose a plinth according to the dimensions of the room?
In order for the baguette to look harmonious in the room, there are certain rules that must be followed:
- If the ceiling height in the room is no more than 2.5 m, the width of the molding mounted on the ceiling should not exceed 9 centimeters.
- With a ceiling height in the room of 2.7 m for a room of 15 square meters. m install plinth up to 10 cm, from 15 to 23 sq. m – skirting boards are chosen from 9 cm to 14 cm.
- If the ceilings in the room are 3 m or higher, use for small rooms plinth 10-15 cm wide, for large living rooms 15-20 cm.
Cutting the baseboard
Installing a ceiling plinth with your own hands is not a very complicated process, however, everything installation work should be carried out very carefully and slowly. Otherwise - quality repairs in the room it will not be possible to achieve:
- To perfectly join the corner cuts, use a tool called a miter box; with it you can easily cut a 45 degree corner on a baguette.
Important! First of all, cut a suitable corner on the baguette, and then adjust its length.
- Most of the plinth has an asymmetrical shape - one side is longer than the other. The long side is glued to the wall, and the short side is applied to the ceiling side.
- If all the corners in the room are 90 degrees, cutting and joining them will not be difficult.
Important! In order to beautifully cut the corners of the plinth, the side that will be located on the ceiling is placed on the bottom of the miter box.
- The ceiling molding must be laid evenly on the surface of the miter box and pressed tightly to the surface. This way, the corners will be created without unnecessary gaps.
- How to attach ceiling plinth to the ceiling if the corners are uneven? Place one strip on the wall and draw lines along the sides of the baguette all the way to the corner, and do the same on the other side of the corner.
- Use a pencil to mark the intersection points of the stripes on the ceiling and wall, then transfer the points to the baguette; a cut should be made along these points.
Important! If you don’t want to waste time on drawing and calculating angles, you can purchase corner mounts for ceiling plinths in the store. Fillets are inserted into the holes provided in it without precise trimming along the walls.
- When installing a plinth on the ceiling for the first time, practice cutting corners on unnecessary parts. It is necessary to cut off the parts along the outer corner, leaving 1 mm for adjustment; the excess can be easily sanded off.
Important! You can get rid of an unaesthetic gap on the outer corner using acrylic sealant. Once the repair is complete, paint the corners.
Which glue to choose for installing skirting boards on the ceiling?
So, you already know how to calculate the number and size of the plinth, then you need to determine what glue to use to mount the fillets. We previously wrote that baguettes are made from PVC, polystyrene foam and polyurethane, so for each of them it is necessary to select a suitable adhesive composition.
Main criteria for choosing adhesive:
- For products made of foam plastic, wood and polymer skirting boards, polymer adhesives are used. The most common among them are made on the basis of aqueous polymers, easily soluble in water, based on liquid hardeners of plastic polymers and organic solvents.
- Mostly for the installation of baguettes, PVA glue, “Bustilat”, “Dragon” or silicone sealants are used.
- In most cases, fillets made of gypsum or foam plastic are glued onto a putty solution; it is also used to seal the gaps between the baseboards, ceiling and wall.
- Wood products are installed not only with glue, but also with nails and screws.

How to properly apply glue to ceiling plinth?
- Before using polymer glue, first prepare the walls and ceiling for better adhesion.
- If walls are treated with plaster or putty, they are first coated with a primer.
- If the surface is covered with plastic or wood, it is necessary to degrease the surface.
- Glue the plinth to the ceiling, using putty, as follows: it is applied to reverse side fillets along the entire length, apply to the wall and press down a little. Excess adhesive mixture is removed with a spatula or finger.
Important! If the wiring is hidden under the ceiling plinth, it is first secured to the ceiling or wall so that the wires do not pull back the plinth and complicate the gluing process.
How to install ceiling plinth? Mounting options
In the process repair work you can use one of the three most common methods of installing a baguette on the ceiling:
- Gluing to the wall.
- Pasting on wallpaper.
- Mechanical fastening. This method Installation of fillets is mainly used when installing suspended ceiling panels indoors. In this case, a special frame is mounted around the perimeter, onto which a baguette is subsequently attached.
The use of any of the options has its advantages and nuances:
- If this is your first time installing a baguette without an assistant, we recommend securing the baseboard by gluing it to the wallpaper.
- The most the best master Consider installing fillets on the wall as an option. As a rule, the wallpaper in a room is changed much more often than the ceiling is repainted, in which case you will not need to re-install the ceiling plinth.
Method number 1:
- Before installing the baseboard, level and prime the ceiling and walls in the room.
- On inner part Apply glue onto baguettes with a spatula.
Important! Try not to use a large amount of glue so that excess glue does not stick out.
- Place the prepared strip against the wall for a few minutes, then remove it and wait until the glue sets.
- After a few minutes, place it back on the wall, pressing down a little.
Important! Do not press the baseboard with great force, as cracks and dents may form on the surface.
- Lubricate subsequent parts of the plinth with glue along the length and side parts in contact with the previous plank.
- Having reached the corner, use a tape measure to measure the distance to it and cut the baguette using a miter box.
Buy traction rods. They come in a variety of heights and styles, so shop around and choose the design you like best. Typically, the angle at which the baseboard is placed in relation to the walls varies from 38º to 52º, so measure it before you start cutting.
Make a guide ruler for your cutting machine. Because The baseboard will be installed on the wall at an angle, each joint (this is where two parts of the baseboard meet) will form a compound angle. The baseboard should be cut at an angle of 45º and beveled so that the two adjacent parts fit snugly. Achieving this with two separate cuts is very difficult, so here you will learn how to cut both corners with one cut. To do this, you need a guide - this is a piece of plywood glued to the table of your machine that helps place the baseboard in exactly the same place for each piece.
Make oblique cuts where necessary. If one of the walls of the room is longer than the lengths of your existing skirting board, you need to connect the two lengths with an oblique joint. Measure the point where the connection will be, place the first part on the machine upside down at an angle, as described earlier. Adjust the machine blade to a 45º angle and cut the baseboard. Place the second part on the machine and cut in the same position of the blade, while making sure that the part you need remains on the other side of the blade.
Trim the outside corner joints. When two walls form an outside corner (creating a 270º angle in the interior of the room), the connection is very simple. Place the first piece of baseboard in the machine against the guide you made and cut it at a 45º angle. Cut the adjacent section with the machine in the same position, this time keeping the piece of baseboard you intend to use on the other side of the blade.
Trim internal corner joints. Internal corner joints are a little more complicated than external ones. The first piece of plinth should be cut into a square, which means that its edge will fit snugly against the wall. The second piece will be cut at a 45º angle as before, but then trimmed to fit closely to the profile of the first piece.
- Cut the first piece of baseboard into a square. Place it on the machine and make a cut with the blade position at 0 degrees.
- Cut the second piece at a 45º angle, just like you did for the outside corner.
- Using a dark pencil, mark the edge of the cut (the second piece) along the front of the baseboard piece.
- Use hand saw to trim the seam of the cut edge. Do this exactly along the drawn outline, removing as much wood as you want behind the front edge. Because after installation it will only be visible outer part baseboards, trimming can be rough, but along the contour.
Ceiling plinth is one of the types of cornice and is intended for decorating the junction of walls and ceiling in the house. It can have different widths, finishes, and be convex or concave.
Installing a ceiling plinth with your own hands will please the eye and help you save money by refusing the help of specialists. How this is done and what materials are needed for this process are described below.
Tools for gluing ceiling plinths

- Ruler
- Roulette
- Pencil
- Construction knife
- Glue (liquid nails)
- Glue gun
- Spatula (rubber)
Consumables: ceiling plinth, acrylic sealant, special glue, polyethylene lining (for suspended ceilings).
For each corner take material with a margin of up to 10 cm on both sides.
Getting ready to install the ceiling plinth
- We place the plinth on the floor for now, figuring out the best placement of the pieces.
- We cut corner joints.
- We check the correctness of the measurements and see if our “puzzle” of the ceiling plinth fits together.
When designing baseboards, try to maintain factory edges. They connect perfectly without any errors.
First, take two corner pieces, which are coated with glue, and glued simultaneously to both the ceiling and the wall. Then lightly press the baseboards and wait about a minute. The joints between them do not need to be lubricated with glue.

After completing the work, it is necessary to seal all joints of the baseboard with the walls and ceiling using a rubber spatula.
How to glue skirting boards to a suspended ceiling?
To glue the plinth to the suspended ceiling, choose very light elements so as not to weigh down the stretched fabric and damage it. Glue the baseboard with the wide side facing the wall. A polyethylene gasket is placed between the ceiling and the baseboard, which is removed after installation.

As you can see, you can glue the skirting boards yourself without special effort. It is enough to know only some of the tricks that we have shared with you.
Installation of ceiling plinth (video):
After repairing or painting the ceiling, you often install the ceiling plinth yourself. This plinth has a huge variety of other names. So, it is also called fillet, frieze, molding, border and baguette.
This work is not particularly difficult. When installing ceiling plinths, you just need to be careful and attentive. And, of course, know how it's done. We hope that our article will provide you with all the information you need to do this.
The materials for the manufacture of ceiling plinths are: polystyrene foam, polyurethane foam, wood, gypsum, aluminum, plastic. In our article, we will dwell in detail only on the most common ceiling border made of polyurethane foam, and also clarify what materials and tools will be needed during the process of installing it.
Preparing to install ceiling plinths
First of all, you need to decide on the circumstances of the installation: whether it is done before or after wallpapering. This issue needs to be dealt with carefully and thoughtfully. If before installing the border, wallpaper has not yet been hung on the walls or there is old wallpaper, but you intend to change it, then there should be no question of installing it on top of fresh wallpaper. The right approach V in this case consists of only preparing the surface, installing the baseboard and only then gluing new wallpaper. If you have wallpaper and you are not going to change it, then only in this case the border should be installed directly on it.
When preparing the junction of the wall to the ceiling, that is, the place where the ceiling border will be installed, it is necessary to perform the following operations:
- Check the evenness of the surface. To do this, you should attach a flat block or level to the wall and make sure there are no gaps between the wall and your standard. To eliminate unevenness, you can apply putty or gypsum plaster. The evenness of the wall guarantees the quality of the fillet fixation. If the ceiling has not been painted before, then a similar operation should be performed on its surface.
- Clean the entire perimeter of the ceiling-wall junction from debris and excess putty.
- Prime the prepared surface.
How to determine the required number of ceiling skirting boards
The installation of a ceiling plinth, a video of which you can watch at the end of our article, should also be preceded by the purchase of a sufficient quantity of the border you have chosen.
To do this, first of all, you need to measure the perimeter of the room. Remembering that the standard length of curbs is 2 m, you should divide the resulting perimeter by two. This will give you the number of absolutely necessary fillets. When purchasing, we recommend taking one or two fillets in reserve to compensate for those that may be damaged during operation.
Tools needed when installing ceiling skirting boards
When installing a plastic ceiling plinth, the price of which is the most affordable, it is absolutely impossible to do without:
- a hacksaw or stationery knife with a set of interchangeable blades;
- a miter box, which makes it quite easy to make the correct cut of the plinth at the required angle;
A miter box that allows you to trim ceiling skirting boards during their installation
- rubber spatula;
- mounting gun;
- acrylic sealant, putty or glue.
The most difficult operations during installation include trimming ceiling borders in the corners. For this work you need to use a miter box and a saw with small teeth, which can be replaced stationery knife. In a miter box, the plinth is installed the same way it will be installed on the wall, that is, the top and bottom of this plank should not be confused. The cutting itself must be done with light movements, without putting strong pressure on the saw.

This is how ceiling plinths are trimmed in a miter box
Particularly difficult to work with are uneven corners. In such cases, marking should be done at the installation site without using a miter box. The inevitable small gaps can be hidden using acrylic sealant.

This is how joints and cracks are sealed
When installing a ceiling border in rounded areas, cut it into small pieces of a few centimeters, and then adjust the joints, sealing them with putty or acrylic sealant. After painting, the sealed joints will become completely invisible.

Installing ceiling plinths in rounded areas
The fillet gluing should begin from the most visible place in the room. This will allow you to make joints and trims where they are less noticeable. For fixation, you can use special glue, acrylic sealant or putty. However, you should know that working with sealant is more convenient.

The sealant or glue must be applied to the baseboard very carefully
Upon completion of installation of the plastic ceiling plinth problem areas must be hidden with putty or sealant, using a rubber spatula for this. However, some voids can be filled even with your finger.
After the glue or sealant has dried, you can begin painting the borders. To provide good quality The painting is applied in two layers. You can paint with a spray bottle or a regular brush of a convenient width.

Painting installed ceiling skirting boards
Installing a ceiling plinth (video)
Everything we just talked about is clearly presented in the following video:


