You can create such a simple pattern using colored adhesive tape: simply stick on even stripes, alternating them with white empty spaces. It will look like a zebra.
Photo: katesdesignspace.wordpress.com
With the help of colored tape you can create more complex ones. The main thing is that your hand does not tremble.
2 Refrigerator covered with wallpaper
Now on sale self-adhesive wallpaper, which you can use not only for, but also on the refrigerator. Choose an option with a simple repeating pattern for a stylish result.

3 Painted refrigerator
Option for the stubborn - . An aerosol or regular paint. Don’t forget to place the refrigerator on film and cover all other nearby surfaces with it so as not to get it dirty. If you want to leave some parts of the refrigerator (handles, brand logo) intact, carefully cover them with electrical tape or tape.
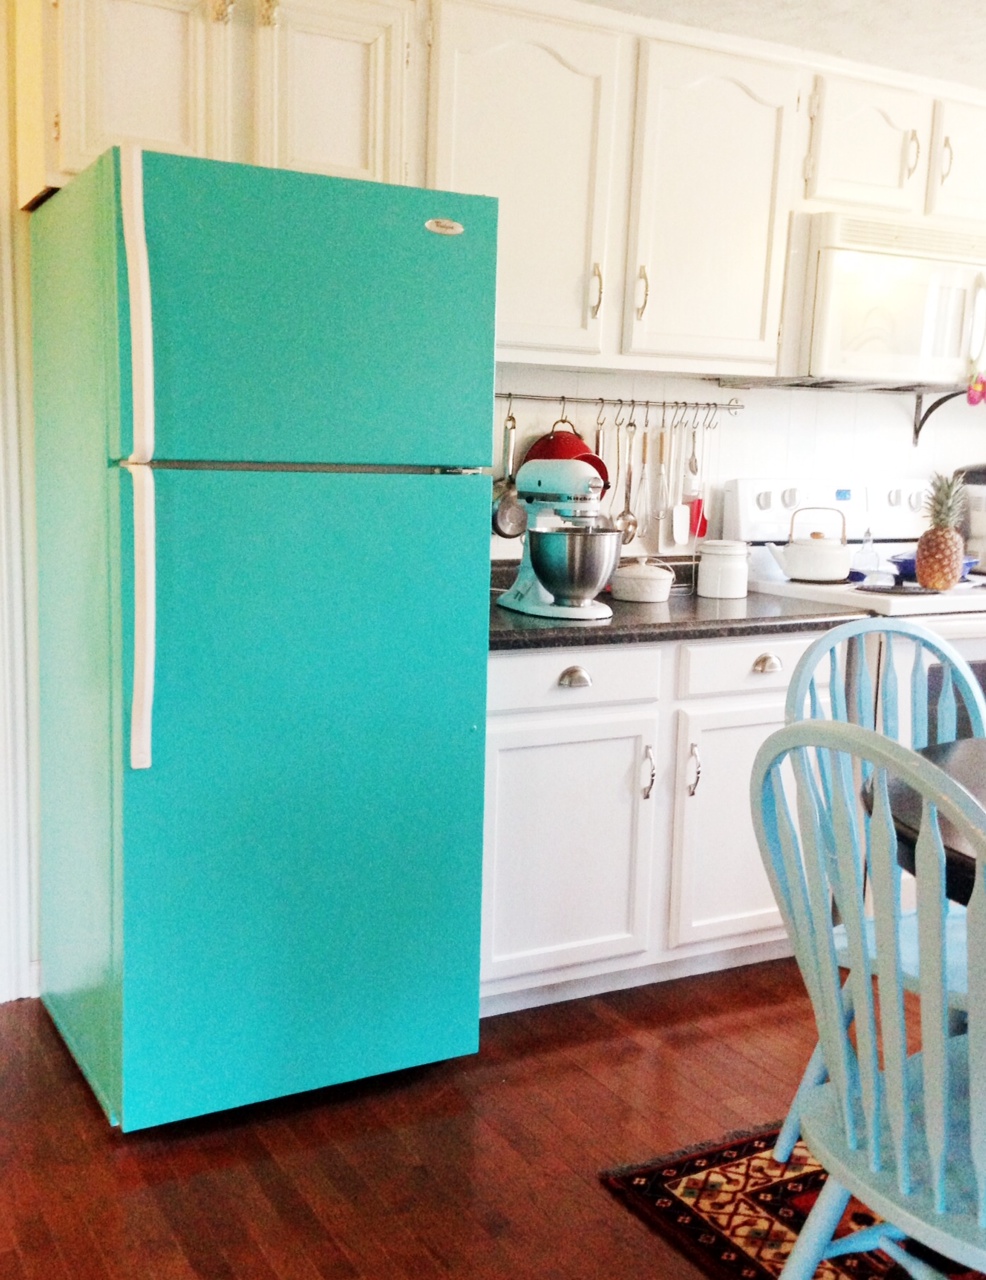
Photo: cozycrookedcottage.wordpress.com
It is unlikely that you will be able to paint your refrigerator perfectly right away - it will probably take a while inner surface the doors will have smudges and uneven colored edges. You can remove them with nail polish remover.
4 A refrigerator you can write on
Want to leave notes or drawings on your refrigerator? Then cover it with chalkboard paint. The owner of this refrigerator also decorated the handles with jute ropes - it turned out very impressive.

5 Refrigerator photo gallery
Turn your refrigerator into a place for your memories by simply covering it with memorable photos.
You can also frame your photos. To do this, you need to glue small magnets to the frames, and they will stick to the door.

6 Homemade refrigerator organizers
If you have a couple of cute metal spice or candy containers, you can turn them into organizers. Here again you will have to arm yourself with glue and magnets. Voila - a stylish and functional decoration is ready!
Manufacturers household appliances They are increasingly delighting us with a variety of colors and decor, which allows us to choose not only a functional refrigerator, but also one that fits perfectly into the interior concept. True, such new items are depressingly expensive.
But is it necessary to overpay for fashion design, if it is quite possible to create it yourself? We invite you to study in detail how to paint and decoupage a refrigerator with your own hands, photos of original works and master classes various techniques decor from hand-made masters.
How to choose paint for a refrigerator
If the operation of the equipment does not cause any complaints, and the whole point is only an unpresentable appearance or a boring white color, you can repaint the device in any shade that suits the interior scheme. To do this, you will need sandpaper, a medium-width brush/roller or spray bottle, masking tape and a properly selected paint.
Best suited:
- Automotive nitro enamels - easy to apply and pleasing good choice colors. They are sold in special cans for easy spraying. But it is better to restore the device outdoors - undried paint releases toxins, and it is also difficult to process a massive device indoors without accidentally staining other surfaces.
- Epoxy paints are wear-resistant and are sold in both spray cans and regular banks for application by brush/roller. There are even special enamels marked “for restoration of household appliances.” The only negative is the small range of colors.
- Acrylic paints for metal are a universal option for home craftsmen. These products do not emit hazardous substances and have a huge selection color solutions and can be easily applied with a roller or spray can.
Instructions for repainting the device yourself
After choosing the paint, you need to prepare the refrigerator itself - remove all the shelves, wash the body with soap.
Old paint, chips or cracks can be removed using sandpaper to ensure better adhesion for the new coating, then remove debris with a rag, degrease and prime all surfaces.
Now all that remains is to protect the handles, decorative inserts and seal the doors with masking tape, and you can get to work.
If you do not cover the fittings, you will have to wash off paint splashes with a solvent, and this can cause glossy coatings to fade.
The process of painting the device depends on the tools used and the type of paint:
Pour some of the dye into the tray, roll the roller so that it is evenly saturated, and remove the excess on the ribbed surface. The paint can be applied in vertical movements, or from left to right.
It is better to treat corners and areas near the fittings with a narrow brush. The second, and if necessary, the third layer can be applied only after the previous one has dried (the time depends on the type of paint and should be indicated on the packaging).
- Use of aerosol products
The spray can is held at a distance of 25-30 cm from the surface, spraying paint evenly from left to right. The main thing is not to linger in one place and not to leave unpainted “islands”. But even if there is a “gap”, it can be easily eliminated by re-processing. Aerosol paints usually dry quickly - after half an hour you can already apply a second coat.
With the help of a spray, the paint goes on smoothly and without drips.
More ideas on how to update old refrigerator with your own hands - in the photo. We will consider decoration techniques in detail below.
DIY refrigerator
- Wash the surface with soapy water or wipe with any degreaser.
- Decide on the location of the decor (you can stick it to the corners with tape and see from afar whether the decoration looks good).
- Stickers consist of three layers: backing, design and protective film. If the design is small, no more than half a standard sheet, you can immediately remove the opaque bottom layer, press the sticker to the refrigerator and carefully smooth it with a dry sponge from the center to the edges to avoid the appearance of bubbles and wrinkles.
- To paste a large fragment, it is worth involving an assistant. First you need to bend the bottom layer a few centimeters and secure the upper part of the sticker to the surface. Then one person will pull the backing down while the other person will smooth the design at the same time.
- When the sticker is completely transferred to the refrigerator, remove the top protective layer of transparent film.
Sticker
Pasting with film
You can decorate the entire refrigerator by hiding its entire body under stickers. To do this, use a special self-adhesive film. It is produced in rolls (usually 50 or 100 cm wide), but stores sell cuts according to the required footage.
Finished drawings most often imitate more expensive materials - wood, stone, metal.
Also popular are floristry and images of birds, animals, butterflies, ladybugs, but there are also options for “kitchen” themes - various vegetables/fruits, dishes, spices.
You can decorate the entire body or individual areas, such as a freezer.
The decor is applied similarly to vinyl stickers - by smoothing it over a degreased surface. If instead of painting you decide to cover the refrigerator with film, look at the photo finished works, perhaps they will inspire you to experiment with decoration on your own.
Oranges perfectly complement orange furniture
The film can also be used to update kitchen facades
Colorful ornaments will help disguise a massive device
Magnetic panel
And among all the ways to quickly decorate appliances, the leaders are undoubtedly the newfangled magnetic panels on the refrigerator. They are made by companies specializing in photo printing by applying a pattern to a thin magnetic sheet.
The panel is very easy to attach - it simply sticks to the body like a regular magnet
Advantages:
- Huge selection of colors and realistic designs (including 3D effect).
- Possibility of adjusting fragments taking into account dimensions, door height and location freezer refrigerator.
- Easy to maintain - after printing, the panels are laminated or varnished, so they can be washed damp cloth without fear of damaging the drawing.
- Easy installation - magnetic film on the refrigerator does not require special surface preparation.
- Excellent camouflage - the thickness of the material varies between 0.4-0.5 mm, which allows you to hide minor defects on the device body.
- You can save money and order panels only for the front part of the refrigerator, and side walls paint in the usual way.
It is easy to make holes in the canvas for fittings and technological openings
Artistic decor
Thematic painting of a refrigerator is an expensive pleasure if you invite a professional artist. But if you arm yourself with templates or master several alternative techniques, you can make decor with your own hands, of quite high quality, and most importantly - unique.
Decoupage technique
One of the most budget-friendly and easiest to implement ways to decorate a refrigerator is decoupage. With its help, you can complement your kitchen design with thematic scenes, add bright colors and turn a standard device into a stylish interior accent. And all you need to do is simply glue the picture you like onto the body of the device and secure it with varnish.
Refrigerator decoupage looks great in rustic and retro styles - country, vintage, Provence, shabby chic.
But also modern kitchens you can decorate with pictures of leaves, flowers, beautiful dishes, “delicious” still lifes with fruits, vegetables, cheese or wine.
You can cut the blanks yourself from napkins, postcards, newspapers, photographs, or buy ready-made templates for decoupage on parchment paper or a transparent backing.
Refrigerator decor in Provence style
If you decide to decoupage the refrigerator with your own hands, our master class will introduce you to all the stages of the upcoming work:
- First of all, you need to prepare the surface - wash it (the old device should also be painted). Wait until dry and degrease with dish soap.
- For work, it is most convenient to use bright multi-layer napkins. They are quite thin, inexpensive, have a wide variety of backgrounds and subjects, and in case of failure, you can always make a new blank - there are at least 10 pieces in a pack of napkins. Cut out the colorful fragment with thin scissors and remove upper layer with a picture. If the drawing has a lot of thin lines, curls and other complex elements, cut it out along with the background, after which you can sketch it by hand.
Multilayer napkins
- Think in detail about exactly how to decorate the refrigerator - determine the location of each element and evaluate the overall composition. To make it easier to visualize the result, temporarily secure the workpieces with magnets or pieces of masking tape. If the decor consists of several parts, do not be lazy to make markings (you can simply outline the edges with a simple pencil) so as not to repeat the “trying on”.
- There are two ways to attach pictures. The first is to apply thin layer decoupage glue or regular PVA, slightly diluted with water, onto the surface of the body. Then press the fragment, carefully removing air bubbles and folds with a soft sponge. The second is to saturate the picture with glue, while simultaneously smoothing it with a brush from the center to the sides.
- When all the decorative details take their place on the refrigerator, wait until the glue has completely dried and proceed to decoration– paint the background of the fragments in the color of the body, paint on shadows, strokes, inscriptions, highlights. As a result of successful creative work the picture will resemble a skillful painting, and not a paper sticker.
Refrigerator decor
- Now all that remains is to apply acrylic lacquer in 2-3 layers, each time waiting for the previous one to dry. This will add brightness to the designs, make the decor more resistant to damage and allow you to wash the refrigerator in the usual way, without fear of ruining your work. It is convenient to use a spray can - the varnish is quickly applied, there are no streaks or drips left, as when using a brush.
Decorating a refrigerator in an antique style
Painting with paints
If you are comfortable with a brush and a palette, the surface of the refrigerator can be an excellent canvas for realizing the most original ideas. It is most convenient to work with acrylic paints - they dry quickly and are easily applied to the smooth walls of the body.
You can decorate not only the refrigerator, but also other household appliances
You can also use small tips - ready-made templates. With them you can decorate your refrigerator with a multi-colored ornament or an interesting picture, even without artistic talent.
Simply attach the template to the body and sketch the cut out fragment with a brush or spray can.
Just remember to protect the drawing with a layer of transparent or semi-matte varnish after drying the paint, otherwise the colors will quickly rub off and fade.
If you need to repaint your refrigerator, you can also use an anti-stencil. To do this, before starting work, glue a cut-out fragment onto a white base (you can also use lace, tree leaves, ready-made templates), and apply paint to the body. When the walls are dry, the workpiece is removed, leaving an unpainted design.
Airbrush pictures look amazingly realistic
DIY refrigerator decor - a sea of photo ideas
Although all of the techniques we have listed above seem simple (perhaps with the exception of painting), if you add design talent and imagination to their execution, you can get a truly unique interior decoration. And if you still haven’t been able to decide how to decorate the refrigerator with your own hands, photos of creative works may give you inspiration and interesting ideas.
- The decor of the refrigerator to match the furniture can be done by covering it with film, painting it in the color of the facades or skillfully painting.
Who would have thought that this stylish retro cabinet is actually a refrigerator, decorated by the talented hand of an artist
- Does simply repainting your home appliances sound like a boring idea? And if you take slate paint, you can create a huge easel for children's creativity, romantic notes or a list of important things to do for today.
- Painting can also be done with a geometric slant by decorating the refrigerator design with stripes or triangles using regular masking tape.
- Antique decor can be created using plastic moldings and surface aging techniques.
- If the task is to disguise large equipment, you can repaint it or cover it with film in the color of the set, or paint shelves with dishes.
Although the most realistic drawings are obtained using airbrushing, professional acrylic painting is also impressive
- Decoration can turn a standard refrigerator even into telephone booth, police station or soda fountain!
master class: how to decorate a refrigerator using decoupage technique
We hope our material helped you find original idea And suitable way How to decorate a refrigerator with your own hands. But if you don’t have time for design experiments, entrust the decoration of your equipment to hand-made masters. They will decorate your device to suit any interior style and perform complex painting that would be beyond the capabilities of a non-professional.
Source: http://KitchenGuide.su/dizain/dekupazh-xolodilnika-svoimi-rukami.html
DIY refrigerator decoupage
Using the decoupage technique, the appearance of an old refrigerator can be changed beyond recognition. After 5-10 years of operation, the paint on the refrigerator turns yellow and its appearance becomes unsightly.
Of course, in this case, you can buy a new one, but such a unit is quite expensive and not everyone can afford to change it because of such a trifle, and it is not a fact that you will find equipment in the store that matches the style of the interior of the room.
However, you want your kitchen to have a neat and modern appearance. You can achieve this by decorating an old refrigerator using the decoupage technique.
Decoration in force decoupage great way add a refrigerator or washing machine into the interior of the room. To decorate equipment in this way, use napkins, fabric or decoupage cards, which are available in abundance in art and stationery stores.
In order not to miss the mark with the design, you need to know which pictures are suitable for a particular interior.
To decorate the refrigerator, you can use napkins, fabric or decoupage cards.
What napkins to decorate refrigerators of different styles:
- Floral print, as well as images of angels and lambs, will fit perfectly into provincial styles, such as Provence or Biedermeier.
- A refrigerator decorated with Russian or African folk motifs will complement the interior of an ethno-style kitchen. Ethnic style is a design direction that involves the presence of appropriate prints and details in the decor of the room.
- Ornate gold and silver patterns will decorate equipment in the Amp style.
- Decopatch is a direction of decoupage that consists of gluing torn pieces of napkin onto an object, without tracing any storyline drawing. This design of the refrigerator will look appropriate in modern interiors.
Decorating furniture and appliances with decoupage will turn yellowed and peeling objects into the main highlight of the room. When choosing a refrigerator design style, remember that the appearance of the equipment should fit into the main interior of the kitchen.
Refrigerator decoupage master class: objects and materials
Before you start changing appearance refrigerator, you need to prepare everything necessary materials and tools. For some you will have to go to handicraft stores, and for others to the construction market.
Before you start decoupage, prepare all the necessary materials and tools
Materials and tools that will be useful for decorating the refrigerator:
- Metal spatulas, which are useful for removing peeling paint;
- Sander or sheet of fine-grained sandpaper;
- Metal paint suitable color;
- Napkins, decoupage cards or pieces of fabric with an interesting pattern;
- Special glue for decoupage;
- Scissors;
- Wide paint brush for painting a refrigerator, a flat hard brush for gluing pictures, a thin soft brush for drawing details;
- Acrylic paints;
- Acrylic lacquer;
- Detergent and sponge.
When all the decorative elements using napkin technology are ready, you can proceed directly to decorating the refrigerator with your own hands.
Master class: do-it-yourself refrigerator decoupage
Refrigerator decoupage will allow you to fit this old kitchen cooling furniture into new interior kitchens.
Napkins can be used to decorate individual areas of equipment with bright elements, or to completely cover it with a pattern.
If your refrigerator is practically new, and you just want to diversify its appearance using decoupage, then you do not need to remove the trim, but if the paint is yellowed, cracked and crumbling, it is better to replace it with a new one.
Master class on transforming a refrigerator:
- The first priority is to think over a new design for a decorative item. To do this, decide in what style it should be decorated to suit the interior of the kitchen.
- Now use a putty knife to scrape away the paint where it has cracked. If the paint has yellowed and cracked, it is better to remove it completely. Clean off any remaining paint with a grinder or sandpaper.
- Degrease the surface of the product with a solution detergent and water.
- Prime the surface of the refrigerator with two layers of paint of a suitable color. Wait for it to dry completely.
- Now you can cut necessary elements with decoupage cards. Mark the places where they will be located. Lubricate the refrigerator with glue where you plan to attach the pictures. Remove the top layer with the pattern from the napkin and place it on the file with the wrong side up. Attach the file to the refrigerator and press it against the picture. Smooth out the motif using a flat, stiff brush, removing any air bubbles underneath it.
- When the glue holding the drawings together with the refrigerator has dried, paint on the missing elements with acrylic paint and a thin brush.
- Cover the composition with varnish in three to four layers.
Decoupage of the refrigerator will allow you to place it in a new kitchen design
Repeated varnishing will not only help protect the patterns from being washed off, but will also give the refrigerator additional thermal insulation properties. If you want to decorate the entire refrigerator without using paint, you can do this with wallpaper or fabric.
Fridge magnets: decoupage
Magnets have a much smaller area than a refrigerator, and it is much easier to remake them in case of unsuccessful design. It is not necessary to buy a special blank; it is enough to find only an unnecessary magnet and a piece of thick cardboard, as well as all the standard components of decoupage.
Fridge magnets can also be updated using decoupage technique
Master class “Fridge magnet from A to Z”:
- Cut out two identical magnet bases from a thick piece of cardboard. You can take a box of some equipment or a pizza package for this purpose.
- Glue the two parts of the base together. And cover them with two layers acrylic paint at both sides.
- Cut out the desired motif from a napkin or decoupage card and separate the top layer with the design from it.
- Glue the picture to the magnet using special glue or PVA. If you want to make a magnet three-dimensional, then you will need two identical images. After you have pasted the first image, place a mixture of pieces on the parts that should be voluminous. toilet paper, PVA and water, and pull a second similar picture on top of them.
- In addition to pictures, you can decorate the magnet with other elements, for example, rhinestones or paper flowers.
- Complete the missing elements with acrylic paint.
- Cover the magnet with three layers of acrylic varnish.
- You can put a braid or ribbon along the edge of the magnet.
- To the back of the base using glue gun glue the magnets.
Such a magnet can become a great gift to your loved ones and friends or decorate the refrigerator in your own kitchen.
Decoupage of refrigerators (video)
Using the decoupage technique, you can give a second life not only to your old refrigerator, but also to other interior elements in your home.
Details: do-it-yourself refrigerator decoupage (photo examples)
Attention, TODAY only!
Source: http://kitchenremont.ru/dekor/hand-made/dekupazh-kholodilnika
How to decoupage a refrigerator with your own hands
It happens that people will do renovations and decorate the kitchen with stylish furniture, for example, in the Provence style. And everything looks good and beautiful until the eye falls on the refrigerator. He stands in the corner and looks with silent reproach... A white, boring and completely inappropriate block that spoils the impression. If this is the case for you, then it’s time to decoupage the refrigerator with your own hands!
Why decoupage and not painting?
No, well, if you are an artist, then you can paint it. It will even be easier for you. But for others, this pleasure is not cheap at all.
But if only that was a problem. When hiring an artist, you never know what the final version will be. There can be anything in the portfolio, but the final result may not match at all. And not giving money for work is a negative karma. And what to do with it then? Removing the paint coating from a refrigerator is not so easy; in any case, it will not return to its original condition. this species.
With decoupage of an old refrigerator, things are simpler.
If a tiger is depicted on a decoupage napkin, then it will remain a tiger, only on the refrigerator, and not a cat or some other unknown animal, as is the case with a careless artist.
And in general: I didn’t like the drawing - I immediately took it off, wiped the area with a clean cloth and forgot about it. Moreover, anyone can decorate a refrigerator with applique! Cheap, cheerful, and with the right choice of style – absolutely stunning.
What you need to have for decoration
First, you need to have an idea. Sticking randomly flowers on, this, you know, is not ice. It will look like transfer stickers in Soviet times. And the effect of transforming the refrigerator with your own hands will be sad.
Therefore, think through the composition inside and out. It should be in harmony with the rest of the furniture and interior items. Moreover, we draw your attention to the fact that you should not combine the design of the refrigerator with curtains, tablecloths, chair covers and other short-lived items. You change them, but the refrigerator will remain...
If you have already come up with everything and are ready to get started, then you need to purchase the following things:
- Napkins for decoupage (four-layer)
- PVA glue
- Scissors
- Fine abrasive “skin”
- Acrylic lacquer
- Craquelure paint (optional)
- Gilding paint (optional)
- Acrylic paints
- Glue brush
- Paint brush
- Foam roller for smoothing
Now you can get down to business. This work is painstaking and requires patience. The volume is still considerable. Don’t rush, it’s better not to do it in one day, slowly, but in such a way that the guests will simply gasp!
Preparing the surface for decoupage and drawing a picture
The refrigerator must be thoroughly washed and wiped dry. Then, wipe with alcohol the places where you plan to glue the applique. There is no point in degreasing with acetone; there is no need to sand the surface either.
There is no risk that the application will “come off”. And, it will be better for you if you leave yourself the chance of reversing. You never know, it won't work out? Or, after a certain number of years, you will want to sell it, but with decoupage no one will take it, that’s a fact.
After this, cut out your design with scissors without separating the layers of the napkin. After the part is cut out, you can separate the very top part from the bottom.
Then, apply a thin layer of PVA glue on it and attach the design to the surface. After 20 seconds, roll the different sides, carefully expelling air and smoothing out wrinkles.
Varnishing after drawing
After the pasted motifs have completely dried (and this is no less than 4-5 hours), you need to use fine sandpaper to smooth out the contours very carefully. Then the sticker won't look rude.
After this, you need to cover everything with acrylic varnish. First, one layer, after complete drying, a second one. If this is not done, the varnish layer will peel off in the very near future, since you have to wash the refrigerator often.
Applique design styles
There are exactly as many styles as there are styles of interior design. We are not talking about what styles there are. We are sure that you are aware of this without us. I just wanted to remind you that if you have a “Provence” style, then you shouldn’t decorate in the “ethnic” style.
Everything should be in harmony so that the refrigerator looks like a single ensemble with the rest of the furniture. Sometimes it looks very good if the refrigerator is decorated in such a way that it is practically invisible, it takes on the appearance of a cabinet in a given style.
Sometimes it’s the other way around. Your kitchen is white, in high-tech style, for example. And often, very a good decision, it turns out, highlight the refrigerator with a bright spot that contrasts with the rest of the decor.
Let's take a closer look at some of the “powerful” ideas. Perhaps you will take something into account.
Decoupage of the refrigerator “Phone Booth”
This is a very cool design. The refrigerator looks like a classic red phone booth, of which there are so many on the streets of London. But to implement it, you can’t do it with napkins alone. Here you will need paints and enough high level skill.
To begin, draw a drawing on the refrigerator so that you know exactly how and where to glue the parts. Windows in the booth, will need to be registered wooden frames, to give the composition volume and natural look. Some details will need to be drawn, not forgetting the shadows.
Such refrigerators look good in almost any kitchen, with the exception of the obvious “Country” and the notorious “Provence”. There they will be completely inappropriate, since this is a more strict style.
Decoupage of refrigerator “Antique cabinet”
But this is clearly for “Provence” and others like it. You can depict the wardrobe absolutely any way you want; you don’t have to try to make it match the main furniture. Moreover, it is even undesirable, since it will still be different, and the appearance will be rough.
It’s better if you make a completely different cabinet, simply, in a given style. And, yes, this is also not a level for a beginner. And here you will also need paints, craquelure, aging effects, etc., etc....
Decoupage refrigerator "Patchwork"
Very interesting idea. Patchwork is a classic patchwork quilt, as you know. Absolutely anyone can do this design.
There are napkins with a ready-made patchwork pattern, and with the effect of stitching with threads. There are simple plain napkins that you can choose to suit your taste and “sew” the patches yourself. In this case, the divisions will need to be painted over, simulating machine stitching.
But, please note that this is catchy and bright design. It will “play” if the kitchen itself is not bright. If your walls are painted, or your furniture is of different colors, then it is better to abandon this idea.
Decoupage of refrigerator “Front door”
Also, great solution. By the way, decoupage can be done not only with napkins, but also with photo wallpaper, for example. And, indeed, there are a lot of motives for such a plan.
Refrigerator decoupage “Flowers” and “Grapes”
In this case, everything is quite simple. Find good options flowers or grapes and glue. But, do not forget that you need to paint the branches. If you don’t do this, the look will look rather sparse.
Decoupage of the refrigerator "Peas"
A funny design, but at the same time a rather bold decision. The refrigerator looks like a piece of cotton fabric. Unpretentious and very cute.
You can choose absolutely any colors, but the polka dots should be monochromatic and not very large, otherwise the fabric effect will not work.
Other ways to decorate your refrigerator
There are a lot of options. Decor with wallpaper, photographs, ordinary magnets, airbrushing, vinyl stickers, plain paint...
By the way, instead of buying refrigerator magnets, you can make them yourself using the same decoupage technique. If you have never tried to decorate something, then you can try it with a magnet.
That’s basically all we wanted to tell you about do-it-yourself refrigerator decoupage. We are sure that you will succeed!
Modern life man is closely connected with fashion, and therefore it constantly requires new reincarnations into something special and unique. This applies not only to personal image, but also to the interior of the home. Sooner or later, a great desire arises to update or change something in the design of the rooms, while Special attention is given to the kitchen, as it occupies important place in the house. When decorating a kitchen in a new style, you often have to deal with the problem that the refrigerator does not fit into the general form interior Of course, all this can be easily corrected by purchasing a new model of the unit in desired color and style, but this will require additional funds. You can simply choose to decorate your refrigerator using film.

Peculiarities
The right solution would be to decorate the refrigerator using vinyl film. Today there is big choice self-adhesive material. It is presented in various shades and textures, as well as using printing elements. The main advantages of vinyl include strength, high wear resistance, reliable protection from influences external environment. Vinyl film is the most suitable option for covering a refrigerator. It is easy to use and anyone can use it. Thanks to this type of decoration, an old refrigerator will quickly turn into a chic “handsome” with a surface like velvet, marble, or wood.

How to choose?
When planning to cover a refrigerator with film, it is necessary to choose the right material, since not only the duration of operation, but also the appearance of the equipment will depend on its quality. Poor quality film will not last very long; over time, it may peel off in the corners or dry out. Therefore, it must be carefully selected, giving preference to trusted manufacturers. The film must have water-repellent properties, because the kitchen is a place with high humidity.


The quality of printing on film is also considered an important point. Often for harmonious combination refrigerator with the general interior of the kitchen, experts recommend that you independently select an image, which is then sent to a printing studio and applied to film white. In this case, you can order regular large-format printing, but for decorating the refrigerator it is better to give preference to special interior printing. This way the drawing is much clearer, it is closer to the quality of a photograph.

When purchasing vinyl film, it is also important to know the size of the pattern. It is measured not in centimeters, but in pixels. To avoid mistakes in calculations, just remember simple formula– 1 centimeter equals 38 pixels. For refrigerator standard sizes(with a width of 55 cm and a height of 180 cm), a film of 6800 by 2090 pixels is suitable. We must not forget about such a concept as the location of the picture. It can be horizontal and vertical.


How to paste it over?
It is advisable to stick the film on the wet surface of the refrigerator. To do this, it is moistened with a soap solution consisting of water and a few drops of any detergent. When the surface of the refrigerator is cleaned of dirt, you can begin work, which includes the following steps:
- Marking. Using chalk or a pencil, make marks on the place where the drawing is supposed to be placed.
- Film preparation. Vinyl self-adhesive is applied to the surface of the refrigerator and leveled so that there are no distortions. For convenience, the film is fixed with tape.
- Pasting. The upper end of the self-adhesive is released from the backing and pasted onto the refrigerator - in accordance with the previously drawn markings. At the same time, one cannot be exempt from paper base the whole roll at once. The work must be done carefully - remove the backing 5 centimeters at a time, using a smooth movement from top to bottom. Then the film is smoothed from the center to the edges (using a special squeegee or rag).

To obtain an excellent result, the pattern must be adjusted well, this will help avoid the appearance of wrinkles, unevenness and bubbles. While working, it is important to ensure that the sticker is glued evenly. It is recommended to start with large elements and end with small ones. If there is a lot of film, the excess area can be trimmed with scissors or a cutter.


Sometimes air bubbles may remain after gluing. To remove them, just make a puncture in the middle with a needle and smooth the surface. As for wrinkles, a hairdryer is used to eliminate them. The film is heated with hot air and smoothed with a squeegee.
If there is a need to re-decorate the refrigerator, then old film needs to be removed. Typically, vinyl stickers are easy to remove. The edge of the film is extended with a knife and peeled off diagonally. The remaining glue is quickly washed off hot water. To clean the surface more thoroughly, many also use rubbing alcohol.

Decor ideas
Nowadays, many people prefer to cover their refrigerator with vinyl film. It's fast, inexpensive and original. An old refrigerator that has lost its aesthetic appearance can quickly turn into a fashionable and beautiful “thing.” The construction market today is wide choose vinyl films, so choose suitable option will not be suitable for decoration special labor. Anyone can try themselves as a designer.


Recently, self-adhesive material with photographs, ethnic motifs, floral arrangements and images of animals has been in great demand. You can purchase self-adhesive tape in either a single color design or in a variety of colors. color scheme- it all depends on general interior kitchens. For lovers of modernism, the right solution would be to decorate the refrigerator with a film with a wavy surface or with patterns in the form of squares and diagonal stripes. If the kitchen is decorated in a classic style and is filled wooden furniture, a great option is to paste the refrigerator under wood.


For those who like to dream up, a combined refrigerator wallpaper is suitable, in which the color scheme is selected in accordance with the prevailing design shades in the kitchen. If, for example, the kitchen is decorated in blue, then the refrigerator can be covered with blue film. Decorating the refrigerator in red and black colors also looks beautiful. It all depends on your preferences and imagination. However, in any case, you should do everything as carefully as possible - this is the only way the result will be perfect.
How to decorate or update your refrigerator, see the following video.
At the moment, it cannot be said that there is a shortage of equipment in stores. But all of it is mostly monotonous and doesn’t look very interesting. Therefore, DIY refrigerator decor is more relevant than ever.
IN COUNTRY STYLE
To get a fun little unit in country style will be needed acrylic enamel, gouache and acrylic varnish for fixation.
If you wish, you can even achieve that the refrigerator does not look like itself - rather, like a painted cabinet or sideboard!
AIR BRUSHING
If the kitchen is made in modern style, then the drawing on the refrigerator should not have small parts, as this will make the interior less holistic
 Similar original solution will be very appropriate in styles such as English and loft
How to decorate a refrigerator to make it look impressive? Use an airbrush! Using it you can create drawings of any complexity.
Everyone chooses their own topic. If you are not confident in your abilities, you should contact the designers!
USING STICKERS
The most inexpensive way to decorate an old refrigerator is to stick ready-made vinyl stickers or self-adhesive film on it. In the second case, the design of the device will change completely. The refrigerator can become “stone”, “leopard” and even “wooden”. Stickers will make the product more attractive.

 Today there are a huge number of ready-made solutions to choose from, plus, you can order photo printing with your own design

Most popular images:
- Marine life;
- flowers;
- cats;
- birds;
- butterflies.
In addition to stickers, you can apply sparkles, rhinestones or ribbons to the refrigerator. You can outline the drawing with paints or a marker.
 It is also decorated traditionally with crystalline matting, a little black stained glass film for ornament and a special graphic design, and just a little rhinestones.
An old refrigerator can be painted. Such a refrigerator can become bright accent in a white kitchen, or fit well and look harmonious in a bright kitchen.

DECOUPAGE TECHNIQUE
Decoupage is a decorating technique that involves cutting out various images from paper. These images are pasted directly onto the refrigerator.
Decoupage makes it possible to create a unique image of equipment that will suit your interior!


Refrigerator decoupage is a great way to try yourself as an artist or designer. Techniques such as gilding or aging can also be used. Volumetric decoupage involves the use of model mass.
Where can I get pictures? The first option is to purchase beautiful multi-layer napkins. IN in this case You have to separate the first layer with the picture, cut it out and stick it on the refrigerator using PVA. After the glue has dried, varnish is applied to the image in several layers.
The second option is to print the image you like on a printer. Regular office paper will do. Then the following steps are performed:
- Apply varnish to the print several times.
- Wait until it dries.
- Place the leaf in a bowl of water.
- Lay a towel on the table and place a wet picture on it, the image should face down.
- Roll up layers of paper base with your hands.
- There should be a thin film of acrylic with the image left - this is glued to the refrigerator.
The paper base compartment is difficult process. Therefore, it is recommended to prepare two printouts. You can practice on one of them.
MAGNETIC NOTE BOARD

 A magnetic board will make your kitchen look a little like Italian restaurants. Why not? A chalkboard is a great way to decorate your refrigerator. It costs only 400-800 rubles. Also, anyone can make such a board on their own. All you need is magnetic paint and an MDF sheet. The board is cut directly from MDF sheet.
Then you have to process the edges and apply several layers of magnetic paint to the product. All you have to do is wait until the board dries and you can use it! You can also purchase a finished product. A magnetic board can be a marker board or a slate board (for drawing with chalk).
The slate board is distinguished by a black canvas. Drawings made with chalk are erased with a damp sponge. The stand for sponges and crayons is also attached to the refrigerator with a magnet.
Marker board - more modern version. It comes with a special sponge and markers.
The new product offered by stores is multi-colored marker board. It will make any refrigerator bright and attractive.
REFRIGERATOR PAINTING
 The painting of the refrigerator is perhaps the most the hard way, because not only imagination is required, but also basic skills in handling a brush and paints. You can decorate the refrigerator with painting. For this purpose they are used different kinds paints