The race for fashion sometimes harms comfort - a modern glass smartphone is a rather fragile device. We’ll talk about how to protect it another time, but today we’ll talk about ways to extract contacts from the phone book of a broken smartphone.
This operation is not as complicated as it might seem - fortunately, manufacturers took into account the possibility of damage to the device and included tools in the OS for rescuing phone numbers.
You can remove contacts in two ways - by air, without connecting to a computer, and through the ADB interface, to use which the gadget will need to be connected to a PC or laptop. Let's start with the first option.
Method 1: Google Account
For full functionality of an Android phone, you need to connect a Google account to the device. It has a function for synchronizing data, in particular, information from the phone book. In this way, you can transfer contacts directly without the participation of a PC or use a computer. Before starting the procedure, make sure that data synchronization is active on the broken device.
If the phone's display is damaged, then most likely the touchscreen has also failed. You can control the device without it - just connect a mouse to your smartphone. If the screen is completely broken, then you can try connecting the phone to the TV to display the picture.
Telephone
Direct transfer of information between smartphones consists of simple data synchronization.


Done – numbers transferred.
Computer
For a long time now, the “good corporation” has been using a single account for all its products, which also stores telephone numbers. To access them, you should use a separate service for storing synchronized contacts, which has an export function.
- Follow the link above. Sign in to your account if prompted. After the page loads, the entire list of synchronized contacts will appear in front of you.
- Select any position, then click on the icon with the minus sign at the top and select "All" to select all saved in the service.

You can simply select individual contacts if you do not need to restore all synchronized numbers.
- Click on the three dots in the toolbar and select an option "Export".
- Next you need to note the export format - for installation in a new phone it is better to use the option "vCard". Select it and click "Export".
- Save the file to your computer, then copy it to your new smartphone and import contacts from VCF.


This method is the most functional for transferring numbers from a broken phone. As you can see, the option of transferring phone-to-phone contacts is somewhat simpler, but using Google Contacts allows you to do without a broken phone altogether: the main thing is that synchronization is active on it.
Method 2: ADB (root only)
The Android Debug Bridge interface is well known to fans of customization and flashing, but it will also come in handy for users who want to retrieve contacts from a damaged smartphone. Unfortunately, only owners of rooted devices can use it. If the damaged phone turns on and can be controlled, it is recommended to obtain Root access: this will help save not only contacts, but also many other files.
Before using this method, carry out the preparatory procedures:
- Enable on the damaged smartphone;
- Download the archive for working with ADB to your computer and unpack it to the root directory of the C: drive;
- Download and install.
Now we proceed directly to copying the phone book data.

This method is more complicated than the previous one and more time-consuming, but it allows you to extract contacts even from a completely dead phone. The main thing is that it is recognized normally by the computer.
Solving some problems
The procedures described above do not always go smoothly; difficulties may arise during the process. Let's look at the most common ones.
Synchronization is enabled, but there is no contact backup
A fairly common problem that arises for many reasons, ranging from simple inattention to a malfunction of Google Services. Our website has detailed instructions with a list of ways to fix this problem - visit the link below.
The phone connects to the computer, but is not detected
Also one of the most common difficulties. The first thing you need to do is check the drivers: it is possible that you did not install them or installed the incorrect version. If everything is absolutely fine with the drivers, this symptom may indicate problems with the connectors or USB cable. Try reconnecting your phone to a different connector on your computer. If this does not help, try using a different cord for connection. If replacing the cable turns out to be ineffective, check the condition of the connectors on the phone and PC: they may be dirty and covered with oxides, which is why the contact is broken. In extreme cases, such behavior means a malfunction of the connector or a problem with the phone’s motherboard - in the latter case, you can’t do anything on your own, you’ll have to contact service.
Conclusion
We introduced you to the main ways to get numbers from the phone book on a broken Android device. This procedure is not complicated, but it requires the functionality of the motherboard and flash memory of the device.
Hello again, lovers of new products from the world of gadgets! Many subscribers ask us how to extract information from a broken phone? Like many technical devices, a cell phone can sooner or later fail.
In case of a fall or impact, or careless handling of the mobile phone, it is very easy to damage it. What to do in this case and how to get data from a mobile device if the phone is broken? This is what we will talk about in our blog today.
How to extract information from a broken mobile phone
One of the easiest ways to extract the necessary “information” from your pet is to use a cloud copy. Owners of other brands of cell phones can also use the “cloud” to retrieve lost data from Samsung, Nokia, NTS or Lenovo, as well as other Android phones.
“Getting” information from a faulty, broken phone is quite difficult. Knowing how to disassemble a cell phone may require knowledge of a variety of technical skills. However, you can use special cloud services that will greatly simplify the work of extracting the necessary data from a broken phone.
In order to use cloud technologies, you need to pre-set the functionality and doing this is quite difficult. At the same time, there are a number of ready-made services that are initially installed on Fly, LG, Sony, and other phones. Of these, it is worth highlighting “Google” contacts.
The first thing you need to do to make your database accessible from another phone is to add a Google account to the other mobile phone. When you connect your smartphone for the first time, during activation you will need to synchronize your smartphone with your Google account.
Optionally, indicate “Existing” or “New” account. To restore all old contacts, you need to specify “Existing”, then enter your email and password that you used on your old cell phone.
If the device already has another account, you first need to go to “Settings” and then click “Add account”. After this, select the device that you want to “pair” with this phone.
For greater security, immediately after copying all the data, you can enter the phone settings and then quickly delete the account link. To do this, open “Settings”, click on the “Google” menu, select an account and click on the “Menu” button. After that, click “Delete account”.
Now, you just need to log into the application and all contacts will be downloaded.
What to do to pull out all contacts using a PC

It will not be possible to completely copy all the data to a computer, however, all the information can very easily be viewed on a computer monitor. Then it is easy to find the necessary data and write down the necessary information.
To do this, type http://mail.google.com in the address bar. Then you need to enter your email and password for your Google account. After authorization, you will be taken to the Gmail interface. To see the necessary telephone contacts, press the key with the image of a telephone handset. It is located at the bottom left of the screen.
By clicking on the magnifying glass icon, you will see 8 phone contacts that are linked to the account. If you start typing a new phone number or contact name, it will be in your list.
How to “get” information from your phone using the ADB protocol
Is it possible to get the necessary information using a special “protocol”? Of course yes!
ADB is a special access protocol for the Android system. In order to extract information using the ADB protocol, you will need a computer and a USB cable. To use this method, you need to enable the “USB Debugging” function on your smartphone (it is located in Settings in the “For Developers” section).
To go there, you need to open the “About phone” item and then click on the “Build number” item 10 times. It should only be taken into account that this method is mainly used only by advanced users.

So, in order to download data from a broken phone using this method, you will need a computer running Windows (version 7 and higher), a cell phone that will have the “USB Debugging” function enabled with the “Mass Storage” connection mode. .
Also, drivers for the phone model must be installed on the PC.
In order to extract contacts, you should click on “Start”, and then enter the value “CMD”, but without quotes. After this, the system will prompt you to run “cmd.exe”. Once you agree, click “Enter.” A terminal window will open.
Now, move this terminal to the folder with the ADB terminal. Type "cdX://adb" followed by "Enter". Instead of X, put the letter of the non-system “screw”.
The last thing you need to do is enter the following command “adbpull /data/data/com.android.providers.contacts/databases/contact2.db/home/user/phone_backup/” and then click on “Enter”. Now in your folder with the specified terminal there will be a file “contact2.db”, where your SQL database will be. If you want to view it, download SQL editors, or use Notepad.
So, today we figured out what to do if the phone doesn’t work. If you like our articles and they are useful, please subscribe to blog updates or add to groups VC, Facebook or Twitter. We are also on youtube channel. See you again and good luck!
There was a site with you

There are several more or less working ways to restore contacts if a phone with a broken screen is functioning and allows access to the memory.
One of the difficulties is that when connecting the phone to a PC, in order to manipulate files and access the Android file system, USB debugging must be enabled. Of course, it is impossible to do this on a phone with a broken screen or non-working touchscreen.
We will describe a way to “pull” contacts from Samsung without enabling USB debugging. The advantage of this approach is that you do not need to root your phone or install dubious applications.
Warning. This method will not help if USB data transfer was not initially enabled on the phone.
Step-by-step recovery instructions
Owners of Samsung devices are lucky - there is excellent software for restoring and backing up contacts.
All we need are two official programs from Samsung:
- Samsung Smart Switch is a proprietary program for saving a backup copy of messages, SMS, and Android user data on a PC
- Samsung Kies – works in conjunction with Smart Switch, its functions are similar.
It’s great if these programs are already installed and you have used them before. If not, follow further instructions.
1) Download and install (in any order) Smart Switch and Kies on your computer.
2) Launch Smart Switch and create a backup copy of user data on Android.
Attention! If Smart Switch does not install, you will most likely need to download the application on your mobile device as well. To do this, after installing Smart Switch on your PC, you need to click in the center of the screen (you will be asked to confirm downloading files to your phone). It may not be possible to do this the first time, since the actions are performed blindly. If you did everything correctly, the Smart Switch installation process will complete successfully.
3) The backup file - it is called Contact.spb - is available at: C:\Users\[Username]\Documents.
4) The Contact.spb contact file can be opened through the Samsung Kies program, in the “Contacts” tab.
Through the main menu, we indicate to the program the file with a backup copy of contacts on the PC. As already mentioned, it is available at C:\Users\[Username]\Documents\Backup\.
5) As a result, Samsung Kies will display all the phone numbers and contacts saved on the phone, you can view them with all the accompanying information.
6) To save contacts, click the "Save as.." button and select a convenient saving format.
The following extensions are available to choose from: .spb, .csv and .vcf. This file can be easily imported to another mobile device or saved to Google Contacts.
This completes the restoration of contacts. By the way, it’s convenient to make backup copies of your phone book on your computer in the same way. We recommend doing this regularly.
If Samsung proprietary software did not help you get your contacts back
Also try contact recovery applications from 3rd party developers - . Among them there are both paid and free tools. They require root access to work. In most cases, they only work when the device is on the working screen.
Do you have any questions? Ask via the feedback form.
(No ratings yet)
A modern person stores a large amount of very important data in the memory of his smartphone. These can be photographs, audio recordings, videos, books, notes and much more. However, as a rule, the main value for any user of a mobile device is the contents of the contact book, where all phone numbers ever saved by the user are stored.
Life is an unpredictable thing and you can easily damage your smartphone during use.
Repair is not always advisable and you could simply buy a new device. This is where the question arises of retrieving saved contact data from a damaged smartphone.
In the informational article below, we will look at how to remove contacts from a broken Android phone. Methods for extracting information will depend on the extent of damage to the smartphone.
Situation 1. The screen is broken, but the sensor works and the image can be viewed
So, you are lucky and the device’s screen has retained its functionality, despite the damage. The procedure in such a situation is quite simple:

After the operation all contact information will be saved in a special file with the *.vcf extension on an external microSD memory card.
It is important to know
To transfer information about phone numbers to another smartphone, just insert a memory card into it, select “Import/export” in the “Contacts” module menu and activate the “Import contacts from memory card to phone” item.
Situation 2. There is an image on the screen, but the sensor does not work
Now let's consider another situation, when the touch layer of the display is damaged and the screen does not respond to touch. In this case, it can help us out to a smartphone via the USB-OTG interface. Almost every modern smartphone is equipped with this interface. Through a special adapter (it can be purchased at a smartphone store, it is inexpensive) you can connect to a phone, a mouse, and even a physical keyboard.
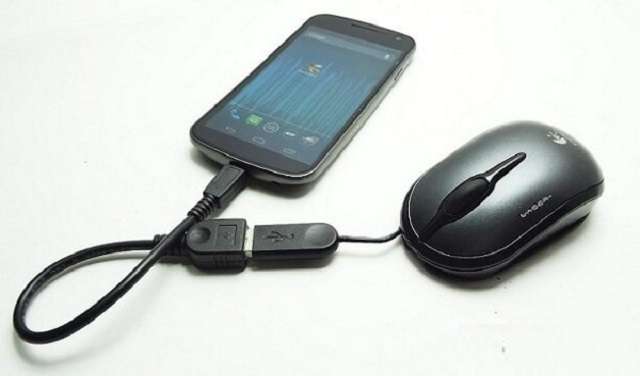
Will be useful
If the sensor is damaged, it is advisable to connect a computer mouse via the OTG interface, clicking on the buttons will replace tapping on the screen with your finger. Once connected, you can export contact information to a file on a microSD memory card.
The simplest situations with screen damage were discussed above. Below we will try to figure out how to retrieve data from a broken Android phone if the screen does not show.
We will also look at options for controlling your phone from a computer via USB if its touch screen is broken.
Situation 3. The screen and sensor are broken and do not show anything, but the phone functions normally
In a situation where the smartphone screen is severely damaged and does not allow you to see the displayed information, there are several options for retrieving contact information. They are listed below.
Recovering contacts via Google cloud service
When setting up a new Android phone for the first time, the user is strongly recommended.
The main advantages of creating an account are as follows:
- Access to a large Google Play Market application store;
- The ability to track the location of smartphones with a connected account and activated data transfer (for example, to track the coordinates of a child);
- Ability to save basic data (for example, contact book) when synchronized with Google cloud storage service.
As follows from the listed advantages, when activating an account on an Android smartphone and synchronizing information with the service cloud, . The procedure is as follows:

Recovering contacts through a Google account on a personal computer
Another option for how to retrieve data from a broken Android phone if the screen does not show can be Login to your Google account on your personal computer. In this case, you need to do the following:

If the previous methods for some reason are not suitable for retrieving contact data, you can try if the screen is broken, control your phone from your computer via USB. You can use the ADB interface for this.
List of required items for the data extraction process:
- Personal computer with Windows 7 operating system or higher;
- Mobile device from which you need to copy information;
- USB cable for connecting a gadget;
- ADB drivers installed on the computer for your phone model;
- Turn off your smartphone if it is working;
- The ADB terminal directory unzipped to the root of any disk (the folder should be called “ADB”).
In order to get the necessary information by controlling the phone from a computer via USB, if the screen is broken, you need to perform a number of the following manipulations:
- Launch the command line in the operating system, to do this, press the Win+R key combination, type cmd.exe in the desired field and click “OK”.
- Next, you need to enter the command “cmd.exe disk:\ADB”, where disk is the partition where the ADB terminal files were unpacked.

How to retrieve data if the display on an Android phone is broken. If you accidentally dropped your smartphone or tablet and then the Android display broke, the cost of replacing it is exorbitant, and you urgently need to get all the data from it? Then let's move on to reading this article!
Very often on the Internet you can come across the following question:
« I broke the display and how can I now extract all the data from Android? Help!!!»Now we will deal with this problem, since at the moment there are no clear and formulated solutions!
The material will be presented from simple to complex - this means that at certain stages you will need additional knowledge, you will be given additional information. articles that you will need to study! The article is designed for those whose screen displays at least something!Instructions for solving the problem
Method No. 1 [simple, solution time 1 - 2 minutes]
If you “didn’t sin” on your Android, to be more precise, you didn’t install Root rights, then in your case everything is solved very simply! All you need to do is download and install the manufacturer’s proprietary device management software!
- For Samsung - Kies
- For HTC - HTC Sync
- For Sony - PC Comanion
Method number 2 [simple, solution time 1 - 2 minutes]
To do this, you need a USB mouse and an adapter from a USB - microUSB connector, or a USB mouse with a microUSB connector.

After you have connected the USB mouse, press the power button (so that the display lights up) and then perform all controls using the mouse.
Method No. 3 [difficult, solution time 40 minutes - 5 hours]
There is a rather interesting program like MyMobiler. The interesting thing is that with the help of this software it is possible to view and control Android via a computer.
For MyMobler to work you will need:
1. Enabled “USB debugging” on Android device
2. Availability of Root rights:
3. Install the MyMobiler application (or via update.zip)

Possible problems if something is disabled or missing:
What if debugging is not enabled?
You can enable it by trying this:
a) Download and install custom Recovery (not TWRP, only CWM No Touch)
b) Find the build.prop file on the Internet for a specific model with the same firmware version that you have installed and enter the following data into it:
persist.service.adb.enable=1 persist.service.debuggable=1 persist.sys.usb.config=mass_storage,adbc) Create update.zip by placing the file build.prop to root /system
d) Flash this update.zip
After which debugging should work!
I received Root, but I can’t confirm the request?
If the display does not respond to pressing in any way, then you can try installing this xml file eu.chainfire.supersu_preferences (located in the 7zip archive) via update.zip from the Recovery menu along the path: /data/data/eu.chainfire.supersu/shared_prefs
Press the power button (so that the display lights up) and then perform all controls using the MyMobler program!
Method number 4 [simple, solution time 20 minutes]
The method works as follows: Android is connected to the computer and, using the program, the Android screen is displayed on the Windows desktop. For this method to work, “USB Debugging” must be previously enabled!
Required tools:
- Windows computer
- USB cable;
- Previously installed Android drivers;
- Previously enabled “USB Debugging”;
- Installed Adb Run program;
Instructions for working with Adb Run:
1. Launch Adb Run;
2. Go to the menuManual Command -> Control Android out Windows;


