The problem of flooding and increased soil moisture is familiar to owners of plots located in the central region of Russia. Dampness and stagnation of water after the snow melts do not allow proper preparation of the summer cottage for summer season, and waterlogging of the soil with constant precipitation is detrimental to many plants. There are several ways to solve these problems, but the most effective is the arrangement of drainage.
In what cases is a drainage system necessary?
Drainage is a technology for collecting and discharging groundwater, melt and storm water from a site, technical and residential buildings. The drainage system prevents leaching, heaving and waterlogging of the soil, which occurs due to oversaturation with moisture.
Arrangement of a drainage system is not necessary at every site. In order to determine how much your area needs drainage, you will need to carry out visual inspection. Pay attention to whether the area is flooded after the snow melts, how quickly water is absorbed after watering the plants, whether there are puddles after heavy rain and downpour. If you have observed these signs more than once, then drainage is required.
The drainage system helps remove stagnant water from the site
If visual confirmation is not enough, then you can conduct a simple experiment - using a hand drill or an ordinary shovel, you should dig a hole 70–100 cm deep. It is better to do this in several places on the site. If after 24–36 hours water accumulates at the bottom of the hole and does not leave, then this is direct evidence of oversaturation of the soil with moisture.
Soil drainage is carried out under the following conditions:
- high groundwater table;
- the site is located in an area with clay soil;
- the site is located in a lowland or vice versa - on a slope;
- The location of the site receives a large amount of precipitation.
The presence of drainage helps preserve the finishing and facing materials used for installation garden paths, finishing of the basement and facade of the building.
Types of dehumidification systems
Dehumidification systems land plots there is a great variety. Moreover, in different sources their classification may differ greatly from each other. In the case of drainage systems for suburban and summer cottages It is recommended to use the simplest and most proven solutions.
Surface type drainage
Surface drainage is the simplest and most efficient system. The main task is to drain the soil by draining water formed as a result of rainfall and uneven melting of snow.
Grids protect the open drainage system from large debris
A surface drainage system is constructed over the area of the site, around the house and adjacent buildings, approx. garage structures, warehouses and courtyard. Surface drainage is divided into two subtypes:
- Point - in some sources referred to as local drainage. Used to collect and drain water from a certain place on the site. The main area of application is drainage of areas under drains, approx. entrance doors and gates, in the area where containers and watering taps are located. Often used as an emergency system if another type of drainage is overloaded.
- Linear - used to drain the entire area. It is a system consisting of receiving trays and channels arranged at a certain angle, ensuring a constant flow of water. The drainage system is equipped with filter grids and sand traps. Trays and drains are made of PVC, polypropylene, HDPE or polymer concrete.
When installing a surface drainage system, it is recommended to combine point and linear drainage. This will provide the most effective work systems. If necessary, point and linear drainage can be combined with the system described below.
Deep drainage
Deep drainage is carried out in the form of a pipeline laid in places where constant drainage of the soil or lowering of the groundwater level is necessary. Drains are laid with a slope in the direction of water flow, which enters a collector, well or reservoir located outside the site.
The process of constructing deep drainage in a suburban area
To lower the groundwater level, pipes are laid along the perimeter of the site to a depth of 80–150 cm. In cases where it is necessary to drain water from the foundation of a building, pipes must be laid below its depth. And also drainage pipes can be laid over the entire area of the site with a certain step. The distance between drains depends on the depth of their placement and the mechanical composition of the soil.
For example, when installing a drainage system, when drains are laid to a depth of 0.9–1 m, the recommended distance between them is at least 9–11 m. On loamy soil under the same conditions, the step between drains is reduced to 7–9 m, and on clayey up to 4–5.5 m. More detailed data for different laying depths can be seen in the table below. Information taken from the book “Draining land for gardens” by A.M. Dumblyauskas.
| Depth of drains, m | Distance between drains, m | ||
| Sandy soil | Su clay soil | Clay soil | |
| 0,45 | 4,5–5,5 | 4–5 | 2–3 |
| 0,6 | 6,5–7,5 | 5–6,5 | 3–4 |
| 0,9 | 9–11 | 7–9 | 4–5,5 |
| 1,2 | 12–15 | 10–12 | 4,5–7 |
| 1,5 | 15,5–18 | 12–15 | 6,5–9 |
| 1,8 | 18–22 | 15–18 | 7–11 |
When laying the pipe, the features of the terrain are observed. According to the technology, drains are laid from the highest to the lowest point on the site. If the area is relatively flat, then to impart a slope, a slope is formed along the bottom of the trench. The minimum slope level is 2 cm per 1 running meter of drainage pipe when constructing drainage in clay and loamy soil. For sandy soil, a slope of 3 cm per 1 meter is maintained.
When installing long drainage, you should follow minimum slope along the entire length of the drainage route. For example, for a drainage system 15 m long, the minimum level difference between the starting and ending points of the route will be at least 30 cm.
If possible, it is recommended to exceed the stated slope standards. This will ensure faster drainage and reduce the risk of silting and clogging of the drain. In addition, digging a trench with a large slope is much easier than measuring 1–2 cm.
Drainage in a summer cottage - the simplest methods with instructions
In order to independently drain a plot of land using a drainage system, you will need to familiarize yourself with the technology of work, calculate and purchase necessary materials, prepare tools and a place to perform work.
Surface drainage of a summer cottage
Open surface drainage is universal solution for draining summer cottages Not large area. For example, for typical plots of 6 acres. You can take the diagram below as a basis. It shows a herringbone-shaped drainage route. The distance between the drains, as stated above, is selected based on the type of soil (see table).
An example of the location of the drainage system on summer cottage
To carry out the work you will need a shovel and bayonet shovel, a tape measure, a bubble level, a hammer and a sharp construction knife. The materials you will need to prepare are gravel of fraction 20–40, geotextiles, edged bars or boards 2–3 m long.
To construct surface drainage on a summer cottage, you will need to do the following:
Sometimes, the base of the trench is concreted along the entire length of the drainage route. This allows you not to worry that over time the earthen walls will begin to crumble, water flow will deteriorate, etc. But this approach is more labor-intensive and requires the ability to work with concrete mixture.
Draining the area using deep drainage
Deep drainage is standard solution for drainage of country and suburban areas. A deep drainage system can be installed even when there is a protective blind area, concrete or slab paths around the building. If necessary, they can be partially dismantled, but the overall structure will not be damaged.
An example of a drainage system project in a suburban area
Work on the construction of deep drainage includes the following:
- According to the design plan of the site, it is necessary to draw up a diagram of the location of drainage pipes and determine the water discharge point, that is, the place from where the collected water will be drained into sewer pipes leading to the drainage well. The depth of the pipeline must be below the freezing level of the soil. For the North-Western region this value is about 60–80 cm.
Preparation of trenches for the construction of deep drainage
- Taking into account the plan, a trench is dug along the perimeter and area of the site with a depth of up to 1 m. The width of the trench is at least 30 cm. All horizontal sections of the trenches are combined into a single system, which is brought to the water discharge point. After this, trenches are dug maintaining a slope of 2–4 cm per 1 m of surface. To check the quality of the drainage, the trenches are spilled with a large volume of water. If necessary, the slope towards the drainage well increases.
The pit for the drainage well must be dug at the lowest point on the site
- At the lowest point of the site, a place is created for the installation of a water intake or filter drainage well. For large areas located on loamy and clayey soil types, it is better to install storage type wells with a volume of up to 1000 liters. For small areas, you can use both storage and filter wells. The type of tank is selected based on the type of soil.
A wide sheet of geotextile is laid on top of the gravel layer.
- Fine gravel is poured into the bottom of the trench. The thickness of the layer is 10 cm. A geofabric is laid on the gravel with an overlap on the walls of the trench. To fix the canvas to the walls, wooden or plastic pegs are used, which are driven into the ground. After this, a 10 cm layer of crushed stone with a fraction of 50–60 is poured onto the laid geotextile and carefully leveled in compliance with the slope. A drainage pipe from Ø 110 mm is laid on the crushed stone.
- Modular inspection wells are installed at the drain turning points. The diameter and height of the well depend on the expected volume waste water. To connect the pipe to mounting hole a coupling is used, which is coated with a waterproof sealant before joining. Similar actions are carried out to connect the drainage pipe to the well pipe.
An inspection drainage well is installed in places where the drainage pipe turns
- Before backfilling, the drainage system is checked for functionality. To do this, it is drained through drains large volume water. If the water quickly drains and enters the well, then everything is done correctly and you can move on to the final stage. In other cases, you need to find and fix the problem.
- A 20–30 cm layer of gravel of fraction 20–40 is poured over the drainage pipes and carefully leveled. After this, the drains with laid crushed stone are covered with geotextiles. A 10–15 cm layer of quarry sand is poured on top of the geofabric and thoroughly compacted. The remaining space in the trench can be filled with fertile soil or regular soil from the site.
Methods for drying an area without drainage
Excessive moisture in the soil and stagnation of water on the site are not always associated with high level groundwater. Sometimes this occurs due to abnormally low temperatures and heavy precipitation. The combination of these factors leads to the fact that moisture does not have time to evaporate, and puddles and mold form on the soil surface.
Sanding clay soil is one of the ways to drain an area without drainage
If, due to some circumstances, it is impossible to install a drainage system, then there are several effective ways to drain the land:
Of the above methods for drying an area, the most effective are adding a sufficient amount of fertile soil and arrangement of trenches along the perimeter. On average, 1 m 3 of soil will cost 550–600 rubles. For a plot of 6 acres, 10–12 m3 of soil is sufficient.
The easiest way to drain the soil on a site
Construction of shallow trenches filled with crushed stone is the most in a simple way drainage of a summer cottage. Despite its overall simplicity, this method is very effective and can cope with big amount water formed when snow melts.
Work on arrangement of trenches around the perimeter and area of the site includes the following:
If desired, the second layer of crushed stone can be reduced, and the remaining space can be covered with soil from the site. This will hide the drainage under a layer of turf. It is not recommended to plant flowers and greenery on top of the drainage trench. This is fraught with their death due to the high humidity in this place.
How to clear a clogged drain pipe
Failure to comply with the technology for laying drainage pipes is the main reason for stagnation and poor drainage of water from distribution wells. In addition, very often stagnation of water is not associated with a blockage at all. Insufficient slope does not ensure constant and uniform drainage of accumulated water towards the drainage pit.
To clear small blockages, use a steel cable or a hose with strong water pressure.
The easiest way to unclog drain pipes is to use a steel cable drain cleaner. At one end of the cable there is a spiral-shaped nozzle, at the other there is a handle with which you can rotate the cable, creating a mechanical load at the site of the blockage.
To clean pipes Ø110 mm or more, it is recommended to use a cable with a steel brush of the appropriate size. During the cleaning process, it is necessary to lower the cable into the drainage pipe until its end reaches the blockage. Next, by rotating the cable clockwise, you need to try to break through the blockage or move it towards draining the water. Usually, small accumulations of silt and leaves can be pushed through without much difficulty.
If it was not possible to remove the blockage, then you will need to call specialists who, using a pneumatic installation and other equipment, will not only clear the blockage, but also carry out preventive cleaning of the entire surface of the drainage pipes.
Video: do-it-yourself site drainage
Oversaturation of the soil with moisture and stagnation of water on the site are big problem, which affects not only the growth of fruit-bearing crops, but also reduces the service life of a residential building. But it is worth remembering that excess water can be dealt with using a drainage system. It's much worse if fresh water and it will pick up moisture, and constructing a well is impossible due to certain circumstances.
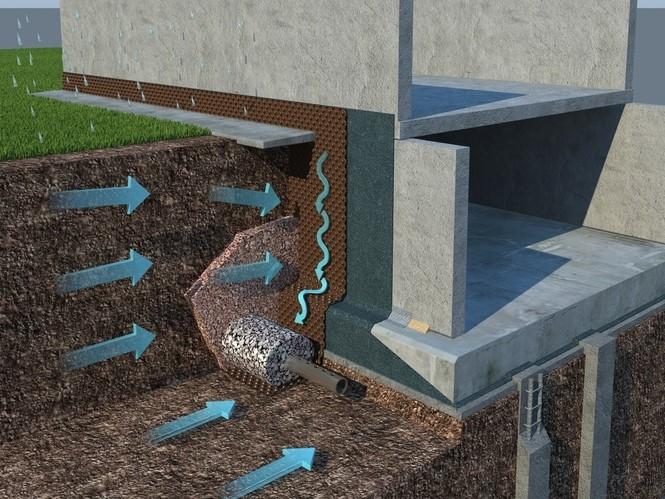
Drainage around the house, waterproofing the foundation and blind area is a set of measures aimed at preventing the foundation of the building from getting wet and the loss of load-bearing properties of the soil. And the device is chosen depending on the type of foundation, type of soil, nature of the high water and groundwater level.
Kinds
Drainage around the house can be surface, deep and reservoir. To be precise, the drainage system is often a combination of these types. For example, the formation view will not be effective if it is not “closed” to the deep view.
Surface
This species is responsible for collecting sediment and melt water. It, in turn, can be of two types:
- Open. This is a system of ditches or trenches that are laid with a slope towards a storm sewer collector or drainage well. Completely open ditches are usually installed only at the boundaries of the site. Around the house (along the perimeter of the blind area), near platforms and paths, gutters are laid in trenches and covered with gratings.
- Backfill. This is also a system of trenches, but already filled with crushed stone (or gravel) of coarse and medium fractions, where fine fractions, screenings or coarse sand are added for “cleaning”.
The depth of the trenches ranges from 50-70 cm.
Deep
This is the system closed type, which is responsible for the drainage of sedimentary and melt water, as well as seasonal perched water. On marshy areas and in close proximity to water bodies, deep drainage around the house reduces the load on the waterproofing of the foundation from the effects of high-lying groundwater (above 2 meters from ground level).
Types of deep drainage:
- Wall-mounted. Purpose - to reduce the pressure of water on the waterproofing of the walls of the underground part of the buried foundation of a house with a basement or underground floor. It consists of drainage pipes laid around the perimeter of the foundation base. Passes at the border retaining wall waterproofing or clay castle (provided they exist).
- Annular. Used around a house with a shallow foundation. Drainage pipes are laid below the base of the foundation along the perimeter of the house beyond the outer boundary of the blind area.
- Solid. This type is used to drain the entire area of the house. The scheme consists of main and auxiliary canals, in which the auxiliary canals are laid in a herringbone pattern towards the main ones, and they, in turn, converge into drainage wells.
Plast
This type of drainage can be classified as deep, but it does not pass around the house, but under it. More precisely - under the foundation slab or concrete floors on the ground.
In the standard version, the base of the slab itself, in the form of a cushion made of sand and crushed stone, has its own good drainage properties. And since the area of the bottom of the pit more area slabs, then to organize the drainage of water from the foundation, it is enough to arrange a ring drainage of pipes around the perimeter.
More complex circuit when the bottom of the pit is made with a slope from the center to the edges or with a decrease in one direction (practice for slopes). And water from the drainage layer is discharged further through a pipe system into receivers or wells.
The most complex scheme is when additional trenches are dug along the bottom of the pit into which crushed stone is poured. For floors, pipes are additionally laid on the ground and connected to the wall drainage.

Device
Surface drainage differs in the method of creating water drainage channels.
A simpler device for backfill surface drainage:
- according to the diagram, trenches are dug (at least 40 cm wide);
- compact the bottom, forming a slope towards the catchment area;
- cover the bottom with a layer of sand (up to 10 cm);
- crushed stone of medium and coarse fractions is poured to the surface level.

For decorative purposes, the top visible layer can be made of pebbles and small boulders to create an imitation of a “dry stream”.
The device for surface tray-type drainage (showers) is a little more complicated, but it is more common:
- According to the diagram, trenches are dug taking into account the size of the trays and the concrete base;
- a layer of a mixture of sand and crushed stone is poured onto the compacted bottom;
- formed from skinny concrete base with the required slope;
- install gutters, fill the trench openings with concrete and compact it;
- mounted on top of the grille.
Scheme
Device deep species drainage systems differ from each other only in the level of pipe laying and layout patterns on the site, but the construction principle is common for all:
- a collector well is installed in the place designated according to the diagram;
- they dig trenches for ring drainage, and for common system- main and auxiliary channels;
- wall drainage pipes are laid during the construction or reconstruction of a house, when the foundation is completely open to the very heel;
- in places where trenches turn they arrange inspection wells(if the distance from the turn to the next well is more than 20 m), and if long length the direct inspection section is arranged every 25 m;
- the bottom of the trench should not have hard protruding inclusions, and the walls should be straight for dense soils or in the form of a trapezoid with reinforced slopes during work for loose soils;
- if necessary, the bottom of the trench is “strengthened” by filling with sand or laying an artificial base;
- if the drainage pipe has a filter shell, then a single-layer backfill of coarse sand with a high filtration coefficient is made around it;
- If the pipe does not have a geotextile shell, then it is first backfilled with fine crushed stone around it, followed by a layer of sand.
When laying corrugated pipe without a shell, the grain size should be less than the depth of the corrugation, and the crushed stone should not contain crushed particles with sharp edges.
A pipe without a shell can be laid according to another scheme:
- geotextiles are laid on the bottom and walls of the trench;
- crushed stone is poured;
- lay and connect pipes;
- another layer of crushed stone is poured on top;
- wrap the geotextile panel so that its edges overlap and fasten them;
- fill the trench with sand to the level of the humus layer;
- pour fertile soil or lay a hard surface for paths.
Deep drainage without pipes
On soils with good water permeability and low groundwater level, it is not practical to install an expensive deep drainage system made of perforated pipes around the house. Especially if the area is small. But a surface open or backfill system is also not suitable - it takes away usable area. In these cases, deep drainage without pipes is arranged, or, as it is also called, soft drainage.
The simplest scheme has almost the same structure as deep drainage, but without pipes:
- dig a trench system;
- geotextiles are laid on the bottom and walls;
- crushed stone is poured;
- fold the edges of the textile overlapping;
- fill with sand and then soil.
Another advantage of this type is the simple nature of the work. The drainage installation time is reduced, plus there is no need to monitor the constant and continuous slope of the pipe - it is enough if general level the trenches will go down towards the drainage well or beyond the boundaries of the site (towards ditches or a reservoir).

In general, there are “folk” methods for installing soft drainage without pipes, when bundles tied from long brushwood are used as a water conduit. And to prevent them from silting, they are covered with crushed stone and sand.
How to make drainage around the house with your own hands. Step-by-step instruction
If the house has already been built, and it has become obvious that the water permeability of the soil is low, and the throughput of the wall or layer drainage is insufficient, then the easiest way to solve the problem of waterlogging of the soil is to make a ring drainage around the house with your own hands:
- Draw up a diagram of the location of trenches with their depth and slopes to the collector or drainage well.
- They dig trenches with a bottom width of more than 40 cm. The depth at the “highest point” should be below the base by the size of the diameter of the drainage pipe plus the thickness of the crushed stone cushion.
- The bottom of the trenches is compacted, a layer of sand is poured, then crushed stone, and an angle of inclination is formed towards the receiver. The slope is calculated depending on the diameter of the pipe based on minimum speed water 1 m/s. But it should lie within 0.5-3%, be constant or increase towards the lowest point.
- The pipes are laid according to one of the above schemes. Drainage pipes are connected using couplings, which, unlike socket joints, do not become silted. The choice of a specific type of pipe (including material and ring stiffness) depends on the depth and design pressure from above (backfill, soil, and when laying under paths or platforms, the weight of the coating and the load on it must be taken into account).
A new product has appeared on the market - drainage pipes with an additional filter layer of specially shaped polystyrene foam granules. This layer is located between the pipe and the geotextile shell. When laying this type, backfilling with crushed stone is not required.
- Backfilling is carried out. The nature and order of layers are chosen according to the type of drainage pipes.
Below is a video on the installation of ring drainage. The owner of the house played it safe and used geotextiles twice - as a pipe shell and around the drainage backfill. Such a system will not silt longer in clay soil conditions. It also shows well how important it is to choose clean crushed stone.
Drainage around the house is no more difficult (but also no easier) than autonomous sewerage with septic tank and filter well. The amount of work involved in laying pipes is greater, but there are no strict requirements for the tightness of the system. And you can do the drainage yourself. The only difficult point is if the drainage well is installed from concrete rings, then you need to involve technology.
17.07.2016 0 CommentsOwners of suburban areas are often faced with a situation where an excess of water on their territory after snow melts or heavy rains interferes with comfortable living. An equally significant problem is high location at the groundwater level area. This applies to a greater extent to those whose land ownership is located in the lowlands of the existing terrain and on the slopes of natural hills with a significant clay content in the soil. Excess moisture in the ground not only has an adverse effect on root system garden plants, but also floods the basements of buildings, which negatively affects the durability of the foundation structure.
The installation of a drainage system will help solve this problem forever. A drainage system is a complex of engineering structures whose functional purpose is to collect and drain water from the serviced area. Often, for a comfortable stay, it is enough for owners to install a system not throughout the entire site, which is quite expensive from a time and financial point of view, but only drainage around the house.
In contact with
Classmates
Depending on the method of implementation, drainage systems are divided into types:
- Superficial, divided into:
- Linear (carried out in the form of shallowly dug trenches located around the perimeter of the building). Such drainages can be either open or closed. An open system, which looks like an uncovered tray along the perimeter of the protected area, in addition to its unsightly appearance, also poses a threat of injury if you move inattentively around the territory and is not popular with landowners. Closed systems are more attractive from a security point of view and have a more presentable appearance;
- Point ones, which are located directly in places where water accumulates (under drainpipes or in front of the entrance to the house) and are connected to each other by pipes.
- Deep, which consist of a whole network of buried perforated pipes that collect and remove groundwater from the site.

Preliminary work
Before starting work, whether installing drainage around the house with your own hands or by a specialized organization, the following is required:
- Study the area to determine the slope of the existing terrain;
- A detailed design of the future system is being developed, which takes into account the slope of the pipes in the ground of about 5 mm. – 1 cm per linear meter;
- Select the type of future drainage system based on the prevailing conditions in a particular plot of land conditions;
- Select the type of drainage pipes. Currently, both flexible and rigid pipes are available on the market, the drainage effect of which is achieved by the presence of holes along the entire length. Flexible pipes are cheaper, rigid pipes are more durable, and it is worth putting some effort into determining the characteristics that the homeowner prioritizes.
Necessary tools for creating drainage
To carry out the work, depending on the chosen type of drainage around the house, you will need the following tools and consumables:
- Garden wheelbarrow;
- Shovels (scoop and bayonet).
- Hydraulic level (in the form of two flasks connected by a hose) for creating and controlling the slope of the drainage system;
- Roulette;
- Pegs with rope;
- Bulgarian.
- Manual tamping.
- Drainage pipes, gutters, trays and their components.
- Coarse gravel or crushed stone (fractions 20-40 mm);
- Concrete or components for its production (cement);
- River coarse sand.
- Geotextiles.
Technology for installing surface drainage around a private house
 This system does not require complex installation, is not allocated on the territory of the site, but due to sand traps and waste bins does not cause any difficulties in operation, while having significant throughput.
When choosing the design of such a drainage system, it is necessary to take into account the likelihood of loads affecting it - in places where traffic moves, the use of models with increased strength is required.
Sequence of work:
- In the selected locations for installing the devices, pits are dug, comparable in size to the structure, adding a small margin. The depth of the pits should take into account the thickness of the concrete pad being poured;
- Concrete pads with a thickness of about 100-120 mm are poured into the pits;
- The pits are connected around the perimeter of the house with pipes laid in trenches. The depth of the pipes must correspond to the mark of the top of the concrete pads;
- Stormwater inlets are installed in the pits, connecting them to the drainage pipes of the system. The slope of the pipe system must exceed 0.5% (5 mm per linear meter of pipe length).
- Before the final pouring of concrete, it is necessary to install decorative gratings on the storm inlets to ensure that they are level at 3–5 mm. below the surface of the earth for the greatest efficiency in collecting atmospheric water. Grates usually do not require fasteners, but are simply placed on the device receiving water;
- Fill the space between the rainwater inlets and the walls of the pits with concrete mortar.
- At a distance of 3-5 meters from the building, a trench is dug with a length of four meters and a depth of 0.5 - 0.7 m, the bottom of the trench is covered with coarse sand and thoroughly compacted. The longer the trench, the more effective the drainage from the protected area will be. A layer of geotextile is laid on top, a layer of crushed stone (gravel) about 0.1-0.2 m thick is poured onto it. Pipes from point storm inlets are brought out to the trench and connected to each other. A drainage pipe is laid on the gravel with the holes downwards, and the pipes leading from the rainwater inlets are connected to it with adapters. Then a layer of crushed stone is poured on top with a layer of 0.1 m and covered with geotextiles. Finally, the trench is backfilled with soil and construction of the blind area begins.
 The linear drainage system around the house, in contrast to the point drainage system, is made in the form of long open rainwater inlets and is used for buildings without specifically designated atmospheric water discharge zones. In this case, water is collected in receiving gutters along the entire length of the drainage line and then, using underground pipes, is discharged beyond the boundaries of the protected area.
The gutters of such drainage are cast from frost-resistant plastic or fiber-reinforced concrete. They have a long service life and are resistant to significant mechanical stress. Geometric dimensions gutters are selected based on the amount of water they receive, which directly depends on the roof area of the building.
Work production technology:
- According to a previously developed scheme, the location of storm water inlets is marked on the ground using pegs and rope.
- Using the completed markings, trenches are dug for water intake gutters. The depth of the trench bottom is determined based on the height of the storm inlet profile + 100 mm. for pouring a supporting concrete pad, the width of the trench should be approximately 70-100 mm. exceed the width of the gutter. At the same time, we must not forget about ensuring the proper slope of storm water inlets and deepening the gratings covering them by 3-5 mm. below the surface of the earth.
- The bottom of the trench is carefully leveled and compacted.
- A concrete pad of a given thickness is poured.
- At the lowest point of the drainage perimeter around the house, a sand receiver (sand catcher) is installed, monitoring the correctness of its installation at the building level. From the sand trap, water is discharged through pipes buried in the ground into the existing sewer system or outside the site.
- Install the gutters of the drainage system by connecting their grooves to each other. It would be a good idea to seal the joints with sealant.
- Transition couplings are used to connect gutters with sand trap, for this purpose, its body contains plugged holes or places provided for their installation.
- After checking the slope and quality of installation, the gutters on the sides are filled with concrete mortar. Before pouring, decorative gratings should be placed on the gutters to prevent deformation due to pressure on the walls of the concrete mixture.
- The trench openings are filled with soil.
Such drainage around the house during operation requires periodic cleaning of rainwater inlets and grates as they become clogged. Depending on the amount of precipitation, it is recommended to carry out the cleaning procedure once every two to three weeks.
Deep drainage technology
Such drainage around the house can be done with your own hands according to two schemes: wall or ring. In both cases, it is a system of drainage perforated pipes that collects soil water at its depth, which is then discharged outside the site. The production of such work, compared to surface systems, characterized by a large volume of excavated soil.
Wall drainage diagram
 Wall-mounted drainage around the house is usually arranged in parallel with the construction of the foundation and basement walls of the building under construction to avoid additional earthworks. However, if necessary, if a problem with groundwater is discovered after the construction of the building, difficulties with the installation of such a system will also not arise.
Device technology:
- The basement walls of the building are coated with two layers of hot bitumen mastic with reinforcement of the first layer with painting mesh.
- Along the perimeter of the building along the foundation, a trench is dug 0.3-0.5 m below the depth of the foundation base; at the corners of the building and in the lowest place on the site, pits are provided for constructing inspection wells.
- A leveling layer of sand 0.1-0.2 m thick is backfilled and carefully compacted layer by layer, observing required slope the bottom of the trench is about a centimeter per meter of length.
- Lay a layer of geotextile in the trench, trying to ensure that the edges of the fabric extend 50-70 cm onto the walls of the basement and trench.
- A layer of crushed stone about 10 cm thick is poured.
- Drainage pipes are laid on the crushed stone, orienting them with their holes down.
- In the places designated for this purpose, inspection wells are installed and drainage pipes are connected to them. The top edge of the wells should be located above the ground surface. Drainage pipes in wells should have breaks, this will allow them to be cleaned if clogged.
- A layer of crushed stone is poured into the trench on top of the drainage pipes so that it covers the pipes by 0.1-0.2 m.
- The edges of geotextile from the walls of the trench cover the resulting drainage structure around the foundation of the house and secure them with synthetic twine.
- Fill the trench with soil.
Do-it-yourself ring drainage technology around the house
 Carrying out drainage according to this scheme is in many ways similar to the wall system and the technology for carrying out the work is almost identical. Ring drainage is optimal when placing the site on clay and loamy soils in buildings where a basement or technical underground is not provided. In this case, a trench for drainage pipes is dug at a distance of 1.5 - 3.5 m from the house, while laying a layer of clay between the drains and the building (the so-called clay castle) to protect the foundation from groundwater infiltration. Otherwise, the technology for carrying out the work is no different from the wall execution scheme. In addition, if the trenches are located at a distance of about 1.5 m from the house, it is possible to use them to collect rainwater by installing linear drainage in the same place. This will save time and effort on excavation work when laying linear storm drains.
As can be seen from the materials in this article, installing drainage around the house with your own hands is a fairly simple task and absolutely any owner of country buildings can do it if they have the desire and a certain amount of finance.
In contact with
The foundations of private houses require protection from excessive wetting, since precipitation and rising groundwater levels can lead to the destruction of monolithic foundations. In this regard, the question arises: how to properly make drainage around the house with your own hands. The opinion that with a blind area you can avoid excess moisture getting into the soil adjacent to the base is erroneous. Only the installation of a well-thought-out drainage system will protect the house without reference to the presence or absence of premises below ground level.
Installation of any type of drainage system around a residential building must necessarily begin with the design of all stages of work to create structures that facilitate the removal of excess moisture. To protect the foundation of the house and basements optimal solution will be the use of wall drainage, ensuring complete removal of precipitation from the building.
If the groundwater is located quite high on the site, then the presence of waterproofing alone will in no way save you. IN in this case Sediment can be removed from the foundation of a residential building only by installing a well-thought-out drainage system. 
If we approach the issue of creating engineering structure comprehensively, the following scope of work will be required:
- Through use quality materials produce foundation waterproofing.
- Install a system that can affect groundwater in terms of reducing its level ( drainage).
- Mount surface drainage at home.
Types of drainage
When choosing a specific engineering structure for installation around a residential building, it should be taken into account that there are several types of such systems.
Wall-mounted
This type of drainage is required to be installed if the house has basement and basements. Installation of a wall watercourse is carried out along the perimeter of the foundation, which is preferably done at the excavation stage when building a house.
This approach eliminates unnecessary excavation work, and this in turn reduces the cost of installing the system and reduces labor costs.

Direct laying of drainage is carried out along the perimeter of the base of the building with pipes leading from its corners to inspection wells. The lowest located part of the system should be used to construct an outlet well in this place, which, from a functional point of view, will play the role of a storage tank for atmospheric precipitation with its further removal beyond the territory of the site.
To ensure a greater level of security, it is advisable to install a so-called clay castle at a distance of one meter from the home.
Trench
If the house is located on soil that is saturated with clay and has no basements or basements, then a trench drainage system known as a ring drainage system can be used. Such a drainage channel is laid at a distance of 1.5-3 m from the building.
![]()
Here, as in the previous case, it is assumed that a clay castle will be installed, the location of which should be determined by the space between the foundation and the drainage system.
It is important that the depth of the drains corresponds to a level located 0.5 m below the deepest point of the foundation. The pipes are laid on a layer of material that does not impede the passage of water, for example, crushed stone.
When is the best time to install drainage?
Most the right time for the installation of systems designed to drain precipitation from the house, the summer period is considered, starting from the 15th of July and ending in mid-August. The choice of this time is explained extremely simply: due to the peak of summer heat falling during the designated period, the groundwater level decreases.
Although you should not relax in this case, since no one can exclude force majeure circumstances. Therefore, it is worth making sure that you have a pump with which you can quickly pump out precipitation. Still, digging trenches brings you closer to underground waters, but does not remove you in any way. I would not like the rather labor-intensive process of installing an engineering structure to have to be repeated again, since water in the trenches can cause trouble.
Drainage scheme
In practice, drainage systems such as trench and wall are used. The choice of a specific implementation option for the varieties under consideration largely depends on the following factors: soil type, terrain, etc.
Which is also called ring, finds its application in those areas where sandy soil is present. In structure, it is a closed system that accumulates atmospheric precipitation in a collector with its further discharge into ravines and various reservoirs. Such a system cannot be installed closer than 5 m from the house, since failure to comply with this requirement may cause soil shrinkage, and this in turn will negatively affect the condition of the foundation.
Wall drainage used in the presence of other conditions compared to the trench system. In particular, it is used on soils with a high clay content and characterized by high groundwater levels.
The main elements of wall drainage are drains, that is, perforated pipes. In addition, such a structure consists of wells that serve as water storage tanks and inspection pits necessary to monitor the functioning of the system at the pipe connections and at the turning points of the water pipeline. 
Wall drainage country house is a system consisting of pipes and other elements, which is a closed structure, the location of which is determined by the perimeter of the building at a distance of half a meter from the walls of the building.
If the terrain of the area does not allow installing drainage around a private house so that water is removed from the collector naturally, care must be taken to install pumping equipment.
Installation of wall drainage
If you have a desire to arrange a drainage system yourself, then know that this work can be done by anyone. Therefore, feel free to correct mistakes made during the construction of a house, since it is advisable to install drains at the stage of construction of a particular structure.
To put your plans into practice, you should understand the basics of creating the type of system in question, and then dig trenches and lay pipes. Water conduits, known as drains, are required to be placed at a certain slope in relation to the storage well, which should be approximately 2 degrees, starting from highest point drainage system.
If we convert this to centimeters and linear meters, it turns out that for each specified pipe length there should be a 2 cm decrease.
When laying cylindrical products without bends, inspection wells should be installed at a distance of no more than 40 m. If water pipelines are expected to have turns, then such wells should be located at a distance of no more than 25 m from those places where such bends are observed.
The pipes are installed to a depth of 30 to 50 cm from the reference point, which is installed at the level of the lower base of the foundation. In this case, one more condition must be observed: the depth of the drainage system cannot be higher than the depth of soil freezing.

At the same time, the blind area being constructed must be wide enough to prevent water from entering the soil located between the house and the drainage system. The blind area should be perceived as a layer of thermal insulation, which helps reduce the depth of soil freezing and protect water pipelines.
Foundation waterproofing
Before installing the drainage, some preliminary work should be carried out to protect the base from water penetration. To do this you will need to do the following:

- apply geotextile fabric and then cover it with bitumen mastic;
- use roofing felt, which implies the obligatory construction of a so-called pressure wall made of bricks;
- apply sprayed waterproofing followed by its reinforcement with geotextiles.
Installation of drains
At this stage, you can begin installing water lines. Such a process involves quite labor-intensive work, including the following:
- Initially, you need to dig a trench to lay drainage pipes. The long ditch must be located at a distance of at least 1 meter from the foundation, provided that it is located lower than the foundation of the house. Since it is assumed that a 110 mm perforated polymer pipe will be used to lay the drainage, the width of the trench must correspond to it. The cylindrical product should not be laid close to the walls of the ditch, as this will not allow backfilling with soil properly. It is necessary that there is at least 10 cm of free space on each side of the pipe.
- The bottom of the trench must be leveled with a layer of sand 5 to 10 cm thick. At the same time, we should not forget that the bottom of the ditch must have a slope of 2 cm per 1 linear meter.
- It is necessary to lay geotextiles on the resulting sand layer so that the edges of the fabric touch the walls of the trench, where they need to be securely fastened.
- The next layer should be gravel - from 10 to 15 cm.
- Then you can proceed directly to the installation of drains installed with a slope in the direction of the well.
- Another layer of gravel of the same thickness as below is poured on top of the laid pipes, that is, from 10 to 15 cm.
- Above construction material covered with a geotextile cloth, the ends of which are secured.
- At the last drain, installed at a distance of at least 5 meters from the house, a water receiver is installed.
- The area under the sediment collection tank is lined with geotextiles that cover the bottom and walls. Then placed here plastic container, at the bottom of which holes are made, which is preferable compared to other solutions.
- A tank with openings must be firmly secured, since heaving forces can simply squeeze it out. On last stage work, this structure is necessarily covered with gravel and laid on top of a layer of soil.
Caring for the wall drainage system
For the full functioning of this type of artificially created watercourse, it should be regularly inspected at least once a month. This refers to control over wells that may become contaminated, which involves mandatory cleaning of them from debris.
In spring and autumn, these types of checks must be carried out more often, since during these periods of the year there is usually a lot of rain. In spring, snow melts, which provokes the appearance of large amounts of meltwater. Here it is necessary to clean not only the drainage system itself, but also storm sewer.
Let’s make a reservation right away: drainage and waterproofing are different concepts and one of them does not exclude the other. Drainage around the house (drainage system) allows you to remove or reduce the water level in the area.
The danger lies both outside (precipitation, flood waters) and inside (groundwater). Waterproofing protects the foundation of a building from water getting inside.
But even a foundation that is well insulated from water will not protect the foundation of a private house (basement) and basement from water ingress for a long time. After all, if water presses constantly, it will find weak spots in the waterproofing. And on the contrary, if you take her away in time, your home or dacha will be safe.
When a drainage system is needed:
- site location. The lower it is, the the problem is more pressing drainage;
- soil quality - on clay and loamy soils, the water level decreases slowly;
- precipitation levels in your area;
- groundwater level;
- deepening of other buildings on the site. If a nearby building has a strong buried foundation- the water will have nowhere to go, and it will accumulate on the surface, increasing the risk of flooding;
- presence of waterproof coatings - concrete paths, an asphalt yard is a place inaccessible to water penetration.
Installing drainage around the house with your own hands will eliminate the problems caused by the factors listed above.

Types of drainage systems
Depending on the severity of the problem of flooding in the area, there are several ways to make drainage around a private house.
Surface drainage
This type includes storm drainage (storm drainage). The advantage of such drainage is that its arrangement is simpler and accessible after most types of work on the site have been completed. Surface drainage systems allow you to remove only rain and melt water, which can cope with groundwater they can't do it.
There are two types of surface drainage devices: linear and point.
Linear drainage
Focused on draining storm or melt water from the entire site and from the house in particular. Water flows into channels dug in the ground and is discharged into a drainage well. As a rule, the channels have a straight linear shape and are closed with gratings.
Point drainage
Focused on the rapid removal of water generated from local sources (for example, under roof gutters, watering taps, etc.). Point drains are covered with decorative metal gratings to prevent clogging of the channel with debris and leaves. Drainage pipes are laid from each point and connected to the main main pipe leading to the drainage well.
Combined drainage combines the two above-mentioned systems: point and linear drainage.
According to the method of installation, drainage can be open or closed
Open drainage
A system of trenches, gutters, drains or drainage trays.
This drainage is a trench that is designed to drain storm and melt water from the house and the site.
The principle of an open drainage system
A ditch up to half a meter wide and 50-60 cm deep is dug along all sides of the site and around the house. All these trenches are connected to a common drainage trench.
In order for water to flow freely into the trench from the side of the house, a bevel is made in the ditch at an angle of 30°, and a slope towards the main water intake trench (or drain well) will allow water to be drained by gravity in the desired direction.
Plus open system drainage can be called low cost and high speed performance of work. But, if you need to drain a large amount of melt and rain water, you will have to install a deep drainage line into which someone could fall. Unimproved ditch walls are destroyed. This system spoils appearance plot.
The service life and safety of such a system can be increased by using special trays (made of plastic or concrete), which are covered with gratings on top.

Closed drainage
It has a more aesthetic appearance compared to the previous one, as it is equipped with a protective grille, but the receiving ditch is much narrower and smaller. Their types are presented in the photo.

Backfill drainage - a system of backfilled trenches
It is used when the area of the site is small and it is impossible or impractical to make open drainage. The disadvantage of this system is the inability to carry out maintenance of the trench after installation without dismantling.
Proper drainage around a house of this type is achieved in several stages.
- a trench is dug to a depth of about a meter with obligatory observance of a slope towards the drainage well;
- Geotextiles are laid at the bottom of the trench;
- the trench is filled with gravel, crushed stone, etc.;
- A layer of turf is laid on top. This stage is optional, but allows you to give the site a more aesthetic appearance.

Deep drainage
Disposal of a large amount of groundwater requires the construction of a solid system - deep drainage of the site. The device of a deep drainage system is used in areas with clay soil, located in lowlands and characterized by a high groundwater level.
The installation process is labor-intensive and consists of laying pipes (the diameter depends on the amount of water drained) from perforations into deep trenches (depending on the height of the soil water).
Closed drainage - pipe system

How to make drainage around the house with your own hands
Step-by-step instructions for installing closed drainage
- Determine the location of the closed drainage system, which can be implemented in two options:
- pass only near the foundation, i.e. around the house (wall drainage), preventing water from penetrating directly into the house.
- be located throughout the site, thus protecting the basement of the cottage, as well as plantings and other outbuildings.

The drainage diagram around the house is shown in the photo

- Mark the location of drainage ditches on the site. Typically, devices such as a laser rangefinder and a level are used for this. But, you can make it simpler, trace where the water grooves remain after the rain - that’s where drainage trenches should be laid.
- Dig trenches. When digging, be sure to observe the height difference. After all, water should flow to the drainage well, and not accumulate in pipes.
![]()
Advice. To check the “operability” of the trench, it is better to wait for heavy rain and see if there are any places of significant accumulation of water.
- Lay a layer of geotextile. Its role in drainage is to filter water from impurities that could clog the drainage pipe perforations.

Advice. If you have clay soil, geotextile is a must; if you have crushed stone or sand, then it is not necessary.
You can use any geotexyl, the main thing is that it allows and filters water well. It is better not to use dense needle-punched geotextiles, because... it does not pass water well.
- Fill the bottom (bottom) of the trench with gravel.
 Lay a perforated pipe - the basis of the drainage system. Pipes can be ceramic or plastic. But any type of pipe must have perforation to receive water (perforation can be done independently, using a drill). The pipes are connected to each other using a cross or tee. Material prepared for the website www.site
Advice. The pipe perforation should be smaller than the size of the smallest gravel particle.
- Lead the ends of the pipe into inspection wells. Such wells are installed at all turns so that the system can be maintained. For example, clean a pipe with water pressure or evaluate changes in water level.
Advice. Collecting pipes over a large area of the site must converge into a main pipe (with a diameter of more than 100 mm), which will carry the collected water to the drainage well.
Lead the ends of the pipe into the drainage well. This is the last component of a closed drainage system.

According to their functional purpose, drainage wells are divided into two types:
- accumulating. This well has a sealed bottom. Water is accumulated in it and then used for irrigation;
- absorbing. A well without a bottom, the water in it gradually disappears into the soil.
- Fill the geofabric with crushed stone without reaching the top ground level of 200mm.
- Fill the drainage pipes with crushed stone to a height of 300mm.
- Wrap the pipes with geotextile overlapping and secure the joints with rope.
- Fill in sand, soil and/or lay turf.

Advice. Surface drainage can be installed on top of a closed system ( storm system) and also take it into the drainage well.
The finished drainage system is shown in cross-section in the photo.

Conclusion
Which of the listed types of drainage is right for you can only be determined by knowing the characteristics of the site. In general, you should choose the drainage around the house whose cost of installation and operation is the lowest, and of course, which you can do yourself. At the same time, it must perform the role of drainage efficiently and reliably. After all, according to experts, proper drainage around the house will extend its service life by more than 50 years.


