And so, for production we will need a pump from the Shmel primus. Or rather, two pump housings and a Chinese Zippo lighter.
First of all, we unscrew the pump valve, remove the contents, and then disassemble the lighter, leaving only the chair, the spring with the screw and the tube in which the spring is located.

We make the case
We mark and cut off the thread from the first tube.

Then, we unsolder the nipple from the second pump tube.

And we solder it into the body of the future lighter, deepening it by about 1 mm.

For the lighter cap, we need to cut a piece from the second tube equal to the height of the valve.

We adjust with a file. To avoid a bevel, during processing with a needle file we turn the part around its axis.
The upper part of the lighter is prepared, let's move on to the lower part. Here the cap will be smaller. To do this, just below the side hole of the valve, mark the cut lines of the valve and tube.
And cut off the tube, and then the valve.

We also cut off a 15 mm long tube for wind protection and make a plate from the remaining piece.

We cut out two plates for each tube and begin assembling the small cap. Apply solder to the joints,
We apply nail polish to avoid unwanted joints.

And while heating it with a burner, we solder the valve, plate and tube together.

We cut off the excess and process it with a needle file.
Before assembling the top cap, we need to plug the side and top holes of the valve.

We wind thin copper wire around the side holes and solder. We simply fill the upper hole with solder, and at the same time tin the surface. We also apply solder to the plate and tube.
We install it evenly and warm it up until it is completely soldered.

After soldering, we cut off the excess, sharpen it with a needle file and process the entire body with fine-grained sandpaper.
Now let's move on to the tube and chair.

A brass valve from a truck camera was perfect for the body of this mechanism.

We process it with sandpaper and cut off a 45 mm tube. and then we make a groove for the chair with a depth of 10 mm.
Next, drill a hole for the pin with a diameter of 3 mm
The gap between the chair and the tube should be about a millimeter.

Now we need to solder both tubes together so that the seat is at a distance of a couple of millimeters from the lighter body. For this I used a brass wrench shaft.

Cut the rod 27 mm long. and try it on. If the distance is too large, you need to sharpen the rod a little. We will also sharpen the tube and body of the lighter.

We apply solder to the surfaces of the rod and the brass tube, as well as to the iron tube that we removed from the lighter and solder it.

We solder the rod, set the clearance of the chair a couple of mm above the lighter nipple, adjust the position, fix the structure with a crocodile and solder it.

In the 15 mm long tube that we prepared earlier, we drill 8 3 mm holes in a checkerboard pattern.
We mark 13 mm with a caliper and cut out a fragment of the tube. Having inserted the drill at 11, we tap wooden hammer and reduce the internal diameter to 11 mm.

Then we solder it.

The wind protection element acts as a guide. Thus, when screwing on the cap, we will save ourselves from aiming, unlike other analogues of screw-on lighters.
Now we need to enlarge the holes in the nipples. We drill the top one at 2.5 mm, and the bottom at 3.5 mm.

And finally, we make a pin from a nail of suitable diameter.
When installing the chair, it is important to pay attention to the direction of the teeth. If mixed up, the roller will not produce sparks.

We insert the flint and spring, tighten it and check.
In order to insert a wick into the hole, we tie a thin copper wire to it and pull it into the hole.

We fill it with cotton wool, cut off the wire, lay the remaining end of the wick and fill it with gasoline for lighters.

OK it's all over Now. The lighter is ready. I hope you liked the article.
If you found the article difficult, you can watch the video instructions for assembling the lighter.
Bye everyone.
In this master class we invite you to collect original lighter with your own hands. All you need from a regular product is a cigarette lighter. In appearance, the lighter resembles a steampunk product and no one will have one like it.
Materials
To work you will need:
- old cigarette lighter;
- 15 mm copper plugs, 2 pcs.;
- 12.7mm copper tube;
- 4 mm brass or copper tubes;
- brass strips;
- brass rectangular tube;
- small screws, 2 pcs.;
- dome nut, M5;
- bolt;
- pliers;
- soldering iron;
- solder;
- Dremel and drills;
- file;
- cotton balls;
- a piece of felt fabric;
- wick;
- liquid for refilling lighters.

Step 1. Disassemble the lighter to remove the cigarette lighter.

Step 2. Take a thin copper or brass tube and attach the cigarette lighter spring to it. Cut the tube so that the spring protrudes slightly beyond it.

Step 3. File the tube at the cut points.
Step 4. Take a copper strip and bend it at a 90 degree angle twice to create a U shape. Use the cigarette lighter wheel when shaping the element. This part will hold it in the future.

Step 5. Drill a hole in the prepared part for a thin tube.

Step 6. Solder the tube to the resulting part. On its lower side, thoroughly heat the metal and screw the screw into it. When the metal hardens, they will be firmly fixed in the tube itself.


Step 7. In the U-shaped part of the prepared element, drill a hole for attaching the ignition wheel.
Step 8. Clean the part, making it smooth, and then insert the wheel by pressing on it.

Step 9. Now you will need to saw off a small part of the large copper tube. Adjust the length of the part yourself. IN in this case it was 5 cm. Be sure to clean the cut areas to a perfectly smooth state

Step 10. Now you will need to make a wick holder built into the copper cap. The latter will protect the contents of the pipe from drying out.
First, drill a hole in the screw to a depth of approximately 1 - 1.5 cm. For convenience, place the screw in a vice and, when finished, cut off the excess part.


Step 11. In the copper cap, drill a hole for the screw slightly away from the center. Paste it. Tighten the screw with a nut with a cap.


Step 12. Thin copper tube solder to the screw with inside copper plug. After everything, solder the plug itself to the pipe.


Step 13. In the second copper cap, drill a hole, this time for a thin tube.
Step 14. Cut down the tube itself so that it is flush with the cap. Screw the screw with the head into the tube, thoroughly heating the metal in advance.


Step 15. With brass tube rectangular shape connect the two lighter elements together. Before cooking them, cut and clean the plate, and then put the entire structure in a vice.
Pay attention to the location of the parts relative to each other.

Today we will tell you how to make a gasoline lighter with your own hands at home.
Hello! One day, while looking for spare parts for my Primus, an idea struck me. I discovered that it is quite possible to make a camping one from a kerosene stove pump, from which fuel does not evaporate during storage. Many users of Zippo lighters will understand me.
I’ll say right away that I found all the parts for assembly at a flea market.
And so, for production we will need a pump from the Shmel primus. Or rather, two pump housings and a Chinese Zippo lighter.  First of all, we unscrew the pump valve, remove the contents, and then disassemble the lighter, leaving only the chair, the spring with the screw and the tube in which the spring is located.
  We make the body. mark and cut off the thread from the first tube
  Then, from the second pump we unsolder the nipple
  and solder it into the body of the future lighter, deepening it by about 1 mm.
  For the lighter cap, we need to cut a piece from the second tube equal to the height of the valve
  We adjust with a file. To avoid a bevel, during processing with a needle file we turn the part around its axis. The upper part of the lighter is prepared, let's move on to the lower part. Here the cap will be smaller. To do this, just below the side hole of the valve, mark the cut lines of the valve and tube.
And cut off the tube and then the valve.  We also cut off a 15 mm long tube for wind protection and make a plate from the remaining piece.
  We cut out two plates for each tube and begin assembling the small cap. Apply solder to the joints,
Apply nail polish to avoid unwanted spots  and warming up the valve, plate and tube among themselves.
  We cut off the excess and process it with a needle file.
Before assembling the top cap, we need to plug the side and top holes of the valve.  We wind thin copper wire around the side holes and solder. We simply fill the top hole with solder, and tin the surface one at a time. We also apply solder to the plate and tube.
We install it evenly and warm it up until it is completely soldered.  After soldering, we cut off the excess, sharpen it with a needle file and sand the entire body with fine-grained sandpaper.
Now let's move on to the tube and chair.  The brass valve from the cargo chamber was perfect for the body of this mechanism.
  We process it with sandpaper and cut off a 45 mm tube. and then we make a groove for the chair with a depth of 10 mm.
Next is a hole for a pin with a diameter of 3 mm
The gap between the chair and the tube should be about a millimeter  Now we need to solder both tubes together so that the seat is at a distance of a couple of millimeters from the lighter body. For this I used a brass wrench shaft.
 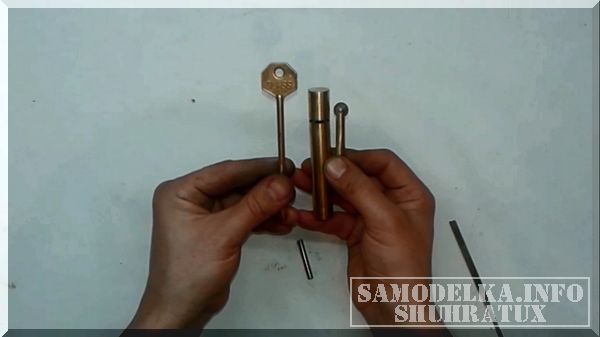 Cut the rod 27 mm long. and try it on. If the distance is too large, you need to sharpen the rod a little. We will also sharpen the tube and body of the lighter.
 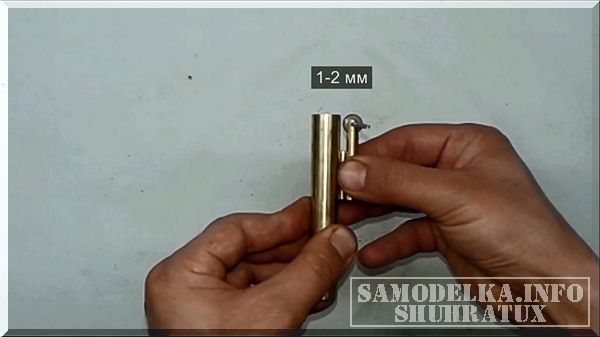 We apply solder to the surface of the rod and the brass tube, as well as to the iron tube that we removed from the lighter and solder it.
  We solder the rod, set the clearance of the chair a couple of mm above the lighter nipple, adjust the position, fix the structure with a crocodile and solder it.
 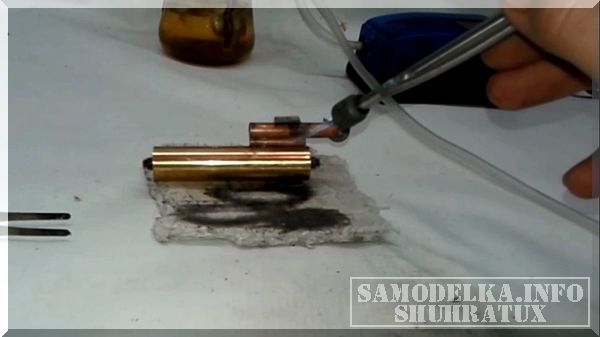 In the 15 mm long tube that we prepared earlier, we drill 8 3 mm holes in a checkerboard pattern. We mark the caliper with a compass at 13 mm and cut out a fragment of the tube. Having inserted the drill at 11, tap it with a wooden hammer and reduce the internal diameter to 11 mm.
  Then we solder
 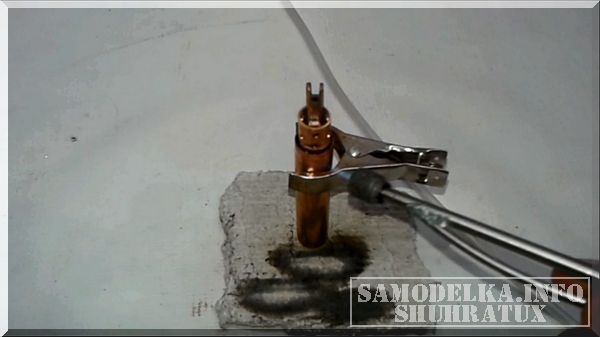 The wind protection element acts as a guide. Thus, when screwing on the cap, we will save ourselves from aiming, unlike other analogues of screw-on lighters.
Now we need to enlarge the holes in the nipples. We drill the top one at 2.5 mm, and the bottom at 3.5 mm.  And finally, we make a pin from a nail of suitable diameter. When installing the chair, it is important to pay attention to the direction of the teeth. If mixed up, the roller will not produce sparks.
  We insert the flint, the spring, twist it and check. In order to insert the wick into the hole, we tie a thin copper wire to it and pull it into the hole.
 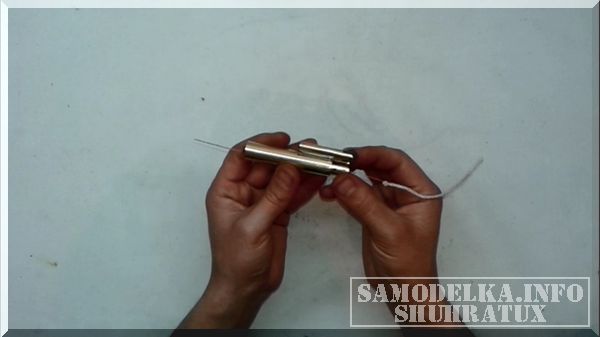 We fill it with cotton wool, cut off the wire, lay the remaining end of the wick and fill it with gasoline for lighters.
 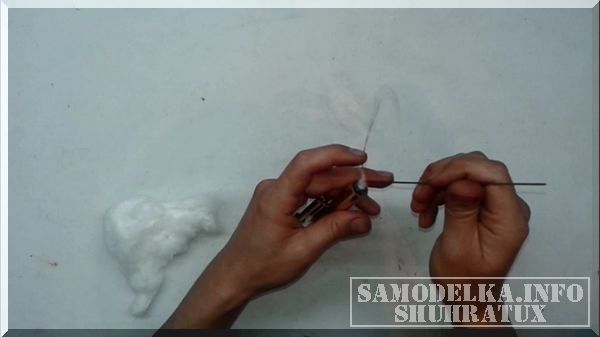 OK it's all over Now. The lighter is ready. I hope you liked the article. If you found the article difficult, you can watch the video instructions for assembling the lighter.
Hello!
One day, while looking for spare parts for my Primus, an idea struck me. I discovered that from a primus pump it is quite possible to make a camping, gasoline lighter, from which the fuel does not evaporate during storage. Many users of Zippo lighters will understand me.
I’ll say right away that I found all the parts for assembly at a flea market.
And so, for production we will need a pump from the Shmel primus. Or rather, two pump housings and a Chinese Zippo lighter.
First of all, we unscrew the pump valve, remove the contents, and then disassemble the lighter, leaving only the chair, the spring with the screw and the tube in which the spring is located.

We make the body. mark and cut off the thread from the first tube

Then, from the second pump tube we unsolder the nipple

and solder it into the body of the future lighter, deepening it by about 1 mm.

For the lighter cap, we need to cut a piece from the second tube equal to the height of the valve

We adjust with a file. To avoid a bevel, during processing with a needle file we turn the part around its axis.
The upper part of the lighter is prepared, let's move on to the lower part. Here the cap will be smaller. To do this, just below the side hole of the valve, mark the cut lines of the valve and tube.
And cut off the tube and then the valve.

We also cut off a 15 mm long tube for wind protection and make a plate from the remaining piece.

We cut out two plates for each tube and begin assembling the small cap. We apply solder to the joints, as well as nail polish to avoid unwanted soldering

and warming it up with a burner, solder the valve, plate and tube together

We cut off the excess and process it with a needle file.
Before assembling the top cap, we need to plug the side and top holes of the valve.

We wind thin copper wire around the side holes and solder. We simply fill the top hole with solder, and tin the surface one at a time. We also apply solder to the plate and tube.
We install it evenly and warm it up until it is completely soldered.

After soldering, we cut off the excess, sharpen it with a file and process the entire body with fine-grained sandpaper.
Now let's move on to the tube and chair.

A brass valve from a truck camera is perfect for the body of this mechanism.

We process it with sandpaper and cut off a 45 mm tube. and then we make a groove for the chair with a depth of 10 mm.
The gap between the chair and the tube should be about a millimeter

Now we need to solder both tubes together so that the seat is at a distance of a couple of millimeters from the lighter body. For this I used a brass wrench shaft.

Cut the rod 27 mm long. and try it on. If the distance is too large, you need to sharpen the rod a little. We will also sharpen the tube and body of the lighter.

We apply solder to the surface of the rod and the brass tube, as well as to the iron tube that we removed from the lighter and solder it.

We solder the rod, set the clearance of the chair a couple of mm above the lighter nipple, adjust the position, fix the structure with a crocodile and solder it.

In the 15 mm long tube that we prepared earlier, we drill 8 3 mm holes in a checkerboard pattern. We mark the caliper with a compass at 13 mm and cut out a fragment of the tube. Having inserted the drill at 11, tap it with a wooden hammer and reduce the internal diameter to 11 mm.

Then we solder

The wind protection element acts as a guide. Thus, when screwing on the cap, we will save ourselves from aiming, unlike other analogues of screw-on lighters.
Now we need to enlarge the holes in the nipples. We drill the top one at 2.5 mm, and the bottom at 3.5 mm.

And finally, we make a pin from a nail of suitable diameter.
When installing the chair, it is important to pay attention to the direction of the teeth. If mixed up, the roller will not produce sparks.

We insert the flint and spring, tighten it and check.
In order to insert a wick into the hole, we tie a thin copper wire to it and pull it into the hole.

We stuff the cotton wool, cut off the wire, lay the remaining end of the wick and fill it with gasoline for lighters.

OK it's all over Now. The lighter is ready. I hope you liked the article.
If you found the article difficult, you can watch the video instructions for assembling the lighter.
I offer a master class on how to make an original gasoline lighter with your own hands. A commemorative coin dedicated to Jerusalem was used for decoration.
Rear view, photo from the side of the hatch for refilling the lighter with gasoline.
The manufacturing process is described in sufficient detail. The work is quite painstaking and sometimes very tedious, but the result is worth it! All customers were very pleased with the lighter, as were those to whom it was given as a gift.
The word Norah embossed on the lighter is the name of the customer’s grandfather. The lighter was made as a gift and was made in the form of a gift set.
Front photo.

Materials and accessories for work
We use the following tools:
- dremel
- hammer
- soft hammer
- round pliers
- pliers
- 3 mm tap
- gas burner
- tin paste (tin can be used)
Photo of the assembled gift set.

Lighter on top.

For work we take the following materials:
- copper tube from the air conditioner, 15–18 cm long and 10–12 mm in diameter
- pieces of brass, thickness 0.5 - 1 mm; one 45x45 mm and the second – 30x30 mm
- brass chuck
- armchair tube with a diameter of 4 mm
- 2 pieces of brass 1 mm each
- small brass elements to decorate the hatch and hide welding
- two brass coins
- copper wire for the edge of the coin, 2x4 mm
- two brass bicycle caps
- two adapters for bicycle caps
- two brass bolts 3x12 mm
- four rivets
- drills of different diameters
- coin for decoration, preferably made of brass
- armchair
- flint
- spring
- wick

The process of making a gasoline lighter
Flatten the copper tube to an even strip.

If desired, we emboss your name or other inscription.

Bend it with a soft hammer to a perfect circle.

We weld the ring - this will be the main body of our lighter.

We hide the welding site, the holes for the rivets are 1.5 mm in diameter.

Using a Dremel, we cut off a piece of thread for the hatch from the chuck.

We are preparing materials.

Fixing a sheet of brass stationery clothespins and solder it.

Ready. We don't pay attention to the dirt for now.

Now we trim off all the excess brass and then sand and clean it.

Now you need to mark the location for the refueling hatch.

We cut a hole with a Dremel, photo of the intermediate state.

That's it, the hole is cut.

Now you need to solder the threads under the hatch.

We clean and try on the hatch ring in place.

Side view photo.

We are preparing materials for assembling the chair holder.

Photo of the finished tube with a flint holder.

We drill holes for the tube in the body of the lighter on opposite sides.

Let's try on the tube.

We make a wick holder. From the adapter we cut off the knurled part of the bottom.

Trying on the wick holder. We use part of a previously cut brass cap as a nut.

Let's try everything on together.

We weld all the parts.

Bottom view of the workpiece.

Now we clean everything thoroughly.

Intermediate view from below. We cut a 3 mm thread.

Let's try on the bolt.

Now you need to weld the second side with the coin.

Let's try it on.

Trying on a coin and text.

We type the text.

Carefully secure with clothespins and solder very carefully. The slightest inaccuracy will be very critical!


View of the assembly from the coin side.

We cut roughly.


We cut off all excess with a Dremel, grind and polish.


Trying out materials for the hatch.

Solder it. Hatch from the inside.

Front part. Here you can solder any decorative elements.

We cut roughly. Clean with a Dremel and a wire brush.

We polish and try on the part on a lighter. It is important that it sits evenly, without distortion.

Photo from the side. The sealing ring must be gasoline resistant.

The lighter is almost ready, there is very little left.

We proceed to making a stand that will cover the spring and provide the lighter with a stable position on the plane.

It is convenient to use a coin of a suitable size for this.

Drill a hole and insert a bolt into it. We place the bead on the solder paste. At the bottom we place the part cut off from the bicycle cap adapter.

Solder everything together.


Let's try on the stand. If the stability is good, we move on to grinding.

We sand the stand with sandpaper until it shines, after clamping it into the drill chuck.

For beauty, we cut longitudinal grooves with a Dremel.

We sand with a Dremel and a wire brush.


Now you need to assemble the top wick cover. We take the following accessories:
- coin for base
- brass cap
- connecting bolt
- copper wire edge
- two thick brass rings
- fentiklushka (for composition)

Drill a 4 mm hole in the cap. We drill a 2.5 mm hole in the coin and cut the thread with a 3 mm tap.
Insert a bolt into the cap. We thread all the elements and twist a coin on top. Apply paste between all elements and on the edges of the coin. Place the edge on the coin.

Top view of the assembly before soldering.

We solder the assembly.


We grind and clean the part from dirt with a Dremel and a wire brush.

Fitting.

The lighter is almost ready.

We polish everything until it shines. The photo shows the individual components of the lighter.
We install the chair. We insert it into the horns, then thread a 2.5 mm brass rod through it. Using gentle blows of a hammer, flatten one side first, then the other. You need to flatten it just a little bit, this will be enough for the chair to rotate easily, but at the same time stay securely in place.

We stuff it with cotton wool. Before stuffing, be sure to install the wick. The cotton wool should tightly cover the wick on all sides.

The lighter is assembled.

Excellent value, stable.


We check the work. It burns well. The flame will subside later while the wick is being fired.

Complete gift set.

The video shows the process of operation of the lighter and its appearance from different angles.


