Everyone loves useful And delicious vegetables grown on your own plot of land or in your country house. Not all plants can survive summer in open ground. To preserve the harvest, many summer residents use special structures called greenhouses or greenhouses.
The option for constructing such a structure depends on the needs, financial capabilities and size of the site. Functionality And design features greenhouses and greenhouses are practically no different, because they are intended for growing vegetables and seedlings. The only difference between these structures is size.
Greenhouses are fairly large buildings that are installed permanently on a foundation. Vegetables can be grown in greenhouses all year round if a special heating system is installed there.
Greenhouse– a reduced copy of the greenhouse. This design is usually used for early planting of seedlings and growing vegetables in summer in cold regions of the country.


 Design features Building a greenhouse at your dacha with your own hands is simple and easy to install. Their varieties are usually determined by the type of material used and the ability to move.
There are greenhouses stationary And portable type.
- Stationary ones are usually made in the shape of a butterfly with doors opening on both sides.
- Portable greenhouses are usually made in the form of a tunnel or arch. The material for such greenhouses is standard polymer film.
In its turn, greenhouse options can be very different:
- The “Dutch” greenhouse has everything in common with a free-standing structure, but its walls are thicker closer to the ground to concentrate heat.
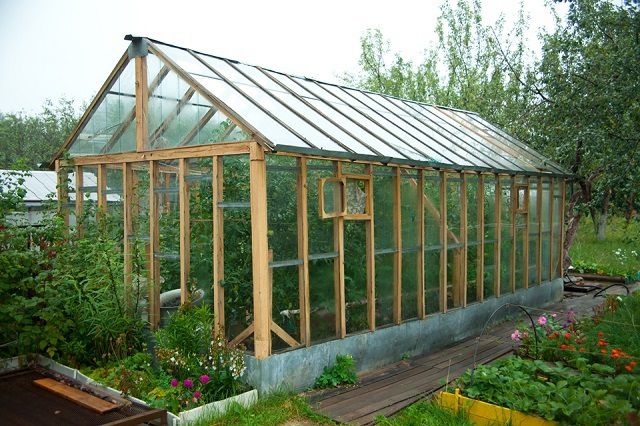
- Detached building with gable roof, where glass frames are used as roofing material.
- The simplest and most cost-effective option is to make a greenhouse in the form of a tunnel. The material for it is film, most often used in the country.
- A wall-mounted structure, which, to save heat, is closely adjacent to the house with one wall. The disadvantage of this design is the lack of natural light.
- A do-it-yourself arched greenhouse is a difficult structure to build. It involves a single roof and wall system in arched form. Experts note that when choosing an arched greenhouse, you must carefully familiarize yourself with the features of the frame material and coating before purchasing or self-construction structures.
- A small greenhouse, built with your own hands, is ideal for small dacha. This structure is made a continuation of the main building and is equipped with a pitched roof.
- The polygonal design of a do-it-yourself metal greenhouse has a rather aesthetic appearance, but it is not economical to operate.
- A dome-shaped greenhouse is an ideal structure for receiving sunlight.
Do-it-yourself greenhouse for cucumbers: types, manufacturing instructions
DIY construction
 When choosing a location for a greenhouse, it is more correct to take into account factors that may affect the quality and quantity of the harvested crop. It is better to place the greenhouse in an open space away from other buildings on the site and large trees.
If area land plot small, then you can build a greenhouse with one side adjoining the wall of an existing building, for example, a house or barn. In this case, a particularly important condition will be the need to build the remaining sides of the greenhouse on the south side of the site to obtain the maximum amount of sunlight.
Material selection
 Material for a simple greenhouse with your own hands must meet the following requirements:
- Easy to install.
- Good sunlight transmission.
- The cost of the material and its installation.
- The magnitude of the load of the structure on the soil.
- Resistance to soil movements, temperature changes and various deformations.
- Duration of operation.
Glass is rightfully considered the most durable material, but its installation requires a fairly strong foundation and an expensive frame. And the most budget option would be polymer film, which you can choose based on quality and characteristics.
Greenhouse construction
 Laying the foundation required only for a stationary greenhouse structure for products made of polycarbonate or glass.
To do this, before starting work, the fertile layer of soil is removed, the rest is thoroughly compacted.
The ideal option for the foundation of a greenhouse is the so-called tape-reinforced type, the depth of which is 25 centimeters or more.
4-5 days after pouring the foundation, you can begin installing the frame. This is an integral part of every greenhouse, for this reason its integrity and quality must be given maximum attention. Usually the frame is made of wood, plastic or metal profile.
How to choose a quality shade net for plants in a greenhouse
How to make a greenhouse
 The wooden frame is an environmentally friendly and easy-to-install material. But the tree does not cope well with temperature changes and changing climatic conditions.
In order for such a frame to last longer, it must be treated with wood preservatives once a year.
The metal frame has increased wear resistance and can withstand heavy loads. The main thing is to protect such a frame from the effects of corrosion. This is a more labor-intensive process of making a greenhouse, for which you will need a special welding machine and an angle grinder.
To build a lightweight mobile greenhouse with your own hands, plastic pipes are suitable, having low weight, flexibility and an affordable price. To connect, you will need fittings and a special soldering iron.
Covering the structure
 After making a solid frame for a greenhouse or greenhouse, you can begin installing walls and roofing using the selected material.
The film is the easiest to install and affordable option for covering the greenhouse with your own hands. When choosing such a coating, you need to adhere to simple rules:
- Do not cut the film in advance. It is necessary to cover the entire structure with it, leaving small gaps, and only then cut it off.
- Avoid mechanical damage to the material by using a special stapler or wooden planks for fastening.
- Carry out work in calm weather and average temperatures.
- When glazing a greenhouse, the material from which the frame is made is important.
If the frame is made of wood, then the roof glazing is carried out along grooves with special grooves for collecting and draining condensate. It is better to make fastening material from dry wooden blocks and pre-prime them with drying oil.
When laying glass on metal carcass The only difference is the fastening material – metal fasteners. Otherwise, the installation is no different; the glass is laid on putty and secured with staples.
How to build a greenhouse with your own hands from scrap materials
Polycarbonate is used to cover the frame on the side where the pattern is located. Sections of sheets of material are sealed with a special tape for sealing along the top and perforated at the bottom. This material is attached to the frame using a specialized profile and rubber gaskets in order from the roof to the sides.
The construction of a floor in a greenhouse is done for greater convenience and aesthetic appearance. A high-quality floor retains heat in a building for a long time. The best option Arrangement of the floor in the greenhouse is sand or crushed stone.
The most expensive option would be to install heated floors in a greenhouse. This requires additional preparation and supply of electricity to the greenhouse, but this solves the problem of heating it in winter.
Ventilation system in a greenhouse and greenhouse
The process of ventilating a standard greenhouse is usually provided for by its design itself - doors that open in warm weather.
Greenhouses, in turn, can be equipped with both natural ventilation and automatic hoods. Natural ventilation systems include vents and doors. Automatic systems designed for regular ventilation, preventing the penetration of cold air into the greenhouse room.
Unusual buildings
- A mini-greenhouse is a cap made from a plastic bottle without a bottom, it is easy to make and is great for growing seedlings of plants that are painful to transplant. Immediately after planting the seeds, the cap must be closed with a lid, and when the temperature during the day is above 20 degrees, it can be removed.
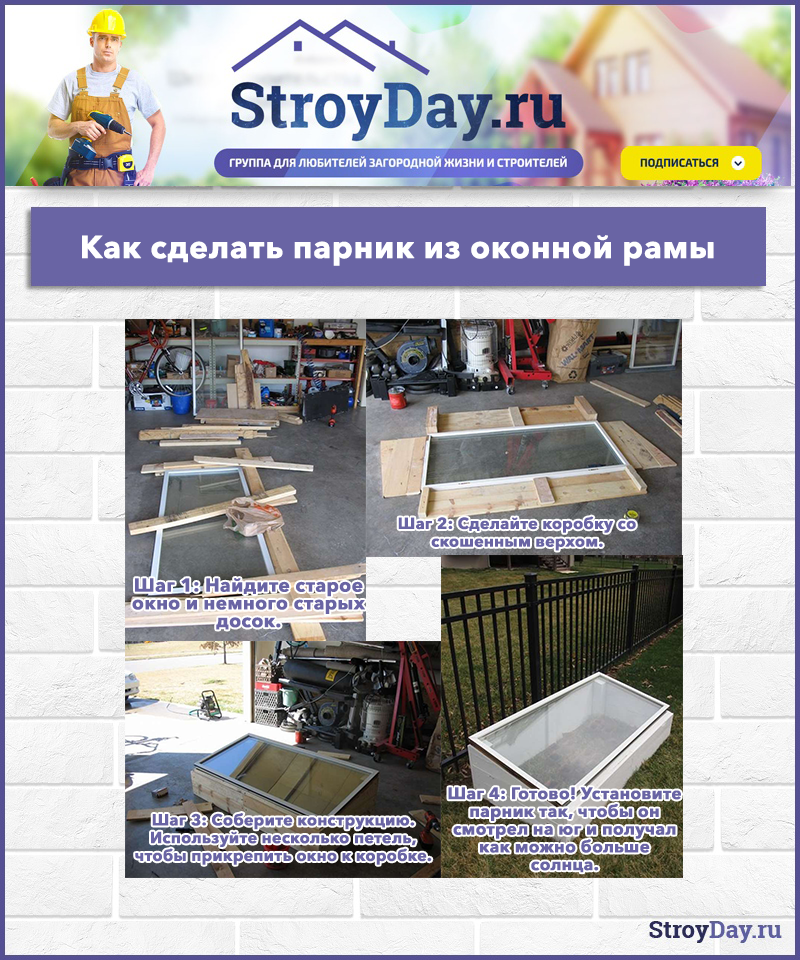
- Neat old houses window frames help ensure comfortable growth for plants and serve as a stunning decoration for a summer cottage.
- The dome is a large polygonal building with a wooden frame covered with ordinary oilcloth. Despite the complexity of construction, this dome-shaped structure is attractive, stable and has excellent light penetration.
- The box, consisting of four boards and a window frame, is a small original greenhouse for flowers and low-growing plants.
- A practical folding greenhouse made from modern small-diameter PVC pipes and regular polyethylene film.
- Greenhouse umbrella - small original design from a wooden barrel and an old oilcloth umbrella covered with plastic film.
- A greenhouse tent is a compact mobile structure made from a children's tent with walls equipped with oilcloth inserts.
- Plastic house - greenhouse made of plastic bottles, which can be open or closed. Creating such a greenhouse does not require large expenses or special skills.
- A flowerbed is a small greenhouse made from a wooden frame of the required size, two thin plastic pipes and a piece of oilcloth. The convenience of this design is that if the air temperature rises to the required level, the oilcloth can be easily removed, and you will get a neat flowerbed.
- Mini-house - a cute little greenhouse made of plastic boxes, which is suitable for indoor plants and will decorate any standard balcony.
- It is enough to simply build a small greenhouse from old pallets covered with plastic film. This design is perfect for growing flowers and seedlings.
- From a standard plastic container you can build an excellent greenhouse for growing seedlings on the balcony.
You should not exclude the possibility of purchasing a ready-made greenhouse or greenhouse from trusted companies. Then you can get an advantage in the form of mandatory guarantee that this product has high quality for long term use. Besides, inIf you receive a defective product, you can exchange the greenhouse during the entire warranty period.Large suppliers offer greenhouses at affordable prices and provide all the information about the materials used for their manufacture.
A greenhouse is a necessary building for all owners of summer cottages, since this design allows not only to grow strong seedlings, but also to obtain early harvest vegetable crops. In addition, it is possible to grow high-maintenance plants in it, since such a building allows them to be protected from frost and pests.
It is not difficult to build a greenhouse with your own hands, since it is much less greenhouse, and its design is simple, so for construction you don’t have to buy special building materials, but use those that are already on the farm. In this article we will look at the technology of building a greenhouse with our own hands, and also consider the main materials that can be used for this purpose.
DIY greenhouse
Before building a greenhouse, you should decide how it differs from a regular greenhouse. Based on this, you can not only choose suitable option structures, but also to select inexpensive but sufficiently durable materials for construction.
A greenhouse differs from a greenhouse in the following features:
- A greenhouse is a temporary structure in which only seedlings and early vegetable and fruit crops can be grown, while a greenhouse can be used year-round;
- Heating equipment is not installed in greenhouses, but support optimal temperature carried out by the sun or with the help of compost and manure that are in the soil;
- Greenhouses are usually low, so they are only suitable for growing low-growing crops, while in a greenhouse you can grow shrubs and even trees.
It should also be taken into account that greenhouses differ from greenhouses in that they can be stationary or portable, and for their construction you can use almost any available materials.
Note: As a rule, arcs that are covered with film are used as a frame for such structures, but such a structure can also be erected from scrap materials.
There are a lot of options for building greenhouses from scrap materials (Figure 1). For example, you can use old window frames for this purpose. They can be mounted horizontally on wooden box, or install vertically, creating a triangular-shaped structure. A simple model can be made from an ordinary old barrel, covering its upper part with a cut plastic canister or film.
 Figure 1. Design options from scrap materials
 As a small portable greenhouse, you can use ordinary wooden or plastic boxes: All you have to do is cover the top with thick plastic wrap.
Selecting material for assembling a greenhouse or greenhouse
Despite the fact that such a building can be made from scrap materials, it is better to use more durable and reliable materials, especially if you want the created structure to last for several years.
Next, we will look at the main materials that can be used to build the frame and as the outer covering of the building. Using this information, you can independently choose the most suitable option.
Polycarbonate
This material is considered one of the most modern and is widely used for the construction of greenhouses. Technical and performance characteristics polycarbonate completely justify its cost. The fact is that sheets of such material are much more expensive than conventional film, but the finished structure will be highly durable and will last for many years, and thanks to the transparency of polycarbonate, enough light will get inside. In addition, this material makes the building airtight, so the plants inside will develop more evenly (Figure 2).
Note: If you plan to use polycarbonate as a covering, it is better to use 4 mm thick sheets. They are quite durable, but at the same time lightweight and suitable for installation on any frame.
 Figure 2. Polycarbonate structures
 The size of the sheets can be any: polycarbonate can be easily cut into pieces of the required area, depending on the characteristics of the frame. However, it should be taken into account that to fasten the material you need to use special screws and thermal washers, which will not only ensure reliable fastening, but also prevent cracking of the sheets.
Profile pipe
Recently, profile pipes have become actively used for the construction of greenhouse frames. This is explained by the fact that this material can be freely cut into any parts and create a structure of any shape and size.
To build a frame from a profile pipe, you will need a tape measure to take the necessary measurements, a level and plumb line, as well as metal scissors and a screwdriver for cutting and fastening parts.
The construction of a frame from a profile pipe is carried out as follows:
- Using self-tapping screws, a guide profile is attached to the foundation.
- The top beam should be positioned so that all side sections are distributed evenly. In this case, the beam must be securely fastened and not move.
- The side beams are attached to the central one, adhering to a step of one third or fourth of the length of the polycarbonate sheet.
The structural elements can be fastened with self-tapping screws, but if you are going to use the structure for a long time, it is better to weld them to increase strength.
Polypropylene or PVC pipes
If you need to quickly build a closed bed, or you do not have the opportunity to buy and cut the profile correctly, you can always use polypropylene or PVC pipes as the frame material.
The advantage of using such pipes is that they can be shaped into almost any shape with minimal physical effort. In addition, such material is relatively inexpensive, and if you have recently had work done at your dacha construction works, pipe remains can also be used for construction (Figure 3).
Note: The flexibility of the pipes and the ease of their installation make it possible to create not only stationary, but also portable models, since the finished structure can be easily dismantled and reassembled in the new season.
The technology for constructing a frame made of plastic pipes looks like this:
- Metal pins are dug into the prepared area, adhering to the area of the future structure and the arrangement of the arcs. In this case, each such pin should protrude approximately 30 cm above the ground surface.
- A pipe is put on the protruding edge of the pin and bent to give the desired shape.
- The second end of the pipe is put on a pin located at the opposite end of the future building.
- After this, you need to fix the arcs together, attaching them to the central pipe, the length of which should correspond to the length of the entire building. If you do not have pipes of a suitable length, you can use two pieces of material, but they must be securely fastened together.
 Figure 3. Assembling a frame from plastic pipes
 The final stage of construction will be covering with dense polyethylene film or polycarbonate sheets. The instructions above show the technology for constructing the simplest arched model, but if you wish, you can build a triangular-shaped structure.
Greenhouse made from window frames
A small but functional greenhouse can be built from old window frames. However, it should be borne in mind that such a design will not have the tightness of a model made of film or corrugated sheets, but is quite suitable for growing a small amount of seedlings, early vegetable crops and herbs.
Despite the minor disadvantages of window frame designs, they also have several important advantages. Firstly, you save significantly on construction, since you do not have to buy any materials to construct the building. Secondly, the technology for constructing such a room is quite simple, and even beginners can cope with this task (Figure 4).
Note: If old window frames have glass, they can be left as a covering. If the frames are empty, after installation they can be covered with film.
To build a model from window frames, you must first build a foundation. To do this, you can simply mount a frame of wooden boards or beams. The optimal size is timber with a cross section of 50x50 mm or boards with a thickness of 40 mm. The frame frame is formed by racks, upper and lower frames made of boards of the same size. In this case, the step between the trims must exactly correspond to the size of the window frame.
If you plan to build a triangular structure, you should additionally install a central post made of timber, the length of which should correspond to the length of the closed bed. This gable structure will prevent the building from collapsing under the weight of snow.
 Figure 4. Drawings of window frame structures
 The window frames themselves are attached to the supports using ordinary nails or screws. To increase the strength of the structure, the frames are fastened at four corners, not only outside, but also inside. The resulting cracks are sealed with polyurethane foam.
Film
Despite the fact that film is considered an obsolete material for covering greenhouses, it is still popular due to its low cost and ease of installation. In addition, film models do not need a foundation, and the light weight of the film does not carry a serious load on the frame.
It should be borne in mind that film buildings do not have a long service life. Even with careful handling and no serious negative effects atmospheric precipitation, such a building will last for best case scenario one or two seasons. However, such structures are often used for growing seedlings and early greens. As a frame, you can use wooden beams, to which the film is attached using nails or screws. In addition, you can build a simple arched model by installing supports made of thick wire or plastic pipes, onto which you can then simply stretch the film.
DIY greenhouse drawings and projects
If you do not have the skills to construct drawings, but have a desire to acquire your own greenhouse, you can always use ready-made drawings and designs for similar structures.
 Figure 5. Finished drawings of various types of models
 Figure 5 below shows several simple options for small closed ground structures that you can easily build with your own hands.
How to assemble a greenhouse yourself using video
Many summer residents abandon the idea of building a greenhouse with their own hands, fearing that the structure will not be strong and airtight enough, and the plants inside will die. To master the necessary practical skills for constructing such structures, we recommend that you watch the video, which shows in detail all stages of construction.
Greenhouses today can be seen in garden plots in both southern and northern regions. And this is not surprising, because the greenhouse allows you to organize favorable conditions for plant growth, protect seedlings from diseases and pests, and get the maximum yield of higher quality fruits than in open garden beds. How to make a greenhouse or greenhouse without professional help, with your own hands - read below.
Creating a greenhouse yourself is a rather labor-intensive process, which includes selecting materials for the frame and covering, making calculations and drawing up a drawing. In order to make a greenhouse, you must first decide on the shape and size of the future building.
How to draw up a greenhouse drawing yourself is explained in our material:

The most popular options for homemade greenhouses today:
- Arched. It can be either capital or temporary. A permanent structure can be assembled from wood, galvanized profiles; RBO planks are suitable for a temporary greenhouse. This greenhouse is compact.
- Wall-mounted. Such a greenhouse is easy to erect, and in winter, due to the nearby standing wall residential building, it needs to be heated less. But such a greenhouse can only be installed if the house does not cast a shadow on it, or the greenhouse has additional artificial light devices for plants.
- Gable. Such greenhouses resemble a “bread” house for birds. They are very convenient to work in and can accommodate both tall and low plants. But a large area will have to be heated in winter.
Which greenhouse is best placed on the site depends on how many acres you have at your disposal: the greenhouse should be positioned so that no shadow falls on it. In addition, you need to leave space in the garden area for opening the bed.
Homemade greenhouses and equipment for them
Homemade greenhouses are the most suitable option for those who do not want to spend money on a purchased structure and its installation in the garden. Which ? You can independently assemble both a simple greenhouse and a large vegetarian garden. At the same time, a budget greenhouse, properly made, will be no less effective: it can be used to organize autonomous system heating, drip irrigation, aeration system.
Easiest with my own hands make tunnel greenhouses from agrofibre, film structures on a frame made of wood (timber, poles) and plastic.
You can assemble both a summer and a year-round greenhouse. To keep the greenhouse warm, you can use electric heating equipment with automatic temperature control, or gas equipment with automation. The autonomous “smart” Arduino super-greenhouse performed well.

The cheapest option would be to use a solar power plant to heat the greenhouse, which will collect the sun's rays and heat the coolant.
Collect solar collector you can do it yourself. The inexpensive “Bubafonya”, a wood-burning stove, is also suitable for heating a greenhouse. Compared to a conventional stove, this stove is efficient and economical.
A geothermal convection system and drip irrigation will help create a favorable climate in the greenhouse. Read more about geothermal heating in our material:
The advantages of a geothermal system are completely autonomous control and durability (can last up to 50 years). In addition, such a system will additionally produce carbon dioxide, which plants need for photosynthesis. Assembling a geothermal system with your own hands will be quite difficult.
Roofing materials: how best to make a greenhouse
Roofing material for a homemade greenhouse should be affordable, lightweight and easy to install, durable and efficient. Previously, one could often see greenhouses made of glass, but such material is very demanding on the frame, is expensive, and can be easily damaged during installation.
Today, there are such affordable and effective materials for covering greenhouses:
- Polycarbonate. This material is excellent for covering the popular “Sotok” greenhouses; it is durable, light weight and durable, and has high light transmittance. From leftover polycarbonate you can make a fence for the beds inside the greenhouse.
- Film transmits light well and creates a greenhouse effect. In addition, greenhouses made of polyethylene do not require a rigid, and therefore more expensive, frame. The disadvantage of film is its fragility.
- Agrofibre is a lightweight covering material that can protect crops from UV radiation, frost, and pests. You can cover a tunnel-type greenhouse with agrofibre. Such a greenhouse will be both cheap and effective.
- Vacuum panels have high thermal insulation properties. It is possible to grow crops in greenhouses made from vacuum panels even in the far north. At the same time, you can harvest up to four times.

Which material to choose depends on the type of greenhouse and the region in which it is located. Each material has installation features that should be familiarized with before starting construction work.
Assembling a simple frame: how to make a greenhouse with your own hands
Greenhouses are divided into wooden, brick, metal or PVC frames. In addition, you can often find combined designs. The most convenient greenhouse designs are those with a frame that looks like a gazebo without windows: it is tall, it is convenient to work in and you can place many plants, put up shelves or racks, or place a trellis. But the easiest way is to make an arched type greenhouse.
Let's look at the greenhouse-arch assembly technology step by step:
- We level the ground and install a wooden frame around the perimeter of the future building. To make the frame more stable, we hammer in pieces of reinforcement in the corners.
- From the outer sides of the base we hammer in pieces of reinforcement 800 mm long in increments of 400 mm so that an even half of the piece goes into the ground.
- We put a PVC pipe on the reinforcement on one side of the frame, bend it and put it on a piece of reinforcement on the opposite side.
- We fix the plastic arcs to the frame using a metal clamp and self-tapping screws.
- We make the end sides with doorways from wooden blocks.
- Separately, we knock down the door frame and fix it on the hinges to the end sides.
- Starting from the end sides, we stretch the stiffening rib and fix it to each arch using plastic straps.

simplest homemade frame ready! Such a greenhouse can be covered with film. Illustrate clearly self-assembly Greenhouse-arches can be provided with instructions and videos.
If you have repeatedly thought: “I want to make a greenhouse, but I don’t know where to start,” then you should turn to the practice of experienced gardeners. Before starting the construction of a greenhouse, it is necessary to draw a model of the future building and calculate the building materials based on it. At the same time, fasteners and fittings (handles, stoppers, openers, etc.) should be included in the construction estimate. At the same time, to build good greenhouse you need to prepare the soil. So, on heaving soils it will be necessary to build drainage, and clay soils will need to be replaced with sandy ones.
From the practice of gardeners, the following can be distinguished: useful tips that will help you find a place for a greenhouse:
- To minimize heat loss, all-season greenhouses should be placed on a foundation buried in the ground.
- Homestead greenhouses can be built on the roof of other buildings on the site (garage, outbuilding, etc.).
- Summer greenhouses can be placed on a foundation made of boards.
- A permanent greenhouse built on hollow blocks will be stable and warm. Brickwork is also suitable for a capital foundation.
- In the greenhouse in the basement you can grow mushrooms, vegetables, strawberries (a hydroponic setup is well suited for growing strawberries and hemp).

The greenhouse should only be placed on level ground and not in a shaded area. At the same time, the greenhouse should not be located in drafts.
A small simple greenhouse with your own hands
The Timiryazevskaya greenhouse is a fairly simple, lightweight structure, which consists of a wooden base frame. In such a greenhouse you can grow low vegetables and flowers (for example, balcony tomatoes, violets). You can even assemble such a greenhouse with a woman’s hands.
In order to make a Timiryazev greenhouse you need:
- Determine the dimensions of the greenhouse and draw a diagram.
- Knock down boards for the base (if the greenhouse is portable).
- Place borders 200 mm high along the perimeter of the base.
- Mark the middle of the curb on the long side and nail a vertical post 600 mm high to it.
- Do the same on the opposite side. The racks must be strictly opposite each other.
- Connect the racks with a horizontal block.
- Cover the greenhouse with film or spandex.
As a coolant, bottles of water can be placed inside such a greenhouse, which will slowly heat up and transfer heat to the greenhouse. To enhance the effect, you can wrap the bottles in black cellophane or paint them black.
Do-it-yourself small greenhouse made from barrels
Increasingly, in garden plots you can find unusual, original greenhouses (for example, a greenhouse made from plastic bottles), which are easy to make and have a minimal cost. Such structures also include a greenhouse made from old plastic or metal barrels. The design is easy to make, heats up well and retains heat.

In order to make the design you need:
- Dig a shallow pit under the horizontal barrel.
- Lay the barrel down and cover it well with soil: the barrel should stand still.
- Using a marker, mark two or three (depending on the size of the barrel) rectangular windows. The windows should not reach the ground by 20 cm and open the “roof” of the barrel.
- Cut out the “windows”.
- Nail a wooden block to the top of the windows and secure the film on it.
A small greenhouse is ready! Now you can fill the soil inside and grow flowers, herbs or seeds for seedlings in it.
What can you make a greenhouse out of with your own hands?
The easiest way is to make a greenhouse from RBO slats or PVC pipes (as the plants grow, they can be raised higher) and a shading mesh. This design will create favorable conditions for plants in warm period, if necessary, it can be easily disassembled.
Any greenhouse, even a small one, should have folding doors that allow ventilation.

A simple frame for a greenhouse can be made from wood. Depending on its purpose, a wooden frame can be a “house” of arcs connected by a stiffener or a wooden box with vertical posts and horizontal ribs. The best coverage There will be a film for wooden greenhouses.
Before assembly, the wood should be treated with an antiseptic: this will protect it from pests.
A greenhouse “for centuries” can be made by welding pieces of reinforcement. Such a frame can be covered with a special cover with folding sides for ventilation. It is very easy to make a greenhouse from used window frames. This structure can be covered with glass.
How to make a polycarbonate greenhouse
If you want to grow vegetables in a greenhouse, it would be best to cover it with polycarbonate. The easiest way would be to make a polycarbonate greenhouse on a frame-box. To do this you will need a galvanized profile metal corners, screws and fastenings with sealing rubber for polycarbonate.

Making a greenhouse step by step:
- We draw a diagram of the future greenhouse. At the same time, one long side should be higher than the opposite: we will hang the top cover on it.
- We cut the profile (don’t forget about the frame for the top cover).
- Preparing the base from wooden beam, coated with an antiseptic.
- Attach the profile for the bottom trim of the greenhouse base to the timber using corners.
- We fasten the vertical posts and connect them to the horizontal ones using corners.
- We hang the upper frame on the higher side of the greenhouse.
- We drill technological holes in the profile for polycarbonate sheets.
- We fasten the polycarbonate with self-tapping screws with a rubber seal. At the same time, try not to overtighten the screws.
The greenhouse is ready! This design will look attractive and will last for decades.
The most convenient DIY greenhouses (video)
A greenhouse is a structure that makes it possible to create the most favorable conditions for growing fruit crops, colors. To decide which greenhouse to install on the site, you need to look at each individual case. The easiest way would be to assemble an arched greenhouse and a small greenhouse. Use the above recommendations, suggested examples and ideas for constructing greenhouses, and build a beautiful and effective structure on your own!
DIY greenhouse ideas (photo examples)


We invite you to familiarize yourself with the 3 most popular and in simple ways make a greenhouse with your own hands: option of manufacturing from pipes, polycarbonate and budget method made from improvised materials. Each method has photo instructions and detailed description manufacturing process.
To diversify your diet, provide your family with real natural vitamins before a new crop appears on the market, and when the right approach– even to deliver fresh vegetables and berries to the table all year round, needs to be built
However, before starting work, you need to carefully think through all the nuances of the future process and thoroughly understand the issue:
- To begin with, you should immediately decide how much area can be allocated for it.
- The second thing that needs to be decided is the functionality of the structure - whether the greenhouse will work all year or will only begin to be used in the spring. The year-round option will require much more effort and materials, since it will require the installation of heating, lighting, water supply and good ventilation systems.
- The next step is to select the type of greenhouse construction and the material from which it will be built.
And in order to decide which of their structures to build, you need to consider some of them in more detail.
Types of greenhouses
There are many types of greenhouses, and besides, based on general principle their devices, many craftsmen come up with own options for greenhouses or individual elements of this agricultural structure. Greenhouses can be divided into different criteria, such as the shape of the structure, material of manufacture, stationary or temporary construction.
Greenhouse structures
- The frame of the greenhouse can be made of boards, and the useful volume can be protected by a shaped lid that can be opened. This type of greenhouse is suitable for growing seedlings or herbs, for getting them to the table early.

- Other temporary type of greenhouse that installed only for the spring-summer period, made of a wooden frame, fiberglass reinforcement and polyethylene film.
 The simplest ones are temporary tented greenhouses
 Such a greenhouse can last for many years, if winter period disassemble it into parts and put it away closed room. Replacing the film with a new one will not require much effort or much expense.
Video: the simplest greenhouse on a fiberglass frame
- Some craftsmen set up a greenhouse in a large old barrel- it is also usually used only in the spring, but you don’t have to remove it from the site for the winter, but use it as open bed or flower beds.

- More difficult type of greenhouse that It can be heated by forced heating and can be used immediately after the snow melts. This structure is made of boards, metal-plastic fittings and thick polyethylene film or. The advantage of this greenhouse is that you can go inside the building to monitor and care for the plants.

- A capital greenhouse, which is equipped with all the necessary equipment to provide the desired microclimate, allowing it to be used throughout the year. For it you need to make a shallow foundation, a brick base and good insulation.

This version of the greenhouse can be attached to the wall of a residential building - then it will be easier to install all communications into it. It will also be more convenient to care for plants at any time of the year - the entrance to such a greenhouse can be made directly from home.

- To save money in the winter, they often set up a so-called thermos greenhouse. A pit 1700-2000 mm deep is dug for it, which is then covered with a transparent roof. In this version of the greenhouse, the correct installation of the ventilation system is very important.

Although the work of arranging such a greenhouse is quite labor-intensive, this design will help you save a lot on energy costs.
Roof shape
When choosing the shape of a greenhouse, you need to be able to understand the question of which roof structure will be most effective for growing plants.
- Gable roofs
Greenhouses with a gable roof are quite popular, as they are spacious and comfortable not only for plants, but also for gardeners. With proper design, installation and choice of material, the room will be illuminated by sunlight all day long.

Such greenhouses are often used as winter garden, planting them not only and even not so much with vegetable crops, but with exotic plants. However, it will be possible to implement such an option if all the necessary conditions are created - there are reliable heating, irrigation and lighting systems.
- Arched roof
This version of an arched greenhouse is easier to install than a greenhouse with a gable roof. In addition, this form, covered with polycarbonate or polyethylene film, perfectly diffuses the sun's rays throughout the room, which allows plants to receive maximum natural light.

Very important point Another advantage is that, thanks to the arched shape, precipitation in the form of snow does not accumulate on the roof, which means that the risk of deformation and damage from high loads in winter is eliminated.
A pitched roof is well suited for greenhouses that are adjacent with one wall to a more massive building - a house or a high stone fence, always on the south side.
You can save money on the construction of this greenhouse, since one of its sides will already serve finished wall, to which it will adjoin. In addition, it will be easier to carry out all communications into the greenhouse.

When designing a greenhouse with a pitched roof, you need to choose the slope of the slope correctly so that snow does not linger on the roof surface, since it is too high load may damage the coating.
Greenhouse covering material

Different greenhouse designs will require different materials, but there is always one thing in common - the material for covering the walls and roof must be transparent, allowing daylight to pass through.

This table contains information about the characteristic physical, technological and operational qualities of the three most used materials, such as polycarbonate, polyethylene film and ordinary silicate glass.

| Technical and operational parameters | Cellular polycarbonate | Glass | Film |
|---|---|---|---|
| Difficulty of installation and weight | Light weight, self-supporting material. It makes it possible to reduce the number of frame parts and even completely abandon the foundation. | Glass is a heavy material, therefore, if it is chosen for coating, the building must have a strong frame and solid foundation(foundation).. | Very lightweight material, which needs reliable strengthening on the frame. |
| Durability | The operational period of the coating, proven in practice, is about 20-25 years, the manufacturer provides a guarantee for 10 years of its service. Polycarbonate, due to its rigidity, is itself an element of the load-bearing structure. Once secured, it does not cause deformation or distortion. | The material is durable if protected from mechanical stress and heavy loads (snow and hail). | The service life of the film is very short, at best two to three years, since it is destroyed under the influence of ultraviolet rays. |
| Noise insulation | The material, thanks to its cellular structure, dampens wind noise well. | If the installation is poor, the wind can penetrate into the greenhouse, and the glass can make ringing or rattling noises. | It creates almost no sound insulation, and in strong winds it rustles in the wind. |
| Appearance | The aesthetic and modern appearance of the material will make the greenhouse even, to a certain extent, a decorative element of a suburban area. | The glass has a fairly neat appearance if installed according to all the rules. | The material looks neat only in the first year after it is fixed, then the film becomes cloudy and collapses, especially if it is left on the frame for the winter. |
| Safety | Polycarbonate is safe and does not break when dropped. It is 200 times stronger and at the same time 15 times lighter than fragile and quite heavy glass. | Glass shards are very dangerous if they fall into the soil, as they can cause serious injury. Therefore, for safety reasons, glass installation must be carried out in strict compliance with all safety rules. | From the point of view of causing injuries, it is completely safe. |
| Care | Dust is practically invisible on the surface of the material, and when heavy pollution It is enough to wash it with water from a hose. | Raindrops can linger on the surface of the glass, and then, when dry, they leave cloudy marks. To wash off these stains from the surface, you will have to make a lot of effort. | It is not recommended to wash the film, as cloudy stains will remain on it, which will prevent the penetration of light. |
| Created microclimate | Polycarbonate perfectly insulates the room. Droplets formed as a result of condensation of rising evaporation flow down the walls of the greenhouse and do not fall on the plants or on the gardener’s head. The material transmits and diffuses sunlight very well. The heat generated by plants and soil does not escape through the greenhouse coverings, and therefore the necessary greenhouse effect is formed. | Glass does not provide the same high thermal insulation as polycarbonate, so the greenhouse effect is significantly reduced. The material transmits light well, but does not scatter it, and low-quality glass often begins to act like a lens, which is undesirable for plant leaves. | New dense film creates good thermal insulation, but after working for one season, it becomes thinner and cloudier, so it loses its ability to completely retain heat and transmit light. |
Taking into account all these parameters, you can choose the material suitable for a particular greenhouse, which will best suit the design of a particular greenhouse.
Prices for various types of greenhouses and arcs for them
Greenhouses and arcs
Preparing to build a greenhouse
Location on the site
 It is very important to choose the right place for the greenhouse
 Expert opinion:
Demidova O.V.
Florist. Landscape designer.
In order for the plantings in the greenhouse to receive the light necessary for their development for as long as possible during the day, it is necessary to correctly position and orient the structure on the site. The productivity of plants largely depends on how long the beds are illuminated with natural light. Therefore, most often greenhouses are installed in a completely open space or with a transparent surface to the south.

By selecting the right option greenhouse, having found a suitable place for it on the site, having correctly calculated your strengths and capabilities, you can proceed to drawing up a sketch and a small drawing.
Greenhouse project

It is not necessary to draw all the elements along a ruler, adhering to the strict rules of drawing art. If the owner plans to build everything on his own, and is making a project for himself and his assistants, then it will be enough to draw a greenhouse by hand in a projection in which all sides of the building can be seen and the dimensions of all the main elements can be marked on them.
Territory marking
After drawing up the project, you can begin marking the territory. This is especially important if a thermos greenhouse or winter greenhouse is built on a foundation, since both options involve a considerable amount of excavation work.
Marking is done using rope and pegs, which are driven in around the perimeter of the future pit.
Pit and foundation
- If you choose the option of a thermos greenhouse, which can work all year round, then before you start digging a pit, you must carefully remove the top fertile layer of soil from the marked area. This soil is put in a separate pile, as it will then be needed for laying in the greenhouse.

When deepening a pit, if layers of clay are encountered, then it is also piled separately from the mixed soil located under fertile soil. Clay can be useful for making adobe bricks that can be used to insulate a greenhouse.
The depth of the pit must be at least 1700 mm, but usually it is deepened by 2000 mm. Exactly at this depth natural is preserved geothermal heat, rising from the ground, since the soil here never freezes. (Of course, provided that the greenhouse is not installed in the northern regions of the country, where permafrost prevails relatively shallow from the surface).
The recommended pit width is from 2000 to 5000 mm, and the length can be selected as desired. You should not make the greenhouse wider, as it will quickly cool down, and its heating and lighting will require much more electrical or other energy.
In addition to the pit itself, a smooth descent is being dug, where the entrance door to the greenhouse will subsequently be installed.
- If a place is marked for an all-season version of the greenhouse, then a trench is marked on it and dug strip foundation width and depth of 300 mm.

This depth is quite sufficient, since the structure is not heavy and does not place a large load on the foundation. In height, above the ground, the foundation can be raised by 200 ÷ 500 mm, although sometimes it is poured only 100 mm, and the rest of the wall is subsequently raised from brick.
Next, sand is poured into the trench and compacted in a layer of 50 ÷ 70 mm, then crushed stone in the same layer. After this, formwork is installed along the trench, with a slight recess into it, which is subsequently filled with mortar. Need to follow up so that the concrete is poured tightly, without leaving air cavities - to avoid this, you can carry out “bayoneting” by piercing the freshly poured mortar with a bayonet shovel.

In some cases, support posts made of metal pipes are immediately embedded into the foundation, onto which the remaining elements of the greenhouse will then be attached.
- The third option for the base for a greenhouse is a wooden frame made of timber, which is impregnated with antiseptic compounds and installed on a sand bed.
 The simplest base of a greenhouse is a wooden frame on a sand cushion.
 Installation of greenhouses
Having dealt with the base for the greenhouses, you can proceed to the installation of the selected option.
Rating of greenhouses for making with your own hands
| Photo | Name | Rating | Price | |
|---|---|---|---|---|
| #1 |
|
Greenhouse on a wooden frame |
⭐ 70 / 100 |
|
| #2 |
|
Greenhouse thermos |
⭐ 84 / 100 |
|
| #3 |
|
Greenhouse on foundation |
⭐ 96 / 100 |
|


3. Greenhouse on wood frame
- no concrete foundation required;
- easy to do with your own hands.
- strong winds can destroy the structure.
A greenhouse, which does not require a concrete foundation, and a strong wooden frame is the basis, is the easiest to install.
- The base box, made of timber with a cross-section of approximately 200 × 150 mm, is laid on a flat prepared area covered with sand. The base should fit tightly to the surface of the earth over its entire area. Therefore, if, when laying the frame, a gap is found between it and the soil surface, it will need to be sealed using stone pads. It is necessary to level the frame, otherwise the greenhouse will stand unevenly and unstable.
- After the box is leveled, pieces of reinforcement 700 mm long are driven into the ground at its inner corners. This measure is necessary to fix the base in place.

- The next step is to drive pieces of reinforcement into the ground along the long side of the box, which should go 700 ÷ 800 mm into the ground, and 600 ÷ 700 mm should remain above the surface.

The fittings are driven in at a distance of 500 ÷ 700 mm from each other and exactly opposite the same rods driven in on the other side of the box, as they will become the basis for securing the pipes.
- Next, pre-prepared metal-plastic pipes of the required length are put on the reinforcement sticking out of the ground. The result is a kind of arcade, which will become the basis for a transparent coating.

- In order for the pipes to stand tightly in one place, it is recommended to secure them with metal loops, which are screwed to the box with self-tapping screws.
 ... and their fixation to the box
 - If the structure turns out to be three-dimensional, then it must be strengthened at the end sides, since they must stand rigidly. This frame will not only add rigidity, but also form a doorway.

To do this, bars with a cross section of 50×50 mm are installed vertically, and then they are fastened in several places with horizontal crossbars.
Sometimes, knowing that transverse fastenings are indispensable, pipes for arches are fastened with cross adapters into which pipe sections are installed horizontally.
Greenhouse prices

Another option for adding rigidity to the structure is to fasten the entire arcade at the top of the vault with one common pipe.
 Sometimes one central “ridge” pipe is enough
 Fastening is carried out with wire, plastic clamps - “ties” or construction tape.
 Fastening pipes together with a plastic clamp - “tie”
 - Next, the frame obtained from the pipes is covered with a very dense polyethylene film. It is laid with an overlap of 200 ÷ 250 mm. At the bottom, the film is fixed to wooden box using a construction stapler and staples.

First, the film is stretched onto the arcade and then attached to the end sides. IN doorway the film is folded inside the greenhouse.
- The door to the greenhouse should be lightweight, but at the same time have a rigid structure. It is mounted from a 50 × 30 mm bar, and to prevent its deformation, one or two slats are fixed diagonally. Then the resulting " door leaf» covered with polyethylene film.

The door is hung on appropriate, prepared for her opening using hinges. Exactly the same as the door, the window openings are also installed, which are located closer to the ceiling on the end side of the greenhouse opposite the doorway. This should create natural flowing air circulation.
Video: an easy-to-use version of a compact seasonal greenhouse
2. Greenhouse thermos
- the ability to grow crops and harvest before deep winter;
- long service life.
- high cost of materials;
- long and labor-intensive construction process.
Foundation for walls
- After the pit for the greenhouse is ready, it is necessary to create along its perimeter. To do this, a trench is dug, and then all actions similar to those described above are carried out, where the issue of foundation for a winter greenhouse was considered.

- When the foundation is completely ready, you can proceed to laying the walls, not forgetting to install one or two ventilation pipes. They are mounted in the lower part of the end side of the building, opposite the entrance door, at a height of 500 mm from the floor.
- The pipes, after installing the roof, are raised to a height above the ground, approximately 1000 mm.

Wall masonry
The masonry can be made from adobe bricks, or from permanent formwork made from polystyrene foam blocks, the cavities of which are filled with ordinary cement mortar.
- If the latter option is chosen, then you can immediately get insulated walls, but in this case the resulting structure will need to be separated from the ground with plastic film.
After erecting the stone walls, the gap between the soil and the masonry must be filled with clay, which should be compacted well. The diagram of a thermos greenhouse is clearly shown in the figure.

- The walls rise from the foundation above the ground by 500 ÷ 600 mm. If permanent formwork was not used for the walls, then they must be insulated to the depth of soil freezing (taking into account the climatic characteristics of the region where the greenhouse is being built).
- The insulation can be laid with outside walls, that is, between it and the ground. Therefore, the gap between them will have to be widened and the insulation will have to be separated from the ground with a waterproof film.
If polystyrene foam is chosen for insulation, and it will rise above the ground surface from the outside of the building, then it must be covered with waterproofing, and then with external decorative coating. It is best if it is a material that is not subject to rotting when exposed to moisture. For example, a plastic lining will do.
- Closing the insulation can be done in another way - it is covered with expanded clay from the outside, and covered on top roofing material. Corrugated sheeting, which is fixed below polycarbonate or glazing, is well suited for this. In this case, polyethylene film for covering the roof is not suitable.
Frame installation
The next step is to install the frame to cover the walls and ceiling with polycarbonate, since installing it is much easier and safer.

The frame is erected from wooden blocks or a rigid metal profile.

- First, bars with a cross-sectional size of approximately 100 × 150 mm are laid on the walls raised from the pit and secured with anchors. The rafters and ridge beams must have the same cross-sectional size as the beams installed on the walls.
- A thin sheathing is attached to the rafters, approximately two to three bars per slope. In this case, it is necessary to ensure the rigidity of the structure.
- Next, polycarbonate sheets are attached to the sheathing. They are screwed with special self-tapping screws with a large head (press washer) and a rubber gasket.

- Having completed the installation of the roof covering, the end sides of the greenhouse are sheathed with polycarbonate, and then the finished door is installed. It is desirable that it also have a glazed part.
- In addition, the upper part of the ventilation is mounted almost under the roof itself - a hole is made and a pipe is installed.
Insulation of the building
- It must be said that it is very important to leave open to sunlight that roof slope that faces the south side, since the sun is there the longest during the day.
- The second roof slope from the inside of the greenhouse is covered, which will reflect the light falling on it through the transparent part of the roof. Foamed polyethylene 5 mm thick with a foil surface is well suited for this purpose.
 Approximate scheme for insulating a thermos greenhouse - 2
 Attach it to the roof rafters using screws with a wide head. At the junction, the insulation is folded onto the wall.
- Next, all the walls of the greenhouse are insulated in the same way. The insulation on vertical stone surfaces is fixed with “liquid nails”, or a sheathing of thin slats is installed on the wall and polyethylene foam is attached to them with self-tapping screws.
 Insulated thermos greenhouse - view from the inside
 The task that the foil covering must perform is not only in the reflection of lightinsidepremises, but also preservation carbon dioxide, moisture and heat, which are vital for the processes of photosynthesis occurring in plants.
Providing heating
In order to retain heat inside the greenhouse for a long time, doors must be installed on the ventilation openings.
The room can be heated different ways— electric “warm floor” system, convectors, and if the greenhouse is located near the house, then water heating can be installed into it from a gas boiler.
- If a “warm floor” system is installed, then before placing it, the bottom of the greenhouse must be prepared so that energy does not go into the ground in vain. The system is usually installed only under the beds, although, if necessary, it is sometimes placed under the paths between them.

The preparation proceeds as follows:
— a thermal insulation coating is laid on the ground. It is better if it is foil;
- placed on top of sand reinforcement mesh with cells 30 × 30 mm;
- the heating cable is attached to it;
— it is covered with a 50 mm sand cushion;
— the reinforcing mesh is laid on top of it again;
- 300 ÷ 400 mm of soil is poured onto it.
All these layers are laid in formed beds, the sides of which are boards or bricks.
Most often they are installed along the walls, but if the greenhouse is very wide, then another, additional one can be installed in the middle. It is advisable to make the beds at a slight angle so that the soil surface is slightly turned towards the transparent southern slope of the roof.
Polycarbonate prices
polycarbonate
- Recently, convectors are increasingly being installed in greenhouses to heat them.
 Convectors - effectively maintaining the desired air temperature in the greenhouse
 They have a number of significant advantages that are ideal for greenhouses and greenhouses:
— they dry the air much less than any other heaters, since they are designed in such a way that they create artificial circulation of warm air;
— ease of installation — convectors are hung on brackets installed in the wall, plugged into an outlet, and the desired temperature is set on the thermostat;
- a big plus - automatic switching on and off of the heater according to the selected temperature conditions– and this is a considerable saving of electricity;
— the convector is compact and has an aesthetically modern appearance.
Before buying a large room, you need to look at the characteristics of the device and its power - only after that will you know how many heaters are required for a specific area.
- Another heating option could be a cast iron boiler long burning with water circuit.
 Heating a greenhouse with a water circuit - approximate diagram
 To install such a system, you will have to work hard:
— It is necessary to install the boiler itself. Its installation is carried out in the greenhouse itself or in an adjacent room.
— A chimney pipe should be installed, which must be raised to a height of about 5000 mm.
— To pass the pipe through the hole arranged for it, it is necessary to well isolate the combustible materials of the greenhouse from high temperature when firing the boiler.
— Fill the system with water, install a temperature sensor in the greenhouse room.
Installation of this system can probably be called the most difficult of all other options, including compared to a converter heating system.
When heating a greenhouse, you need to know that for normal development and growth of plants, you need to maintain the air temperature within 25 ÷ 30, and the soil temperature - about 20 ÷ 25 degrees. In addition, the greenhouse must be created optimal level humidity.
1. Greenhouse on a foundation
A greenhouse installed on can easily function year-round if all the necessary conditions for this are created in it.

In this case, the assembly of the structure must be carried out with special care, since the structure must be essentially airtight, with the exception, of course, of the installed ventilation system.
- longest service life;
- resistance to strong winds and hurricanes.
- high cost of materials;
For the frame of such a greenhouse, it is best to choose wood, since it conducts cold to a lesser extent than a metal profile, which is guaranteed to create “cold bridges.”

The frame for this type of greenhouse is mounted as follows:
— On stone or adobe, plastered walls, erected 500 ÷ 700 mm above the ground surface, it is laid waterproofing material. As a rule, this is ordinary roofing material.
— Thick ones are fixed to it with anchors wooden blocks. Their width depends on the width of the walls, and their height can vary from 50 to 150 mm.
— The gaps between the wall and the bars (or metal profiles) must be sealed with polyurethane foam.
“Further, the work depends on what material is chosen for the greenhouse - this could be the installation of ready-made metal-plastic frames or the construction of a wooden or metal frame.
- Then, double or even triple glazed windows are installed in metal-plastic frames, and in a wooden frame - frames made of wood, with glass already installed in them, or also double-glazed windows, and polycarbonate is most often fixed to the metal frame.

The foundation, floor and lower part of the wall of the greenhouse must be very well insulated. Therefore, in this case, you can use the “warm floor” system, the design of which is described above, but in addition to it, it is recommended to install convector heating. It will well maintain the desired temperature in the room.

If the greenhouse is located in regions with very snowy winters, then when clearing the yard of snowdrifts, it is recommended to pile the snow to the bottom of the greenhouse walls. Snow is a very good insulator and will help save on heating a building in the winter.
For walls, you can choose thick glass 5 ÷ 7 mm or cellular polycarbonate 10 ÷ 15 mm thick. The honeycomb material has an air gap between the two main planes, which will act as insulation.
Greenhouse lighting
Any greenhouse used in the cold season must be additionally illuminated in order to create a “spring” state in the room, since both the length of daylight hours and the intensity of winter solar radiation will clearly not be enough for this.

In order to save energy, light emitting diodes (LED) are used as lighting devices. They can have different shapes, but it is recommended to place them in the most high point greenhouse ceiling. Of course, if desired, you can equip the room with lamps, which are most often fixed at the junction of the roof and walls or high on the walls themselves.
You can, by the clock, install a control unit with a timer and program on it the time when the lights in the greenhouse should turn on and off. Such a system will help save energy and create the most comfortable conditions for plants.
If the greenhouse is used only in the spring-summer period, then building it is not at all difficult, since it does not require the creation of any special conditions insulation and lighting. The winter version of the greenhouse is quite complicated in calculations and in construction, as well as in everyday maintenance, and usually such complexes are arranged by those owners of plots who are professionally engaged in floriculture, vegetable growing or growing exotic plants. In this case, without
Greenhouse thermos
0 % ( 0 )
Greenhouse on foundation
0 % ( 0 )
To see the results you need to vote


