) is a device whose main function is to transfer paint and varnish materials, primers and various water-chalk solutions on the surface by spraying. A torch of tiny paint particles moving at high speed is formed due to the fact that in a special chamber liquid paint mixes with air and is pushed out of the nozzle under pressure. The spray gun has compact dimensions and is easy to use.
Homemade spray gun. Click on photo to enlarge.
If you have to paint a small car part one time, then it is not at all necessary to purchase an expensive factory-made sprayer. A little patience and skill - and you have a homemade spray gun in your hands. Such a device can be used not only for painting cars, but also when carrying out repair and finishing works in an apartment or when restoring furniture.
Those who already have experience with a home-made sprayer say that this is not just saving money on the purchase of professional equipment, but an opportunity to improve the quality of car painting, since homemade apparatus You can customize it as much as possible, which is not always possible to achieve when using factory spray guns. But first of all, the sprayer must be manufactured, and manufactured correctly and conscientiously. We present to your attention several ways.
Method one
You can make it yourself if you have a piece of foam on hand, unnecessary plastic container with a wide neck and the most ordinary fountain pen. It is better if the foam is compacted, for example, such as is used for thermal insulation of a balcony or sound insulation of plasterboard partitions.
It is necessary to cut a blank from foam plastic whose lower end will fit tightly into the container. Try to find a bottle with as wide a neck as possible. Make several holes in the upper part of the foam blank, preferably using a drill, so that they are neat:

A piece of an empty pen refill is inserted into the vertical hole, and the body of the same pen is inserted into the horizontal hole. At this point, the assembly of the spray gun can be considered complete.
The process of painting a car using such a device is as follows: you hold the bottle so that the paint flows out through the rod, and blow into the tube (the body of the pen). The intensity of the paint spray on the car body will depend on how much you exhale into the tube. Before you start painting, it is better to practice on some other surface. Move your homemade spray gun carefully and slowly, and you will definitely succeed.
The main thing in this matter is patience and a certain supply of consumables. Of course, without sufficient experience in the field painting works and using a DIY spray gun, you will not be able to immediately achieve a premium paint finish on your car body. But with the creation of a dense layer of large drops of paint on the surface large area you will surely succeed.
How can you improve your homemade spray gun?

"Upgraded" spray gun. Click on photo to enlarge.
If you want to use a homemade spray gun for finer, more delicate painting, it will need to be modified. Arm yourself with the drill again and make a couple more holes: one vertically and one in the handle body.
Another rod is inserted into the new vertical hole, and not necessarily the same diameter as the first. You can use a thinner one. This move is made to create more pressure in the paint bottle with less air being blown into the tube. Thus, the paint flow will be more intense, and your effort to pump air will be reduced.
Another rod is inserted into the hole that you made in the body of the pen, inserted horizontally. After these simple manipulations, you will have a full-fledged spray gun for painting a car. With its help you can form quite quality coatings, and also use a thicker working mixture.
Note!
Some components of paints and solvents used in car repairs are aggressive and therefore incompatible with polystyrene foam. In this regard, it is advisable to use homemade spray guns made using polystyrene foam in the process of applying paint and varnish materials for cars on water based. If you have to work with more caustic compounds, foam can be replaced with rubber.
Method two
Using this algorithm, you can make a more reliable universal spray gun with your own hands.

The device of a spray gun made of glass jar(scheme). Click on photo to enlarge.
Prepare a plastic or glass bottle with a working screw neck having a diameter of at least 20-25 mm.
The second device is a tube made of copper or aluminum with a diameter of about 4 mm and a length of 20 cm. It should be bent and fixed at one end (lower) with a tip for a hairdressing spray bottle or a vacuum cleaner hose, and at the other (upper) with a nozzle made of brass rod .
The bakelite handle can be used as a handle. If it is thick enough, then a groove is cut along the profile of the tube that you bent before, into which the handle is attached with screws.
Select a tube with a diameter of 2 mm, preferably made of copper. It will be used as a suction tube, so its length should match the height of the paint container. The top edge of the tube should be tapered and thoroughly cleaned. Insert this tube into the socket from the plug connector, made of brass.
From steel sheet make a bracket with a hole shaped to match the dimensions of the socket.
Assemble the prepared parts so that the tapered end of the suction tube is at the level of the nozzle. Make a few test sprays to check and adjust the spray quality if necessary.
The suction tube should be fixed with glue or soldering in the socket, which, in turn, is glued to the lid of the container.
Tighten the nuts to the desired position of the paint container relative to the nozzle.


Do everything carefully and consistently, and you will have a complete tool for high-quality car painting. In the future, it can be used for other purposes, for example, for restoring furniture or even for spraying large indoor plants.
Method three: DIY mini spray gun
This spray gun is suitable for painting small areas of a car, since it does not require a large container of paint. The main “spare parts” for such a small spray gun are a medical syringe and a pen.

Construction of a homemade mini-spray gun (diagram). Click on photo to enlarge.
The point of the syringe needle should be ground off and the chamfer should be carefully removed. We remove the ball from the tip of the pen, and shorten the rod so that the part is 0.5 mm shorter than the needle, because in the future the rod will be put on the needle, and the latter should protrude slightly from the hole where the ball was. The end of the rod that was cut needs to be slightly flared so that it fits better onto the base of the needle.
In the middle of the rod, make a hole for a piece of the same rod, which is soldered at an angle of 45°.
Another one important detail is a source of compressed air. We propose to use as such a siphon for soda, preserved from Soviet times. We solder a tube into the spout of the siphon, onto which you can put a red medical hose, and solder a nipple from a bicycle wheel into the body, so that you can then use a pump to pump air into the siphon.
So, all the details are prepared, you can start testing the spray gun. We disconnect the needle and other “equipment” from the syringe and fill up half of the liquid filtered paint. The second half of the syringe volume should be filled with air. We put a needle and a rod with a connected hose onto the syringe. The spray gun must be kept in right hand so that you can press thumb on the stock. At this time, use your left hand to operate the siphon lever to open the compressed air supply.
Be careful, as the paint may splatter in large drops at the very beginning, so it’s better to do a few test spritzes on another surface, and then move on to painting the car body.
If you need to paint a small area, there is no need to press on the rod, since the paint will be pushed out of the syringe by the air expanding from the heat of your hands.
Addition: "blower" from the refrigerator compressor

Construction of a homemade “blower” (diagram). Click on photo to enlarge.
A device for supplying air to a homemade spray gun can also be made from a compressor from a faulty refrigerator. The compressor must be cut, the rotor and windings removed, and a pulley from washing machine. The structure is installed on wooden base and secured with steel tape.
On the same basis we attach an electric motor with a power of about 50 W with a handle from some radio device as a pulley. The diameter of the handle should be about 3 cm. Instead of a drive belt, we use a belt from a sewing machine.
Thus, after spending a few hours of free time, you get a complete tool for painting a car. This is a direct path to saving money on the purchase of expensive professional spray gun, as well as the opportunity to reduce the consumption of car paint, which is also expensive. However, do not forget that a homemade spray gun made to last is only half the success. The second half is the ability to use it. Don't be afraid to experiment, and good luck with your renovation!
Create smooth and high-quality paintwork only possible when using a spray bottle. Such a device is capable of evenly spraying paint on various surfaces. Among the advantages of such a tool are: high performance and practicality in use. The high cost of special equipment determines that many people decide to create it themselves. There is quite a large number various instructions, let's look at some of them in more detail.
Types of spray guns
Before creating a paint sprayer with your own hands, you need to pay attention to their classification. The following types of such equipment are distinguished:
- Manual.
- Pneumatic.
- Airless.
- Combined.
- Electric.
The manual version is characterized by the fact that the master has to perform certain actions to supply the substance. Pneumatic models are the most widely used, as they are characterized by an optimal combination of practicality and cost. In most cases, homemade versions are represented by a combination of a sprayer and a pump or compressor. Electric ones appeared on sale relatively recently; the features of the device allow high precision adjust operating parameters. Combined ones are rarely made by hand, as they are characterized by a complex mechanism.
A spray gun for whitewashing should be included in a separate category. It can also be made with your own hands; when creating the design, the moment is taken into account that lime mortar may contain large impurities. It is worth considering that this version of the device cannot be used for spraying paint.
Required tools and materials
In most cases homemade design created to work with water-based paint. As a rule, their creation requires a standard set of tools, as well as a welding device. The following are used as a basis:
- Aerosol can.
- Vacuum cleaner.
- Old refrigerator.
- Ball pen.
The choice of materials and tools is carried out depending on the characteristics of the structure being created. The scheme is selected taking into account what type of work will be carried out and what productivity the equipment should have.
Aerosol can sprayer
A homemade spray gun is often created with your own hands from ordinary aerosol can. This design is characterized by simplicity and low cost. To carry out the work you will need the following elements:
- Bicycle wheel tube or nipple. In this case, the camera itself is not required.
- Plastic bottle of suitable size. It must be durable and free from serious defects.
- Aerosol can. When choosing them, attention is paid to the quality of the sprayer, since it should work for a long time.
- Bicycle hand pump.
Much of the above does not need to be purchased; you can find it in the garage. Work on assembling the structure is carried out as follows:
- The selected bicycle cover will require a nipple that can only allow air to flow in one direction.
- The bottle will be used as a paint storage tank. A hole is made in it that is suitable for the nipple.
- A nipple is attached to the inner wall. When fastening, it is worth considering that the connection must be airtight. This element will only supply paint in one direction.
- The upper part of the can is sawed off with a hacksaw. It is selected so that it perfectly matches the diameter of the plug.
- To connect the spray can with a bottle, use cold welding. This is due to the fact that it is necessary to ensure reliable fastening of such an element, since high pressure will be exerted on it.
The created design is designed for a pressure of no more than 3 atmospheres. The air is pumped using a bicycle pump, for the connection of which a nipple was located. A hand-made device like this is ideal for painting tasks. various surfaces water-based composition. The container can also be filled with lime mortar.
Spray gun from a vacuum cleaner
A vacuum cleaner can be used to create the required pressure. It is ideal when the primary consideration is performance.
You can create a DIY spray gun from a vacuum cleaner when using an old model, since they allow you to connect a hose to the outlet hole.
If there is no such model, then many problems may arise with ensuring the required tightness.
- A suitable bottle is selected, which can be made of plastic or glass. The diameter must be at least 5 cm.
- A cork is cut out of foam plastic. It should fit perfectly under the neck of the tube. When creating it, it is worth considering that the plug is intended to fix the inlet and outlet channels, and therefore must have a rectangular protrusion. Due to the high degree of machinability of the material, creating the required shape will not be difficult.
- Two holes are formed in the foam, which are intended for the outlet and inlet tubes. The dimensions are selected so that they are inserted with force, thereby ensuring the required tightness.
To spray the substance, you will need a nozzle with an adjusting screw. A hole is created in the upper part of the body to connect the bottle. This design is characterized high efficiency, however, the vacuum cleaner requires electricity to operate. In addition, you need to ensure that the nozzle does not become clogged, as this can lead to an increase in pressure in the system, rapid wear of the vacuum cleaner motor, or rupture of the pipes.
Refrigerator for making a spray gun
To create a spray gun, a compressor is suitable, which is installed on the refrigerator. You can make such a spray bottle yourself if you need to save on the amount of material consumed. In addition, the design features make it possible to spray lime. Among the features of making such a sprayer with your own hands, we note the following points:
- Requires a receiver that can be used as old cylinder. The container used must have increased tightness.
- For analysis you can take old refrigerator, from which the compressor and start relay are removed. Dismantling is quite simple; just saw off all the copper tubes.
- The inlet and outlet openings can only be determined by connecting the compressor to the power supply.
- In order to eliminate the possibility of various debris entering the system, a filter is attached to the suction pipe, you can use an old one car version execution. It is secured with sealant.
- The tube through which air is pumped is connected to the previously prepared receiver with strong hoses through a fitting. All connections are also covered with sealant.
- In order to increase the efficiency of the design in question, a diesel filter is attached to the outlet after the receiver. It reduces the humidity of the supplied air.
It is worth considering that the compressor must be located in the same position as at the time of use in the refrigerator.
Otherwise, it may be difficult to start the device. In addition, experts recommend periodically changing the oil, which ensures a long service life of the compressor. In order for it to remain stationary during operation, a special base is created.
In almost all cases, a special holder is required for the device to operate. If necessary, you can also make it yourself. To do this you will need:
- A small piece of plywood, which measures 25 by 25 cm. Using a jigsaw, a hole is formed in it that fits the diameter of the spray tank.
- The handle is inserted into the groove, after which the edges are cut to size.
- Special legs are created for the stand, which provide correct location hose
Such a holder can additionally be equipped with an element for installing a filter funnel. It is created using aluminum wire, which can be secured with screws.
Ballpoint pen spray
A small and practical device can be obtained by using ballpoint pen as a basis. Such a home-made device can work with a small cylinder, the volume of which is no more than 1 liter. If you need to carry out small finishing work, then you can create such a spray gun with your own hands quite quickly. Recommendations for performing the work are as follows:
- All you need from the handle is the outer shell, which should not have any defects. To do this, everything is taken out internal elements. Attention is also paid to the size of the shell; it should not be too large or small.
- The reverse tip is cut off at its widest point.
- You will also need a rod. It is cleaned from the paste using alcohol.
- A hole is created in the central part of the cork that will fit under the rod. It will be drawn to the bottom to connect with the bottle in which the paint is placed.
You will have to pump the air yourself. That is why this design has not become widespread, since it cannot be used to process a large area.
Making a spray gun for powder paint
Powder paint is used to cover a wide variety of surfaces. It is worth considering that such equipment is quite difficult to manufacture; a homemade sprayer is assembled as follows:
- First, the electrical module is assembled. It consists of a core with wound wire. The element is placed in a sealed plastic container with paraffin.
- The gun is assembled, which ensures spraying and supply of paint. A plastic tee is used as a base into which the core is inserted. The stability and strength of the element is ensured by treating the edges with glue. All electrical connections are routed through the bottom of the structure.
- The previously created gun and electrical module are connected to the paint tank. The flow of paint can be controlled using a rubber trigger.
After this, you can begin directly testing the spray gun, for which its container is filled with powder paint.
Safety precautions when making a spray gun
Almost all created designs are related to high pressure, which is supplied from various devices. That is why it is recommended to carry out work on assembling the spray gun in ventilated, protected areas. During assembly Special attention pays attention to the tightness of all connections, as well as their strength. The amount of supplied pressure is also controlled.
Making a regular spray gun with your own hands is quite simple; the equipment created in many cases copes with the assigned tasks. The most difficulties arise when it is necessary to paint the surface with a powder composition.
Often, home craftsmen have a situation when they urgently need to paint some part or surface, but there is no spray gun at hand, and there is no point in buying one for a one-time job. In this case, the only thing correct solution- this is to make a spray gun with your own hands.
The simplest paint sprayer can be made at home in just a few minutes from an aerosol can, a plastic bottle and a car nipple(with nut). The process of making a spray bottle is as follows.
- Drill a hole in the neck of the plastic bottle that matches the diameter of the nipple.
- Insert the nipple into the hole with inside bottles.

- Apply glue using a glue gun around the threads of the nipple.
- While the glue is still wet, place the washer on the nipple and tighten the nut well. Instead of glue, you can install under the washer rubber gasket.

- Next, you should cut off the top part of the aerosol can. This is done using a hacksaw for metal.

- After sawing off the top, remove the part from the cylinder. It should have a tube connected to the sprayer.
- Trim the metal around the atomizer so that the part can fit into the bottle cap.

- Drill a hole in the cover corresponding to the diameter of the upper part of the part with the sprayer (shown by the arrow).


- The next step is to prepare two-component adhesive, mixing both parts well together. The spray bottle will be secured to the lid using glue.

- Apply glue to the metal part of the sprinkler and insert it into the cover.

- If necessary, apply a little more glue around the inserted part. It is also necessary to apply glue to the top of the lid.

- After the glue has dried, put on the spray cap.

- Extend the existing tube using a cocktail straw and cut it to the right size. The tube should reach the bottom of the bottle.

- Next, fill the bottle with paint or other composition intended for spraying.

- Screw the cap with the sprayer onto the bottle and connect the hose from the pump to the nipple.

- Use a pump to pump air into the bottle. After this, the spray gun will be ready for painting.

Spray gun from a vacuum cleaner
To spray paint and varnish compositions, as well as materials for whitewashing, you can use a vacuum cleaner as an air blower. A spray gun from a vacuum cleaner is made in 2 stages: first you need to “make” the vacuum cleaner work for blowing, and then make a paint spray gun.
Remaking a vacuum cleaner
In vacuum cleaners of older models, a mount was provided for connecting a hose at the point where the air exits the unit. Also included with these vacuum cleaners was a paint sprayer in the form of a lid for a can, which had a pipe for connecting a hose. In modern vacuum cleaners, where the air exits the vacuum cleaner, a grille is installed that covers the filter. To connect a hose instead of a grille, you can make special adapter, shown in the following photo.

The adapter is installed with the grille with filter removed and secured with four screws.

The vacuum cleaner hose is attached to the adapter. To seal the connection, you can wrap a little electrical tape around the adapter pipe.

There is also a simpler option for making an air blower out of a vacuum cleaner. This will require high density trash bag.
Important! The bag should be of such a size that a vacuum cleaner can fit inside it.
To make an air blower, do the following:
- Cut off the corner of the bag.

- Insert the hose from the vacuum cleaner into the resulting hole and seal the connection with electrical tape or tape.

- Remove the filter bag from the vacuum cleaner.

- Connect the second hose to the vacuum cleaner.

- Next, place the bag on the vacuum cleaner and wrap the area around the hose well with electrical tape.

- You should also make a hole in the bag for the electrical cord and seal the place where it comes out.


- Connect the power cord to the outlet and turn on the vacuum cleaner. The air blower for the spray gun is ready for use.

Making a paint spray gun
A homemade spray gun for a vacuum cleaner can be made by analogy with the sprayer that was equipped with units of older models. Below is a drawing of a spray gun, according to which it can be easily made from simple and inexpensive materials.

The device is made as follows.
- Pick up plumbing pipe (1) made of PVC of such diameter that a hose from a vacuum cleaner can be connected to it.
- On one side the pipe should be plugged with a plug.
- Drill one hole in the center and several holes (5 and 6) on the sides of the plug. The more holes there are around the center, the better the paint (7) poured into the can (3) will spray.
- Next, you should drill 2 holes in the lid and in the side of the pipe. A tube (4) will be inserted into one hole, designed to supply paint from a can, and air will pass into the second, due to which the pressure in the paint container will increase.
- You should also choose small plastic tube, which will serve as a nozzle. It must be bent as shown in the figure above, and one end must be inserted into the central hole of the plug, and the other end must be threaded through the pipe and cap and connected to the supply tube (4).
- In this position, you should fix all the elements on the lid using a glue gun.
- When the glue has hardened, make a hole in the lid on either side. hole measuring 8-10 mm in diameter. It will serve as a kind of start button. When you close the hole with your finger, the pressure in the can will increase, and the paint will begin to flow through the tube (4) into the nozzle. Due to the presence of holes near it, the paint will be blown away by air and sprayed. If this hole is opened, the pressure in the container will normalize and the paint will stop rising through the tube.
Advice! A spray gun made in this way is convenient to use for whitewashing, as well as for covering surfaces with acrylic and water-based paints.
Also, a device for coating walls and ceilings with various water-based dyes can be made from a garden sprayer. In this case, no modification of the device is required. It is enough to dilute the paint to the required thickness, strain it and pour it into the tank. Next, air is pumped into it and whitewashing or painting is done, as with a regular spray gun.
Spray gun from a compressor from a refrigerator
Working with a spray gun connected to a compressor from a refrigerator is noticeably different in noise level from working with the same device, where a vacuum cleaner is used as an air blower. When the refrigerator unit is turned on, it makes a barely audible noise. For this reason, many craftsmen prefer to make a compressor from a refrigerator not only for connecting pneumatic tools, but also for painting work. But the compressor manufacturing process itself is quite complicated.

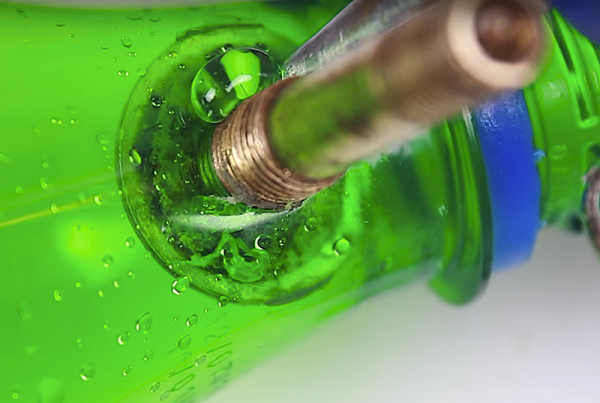
When the compressor is ready, all that remains is to make the spray gun yourself. It can be made from parts from a fountain pen and a jar with plastic cover . The fixture drawing is shown in the following figure.

A paint sprayer is made as follows.
- From the writing rod assembly from writing pen the ball is removed.
- Next, the rod is inserted into a pre-made hole in the lid and secured with glue gun.
- Opposite the rod on the lid of a jar or bottle, the body of the pen is also fixed glue gun. The hole in the pen body will serve as a nozzle. If necessary, it can be expanded using sandpaper. The writing part of the rod must be installed strictly in the center of the nozzle opening.
The hose coming from the receiver is connected to the handle body, after which the spray gun will be ready for use.
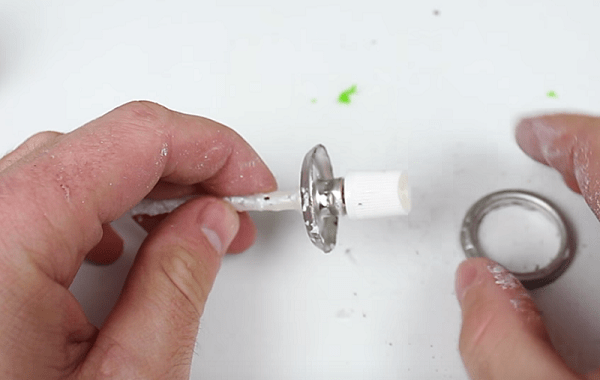
By the same principle you can do mini spray gun. To make it, you will need a medical bottle, for example, from a bottle of brilliant green, 2 corks and 2 pen refills.
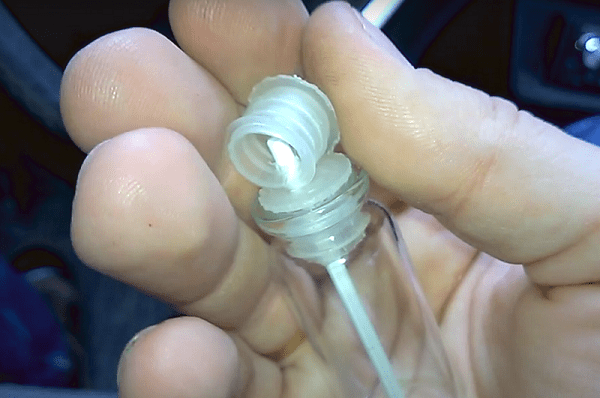
Holes are made in the corks, as shown in the photo above, into which pen refills without a writing part are tightly inserted. The tube through which the paint will be supplied must be aligned with the center of the air tube.

The resulting small paint sprayer can be useful for small painting jobs.
Advice! It is not necessary to connect it to the compressor. Simply blow into the air tube and the paint poured into the bottle will begin to spray.
Powder coating spray gun
The spray gun for powder coating allows you to produce high-quality painting parts and surfaces of complex configuration. Basically, powder spray guns are used for painting cars and various parts for them.

The manufacturing process of a powder paint sprayer is quite complex and difficult to describe. To understand how to make the device, you can watch the training video.
DIY spray gun holder
Important! Spray gun stand air type involves fixing a paint tank in it. It is not possible to install an airless spray gun in such a holder due to the lack of a paint container in the device.
A do-it-yourself spray gun holder is most often made of thick wire or a metal rod approximately 6 mm thick.

Advice! The length of the board is selected taking into account the number of spray guns that need holders.
Making a homemade spray gun with your own hands is not that difficult. And, if you have a lot of painting jobs, then you will save on the purchase. Today we will look at how to make a homemade spray gun at home.
After all, there are several options here and you will need to choose the right option. Videos and photos will help you make the right choice.
DIY spray gun: main advantages
To carry out any painting work, you can use a homemade simple spray gun, which will provide you with additional advantages than a regular roller (see). At the same time, to save money, you can make a homemade spray gun for painting.
Strengths compared to a roller
Using a spray gun has a number of advantages, which will certainly affect the speed of painting work and its quality.
Advantages of the spray gun:
- Using a tool eliminates the possibility of preserving lint, bristles and other foreign debris on layers of freshly applied paint;
- Using a spray gun will reduce the duration of any work by several times. than without it;
- Achieving significant savings Supplies : paint applies evenly thin layer, there are no smudges, excess does not spill onto the floor;
- Spray gun – reliable tool , does not require careful care, lightweight and small in size.
What is a spray gun used for, classification of tools
Most often, a spray gun or spray gun is used to paint pieces of furniture, wooden fencing(see How and with what to paint a wooden fence), metal coating(including the car body), designer plaster and designer finishing.
There are many types of this equipment:
| Hand spray gun | This option is ideal for those who do not have significant experience in painting. When using a manual spray gun, uneven application of the layer and uneven coloring are possible, but this type of tool is extremely reliable and easy to use. Even a child can easily master it. |
| Pneumatic spray gun | The principle of its operation is based on the action of compressed air, with the help of which paint is applied to the surface. In most cases, such a tool is used to work on large areas: in factory workshops and large shopping centers. However, a pneumatic spray gun is also suitable for compact objects. |
| Vacuum installation | This principle is based on the contrast between the pressure inside the spray gun and at the outlet environment. The resistance of the air environment slows down the flow of the dye, which acts in the opposite way to a pneumatic tool, when used, the air, on the contrary, builds up pressure. Main strengths airless system:
This method is actively used when painting rolling stock. railways, subway cars and public transport. Coating is carried out using an airless system metal surfaces against rust. However, its use makes the paint layer too thin and susceptible to mechanical damage. |
| Electric spray guns | IN in this case The paint is dispersed over the surface by an electric pump. This method is especially common in domestic conditions when renovating residential premises. |
| Simultaneous use of vacuum and pneumatic systems | Combining these two principles is common in manufacturing aircraft and in furniture factories. Surprisingly, in terms of efficiency, all this professional equipment can be noticeably inferior to items made at home. Of course, this is achievable if you have certain skills and follow all the rules when creating a homemade instrument. |
Making a spray gun yourself
Spray bottle - ballpoint pen
The most primitive option when creating a spray gun is to use an ordinary ballpoint pen as the basis. Of course, such a tool will not replace factory equipment when painting. large areas, but may well be applicable at home or in the garage.
In order to paint with high quality, any experts in this field advise using optional equipment- spray gun or spray gun. It avoids the formation of unevenness on the painted surface. But since many factory models cost a lot of money, it will be more economical to assemble the spray gun yourself from scrap materials.
Spray gun at home
Such a design can be made from a variety of materials that most people have, for example, from a vacuum cleaner, car camera, refrigerator, ballpoint pen, etc. Moreover, such models will be in no way inferior to their factory counterparts and even surpass them to some extent. This directly concerns the price of such equipment.
A hand-made spray bottle is ideal for painting with water-based paint, whitewashing or other necessary work. Powder paint, in turn, requires more expensive, high-quality and powerful equipment. Therefore, for many it remains interesting question on how to make a homemade spray gun with your own hands.
Aerosol can sprayer
An aerosol can sprayer is one of the simplest homemade options for water-based paint. Making it from scrap materials will not be difficult.
To create such a device, you need to prepare the following materials:
- bicycle camera;
- plastic bottle;
- bicycle pump;
- aerosol can (for example, deodorant).
After preparing everyone necessary materials You can proceed directly to the work:

Such a spray can will cope perfectly with the assigned tasks: painting with water-based paint and lime.
Spray bottle from a vacuum cleaner
 If you need to paint large surfaces, a hand sprayer will not be suitable, as the process will be delayed. In such cases, it is necessary to make a device with automatic system air supply. A refrigerator compressor or vacuum cleaner is perfect for these purposes. It is not difficult to make such a “torch” at home. Such designs are ideal for creating a homemade automated compressor that will cope with water-based paint, but they are not suitable for powder paint.
Old Soviet vacuum cleaners are suitable for these purposes. Their advantages over the new ones are that the design of the new ones does not provide for two hoses: one for “blowing” and the second for “blowing”.
In the case when the old vacuum cleaner is no longer needed, in order to change the direction of inflation, sometimes it is enough to simply change the direction of the terminals that connect the starter and the rotor. Next you need to do a few steps, thanks to which you can use an old vacuum cleaner to paint surfaces:
- Prepare glass or plastic bottle with a neck diameter of at least 4 centimeters and a volume of no more than 1.5 liters.
- Cut a cork from foam plastic to the diameter of the bottle opening.
- Make two holes, one of which will serve compressed air, and the second - paint.
Such a device is perfect as a spray gun for painting a car, and with the help of attachments from a vacuum cleaner you can change the direction and volume of the jet.
Refrigerator as raw material
 This option is characterized by great reliability and performance; it will work for a long time and bring benefits to household. But on the other hand, its production will require a lot of effort and energy, as well as time. Although it is worth it, since in the end you can get a very good device.
To make a spray bottle from refrigerator elements, it is necessary to prepare the appropriate materials and tools:
- large container for paint;
- one hose 45 centimeters long and two 15 centimeters long;
- several clamps;
- machine gasoline filter;
- steel wire;
- screws;
- board.
 Before starting work, you need to find something that will serve as a receiver. A fire extinguisher, a canister, or any container that can be hermetically sealed may be suitable for this.
Using a pre-prepared board, you need to attach the compressor from the refrigerator to it. Next you need to understand in which direction the device operates, where the air comes from and where it enters. To do this, you need to connect it to the network and start it. The pipe from which the air will come out will serve as an exit. The second tube will be the inlet, and the third on such compressors is closed.
It is necessary to connect hoses to the inlet and outlet openings, which will clamp the tubes tightly, and additionally clamp the joints with clamps.
As for the third closed tube, it serves to lubricate the compressor itself, and it is not recommended to touch it until the first malfunctions appear.
You need to drill two holes in the receiver. A large hose is connected to one, which, in turn, on the other side is connected to the inlet pipe of the compressor. A smaller hose is attached to the second hole in the receiver and the compressor outlet pipe on the reverse side.
To monitor the pressure in the system, it is necessary to install a pressure gauge. Only after this should you connect the spray gun. For mobility of the device, you can attach wheels to it.

Making a spray bottle at home is not difficult if you apply a little effort.
From a ballpoint pen
 You can also make a spray gun with your own hands at home from a ballpoint pen. This is the most primitive version of such a low-pressure device. Of course, this option will not replace the factory models. or homemade automated ones, but can be used for small jobs, for example, in a garage. The manufacturing time for a mini-spray gun is no more than half an hour.
A person blows into a pen, and paint comes out through the rod. This way you can even regulate the intensity of the spray gun, but first it is recommended to practice on a small area. Since using such a device can lead to liquid getting into the mouth, it is not recommended to use it for whitewashing.
For its production it is necessary to prepare the following materials:
- Thermal foam, plastic or rubber.
- Ball pen.
- Plastic bottle or other container with a neck.
Thus, a spray gun for painting cars, walls or other needs can be made easily and the process is not very complicated. For more complex work and renovation of premises, it is better to make a spray bottle from a compressor. He's on his own technical specifications is in no way inferior to factory models. For simple work In the garage, a device made from an aerosol can or pen will be sufficient.


