Despite their attractiveness, buildings made of wood have a significant drawback - the material from which they are built belongs to the category of fire hazard (it ignites quite easily and also burns quickly). Therefore, special requirements are imposed on electrical wiring in such houses. Moreover, if we're talking about about internal communications. What kind of wire do you need to buy for wiring in wooden house? Let us consider this issue in as much detail as possible and clarify important points.
Core material
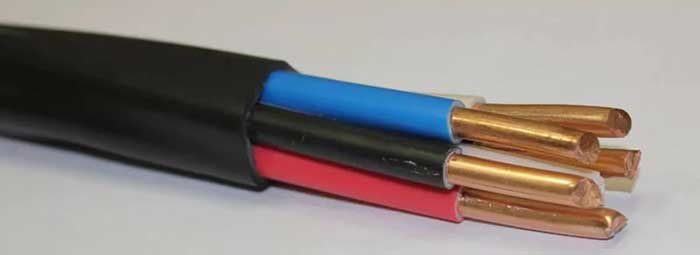
There are no restrictions on this item. But experts point out that for indoor wiring in wooden buildings, it is advisable to choose products with copper conductors. It is much preferable to aluminum-based analogues.

- Electrical conductivity is much higher. Consequently, line losses will be less.
- Both designated metals are subject to corrosion (oxidation). But copper not so much. Why is oxide dangerous? In this layer, the conductivity drops sharply, the resistance increases, and as a result, the wire heats up.
- Copper is stronger than aluminum, including in bending. Consequently, if there are breaks in the veins, the risk of possible sparking is practically reduced to zero.
- Screw clamps hold the copper wire more securely. Therefore, during operation, the quality of connections does not decrease. With aluminum wires it is more difficult - you will have to regularly check the line and make “tightenings”, since the contacts (the metal is soft) weaken over time.
Note
There is an intermediate option on sale - wires with composite conductors, made of aluminum copper. This alloy optimally combines all the advantages of both metals, but the indicators are, naturally, averaged. When choosing such products, consulting a professional will not be superfluous, since you will have to take into account many factors and decide on priorities based on the specifics of the line and general scheme in-house wiring.
Insulation

Examples of wires and prices
It is hardly worth listing the entire assortment. Moreover, the prices of the same type of wires differ depending on the region. For in-house electrical wiring, the most popular products are those with a core cross-section of 2.5 square meters. They are used to connect switches, sockets and a number of medium-power household appliances - washing machines, climate control equipment and the like. Using this example, it’s easy to get an idea of the cost. various types wires
*Price in Russian rubles per linear meter.
- VVGng and its modifications – from 38.6;
- RKGM – from 25.9;

- NYM – from 42.

What not to buy
PUNP. This wire is still found on sale today, and is even still produced by individual companies. It attracts with its low price and is often used to connect sockets and household appliances. Unfortunately, not everyone knows, and dealers are silent, that this wire is prohibited from being used for indoor electrical wiring, since its characteristics no longer comply with the latest GOST.
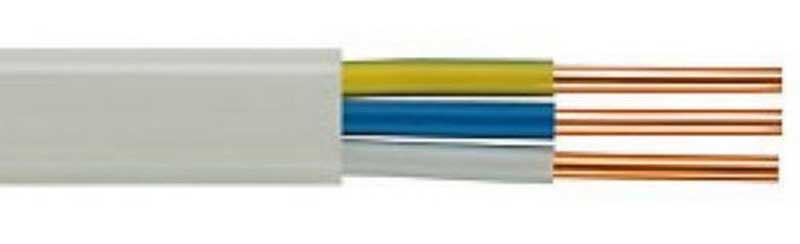
These wires have copper cores, and their insulation fully meets all the requirements for cable products for installation inside a wooden house.
Residential buildings made of wood are among the most ancient architectural structures. But even nowadays, when the range building materials amazes the human imagination, most happy owners suburban area prefer to use wood with environmental qualities and natural beauty for the construction of a house, which cannot be compared with any finishing material.

Requirements for wiring in wooden buildings
To begin with, anyone who wants to independently supply electricity to a wooden house must understand that knowledge of how to distinguish a neutral wire from a phase analogue or connect a socket with a switch is far from sufficient. First of all, this is due to increased safety requirements use of electrical appliances in wooden buildings.
It is better to entrust all work to qualified electricians. But every homeowner needs to be aware of the basic rules of how to install electrical wiring in a wooden house, even for the simple reason that this will allow him to evaluate the work of specialists. So, what are the rules for electrical wiring in wooden residential buildings?
- It is important to completely eliminate or minimize the possibility of fire in electrical cables to prevent the transfer of an open source of fire to the wooden parts of the house if a short circuit occurs in the electrical circuit.
- Main indicators and characteristics of cables used in wiring must strictly comply with the rules and regulations and have sufficient power reserves to withstand peak loads. Under no circumstances should there be any manifestation of heating of the input wire or terminal connection.
- Technical condition electrical wires should not allow even the slightest risk of electric shock to the residents of the house or animals.
The question of the aesthetic component in conditions wooden houses should fade into the background. Today there are many options for solving this problem. But in no case should safety rules be neglected to improve the external characteristics of the building. Such actions can lead to irreversible consequences.
Features of electricity input in a wooden house
 The most dangerous area of electrical wiring is considered to be the entry of wires through the attic wall, made of wood. There is a misconception among craftsmen that a piece of rubber hose is enough to ensure safe cable entry into the house. But the use of such material is not applicable, since the composition of the rubber product includes soot, which is carbon that conducts current well.
Therefore, as a rubber hose ages, bridges may appear that allow electricity to pass through with fairly high resistivity values. Because of this, the cable heats up in local areas, which can lead to fire in dry wood.
If the main goal of the owner of a wooden house is to completely reconstruct the electrical wiring and bring it to proper condition, then the modernization should begin by introducing the electrical cable into the building. Wherein specialists consider two main methods on how to install a power cable into a wooden building:
- Laying an electrical power cable underground is the most reliable in terms of safety, since the wires are hidden from the influence of external factors. But in terms of cost, this option is too expensive and requires excavation work. According to the rules for laying underground electrical wiring, the depth of the trench must be at least 80 cm.
- Overhead wiring involves work on an electrical pole, which is strictly prohibited without the necessary permission. This should only be done by qualified electricians.
 The section of the electrical main from the high-voltage pole to the wooden structure must be made of wires with a cross-section of more than 16 mm. The optimal ones are self-supporting aluminum wires with high-quality insulation. The service life of such a cable should be 25 years or more.
Naturally, introducing such a line indoors is unacceptable. If you follow the established rules, laying electrical wires with current-carrying parts made of aluminum over highly flammable structural elements at home is strictly prohibited. Therefore, only copper conductors can be laid in wooden buildings.
The electrical cable connection must be carried out with outside Houses. For this purpose, special compresses are used, thanks to which quality contact is ensured, which does not subsequently oxidize and does not spark. Electrical wiring sections passing through wooden walls or ceilings between floors must be enclosed in metal sleeves. Thanks to this additional measure precautions, the following goals are achieved:
- the electrical cable will be protected from mechanical damage caused by displacement of the house structure due to shrinkage or vibration of the soil;
- metal is a fire-resistant material that will reliably protect the wooden surface from ignition in a short circuit situation, leading to heating and further fire of the electrical wiring;
- electrical wiring in hard-to-reach and inconspicuous places will be reliably protected from small pests - rats and mice.
If we consider the thickness of the pipe walls, then it is regulated by the current rules. If it is necessary to lay wires whose cross-section does not exceed 4 mm, a pipe with walls of 2.8 mm is installed, and if a more powerful cable is used, thick-walled protection up to 10 mm is used. This will not allow the metal sleeve to burn out in case of short circuit. This rule applies to all areas of electrical wiring in a wooden house.
Laying wires from the entrance to the house to the electrical panel
 Another important section of the electrical wiring of wooden houses is the gap from the input to the intra-house distribution panel electrical system. A particular specificity of this section is the vulnerability of the latter from overload using automatic machines. And given the fact that it is laid in the attic or utility room, then the risk of fire in the event of a short circuit increases greatly, since it is not worth relying on the automatic protection of the substation. Therefore, two radical methods are used to solve the problem.
- The entire length of the cable is enclosed in a metal pipe, with parameters corresponding to the established rules. But this method is applicable over short periods of the electrical network up to 3 m long.
- A more acceptable method is to install the machine, placed in a sealed box immediately before entering the line into wooden room. The response threshold of such a device should be a level higher than the main machine located in the switchgear.
Another solution to the problem is to place machines and an electric meter on external wall outside a wooden house in a separate protected box. Naturally, this option is the most reliable, although inconvenient for property owners.
Installation of distribution boards
The electrical cable entering a wooden house directly, without additional branches, enters the distribution panel, which consists of the following elements:
- a box made of plastic or metal with places for placing the device, monitoring electricity consumption and automatic protective devices;
- electric meter with appropriate sealing;
- two-pole or three-pole automatic device protection of the main input cable;
- circuit breakers for indoor electrical wiring in a wooden house;
- It is very convenient if garage and yard lighting, as well as power supply for utility rooms, are allocated to a separate area.
The calculation of the machine’s power for each individual zone is carried out individually. The basic rule that guides this is protection triggers when an overload occurs on a weak section of in-house wiring. At the same time, the optimally selected nominal value ensures maximum safety. You should not get carried away with savings when purchasing hardware for the distribution system, since the safety of people depends on it.
Open wiring in a wooden house
 If we consider methods of wiring in a wooden house, then the safest option is the open option of laying wires. Plus, such work will cost the homeowner much less. Electrical cables are laid along the interior walls and ceiling of the room. For aesthetic camouflage of wires they can be decorated in retro style or put in decorative box made of plastic.
The electrical cable is laid in a self-extinguishing channel. At the same time, in construction stores you can find a product that matches the color in accordance with the general style of the building. This type of box is popular in log houses and buildings covered with clapboard wood with smooth wall surfaces.
Using braided cables will give electrical wiring an aged, retro look. The wires resemble twisted cords attached to a wooden wall through a ceramic insulator. This method is considered quite safe for the simple reason that The cable has high-quality double insulation and does not come into direct contact with wooden surfaces. Plus, this type of wire will emphasize the overall stylization of the building.
Hidden electrical wiring in a wooden house
 If we consider hidden electrical wiring in a wooden house, then its installation is very labor-intensive and, if it is necessary to modernize or repair electrical cables, it makes the procedure expensive and inconvenient. But despite this, most owners of wooden country houses They prefer the hidden method of installing electrical cables.
Homeowners of wooden buildings do not want to spoil appearance finishing the house with distribution boards and wires. The installation of hidden electrical wiring begins at the design stage of the building. In this case, for safety reasons, the wires are placed in a metal or galvanized pipe, which must be painted. To lift the cable to the socket or switch, a special fire-proof hole is installed.
Installation of electrical networks in wooden buildings in a hidden way should be carried out only in accordance with the rules and regulations for electrical installation work and using special materials to ensure fire protection. Cables running in the floors of a building must be placed in a metal sleeve or pipe made of non-flammable plastic.
Also hidden way wiring can be placed in grounded metal pipes. Log buildings often shrink, which must be taken into account to ensure that the logs are not exposed to wires or metal sleeves. To route cables through walls, special metal sleeves are used. But due to the fact that open and closed methods of laying wires in a wooden house have their own advantages and disadvantages, they are most often combined.
Features of installation of electrical appliances
 After studying the layout of electrical wires in a wooden building and marking the cable lines you can proceed to the installation of electrical distribution devices– sockets, lamps and switches. In this case, the fastening of all electrical components should be carried out only on a pre-prepared metal platform fixed to a wooden surface. Only thanks to metal protection can the proper level of fire safety in a wooden house be ensured. This rule also applies to distribution boxes.
The problem of many DIY enthusiasts when installing electrical wiring is non-compliance with fire safety standards and requirements. wooden buildings. In no case Do not use standard wires and electrical devices, as this is contrary to safety regulations.
The installation of electrical wiring in wooden buildings should be carried out only taking into account all recommendations, which will ensure the durability and efficiency of the work performed, as well as the safety of all residents of the house.
When planning to install wiring in the house, conduct additional lighting or adding a couple of outlets without resorting to the services of professionals, you have to deal with many questions.
The essence of these questions comes down to one thing - how to choose from the variety offered the only option that will serve faithfully for many years.
In this article we will tell you how and which wire is best to choose for wiring in the house.
The first thing you need to decide is which wire to use for wiring in a wooden house - copper or aluminum. Although you can use both, experts still prefer copper:
Aluminum has only two advantages over copper:
- he's more flexible, which makes installation easier,
- he is much cheaper.
In all other parameters, aluminum is inferior to copper:
- oxidizes quickly(and the oxide conducts current less well and this place will heat up quickly),
- after a few bends may break, therefore, aluminum wires must be laid with greater care than copper wires, you will have to avoid bending them multiple times in the same place,
- screw terminals aluminum slips out over time, loosening the contact, and all places where there are clamps require periodic inspection.
The core can be made of aluminum copper - inexpensive composite material , which on the one hand combines good properties both materials, and on the other hand, it is inferior to each of them in terms of performance.
Wires differ in the number of cores (single- and multi-core, each core can be single- or multi-wire), cross-section and rated operating voltage; they are manufactured with insulation for 380, 600 and 3000 V alternating current. The conductors can be enclosed in a sheath made of vinyl plastic, PVC or rubber.To protect the wire from mechanical damage, it can be covered with a cotton braid. If it is intended for installation in places where there is a possibility of mechanical damage, it is additionally protected with a braid of galvanized steel wire.
Despite the fact that aluminum wires are cheaper, recently copper is increasingly replacing them because many homeowners prioritize reliability.
 Would you like to know how to make grounding in a private house? In the next review we will talk in detail about all the nuances, as well as what it should look like.
Read about the rules for installing hidden wiring in a wooden house here.
Retro wiring is not only functional, but also a decorative solution for those who want to decorate their home and make their wiring attractive. Detailed and helpful information.
Marking
The marking contains information about the material from which the conductors are made, the degree of flexibility, insulation and design of the protective sheath:
 For example, 4x2.5-380 means a 4-core wire with a core cross-section of 2.5 square meters. mm.
 Let's figure out what kind of wire is needed for wiring in the house. It is necessary to choose, taking into account the maximum amount of current consumed during the load, which determined by the formula P/220, where P is the rated power of the connected devices. So, for a 100-watt light bulb, the current will be 0.5A. Knowing the total power of all connected devices, you can calculate whether the selected wire is suitable or whether you need to select another one.
The choice for a home is made on the basis that For every kilowatt of load you need 1.57 sq. mm. You should adhere to the power characteristics:
- for copper 8 A per 1 sq. mm;
- for aluminum 5 A per 1 sq. mm.
Diameter of current-carrying core measured with a micrometer or caliper and calculated using the formula S = 3.14D2/4, where D is the diameter in millimeters. If the core is multi-wire, then the result is determined by adding the cross-sections of all the wires.
When installing wiring, you can focus on the following cross-section indicators:
- 2.5 sq. mm- sockets, air conditioning, washing machine, storage water heater;
- 6 sq. mm- electric stove;
- 1.5 sq. mm- lighting.
The load must also correspond to the installation method. : open wiring cools better, rubber insulation allows heating no higher than 65 degrees, plastic insulation - 70 degrees. Here's how the type of wire depends on the way the wiring is laid:


Practicing electricians It is recommended not to save money, but to use stranded copper wires even where you can get by with single-core, because multi-core, with the same cross-section as monolithic, withstand overloads 5–10% better.
In addition, it is technically impractical to counterfeit a stranded wire, and in a “monolith” there is a danger of running into a counterfeit - an alloy with the addition of copper. But any advice from a specialist has some bias, so it is still better for the home owner to decide for himself what is more important - the economy of aluminum or the quality of copper.
If to this approach the critical stage of repair accordingly, you may never know what melted insulation, fire or short circuit is. You need to take a particularly responsible approach to the arrangement of baths and saunas - there elevated temperature and humidity, which leads to rapid wear of the insulation.
By following safety rules and GOST recommendations, you can protect not only your own home, but also your life from fire.You can learn how to choose a wire for electrical wiring in a private house or apartment from the video review:
What is attractive about the idea of building a wooden house? This is the ecological purity of materials that can provide a comfortable and healthy microclimate in the premises of the home and, of course, the desire of homeowners to follow the traditions of Russian architecture. Modern market building materials allows you to build a house made of profiled and laminated timber, as well as rounded logs. In contrast to all the advantages inherent in houses made of wood, a problem arises with the arrangement of electrical wiring. The option of open wiring laid in cable channels does not always meet the requirements of an attractive design interior decoration premises, the homeowner is faced with the question of how to make hidden electrical wiring in a wooden house with his own hands. We will talk about this further.
Advantages of hidden wiring
The undeniable advantages of installing hidden wiring in a wooden house are:
- The absence of cable channels on the walls, which have a detrimental effect on the premises and significantly complicate the process of applying wallpaper.
- Minimizing the risk of mechanical damage to cables and electrical wiring.
- Possibility of replacing the cable laid in the pipe.
- High degree of electrical fire safety, provided that installation work is carried out correctly in accordance with the requirements of regulatory documents.
Special safety requirements
Hidden installation electrical wiring in a wooden house is very complex and requires strict compliance with standards against fire safety, PUE requirements and compliance with GOST R50572 1-93. A person who does not have electrical installation experience should not attempt to do this work with their own hands. The homeowner who has invited specialists to install the installation needs to know the basic provisions about installation methods in order to control the progress of the work and in no case take this material, as step-by-step instructions.
When designing a home's electrical circuit, the main emphasis is on ensuring fire safety, even if this goes against the aesthetic component. The finished project must be agreed upon with specialists. The hidden wiring diagram should provide for a minimum of turns of the electric main. Considering the high probability of fire in wooden structures, the wiring must be laid in such a way that even a tiny section of the power line does not come into contact with wood. The cable must be laid in steel or copper pipes. It is allowed to lay electrical wiring in a corrugated metal hose, as well as in PVC corrugation, provided they are protected with plaster or asbestos gasket.
The diameter of the pipe is selected taking into account the fact that the pipe laid in it hidden electrical wiring should occupy 40% of its internal cavity, the thickness of its walls should correspond to the cross-section of the conductive conductors. Pulling an electric main through pipes can cause mechanical damage to its shell, so it must be done after each such operation. Special requirements are presented to the cable brand, its shell must be made of non-flammable three-layer material, and the marking of domestic samples must necessarily contain the letter symbols “NG”. For example, VVGng-p. The imported analogue is the NYM cable.

Pipes must be securely joined by threading, welding or soldering. Places for interroom transitions, as well as installation points for wiring elements, should be equipped with metal boxes or glasses, wrapped in asbestos and secured with alabaster plaster. We talked about this in more detail in a separate article.
Installation features
The most labor-intensive operation when laying hidden electrical wiring in a wooden house is installing pipes in the body of the wall. The process is quite labor-intensive, requiring the greatest possible accuracy and precision. To carry out this work, special practical skills and special high-tech tools will be required.
To install insulating pipes into walls, drilling will be required, both horizontally and vertically. Vertical holes are drilled during the process of laying the frame, horizontal holes are drilled when the walls are already erected. After the pipes are fixed in the body of the wooden walls, a wire is inserted into them, which will serve as a conductor for pulling the wire. The seats are carefully cut out to fit the dimensions of the wiring elements, and insulating metal boxes are attached to them.


An alternative option is wiring over the ceiling. Is it possible to avoid such a labor-intensive process associated with installing pipes into walls? Many homeowners when settling hidden electrics wooden house they practice laying wiring along ceiling in the attic. Fire safety requirements for this method of electrical installation remain the same; the electrical main in the attic is insulated with metal pipes or trays, only descents to switches and sockets are made through grooves or vertical drillings in the walls, as shown in the photo below:

Another option is hidden wiring in the plaster. You can take the simplest route and lay the electrical wiring between the layers of plaster. The method is primitive and inexpensive, but not very safe. Plaster actively absorbs moisture and also cracks over time, causing it to lose its insulating properties.
Helpful information
For laying hidden wiring in wood, experts recommend, developed in Germany, with three-layer insulation from non-flammable material. The shell is so strong that it can be installed without PVC corrugation.

The home electrical network must have a TN-S or insulation system that makes it possible to ground metal pipes, trays, ducts and boxes.

It is better to equip the electrical equipment of the house with protection against short circuit currents, as well as with RCD functions.

Now you know how hidden electrical wiring can be done in a wooden house with your own hands. We hope that our installation tips, as well as the rules and requirements provided, helped you understand the essence of the work!
Materials
Installation of equipment in the panel
Having completed the external electrical installation of a wooden building, it is customary to lead the input cable through a metal sleeve into the room. To receive electricity and distribute it in the house, an input distribution board is used, which must be installed in safe places to ensure easy access.

The shield must not be installed in rooms with high humidity
Residual current devices and circuit breakers are installed in the switchboard. Particular attention is paid to the selection of automation. It is recommended to use products only from well-known and reliable manufacturers.
Laying the internal network
Internal wiring in a wooden cottage is considered a guarantee of the safety of residents. Unskilled electrical installation often causes fires. There are two methods of installing wiring inside a wooden building - open and hidden. These names make it clear what these transactions look like.
Open installation method
Of the two methods, open electrical wiring in a wooden house is safer. In addition, performing such electrical work will be cheaper. Wires are laid along inner surface buildings, attached to ceilings, walls and other structural elements. You can hide the cable using various methods: by decorating it with a retro cable or placing it in a PVC box.

Open wiring in a wooden house: the cable is placed in self-extinguishing channels
Electrical wiring is laid in self-extinguishing channels. The modern range of similar products allows you to choose the desired color of the box, which imitates wood, to suit any design. Such boxes are usually used in houses made of clapboard and rounded logs, where the walls have a flat surface.
Wiring in a cottage using a retro braided cable is another method of laying material externally. The cable looks like a twisted cord and is fixed on ceramic insulators. This installation method is considered safe because the cable has an outer insulation made of natural silk and two outer insulations made of PVC plastic. The main advantage is the gap between the surface and the cable. In addition, this type of wire can decorate any log house.
Features of hidden wiring
Hidden installation of electrical wiring is characterized by the rather inaccessible nature of the wires in the case of modernization and renovation of housing, higher prices for services and a much greater required time expenditure for work. However, the lion's share of customers prefer this technique, citing aesthetic appeal. The owners of wooden cottages do not want to spoil the interior and expensive finish of their home with electrical panels and wires.
Hidden electrical wiring in a wooden house is usually installed during the assembly stage of the house. To comply with all safety standards, the cable must be enclosed in a painted metal or galvanized pipe. All lifts to lighting fixtures, switches and sockets are made in special holes.

Hidden wiring in a wooden house is a very complex and expensive process, justified only by aesthetics
When installing electrical networks in wooden houses, it is recommended to comply with certain requirements and use special materials to ensure maximum safety and protection against fire. In the ceilings of a wooden building, the cable is placed in pipes made of non-flammable plastic, and care is taken to ensure that there is no mechanical impact on the pipe and cable.
Hidden electrical wiring can be located in grounded metal hoses and metal pipes. Log houses are subject to “shrinkage”, so it is recommended to take this into account, preventing the logs from affecting the wiring in the metal hoses. The wire passes through the wall through special metal sleeves. Both methods of installing electrical wiring have advantages and disadvantages, so a combined wiring method is often practiced.
Marking of devices, panels, cables
After completing the electrical supply project, you need to mark the cable lines and locations for switches, sockets, dimmers, panels and lamps. It is necessary to approach the markings carefully so that you do not have to redo the work performed in the future. Electrical wiring in a wooden house should be planned so that cable routes do not interfere with the installation of furniture in the future.
The wire in cable channels will look most harmonious and aesthetically pleasing. You can choose any pattern, any shade of wood. For such channels you immediately need to buy tees, plugs, and adapters. And although the price of these parts is twice as high as the boxes themselves, it is not advisable to save money, since no one will fit the non-joint areas of the boxes perfectly.

When purchasing channels, you should pay attention to the thickness of the walls and the lock of the box. Carrying out work on installing wires in miniature boxes that have thin walls and double locks, electrical installation companies do not think that in most situations, servicing electrical wiring in such boxes provokes a break in the locks if the channel covers are opened.
To add cable to the box, you will have to buy new channels and re-install the wiring and boxes. Double lock needs to be used specialized tool, which can open the lid, but absolutely not all electricians think about this. It is better to choose a box with a technologically consistent profile geometry, large walls and a single lock.
When the electrical wiring diagram in a wooden house has been studied and the cable lines have been marked, you can begin installing switches and sockets. All switches, dimmers and sockets, the bases of sconces and lamps must have a metal platform for attaching the electrical installation product to the ceiling or wall, because wiring electrical equipment on metal platforms is the most fireproof option.

After installing all the platforms, you should begin installing the cable boxes. No matter how accurate a specialist’s eye is, all electrical work must be done using a level.
Passing through wooden surfaces
All wiring passes through wooden walls, partitions, and foundations must be made through metal pipes called feed-through sleeves. Before proceeding with electrical installation of wires through combustible walls, it is recommended to drill them, then insert a metal sleeve into the hole so that its edges protrude from the combustible base on both sides by at least 1 centimeter.
It is recommended to pay special attention to ensure that such sleeves are equipped with plastic bushings at the edges that can protect the wire from cuts during installation and further operation of the power supply system, in other words, they will help preserve the cable insulation from damage. After this, the cable channel must be mounted in such a way that the end of the metal sleeve enters the box.
How to choose an electrical cable
Installation of electrical wiring in a wooden house requires a certain cable. The wire for power supply to a private home should be purchased with the index “NG”, which means “cable that does not support combustion” and with the designation “LS”, which stands for “low smoke emission”. For wiring in a wooden building, it is preferable to choose a wire that meets all existing fire safety requirements and also has all the necessary quality certificates.

The choice of wiring cross-section depends directly on the power consumed by the electrical equipment. Designers usually include 3 by 1.5 millimeters for lighting in their electrical supply projects, and 3 by 2.5 millimeters for groups of sockets. To organize power supply for electric stoves, you will need a wire with a cross-section of at least 6 millimeters square. It's better not to skimp on cable. Rosette lines must be calculated with a minimum number of outlets located on one group. If a wire is laid from the switchboard to a block that consists of 4 sockets, then it is not recommended to connect anything else to it. Only then will the electrical wiring last long years. The relationship between the cable cross-section and the power of electrical appliances can be found in the corresponding tables.
After performing such work as installing electrical wiring in a wooden house, you need to immediately measure the insulation resistance of the wiring.

This manipulation is done to ensure that the conductor insulation is not damaged during installation work. It is recommended to carry out such electrical measurements once every 3 years to protect a wooden house and its easily combustible foundations from short circuits in the wiring.
Video about electricians in wooden houses
Thus, the problem of installing electrical wiring is as follows: often inexperienced craftsmen believe that the cable in a wooden building should be the same as in a simple apartment. This is unacceptable, because the wiring of a wooden structure must have increased fire safety characteristics. If you carry out the installation work according to the instructions above, the wiring in your cottage will last for many years.
One of the most important measures when building a house made of wood is its electrification in compliance with fire safety rules. Typically, professional electricians are involved in installing the cables into the house and further laying cables to each point, although some homeowners tend to take responsibility themselves when doing this difficult task. To help those who decide to install electricity in the house themselves, step-by-step instructions accompanied by mandatory rules.
Rules for laying electrical cables in wooden structures
Before working out in a wooden house, you should study some of the features of this activity that are typical for buildings made of timber or logs. The rules for electrifying a wooden structure differ from the wiring and installation of equipment in houses built from stone, brick or building blocks. The main difference is the flammability of wood, which requires special care when carrying out all work related to supplying power to each point.
The second feature of a building made from lumber is its significant shrinkage, the degree of which must be taken into account when installing electrical wiring. These features of buildings built from wood building materials dictate the following rules that must be followed when installing electrical wiring with your own hands:
- preference is given to an electrical cable with a copper power core, as it is more flexible and less susceptible to damage from bending and stretching;
- priority is given to the open (external) method of laying wires;
- the use of metal (non-flammable) socket boxes and distribution boxes;
- holes in the walls for routing cables between different rooms and when entering the house, they are fenced off from the wood with metal cases (sleeves);
- when installing electrical wiring in a closed way the cable is laid only in a solid metal tube; the use of corrugated cable ducts for these purposes is strictly prohibited;
- It is recommended to use a wire protected by several layers of non-flammable braiding, the outer diameter of which is at least 40% smaller internal section case or mounting tube;
- special attention is paid to protection against short circuits (installation of automatic circuit breakers and RCDs), grounding of all electrical appliances with connection to the appropriate circuit, creation effective protection from lightning strikes;
- The electrical distribution panel is mounted to a wooden wall using a reliable dielectric non-flammable plate.
These rules will ensure you maximum safety during the operation of the electrical supply, because more than half of the cases of fires in wooden buildings are caused by problems with electrical wiring. Due to fire safety, to the detriment of aesthetic preferences, experts recommend using an open cable installation method when wiring around the house.
If, however, hidden (internal) laying of wires is preferred, the laying of metal cases for electrical cables must be done during the construction of walls. This is a labor-intensive process, which also requires accurate calculations when designing power supplies in order to minimize the likelihood of channel deformation from pressure building structures when shrinking the house. For this reason, they often give preference to open installation of wiring in a wooden house, as it is safer and more controllable during operation.

At open method When laying cables, two options for installing wires are used. The first, considered somewhat outdated, involves fixing the wiring to special dielectric insulators, which are installed with a certain step according to the wiring diagram. This method is inferior in aesthetics, but at the same time it is the easiest to install, safest and least expensive in terms of material investments. Open wiring on insulators is now used less and less, preferring to lay electrical cables in special closed cases that are mounted on top of a wooden wall or ceiling. Laying wires in wall cable channels is convenient, functional and allows you to implement complex circuits wiring that meets modern requirements for power supply of private houses.
Electrical design - highlights
Any complex installation work precedes design, including the installation of wiring in a wooden house. But first, it is necessary to coordinate the provision of electricity to housing with the organization providing electricity supply services, whose specialists must develop technical specifications– the basis for further design. At the same time, the total energy consumption and the set of necessary electrical equipment for introducing a power cable into the house are assessed.

For private households, according to approved standards, it is considered acceptable to consume electricity within 15 kW at a time, which corresponds to an installation at the input of 25 A. If consumption exceeds the indicated figure, it is necessary to install an additional electric current converter.
Design begins with marking the location of electricity consumers on the construction diagram. Some of them will be powered from the general network (lighting and appliances connected to regular sockets), others will be connected to the distribution panel via a separate cable. This is how devices with increased power consumption are connected (electric stoves, hot water boilers, electric boilers heating). Each of the powerful electricity consumers is connected through an individual circuit breaker.
Depending on the number of devices and their power that will presumably be powered from a particular room, the number of required sockets and the cross-section of the supply cable are calculated. In order to prevent overheating of the conductors, a cable with a core cross-section of at least 1.5 mm is used. Provide at least 2.5 mm to the sockets. The use of tees and electrical carriers is not recommended; it is advisable to install more power consumption points than the number of electrical appliances expected to be used.
Also, during the design, the locations of distribution boxes and their communication paths with lighting fixtures, switches and sockets are noted. In this case, the minimum distances from the laid cable to the door and window openings(at least 10 cm), floor and ceiling. The cable routing diagram, especially when installed hidden, will help in the future not to damage the wiring when carrying out various installation and finishing works.When designing electrical wiring, not only personal ideas about the convenience of the location of electrical points and cables are taken into account, but also requirements dictated by considerations of safety and expediency, which include the following rules:
- It is unacceptable to connect power supply points along the shortest path - cables are laid only vertically and horizontally, forming direction transitions at right angles;
- switches are installed in the range of 0.6-1.2 m from floor surface, the permissible height range for sockets is 0.4-0.8 m;
- switches, sockets and distribution boxes must be freely accessible for use, inspection or repair work;
- direct contact of passing wires with metal objects and with each other (the distance between adjacent cables should not be less than 50 mm).
The connection of copper and aluminum conductors, if any, is prohibited by twisting. To avoid rapid oxidation of such contacts, it is recommended to use special terminal blocks.
Wiring - widely used methods and diagrams
Installation of wiring in a wooden house begins with choosing a wiring diagram and method of laying cables. But first it is necessary to install external electrical equipment, which includes an electric meter and circuit breakers. Typically, the meter and the main machine are installed by specialists from the power supply organization, further wiring done by hired electricians or independently.
It is recommended to install additional circuit breakers, through one of which the lighting is powered, the other breaks the circuit going to the sockets, the third - for electrical appliances located outside the building . Individual machines are installed on cables that supply electricity to utility and technical buildings, as well as high-power electrical appliances installed in the house and powered using individual wires.

The main power cable is brought inside through a case mounted in a wooden wall and brought to the first junction box, where it connects to the next main wire going to other rooms. When installing open wiring in a wooden house, before routing the wires from the distribution boxes to the power consumption points, you need to install insulators (for the retro version) or lockable cases (boxes) in accordance with the electrical wiring diagram, designed to accommodate the appropriate number of cables. If the method of installing wires in boxes is chosen, the subsequent steps are performed in this order.
- 1. We put wires in cases fixed to the walls (fastening spacing 50-60 cm), one end of which is inserted into the distribution box, the other into the corresponding socket box. In the box we leave a cable reserve of up to 20 cm, in the socket box - about 10 cm. After laying the electrical wires, we close the box with a lid.
- 2. According to the wiring diagram and connection of electrical consumers in the box, we connect the wires. The easiest way is twisting followed by insulation. We clear all conductors from the braid by about 40 mm, twist them along the entire length of the protected conductors, and then insulate them with special caps.
- 3. More reliable way connecting wires - using terminal blocks of the appropriate cross-section. We strip the wires to about 7-8 mm, insert them into the corresponding connector of the block and tighten them with a screw. This connection method prevents sparking and oxidation of contacts.
- 4. Next, we connect the contacts of switches, sockets and lighting sources to the corresponding wires. We install sockets and switches in socket boxes and securely fix them with special unclenching “whiskers”.
- 5. Only after installing all elements of electrical equipment can the distribution boxes be integrated with each other and with the central power cable.
For wires supplying high-power electrical appliances, we lay separate boxes designed for one wire. The cable coming from an electric stove, boiler or other powerful electrical installations must be continuous and open only at an individual circuit breaker, installed in switchboard. To install wires into the house for individual electrical appliances, you can use the same case as for the main cable of the main wiring. But at the same time, it is necessary to protect each conductor from each other with dielectric non-flammable material.
This is how open electrical wiring is done in wooden houses, and its installation is available for independent practical implementation. If you want to carry out wiring hidden in a building made of logs or timber, it is better to contact specialists, since this is a troublesome task, requires accurate calculations and involves a labor-intensive installation process with the installation of complex communication units.