After replacing and installing double-glazed windows, window openings need finishing. And if only a specialist is required to install the window, then perform Finishing work everyone can. This process has simple technology, so installing plastic slopes with your own hands is not at all difficult. Practical, inexpensive, easy-to-use plastic panels can be installed in just 3-4 hours, completely changing the appearance of the window opening.

To install slopes efficiently, you should thoroughly clean the surfaces of the opening and prepare everything necessary tools and materials. Plastic panels must have a thickness of at least 8 mm, and their length and width must correspond to the parameters of the opening. Plastic that is too thin will not last long, and it can easily be damaged during installation.

In addition to the panels, you will need:

You can start finishing no earlier than 36 hours after installing the double-glazed window. During this time, the mounting foam on which the frame is installed has time to completely harden, and even accidentally touching the structure, it will not be possible to move it.
Now you need to clean and prepare the walls of the opening by performing the following operations:

Production and installation of plastic slopes
When the walls of the opening are dry, stick around the perimeter vapor barrier film. At the joints, film pieces are laid with an overlap of 5-7 cm and glued along the seam. The edges of the film should not protrude beyond the window frame. After this, they begin to make slopes.
Step 1. Installation of the starting profile

Along the outer edge window frame Use short self-tapping screws to fasten the starting profile. In the corners, when connecting a horizontal strip with a vertical one, the profile is fastened so that its inner walls fit tightly to each other, without gaps or cracks.

Step 2. Attaching wooden slats

Fastening wooden slats
Take slats 15 mm thick and 40 mm wide, cut them to the width and height of the outer edge of the opening. Using driven dowels, the slats are attached along the perimeter with their flat side to the surface so that their edges do not extend beyond the plane of the wall. Both the top and side slats must be aligned horizontally and vertically using a level. If the walls of the opening are not smooth enough, thin wedges are placed under the slats.

Step 3. Cutting the slopes

The length and width of the opening walls, as well as the bevel angle on each side, are measured very accurately. Cut lines are marked on the panel and slope blanks are cut out using a jigsaw or a sharp knife.
By the way, you can read about plastering slopes with your own hands on our website.
The resulting parts are applied to the walls and to the top of the opening, their location and tightness in the corners are checked.
Step 4. Installation of slopes

The F-shaped profile is cut to the size of the outer perimeter of the opening and the ends are filed at an angle of 45 degrees. A section of the profile is applied to the rail so that it is completely covered with plastic, but does not overlap the groove for attaching the slope. Secure the profile to the rail with stapler staples. The remaining sections are mounted in the same way.

The upper slope blank is placed in the upper starting profile, having previously covered it with sealant. Holding the slope suspended, fill the gap between the panel and the wall with insulation. The insulation layer should not be too thick or have voids. The outer edge of the slope is inserted into the groove of the profile and pressed lightly to level the panel.

Next, install the side slopes, carefully distributing the thermal insulation material. If the external walls are insulated, there is no need to additionally insulate the slopes. In this case, the voids between the panels and the base of the slopes are filled with polyurethane foam. It is very important not to overdo it here, since excess foam can squeeze out the panels or bend them in an arc. It is advisable to use foam with a low coefficient of expansion, apply it in small portions, evenly distributing it along the height of the gap.


Step 5. Finishing
The areas where the panels meet each other and the window sill must be thoroughly degreased. Next, the seams and cracks are filled with acrylic sealant. With a clean rag soaked in acetone, wipe away traces of glue and sealant on the panels and profile, and plaster the area of the opening under the window sill.


They are also used to decorate the doorway. plastic slopes. The process of installing them is slightly different from installation window slopes. Preparing the surface of the opening is done in the same way: hardened foam around door frame cut with a knife, the walls are cleaned of wallpaper, paint or plaster, and all cracks are carefully sealed with mortar. If you plan to attach the slopes to the surface itself, it should be leveled with cement-sand mortar. If used frame technology, it is enough to seal the cracks and deep recesses.


To work you will need:

Step 1. Frame installation
Measure the width of the opening walls from the door frame to the corner line. The slats are cut into pieces according to measurements. On the side walls, horizontal lines are marked with a pencil at a distance of 50-60 cm. Using the markings, holes are drilled for dowels and the slats are secured. If the surface is uneven, use mounting wedges or thin bars that are placed under the slats. 3 transverse bars are attached to the ceiling - 2 in the corners and one in the middle.
Step 2. Cutting the panels
On the panel, mark cutting lines with a pencil, forming a slope. The angle of inclination is measured especially carefully, because mismatched joints cannot always be repaired unnoticed. All fragments should be 10-12 cm wider than the sheathed surface in order to cover the edges of the corners. It is necessary to cut three blanks - 2 side and one for the ceiling. After this, the blanks are placed against the walls of the opening and the correct cutting is checked.
Step 3. Installation of slopes
Take the first slope and apply it to the wall of the doorway. Having aligned the joints at the corners, mark the fold line on the back side of the workpiece with a pencil. With a sharp knife make a vertical slot in the cavity of the panel, leaving the front side intact. Apply the slope to the surface again, level it and screw it to the frame with small self-tapping screws.

When the main part of the slope is secured, screw the protruding edge. To do this, determine the border of the panel, step 2 cm away from it towards the opening and draw a vertical line. Drill 6-7 holes according to this marking and hammer into them wooden wedges, and then press the edge of the slope to the wall and screw it, aligning the screws at the level of the wedges. Instead of wedges, you can use dense wooden plugs.

The second side slope is installed, after which the ceiling is sheathed with a panel. The upper edge of this workpiece should overlap the ends of the side projections; After installation is completed, the material is carefully cut at an angle and the joints are glued. Internal seams coat with sealant, remove excess with a clean rag, if desired, cover the heads of the screws to match the color of the slopes.


Video - Installation of a slope on a door
Frameless finishing method
If the walls of the opening are perfectly smooth and even, you can simply glue the slopes:
- To increase adhesion, the surface is coated with a primer deep penetration and dried;
- plastic panels are cut according to measurements so that the edge of the slope falls exactly on the corner of the wall;
- after this, glue is applied around the perimeter of the workpiece and several strokes in the center, and then pressed to the surface;
- until the glue has hardened, align the corners and edges;
- glue the side slopes, then close the lintel. The side cuts of the top panel should overlap the edges of the slopes by 2-3 mm.
Finally, the vertical seams are sealed, and decorative trims are attached along the outer perimeter of the opening to match the color of the door and slopes.
Video - Do-it-yourself plastic slopes
Video - How to make slopes on plastic windows
Practical and inexpensive plastic slopes - perfect solution for registration window openings. They are easy to wash, they do not need painting, and the service life of PVC panels is at least 10 years. Such windows are free from condensation, mold and peeling plaster and provide scope for modern technological solutions. To do the installation yourself, read step by step instructions on installing slopes, secrets of choosing materials and basic rules of work.
Cleanliness and beauty for many years
Popular myths – TOP 3 misconceptions of the customer
"Plastic? But it’s not aesthetically pleasing, not environmentally friendly and not practical!” - masters often hear. Nothing like this! It's time to debunk the myths regarding this finishing material:
- Plastic is harmful to health. It's only partly a myth. Virgin plastic does not emit toxic compounds. Unlike the same chipboard or paint and varnish materials. But installing plastic slopes made from recycled materials is not best idea. After all, they can be extremely unhealthy. Therefore, when choosing panels you should pay attention to this factor.
- PVC slopes spoil the appearance of the window and look cheap. Actually smart installed panels create a harmonious, integral composition. They give the window a finished look without joints or cracks. But it can ruin the appearance of the panels incorrect installation. Or a choice of cheap materials with thin layer plastic.
- Plastic is not durable. PVC slopes can last 10, 15 and even 20 years without repair. While plastered ones need painting every year. But the deposit long service sandwich panels in their correct installation.

Plastic creates a seamless composition
Advantages and disadvantages of plastic panels - an honest review
Installation of plastic slopes has many advantages:
- Energy efficiency. Insulated sandwich panels significantly reduce heat loss when heating a room.
- Improvement performance characteristics windows In an era of fierce competition, unscrupulous manufacturers have already left the market. Therefore, low-quality products are very rare. But poor finishing of the slopes is a significant disadvantage during installation. After all, the weak points of windows are their junctions with the wall. When installing plastic panels, the seam is additionally strengthened with polyurethane foam. Which improves characteristics such as sound insulation and heat retention.
- The presence of a closing circuit that prevents damage to the wallpaper. The profile for plastic not only gives a neat look to the room, but also protects the wallpaper from peeling off at the ends of the walls.
- Possibility of using effective sealants. It's all about adhesion! Sealants adhere better to plastic than to a plaster surface. In this case, the seam is absolutely invisible.
- Huge selection colors, including wood, marble, stone.

The choice of colors is huge
The disadvantages of installing plastic slopes include the ease of scratching. Therefore, no one can cancel careful operation!
Compared to plastic, plastered slopes have a lot of disadvantages:
- form cracks;
- absorb moisture, becoming a breeding ground for mold;
- the paint turns yellow and peels off;
- The wallpaper is peeling off at the joints.

Window finishing scheme
Installation stages - the ABCs of construction work
Installing plastic slopes with your own hands will take no more than 2 hours. For comparison, high-quality plastering work will take up to 3 days!
Selecting materials - how to avoid mistakes
There are two types of plastic slopes:
- decorative;
- sandwich panels (insulated).
Decorative slopes are necessary in the following cases:
- For formal partitions. That is, the design of window openings located between rooms (for example, in an office).
- For finishing loggias. The external slopes of the balcony block cannot be insulated. Because the panels cannot be placed behind the frame. They are hindered by a quarter lined with brick (its purpose is to prevent the window from falling out).
In all other cases, it is better to choose sandwich panels. They consist of two sheets of PVC and a layer of insulation between them.
Standard thickness slope – 8 mm. But if installed carelessly, such a panel can easily be squeezed out with foam! Therefore, many craftsmen advise choosing thicker options (for example, 24 mm). This panel is difficult to cut, but it is much stronger.
Basic rules for selecting panels:
- Made only from virgin plastic. Such plastic slopes will not turn yellow over time, and their composition will not harm health.
- With a thick layer of plastic. Cheap panels with thin PVC sheets quickly become unusable. The plastic simply peels off the surface.

Window device
In addition to panels, you definitely need to buy profiles - internal (J-profile) and external (C-profile). Together they form a strong anchor lock that tightly holds the slopes.
Installing plastic slopes with your own hands will also require the availability of other materials:
- self-tapping screws 51 mm;
- PVC dowels;
- wooden slats;
- “summer” foam (2.6);
- gypsum mixture for plaster;
- mineral wool.
You will need the following tools:
- drill;
- screwdriver;
- electric stapler;
- putty knife;
- mounting gun with the ability to normalize and adjust foaming.

The window sill must be installed at an angle of 3–5°
Rough work - preparatory stage
To install plastic slopes with your own hands, use step-by-step instructions:
- The first step is to install the guides. Wooden slats 10x40 mm, self-tapping screws 51 mm and PVC dowels are suitable for this.
- The slats must be secured around the perimeter of the window strictly parallel to the frame. Drill holes through the guides (6–12 cm).
- Insert dowels into the holes and tighten with self-tapping screws, drowning them to a depth of 5 mm.
- Strengthen the slats with summer polyurethane foam.
- Select a groove in the foam joint along the window frame that is 6mm deep and 8mm wide.

Slats for slopes

Groove in the assembly seam
The process of fastening and insulation - how to fix the panels
Attach the connecting internal J-profile to the slats using staples 10-14 mm long. For fastening, a step of 10-25 cm is sufficient.

Internal J-profile
Attach plastic slopes. Form a construction seam from foam. To do this, apply a plastic panel and evenly fill the cavity by 15%. Then fill the cavity 70% with mineral wool. This will reduce heat loss and avoid mold.
Press the panels against the slats and secure them with brackets at an angle of 45°. This will further increase the pressure and allow the plastic to be pressed well.
Advice! To prevent the foam from falling off, you can use supports to secure it. These may be pieces of hardened foam or plastic.

The percentage of filling with cotton wool is from 30 to 70%
You can watch the video to see how to properly install plastic slopes with your own hands.
Video: Installation of plastic slopes
Clean everything up - make it beautiful
Before installing the outer profile, the walls adjacent to the window should be leveled. To do this, you need to remove the remnants of the old wallpaper and apply a quick-hardening mixture.
Then install external C-profile and adjust it to size. To do this, measure the profiles and file them so that the lock is at an angle of 45°.

Profile adjustment
Pressing on the profile, secure it until it clicks. Use a hacksaw to cut through both profiles at the intersection of the plastic. This way the seam will be as neat as possible. Move the corners towards each other by tapping them.

Cut it with a hacksaw
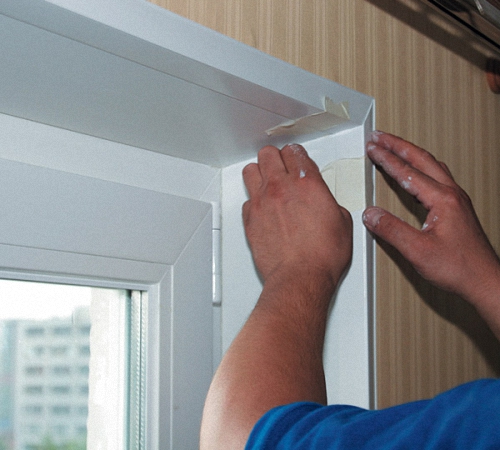
At the end, clean the room, remove all dust and debris with a brush and rag. Degrease the joints and lightly moisten them. After this, apply decorative silicone acrylic sealant.
Advice! If there is still room in the room construction works, which produce a lot of dust, it is better to postpone treatment with sealant. Since it absorbs dust and dirt before it dries completely.

The joints are invisible
The hand of a master - the secrets of a flawless installation
Every business has its own secrets. And when installing plastic slopes with your own hands, it’s useful to know them!
Setting the correct angle
The angle of rotation of the slopes has the romantic name “dawn”. Thanks to the correct arrangement of the panels, you can increase the amount of light penetrating into the room. The main rule: slopes should in no case be located at right angles. It creates a feeling hospital ward. But you shouldn’t make the spread of the panels too wide.
The secret of mastery is to measure the angle not in degrees, but in centimeters! How to do it:
Place a square in the corner of the window.

Construction square-perpendicular
Measure the distance from the extreme point (wall) to the perpendicular line.
The ideal value is 3.5 cm. This rule applies to slopes with a width of 15 to 50 cm.
Advice! Measuring in centimeters or millimeters is more convenient than using a square. Since measuring the exact angle on an object is extremely difficult.

Slope dawn measurement
The upper slope may deviate from this value upward (be more than 35 mm). But side panels must be deployed equally.
Eye meter or laser - how to level the panel
According to regulations, when installing windows and slopes there is a tolerance of 4 mm. That is, the product can be installed with a deviation from the level. This is necessary, including for aesthetic reasons. After all, curved walls and ceilings do not go very harmoniously with the right angles of the windows.
Installing plastic slopes with your own hands, laser level can be put aside. Since here you need to focus on the window line! The upper slope must be strictly parallel to the frame. And your own eye will help you with this.

Slopes should be installed relative to the window
How to give a panel the shape of an arch - we design arched windows
PVC panels are quite elastic, which allows them to be bent at a slight angle. The guide profiles also bend well. But what if the arch has the shape of an ellipse with a small radius? Sandwich panels cannot be bent, as this will lead to their breakage. There are several ways to install plastic slopes:
- The flexibility of the panels can be increased by separating inner layer plastic. The remaining material is easily acquired the required form.
- You can install composite slopes. That is, a structure consisting of several panel parts. In this case, great attention should be paid to joining and processing of seams.
Useful life hack - use slopes with maximum efficiency
What functions can regular plastic slopes perform? Only aesthetic and thermal insulating? But no!

Socket on the slope
Why do you need a socket on the window?
It is possible, and sometimes simply necessary, to install electrical points in plastic panels. After all, the slopes - perfect place for placing sockets and switches!
Workplace often placed near a window. This allows more daylight to reach the table, which is important for vision. But often you have to work at the computer in the dark. And this requires good lighting.
The ideal solution is to install two main light switches. The first is at the entrance to the room, and the second is in the slope next to the workplace. This way it won’t be blocked by printers and monitors, and you won’t have to reach across the table to turn it off. An additional socket will allow you to always keep your phone at hand, even when it is charging.
This solution is also perfect for compact kitchens. No place to put an electric kettle or toaster? Place them on the windowsill, having previously installed sockets in the slopes! Space saving and comfort are guaranteed.
About the safety of using electric points
How safe is it to place electrical points next to a damp window?
- Moisture does not accumulate inside the insulated panels. Since the temperature there is the same as inside the room.
- Condensation that appears on the glass does not conduct current. Why? Because it does not contain salts, which are conductors of electricity.
- Leaving the window open when it rains also means you don't have to worry. After all, the outlet will be protected by the open flap. It is also worth remembering that rainwater does not conduct current.

Cable inside plasterboard wall
Installation process - installation tricks
How to install plastic slopes with your own hands, placing electric points in them:
Lay the power cable behind the false wall in advance, at the stage of installing the wiring. It will hang along the slope.
Plaster the false gypsum board wall and cover it with wallpaper. Install the slopes at the very end. To do this, you first need to cut them out and try them on. And then remove and apply mounting foam to the back surface.

Preparing the slope for installation
When the foam dries, the slope needs to be tried on again. If pieces of foam prevent the panel from being pressed tightly, they must be carefully trimmed.

Removing excess foam
Cut holes in the panel for sockets or switches. Pull the wires through them. Apply a little fresh foam to the already dried one to glue the slope to the opening. Secure the panel with brackets as in the previous instructions. This is necessary so that when using the socket the panel does not bend or come off.
Install socket boxes for drywall (with “claws”). Then install switches or sockets.

Socket box for gypsum boards
Do you want to get perfect plastic slopes with a minimum of effort? Then turn to professionals. And the knowledge gained will help you control the quality of their work!
The window installation process is coming to an end and you are already looking forward to a new one. appearance premises? However, do not forget about the slopes, without which you obviously cannot get an aesthetic picture. How to make slopes on plastic windows? How difficult is it to do it yourself? You will get answers to these questions by reading the article.
As a result of reading our article, you will have the same beautiful window
Why plastic slopes
Currently, plastic slopes are becoming more and more in demand. One-piece design, which fits quite harmoniously into any interior, low cost and ease of installation, allowing you to do all the work yourself - these are the main competitive advantages of panels made of plastic.
There are two ways to make plastic slopes with your own hands:
- by using starting profiles;
- without using a starting profile.

Method using a starting profile

Method without starting profile
The starting profile allows you to install the slopes as smoothly as possible, which, in turn, will affect the correct shape of the window as a whole. In addition, its use when constructing slopes allows you to obtain a strong, sealed connection. However, there are times when using a starter profile is quite difficult or even impossible. For example, if the distance from the wall to the frame is too small.
Advantages
The advantages of plastic slopes include the following factors:
- low cost;
- quite long service life;
- a wide range of colors and, as a result, the ability to decorate any room;
- easy to maintain, as dirt is easily removed from plastic damp cloth;
- speed and ease of installation;
- Possibility of use both indoors and outdoors.
Flaws
The disadvantages of plastic slopes include exposure to high temperatures. In addition, if for some reason a crack or hole appears on the plastic, you will have to replace the panel completely.
Selecting the thickness of panels for slopes
For clarity of the process, we have prepared for you a “sectional” diagram of finishing the slopeIf you have made your choice in favor of plastic slopes, let's figure out how to make them yourself. The first thing you will encounter is purchasing the panels themselves. You should not choose them with a thickness of less than 8 mm. Based on the dimensions of your window opening, take panels with a small margin, especially if this will be your first slope.
In addition, you will also need following materials:
- polyurethane foam;
- wooden blocks that will be attached to the sides and top sides of the window opening;
- self-tapping screws and dowels for fixing the starting profile and wooden blocks;
- the starting profile itself and the F-shaped bar;
- silicone in the color of plastic panels;
- decorative corners;
- liquid Nails.
Do not forget that slopes can be made only 36 hours after the installation of the window is completed. It is during this period that the polyurethane foam finally hardens.
Installation of slopes using a starting profile
Procedure (photos can be enlarged by clicking on them):
What to do if the distance from the panel to the wall is too large
If the distance from the wall to the future slope is quite large, it is reasonable to make another frame from wooden blocks along the outer perimeter of the window opening:
- We attach an F-shaped strip to it, also using construction staples.
- We insulate the space between the wall and the future slope, and then insert the panel with one edge into the starting profile and the other into the F-shaped strip.
- After this, we fix each panel to the F-shaped strip using staples in increments of 20-30 cm at an angle of 45 degrees, install decorative corners and seal all joints with silicone.
When working with polyurethane foam, you should know several features. If the surface is smooth, the level of adhesion will not be very good. In order to avoid this, the surface that will subsequently face the wall should be treated with sandpaper and primer. In addition, for complete polymerization of the foam, the surface must be slightly damp. For this reason, we spray the slope wall with minimal water.
Installation without using a starter profile
The procedure, the first steps are the same as in the first method:
1. We completely clean the walls of debris and foam that interferes with work.
2. Also, do not forget to protect the glass and frame from possible damage, for example mounting tape.
3. We measure the size of all external window openings and cut out wooden blocks of the required size.
The slats are fixed around the perimeter
4. We fasten the bars evenly on each side using self-tapping screws. We recess the screw caps a few mm into the wood.
 A cut in the foam along the width of the panels
 5. Measure the width plastic panel and exactly the same amount of mounting foam is cut around the entire perimeter of the frame.
6. We carefully mark the panels (taking into account 1 cm, which will go into the foam and a little should be taken as a reserve) and cut them out. For greater convenience, you can use cardboard or old wallpaper as a stencil. If the cut edge is uneven, it should be processed using a file or sandpaper.
Insert the top panel
7. We insert the panel with one edge 1 cm into the cutout prepared in the foam, and fix it with the other wooden block. Easiest to use construction stapler, driving staples every 20-30 cm at an angle of 45 degrees.
This is how it should work out
8. We insulate the cavity between the wall and the slope with mineral wool or polyurethane foam.
We fix the joints with masking tape until the foam sets.
9. Close the contact points between the wall and the slope decorative corners, secured with liquid nails.
10. We seal all joints with silicone.
 Final view
 As you can see, there is nothing difficult about making plastic slopes yourself, even if you have not worked with such material before. It all depends on availability the right tool and what is especially important is good preparation before work and accurate markings.
Video
1. Video method for installing slopes on plastic windows with a starting profile:
2. Installation method without starting profile:
Today many construction companies switch to using new technologies and new standards. In all new buildings only plastic windows, windows in all houses are also changing. It is worth knowing that after the windows are installed, you have to make slopes. They can be made from any material, but the most commonly used are plasterboard and plastic.
Foam is not thermal insulation; it also requires the use of Additional materials, they will be able to protect the windows from cooling.
Types of slopes for windows
The most commonly used slopes are plaster, plasterboard and plastic.
Plastering slopes were popular in the old days. In fact, they have more disadvantages than advantages. First of all, they can lose their color; if the house sag, the plaster will definitely move away from the wall. Such slopes are quite labor-intensive because their installation takes several days.
The plaster is applied in several layers, and each layer takes quite a long time to dry. The layers are then primed and painted. In addition, such slopes do not provide protection from temperature changes; the windows will sweat.

Slopes from plasterboard are more durable, they have excellent thermal insulation, but at the same time they are afraid of moisture, that is, they are best installed in rooms where thermal insulation is provided. However, to install this option you need good specialist, besides, then priming and painting are still required.

It is considered the most universal plastic slopes. They are very practical, do not fade and are quite easy to care for. Plastic is durable and can last more than fifteen years. This plastic will harmonize perfectly with the window if you choose the right shade. Plastic is quite easy to install; if you study the technology itself, you can always do this work yourself.

As an option, plastic sandwich panels are often used. They are matched to the frame and can be matte or glossy.
Installation of slopes made of sandwich panels
The profile for fastening slopes is made of sandwich panels whose thickness is no more than 1 cm. The profile is attached to the opening, and any options can be used; most often, fastening is carried out using self-tapping screws and dowels. In some options, fastening is used using galvanized iron brackets with a thickness of no more than 1 mm. The bracket is attached to the wall and to the slope using mounting foam. The brackets are connected to each other using self-tapping screws.

If you plan to decorate the window with integral PVC or plasterboard, then you can give it any shape. Integral PVC can be bent at any angle, and special cuts are made. The cuts are fixed using a special adhesive. Essentially, the installation is done according to the same scheme as the installation of sandwich panels, using self-tapping screws, dowels and a profile.

Sandwich panels are fastened in a certain sequence:
- guides are attached around the perimeter of the entire opening using self-tapping screws of the appropriate size,
- holes in the wall for the guides are made using a drill or hammer drill. You should make sure that they are attached completely evenly; it is better to control the process using a level,
- the plastic panel should be adjusted in size so that it fits neatly into the guides,
- excess panels are trimmed to the depth of the slope and free places filled with sealant and sealed with a special masking tape until completely dry,
- After the sealant has dried, decorative plastic corners are installed.
- six-meter strip of plastic 8 mm thick,
- starting line,
- F-stripe, that is, a strip of plastic of a special shape,
- 15 mm thick rail,
- level,
- staples and stapler,
- white silicone,
- hammer drill,
- mineral wool,
- metal scissors,
- self-tapping screws


Useful. Which blinds are best to choose for your home? Let's try to figure it out together:
Tools and materials
To install conventional plastic slopes, the following materials and tools are required:


Useful. During the operation of plastic windows, they may need to be adjusted - read more about this.
Stages of installation of slopes
Installation is carried out in several stages. Initially, wooden slats are assembled, the main thing is that the lights do not protrude. The slats are attached to the wall using a hammer drill. You can use wooden blocks for leveling. At the same time, perfection at the joints is not so necessary.

A starting strip is nailed along the edge of the plastic window. It is important that a strip of plastic will be attached to the groove of the starting strip. If you did not have wallpaper pasted over, then you can tear off the film and glue it, because the dirty work will be finished. Before stuffing the F-ki, it is important to cut it correctly.

After the strip is stuffed, there will be an overlap, which can be removed using metal scissors. It is attached with a stapler to wooden slats. On last stage The plastic is attached and the wall is immediately insulated.

The plastic is attached, and cotton wool is inserted in front of it, everything will turn out tight and beautiful. If you don’t get smooth and beautiful corners, you can always rub them with white silicone.
The durability, reliability and stability of windows depends on the quality of installation of slopes. Slopes provide tightness, heat and sound insulation. If they are installed incorrectly, the window will not last long or be functional, and will soon have to be replaced. Therefore, it is very important to choose the right type of slopes that are suitable specifically for your windows, and install them correctly.
Types of window slopes, their advantages and disadvantages
Depending on the location of the slopes, they are divided into internal and external or external.
Internal slopes are located directly in the room and do not carry any special functional role, in addition to tightness, they also act as a design for the joints between the window and the wall. In contrast, external slopes provide sound and heat insulation, protect the room from moisture, heat and temperature changes.

Depending on the material from which the slopes are made, there are:
- Plastering,
- Wooden,
- Plasterboard,
- Plastic,
- Sandwich panels.
1. Slopes made of plaster are classic version. It will take at least two days to install such slopes. Since the plaster must dry after application. And then it needs to be sanded to make it smooth. After grinding the internal slope, it is treated with a primer and painted with water-based paint.
2. Wooden slopes for windows. For windows made from natural wood, wooden slopes are ideal. At the same time, the design of the room will become more aristocratic and sophisticated. For the manufacture of such slopes they choose the best wood, thoroughly dried and processed. Therefore, wooden slopes will last as long as, for example, plastic ones. One of the significant advantages of wooden slopes is their environmental friendliness. After all, wood is a natural material that does not emit toxic substances, unlike plastic.
3. Slopes for plasterboard windows. Drywall slopes are used for significant damage to window openings. They seal only internal openings. Plasterboard slopes allow you to get rid of additional moisture on the windows. First you need to beat all the plaster and cover it with a primer. Then sheets of moisture-resistant plasterboard are installed, and insulation is placed between them: polystyrene foam, polyurethane foam or mineral wool. Next, this slope is primed, painted or finished according to the interior design. And at the junction between the wall and the slope a corner is glued. The disadvantage of such slopes is that when wet for a long time, the plasterboard slopes swell.

4. Window slopes made of plastic. Plastic slopes are more expensive than plasterboard. Such slopes are ideal for plastic windows, since they have the same coefficient of thermal expansion when there is a temperature difference. This eliminates the possibility of gaps between the windows and slopes. Plastic slopes are suitable for finishing both internal and external slopes.
5. Sandwich panels - like a type of plastic slopes. Sandwich panels are a type of plastic slopes. Unlike plastic ones, sandwich panels consist of three layers, two sheets of plastic and insulation between them. Sandwich panels can withstand temperatures up to 45°C, thereby providing protection from moisture and cold. Of all the window slopes, they are the most expensive.
Installation of slopes on metal-plastic windows
There are three types of slopes suitable for PVC windows:
- Plastic,
- Plastering,
- Plasterboard.
For finishing plastic windows, slopes made of plastic or sandwich panels are best suited. Plastic slopes are used after installing plastic windows. To better understand the technology of their installation, let’s get acquainted with the tools that will be needed during the work process:
- Plastic panels,
- starting line,
- corner,
- Profile,
- Self-tapping screws,
- Insulation: polystyrene foam, mineral wool or polyurethane foam,
- Silicone gun,
- Screwdriver,
- Scotch,
- bubble level,
- Putty.

The technology for installing slopes of plastic windows is not too complicated if you carefully understand everything:
- To begin with, with outside remove all excess foam. You can do this using construction knife. Next, you need to fill all the cracks using any mixture for external and interior work, depending on the type of slope.
- Using a level, measure the dimensions of the internal slopes. Install a wooden frame onto which our plastic slope will later be attached. The starting strip is installed at the bottom of the window frame.
- TO wooden frame attach your profile. Using polystyrene foam, mineral wool or polyurethane foam insulate the slope.
- Now we install the plastic base. To do this, simply attach it to the profile and treat the joints with silicone. This technology for installing slopes on PVC windows for external and internal slopes is absolutely the same.
Watch the installation of slopes of plastic windows - video:
Advantages of installing plastic slopes:
- No serious contamination of the premises.
- Since plastic does an excellent job of thermal insulation, energy savings are guaranteed.
- Replacing a window does not require renovating the entire room.
- Plastic slopes are easy to clean and do not collect dust.
- The slope performs the function of absorbing moisture, thus preventing the appearance of mold.
- The plastic slope is made of the same material as the window, which means it will last the same amount of time.

Plaster slopes for metal-plastic windows
Plaster slopes are also installed on plastic windows, but have more disadvantages than advantages. Firstly, they do not retain heat well, which means that windows are guaranteed to fog up. Secondly, plaster slopes will not last as long as plastic ones, because they crack over time. Thirdly, for installation plaster slopes it will take a lot of time. Since such slopes are laid in multi-layers, and each layer requires at least two days to dry. The advantages of these slopes are low cost of operation and versatility.

To install plaster slopes we will need:
- Plaster mixture,
- Hammer,
- Hammer,
- Dowels,
- Self-tapping screws,
- Screwdriver,
- Level,
- Putty knife,
- Square,
- Primer.
Installation steps:
- Before starting work, stick it on the windowsill protective film, do the same with the window if there is no special branded film on it.
- Use a paint knife to remove excess foam. Next we prime and insulate future slopes. We glue foam plastic around the perimeter of the slope.
- Next, you should install the beacons and dilute the plaster solution. It is recommended to use ready-made cement mortars based on gypsum or cement.
Tip: Before applying the solution, attach plaster mesh on top of the foam.
- The plaster should first be applied with a wide spatula at a right angle, and then level the surface at an angle of 45-50 degrees.
- Sanding, priming and painting
- We prime, putty and paint
Plasterboard slopes for metal-plastic windows
Plasterboard slopes are installed only indoors; the use of external plasterboard slopes is unacceptable.

To install plasterboard slopes on plastic windows we will need:
- Moisture-resistant drywall,
- Profiles and guides,
- Metal screws,
- Assembly knife,
- Dowels,
- Level,
- Insulation,
- Screwdriver,
- Perforated corner.
For correct installation When installing slopes on windows, you should perform a number of the following actions:
- We measure the distance from the window to the location of the future slope. Take into account the width of the plasterboard; plasterboard with a thickness of 12 mm is best suited.
- Once you have measured the distance, place marks on the wall.
- Install the guide profile. His outer side should follow the line, and the profile itself should be behind the line.
- Next, draw lines on the floor and ceiling and nail the next profile.
- When the frame is ready, we insulate the slope. The same as when installing a plastic slope, using polyurethane foam, polystyrene foam or mineral wool.
- Using the exposed profiles, we measure the slope and cut it out assembly knife required sizes.
- The next step is the assembly of the plasterboard slope. We fasten the drywall using self-tapping screws.
- Using a perforated corner we check the corners.
- We glue fiberglass or non-woven fabric onto the drywall joints.
- Next we carry out finishing work: putty and paint.
Tip: to install a plasterboard slope, choose moisture resistant drywall, as moisture collects in the corners and mold forms.

There is another option for installing plasterboard slopes. This is gluing them to the surface of the slope. To do this, first remove excess polyurethane foam with a knife and prime the surface. Then we level the slope using putty. We measure and cut out sheets of plasterboard of the required sizes. We glue them using special adhesive for drywall.
Tip: When gluing sheets of drywall, they also use finishing putty, which does not set as quickly as glue, so it is ideal for those who are making such slopes for the first time.
Installing slopes on wooden windows
For wooden windows The best option is a wooden slope made from the same wood as the window itself. It is advisable to install the wooden slope on the second day after installing the window, so that the mounting foam has time to dry.
For installation wooden slope we need:
- Assembly knife,
- Primer,
- Screwdriver,
- Self-tapping screws,
- Wooden casing.
You need to measure the future slope in advance to prepare the casing of the required size. Next, trim off the excess foam and prime the surface. Then we install and attach the slope, connecting the slopes to each other using self-tapping screws.
Another type of slopes is suitable for wooden windows - these are cork slopes, made of plasterboard covered with cork oak bark.

Advantages:
- Installing such a slope does not take much time,
- Environmental friendliness,
- Excellent noise and heat insulators.
Flaws:
- Price.
- Very soft, easy to damage.
To install a cork slope, you need to install a profile and attach sheets to it required size. Next, insulate the space between the sheet and the window using polyurethane foam. Then treat the joints with silicone.
Plaster, plasterboard and plastic slopes are also suitable for wooden windows. The technology for installing slopes on windows, both plastic and wooden, in this case is the same.


