So, let's move on to the third part of the photo report. I won’t say that it is final, but for now the photo report will be limited to it. As you remember, by this time the tiles on the floor had already been laid and I started changing the bathroom. This operation is complicated, naturally, due to the mass of replaceable plumbing parts. But in general, everything is quite simple - throw out the old bathtub and install a new one.
Replacement of bathtub and toilet
To throw out an old bathroom according to the rules, you need to order a container for construction waste. Actually, it also had to be ordered for other large construction waste such as door frames, plaster from walls, etc. Or you can simply drag the old bathtub to the trash cans, where someone will quickly take it for scrap.
Installing a bathtub is a little more difficult, but not much. The main task is to level all the edges of the bathtub, which may require filing the legs, which is what I did:

After I cut off the extra piece of the leg, I try it on, check the level and, if everything is good, screw it on:

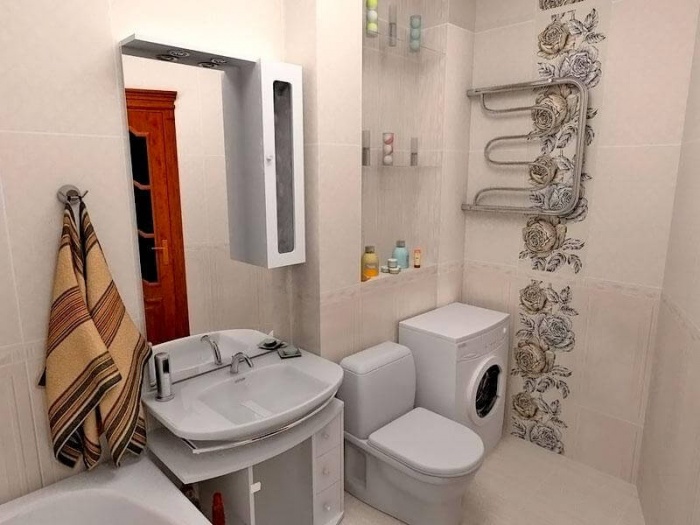
After changing the bathroom, changing the toilet will seem like an easy walk in the summer garden:

I haven’t screwed in the new plumbing throne yet, since later it will need to be moved many times - it’s more convenient to glue tiles to the walls, install a washing machine and supply water to it, and in other similar cases.
Laying tiles on walls
Next, I just started gluing the tiles to the walls. By the way, I would like to draw your attention to one very important fact: for all solutions there is a time limit for hardening and it must be maintained. It took several weeks for the screed to dry, and one week for the plaster on the walls. It is better not to touch the surface until the solution dries (do not glue tiles, do not paint, in general, do not finish the surface).Since I had previously managed to level the walls quite well, the tiles on the walls were easy to glue. As a starting point, where I started gluing the tiles, I took the edge of the bathtub. It was already leveled by me earlier and can well serve as a starting point. I needed this so that the tiles would be glued as close as possible to the edge of the bathtub. The second trick of this process is well known - the use of plastic crosses for an even seam between the tiles.

In the photo above of the actual plastic crosses, you can see the rest of the tools used for gluing tiles to the walls. For example, to evenly distribute tile adhesive along the wall, a comb spatula is used:

The third trick is also widely known - proper preparation of the wall for tiles. The fact that it is level is good, but its smoothness will not contribute to good adhesion of the tile adhesive. Therefore, I made notches on the entire wall with a grinder. Then I washed off all the dust and applied concrete contact, which has better adhesion, but as a result sticks to everything - including hands, hair, etc. So be careful with this thing. It takes one day for the concrete contact to dry.
After preparing the wall, you can start gluing the tiles. Using a drill with a special attachment, I diluted the tile adhesive to a creamy state and applied it to the wall with the previously mentioned comb spatula:

As I said earlier, the edge of the bathroom served as my entry level. Where there is no bathroom, I still glued it away from the floor. And to prevent the tiles from sliding down, I used a homemade base from a long level:


There was no need to make notches on the concrete wall with a grinder, since they had already been made there before me:


In the place of the future socket for the washing machine, an electrical wire that I had previously bricked up was sticking out of the wall. Accordingly, in this place I first tried on the tile and drilled a hole in it with a special drill for the wire.

I’ll share one more trick - in some places you don’t attach a base under the tile so that it doesn’t slide (for example, above the door). In these places I secured it with tape to the top tile:


And a few more photos during the process of gluing the tiles:


Laying tiles under a heated towel rail
The next problem was the heated towel rail. It was necessary to temporarily unscrew and bend it:


After gluing the tile, I drilled holes in it, reinstalled the fastenings of the heated towel rail and the heated towel rail itself:


When I further glued the tiles, my leveled walls in one place were still not perfectly level, but the difference was insignificant and I used a fairly well-known method of leveling with tile adhesive, when screws are screwed into the wall so that the tiles do not sink too deep. In addition, the screws will provide better adhesion to the wall.

And a few more photos of this entertaining process:


Laying tiles under the faucet
The next problem area is in the area of the mixer and pipes. To hide the pipes, I used a grinder to cut grooves for them.
To put it or not to put it? This question is asked by millions of people around the world. For example, a mason sitting on the edge of a 12th floor wall and peering into the distance. Or a hospital doctor when his shift ends when he receives a newly arrived patient. Or a couple of young students having dinner in a cafe and evaluating the work of a waitress. But there are people for whom this question arises especially acutely - happy owners of an apartment in a new building. Specifically, we are talking about tiles and whether they can be laid immediately after receiving an apartment or wait a year or two.
There is a widespread belief that major repairs in a new building apartment need to be done a year or even several years after receiving the keys. Allegedly, as a result of settlement of the house, wallpaper and tiles may peel off from the walls, not to mention the fact that the walls may crack. Is this really so, let's find out.
In order to answer the question posed, we will give a definition of precipitation. So, settlement is a lowering of a structure caused by soil compaction. According to Table D.1 of Appendix D SP 22.13330.2011 “Foundations of buildings and structures,” the settlement of single- and multi-story residential buildings, depending on the type of load-bearing structures, is in the range from 10 to 18 cm. At the same time, the relative difference in settlement for residential buildings (s/ L) should be 0.002-0.0024.
Let's look at an example. Let's say there is a multi-storey panel house with a plan size of 48x18 m. For it, the maximum draft (according to the same joint venture) is 12 cm, and the difference in draft is 0.0016. This means that if one corner point of a building settles by 12 cm, then at a distance of 18 m the settlement should be maximum:
12 cm - (1800 cm * 0.0016) = 12 cm - 2.88 cm = 9.12 cm.
That is, the difference between these two points should be no more than 2.88 cm.
In fact, in life, the difference in draft, or in other words, roll, rarely reaches its maximum values. Especially when it comes to a pile foundation or a monolithic reinforced concrete slab.
Now let’s imagine a bathtub, the length of which in most high-rise buildings is usually no more than 2.5 m. For it, the maximum difference in sediment should not exceed 4 mm. Moreover, it will not look as if the left wall remained in place and the right one sank by 4 mm, but as if the bathroom, relative to the entire house, tilted with all its walls by 4 mm.
For a more accurate understanding, let’s visualize the 3D model. So, let's imagine a 12-story panel house. Let's make it all translucent. Next, let’s select one bathroom on the 8th floor measuring 2.5x1.8 m with all the plumbing, tiles, etc. Now let’s start lowering the right corner of the house by 2 cm. The selected bathtub will also tilt slightly (by 4 mm). This will only be noticeable if you look at the entire house from the outside and then with the help of special devices. That is, the bathtub will change its position relative to the horizon, but not relative to the house.
Another example. Let's imagine a frame 1x0.6 m, made of 4 slats, onto which cardboard is attached. Glue foam tiles measuring 20x30 cm onto the last one. Next, raise the frame in front of you. After this, we turn it at a slight angle, i.e. we lower our right hand down and raise our left hand up. The tiles will turn after the frame and remain in place. This example is a clear simulation of how a bathtub and other rooms should behave during the period of settlement of a house according to regulatory documents.
Let's do first output: if the house is designed correctly, then the tiles should not fall off during settlement .
But why then do so many people on forums complain that their tiles are cracked or there are voids between the tiles and the wall? There is an answer to this question.
Let's look at the frame example again. Only this time, when tilting it, we use only one hand. In other words, we will leave our left hand in place, and begin to lower our right hand. In this case, our rectangular frame will turn into a diamond, and the tile will begin to shift. If we transfer this example to a bathtub, then such a situation can occur in the event of an unexpected subsidence of the foundation under one specific column or wall, for example, in the case of soil erosion as a result of a break in water supply pipes or in the event of the formation of a karst funnel, which was not taken into account in the calculations.
Let's formulate second output: tiles may crack or swell as a result of unforeseen force majeure or the same errors in the design of the house itself. Moreover, the latter is unlikely, since any multi-storey building must undergo a special examination for compliance with regulatory documents.
An example is no longer needed to present the third and final conclusion. So, let's look at the technology of applying tiles to walls. Typically it includes the following steps:
Stage 1 - surface leveling. It is most convenient for a tiler to work on a flat surface rather than adjusting tiles to a curved wall using tile adhesive.
Stage 2 - priming the surface. There should be no small particles of wall material (brick, cement or lime dust) left on the wall that will interfere with the adhesion of the tiles to the surface. For reliability, it is advisable to use deep penetration primers here. This stage also includes the application of a special composition to the wall that increases the adhesion of the tiles to the wall, the so-called “concrete contact”. True, tilers treat it differently. Some say that this is a cool thing and you can’t live without it, while others claim that it doesn’t play a big role, and can even make things worse, since after it dries, a film is created on the surface, which can be peeled off by hand if desired. . And it somehow confuses such specialists that the tiles will hang on such a film.
Stage 3 - sticking of tiles. This can be done either by applying an adhesive solution to the tile, or by spreading the same composition directly on the wall, followed by gluing the “empty” tile.
Stage 4 - grouting the joints. To make everything look beautiful, in 99.9% of cases the gaps between the tiles are filled with a special compound, usually white.
Why were the stages described? And in order to say that, due to their inexperience or simply negligence, the tiler may make mistakes at one or several stages, which can subsequently lead to peeling of the tiles. For example, this can happen if the primer is not applied to the surface or if it is applied in a very diluted form. Also, the tiles can peel off as a result of using low-quality tile adhesive or its uneven spreading on it (4 small “bumps” in the corners). In addition, some experts claim, and this is confirmed by a special inscription on the packaging of the tiles, that the latter must be dry before applying glue to it for better adhesion. That is, there is a possibility that the tile may peel off from the tile adhesive if it was wet during the gluing process.
We state third conclusion: troubles with tiles can happen due to poor quality of materials and work .
Summing up the end result of everything to the above and answering the question posed at the beginning of the article: “Should I lay tiles in the bathroom in a new building? - you can definitely download that this is at the discretion of everyone. But you can add confidence in making a decision. So, if the house was built by a time-tested construction company, the foundation of the house serves as a monolithic reinforced concrete slab, the construction site does not fall into a zone of increased karst hazard, and the tiler “has his hands full”, you can safely lay the tiles. You can be even more confident in this if the house has stood at full size for at least one year , for example, when finishing work was carried out for the second year, because the initial settlement (from its own weight) had already passed.
Half a century ago, panel houses were considered the most comfortable housing in the country. Their construction made it possible to provide shelter for many millions of Soviet citizens. However, now the attitude towards them has become different. Such apartments have rather modest dimensions. In addition, the deterioration of panel houses is accelerated due to savings on their construction.
However, in Soviet times, having such an apartment was much more prestigious than housing in a communal apartment. Today, many owners of such apartments are trying to make living in them more comfortable. It is worth understanding what options exist for finishing a bathroom in a panel house.
Features of room arrangement
The main distinguishing feature of a bathroom in panel-type houses is its small area. If to expand the kitchen it is enough to remove the partition and make something like a studio, then you can expand the bathroom only by combining it with the toilet.

Combining a bathroom in a panel house
A combined bathroom in an apartment in a panel house is a popular solution that has several advantages and disadvantages. The disadvantages of this solution include:
- When several people live in an apartment in a panel house, using a shared bathroom is not very convenient. One family member may want to relax in the bath, while another will need to use the restroom. In the morning, a queue forms in the shared bathroom.
- Any demolition of walls, even non-load-bearing ones, affects the stability of a panel house. Such redevelopments require legalization.
- Removing a partition is a quick but troublesome procedure. The work process creates a lot of noise and dirt.
Before making a decision, you should familiarize yourself with the photo of a combined bathroom in a panel house.
However, combining a bathroom and a restroom has several undeniable advantages:
- When combining two rooms in a panel house, you can get a lot of usable space. It will be very convenient to move around it.
- It will be possible to correctly distribute space using the zoning method. To do this, install temporary partitions in the bathroom and experiment with lighting.
- It is much easier to install plumbing equipment. It becomes possible to install large household appliances in the bathroom. In such a bathroom it is easier to place an additional shelving unit.
It is better to combine a bathroom when one or two people live in an apartment. If there is space in the bathroom for installing a corner sink, and after installing the bath itself there will be space for a washing machine, it is better to leave the partition.

Selection of plumbing equipment
The main condition is that the plumbing fixtures must match the dimensions of the bathroom. If a massive hot tub is installed, it will look out of place. In addition, it will not be possible to install the necessary equipment in a small bathroom. In small rooms it is better to install small equipment. When installing a shower and corner sinks, a lot of space is freed up in the center of the room.
When choosing between a shower stall and a bathtub in a panel house, you should pay attention to the first option. Modern shower designs have more functionality than a standard bathtub. You can choose different types of water jets, listen to music, and call friends. Many cabins are equipped in such a way that water procedures can be performed in a sitting position.

Washing machine location
A washing machine is an integral element of the household. However, it is difficult to place a large device in a small bathroom of a panel house. There are several ways to solve the problem:
- Install a washing machine under the bathroom sink of a panel house. This arrangement of equipment will allow an extra meter. To do this, you will have to equip a hanging sink.
- Place the machine sideways to one of the walls of the bathroom of the panel house. Place a partition on the other side and place a cabinet above it.
- Place the machine close to the shower stall. This option is convenient when choosing devices with a vertical hatch.
These tips will help you equip a comfortable bathroom in a panel house.

Bathroom ceiling design
A ceiling with whitewash or plain paint, often installed in panel houses, can cause melancholy. For this reason, it is worth making slatted ceilings. Using these elements you can create an original bathroom design in a panel house.
The advantages of such designs:
- attract attention and do not get boring;
- there is a wide selection of textures and shades on the market;
- they last longer and are much easier to care for;
- It is very convenient to place original lighting fixtures in them;
- You can equip a mirrored ceiling that can visually expand the bathroom space in a panel house.
When choosing the color of the bathroom ceiling in a panel house, you should remember that it should be several tones lighter than the wall surfaces (as in the photo).

Bathroom wall decoration
The standard choice is to tile the bathroom. In small spaces this is really the right choice. However, you shouldn’t settle on a certain type of tile. It is better to choose products with a pattern or design. If you have experience, you can choose tiles of different shades that will harmoniously combine with each other. The surface with a mosaic pattern looks interesting.
To make your work easier, you can equip your bathroom walls with PVC panels. In this case there will be many color solutions, but less than in the case of tiles. It is better to make the walls in light colors. If the surfaces are too dark or bright, the visual space of the bathroom will be reduced.
Floor arrangement
It is also better to equip the bathroom floor in a panel house with ceramic tiles. You should choose less slippery products. To prevent slipping, additional panels are laid on it. They are made from durable wood. You can safely stand on such products with bare feet.
Another optimal option for equipping a bathroom floor is self-leveling technology. However, it will take a lot of money. In a small bathroom, they usually don’t skimp on materials. To maintain heat in the bathroom, a heated floor system is installed.

Illumination and lighting
Spotlights are installed in the bathrooms. To create the desired level of lighting, there must be a lot of them. If possible, the light intensity is adjusted with a special dimmer.
Another option is to install lamps in the bathroom that have light bulbs with a cold and warm spectrum. The first will allow you to relax, and the second will speed up awakening.
Bathroom interior design
A bathroom in a 9-story panel house can become a cozy room if you approach the interior design correctly. When doing this, several points are taken into account:

By arranging the room taking into account these tips, you will not only visually expand the space, but also create a favorable atmosphere for taking water procedures.

conclusions
The best option when decorating a bathroom is gluing ceramic tiles to the floor and walls. This material is easy to clean, it is not affected by moisture and temperature changes. Using tiles will allow you to make long-lasting bathroom renovations. An interesting interior is created using decorative plaster, self-leveling floors, and a suspended ceiling. Delimit the bath space with curtains or partitions. You should use the free space of the bathroom very sparingly - install additional shelves, a hanging sink and a shower stall.
A budget solution to the housing problem is an apartment in a panel house. And if its owner always tries to somehow transform a kitchen, corridor or living room, to emphasize his individuality, then the bathroom in a panel house remains the least thought-out room.
This happens because the layout options of “Khrushchev” and “Brezhnevka” buildings limit their owners in size and comfort. The tenant ends up adapting to their home rather than creating a space for themselves.

This especially affects the bathroom. According to most, inexpensive tiles and simple plumbing fixtures are enough to satisfy the basic needs of a hygiene room.
At the same time, the modern market for building materials makes it possible to make a bathroom as comfortable and efficiently planned as possible, and to realize any bold plans for its improvement.
Room planning
First, you should consider the issue of building a separate or combined bathroom.
Combining a bathroom always benefits because it increases its usable area, allowing you to more flexibly plan the installation of plumbing, furniture and lighting.
You can also save on finishing materials: the common wall to be tiled is demolished, and finishing the doorway that has become a wall will be cheaper than installing a new door.
This type of bathroom renovation in a panel house is convenient for young families or older people living without children.
If the space in the toilet allows you to install a small sink with a mixer tap and a pseudo-bidet, and the bath allows you to install a washing machine, then you should not combine the rooms. The exception is the personal wishes of the owners.
Selection of bathroom equipment.
Having decided on the configuration of the room, you should organize its space. The small area does not allow installing a bath and shower, a linen closet and a washing machine at the same time.
Shower or bath?
A shower cabin will significantly save space, but will deprive you of the opportunity to take a full bath, and for families with small children this is very important.
But a medium-sized corner bath can save room space and serve as a convenient tray for a shower stall.

Do not seal up the niche under the bathtub. Equip it with a door for storing household chemicals and cleaning equipment.
Where should I put the washing machine?

Bathroom renovation in a panel house is always done to create greater comfort for the apartment owners than before. Starting it, it is worth taking a fresh look at the installation of large household appliances.
There are three options for installing a washing machine:
- next to a bathtub or shower stall without a partition from them. The drain from the machine is organized directly into the plumbing through a special outlet or sewer system. This is the only option for top-loading washing machines;
- behind the partition. Its installation allows you to create a small niche above the washing machine, possibly with decorative lightweight doors.
This provides additional space for collecting laundry, storing bath accessories or cosmetics; - under the sink.
Selection of finishing materials
At first glance, it may seem that a bathroom in a panel house is not very demanding on finishing materials.
However, not only future comfort, but also the meaning of all work depends on their variety and quality.

Ceiling.
- Whitewashing is a thing of the past. It should be abandoned immediately.
- Painting. The method is labor-intensive, requires careful surface preparation and costs.
- Plastic tiles. Installs easily. With high humidity, mold may appear at the joints, which will ruin the coating.
- Polyvinyl chloride panels. They allow you to hide ceiling imperfections, hide ventilation and install spotlights. Easy installation.
- The slatted ceiling is more durable and more aesthetically pleasing than the previous one.
- . Installed only by specialists. Has all the advantages of panel and slatted ceilings. More reliable in damp rooms, as it does not have slotted joints.
Of the many types of finishing, tiles are the best to provide high sanitary conditions and a decent appearance.
Certain areas of the bathroom that are not exposed to direct splashes can be decorated with Venetian plaster, moisture-resistant wallpaper, wood and other materials. But it should be taken into account that due to the cramped space of the room, the wear of such coatings will increase during its use.

As mentioned, the best option would be a tiled floor. However, polymer bulk is also durable and beautiful. Both options allow you to install a “warm floor” system.
If you do not use a “warm floor”, then for additional comfort it is recommended to make a removable grating from oak or larch slats.

Bathrooms in a panel house are not a relic of the past. With proper organization of the premises and high-quality accounting of modern means, these premises acquire a new functional form and uniqueness.
Choosing lighting for the bathroom
The most correct solution would be to install spotlights in the bathroom. To achieve the best level of illumination, you need to take care of their quantity. It is best to regulate the saturation of lighting using a dimmer designed for this purpose.
An alternative way is to install lamps in the bathroom that have lamps with a cold and warm spectrum. The former provide an opportunity to relax, while the latter, on the contrary, contribute to a speedy awakening.
Gallery


In every home, the bathroom is a room for hygiene procedures. And for many, it is also a place where you can be alone with yourself, relax or have spa treatments. That is why the design in it should be, first of all, comfortable, as well as simple and sophisticated.
Bathroom tiles are nothing new. At the same time, with the help of this material you can decorate the room in a very bold and original way, and without compromising square meters at all. Anyone can be convinced of this by looking at a photo of a bathroom being tiled.
Advantages of tiles
Finishing the bathroom requires care and a thorough approach. Compared to the renovation of other rooms in your home, the renovation of a hygienic room should be done so that it is beautiful, cozy and comfortable, and all the nuances and subtleties should be thought out, since in such a room, as a rule:
- increased humidity levels;
- higher temperatures;
- Various cleaning and abrasive detergents are used.
In such a room there is a specific microclimate and there is a considerable probability for the proliferation of fungi and bacteria, which are very harmful to the human body! This is especially true for small children, who, as a rule, love to chew or lick some surfaces.
It is possible to avoid “troubles”. To do this, you need to think about decorating the bathroom design with tiles so that it does not deteriorate over time, and also constantly (regularly) maintain the cleanliness of the hygienic room.
We can conclude that the material for finishing the bathroom should definitely have some qualities, namely:
- resistant to high levels of humidity.
- resistant to regular temperature changes.
- hygienic.
- safe from an environmental point of view.
- Quite easy to wash and clean.
Today there are a large number of manufacturers of ceramic tiles. Each of them offers a very wide range of finishing materials for both the ceiling and walls of the bathroom. You can also choose wallpaper that has a high degree of moisture resistance, or maybe plastic panels, plasterboard or special plaster for decorating the ceiling and walls.
But for finishing bathrooms, it is tiles that have won the trust of most people. This material has been used for decades!
Features of bathroom tiles
- Price. Due to the fact that the material is produced in huge production areas and in a very wide range, everyone will be able to choose for themselves exactly the option that they like best or that suits the price. Even if you have limited funds for the purchase of material, you will select exactly what you need in an excellent price-quality ratio.
- Tile is a hypoallergenic material, completely non-toxic. During the production process, the material is burned. It is at this moment that any toxins or allergens are destroyed. Therefore, you can rest assured that even with prolonged contact with the material, no allergic reactions will occur.
- In addition, when tiles are produced, no harmful substances are released from them, since they are an environmentally friendly material. Accordingly, no environmental pollution occurs either.
- The finishing material is produced under the influence of high temperatures. Of course, during production any microflora is simply killed. Accordingly, if there are tiles on the floor and walls in the bathroom, there will be the lowest chance for the growth of bacteria and fungi compared to other finishing materials.
The only caveat is that mold and mildew can form at the joints between the tiles. This happens due to the fact that the walls in houses or apartments are not treated with anything. In order to avoid such formations in the future, it is worth using a special antifungal composition for laying slabs.
What is the advantage of tiles?
- The tiles are moisture resistant. In addition, even over the years they do not lose their original appearance (especially with proper care!), and if the joints are properly sealed during installation, then the chances of flooding your premises or, worse, the neighbors below, will be zero.
- The tiles in the bathroom are very easy to clean and wash. She is not at all afraid of cleaning products and detergents. Due to the fact that it has a special coating, it is very easy to remove any dirt or grease stains. In addition, such material practically does not attract dust. That is why it is used for finishing work and in the kitchen.
- If you lay tiles correctly and efficiently, they will last you for many decades! Most likely, you will want to change it, for which there will be reasons such as: the design is tired or outdated, it has become boring, etc., rather than it will fail and become unusable.
- This material is very wear-resistant. It performs a protective function against damage to the appearance, for example, during the rearrangement and movement of furniture, from scratches and other minor mechanical defects.
- Due to their high degree of strength, the tiles are able to withstand heavy loads (weight, pressure). For example, the same bathtub made of cast iron!
- Also, the material is fireproof. After all, tiles are not a flammable material and can even prevent the spread of fire! Therefore, in the kitchen, such material is also very often used to finish the apron.
In the event of a fire in the apartment, a tiled bathtub is the safest place!
Our collection of bathroom tiles 2016 will allow you to display real masterpieces of creative art, as well as make your old dream of creating a comfortable and stylish hygienic room come true.
If we compare the price range of different materials, we can note that for bathroom design, tiles are the most inexpensive material, compared to stone, glass and porcelain tiles, which can also be used for the bathroom.
Ceramic tiles
Ceramic slabs are the most budget-friendly and most common material for bathroom cladding. It has a relatively low price level. It is made from clay and sand, and the upper part is covered with glaze, due to which the material acquires a variety of textures, colors or patterns.
As a rule, the following main types of ceramics are distinguished:
- Sprayed;
- Matte;
- Glossy.
In special catalogs you can view a wide variety of photos of bathroom decoration with ceramic tiles.
Please note that when creating designs, only one type of tile is not always used. They can also be combined with each other, using two or three different types - this design will look great. The main thing is to choose an original color combination.
Porcelain tiles
This type of tile is very similar in its composition to porcelain, but at the same time, it resembles stone. The peculiarity of this material is its inability to absorb moisture and liquid. Accordingly, he is absolutely not afraid of either water or temperature changes. It is for these reasons that it is often used for external cladding work.
Porcelain granite has a structure very similar to stone. Less susceptible to cracks, chips and mechanical damage. This is a great option for decorating the floor, since porcelain stoneware is a very durable material.
Stone tiles
This material is wonderful and, moreover, environmentally friendly and natural. Stone tiles for the bathroom 2016 are already much more affordable compared to the old days, when they were a very expensive material.
Due to the fact that it has a unique structure, designers can create completely unique designs for bathroom cladding.
But it also has its drawbacks. Namely, the stone is only to some extent able to withstand mechanical damage. It can also become covered with very small cracks. Due to the fact that stone slabs are not subjected to the same treatment, for example, as tiles, the risk of fungi and bacteria growing in them is much greater.
Glass tiles
If you are determined to create a futuristic style for the interior of your bathroom, then the ideal option for tiling the room is glass tiles. It can be used to decorate not only walls, but also completely decorate the floor. The glass used for decoration can be transparent or colored, as well as glossy or matte, smooth or textured.
Using glass tiles, you can create partitions in the bathroom, and quite stylish ones at that! Alternatively, you can also mask additional lighting with it.
But do not use such material to try to “hide” pipes, meters, valves, etc.
Choosing the size of tiles
Even though the color range of grout for sealing joints between laid tiles is presented in a fairly wide range, in any case it will not be possible to make them completely invisible, no matter how hard you try. And that is why the size of the selected slabs for finishing the bathroom is of great importance.
Standard tile
This material has a size of 20 x 30 cm. Its best design is for large or medium-sized bathrooms, since the frequency of the seams will not “loom” much. In addition, if you lay the tiles vertically or horizontally, you can visually make the room wider or make the ceilings higher.
Large slabs
If the size of one tile exceeds 25 x 40 cm, it is considered large. Often such slabs are used for laying floors, in more rare cases - on walls. If you prefer large slabs, use them when you have a large bathroom. Or you can use it to decorate some elements. But only if it is combined with smaller tiles.
It is best to choose tiles that do not require cutting.
Mosaic
It is also called small tiles. Using this material, you can very easily make adjustments even if the surface of the walls or floors is not perfectly flat. But its disadvantage is that it can visually reduce the size of the room. For this reason, you can combine it with medium-sized tiles.
Tiles and house type
Let's look at the main types of houses and what tiles need to be selected for finishing work.
Khrushchevka
As a rule, houses of this type have a combined bath and toilet, in which there is very little space (up to three square meters). For a small bathroom, it is best to choose medium-sized tiles. Also, choose it light and without patterns, especially large ones.
You can visually raise the ceilings in a small room by combining two tile colors: lighter at the top, darker at the bottom.
Panel house
As a rule, the bathroom is separate. The powder room can have the same finishes as the bathroom, or you can create a contrast. Here it is - whoever likes it more. But as for the size of the slabs, it is advisable to choose it the same for both rooms. In this case, they will be in harmony with each other!
Bathroom design in a marine style with mosaics from the Dune factory
A private house
If you had an individual plan for construction, it means that you yourself provided for the exact dimensions of your bathroom and other premises. For hygiene procedures, the room can be made very comfortable, bright, and cozy. Here you can use large-sized tiles, and without causing any damage to the square meters of the room.
The floor in the bathroom is best made of porcelain tiles, since temperature changes can occur both indoors and outdoors.
Small bathroom tiles
- It would be great to decorate the walls in a small room using medium tiles. After all, it is completely non-volumetric and will not ripple with joints (and in large numbers), compared to “small” material. In this case, you can also use mosaics, but as separate elements of interior decoration.
- Since the bathroom should be comfortable and cozy, do not use cold shades of finishing materials in it!
- If the room is small, it is best to choose tiles in light, warm shades. If you use dark colors, they will visually make an already small room smaller. To make accents, you can choose small elements with patterns.
- Visually raise the height of the ceilings. To do this, you need to lay the tiles vertically. As for the floor, it is best to lay the material on it horizontally.
- If you use raised tiles, they can clutter up the space, so if the bathroom is small, install smooth tiles covered with glaze. Matte tiles also look very original. In addition, it is less visible of the limescale deposits that appear from water over time. But such material, again, will make the room smaller.
Mirror tiles for facing work will greatly help to increase space. - It is best not to make niches using tiles. For them, use other methods and materials.
Choice of colors
The most important rule when choosing the color scheme of slabs is the lighting of your bathroom. After all, the dimmer it is, the lighter the wall decoration should be.
White
Very stylish. But some people associate it with being sick, which can make the bathroom feel downright uncomfortable. In addition, white color is very easily soiled, it needs to be constantly monitored and kept clean regularly.
If we look at the interior design in white from the other side, then with the right furniture and the placement of bright original accents, your bathroom can become the most sophisticated!
Blue
Just like blue is the color of water. Therefore, it is often used to decorate the interior of a hygiene room.
An original idea is to arrange a bathroom in blue tones, with a marine theme. This will require some decorative design (even shells, fish, etc. will do). Of course, manufacturers of finishing materials always take this into account. Therefore, in each collection you can always choose something suitable for your interior!
Green
This is a great analogue to blue or cyan. Green is a calm and measured color that gives harmony. If decorating with plain green seems boring to you, you can hang a curtain in the bathroom, for example, with frogs. Then the interior will be much more mischievous and fun!
Other color options
Tiles in colors are often used. For example, if your hygiene room is decorated in purple shades, the tiles could be violets or lavender. A very original combination of pistachio or peach with violet.
Yellow as well as orange colors add warmth to any bathroom. Even if it’s bitterly cold outside, you definitely won’t be able to freeze in a yellow or orange bathtub!
For young girls - a wonderful option for a pink bathroom.
For confident and impetuous men, a black or red bathroom design would be perfect.
DIY bathroom
If we consider the option of hiring workers to lay tiles in the bathroom, then this pleasure is far from the cheapest.
But if you have a strong desire, everything can be done with your own efforts. The main thing is to know and remember the main points:
- It is necessary to clean the surface very thoroughly before laying the tiles.
- The floor can also be leveled. But it is best to make a very small corner in the center of the room. Because there is always a possibility of water leaking in the bathroom, and it is much easier to “remove” it from the center of the room than, for example, it is inconvenient to get behind the bathtub.
- Prepare the adhesion solution (glue, etc.) strictly according to the instructions provided for it. And it must be applied in a very thin layer.
- When laying the slabs, place plastic crosses between them. This is necessary for identical seams.
- Start laying out the material from the corner opposite the front door.
- If you mark the wall in advance, you can independently calculate the places where you will need to cut the slabs and lay out the very bottom row in pieces. But lay the top rows in whole slabs!
Bathroom design
Small bathroom design: photo ideas
Toilet design
Shower cabins (150 photos)
We also suggest watching a few video tips on laying tiles in the bathroom, which will greatly simplify the installation process.
Video - secrets of installing ceramic tiles
Video - where to start laying tiles in the bathroom
Video - laying tiles in the bathroom from start to finish (floor and walls)


