An autonomous water well is a permanent and reliable source of water supply in a country house or country house. Everyone who began to be interested in the question of how to make a well on their own or with the help of a master do not always come to such a decision due to the lack of centralized water supply. Often the reason for this is the periodic shutdown of water, its pollution, high cost, or other factors.
Types of water wells
Permanent, uninterrupted and, most importantly, autonomous water source almost all owners of country cottages have. The difference is that their desires may not match. Some preferentially install wells, while others install wells.
Depending on the depth of the hole, they can be divided as follows:
- Sandy well. This type is quite popular, since the installation price is low. Moreover, you can even do it yourself. The structure looks like a solid column with a filter at the bottom. The rise of water is from 5 to 100 cubic meters in 24 hours. It is enough to drill 10 meters when self-setting. And if a car is used, then 30 meters. A hand pump is installed to pump out water. The maximum duration of work is up to 15 years.
- Artesian well. This species is in much less demand among the population. The reason for this may be the price of the equipment and the need to take the approval of the project from the local licensing authorities. The design is also more complex than that of a sand well. It has two columns - a siege and a worker. The first is mounted before the limestone, and the second - in the limestone. This design can give a maximum of 40 cubic meters of water per hour, depending on the diameter of the pipe. The length of the pipe can be up to 320 meters, and only specialized equipment can perform such work.
Hole depth selection
Before starting work, it is necessary to find out what size the well will be. The depth can be from 3 to 7 meters or more... It depends on many factors. Basically, the main thing is its future location.
Depending on the depth, they can be divided:
- Shallow well (up to 3 meters). This type is used exclusively for technical needs or for watering the garden. The project can be completed if the well runs close to the surface of the earth. From materials and tools you will need a drill, a siege pipe and a hand pump.
- The well is of medium depth (from 3 to 7 meters). You can already drink this water. For self-installation, in addition to the drill, you need to have a shovel and time to equip a pit (pit). A well is a pit measuring 1.5 x 1.5 x 1.5 meters, which is designed to simplify self-installation of a well to a great depth. After the installation of the entire structure, the pit is filled up.
- The well is more than 7 meters deep. It will close the problem with water for all residents of the dacha: not only personal needs, but also for technical purposes for watering the garden and the like.
The type of well for water can be selected only after a thorough geological study of soils and terrain. But in any case, if there are no other sources of water supply in a private house, it will be necessary to install a deep well for full and constant access to water.
Drilling methods
There are quite a few ways in which you can drill a sand hole to the required depth... But it should be noted that this does not apply to artesian, since it is impossible to make them on your own.
You can apply the following methods for drilling a sand hole:
- Auger drilling (auger drilling).
- Using a ring drill (core drilling).
- The tool is a drill bit (wire rope drilling). In this case, the bit is driven into the ground, pushing the ground to the sides. Advancement takes place using a tripod and a winch.
- Rotary percussion drilling. It is accompanied by the washing out of the soil with water. For self-installation, the process is quite time consuming.
- Drilling with a mobile structure (rotary drilling).
Creating a building project
 If known what level is the aquifer, then you can immediately proceed directly to the work. But when there is no such information, then it is necessary to find out at what level in a certain area the aquifer is located.
That's why each well has its own individual project which is influenced by the following parameters:
- type of soil and its geology;
- the drilling method to be used;
- obtaining the desired result in the field of the quantity and quality of the produced water;
- the depth of the aquifer, but not the first one that the drill collided with, but the one that will be responsible for the amount of water for a certain time.
Necessary tools for the job
The most accessible and simple method is the shock-rope method, therefore it should be considered as an example. He is one of the ways how to drill a well with your own hands without drilling.
This method of working has the following advantages over others:
- allows you to preserve almost all the soil on the site in its original state without any damage, since the use of technology can greatly spoil the land over a large area;
- there are no restrictions on the choice of the territory for the well, it can be done anywhere;
- the equipment is simple and does not require much qualification of the driller.
To work, you must prepare the following tools:
- Shovel.
- A drill, preferably with additional cutting parts. To do this, lathe cutters, files or other devices should be welded onto the cutting part. You can sharpen the incisors with a grinder.
- Trolley for removing excess soil.
- Water buckets.
- Pump for pumping out liquid.
Additionally, you must prepare the following materials:
- crushed stone for a pillow;
- steel wire;
- pipes;
- wire for arranging the bottom filter.
Site selection and pit installation
 First you need to choose well installation site... And if we are talking about the use of this water by a person, then it is necessary to look for a source. A hired specialist will help to determine such a place, but if the budget is not designed for this, then you can do it yourself using alternative methods, for example, by the amount of dew on the territory, dowsing or trial drilling.
When the place is determined, you need to dig a hole. This hole is basically one and a half meters in width, depth and length, but there are other sizes, it all depends on how deep the well should be. Such a structure will greatly simplify further work on installing the pipe and drilling a hole in the ground.
Mandatory preliminary arrangement of the pit is important for two reasons.:
- The drilling length is reduced.
- The possibility of land collapse is excluded.
As a rule, in order to avoid sprinkling of soil, the pit is reinforced with boards or plywood around the perimeter.
Mounting the drill with a tripod
 The tripod is a percussion mechanism for drilling water wells. A tripod mechanism is used to facilitate glass work. Such an apparatus can be made of wood (there should be no knots) or from a pipe (a metal profile is also suitable). The length of each of the three parts should be 3-4 meters. After that, a metal cable is attached to the frame, and a drill bit is attached to it, respectively.
This type of drilling rig is quite compact and has good strength. It is not difficult to understand the principle of operation of such a design. The glass, striking the ground, selects it on its way into itself. Thus, in one blow, a well is made from 20 centimeters to 1 meter, it depends on the type of soil. The drilling process will be easier if the place is pre-treated with water and done from time to time. Also periodically it is necessary to clean the drill bit from the packed soil.
The cable that lowers the glass to the bottom should be several meters longer than the well itself, since it can come off and the glass will remain at the bottom. The casing is installed simultaneously with or after drilling.
Using casing
During the drilling process, you can immediately lower the pipe with the drill, but then its diameter should be less than the pipe itself, since it should move freely in it. When performing work, it is necessary to constantly monitor the moisture content of the soil. If you skip the aquifer, then it can be accidentally closed with a pipe.
The first signs of such a layer:
- drilling is greatly facilitated and the drill is quickly lowered to a certain distance;
- after flushing, the presence of watery soil is observed;
- after the end of the clay layer, sand begins to appear;
- the first pressure arises;
- there is a puncture;
- vibration of the drill during operation.
When a watery vein is found, then it is necessary to make a test intake of all the water in order to understand how much such a source will give it. This can be done using a conventional pump. When two or three buckets of dirty water are obtained, and the purified water does not appear yet, then it is necessary to continue drilling until the next watery soil layer is found.
Ordinary pumps are not suitable for these operating conditions, so they can fail. For such work, it is recommended to use professional and high-quality pumps.
Well casing
For casing purposes, you can take metal or plastic pipes. The duration of the work can last up to 50 years. It is important not to use zinc pipes as there is a risk of zinc oxide contamination of the water.
A discussion is needed in order to:
- prevent shattering of the borehole walls;
- exclude the ingress of sewage, rain or melt water;
- the well will not clog.
If the pipe squeaks, hit it with a sledgehammer.
Flushing after drilling
 After the pipe is installed, the work does not end there. The next step is to flush the well. This is also easy to do. In the newly formed well, it is necessary to lower the pipe through which water is poured. Sand, dirt and clay will be washed out under pressure. After that, it is imperative to do an analysis for the detection of harmful substances in the water. The quality of water and the requirements for all its characteristics are specified in the legal regulations of the respective state. If the quality is good, then you can safely continue the installation work.
Providing a bottom filter
 The need to provide the pipe with a bottom filter is very important. The filter avoids the formation of a mule at the bottom. Making it yourself will not be difficult. It is required to make cuts (notches) on the pipe using a grinder. To make such notches, you need to use a thin Bulgarian disc, preferably 0.8 millimeters. But, on the other hand, a large number of notches can make the pipe weaker, so there should be few of them.
Also, instead of cuts, you can make holes in the pipe. Next, the filter must be wrapped with wire or fine mesh. After that, cover it with rubble, which will prevent the formation of a mule.
The filter should not be larger than or equal to the cross-section of the pipe. It must be easily submerged into the well.
An easier option is to buy a filter from a store. Without it, such a well will not last long. Its absence is allowed when the hole is more than 40 meters long.
If the work is done by hand, then the principle of success is in the absence of haste. It is necessary to adhere to the drilling technology and use only high-quality materials, this will be the key to the successful and long-term operation of the well.
There is no central water supply system at your site and will not be. Or it is only planned. The construction of a well is very labor-intensive, it is necessary to turn over a mass of soil, buy, deliver and dig in heavy concrete rings rather deeply. Your own well is a great solution, but the services of geologists are quite expensive. Especially for those who cannot afford large expenses and know how to work with their hands, we will tell you how to drill a well with your own hands.
Let's make a reservation right away that drilling water wells with hands is literally impossible, a person is not a mole, and his hands are not shovels. You will need certain devices and mechanisms. The savings are that drilling can be done in-house, and the rental of the necessary equipment will cost much less than the services of a drilling rig on a truck platform. However, it should be understood that in 99.9% of cases the answer to the question of how to drill a well with your own hands to artesian water will sound like this: nothing. The fact is that reserves of high-quality groundwater, with rare exceptions, are located at a depth much greater than it can be done without the use of complex and expensive mechanisms. In addition, artesian waters lie in strata of rather hard rocks, which only powerful installations can handle. What types of groundwater are potentially available for independent water intake?
Verkhovodka
Verkhovodka (soil water) is located close to the surface above fragmented waterproof lenses, usually clays. It is not possible to find it everywhere, the top water is often seasonal in nature and during the dry season it can disappear altogether. As a rule, it is of poor quality, undrinkable. Often, it can only be used for household purposes, mainly watering the garden and vegetable garden. In the case of a verdant, due to its shallow depth of occurrence, the question of how to drill a well under water with your own hands is solved by simple and cheap methods.
Ground water
Groundwater occurs in a sandy interlayer over the upper vast water-resistant layer, the depth can vary from 5 to 50 m. In wooded areas, groundwater can be found quite close to the surface, while in steppe areas they are often located deeply or are absent altogether. Groundwater quality varies greatly, rarely meets drinking water standards, and a filtration system is required. Wells that are drilled into groundwater are called sandy; due to their moderate cost, they are most common among owners of private estates with their own water intake.
Interstratal waters
Interstratal waters, as the name suggests, lie between water-resistant soil layers. The layer located on top (or several) serves as an effective filter, therefore, such waters have, as a rule, high quality indicators. If you are lucky, under certain conditions (low bedding, soils without stony inclusions), interstratal waters may be available for independent drilling. However, more often they are located at a distance of more than 40 m from the surface; it is problematic to drill a well by hand to such a depth.
How to drill a water well yourself
So how do you drill a well yourself? Recall that it is possible to drill a well using manual and low-power mechanisms only for a short distance and provided that the soil does not contain stony inclusions and boulders. Before starting work, it would be nice to know the potential depth of groundwater, for this it is worth talking with neighbors who have already equipped their own water intake. The depth map of drilling wells in your area will also tell about the level of occurrence of interstratal and groundwater. Work can be carried out using manual mechanisms or a small-sized installation. Let's consider how to properly drill a water well on our own, in more detail.
How to manually drill a water well
There are several options for manual drilling, differing in labor intensity, the tools and mechanisms involved, and, of course, the result.
- With a manual garden drill, having a set of nozzles, together in soft soil, it is really possible to make a well with a depth of up to 10 m for a perch. A large hole diameter is not needed, it is enough to use 70-80 mm nozzles, which will allow installing a casing pipe of 50-60 mm. Since the height is minimal, a hand column or a surface pump is used to raise water.

To drill a well with your own hands, you must have a set of tools: a gate, a drill, nozzle rods, open-end wrenches. The work is hard, unproductive. A stone the size of a fist or more, caught in the way, will nullify all efforts
Not only is it difficult to rotate the gate, but it is also difficult to lift the drill to install additional rods. This task can be facilitated by hanging the drill on a cable through the block to a tripod.

A simple combination of a tripod and a lifting block will help to lift the drill on a cable, which will at least partially facilitate the work.
- The handheld soil drill will achieve similar results, only faster and with less labor. A motor-drill can be rented, you should choose a two-handed model with an engine with a power of at least 1 kW, you will also need a set of extension nozzles. You need to work with such a device together, alone it is difficult to keep it level.
How to drill a well under water using a small drilling rig
The main disadvantage of hand drilling is the inability to go to a considerable depth. The reasons for this are the impossibility of developing a significant effort, and keeping the drill straight, without distortions. The problem is solved by installing a more powerful engine on a sturdy frame that is not subject to displacement. The engine can be gasoline or electric, the more powerful, the higher the capabilities of the device. Frame - have a mechanism for lifting the drill and installing nozzles, this will allow you to reach depths much deeper than if the work was done manually. There are craftsmen who make such equipment with their own hands, since the design is simple.

The simplest home-made drilling rig: a bed with a support platform, a movable platform with a motor is fixed on it
But there are also quite productive factory small-sized drilling rigs (MBU), which can be rented.

MBU with a powerful electric motor and a stable frame allows drilling to a fairly large depth. Of course, this is already quite complex equipment, but its rental is still much cheaper than attracting a full-fledged installation based on a truck.
The passport indicates the maximum drilling depth depending on the type of soil and the diameter of the drill. How is a water well drilled using MBU? One operator monitors the operation of the device, assistants are needed only to bring it to the construction site and install it. In soils that do not contain stony inclusions, using a small-sized installation, depending on its model, you can drill a well with a depth of 20 to 50 m.Most likely, this will allow you to arrange groundwater intake for sand, and if you are lucky - high-quality interstratal water.
How to drill a well with your own hands without drilling
There is also a method of percussion-rope drilling, when a heavy pointed bit is thrown into the well, breaking the rock. It is fixed on a steel cable, which, in turn, is wound on a shaft with a stopper or fixed on a block. This whole structure should be fixed on a fairly high tower, its dimensions are larger than that of the MBU. The reciprocating movement of the bit can be provided by the motor or the cable is wound and released manually. Of the advantages of the percussion-rope method, one can name the possibility of constructing large-diameter wells and the ability to work in rather hard rocks. However, the shallow drilling depth and very low rates of work make this method of little demand.

How to drill a well with your own hands using the percussion rope method? You will need a tripod with a block or shaft, a cable, a chisel and a lifting mechanism. The installation height is the greater, the deeper it is planned to "hammer" the water intake
- Equipment manufacturers and craftsmen who contract for work often use the hydrodrilling method. The video below shows how a well is drilled for water, pumping liquid into it and removing it along with soil particles. The water acts as a lubricant, so you can almost double the drilling depth. However, together with the liquid from the surface, harmful microflora inevitably enters the aquifer, which can lead to contamination of clean groundwater. If the water intake is done to obtain drinking water, it is advisable not to use the hydromethod, but to drill "dry". When this cannot be avoided, immediately after the end of the work, it is necessary to install a casing pipe with a filter, lower a vibration pump into the well and continuously pump the water intake for at least a week. If this is not done, the source will have to "heal" for a long time.
- When installing nozzles on a drill, observe safety precautions in the strictest manner, otherwise you risk being left without fingers.
Video: how a well is drilled for water
Quite a powerful semi-automatic small-sized installation "Mole", it is shown step by step how a well is drilled for water.
It is clearly shown how to punch a well with your own hands using a motor-drill with nozzles.
You can try to drill and equip a well for water supply yourself if you have the certain skills, time and desire. In the absence of such, entrust the task to professional geologists, competent specialists will preliminarily determine the approximate depth of occurrence of various types of water, offer options for a water intake device, perform well drilling, and install a production string. They will pump the source, determine the characteristics, issue a passport and give a guarantee for the work performed.
In practice, I personally have not tried this method, but brought an article by my friend who does it for money.
I think it will be interesting for you, and I personally will try this method in the summer. May come in handy in the future. The principle is pretty simple. I made an animated picture showing how this should happen. Now let's look: first you need to buy 2 pumps, two barrels, hoses and pipes. Several 6-meter bars and, of course, pipe couplings. We dig a hole with a shovel about 1 meter x 1 meter and a depth of 60 cm. The pipes should be about 2 meters long (or longer). Threads must be cut from both ends of the pipes. Later, when the pipe enters the ground, a second pipe is screwed to it with the help of a sleeve, and so on until you go deeper to the required depth.
The first pipe has teeth on one side, which can be made with a grinder, and the second side of the pipe has a thread. First, you screw an adapter onto it with an end piece for your hose. I was recommended to cut pipes 4-6 meters long. So there is less gimoro with unscrewing the adapter, and the weight of the structure becomes larger, which allows the pipe to cut into the ground more quickly. So in order. First, we make a tripod from a bar and put it over the dug hole. On top of the tripod we attach a roller through which we pass the rope. It is better to fix the tripod by connecting three legs at the bottom and in the middle with the same bar. A little further from the tripod, we drive a wooden or metal pin into the ground. It is even better to make a drum as for raising water from a well. We attach one end of the rope to it. We tie the other to the pipe.
We insert the pipe with the connected fitting into the pit. Next, we move on to the barrels. Next to the pit, one barrel is placed on the ground, the second on a platform made of improvised materials to the height of the upper level of the first barrel. At the bottom of the upper barrel we drill a hole and insert a pipe with a tap there. We fill the top barrel with dry grass, which serves as a kind of filter, put a mesh on top of it obliquely. The mesh will clean large fractions of soil that has gotten with water, then this soil will simply fall down. The grass filters small parts of the soil and flows from the upper barrel into the lower one.
There is a pump in the bottom barrel that takes water, feeds it into your pipe under pressure. Water comes out from the bottom of the pipe and washes out the soil. This cloudy suspension falls into your pit. A second dredge pump pumps the muddy water into the upper barrel. In this case, a small part of the soil gets into the barrel with water. Its main part begins to grow out of the pit before our eyes. After a while, you remove it with a shovel.
Thus, the pipe itself deepens, the soil is thrown up like a geyser. You only need to fold back the soil and watch the level of the soil being washed away.
THE MAKING METHOD HAS BEEN TESTED BY ME PERSONALLY.
For this I do not use a casing pipe, a drill, a headstock, a bailer and other things ... A pipe for such a well is needed, in my opinion, 5-10 cm, and no more: it completely ensures uninterrupted water supply using a household high-performance pump. The method is as simple as two and two. At the same time, you do not pay the drillers, and this at the beginning of 2007 costs about 30-45 thousand rubles. Digging a well also costs a lot. Without the cost of the rings, you will pay about a thousand American tugriks. And if you are not a rich person and the saved piece of bucks is a significant amount of the family budget for you, then this topic is definitely yours.
First you need to stock up on pipes. I recommend pipes with a diameter of about 5 cm. The length of the pipes should be about 1.5 - 2 meters. Take pieces just in case 8. Cut threads at the ends of the pipes and buy bushings so that you can connect the pipes with bushings. Buy a steel bar as well. Its length should be 2-2.5 meters. The rod also has threads at the ends and connecting sleeves of its own diameter. You will also need to make a steel cone, the diameter of which is larger than the diameter of the pipe. We weld a piece of pipe with cut longitudinal slots to it. These slots must subsequently be wrapped in a net. They are a filter. You can weld strips of hard steel to the cone (for example, pieces of a sharpened flat file), but only so that upon impact, these strips create a small rotation in the direction of twisting the pipes. Then we do the following:
The pipe is clogged (and thus a well is formed) using your composite rod, consisting of two pieces of steel bar dia. 20-30 mm. and 2.5 m long, with threaded ends. This rod is lowered into the pipe (filter) and abuts against the cone welded to the filter. Together with a partner, installing the filter vertically along a plumb line, grab the bar with our hands, raise it up and sharply lower it - in short, we beat it. In this case, the impact of the barbell falls on the cone. When the filter deepens, a tow soaked in paint is wound onto its threaded part, then a coupling is screwed in, and into it the next piece of pipe 2 ... 2.5 m long.If the rod is short, build it up and beat it again. Having hammered into a depth of 3-6 meters, we check if there is water in the well. We take a bucket of water and pour it into the pipe (we do not pull out the bar in this case). If there is water in the pipe; does not go away, which means we have not reached the aquifer. We hit another meter, check again, pouring water. Aquifers go in layers, therefore, in my opinion, it is more rational to punch a well to the second aquifer or at least to the bottom of the first layer. And the layer can be up to 10 meters thick.
It is not always justifiable to check the aquifer by pouring water into the pipe. In some cases, the water goes into the sand layer. After all, I cannot check to what layer I have reached. If the water is slowly leaving, then we are theoretically at the beginning of the aquifer; We punch another 0.5-1 m, fill in water. Now the water should quickly go into the pipe - we have reached the aquifer. We begin to pull out the barbell, but it does not go, it is jammed. Do not be upset, take a hammer and hit the barbell, but not from above, but from the side from the top. With these blows, you create vibration, and the soil that has fallen through the filter mesh into the pipe "liquefies", the rod is released. After pulling out the rod, we screw a fitting with a pump onto the well. Can be manual or electric. After pumping out two or three buckets of turbid water, clean water usually comes out.
It is advisable to pump out a couple of two hundred liter barrels. You will be convinced of the amount of water and its quality. Then we pour clean water into a saucepan and boil, and then taste what quality it is. If it is bad, then after boiling it becomes reddish or cloudy, and a sediment will fall to the bottom. Then you will have to deepen the well by one more meter. Not to be confused with lime water sludge if it flows through the limestone bed.
It also happens: after a few years, the water in the well disappears (the electric pump does not "take", but the manual pump is very tight). This is a sign of a clogged filter. Many people flush wells with various solutions. I argue that this gives little effect in practice, such washing only poison the aquifer. It is easier and safer to pull the filter out of the ground, but this is not always possible. This happens quite rarely with a competent approach to business, and in this case you have to use a crane, a jack. In this case, you need to lower the rod into the well and hit the cone a dozen times, then apply the listed mechanisms. After 10-20 cm, the rise is again locked; you need to hit again, and after 2 hours you will pull out the filter. As a rule, it turns out to be covered with a black oily coating. Collect water, pour the filter on top and rub it over the mesh with a metal brush. For better cleaning, pour "silit", which will master everything from rust. The plaque is gradually washed off.
Check the pipes too: sometimes rust will puncture small fistulas in them. Because of this, the integrity is violated and the well may not work (due to air leaks or soil fistulas). Better, of course, to replace the pipes with new ones. And again you can hammer them in the same place where the well was before.
This method has been tested in practice. Hundreds of wells were drilled using this method. All work to this day. Some were driven to a depth of more than 20 meters, into artesian layers of water.
You can drill a well for water on your site, despite the seeming grandeur of this process, on your own, i.e. manually. This will require a metal auger, the so-called coil, for the role of which a fishing ice ax is quite suitable. This method of drilling a well for water is the cheapest possible.
Required tools and materials for drilling a well for water:
The main tool that will be used is an auger with lengthening knees, for lack of a special one, you can safely use a fishing auger. For the best efficiency of the process, it is recommended to weld reinforced cutters onto the winding edges of the drill. For this purpose, you can use a couple of files, which can be sharpened with an ordinary grinder. And of course pipes for elbows, the diameter of which is 25 mm.
You will also need a shovel, a cart for removing the selected soil, a pump and a hose for "swinging" the well, a barrel or a high table, on which you will need to stand up and screen out gravel.
Pipe preparation for running into the well
Before lowering the pipes into the well, they must be properly prepared. This is an important point because the drilled section is tightened very quickly and the pipes must be lowered immediately after removing the drill. Pipes can be purchased at specialized construction shops, thick-walled polyethylene pipes are best.
Pipe preparation consists in drilling perforating holes, approximately at a distance of 0.5-1.0 meters from the bottom end and over a length of 1.5-2 meters. It is enough to make the holes with a 6 mm drill, if you make them wider, you will need a filter mesh.
Then the guide bars are prepared and attached to the pipe surface. The bars are necessary to center the pipe in the borehole and provide equal clearance to evenly distribute the gravel screenings.
Manual drilling technology with auger
The place where the well will be equipped must first be leveled. To begin with, a guide recess for the drill is dug to a depth of 2 shovel bayonets. Having assembled the tool, you can proceed directly to the drilling process itself.
At the initial stage, it is quite within the power of one person to rotate the drill, but as it deepens, additional help will be needed. The deeper the drill goes, the harder it will be to rotate it, so you can use water to soften the soil. Making two or three full turns, the drill is pulled out and freed from the soil, dropping it into the cart. The sludge is poured away from the work site so that it does not create additional obstacles.
Thus, drill until the tool handle is lowered to the ground. After that, the drill is extended with an additional knee.
After the lengthening of the handle, naturally, the size of the tool no longer allows you to work with it while standing on the ground. Just for this case, a metal barrel or other pedestal is needed, standing on which it will be possible to rotate the drill by the handle. Or gas pipe wrenches are used for the handle.
Increasing the knees, drilling continues until it enters the aquifer. This moment will be very clearly visible in the condition of the excavated soil. During this phase, it is possible to tighten the tool, therefore, you should select the cuttings in small portions, otherwise you will not be able to pull out the drill manually. If, nevertheless, the drill "sucked in", so that you cannot pull it out with your hands, you will have to resort to the Archimedean lever, using two logs and a barrel for this, or buy a lever chain winch.
To prevent upstream water from entering the well, its depth should be greater than the first clay layer. Before lowering the pipe, it is necessary to raise and lower the drilling tool several times, like a piston. This will remove possible obstacles in the path of the pipe and greatly facilitate its descent. After the pipe is completely lowered, the gap should be filled with gravel screenings - this is an ordinary sand-gravel mixture screened out from the sand. No sand, as sand can penetrate into the borehole.
How to rock a well
In order to quickly shake the well, it is better to use a powerful centrifugal pump. Such a pump is capable of handling very dense media. Although you can get by with an ordinary household pump. In order for the vibration pump to work more efficiently, you should periodically lift it and shake the water with your assembled knees in order to lift heavy particles from the bottom, and then continue pumping water again with a pump with a lower water intake, otherwise the pump will silt up the well with the upper water intake.
When rocking the well, the filter screening of gravel will shrink, so it should be periodically poured.
The process of swinging the well is quite time consuming, so you should worry about the drainage channels or try to reach the drainage ditch with the hose.
Once the well is fully rocked, it should be equipped with a pump for daily operation.
Advantages and disadvantages of manual water well drilling
The advantage of manual drilling, in addition to the above-mentioned low cost, is the fact that there is no need to drive into the site of bulky special equipment, therefore, your green spaces or landscape design will not suffer.
Having a relatively shallow depth, such wells are pumped much faster and are less prone to pull-in.
In the absence of electricity, water can be obtained using a manual suction pump.
The main disadvantage of hand drilling is its limited depth. The disadvantages include the criticality of soil density and the lack of specialists who are ready to take on repairs if necessary, although it is less likely to occur than in deep machine wells.
Video how to drill a well manually with your own hands:
An increasing number of people are thinking of drilling a well at their site.
Everyone can quickly make a well at their dacha, and independently and correctly, both with a pump supply and manually.
But this process is complicated, as it is often performed with the help of special equipment, it requires knowledge and adherence to some nuances.
There are several reasons for arranging a well at your site:
- Own water source in the country.
- Independence from utilities.
- Access to water 24/7.
- Pure water free of chlorine and heavy metals.
- Drilled independently once and for years.
Let's look at the question of how to drill a well with our own hands in all the details: types of drilling, nuances and the drilling process itself for practical implementation in practice.
We are not talking about a well, since this is a different type of well, which does not always justify the time and labor costs.
There are several ways to quickly and correctly drill with your own hands.
Let's take a closer look at them so that you understand not only the essence of drilling, but also the options for choosing a method in relation to your summer cottage.
Shock rope
A special drill bit breaks the rock, preliminarily rising to a height of 2 meters above ground level. The principle of operation resembles the stroke of a piston in an engine: rose-hit-rose.
With such drilling, it is worth constantly pouring water into the well so that the walls do not crumble, and the rock in the well softens and is easily extracted.
For wire rope drilling, you need a tripod with a height of 2 meters, it stands directly above the drilling site. At the top of the tripod there is a block with the help of which the cable with the drill is pulled up and down.
You can easily drill up to 20 meters deep in a day. You can do without the tripod yourself, but you will be physically exhausted. Don't listen to this kind of advice from homebrew drillers.
Watch the video: the tripod is very easy to assemble, and its role is invaluable.
Impact-rotational
The method is somewhat similar to the one described above.
The difference lies in the nature of the movement of the drill in the well - it not only strikes, but also rotates.
The soil is removed using a special bucket.
If the soil in the country is dense, then it is better to use this type of drilling.
Auger
The most common method used by the auger is a metal rod with a screw thread along its entire length.
The auger has an advantage: it destroys the soil in the well and then brings it to the surface.
Auger drilling is performed in one of 2 ways:
- 1st - the blades are welded to the auger at an angle of 90 degrees. Disadvantage - the soil will still crumble from the drill and will have to be removed separately;
- 2nd - the blades are welded at an angle of up to 70 degrees. During the extraction of the drill, soil will not get inside the well, so this method is more profitable. You just need to have the necessary auger.
Please note that in order to drill a well quickly, correctly and without breakdowns, water supply is required directly into the well itself, since it lowers the temperature of the drill itself, softens the soil in the well.
As a result, it can always be pumped out by the pump yourself.
Columnar
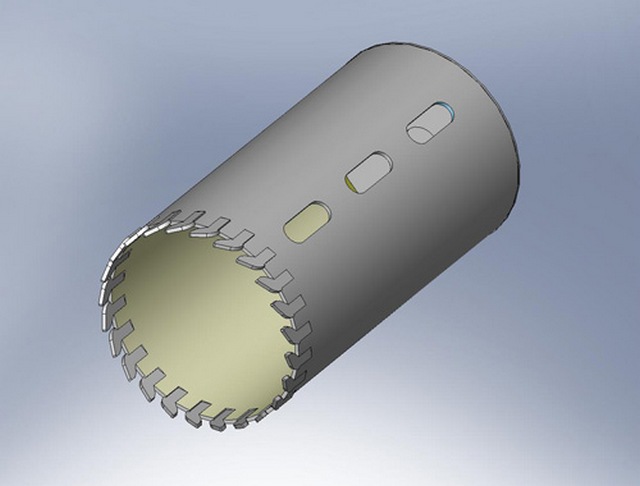
This is done with a core bit, which is like an upside-down empty glass with metal teeth.
When rotating and passing through the earth, the bit forms a borehole of the required diameter. All the collected cuttings are accumulated in the bit, then, together with it and the sand, is carried to the surface.
It is enough to hit the bit correctly with a mallet a couple of times, as it will immediately empty the entire "stock" of soil from the bottom of the well. If the soil does not go, pick it with a twig. Only a clean drill can be immersed.
When drilling, water is poured into the bit through the pipe, which softens the soil. The column approach is suitable for any soil.
To summarize: of all types of drilling, auger drilling is less effective, although it is easy to carry out independently.
The auger is suitable for softer rocks, for hard ones - only the percussion-rope method or percussion-rotary method.
Well types
There are several types of water wells. Each has its own terms of use.
Well on the sand
With a depth of 15 to 30 meters, such a well is drilled by a screw method.
The well in this embodiment is a pipe with a diameter of 10 to 12 cm, at the end of which there is a filter in the form of a perforated pipe wrapped in a net.
When drilling a well, you need to find a layer of so-called water-bearing sand and put a filter. Otherwise, such a layer is called a water lens.
The thicker the lens, the greater the well debit - you get more water per unit of time. The service life of the well reaches up to 20 years; in winter, the well can be mothballed.
Rarely, a well is silted up - in this case, it is enough to clean it either with a powerful compressor or an injector. The latter option is preferable.
Benefits of a well for sand:
- low cost of drilling;
- drilling takes only 1-2 days, even by hand;
- can be drilled in hard-to-reach places, in the country, with small-sized installations;
- the water is not cloudy - no complex purification system is needed;
- well licensing and registration are not required.
There are only two drawbacks: low durability in comparison with artesian, instability of water level and well debit. The water runs out quickly, it takes a long time to fill.
At the same time, it is rarely cloudy, but it is supplemented with sand - therefore, a filter is needed. At the summer cottage, cloudy water is suitable only for irrigation.
Artesian well
The filter is not used when drilling.
Water accumulates in limestone layers, while it is not cloudy: porous limestone contains water, actively filters it, and its debit is up to 10 cubic meters per hour, which is a lot.
The service life of such a well can be tens of years!
Another advantage of such a well is that there will be no ammonia, microbes, suspended solids in the water, it will not be covered with sand, therefore even a simple pump of the "Kid" type will cope with the task.
The advantages of an artesian well:
- a certain depth (the geological map of the area is well studied);
- huge fluid loss, the water is rarely cloudy;
- durability - 30-40 years;
- constant water level;
- you can put a powerful pump in the country.
True, there are a number of disadvantages: drilling takes up to 7 days (but not manually!), It is imperative to clean the water in the well from a high concentration of minerals, sometimes permits for drilling are required.
There is also a well familiar to everyone and its Abyssinian variation. We do not consider them, because technically they are not drilled, but dug out, and the water in them comes from the ground in a different way.
There is always a risk of external contamination in the well.
Drilling a well with your own hands
The drilling process consists of 3 stages. The description is followed by a detailed video of the process.
Stage 1 - preparatory work:
- We find out in the land committee or with neighbors the depth of the reservoir with water;
- Get ready for machine drilling - it is impractical to work manually in a well at a depth of 20 meters;
- All sources of sewage should be located as far as possible from the place where you will make the well;
- The borehole diameter is always slightly larger than the casing diameter - 10-12 cm. Prepare the pipes in advance;
- We dig a guiding recess in the selected area: a hole with a diameter and depth of 1.5 m. We strengthen its walls with slate or metal sheets so that it is not covered with sand.
Stage 2 - assembling the drilling tripod:
- We take 3 metal pipes or very strong beams, the length of the part should be 4-5 meters;
- We put the structure on the ground so that two legs are turned in one direction, and the third in the opposite direction;
- In each leg you need to make a hole for fasteners;
- We fasten the legs in the form of a triangular pyramid;
- At the top of the tripod we put a block on which the cable will slide freely;
- We put a mechanical winch, with which we will carry the drill manually (you can use an electric one);
- We fasten the cable, and on top we fasten the drill.
The tripod is ready.
Stage 3 - drilling:
- We take a tripod with a winch, a hammer in a glass, a rope (cable) and an impact bar;
- We put a tripod, on top of it - a winch with a projectile over the dug hole, right above the drilling point;
- We lift the glass over the drilling point with a winch, lower it with force. A tool that has cut into the ground grabs the ground with a glass. When lifting, the sludge remains inside the glass. We take it out - this should be done after each rise;
- We continue to hammer the drill into the ground with the hammer bar. When it is full, take it out and shake out the soil;
- When passing a certain step, say 1 meter, we immediately insert a casing pipe, which is slightly larger than the diameter of the drill itself. It prevents the well from collapsing;
- As soon as the auger descends to the entire length of the projectile, we attach an additional bar to it;
- When drilling, we constantly check the evenness of the laying of the entire column: if you hear the sounds of the drill hitting the pipe walls, the barrel must be straightened right there. How to do it: Drive wooden wedges between the casing and the wall;
- As soon as the projectile has passed the aquifer, we do not deepen the pipe further. After the water arrives, we wait 1 hour, then we pump it out with a garden pump and check for cleanliness. We repeat this until the water becomes transparent;
- We pumped out water in an impromptu well for the last time - leave the well until tomorrow;
- The next day we measure the debit of the well: we multiply the depth of the well in meters by the pump capacity (cubic meters per hour) and divide the result of the product by the difference between the dynamic and static water levels. The static level is the distance to the water surface (we lower the load on a rope into the water and measure along the length of the dry part of the cable), the dynamic level is the distance from the ground to the water, but after pumping it out. If the difference between the two levels is small, then the well debit is very large. This means that more water is supplied per unit of time than the pump is capable of pumping out in the same unit of time. The pump casing always indicates its capacity - cubic meters per hour;
- If the debit is several cubic meters, then stele the bottom of the well: fill in a layer of gravel or crushed stone, 20-30 cm wide;
- We fill the entire space between the wall and the casing with gravel, sand;
- We immerse a pump into the well (any, even a budget "Kid" will do an excellent job) according to the manufacturer's instructions and fix it on the surface, supply power;
- We connect the hose, disassemble the tripod and the winch.
An important point! This moment is not indicated in the video, but it is significant: it is better to take the first extracted, already pure water to the laboratory for a series of tests to be performed on it - it may turn out to be completely unsuitable for drinking and contain traces of heavy metals, pathogenic organisms and an increased amount of minerals.
Conclusion
Now you know how to drill a well with your own hands in your country house.
Pay attention to the process itself: in the video, all work takes place at home using equipment that can be borrowed from neighbors or rented for a couple of days.
After drilling, using a pump, you can organize the supply of water to any point of the site, even to the house.
Put a simple submersible "Kid" in the well and it will easily cope with the supply of water in the required volume.
Country houses increasingly resemble a completely independent system in the field of water supply and sanitation. After all, many happy owners of their own homes want to live comfortably even where there are no centralized water supply and waste disposal systems. It is all the more pleasant to have your own source of clean drinking water on the site - a well.

We are accustomed to the fact that well water is understood as artesian water. But in addition to the artesian well, there is also a sand well and an “Abyssinian well”. Below is a description of each of these groundwater sources in more detail.

This type of drinking source has been known for a long time. The depth of the Abyssinian well can be 8-12 m.The Abyssinian has a very simple design:

Advantages
- Such a well can be made inside the house, which will allow it to be used even in winter. If your site experiences a power outage, you can install both an electric pump and a hand pump.
- Despite its small size, the Abyssinian well is an excellent source of drinking water for a summer cottage. Indeed, due to the simple design, the Abyssinian can be easily reproduced independently in just 10 hours.
- The Abyssinian is called a well conditionally. It is not susceptible to such an effect of water flow, surface runoff, therefore, the water in the well often has better performance than well water. Especially in microbiology.
- At the same time, in terms of mineral composition, the water in the Abyssinian well often outperforms the artesian one. This applies to inorganic iron and hardness salts.
- To equip this well, it is not required to obtain a license and enter it in the register.
- If necessary, all the constituent parts of the Abyssinian can be easily dismantled and moved to another place.
- Arrangement of such a well will cost you less than other types of water wells.
Peculiarities
But before you make an Abyssinian well on your site, you need to take into account a number of features.
- The aquifer must not extend below eight meters. This is due to the fact that the well is very narrow, therefore, water-lifting equipment can be installed to it only from the outside.
- Even if all installation rules are followed, the water in the Abyssinian can undergo a change in composition due to the seepage of pollutants through a relatively small soil layer. For this reason, potential contaminants should not be allowed near the well.
- It is impossible to drill an Abyssinian well in rock formations, since a drill cannot cope with them. The best soil option is medium to coarse sand, in which the well is less susceptible to siltation.

The aquifer of this well is located in a sandy layer. They resort to its arrangement when the water layer is more than ten meters deep, maximum - 50 m.
This is another source of drinking water supply, which can be equipped with your own efforts without significant material costs. The sand well includes the following elements:
- bottom filter;
- submersible pump;
- casing and water supply pipe at the same time;
- headband.
A well of this type can produce up to 20 cubic meters of water per day, which may well meet the needs of a small house.
Peculiarities
But there are a number of nuances in the installation and operation of a well in sand that must be taken into account.
- The chemical composition of water does not always comply with sanitary standards, therefore, for its use for drinking purposes, it is necessary to purify it.
- Your gerbil has a maximum lifespan of 15 years. It all depends on what kind of soil the filter is in: the coarse fraction is a protection against siltation, extending the life of the well.
- In addition, the gerbil needs constant maintenance. Therefore, if it is not possible to regularly pump it, it is better to abandon this well.
- If your neighbors have drilled a similar well at the same depth, then the debit of your water source will significantly decrease.
- The well filter must be flushed annually. Sometimes flushing is required every six months.
The wells mentioned above are suitable for small houses. If you are the happy owner of a country house of impressive size or for other reasons the gerbil and Abyssinian are not suitable for you, then the only way out is to drill and equip an artesian well.

It is impossible to drill this source on your own; you need to hire professionals whose services are not cheap. But since the flow rate of the well is high, you can chip in with your neighbors for the services of the drillers.
Artesian water is extracted from a layer passing at a depth of 0.1 km or more. It is not subject to pollution by pathogenic microorganisms, oil products, copper, zinc and has a low organic matter content.
But at the same time, artesian water is often characterized by an excess in hardness and content of unoxidized inorganic iron and manganese. Water can also have a characteristic odor associated with the presence of hydrogen sulfide in the water. In this regard, artesian water often needs to be subjected to additional purification.

Another significant disadvantage of the artesian woman is the need to obtain a license for drilling and use of the well, as well as strict observance of sanitary protection belts. The standards for the radius of the latter are unlikely to make it possible to equip a well in a small area.
Therefore, the best option is to drill one well to service several houses.
Abyssinian and gerbil do it yourself

Abyssinian well (hand drilled well)
http://d-otshelnik.forum2x2.ru/t186-topic
Abyssinian well (hand drilling well).
Despite its simplicity, the Abyssinian well is very popular among the owners of country houses. Indeed, often its debit is higher than that of a gerbil, and it is much easier to drill and equip it. But if the aquifer is below the level from which an external pump can lift water, then a sand well can be equipped. Let's consider in more detail the installation of these two types of wells.
Driving the Abyssinian well

Before you start driving the Abyssinian woman, and this is how the process of obtaining this source of water is called, it is necessary to prepare all the elements of this well. They are sold ready-made, but making them yourself is not particularly difficult.
Step 1. A filter base is made from a meter-long pipe, the diameter of which is an inch. For this, holes in the form of a slot are cut out in the walls of the pipe for 80 cm every 20 mm from each other.
Step 2. A wire is wound around the filter tube and a filter net is pulled. The latter must be fixed with clamps every 100 mm.

Step 3. A steel cone is installed on the far end of the filter, the base diameter of which is greater than the pipe diameter, and the height is 100 mm. The tip can be ordered from a turner, and the cone can be securely fixed to the filter pipe with tin solder.
In the same way, the mesh is additionally fixed.

Step 4. For the well body, prepare meter or one and a half inch pipes with threads at both ends for connection.
At the preparatory stage, you can make a headstock - a driving tool. For this, a small section of a pipe with a thick wall is taken, a centimeter base is welded to one end of the tube, and handles are welded to the side. The weight of the headstock must be at least 30 kg.

After the preparatory measures, they start driving.
Step 1. In the place chosen for the well, a pit is dug with an area of 1 square meter, and a depth of half a meter.

Step 2. In the pit, they begin to drill with a garden drill, the length of which is gradually increased using half-inch pipes, connected to each other using couplings and bolts.

Step 3. From the moment the sand saturated with moisture appears, they proceed directly to the blocking. For this, the prepared filter is connected by means of a thread to the first pipe. A sleeve is screwed onto the free end of the pipe with a termination that protects the pipe from impact. They string the grandmother and hit her sharply.

Driving can also be done with a sledgehammer, but in this case the pipe is more likely to bend.
Important! Plugging must be combined with sprinkling the pipe with soil and sealing it.
Step 4. During driving, water is constantly poured into the well and listened to. This is necessary in order not to drill past the layer of water. The wiretapping is carried out as follows: every half a meter, the well pipe is turned clockwise and listened to what sound is emitted. Thus, the rustle and rattle indicate a horizon of fine and coarse sand, respectively.
Step 5. As soon as noise appears, add more water and look at how fast it seeps into the ground:
- if slowly, then they deepen another half a meter;
- quickly - you need to go deeper by 30 cm.
When the blocking is finished, proceed to the installation of the pump.

How to make a filter well
The first thing to do before drilling a filter well is to interview your nearest neighbors if they have a similar water source. The main thing is to find out from what depth they extract water. If you have to drill more than two dozen meters, you will have to hire a team of professionals or rent special equipment.
If the layer with water is located at a shallower depth, you can do with the tools at hand.
Having chosen a convenient place, far from heaps of garbage, cesspools and other contaminants, dig a hole 150x150x150 cm. It is recommended to strengthen its walls with sheets of wood or metal.

Now you need to build a tripod, on which the winch will subsequently be fixed. Below is an instruction on how to build this structure needed to lift the drill.

Step 1. At the ends of three bars with a twenty-centimeter section, holes are cut out for the tube, which will connect these tripod supports.
Step 2. The tripod is placed over the drilling site, fixing the supports to protect them from sinking into the ground during operation.
Step 3. Attach a winch to the tripod: electric at the top, mechanical at the bottom.
Step 4. A drill is hooked to the winch.
You can start drilling, which is a cycle that repeats until the aquifer is reached, and includes the following steps:

As soon as clean water begins to flow, you can proceed with the arrangement of the well, which includes the filling of the bottom filter, installation of casing pipes, pumping equipment, the head and the caisson.


Thus, you can independently drill a well in sand or an Abyssinian well using the equipment at hand. If you need a larger debit of water, you will have to allocate a significant amount of funds and hire an organization whose activities are related to the drilling of artesian wells.
When choosing drillers, it is best to choose a company that has several drill rigs and does not offer plastic casing. In addition, this firm must have a hydrologist.


Video - Abyssinian well inside the house
Video - Drilling a well in the sand. Diy water well