Specialization: a professional in the field of construction and repair (a full cycle of finishing work, both internal and external, from sewerage to electrics and finishing work), installation of window structures. Hobbies: see column "SPECIALIZATION AND SKILLS"
What to make the floor on the balcony from is a question that needs to be addressed even before the start of repair work. Here, a lot depends on the state of the ceiling, and on whether the balcony is glazed, and, of course, on our personal preferences. However, the process of arranging the floor is by no means limited to the choice of flooring: no less important is how carefully we will carry out all the preparatory work, as well as how efficiently the insulation will be carried out.
In the article I will tell you how to properly organize the overhaul of the floor on the balcony, and also describe the algorithm for performing the key stages of this process.
Step 1. Preparing the base
Stove Inspection and Repair

Before we make a floor on the balcony, we need to make sure that it has a solid foundation. The balcony slab most often acts as the base, therefore, at the first stage, all attention should be paid to it.

I usually work according to the following algorithm:
- To begin with, I dismantle the old flooring and other structural elements - in general, I remove to the maximum everything that blocks access to the main foundation.
- Then I inspect the condition of the balcony slab, checking it for cracks. I examine the cracks themselves with the help of probes - steel plates of a fixed thickness, which allow me to measure the depth of the defect and determine whether its propagation in depth has stopped.

If the probe, after plunging into the crack, rests against the barrier, then there will be no deepening in the near future (most likely). If the plate is wedged in a narrow slot, then there is a risk of further deepening of the defect up to the formation of a through hole.
- I clean all identified cracks from fragments of concrete and dust, and then I embroider them to stop their expansion and deepening. I fill the defects with a repair compound based on high-quality fast-hardening cement.
- Before closing a wide crack, I form several transverse cuts on it - they will contribute to a more reliable fixing of the solution.
- I knock down fragments of concrete from the edge of the balcony slab, which are held only by reinforcement. I make formwork from boards and pour mortar to restore the edge.

Waterproofing
When the repair compound polymerizes and dries, it will be necessary to protect the base from moisture. Waterproofing can be carried out both by a surface method and using penetrating compounds.

The upper sealing of the floor of a street balcony without opening is performed as follows:
- I clean the base from cement dust that falls on it during repairs.
- I lay several layers of roofing material or a waterproofing membrane on a concrete slab.
- Instead of rolled material, you can use paint moisture-proof compounds: I apply them with a brush in two or three layers.

- I pay special attention to finishing the gaps between the balcony slab and the front wall of the house. Here I raise the waterproofing layer by 10-15 cm, forming a barrier against leakage.
Instead of surface products, it is possible to perform waterproofing of a concrete base using penetrating compounds (Skrepa M500, Penetron and analogues). The technology for applying them will be as follows:

- We clean the concrete slab and moisten it with a spray bottle.
- Using a brush with synthetic bristles, apply the first layer of penetrating material.
- When the coating begins to polymerize, but does not dry completely, moisten it.
- We apply the second layer, performing strokes in a perpendicular direction.
- Within 48 hours (minimum), we make sure that the treated surface is not subjected to mechanical stress and temperature changes.
Arrangement of the screed
If we insulate the ceiling, then the question of how to level the base for the floor covering does not arise - all the same, the floor level will rise due to the heat-insulating layer. But for open balconies, alignment is most often done by pouring the screed over the beacons:
- We install beacon profiles on the base, forming a slight slope towards the street. This is done so that rainwater does not accumulate on the floor and, moreover, does not flow into the room.

- We install metal corners along the perimeter, which are designed to strengthen the edges of the screed. You can also fix the perimeter with bars or boards with a thickness of 30 mm or more - they will not allow the solution to spill over the edges of the balcony.
- We are preparing a solution for pouring, as a binder I use cement grade M300 and higher. We add plasticizers to the solution for quick spreading and hardeners that accelerate polymerization.

- Pour the screed, carefully making sure that there are no cavities in the solution. We roll the fresh solution with a spiked roller to remove air bubbles.
- Two or three hours after pouring, we remove the beacons, and fill the grooves formed in the ceiling with a solution. We rub the surface, removing the largest irregularities and trying to get the smoothest possible coating.

We dry the screed as usual: under a plastic film, with periodic moistening of the surface. Bulk concrete dries for 28 days, but this time can be reduced by adding hardeners to the solution. In any case, further work should be postponed for at least two weeks.
Step 2. Warming
Preparatory work

By insulating the floor on the balcony, we will reduce the overall level of heat loss in the room by about 5 - 8%. In addition, the thermal insulation procedure ensures the formation of an acceptable microclimate for a balcony or loggia, so it is definitely worth spending time and money on this.
Even an unheated balcony will be more comfortable if we perform the work according to the following scheme:
- First, we treat the base with a primer with antiseptic components. This is done in order to prevent the development of fungi, which under a layer of insulation will feel quite comfortable.
- Next, we decide on the insulating material. It all depends not only on what result we want to get, but also on the configuration of the balcony. The thing is that when deciding how to raise the floor high, we should make sure that the raised coating will not prevent the balcony door from being forged: sometimes this imposes serious restrictions on the choice of thermal insulation.

- After that, we proceed to the installation of the frame for the insulation. If the concrete slab has not previously been waterproofed, several layers of polyethylene film are laid under the frame.
- Then, from a bar with a section of at least 40x40 mm, we cut out the logs, which we lay on the floor. We attach the extreme log to the wall with metal brackets, and set all the rest on the same level with it on the support bars.
It is very convenient to align the logs along the plane with the help of plastic mounting wedges, which are used when installing PVC windows. Such wedges do not deform under compression and do not swell in a humid environment, and their price is only slightly higher than that of wooden ones.

- The optimal step between the lags is 60-70 cm (so the floor will not sag), but I prefer to focus on the width of the thermal insulation material.
Installation of thermal insulation
You can insulate the floor on the balcony using different materials. I usually use these options:

- expanded clay or perlite - if the configuration allows you to raise the level of the subfloor by at least 20 cm (and preferably by 30 - 40);
For more efficient functioning, the expanded clay layer can be poured with a very liquid cement mortar.
- polystyrene foam or polystyrene - an economical option that allows you to most effectively insulate the floor on the loggia, raised above the base by 10-12 cm;
- Mineral wool is the best solution, since, along with good thermal insulation potential, mineral wool has an acceptable vapor permeability.
I do my work like this:
- If expanded clay is used, then I fall asleep it directly on the floor so that about 30 mm remains to the upper edge of the lag.

- I adjust the panels of heat-insulating material in size to the cells between the lags of the subfloor. This is done so that the insulation does not wrinkle on the one hand, and on the other hand, large gaps do not form during installation.
- I lay polystyrene or mineral wool in the space between the lags. At the same time, I carefully monitor that between the insulation and the rough flooring there is a ventilation gap of 3-5 cm.
- All cracks and gaps are filled with self-expanding polyurethane foam.

- I put a layer of vapor barrier on top. When choosing how to lay the insulation, I usually prefer foil film or thin foamed polyethylene with a metallized coating. These materials not only protect the heat-insulating layer from moisture, but also play the role of a “mirror” that reflects infrared rays back into the room. .
- I lay a subfloor on top of the vapor barrier. It can be made from boards, chipboard or plywood (preferably moisture resistant) with a thickness of 15 cm or more.
It is not at all necessary to do the floor with your own hands on the balcony according to this algorithm. However, for a glazed loggia, which will be used, if not as part of a living space, then at least as a recreation area, one should not neglect either waterproofing, or filling the screed, or insulation.

In addition, do not forget about the flooring itself: in many respects it determines how comfortable the room will be. I will devote the next section to the key aspects of the selection and installation of materials for this stage of work.
Step 3. Installing the flooring
Overview of materials
It is impossible to say unequivocally which floor is better on the balcony: each coating has its own scope, its own poles and minuses. That is why here I will give a brief overview of the main materials, and then I will describe the editing algorithms most commonly used.

So, what to put on the draft floor to finish the balcony or loggia? We look at the table and choose:
| Material | Features of use |
| Tile | It is with the help of tiles (ceramic, clinker or porcelain stoneware) that the floor is most often finished on a non-hermetic balcony. The material is quite expensive, but then the design is not afraid of moisture, temperature changes, or climatic influences. |
| Polymer self-leveling floors | Another fairly modern solution that allows you to protect the base from moisture as much as possible. A small balcony area allows you to pour even quite expensive polyurethane mixtures - all the same, the material consumption will be moderate. |
| plank floor | Natural wood is most often used for finishing glazed balconies and loggias. At the same time, open structures can also be finished with wood - planken and decking work well here. Wood-polymer composite (WPC) should be included in the same category: they are not at all afraid of moisture, and visually they are difficult to distinguish from natural wood. True, they are expensive, and they do not tolerate severe frosts very well, but they are easily mounted with their own hands. |
| Linoleum | An economy option, which is usually implemented on balconies in typical high-rise buildings. Since the level of pedestrian traffic is relatively low here, household models can be used for decoration. The main thing is that the substrate is thicker - then walking on the floor will be much more pleasant. |

Naturally, other answers can be given to the question of how to cover the floor on the balcony: this is a cork laminate on a moisture-resistant basis made of pressed cellulose, and a soft floor - a puzzle that is assembled from individual polymer elements, and other floor coverings.
Here it is important to choose an option that will meet the operating conditions and easily tolerate periodic moisture and temperature changes that are inevitable on a balcony or loggia.

tiling technology
When choosing what to lay on an open loggia, many often stop at the option with tiled or clinker tiles. The method of its installation practically does not differ from the method of flooring in other rooms. So here I will give only the main points of the algorithm:
- For cladding, we choose exclusively floor tiles - especially since it needs very little.
- We prime the base, impregnating it with an antiseptic penetrating composition.
- We prepare tile adhesive with good adhesive ability. For open balconies, it is advisable to take moisture-resistant glue brands that are elastic and not afraid of temperature changes.

- We apply the adhesive composition with a grater both on the base and on the tile.
- We lay the tile on the floor, press it and carefully level it (keeping a slight slope to the outer wall of the balcony).
- To maintain a constant width of the seams between the cladding elements, we use special spacers.
- After facing, we remove the remaining glue from the surface and leave the balcony for about 12 hours.

- Then we remove the remote crosses, if necessary, we embroider the seams and perform their grouting. For grouting, you can use any moisture-resistant composition, but here I would recommend stopping at polymeric materials: even if they are more expensive and more difficult to apply, but after polymerization they are not at all afraid of moisture.

Finishing the balcony with tiles is completed after the grout has completely dried: we just have to rinse the surface of the tile, removing the remnants of glue and jointing mixture from it.
Linoleum flooring
If for open balconies the “default” finishing option is ceramic tiles, then when decorating a glazed loggia, inexperienced craftsmen are often interested in how to lay linoleum. There are several nuances here:

- We bring a roll of linoleum onto the balcony and leave it there for at least a day. All the same, deformations of the coating cannot be avoided (temperature changes here are sharper than in an apartment), but it is very important that the material is sufficiently stable at the time of installation.
- Then we roll out the coating on the floor and perform a rough trim. Along the walls we leave a margin of 40-50 mm for the shrinkage of the canvas.
- You can lay linoleum on the balcony without glue, but I still prefer glue installation as it is more reliable. To do this, I fold the roll in half, and apply a layer of PVA-based glue to the freed part of the subfloor.

- I turn the linoleum back and smooth it out, removing wrinkles and air pockets.
- I repeat the operations for the second half of the material.
- 12 hours after gluing, I perform the final trimming: cutting the edges so that the gap to the wall is about 5 mm.
- The installation of the plinth around the perimeter of the balcony and fixing the edge of the canvas at the entrance with a small threshold, which should fit snugly against the balcony, completes the work.
Conclusion

Of course, you can finish the floor on the balcony and other technologies. However, the algorithms I proposed will be useful not only for beginners, but also for experienced finishers, so before starting repair work, you should carefully study the video in this article, which contains a number of useful recommendations.
In addition, you can seek advice on arranging floors on the balcony by asking a question in the comments.
Before starting work related to arranging the floor on the balcony, you need to decide on a couple of important points - the purpose and choice of material for flooring.
When choosing a material for cladding, one should be guided by the purpose of the balcony space used as an additional room.
We solve the issue with the appointment
The balcony is a multifunctional space of the apartment. This room has a universal purpose, and its use depends on the individual needs and wishes of the apartment owners.

Do-it-yourself floor on the balcony, photo
Consider the most popular options:
- Terrace open type operated in the warm season (mainly in the summer months).
- Glazed- in the warm period it can be used as a workshop and even a gym. In winter, it is often used to store household items.
- Thermally insulated. Thermally insulated loggias and bay windows can be used year-round, including as an additional living space.
Having considered every detail, you will be able to fully translate into reality all your ideas, investing in their implementation of funds in a small amount, limiting yourself to minimal labor costs.
Watch a video that teaches you how to properly install flooring on a balcony:
Choosing a material
Let's look at how to lay the floor on the balcony and what is the best way to cover it. As mentioned above, when choosing a finishing material, you need to focus on the purpose of the balcony space, the features of its application.

What can you make a floor on a loggia or balcony from? The following materials can be used as a floor covering for a balcony:
Tile. Ceramic-based tiles are the best solution for an unglazed balcony. To install it, you just need to level the floor surface.
Among the advantages of this material are:
- strength;
- long service life;
- resistance to temperature changes (ability to withstand exposure to frost);
- presentable appearance.
There is only one minus for ceramic tiles - this is a cold material, on such a floor, even in summer, the feet will quickly freeze.
On a note! Ceramic-based tiles can also be used for closed bay windows, in combination with a heated floor system.Another suitable material for arranging the floor on the loggia is tree. Wood flooring is done on closed balconies; This fact is explained by the ability of wood to absorb moisture. The wooden floor on the open balcony will quickly collapse.
The next option is self-leveling floor- used on loggias with strong supporting structures and on well-insulated closed-type balcony spaces.
Self-leveling floors do not tolerate the effects of negative temperatures, since the period of their use is significantly reduced.
Many apartment owners choose to finish the floor on the balcony linoleum.

This option is more suitable for insulated balcony spaces. On sale are also linoleum coatings designed for "street" use.
The most budgetary coverage option is considered staining. In recent years, almost not used and does not look very presentable.
Foundation preparation
Having decided on the use of a bay window and finishing material, you should prepare the base.
Attention: for a certain type of finish, its own method of preparing a balcony floor is provided.We present to your attention a number of rules that are identical for all types of coatings.
- First of all, it is necessary to level the floor surface, dismantle the old coating and screed, if any.
- A level is used to check the evenness of the surface and the location of the plate.
- An important point is the installation of beacons. They are mounted transversely to the bay window for the entire width. Profiles are installed at a distance of 60 cm.
- Irregularities are compensated by hardboard gaskets.
- The next step is to prepare the screed solution. The consistency of the solution should be similar to sour cream. Using the rule, evenly distribute it over the entire area.
- Wait until the solution is completely dry - be guided by the instructions.
If the balcony is open, during the leveling process, form a two to three degree slope from the outer wall towards the street so that the flowing water does not destroy the coating.
We make flooring
Let's get acquainted with the technique of repairing and laying flooring for a certain type of flooring.
Linoleum
To install linoleum, you will need the following tools:
- roller with a rubber-coated head;
- adhesive suitable for a particular coating;
- fasteners (best of all self-tapping screws, and for fast flooring - dowels) for fixing skirting boards;
- a knife (you can use scissors) to adjust the size of the finishing material;
- skirting board of the right size.

Flooring instructions:
- Prime the base prepared in advance.
- Roll out the linoleum and let it lie down for a couple of days. The material should flatten and stretch.
- The dimensions of the linoleum should be clearly adjusted to the area of \u200b\u200bthe loggia around the entire perimeter.
- Roll up the material to half the balcony.
- Apply the adhesive to the base and finishing material. Roll out the linoleum and press it to the base, walk on it with a roller. Perform similar actions with the second half of the material.
- Places of docking of linoleum with walls are covered with plinths.
wood flooring
Wood is a natural material with "living" properties. For this reason, such a floor is made only in well-waterproofed rooms. Upon contact with moisture, the wooden floor swells and changes its original characteristics. Consider how to make a wooden floor on the balcony with your own hands.
To install a wooden floor you will need:
- fasteners;
- level;
- waterproofing material;
- dowels (for fixing to a concrete base);
- screw driver;
- drill;
- jigsaw;
- glue;
- lacquer or stain for finishing.

Wooden floors on the balcony, photo
Wooden flooring can also be done on your own. This will require carpentry skills, you must also follow a number of recommendations:
- On the base (do not forget to level it first!) Glue a layer of waterproofing. For this purpose, a dense polyethylene membrane glued in several layers, or bituminous insulation, is suitable.
- Using the level, set the logs - along or across to the bay window. The length of the bars is equal to the length or width of the loggia, the installation range is 40-70 cm.
- Cover the logs with compounds that provide protection against moisture, fungus and fire.
- Lay a sealant (for example, mineral wool, polyurethane material or foam plastic) in the cavity.
- The crate is attached with dowels to the concrete floor.
- The boards are placed transversely to the bars and fixed with self-tapping screws. Before installation, they are impregnated with the same compositions that were used to process the log.
- The finishing coating should be mounted with small gaps.
- The plinth is located as close as possible to the floor and to the walls of brick (concrete). Fastened with self-tapping screws.
self-leveling floor
Self-leveling floors are gaining more and more popularity. The advantages of such a coating include: good tolerance to temperature fluctuations, elasticity, wear resistance and a diverse color palette.
This finish looks aesthetically pleasing and is perfect for residential premises.
To create such a cover you will need:
- solution;
- dye;
- mixer for the preparation of a building mixture;
- lighthouses;
- large spatula.

Work progress:
- The base is primed in three or more layers (it is important that each of the layers dry well).
- A solution is being prepared (its consistency should be similar to sour cream). Water is gradually added to the dry mixture, after which the components are mixed with a mixer at a low rotation speed.
- Dyes are added. The amount of pigments is taken based on the desired tone and concentration of the solution.
- The floor is evenly poured. The density of the filling layer is 2-3 mm. Drying takes 2-4 days.
Tile
Tiled flooring is one of the most durable and wear-resistant types of flooring, suitable for any environment.
Materials and tools for work:
- steam and heat insulator (for loggias operated as living quarters);
- dividing crosses for tiles;
- putty knife;
- adhesive composition;
- grout mixture;
- building level.

To equip the living area on the balcony, before leveling the floors, a vapor barrier and heat-insulating layers are laid. Warm floor
The device of the "warm floor" system on the balcony is not available to everyone. Such a coating is quite expensive, but the costs are fully justified after the cold season comes. With the "warm floor" system, the atmosphere on your balcony will be warm.
To create a comfortable environment on the loggia you will need:
- underfloor heating system;
- finishing coating.

Let's take a look at the course of action:
- Prime the base.
- Lay heated mats on top and make cabling.
- The mats have a small width, so they are rolled out in one direction for the entire length of the loggia.
- When you get to the end, turn the mat in the opposite direction by cutting the net. Perform similar manipulations until the entire bay area is covered.
- Rewind the unfolded cover.
- Thoroughly clean the overlap of debris and wash.
- Prime the base and let it dry.
- Finishing installation is carried out due to the adhesive base of the floor covering grid with heating.
- All cables must be securely insulated.
- After these steps, a screed is made. Density is determined by the section of the electric cable of the heated floor.
- At the very end, you need to put a finishing coating, such as tile or laminate.
To install such a heating system, you should take care of a separate line for connecting an electric meter and automatic shutdown.
- Wooden boards can be replaced and chipboard sheets can be laid.
- Heated floors are suitable only for closed loggias and balconies.
- Use only high-quality finishing materials, especially if you plan to cover an open balcony.
- Certain types of linoleum coating can be used on open balconies.
It is quite possible to equip the floors on the balcony on your own. To do this, you need to decide on the purpose of the balcony space and the type of finishing coating.
What if the apartment is not very large in area? Many of us try to rationally use the space, organizing there the continuation of rooms, an office, a play area, a flower garden or just a recreation area. Whatever the purpose of this space, in any case, it needs to be finished. It is not very correct to decorate a balcony and a loggia according to the residual principle - it will be very difficult to get a harmonious and cozy space. It is necessary to approach repair work on the balcony as carefully as to or. The first thing that is important to decide is.
What will be the floor on the balcony or loggia, depends not only on the preferences of households and the family budget, but also from the features of the room. The leading role is played by or not: on an open balcony, the floor should be more resistant and strong. If the room is glazed, then the choice of materials expands: only the presence imposes restrictions. Let's figure out which materials are suitable for different conditions.
The arrangement of the balcony space includes the creation of a new floor. It does not matter at all whether it is glazed or not, the nature of its use and other features. A quality floor is essential in all these cases. It will not only increase the comfort of using the loggia, but also protect the balcony slab from destruction. To make the floor on the balcony with your own hands, you should perform a number of works.
Rice. 1 Self-leveling floor on the balcony
Create a floor on the loggia with your own hands in the following way. First, the loggia is freed from all the things there. Remove the coating from the floor surface, if any, remove debris.
Considering how to make the floor on the balcony with your own hands, find out the evenness of the base using a level. You can pour some water on the floor. It will immediately be noticeable where it flows and where it collects in the form of puddles. If this happens, then the surface needs to be leveled.

Rice. 2 Repair of the floor on the balcony - pouring the screed
The arrangement process begins with the creation of a screed. It is poured over beacons, which are leveled with a level.
If the balcony structure is open, then the screed is laid with a slope outward. This will allow water that hits the surface of the plate to flow out without problems. Precipitation will not accumulate on the floor.
The screed can be made from cement mortar or self-levelling. For the second option, a frame is made so that the liquid solution does not flow out of the balcony space. It is required in cases where a self-leveling screed is made on an open balcony with a metal fence.
Balcony floor materials
The choice of materials for the floor on the balcony is a very important process. The durability of the structure, the convenience of its use and maintenance depend on this.
The material for the balcony floor must meet a number of requirements. It must be reliable and durable. If the balcony space is not heated, then frost resistance is an important characteristic. Many remote structures suffer from high humidity. The floor material must be resistant to moisture.

Rice. 3 How to finish the floor on the balcony - wooden board
When choosing materials, the fact that the loggia is open or closed is also taken into account. For flooring on a closed balcony, you can use less stable options. For open loggias, it is imperative to use materials that tolerate temperature extremes and water ingress. These options include ceramic tiles. It is she who is most often used for finishing the floors of unglazed balcony structures.

Rice. 4 Carpet on the balcony
Floor for an open balcony
Arrangement of the floor on an open structure has its own characteristics. It requires a floor covering that would not be afraid of low and high temperatures, rain and snow, sunlight.
Preliminary waterproofing of the balcony slab is very important. Water must not soak into the slab or penetrate through the smallest cracks. Waterproof the slab with roll material, primers or moisture-resistant mixtures. At the same time, a slight slope to the outside must be maintained so that precipitation water flows off the surface of the structure.

Rice. 5 Bulk waterproofing for the balcony floor
For open loggias, the following types of flooring are most often used.
Ceramic tile
This material meets all the requirements for coating used outdoors. Tiles should be designed for outdoor surfaces, have a rough, non-slip surface, so that the floor on the open balcony is safe.

Rice. 6 What to make the floor on the balcony - ceramic tiles
Since ceramic tile is a heavy material, the design must cope with the increasing load. This material is highly resistant to moisture. To ensure high waterproofing, you need to choose the right glue and moisture-resistant grout. Additionally, the seams are treated with a water repellent agent.
Coloring
The even and smooth surface of the balcony slab does not have to be tiled or covered with other flooring material. There is another floor finish for open balconies. Coloring will create a matte or glossy surface of the desired color shade. The paint coating will protect the concrete slab from moisture and deterioration.
For concrete floors, acrylic, epoxy and polyurethane paints are used. Abrasion loads are small, so the coating will serve for a long time and effectively. It's also easy to update.
Linoleum
This material is used as a floor covering for balconies, but it is not designed for use in such conditions. Many variants of linoleums lose their elasticity and crack at sub-zero temperatures. The material changes dimensions with temperature changes, which also affects the quality of the coating for the loggia.
The downside is the low moisture resistance. However, the low price allows the use of such a coating in an open loggia, periodically replacing it after a few years.

Rice. 7 The appearance of the floor covering on the linoleum balcony
decking

Rice. 8 What floor is better to do on open balconies - decking
Decking or artificial decking is designed for outdoor use. From it you can assemble a high-quality floor that will look like wood. Decking weight is small, so it can be used on any structures. The coating is made of wood-polymer composite.

Rice. 9 Floor arrangement on the loggia made of composite material
Glazed balcony floor
Considering how to make a floor on a loggia, it can be noted that the requirements for the floor of a glazed structure are no longer so high. For the arrangement, you can use almost any floor covering, ranging from laminate to carpet. Of course, it is worth considering other characteristics of the room. If the loggia has high humidity, then the carpet is not the best option, it will collect and retain moisture. If the balcony structure is insulated and heated, then there will be no restrictions.

Rice. 10 Laminate balcony floor
When arranging the floor on a glazed and insulated balcony, installation is carried out on logs. A flooring is created, the surface of which is the floor. Between the lags there is space for insulation. To make a wooden floor on the balcony with your own hands, you must follow these steps.
Preparation of materials
In order for the wooden floor to serve for a long time, all its parts are treated with an antiseptic and dried, and then the process is repeated.
Foundation preparation
We make a wooden floor directly on a concrete base, so the old coating is first removed. The plate is cleaned, cracks and various cracks are sealed.
Laying heat-reflecting material
In order for the thermal insulation of the balcony to be effective, a heat-reflecting fabric is placed with the foil side inward. The walling material should not only cover the surface of the slab, but also go into the walls by about twenty centimeters on each side.

Rice. 11 Arrangement of the floor on the balcony - laying reflective material
Installation of transverse logs
Transverse logs are laid along the entire length of the balcony in increments of about half a meter. They are attached directly to the concrete base. Fastening is carried out in increments of six centimeters. The beam should not rest against the walls. Expansion gaps of about a centimeter on each side are required.

Rice. 12 The process of installing the floor on the balcony - laying transverse and longitudinal logs
Laying the main lag
On top of the transverse logs, the main ones are placed from the thicker and more massive bars. They are laid along the entire length of the balcony. The distance between these lags is about half a meter. For a standard, narrow balcony, three longitudinal logs are enough. Extreme should not be laid close to the walls. All lags should be at the same level. Insulation can be placed between the elements.
Solid board installation
The board is laid across the balcony, cut to size. Flooring is being created. It shouldn't hit the walls.

Rice. 13 Solid board for balconies
At the first board, a spike is cut off, all the rest are successively laid out and fastened with a locking joint. We lay the boards and fasten them to the lags with self-tapping screws. Self-tapping screws are screwed into the groove at an angle of forty-five degrees.
If you lay a massive board without coating, then the floor can be varnished or painted for wood. Watch the video on how to lay the floor on the balcony from the board.
Floor coverings made of wooden boards are popular not only for flooring in a residential area, but also for making a surface on a balcony, loggia or terrace. The wooden floor on the balcony is beautiful and warm. Moreover, the comfort of the surface is ensured not only by the possibility of laying insulation under the plank floor, but also by the characteristics of the material. Subject to the installation technology, the balcony flooring will serve you for decades. If you do not know how to make a wooden floor on the balcony with your own hands, the step-by-step instructions from our article will help you with your work.
Advantages and disadvantages of a wooden floor on a balcony
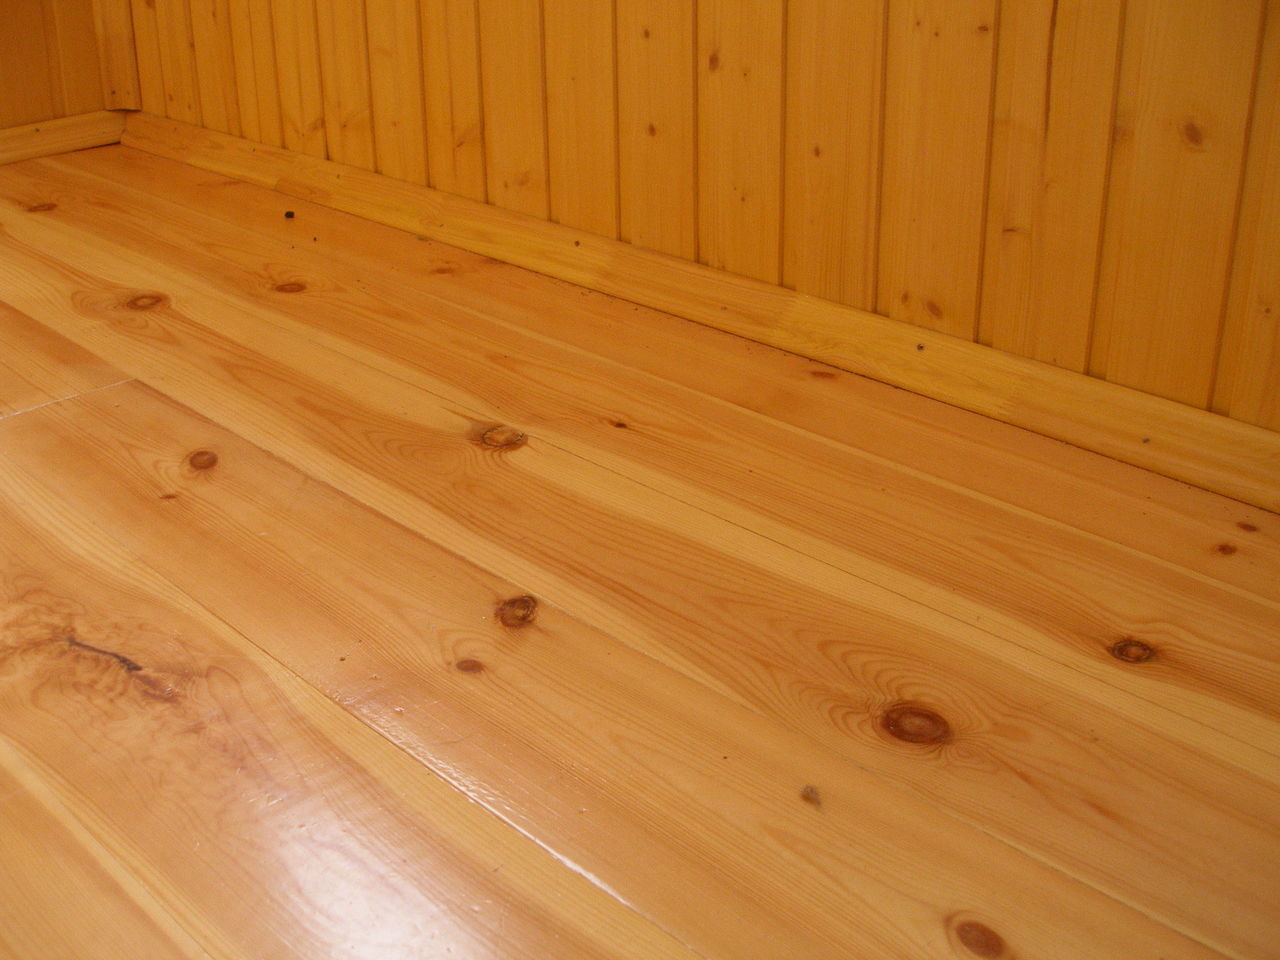
Before you make a wooden floor on the balcony, consider the main pros and cons of such a coating. Wooden floorboards are a naturally occurring material traditionally used for flooring. The tree has a low thermal conductivity, so the floor on the balcony of the boards is the best option for arranging a comfortable and warm coating in a room without heating.
The benefits of this type of flooring include:
- aesthetic appeal;
- the possibility of using in any interior;
- ease of processing (fastening and sawing of wood is performed without the use of special equipment);
- environmental cleanliness is very important for homes with children and allergy sufferers;
- if you lay a floor made of durable beech, oak or larch wood, then the surface will serve you for several decades while maintaining all performance characteristics;
- the best solution for balconies with a low floor is to cover it with boardwalk along the logs (in the end, you will be able to understand it to the level inside the room);
- to level an uneven concrete slab base, the easiest way is to lay a plank floor;
- installation of a wooden structure will allow you to perform high-quality insulation of the balcony;
- it is possible to lay wooden floors even on dilapidated concrete slabs, since the structure does not load them at all.
The wooden floor on the loggia or balcony has its drawbacks:
- wood is susceptible to rot, mold and insect damage;
- the material is highly flammable;
- wood quickly absorbs moisture from the air and deforms from this.
Important! All wood imperfections are minimized if the elements are treated with antiseptics to protect against decay and fire retardants to prevent fire. In order for the coating to absorb moisture so quickly, the floors are painted with paints and opened with varnishes.
It is best to lay the floor with boards on a glazed balcony, so the operating conditions will be as close as possible to the living space. If you decide to cover an unglazed balcony with plank flooring, then carefully approach the choice of wood. Give preference to moisture-resistant species, such as larch, and get ready for more thorough surface care.
Preparation of the concrete base of the balcony

If you are making wooden floors on the balcony with your own hands, then pay special attention to preparing the base. If the concrete slab is strong enough and in good condition, then the preparatory work is as follows:
- Using a cement-sand mortar, we close up all cracks, holes and crevices in the base. Using mounting foam, we seal all joints of structures.
- Let's start leveling the surface. To do this, cut off the protruding mortar, concrete and mounting loops.
- We prime the surface with the use of primer solutions of deep penetration. They are applied to the concrete slab and the lower part of the walls.
If the concrete slab is old and has many defects, a new screed is made:
- A waterproofing mastic is applied to the junction of the wall of the house and the slab. The composition is brought to the wall and slab to a width of 10 cm.
- Along the perimeter we fix temporary formwork to a height of 100 mm.
- We install beacon rails along the plate. Align them in a horizontal plane according to the level.
- Pour the cement mortar and level it over the beacons.
- The next day, we take out the lighthouse rails and fill the voids with a solution.
- Let the screed dry for a couple of weeks.
Floor waterproofing

When making a wooden floor on a loggia with your own hands, do not neglect the waterproofing of the base. It will protect the floor from moisture, mold and fungus. To this end, the surface can be treated with impregnation, paint, waterproof plaster, rubber, liquid glass and covered with rolled materials.
When performing waterproofing, pay attention to the following recommendations:
- The easiest way to make waterproofing with polyethylene film. The material is laid with an overlap, and the joints are glued with adhesive tape. Use two layers of film and run it on the wall to a height of 150mm.
- Ruberoid is laid on bituminous mastic, applying it with a spatula to the base. And the rolled material with the mastic already applied is simply warmed up before laying.
- Paint waterproofing suitable for self-study. Typically, latex-acrylic compounds are used, which are applied with a wide brush to the floor and bottom of the wall.
- Mixtures for penetrating waterproofing applied in several layers to walls and floors. The substance crystallizes in the pores of the material and reliably protects against moisture.
- For application moisture resistant plaster compositions use a brush or spatula.
- Liquid rubber and the same glass are the most reliable materials for waterproofing.
The device of a wooden floor on logs
The floor on the balcony of a wooden house is often below the level of the floor in the room, so while walking you have to overcome a step, which is not very convenient. Thanks to the arrangement of the floor along the logs, it will be possible to smooth out the difference in heights and bring the surface to the same level as the floor in the apartment.
Installation log for the floor

Dried timber is used to make the frame. Its section is determined from the height to which the surface is raised, minus the thickness of the boardwalk.
We work in the following order:
- We lay two beams along the longitudinal edge of the balcony and against the wall.
- Next, measure the distance between them and cut the bars of the same length. There are enough transverse bars so that they can be laid in increments of 800 mm across the balcony.
- We treat the blanks with an antiseptic and cover with drying oil.
- The bars are laid out and aligned in a horizontal plane. We fasten the extreme longitudinal and extreme transverse bars to each other with metal corners and self-tapping screws. We align the structure horizontally by placing plywood scraps or wedges under it.
- Inside the frame, we install the remaining transverse bars and fasten them to the crate with corners and self-tapping screws.
Important! We fix the resulting wooden frame with dowels to the concrete base.
Floor insulation with lags
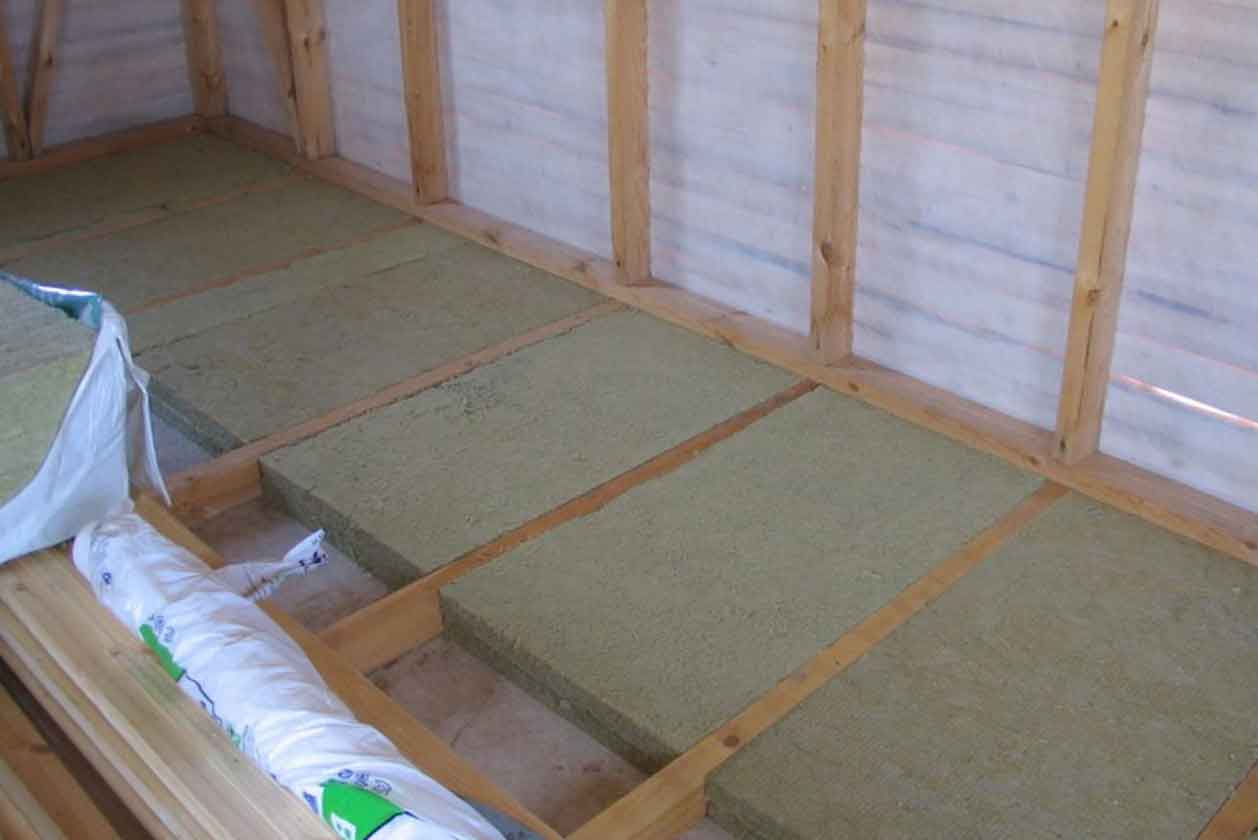
Despite the low thermal conductivity of wood, the structure must be additionally insulated. This is simply necessary if there is an unglazed balcony or open space below. For insulation, rigid board materials and roll insulation based on mineral wool are used:
- extruded polystyrene foam;
- slag wool;
- perlite-cement slabs;
- glass wool;
- basalt wool.
The insulation is cut into rectangles of a suitable size and laid between the lags. For dense laying, the dimensions of the insulation take a couple of centimeters more than the gap between the structures.
Important! A balcony without glazing is not insulated due to the lack of such a need and due to the possible accumulation of moisture in the heat-insulating material.
It is also allowed to use bulk materials as a heater. Expanded clay, sawdust, granulated polystyrene foam, ecowool, vermiculite are suitable for filling the voids between the lags. The selected insulation is poured into the space and slightly compacted. If necessary, the material is topped up.
Plank flooring

As a flooring, it is better to use boards with locking joints. We impregnate all elements with antiseptics before laying. This is done especially carefully from the back side and along the ends, because after laying it will not be possible to get to these places.
Installation is carried out in the following sequence:
- We lay the first element with a groove to the wall with an indent from it by 1 cm. We fix it to the logs with self-tapping screws or nails.
- We insert the spike of the next floorboard into the groove of the previous one and press it tightly. We also fix to the lags.
- Similarly, we stack all the following elements. We cut the last board to the required size and also lay it.
- If two boards are used in one row, then the place of their junction should fall exactly in the middle of the log.
- We install a wooden plinth.