By freeing your site from excess trees or stumps, you can find a worthy use for the resulting material. The resulting logs and roots will become the basis for making various crafts made of wood: fairy-tale characters and animals who will become worthy decoration for any children's playground or simply decorate the facades of the house.
First, decide on the size of the craft, measure necessary part logs, clear of bark and knots, clean to give the workpiece smoothness. You can fasten the parts using:
- special glue
- small carnations
- wood drills (a part is driven into the formed recess, intended to be, for example, the neck or legs of a craft)
Next, the finished figurine is treated with a special protective solution, coat with varnish and allow to dry. Decorating crafts for a playground made of logs can be entrusted to children or decorated together with the kids fairy tale hero V bright colors, come up with additional details for decoration, turning the process into an exciting game.
In addition, logs can become the basis for creating children's swings, sandboxes, various labyrinths, paths, ladders, etc. The stumps and logs remaining after felling can serve as material for the construction of a real small children's playground: a little imagination, skill, additional materials in the form of ropes, ropes, reliable fasteners, children will have somewhere to play in the country without distracting adults from important matters.
Crafts made from logs for the playground. Photo
Stylish garden furniture
If your financial capabilities do not allow you to order a stylish set for your dacha garden furniture By individual project, but you don’t want to buy simple furniture made of plastic, you can try to create a stylish one for your favorite dacha furniture set with your own hands.
Logs and stumps remaining after felling can again serve as irreplaceable parts. The main task is to move these heavy structures to the desired location on the site. Further processing depends on the skills and tools you have at your disposal.

A simple option, but without losing any of its originality and style:
- table and chairs made from tree stumps
- shop from solid log
First option allows the use of minimal processing of parts: it is enough to finish the table top and the tops of the stumps that will serve as seats. More difficult option involves cleaning stumps from bark and knots, creating backs and additional decorative elements at the discretion of the dacha owner.
Second option t will allow you to create two benches if you have a tool and the ability to divide the log lengthwise into two equal parts. By making small notches on the rounded part of the log, you can securely place the main part of the bench on two small logs, which served as reliable support for such a simple, stylish and reliable bench that will serve you long years and will require minimal costs.

Do-it-yourself furniture made from logs in the country. Photo
Flower bed made of logs
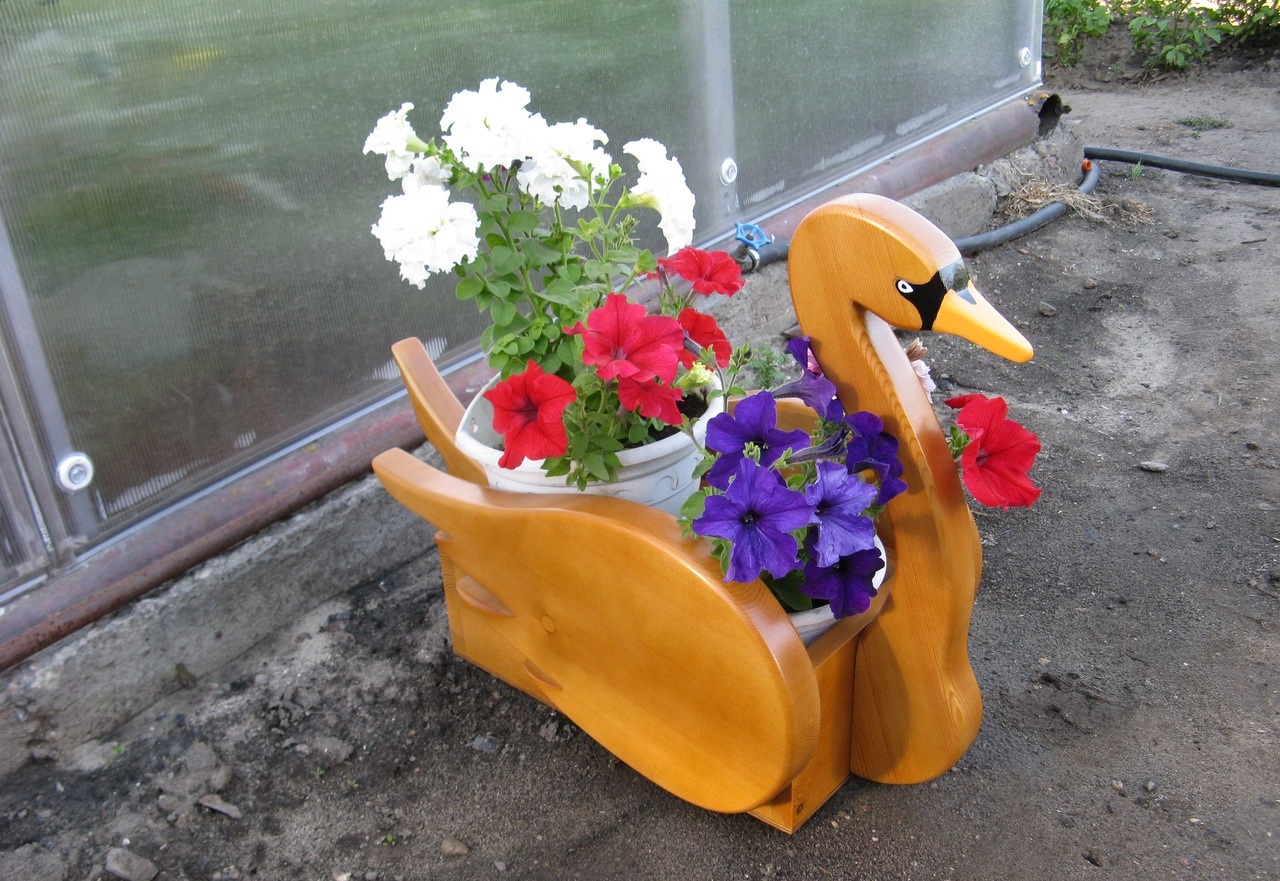
Another option to successfully decorate your site is to create original flowerbed for flowers made of logs. Usage plastic bottles, tires and even stone will require more time, and the result will lose in advance to a flower bed made of wood.

Using a chisel and a hammer, in a couple of hours you can make a recess of the required width and depth in a finished wooden blank or stump located in a suitable place on your site, fill it with soil and plant flowers that will feel comfortable in such conditions and look impressive inside wooden structure.
DIY flower bed made of logs. Photo
Log dog house
Creation log booths For your beloved pet it will be a small rehearsal for the construction of more serious structures. After all, a dog house made of logs is a mini-house with a roof and access doors, designed for a dog’s comfortable stay in any weather. This is a complete home for the animal, reliable and durable. For the roof, you can use roofing felt and tiles, which will make the booth even more similar to a real house.

In addition, such a structure will not only carry a functional load, but will also serve as a real decoration. summer cottage.
Do-it-yourself dog house made of logs. Photo
Log fence
Logs will be an excellent material for construction fences and various kinds barriers on the territory of the summer cottage. To install such a fence from the front of the house, additional processing of the material will be required and not every wooden blank will be suitable for external construction due to increased requirements for quality indicators.

On the territory of the summer cottage itself, it is quite possible to build fences from logs of various heights and thicknesses, using non-standard details to make the building more impressive and original.
DIY log fence. Photo
Log bridges in the country
Another classic building for a summer residence - log bridges. In this structure, the logs look most organic. The main task is to achieve stability and reliability of the structure: will it be decorative bridge through a dry pond or flowerbed, or a full-fledged structure used to cross to the other side.

If the bridge is not decorative and its length is more than 2.5 meters, for reliability it is recommended to use additional intermediate piles, and a special foundation is laid at the base of such a structure.
The basis for such a heavy construction may well be metal carcass, which will ensure the reliability of the structure.


Log bridges for a summer residence. Photo
Wooden house made of logs
By making small wooden crafts with your children, building simple structures and structures from logs on your own summer cottage, it is quite possible to gain knowledge and experience to begin building a full-fledged wooden house from logs.
To begin with, it could be a gazebo or a small outbuilding, a bathhouse or a barn. Gradually, accumulating the necessary knowledge and skills, you can move on to the construction wooden house made of logs - the dream of many summer residents.
A house made of logs does not require finishing; it retains heat well in winter and cool in summer. In such a house it is always dry and cozy. Build a small wooden house from logs is a completely feasible task for many summer residents.


Photos of log houses
You can use logs to build a house:
- rounded
- planed
The latter makes the construction process more complex and time-consuming, but quality characteristics significantly superior to the first option. Planed log preserves all the protective layers of wood, which allows it to be used in its original form, without subjecting it to additional processing with various chemical compounds for wood protection. Houses built from such material are environmentally friendly and durable, although they require much more time and scrupulousness in selecting logs of similar diameter when constructing a structure. Logging from such logs must go through a process shrinkage, which takes 1-1.5 years. Only then can you install doors and windows and lay the roof.
Forest dwellers made of logs
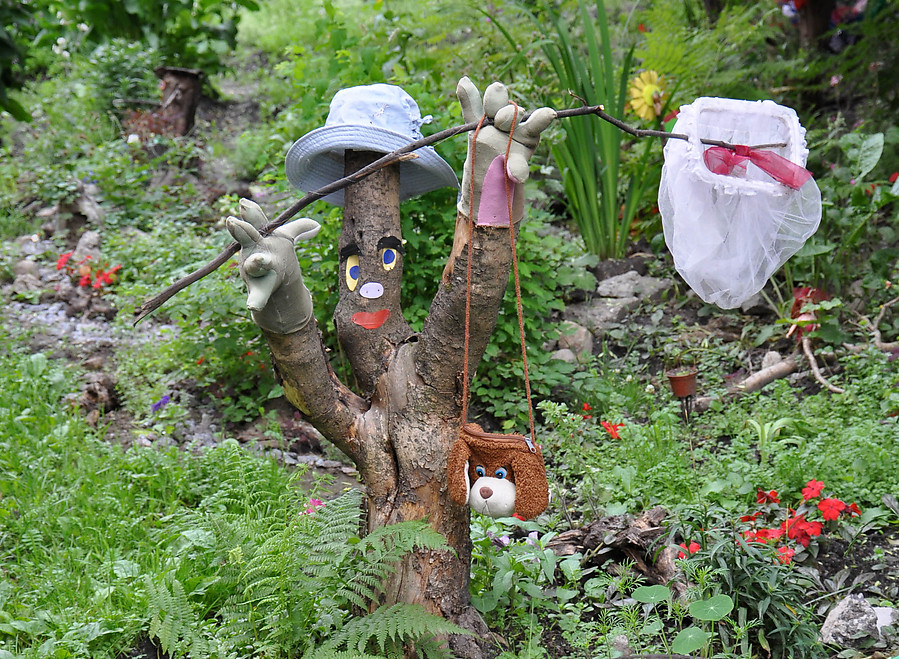
Figurines depicting forest gnomes and fairies will be a wonderful decoration for a children's playground or summer cottage decorated in a forest style. Knots located in good places will become spouts, horns and handles. Bright flower pots and other dishes will serve as hats and caps. With the help of paints you can draw funny faces, straw and tow can be used for the lush hairstyles of forest dwellers.

The use of metal reinforcement for such structures will securely secure them in the right place and make them more durable.
Making a bunny from a log

To make a figurine you need:
- a suitable log, the diameter of which is 16-23cm, length 35-55cm
- plywood sheet 4-6mm thick
- facade paint
- carnations
Stage 1
The lower part of the log should be cut evenly to stabilize the figure, the upper part should be cut at an angle of 45 degrees.
Stage 2

Stage 3
Treatment of the workpiece with a special solution and varnishing.

Stage 4
At this step, you need to use a jigsaw to cut out additional parts for the bunny figurine from plywood. This is a cute muzzle (the diameter of which should be equal to the diameter of the top of the log) and ears. To do this, you can use special templates and stencils or make a sketch yourself.

Stage 5
Paint the face and ears with paint desired color, let dry. Then draw eyes, mouth, mustache.

Stage 6
Make small holes for the ears, muzzle and paws, if any, using a special drill, secure the elements using nails and glue.

DIY wooden man made from logs
We will need:
- two small logs of different diameters
- branches
- special drills - perks
- saw or hacksaw
- carnations
Stage 1
We determine the blank for the head and torso (larger in diameter). The approximate ratio is 2:1, but this is conditional.

Stage 2
To fasten these parts, we use a branch, the length of which is about 25 cm: with a drill, we make indentations for the diameter of the branch at the ends of the two parts, so that the parts fit tightly onto the branch.

Stage 3
Then we shape the man’s face: using a drill, we make indentations for the eyes and nose, then we drive small pieces of wood into them. You can decorate them with paint in advance.
An important point is to use only dry branches for the neck, eyes and nose, otherwise there is every chance that the workpieces will soon fall out of the prepared grooves.

Stage 4
We create a small bench using a log and a plank: we drive the log into the ground, leaving the upper part 20-45 cm long, and nail the plank with a nail. We place the finished forest man figurine on the bench and secure it with nails.

Stage 5
Arms and legs are made using branches, cutting off parts of them under the right angle and securing with self-tapping screws, which will then allow you to tighten the parts of the limbs.

Log bench
Such a wooden bench will require a lot of effort to make, but it will not only become a real decoration for your summer cottage, but also a reliable and useful structure that will last for many years and will delight more than one generation. The back of the bench is made in the shape of a butterfly, which allows you to use all your imagination and decorate the bench in bright colors.

Well made of logs
A complex product made from logs that will decorate the entire country street. Additional details and decor will give the building an individual design and spectacular appearance.

Garden swing
Such Garden swing They will become not only an excellent place for entertaining children, but also for relaxing adults. This design can easily serve as a bench; it is reliable and safe to use. Additional processing of parts, reliable fasteners and ropes will allow the use this design for sports activities with children. And the installation of several ladders and labyrinths nearby will help create a real sports ground.

 OLYMPUS DIGITAL CAMERA
Do-it-yourself garden swing made of logs. Photo
Garden plot - appropriate place show your design talent. It is not at all necessary to follow strict canons when designing a landscape. A wonderful addition to well-groomed flower beds will be original crafts made of wood for a summer residence. They differ in complexity, so every master will find a sample that he can do with his own hands.
Varieties of country wood crafts
There are many options for decorating a summer cottage with wooden crafts. When making the simplest samples, children and grandchildren are involved in the exciting process. Complex specimens will require woodworking skills and painstaking work. All variety wooden crafts for giving are conditionally divided into groups:
- Hemp and logs, which serve as the basis for planting flowers in the country.
- Saw cuts, boards and wooden posts used in fencing a flower garden.
- Funny figures made of plywood or all sorts of combinations of logs and branches.
- Household utensils made from tree branches or bark.
- Complex monumental figures that will become an accent area in the design of the dacha landscape.
- Various decorative furniture from logs and branches: tables, chairs, armchairs and benches.
- Spectacular paths made from wood cuts.
In addition to their decorative role, wood crafts successfully cope with practical function. The most popular option is to design flower beds and make garden furniture.


Crafts made from plywood
The design of a dacha is limited only by the imagination of the master. Plywood is a fairly simple material to work with, so it is actively used when decorating a site. One of available ways To make your landscape brighter with your own hands is to install original figures. The most common are fairy-tale characters, cute animals and birds.
The registration procedure consists of three stages:
- the image is applied to a sheet of plywood;
- a wooden figure is cut out with a jigsaw;
- the craft is coated with paint intended for external use;
- the finished product is installed at the dacha in a recreation area or other prominent place.

Crafts in the form of flowerpots can combine beauty with practicality. Whether the flower stand made of wood will have a primitive shape or will take on original shapes depends solely on the skill of the dacha owner. But even a simple box will become decorative if you decorate it creatively.

Advice! In addition to standard painting or varnishing, wooden flowerpots are covered with shells or decorated with hemp rope.
Another option for practical crafts for the garden is a bird feeder, birdhouse or mailbox. Examples original ideas shown in the photo:


The basis of creativity is stumps and logs
There is no need to rush to remove the old stump from the dacha site. If it occupies an advantageous position, it can become an original art object. The most popular idea is to transform the remains of a tree into a flower bed. Main process steps:
- A chisel and a hammer will become assistants to remove rot from the middle of the stump.
- The outer part is cleared of bark.
- The wood is treated with protective compounds against insects and fungi, and varnished. The varnish intended for treating yachts has excellent characteristics. The coating is resistant to frost and high humidity.
- The depression is filled with fertile soil.
- To prevent waterlogging of the soil, holes are drilled in the tree to drain excess water.
- Planted out unpretentious plants. A common practice for the garden is petunias or ivy.

The landscape of the dacha will be transformed if you decorate a craft from a stump with your own hands in the image of a forest character with eyes and a mouth.
By similar technology with a stump, sawn logs become the basis for the flower bed.

Logs different sizes- an excellent basis for all kinds of crafts in the form of decorative figures.
Comment! In this regard, the decorative properties of birch are superior to other types of wood.
Funny little people and donkeys will add a unique charm to the landscape of the dacha. The main thing is to take care of the winning position of the craft, think over the original composition and not forget about small details. Photo collage will help you create own crafts made of wood for a summer house or garden with your own hands.


Functionality of a wooden cut
Tree cuts provide a wide field for creativity in decorating a garden plot with crafts. There are many ways to use it, here are examples of simple and popular crafts:

Advice! Pre-treatment of saw cuts with drying oil will help extend the life of a labor-intensive craft. Protection from insects and moisture will not be superfluous.
Sometimes colored pebbles are placed between fragments of wood small sizes. Over time, the saw cuts will darken and take on the solid appearance of an old country path.


We use bark and branches
Wooden crafts can also decorate a dacha house. Branches or tree bark are more useful here. Craftsmen create with their own hands using branches:
- frames for chandeliers or wall lamps;
- hangers;
- photo frames;
- individual elements furniture (backs, legs)
The craft for the dacha in the form of a hanger is distinguished by its originality. The manufacturing procedure is not difficult:
- For the craft you will need branches same size.
- The tree is cleared of bark or left in its original form, but must be treated with impregnation or varnish.
- The frame for the hanger for the dacha is assembled from four boards, its height is equal to the size of the branches.
- In the absence of intense loads, tree branches can be fixed to the base using glue. When placing heavy items, it is better to fasten individual elements with nails. The work on the practical craft is finished, all that remains is to hang it on the wall of the cottage.

Birch bark has been actively used in everyday life since ancient times. Now a craft in the shape of a basket or tee will become an exclusive decoration for a dacha. If they have the necessary skill, craftsmen use their own hands to make mugs, paintings, baskets and other household items for the garden from individual parts of wood.
Monumental creativity

Experienced woodworking craftsmen can make more complex crafts.
Decorative figures
A non-trivial decoration of the dacha will be a figure carved from wood. For a forest monster, it is important to choose a trunk with branches of an original configuration, the rest is the imagination of the craftsman. The fairy-tale hero needs more diligence, but the landscape of the dacha with such a protector will not leave anyone indifferent.


Wood carving is another labor-intensive design process for garden crafts. Neat figures of birds or animals are the main theme of creativity.

Painting on wood
Wood can serve as a canvas for an artist's creativity. A craft in the form of a painting is another option for decorating a dacha landscape. Basic steps to create decor:
- Part of the trunk is cleared of bark.
- The sanded surface is impregnated with a primer intended for treating wooden surfaces.
- To create your own paintings, use acrylic or oil paints.
- After the drawing has completely dried, the craft is opened with varnish.

Mills and huts
The landscape of the dacha will be exquisitely decorated with a craft in the form of a mill, well or hut. Objects are assembled according to the log house principle. The main stages of the mini mill design process are as follows:
- Planks of the same size are prepared, which serve as the basis for a craft in the form of a mill.
- First, the first two strips are fixed parallel to each other.
- Two more planks of wood are laid perpendicular to them.
- The elements of the craft are fastened together different ways. You can use glue, nails, or string the parts onto metal pins.
- After the walls are erected, they move on to decorating the roof.
Crafts for the garden can vary significantly in size. It all depends on the area of the site, the availability of material and the skill of the craftsman in handling wood.


Furniture
Their garden plot is often decorated with wooden garden furniture. It can be a separate simple bench or a complex composition, complemented by funny figures.
Entire ensembles of furniture consisting of a table with chairs or benches look impressive in a dacha. The function of the legs is usually performed by sawing logs. For bench seats, boards or sawn logs are used.
Comment! The significant weight of furniture made from logs makes it difficult to move it around the garden area, so you should choose in advance the optimal place to install the heavy craft.

Fans of the rustic style will like the idea of garden furniture, where curved tree branches are actively used for decoration. The picturesque picture will not leave the guests of the dacha indifferent.

Making your own furniture for a summer cottage from wood is represented by various technologies:
- In some cases, the bark is completely removed, while other craftsmen clean only the areas of the craft intended for the seat.
- The tabletop is made of solid logs, saw cuts, boards or decorated with durable glass.
- The function of the legs is performed by logs or branches.
- The color of the wood is left natural or covered with stain to give a specific shade.
Photo examples interesting crafts furniture are presented below:


Finally, here are a few more tips on decorating wooden crafts for your garden:


There are many wooden crafts that can effectively decorate a garden plot. When choosing a sample, you should take into account your own abilities and the availability of free time. The rest is at the discretion of the master. Good luck in your creative endeavors!
Remains of firewood, cuttings from parts of the trunks of fallen and cut trees - all this is a valuable material for making the most different products- from birdhouses to garden furniture.
DIY stump stool
This is the simplest and most frequently used piece of garden furniture. It is enough to cut the log to the required length, remove the bark, coat it with an anti-rotting agent - and you’re done.
If you are using a stool as dining room furniture, cover it with a woven or crocheted rug self made. More decorative than practical, the stool can be left with a couple of knots.
Depending on the location of the item, use the knots as hooks for keys, a beautiful candle holder, or potholders. In the garden, a stool with a hollow or artistically attached tree mushrooms will look more like a stump. A stool, like any other wooden furniture, is prone to rotting in the lower part, so it is advisable to install it on furniture wheels, hard paving or gravel.
In order not to bring forest pests and their larvae to the site, do not forget to saturate the workpieces by special means. As a rule, they are complex and at the same time destroy pathogenic flora and fauna in wood, and tinting impregnations will also paint the product in the desired color.
Armchairs and chairs
Classic log chairs are made by hollowing out a semicircular back and cutting off part of the trunk. If such a model seems too labor-intensive to implement, then make chairs. This is a simplified version of the chairs.
For them, bars are nailed diagonally to the trunks of the required height from the sides, fastened at the top with a small plank as a back. The height and degree of inclination of the resulting chair back can be made to any size. It is better to slightly “drown” the sides into the body of the hemp.
DIY decorative stupa
A massive stationary bench consists of half a log sawn lengthwise, which is usually selected at the bottom and placed “in a bowl” on scrap legs. Try to use logs from deciduous trees, as even dried trunks coniferous trees in the sun they will release resin.
It is for this reason that benches are often made of combinations - the legs are made of trunks, and the seat is made of boards.
DIY log flower girl
Do you think that a chainsaw is only needed for felling trees and preparing firewood? We will dispel your misconception! With her help ordinary log we will turn it into an original flower girl.
From the remains of logs you can create many beautiful and useful things for the household - cute birdhouses, flower boxes, rustic benches. We suggest starting with a simple container for flowers. As a material for it, it is better to choose weather-resistant coniferous logs - larch, fir or pine. But before you get started, it’s a good idea to familiarize yourself with safety precautions when handling a chainsaw.
To make a flower girl from a log you will need materials
- log length approx. 120 cm and thickness 30-35 cm
- two small logs approx. 30 cm and thickness approx. 20 cm
- drill
- axe
- petrol or electric saw
- 4 self-tapping screws 150 mm each
DIY flower box made from logs

When cleaning or improving your summer cottage, do not throw away or burn any logs, stumps or snags. This is all creative material for future crafts for the playground or design elements for the site itself. In this article, we decided to present for you crafts made from logs for the dacha.
How to make crafts
In order to make products from logs, you need to perform some steps. First, carefully clean and separate all the excess, in your opinion, now it becomes clearer what a log or driftwood looks more like. Perhaps it will not be a whole image, but one of its parts, but you can fasten the parts together using:
- Specialist. glue.
- Small carnations.
- Using a drill (when another part is inserted into a drilled hole).
The finished figure is coated with varnish for protective purposes. We wait for it to dry, now with the children you can decorate your hero with multi-colored paints.
You can also make a lot of things from solid logs. These include swings, labyrinths/ladders, small houses/huts. The log playground will keep children occupied for a long time, while adults can calmly go about their business.
Craft ideas
Well, the time has come to demonstrate crafts made from birch logs for the dacha. Surely, you will like our ideas.
Stylish country furniture.
If plastic furniture It’s not comme il faut for your estate, but you don’t have enough money for expensive designer furniture; making garden furniture on your own is your option. The main difficulty is to deliver heavy stumps or logs to the desired point in the summer cottage. And then stock up on tools, choose suitable option, and remember the ancient motto - “I take a stone and cut off everything unnecessary from it,” only in this case you have not a stone, but a wooden material. 
Let’s say you can make an intricate bench out of a solid log, and a table and chair out of stumps, perhaps an option for kids.
A children's set can be made either in a simple version, when only the upper surfaces are processed, or in a more complex one, with the removal of bark and unnecessary parts, and with the backs, sides, etc. attached to them.
But you can even make a couple of benches from a log if you can evenly divide the log lengthwise into two parts. On the semicircular side you can make recesses, due to which the bench can be installed on two small logs; if calculated correctly, it will stand quite stable. And it will last for many years with minimal care.
Log flower bed.
This option will require less time to create than a flower bed made from PVC bottles or tires. Using a chisel and hammer, we make the necessary indentations in the log or stump, fill them with soil and plant flowers in it. And how impressive they will look!
Log dog house.
As an option for making children's houses or huts from logs, there may be a doghouse option. The principle is absolutely the same. Only you don’t have to make windows, and the hole is lower. The roof is also covered with roofing felt or tiles, and your pet will be grateful for such a reliable and durable home. In fact, it can be made in one ensemble with the entire estate and can even be its decoration.
Log fence.
Remember the palisades in the fencing of ancient fortresses from the school history course? Using the same principle, you can build a fence around your site, or make small fences inside the site itself. But the appropriate processing prior to installing the palisade will require considerable and expensive work, so consider your strengths, including financial ones.
Country bridges made of logs.
What crafts to make for the garden from logs with your own hands? This question is of interest to many. Just imagine the delight of your guests over the original log bridge over an artificial pond on your site, where you can fish or take a spectacular photo! Even in the absence of a reservoir, a bridge can still be built as an element of a unique design. The main thing here is the reliability and strength of the structure, no matter whether it will perform decorative or direct functions. If it is expected to be at least
25 meters, then it would be advisable to pour a foundation at the base of each end, and install intermediate piles in the gaps under the span. The metal frame will only strengthen the structure and give it a more fundamental look. A wooden railings will give it a unique charm.

Houses made of logs.
So, we’ve already got our hands full on children’s houses and huts for playgrounds, as well as on doghouses; it’s time to move on to more serious buildings. For example, residential building. By the way, before this you can test your design and construction skills on a gazebo, bathhouse or garage, if the estate is supposed to be in the same style.

Pros log house are its environmental friendliness, unnecessary decoration, such a house always looks respectable and fundamental.
For the construction of houses, as a rule, logs of two types are used - rounded or planed.
The last option saves all beneficial features wood, although construction from them will be somewhat more labor-intensive than from rounded logs. Such a house will also not require any additional coating with various protective compounds. But it needs to stand for about a year to a year and a half, and only after that can doors and windows be installed.
Figures made from logs.
Wooden men, fairy-tale characters or forest dwellers will be a wonderful addition to the playground. Don’t chop off unnecessary branches, it’s better to think about how to fit them more harmoniously into the character and use them as a nose, horns or arms - legs, maybe a tail. Ordinary flower pots or children's buckets will serve as an excellent headdress; use sponge or straw to make hair, mustaches and beards for them. You can draw faces with paints, and the reinforcement in the structure will only strengthen their position in their place.

Wooden bunny.
It is very easy to make a variety of garden crafts from logs with your own hands. If you like a wooden bunny, then feel free to start making it. What do we need:

- A log with a diameter of 16 - 23 cm and a length of 35 - 55 cm.
- Plywood sheet 4 - 6 cm thick.
- Nails.
- Facade paint.
Progress:
- For stability, we cut the log from below very evenly, and the cut from above should be at 45 degrees.
- We sand the log properly and dry it in a warm room for several days.
- We cover the log with special varnish.
- Using a plywood jigsaw, we cut out the muzzle (with the same diameter as the top cut) and ears. You can use both templates and pre-draw everything yourself on a plywood sheet.
- We first paint the cut-out parts in the background color, and after drying, add the necessary elements, eyes, nose, antennae.
- Now we fix the corresponding elements in in the right places, first we drill holes, then we attach the muzzle and ears with glue and nails.
Wooden homemade product in the shape of a man.
What we need for this craft:
- A pair of logs of different diameters.
- Branches.
- Perks are special drills.
- File or hacksaw.
- Carnations.

Progress:
- The log ratio should be approximately 2:1, but this is not necessary. The larger part will become the torso.
- We fasten the logs together with a branch, which is inserted into holes drilled in the ends of both logs.
- Now the face - we drill out indentations for the eyes in the appropriate places on the face and insert small, pre-painted blocks there.
- All branch inserts must be properly dried to prevent them from quickly falling out of their places.
- We put the little man on a bench; to do this, we fill a board on a log fixed in the ground, and attach our little man to it with nails.
- We fasten the arms and legs from the corresponding branches with self-tapping screws so that, if necessary, they can be tightened.
Log benches.
You can start with a simple option, then move on to more intricate designs that will allow the master’s talent to unfold to the fullest and will delight guests with its originality of solutions.

Log well.
It doesn’t matter whether it’s a real well or a fake one, it’s important that it will become a genuine decoration of your site, a decorative element next to which everyone will immediately want to take a photo.

Garden swing.
Oh, this idea will appeal not only to children, but also to adults! Robust design will attract well-deserved attention, and if ladders and ropes are additionally installed nearby, then it will already be a whole sports ground.

Finally
With some effort, you can create beautiful crafts from thick logs for the garden. And you were able to verify this. In general, prepare everything you need and spend your free time with benefit.
From old wood you can make a garden path, steps, country furniture, and a firewood shed. See how to use scrap boards for gardening tools.
Many people are familiar with this picture: when you go into a country shed, the shovel tries to fall, and the rake, if you step on it, hits you on the head. Sometimes it's so hard to find the right tool, so it is necessary to make an organizer for your garden equipment. Here is another problem regarding where to put the old tree, or rather, boards, that will be resolved.
Organizer for garden tools made from PVC pipe scraps
It is convenient when each garden tool is in its place. In addition, it’s good when the organizer for it looks beautiful and is made from leftover old material.

If you were making water supply for your dacha, you probably had scraps of PVC pipes left over. They will be useful for next idea. For such an organizer, take:
- narrow thick planks;
- self-tapping screws;
- PVC pipes or their trimmings;
- hacksaw;
- screwdriver;
- level;
- wood saw.
To cut PVC, use a hacksaw, miter saw, plastic pipe cutter or special cutter.
Make the markings, helping yourself with a level, draw three horizontal lines on the wall on which the boards will be fixed. Measure the length of the boards and saw them off. Using self-tapping screws, attach two to the wall. The lower one is needed for support so that garden tools do not touch the ground. We secure it with a small block.

On other boards, mark at the same distance. Attach the PVC pipes with the cut side up.
If you have a straight wall in your shed, then look at what other garden crafts are designed to store hand-held garden tools in them.

For such an organizer you will need:
- PVC pipes;
- double-sided mounting tape;
- hacksaw;
- scissors;
- roulette;
- pencil;
- soft cloth.
Using a tape measure and pencil, mark the wall. Cut pieces of mounting tape to the required length. After removing the protective layer on one side, attach it to the PVC, then remove the second protective layer to attach it to the wall.
To ensure that the tape adheres more firmly, avoid contact with dust and dirt during installation, and do not touch the sticky surface with your hands.

After you have secured the PVC pieces to the wall, put your gardening tools in the section for easy storage.
Attach a board painted with wood varnish to the wall, scraps of PVC pipes. This will solve the problem of storing extension cords. And the brushes can be hung on nails nailed to another wooden board.

If you have pallets at your dacha, they can also be used for storage gardening tools, attaching them to the wall.

Boards and small glass jars turn into a storage system for nails, screws and other small metal objects that are needed at the dacha.

To implement this interesting idea, take:
- a small board;
- nail;
- hammer;
- self-tapping screws;
- screwdriver;
- small jars with screw caps.
- First you need to make holes in the lids. To do this, turn them over and place them on a board. Make three holes at equal distances using a nail and hammer.
- Place the cover on the bottom wooden shelf, attach with self-tapping screws.
- Place all sorts of little things for handicrafts at the dacha in a jar. All you have to do is screw it to the lid.

Shoe organizer made from old wood
Another problem faced at the dacha concerns shoes. There is not always enough space to place rubber boots, flip-flops, and slippers for everyone in the household. Interesting ideas will help with this.

If you have an old hanger with hooks, don't throw it away. It is enough to paint it, nail it on required height, after which the problem of storing shoes will be solved.
In the presence of wooden pallet, this can be done this way: cut it into several parts so that each one remains cross bar. There is no need to make a bottom for such sections. It is enough to coat the shelves with wood varnish and place shoes in them. Teen and adult will hold up well.

If desired and wooden boxes, in which fruits and vegetables are stored, will turn into original crafts for the garden, for example, a shoe organizer.

To create this, take:
- wooden boxes;
- impregnation for wood;
- self-tapping screws;
- dostochki
On the small sidewalls, find the middle, attach the blocks here that hold the shelf. Now connect the sections together as shown in the photo. That is, first, they are fixed in pairs, then in rows, moving them slightly in one direction or the other.
And here are some others interesting ideas can be realized using such boxes.

For the first one, you first need to paint them, when dry, place them vertically and horizontally. For the second one, you don’t even need to spend money on paint. These elements are connected to each other using large paper clips.

This staircase can accommodate many pairs of shoes at once. You just need to nail the boards horizontally to the steps. If desired, you can fill out corner space, if you attach rectangular shelves here with self-tapping screws.

Beautifully stacked firewood at the dacha
It’s easy to put things in order not only in the barn, but also in country house, but also on the street. Such firewood sheds will not only become a place for firewood, but will also add some zest to the area. Brushwood is good for heating the stove. Make bundles and put them in the woodshed. To make it you will need so little:
- boards;
- self-tapping screws;
- paint for wood.

It is not difficult to create such a building. The basis is four vertical pillars, which can be made from narrow wide boards or bars. They are fastened to horizontal boards, which also serve as the bottom shelf. Make another one in the center. The roof is gable. Don't forget to cover all elements with antiseptic impregnation.
If you have an old rack, you can also place stacked firewood on it. But first you need to paint it with an antiseptic so that wooden elements served as long as possible. Place the firewood burner near the wall, then it will take up little space and precipitation will not get here.

The next firewood racks will decorate old fence, if you place them in front of it.

For one such structure you will need:
- four bars with a cross section of 50 or 40 cm;
- nails;
- self-tapping screws;
- boards of the same width;
- metal ridge;
- impregnation for wood;
- saw;
- roulette.
- Knock down the bars in pairs in the shape of the letter L, attaching them to the cross bar.
- Measure the distance between the two posts and cut boards to that length. Nail them in starting from the bottom. In this case, each upper one should overlap slightly with the lower one.
- Nail two bars horizontally from below, attach boards to them, on which beautifully stacked firewood will lie. Attach the skate.

If you want to decorate the woodshed, then nail a board under the upper “leg” of the pallet. Place film in the resulting box, add soil, and plant flowers or herbs.
A place for beautifully stacked firewood can also become a bench for relaxation, look how easy it is to make one. This idea will also tell you how to save space.

Place the firewood close to street hearth, under the bench. When the weather is dry, put it on decorative pillows, which are so comfortable to sit on.

Sawed birch firewood can be designed in an original way. Place the thick and thin branches of this tree in the center, around it - fragments of trunks, secure everything with a rope. A couple of flower pots and a lantern will complete the natural picture.
Where to put the old tree?
If you got a plot where several trees grow or, perhaps, there are some that were broken by a storm. So that you don't have to spend money on exporting this natural material, look how many interesting things you can make from it.

For a device like this garden path you will need:
- old tree;
- electric or chainsaw;
- antiseptic;
- geotextiles;
- brush;
- crushed stone;
- sand.
Take geotextiles high density so that it lasts as long as possible and weeds cannot grow through it.
Saw the wood into round pieces 4–5 cm thick. Cover them with antiseptic on all sides. If you want to give these elements shine, then after the last layer of impregnation has dried, paint them with wood varnish intended for outdoor use.

First place wide logs on the marked and prepared area, and place smaller ones between them. You can help yourself with wooden or rubber mallet, tapping the workpieces to better adhere them to the surface.
If you have few such elements, arrange them sparser or pour a layer of crushed stone on the soil, and place wooden logs on top in the form of a pattern.
Using the same technology, secure the second board at the top so that you can rest your back on it when sitting.
If you know how to work with an electric or chainsaw, then you can make such an outdoor chair.

If you are looking for more simple ideas where to put the old tree, then pay attention to these.

The logs need to be treated with wood varnish; they will become flower pots or other room decor items.
An old tree and its branches can turn into such a stylish mirror, for this you will need:
- plywood;
- dye;
- primer;
- tree;
- jigsaw;
- round mirror;
- liquid Nails;
- wood glue.

Place the mirror on the plywood and outline it. Step back 10 cm from this marking on all sides, outline this outer circle, and cut along this marking.
Apply primer to the frame; when dry, paint the area. Glue the mirror in the center, “placing” it on liquid nails. Apply glue to the wooden circles and secure them to the frame. You can pre-coat them with wood varnish, then glue them to the plywood.

That's how many useful things you can make from wood and leftover PVC pipes. If you are interested in ideas on how to make a shoe organizer, watch the following video.
The second story will teach you how to make a bench from a log without a single nail.