Paving slabs firmly occupy a leading place among construction products used for paving on city streets, squares and individual plots. Indisputable proof of such popularity is evident in any city, town and private backyard. In this article we will look at how to lay paving slabs on concrete base.
Most often, tiled covering is arranged:
- on sidewalks and squares;
- around administrative buildings, offices, shopping, sports and entertainment complexes, train stations, airports, educational institutions and other places with high traffic volumes;
- in public parks, lawn and garden paths on private plots;
- private car parking areas and parking lots for large equipment;
- when improving suburban areas.
Main types of products
Depending on the manufacturing methods, the following varieties are distinguished:
- vibrocast;
- vibration-pressed;
- hyperpressed;
- polymer sand.
The composition of paving slabs usually includes sand concrete with the addition of granite chips, limestone, shale or crumb rubber. Basalt chips are added less frequently.
- sawn paving stones with all edges smooth;
- sawn and split with a smooth bottom and top edge;
- chipped, with uneven edges.
In the first two types, the flat top surface can be subjected to heat treatment, which makes it non-slip.
The most common square paving stones with sides of 10 cm and a thickness of 3 to 10 cm.
In what cases is it necessary to lay paving slabs on concrete?
The following can be used as a base for tile covering:
- crushed stone or gravel-sand cushion;
- concrete, reinforced to increase strength steel mesh or individual rods, composite reinforcement or vibrating fiber.
The tiles can be laid on existing concrete screeds or on newly installed ones.
Although in the first case the work is much easier and faster, laying tiles on concrete is necessary to ensure a stable and durable coating in the following cases:
- the presence at the work site of soils with increased susceptibility to shrinkage (recently filled embankments, silty sands, peat);
- heaving clay soils characterized by uneven swelling in certain areas;
- a concrete base for paving slabs is installed when the surface is exposed to significant loads, for example, parking for a car;
- when facing on existing solid concrete bases, when their dismantling is impractical and is highly labor-intensive (blind areas around the house, existing concrete coverings, floors in garages and outbuildings). The decision whether it is possible to lay paving slabs on concrete is made after a thorough examination of the existing old concrete pavement. Laying over old concrete allows for significant savings on building materials and protects existing coverage from further destruction and will significantly improve its appearance.
Advantages and disadvantages of laying paving stones on a concrete base
The concrete base for laying paving stones has the following advantages:
- high strength and resistance to the application of significant loads and mechanical stress;
- durability;
- installing tiles on a concrete base minimizes the risk of shrinkage;
- ease of implementation, allowing installation paving slabs with your own hands;
- there is no need to use complex expensive technical devices;
- base resistance to chemical influences, water washout, temperature changes;
- on a solid concrete base, the process of leveling tiles in a single plane is much easier, resulting in a clear, straight shape and a perfectly flat surface
- absence of failures caused by poor-quality compaction of the base;
- environmental friendliness of paving with tiles.
Existing disadvantages:
- the technology for laying paving stones on a concrete base is more complicated than on sand and crushed stone pads;
- the need for reliable drainage systems. Having leaked through the seams in the coating, water will remain between the concrete base and the tiles even when negative temperatures can swell and even split the paving stones. To avoid this, paving stones are laid with certain slopes, point water inlets are laid in the concrete, and stormwater systems are installed;
- a concrete base for paving stones is more expensive than a simple base of crushed stone and sand;
- in case of violation technological process After the end of the first winter, painting of the concrete base may occur.
What requirements must paving slabs meet?
When using any types of products for paving, they must meet the following requirements: 
- when laying tiles outdoors, frost resistance ≥ 200 cycles;
- compressive strength ≥ 30 MPa;
- water absorption by weight ≤ 5%;
- abrasion during annual operation ≤ 0.7 g/cm 2 ;
- the purchase of products must be made from one batch, since in different ones, even from the same manufacturer, the tiles will differ in geometric dimensions and color saturation;
- environmentally friendly cleanliness of products, when used both for external and internal work with the installation of cobblestone flooring in warehouses and utility rooms;
- lack of porosity on the surface;
- strict compliance geometric dimensions with evenness of all edges;
- absence of internal and external cracks, as well as chips;
- naturalness and uniformity of coloring.
Technology for laying paving slabs on a concrete base
The following methods of paving on a rigid base are distinguished:
- A dry mixture of 1 to 5 cement with sand is poured over the concrete base, the thickness of such a dry solution is taken to be up to 5 cm. Due to the difficulty of creating the necessary slopes for water drainage, a slope of 2 to 5 degrees is created in the process concrete foundation installations. To prevent moisture from being retained under the tiles, pieces of polymer or asbestos pipe, 1 pc. for every m2.
After hardening concrete mixture, the top of the pipes is cut off at the level of the top of the concrete and the holes are filled with fine crushed stone. Laying paving stones begins directly from the curb; after laying 4 elements, a check is made to maintain the specified level using a building level. Ensuring the quality of the fit is carried out using a rubber hammer; by lightly tapping, the tile is sunk into a mixture of cement and sand or, if necessary, raised with a sprinkle of dry mixture (prance) or a cement pad. With this method of paving, labor costs are significantly reduced and costs for materials and labor are saved. Laying is done in front of you, moving along an already paved surface. The downside is the need to thoroughly compact the mixture, and then the finished cladding.
Tamping can be carried out using vibrating plates, and if they are not available, you can use a piece of thick wide board. The method is most repairable, as it allows easy replacement of individual damaged tiles. - For mortar, widely used for paving large areas. The cement-sand mortar is applied to the base in a layer of up to 3 cm per reachable area by the master and leveled using a notched trowel.
Laying paving stones on concrete using this “wet” technology is carried out first in whole tiles, taking into account the desired pattern, all mortar is removed from unpaved areas with trowels, cut tiles are installed on fresh mortar after the base mortar has hardened under the solid tiles. Compliance with the required slopes and the flatness of the coating are checked using a level and rules.
In all methods, the tiles are laid with equal gaps (5 mm), the resulting seams in both of the above methods are filled with grit or simply sifted quartz sand and spilled with water. Movement of people on the laid surface is allowed no earlier than after 24 hours. - Glue the tiles to the concrete using a special construction adhesive. With this method, create required slopes possible only on a concrete base, since the glue spreads very thin layer(from 5 to 10 mm) onto a small surface area (≤ 1 m2), since its hardening time, indicated on the attached instructions for use, is short. For the same reason, paving slab adhesive is diluted in small quantities to avoid it from freezing.
The seams are filled with the same glue or you can use a garter, as in previous cases. Cured special construction adhesive provides durable and reliable connection with concrete, so this method is used quite often, but replacing a damaged element without its final fracture will not work.
Step-by-step instructions for paving on a concrete base
Composition and sequence of work:
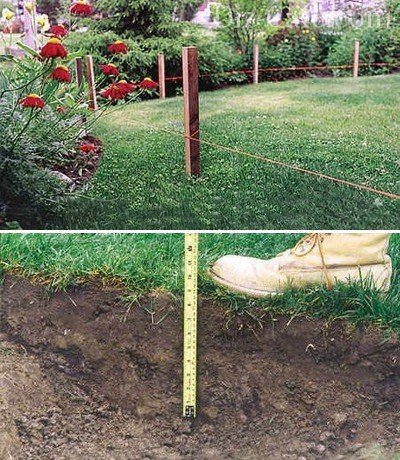
- Laying out areas and paths on which paving is planned, securing the markings with wooden or metal pegs. The boundaries between the pegs are covered with lime or chalk.
- Removal of the fertile soil layer with the construction of an earthen trough, taking into account the location of reinforced concrete curbs or curbs. The depth of the trench under the curbs depends on their height; the top of the curb, to ensure drainage from the paving surface, should be 2 cm below the top of the tiles and rise above the level of the lawn.
- Installation of curbs or curbs. A strong cord is pulled onto the hammered pegs at the height of the curbs, taking into account the required longitudinal slopes. To collect water flowing from the tile covering, it is recommended to provide trenches for laying trays close to the curbs storm system. Reinforced concrete elements are installed in trenches on a compacted sand base with a small layer of lean concrete or mortar laid on top of it. The elements are fixed with wooden pegs and pouring concrete mixture.
- Construction of a concrete base. The soil in the earthen trough is carefully compacted and covered with geotextiles to prevent weed germination. Concrete is laid on a compacted bed of sand or crushed stone ≥ 10 cm thick.
In some cases, curbs are installed by craftsmen after the base has been concreted. This option, when independent execution work is not recommended for execution. To protect the edges of the platforms from soil shedding and create a concrete base with smooth edges, formwork is installed from boards 40 mm thick, which will have to be carefully secured. If the curbs are installed immediately, they themselves will serve as formwork. The advantages of this option:
- there are no costs for purchasing materials for formwork;
- time is saved on its installation and subsequent disassembly;
- the concrete mixture will be poured without seeping into the cracks between the boards;
- additional fixation of curbs in the required position.
Concrete is poured no earlier than 24 hours after fixing the curbs. The break can be used for reinforcement (paths that will not be accessed by vehicles and heavy equipment do not need to be reinforced). The concrete thickness is assumed to be 15 cm in the absence of reinforcement and 20 cm in the presence of reinforcement. In the presence of moving heaving soils, the thickness can increase to 40 cm.
Reinforcement is carried out with meshes connected from steel or composite reinforcement with a diameter of up to 10 mm and cells from 15 to 20 cm. The meshes are located at the top, at a distance of about 5 cm from the top of the concrete, with laying on concrete pads. You can perform the pouring in two stages: lay a layer of concrete about 10 cm, carefully level it, lay nets on the fresh concrete and pour the concrete mixture to the required level.
When pouring large areas, every 3 m it is necessary to arrange expansion joints from boards laid over the entire thickness of concrete. On paths, such seams are made every 6 m. Before hardening begins concrete boards are removed, and the resulting seams are filled with hot bitumen.
- After what time can I lay tiles? Concrete will gain the minimum required strength in about three days, so you can’t start work earlier. Selected suitable way laying, if traffic on the surface will be high or it is planned that vehicles and heavy vehicles will enter it technical means, then it is preferable to do paving with tiles using cement mortars or construction adhesives. If there are obstacles in the lining area (sewage manholes, flower beds, drainage holes etc.), their outline is made with whole tiles.
Before completing the work, the final design of the junctions of the required configurations is carried out with cutting of the tiles using a grinder with a concrete wheel or a circular saw. Upon completion of installation, the joints are filled. You should not walk on the paved surface for about 3 days to avoid damaging the edges of the tiles. If necessary, the required passages can be carried out by laying sheets of plywood over the paving surface. - Finally, after 3 days, sweeping is performed construction remains and debris, after which the entire surface is washed with water under pressure from a hose.
Laying tiles on a concrete blind area
Blind areas around buildings are usually made up to 1 m wide. First, the condition of the blind area is examined, after which the following operations are performed:
- the concrete is cleaned of dirt, existing cracks in it are cut out;
- the entire surface of the old concrete is filled with a 2 cm layer of cement mortar;
- the boundaries of future paving are marked with driving in pegs;
- The location of the curb along the edge of the site is planned; the top of the curb should be located taking into account the slope away from the building of 2 cm for each linear line. m. and below the top for paving stones by 3 cm. Then a mark is marked on the base, equal to the sum the height of the tile and the thickness of the preparation for it, to which a strong cord is attached, the second end is tied to pegs at the planned height of the top of the curb;
- according to the arranged markings, a trench is developed for the curbs, then an earthen trough is developed between the edge of the blind area and the curbs;
- Then the work is carried out in the order described above when installing a concrete base and paving with paving slabs.
When performing the work yourself, the cost of paving is reduced by at least 2 times. Additionally, you can read technical literature or consult with specialists about how to properly lay paving slabs; this will help avoid damage to expensive materials and ensure the durability of the coating.
For craftsmen who lay paving slabs with their own hands step-by-step instruction will help save the budget for arranging pedestrian paths and parking lots near the cottage. The technology is the same for concrete tiles and polymer materials. Work should be carried out in summer in the absence of precipitation.
This coating allows you to completely avoid concreting and other “wet” finishing processes, but only on soils with normal bearing capacity. If the site is located on a fresh embankment, undermining and problem soils (for example, silty sand or pure clay), or has a complex topography, it is necessary to concrete the base to ensure a rigid underlying layer and uniform distribution of loads on the soil.
On sand, gravelly, rocky soil, sandy loam and loam, it is enough to remove the topsoil and replace it with non-metallic material:
- paths - sand;
- parking – crushed stone 5/40.

Crushed stone base of the parking lot.
To prevent mutual mixing of soil with inert materials, you should line the bottom of the pit with geotextiles and start this non-woven material on side walls. It is necessary to compact layers with a vibrating plate with a maximum thickness of 10–15 cm, as in the photo below.

Geotextile layer.
A vibrating plate with an electric or gasoline drive will be needed in further stages in any case. Therefore, they either rent it or make it themselves. You will also need the following tool:
- rule - special, made of boards, ordinary plaster 1.5 - 2 m;
- rubber mallet - for laying paving slabs (TP) and installing curbs;
- level - laser is preferable, but a bubble level will also work; on difficult terrain - hydraulic;
- a hard brush – needed for filling the seams at the last stage;
- Angle grinder (“grinder”) – used for cutting cladding elements;
- cord – marking the route, slopes;
- trowel and shovel – adding and leveling sand.

Tool for paving TP.
Important! Crushed stone is placed in natural state, the sand is abundantly moistened, there is no need to spill it from a hose/bucket so as not to create with my own hands perched water in this technogenic layer.
On complex terrain, terracing is first done with retaining walls made of gabions or monolithic reinforced concrete. Otherwise, lateral soil movements will disrupt the geometry of the paths after just a couple of years of operation.

Even on flat areas the slope of the paving slabs is necessary, since the material is waterproof, and the gaps between the paving elements are not enough to quickly drain storm and flood runoff. It is advisable to install storm drainage trays between the curbs and tiles, and integrate rainwater inlets into the roofing under the vertical drains of roof gutters.

Paving technology
It is important for the home craftsman to understand that the quality and durability of the coating garden paths completely depend on ground conditions:
- clay soils swell unevenly, disrupting the geometry of sidewalks and parking lots;
- problematic soils settle over time;
- on slopes and without a curb edge, the tiles spread out.

To fix the base, the tiles will have to be completely removed.
When purchasing non-metallic materials, it is worth considering:
- in parking lots, a crushed stone fraction of 20/40 is preferable, depending on the intensity of traffic and operational loads, with a layer thickness of 30 cm or more;
- for paths, crushed stone 5/20 in a layer of 10 - 15 cm is sufficient;
- It is better to choose river or washed quarry sand with a minimum percentage of clay;
- when compacting with a vibrating plate, the compaction coefficients are 1.7 for sand, 1.3 for crushed stone, so when purchasing, the volume of the pit must be multiplied by these numbers, otherwise there will not be enough material.
Paving slabs must provide required quality the exterior of the paths and the durability of the coating. Therefore, cladding is chosen according to the following characteristics:


Hyperpressed paving slabs.
Important! Vibration-cast products are cheaper because they are easier to manufacture, have an original configuration, and reduce the finishing budget. Hyper-pressed tiles are difficult to split or damage; this option is optimal for parking lots that are serviced by snowplows in winter.

Vibrocast TP.
Marking and planning
Unlike load-bearing structures The marking of personal space is most often combined:
- Curvilinear and radius shapes are used to increase artistic value;
- straight routes are marked with cords using cast-offs;
- the roundings are outlined directly on the ground using patterns or large-sized compasses (a rod tied with a cord to the central peg).

When marking, the following factors should be taken into account:

Chernozem contains organic matter, which rots under the tiles and shrinks. Therefore, the loose topsoil needs to be removed, used in beds, in landscape design, or removed from the site. The resulting layout is called by professionals a “trough”, in which further TP paving operations are carried out.

Important! The roots of mature bushes and trees are dangerous for paving slabs, so they are either uprooted or pedestrian traffic routes are laid at a distance of 3 m from them.
Drainage and sub-base
The TP should be laid on a rigid base that has drainage properties, since part of the storm water is drained through the cracks between the tiles. However, natural drainage is not enough to cope with the entire volume of water in heavy rain and drain the roof drainage when there is a path near the house or when the blind area is lined with this material. Therefore, several conditions must be met:


If a topsoil layer of more than 40 cm is removed and a 6–8 cm thick TP is selected for lining, the thickness of the underlying layer increases sharply so that the paths rise slightly above the adjacent soil. To save budget in this case, you can use cheaper materials in the lower level of the underlying layer than crushed stone, river sand - sandy loam or loam. They also need to be compacted with a vibrating plate to a similar surface condition.
The curbs (border stones) are much higher than the tiles (20 cm), so along the paving contour it is necessary to make a trench of the same width, 25 - 30 cm deep, in order to place the curb on the mortar layer.
![]()
Trench for curb
Important! Where the storm drains pass, another trench will be required, since the height of these elements varies from 13 to 41 cm depending on the design and material.
Installation of curb stones
Without curbs, sidewalks will lose their shape, as the tiles on the sides will “creep.” The curb stone must be laid along the cord, taking into account the longitudinal and perpendicular slopes of the decorated areas on cement-sand mortar. The ratio of ingredients is 1/4 (cement/sand, respectively. The technology looks like:
- the mortar is placed into the trench with a trowel;
- the curb is installed on it and pressed down with a mallet along the cord;
- outside and inside in 2 - 3 places the solution is placed in a slide on side surfaces border just below the sand layer on which the tiles will be mounted, as in the photo below.

Paving is possible within a day or two, after the cement stone has gained strength.
Advice! Regardless of the size of the storm drains, it is better to install them along the curbs along with them at the same stage. These elements are also installed on a solution that requires time to harden.

Tile paving
There are methods for laying TP on cement-sand mortar (for use in difficult conditions), dry mixture (1/5 cement, sand, respectively) and on clean river sand. Practice has proven that when adding cement to a dry mixture, the developer does not receive any additional benefits, but the maintainability of the coating sharply decreases and the finishing budget increases. Therefore, in 80% of cases, paving slabs are installed on dry sand using the following technology:

Advice! Installing curbstones at the ends of paths is not always possible. To prevent the spreading of paving elements in such an area, the last two rows are mounted on a cement-sand mortar.

Methods for connecting TP to the ground and screeds.
The nuances of laying paving slabs
Problems with paving usually arise when designing curved areas. The simplest option on radius paths is to lay rectangular elements, as in the bottom photo:
- the tile is oriented with the long side in the direction of travel;
- work starts from a smaller radius;
- each element is shifted relative to its neighbor;
- transverse and vertical seams are arranged in a wedge.

Rectangular TP on turns.
If the developer has chosen a collection of tiles with a complex configuration (for example, “clover”), the paving technique changes radically:
- the seams are shifted at 45 - 60 degrees along the length of the tortuous section;
- the surface is filled with solid elements;
- pieces are laid near the curbs.

Less commonly used is the “Beam” technology, when a rectangular-format TP is oriented perpendicular to the curbs.

At complex radius intersections and large areas, the direction of the seams can be changed to increase the artistic value of the composition.

Decorating a complex radius intersection.
Thus, it is easiest and cheapest to pave paths, recreation areas and parking lots on the site on sand with cast or vibropressed paving slabs along straight routes. On radius sections, the above recommendations should be taken into account. For problematic soils, a rigid concrete base layer should be made.
Advice! If you need repairmen, there is a very convenient service for selecting them. Just submit in the form below detailed description work that needs to be done and you will receive offers with prices from construction teams and companies by email. You can see reviews about each of them and photographs with examples of work. It's FREE and there's no obligation.
Paving slabs are a product that today is actively used for tiling floors in a gazebo, on a porch or in another area. The main advantages of tiles are their durability. But this criterion is particularly influenced by compliance with technology during the arrangement of the base and the quality of laying work.
Let's consider what is better to lay paving slabs on. This article will only touch on technical issues.
Laying methods
Paving slabs can be laid in three ways:
- on the sand;
- on concrete;
- on the ground.
How to lay tiles on a concrete base is described in detail.
On concrete
This method is advisable to use in cases where the area where the installation will be carried out already has a concrete base. It should simply be cleaned of dust and dirt, moistened and a layer of solution applied. After this work, paving slabs are laid. The laying technology is similar to the principle with a sand cushion.
On the sand
Dry installation occurs when the owner plans to make changes to the construction project. In addition, this method is actively used by those who do not want to bother with cement mortar. Dry installation is an excellent solution for placing a chaotic or random pattern of sidewalks, with space between the products.
On earthen soil
This installation option, like on the ground, has become widely known during the design of summer cottages, as well as in the courtyard of a private house when laying tiles in the country and this is naturally the easiest. In this case, large tiles are used that imitate natural stone. The tiles are laid in prepared pits (preparation is required), and then using wooden hammer The compaction process is underway. The space between the tiles and the edges of the pits is eliminated using soil.
Mortar laying technology
Most types of products can be laid in this way. The process of laying on a concrete base begins with preparatory activities.
The technology for laying polymer sand paving slabs is described.

Action plan:
- Marking the area where the path will be located.
- Remove the top layer of soil from the marked area.
- Make a 3–4 cm deepening.
- Compact the bottom of the pit and fill it with crushed stone, the layer thickness of which is 10–20 cm, compact it again.
- Install curbs.
Before preparing the solution, it is necessary to lay the paving slabs on a layer of sand. It must be laid out in the order in which it will be used.
For getting concrete mortar you need to prepare the following materials and tools:
- cement grade 500;
- quarry crushed stone fractions 10-20, 20-50;
- paving slabs 50-60 mm thick;
- corresponding to the established ;
- sand;
- water;
- vessel;
- shovel or electric drill.
To prepare in the appropriate, you need to take cement and add to it required quantity water. Using an electric drill, mix everything and add 4 parts of sand. Mix everything again and the solution is ready.
Installation process:
- Remove 4 tiles from the sand and apply mortar to the area.
- Reinstall the product. Do the same manipulations with the remaining tiles.
- This must be done until the entire sidewalk is laid out.
- It is imperative that there is space between the tiles. And this can be achieved if you install special wooden spacers.
Screening stacking technology
How to lay tiles on screening? This installation method is the most economical. However, this will not affect the quality of the final coating in any way. 
The installation process and technique is carried out according to the following plan and subject to specific rules:
- Mark the site and plan water flow. Such measures are necessary to ensure that water does not accumulate on the finished site. For effective removal water, you need to make a slope of 1-2%. You may also be interested.
- Remove top layer of soil. The depth of the removed layer depends on the intensity of use of the coating. As a rule, it is in the range of 15–50 cm. If the soil is weak, then it can be further compacted. Pour the screenings over the dug hole. If you want to perform quality foundation, then the minimum number of its layers should be 3.
- Pour in crushed stone and compact well. Its thickness can be 5–10 cm since the crushed stone shrinks during compaction, so make a reserve of 10–15%. spread out the screenings up to 7 cm thick. Compact thoroughly.
- Place the screenings again, but adding cement to it in a ratio of 1:4. In the tamping field, make sure that this layer is 5 cm higher than the desired tile level.
- . This process can be performed using a cord, the tension of which is carried out at the required height. The process of installing the side edging takes place on a concrete base, the width of which is 20 cm, and the height of the concrete lock is 15 cm.
- Laying the material. During the process, you need to clearly follow the drawing. It is necessary to lay out the first row with special care. The tiles must be installed tightly. If irregularities have formed, they must be eliminated. The quality of the work performed can be checked using a marking thread; when making roundings, pay attention to the fact that outside the width of the gaps was minimum dimensions and did not exceed 8 mm. To cut the tiles, you can use a circular saw or grinder. A diamond disc is used for these purposes.
- Grouting the surface. When the surface is laid out, it is necessary to fill it with river sand. Then, using a hard-bristle mop, grout. You can also buy for these purposes special compounds, but their cost is high.
- Compact the surface. After completing all the work, it is advisable to take a vibrating plate (vibrating machine) and use a rubber gasket to compact the entire surface. If such a tool is not available, then there is nothing to worry about, since such an operation is not mandatory. Just so the tile will be firmly and securely fixed.
A vibrating plate is a tool necessary for compacting and leveling the concrete mixture when laying paving slabs. The design of the equipment assumes the presence metal beam and vibrator series IV.
Read how to lubricate molds for paving slabs.
In the video: how to correctly lay paving slabs on the screening (instructions):
Laying granite paving slabs
Granite paving slabs are a building material that is actively used when laying areas. But today I actively use it for other purposes. Main advantages granite tiles is high strength and reliability.
Work order/step by step:
- Mark the area.
- Lay the base in the form of geotextile. Why geotextiles are laid under paving slabs will tell you.
- Lay a layer of crushed stone on top of the base, the thickness of which is 15–25 cm (base preparation)
- Using a rake, form the required slope.
- Compact the laid layers.
- Using sand and geotextiles in the process, perform a secondary foundation installation.
- Treat the second layer with water and install side edging around the perimeter. For the base you can use skinny concrete. The edging is fixed using cement-sand mortar.
- When all preparatory activities have been completed, you can proceed to laying granite paving slabs. To prevent the tiles from falling out during operation, the gaps between the products must be eliminated using sand.
- Each laid row must be compacted using a rubber hammer.
- Upon completion of work, treat the finished surface with a weak stream of water.
Video: laying granite paving slabs
Laying tiles in different weather conditions
Today the question remains: is it possible to lay paving slabs in the rain? No one can prohibit this, since before laying even the sand, the craftsmen lightly moisten it with water. If you want to receive high-quality coating, then all work must be done in dry and warm weather.
Do not install during rain, which immediately begins to freeze. Otherwise, you will have to do all the work again in the spring. The reason is that water expands when frozen. Therefore, when the tiles are laid level and everything is fine, but after frost it becomes warm, the water will melt, reduce its volume, and the tiles will shrink.
How the material is laid in the gazebo, on the porch
Today, many owners use paving slabs to lay the floor in a gazebo or on the porch. This procedure is very simple to perform.
First you need to stock up the following materials and inventory:
- quarry sand;
- fine gravel;
- cement grade 500;

- paving slabs;
- rubber hammer.
The action plan is as follows:
- Remove the top layer of soil; its depth should not be less than 20 cm.
- Lay a layer of sand and gravel. The thickness of each layer should be 3 cm. Compact everything thoroughly and add a layer of sand and cement.
- Replacing two last layers An ordinary solution may appear, for the preparation of which sand, cement and water are used. The laying out of the solution should not be carried out immediately, as the material is laid.
- You can level the laid tile surface using a rubber or wooden hammer. If you use any other tool, this will lead to damage to the product. The main difficulties that arise during this process depend on the shape of the selected product. Not everyone can cope with this job. As a rule, all material is laid according to the principle of assembling puzzles. The same thing can be done with a large slab 300x300x30
Find out what plastic tiles for paths in your dacha are.
On the video there is a video tutorial: laying paving slabs yourself and with your own hands (crisis option):
Cost of work
If you decide to use the services of an experienced specialist, then you need to know the price/prices for laying 1 m2. the cost may vary, as it depends on the chosen installation method (how much it costs to lay paving slabs must be found out in advance
- Turnkey laying of tiles on a concrete base for square meter– 2100 rubles, for crushed stone – 1650 rubles.
- Laying on a finished base – 400 rubles.
- Laying material on sand – 1400 rubles.
- Laying granite tiles – 1400 rubles.
- Laying a product with a pattern – 450 rubles.
Laying paving slabs is a process through which you can obtain a durable, reliable and practical coating. It is actively used for arranging gazebos, squares, and courtyard areas. The service life of the finished surface depends not only on the quality of the product, but also on precise adherence to the installation technology.
Ennobling local area, many owners often wonder what to cover the paths, front and back yard, recreation area... Paving slabs are great for these purposes. The functional covering in landscaping has no equal. The price of the material is far from fabulous, and laying paving slabs with your own hands is quite simple to do. So, the design of paths and areas on the site will not cost too much, and at the same time it will be a worthy frame for the garden and decoration of the local area.
Variety of colors, shapes and textures
This allows you to create a harmonious ensemble, combining all the elements of the site into a complete picture, and embody any design and architectural plans.

Thanks to their aesthetic appeal and excellent performance characteristics, paving slabs are indispensable in landscape design
Environmental friendliness and comfort
Paving slabs do not emit harmful volatile substances when heated and do not soften under scorching heat. sun rays. Sand-filled tile joints allow excess moisture to seep out after rain, preventing the formation of puddles.

The tiled path does not disturb the natural need of plants on the site for water and gas exchange
Easy to maintain and durable
Paving slabs are an ideal covering in frosty winter conditions; they have high strength and low abrasion.

With high-quality installation, tiles can last more than 15 years
Both the technology for laying paving slabs and their subsequent care are quite simple. If the coating is damaged, it is always possible to restore the area by selecting and replacing just a few tiles.
In order for the paved paths and platforms on the site to become not only an original addition landscape design, but also served well for many years, when carrying out work it is important to take into account a number of basic points on how to properly lay paving slabs. For example, depending on the location and purpose of the coating, paving slabs can be laid either on mortar or on sand or crushed stone.

To arrange garden paths and recreation areas, it is enough to use a sand and crushed stone “cushion”
Tile laying work step by step
At the stage of preparation for laying paving slabs, it is extremely important to correctly select products from a wide range of products and necessary tools, which will be simple and convenient to work with. When choosing a tile, you need to focus not only on taste preferences, but also take into account performance characteristics material. So, when equipping a recreation area or a covered carport, you should ask the manufacturer whether the tiles are capable of supporting heavy structures or are designed only for human weight.

Attention is paid to the surface roughness, the shape of the product: are there any adjustments, will it need to be trimmed?
To carry out the work you will need the following tools:
- Master OK;
- wooden or rubber mallet;
- manual rammer;
- metal or wooden pegs;
- cord-order;
- building level;
- I-beam or pipe of any diameter;
- watering can or watering hose with sprayer;
- rake and broom;
- M500 cement and sand.
To determine the number of tiles and raw materials for the base, it is necessary to think through the layout of the site, taking into account the location and size of its paths and platforms.
One of the basic rules for laying paving slabs is the need to arrange paths under slight slope at the rate of 5 mm for each meter so that water freely flows from them into wells or onto lawns.
Arrangement of the base
The success of the entire construction directly depends on the reliability of the base surface. When arranging the base, stakes with notches are hammered along the edges of the location of the future path at a height of 5-7 cm, at the level of which the cord is pulled. A layer of turf, stones and debris are removed from the construction site.
In order to lay any paving slabs with your own hands, you must first carefully prepare the base
To level the surface of the outlined area, in elevated places the excess layer of soil is removed, and in depressions, holes and basins, on the contrary, it is added. The base, leveled with a rake, is carefully compacted. When working with soft soil, it is advisable to moisten the leveled soil surface with water before compacting. Careful compaction of the base will prevent uneven settlement of the sidewalk.
The depth of the base is calculated with a margin of a couple of centimeters, taking into account the fact that shrinkage always occurs during compaction. On average, it takes from 20 to 30 cm to lay a layer of sand and the tile itself.

After excavating the soil, the front side of the tile should reach the desired level
The entire surface of the future path is given a transverse, longitudinal or longitudinal-transverse slope. At this stage of arrangement of platforms and paths, work on laying communications is also carried out. Laying geotextiles before filling with sand will prevent the growth of weeds between the tiles.
Creating a “pillow” from sand or crushed stone
Sand can be laid on the prepared base layer of soil, which will not only increase the stability of the sidewalk, but will also act as drainage system. The poured sand must be leveled with a rake and watered until puddles form on its surface. After only 3-4 hours in sunny weather, the “pillow” can be given a smooth, even shape using a profile, which can also be an ordinary pipe or beam.
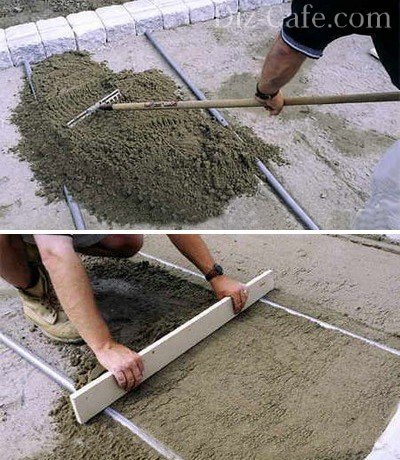
To level the surface of the sand layer, you can use inch PVC pipes
The pipes are placed like rails at a distance of 2-3 meters from each other. The gaps between them are filled with sand to the same height, ensuring a smooth surface throughout the entire area.
To give greater strength to the coating, paving slabs can also be laid either on a crushed stone base or on a mortar. To do this, you need to prepare a dry sand-cement mixture in a 3:1 ratio. The mixture is laid out even layer onto the base, a channel screed is performed. When working with “difficult” soils, it is advisable to use a combined installation consisting of a layer of cement-sand mixture and concrete.
Installation of paving stones
Before laying the paving stones, it is necessary to pull the cord along the chamfer. It is better to start laying paving slabs with your own hands from the curb. The first row is laid out strictly along the cord. The tiles are laid in the direction away from you.

The “bricks” must be placed in such a way that they fit tightly together
This will avoid increasing the width of the seams. Using crosses will make it possible to set equal intervals of 1-2 mm between the tiles. If the tiles lie unevenly, you can use a trowel to remove or add a layer of sand under it and then compact it again.
It is necessary to level paving slabs using a building level and a mallet. Upon completion of the tile laying work, the seams are covered with a layer of cement-sand mixture and watered with water.

To give the path a more neat and attractive appearance, the seams between the tiles can be “rubbed” with quartz sand
If the tiles do not fit well with other buildings or elements of landscape design, you can trim its edges using a grinder.
Upon completion of work, debris and remaining sand are swept away from the finished path. Installing the border with M100 liquid mortar will prevent loosening of the tiles and “creeping” of the path.
Video master classes with installation examples
In the future, it is enough just to renew the sand washed out by water in the seams of the paving stones. A path decorated with paving slabs will be an excellent decoration of the site.
If you want to give your yard a more civilized look, laying paving slabs will come in handy. Advantage of this material is that it is quite beautiful, and the quality is expressed in durability and long service life.
On construction market you can choose a universal option, but it would be wise to select tiles to match the facade of the house. The range is so large that you will definitely find material to suit your taste.
The technology for laying paving slabs with your own hands is quite simple if you stick to a certain plan. For an ordinary patio, a week is enough to lay tiles.

But if we take, for example, a large yard where a car can drive, it will take more time (about two weeks), and even extra hands (you may have to hire a helper).

Before starting work, you need to decide on the type of paving slab. For example, there is stamped and vibration-cast material. The best choice would be the second option. Perhaps the cost will be higher than other options, but it will be compensated by the decent appearance and long term operation.

Paving slabs are distinguished not only by appearance, but also thick. Standard thickness slabs can range from 20 millimeters to 40. For small areas that are intended for walking only, 20mm thick tiles are suitable.

In the courtyard itself, the thickness of the tiles is estimated at 45 millimeters. But when the road is intended for cars, then the material is laid at 60 mm.

If you pay attention to the photo of laying paving slabs, you will be able to notice the variety of styles. For beginners, it is not recommended to install in the diamond, brick or pavers style. The point is that this kind of work is not easy.

But professionals will willingly take on the most complex drawings, because they will be paid well for it. Also, paving slabs vary in color. Certainly, grey colour not as expensive as colored ones, but as they say, beauty requires sacrifice.

To save money and at the same time beautifully arrange a place where people walk or transport travels, step-by-step instructions for laying paving slabs are just for you.

What do you need for work?
What do you need to lay paving slabs with your own hands? First of all, you will need special materials and tools. As for materials, work will not begin without sand. But its quantity directly depends on the area of the covered territory and the landscape itself.

The next material is the tile itself. How much will it take? The manufacturer himself carries out quadrature calculations. This is followed by cement and curbing. Next you will need a thread of good elasticity and strength, thanks to which it will be possible to lay the tiles evenly.

But an elastic thread cannot do without metal pegs and two narrow steel pipes. Well, then everything goes according to the standard: a regular and rubber hammer, a shovel, a broom, buckets and a wheelbarrow. To go in the right direction you will have to use the level.

To give a plane it will be used building code. Also, a tamping tool and a grinder are used for cutting concrete. The work ahead will be a little dirty, which means you should prepare your work clothes and shoes in advance.

In addition, you can use knee pads to avoid rubbing your knees.

The working process
The area covered with paving slabs must have a slope. What is it for? When it rains, water will form puddles on your driveway. But when the tiles are laid on a slope, the remaining water after rain will flow outside the home area.


As you already understood, the slope will be towards the street, which means it can be taken as the zero point. Just in this place you need to drive in two pegs and stretch the thread along the zero line. During the tensioning process, you need to check the horizontal position with a level (the level is applied to the thread from below).

Following the example of the first thread, you need to pull the second one perpendicularly. It is worth noting that the second end must be higher than the first, which is located in the zero level area. Another thread is tied to the last peg.

It's on the same level as the previous one. It needs to be pulled parallel to zero, and the end tied to the fourth peg. The first and last pegs are connected by a thread. Overall, a rectangle of thread is formed.

After marks from the threads, the plane of the rectangle is divided into strips. Its width is determined by the length of the rule. How is the site divided into strips? A distance is selected from the zero line, and there a peg is driven into the ground.

The same steps are performed on the opposite side. The height is equalized using connecting threads. This is how the entire site is divided into strips.


Over time, you have to align the markings. For example, when the thread is too low to the ground, the excess is removed and added to where there is not enough. The gap between the thread and the ground can be determined by eye. When everything is balanced everywhere, it's time to compact.

After this, a sand-cement mixture is prepared. The cement is mixed with a pile of sand in a ratio of 6:1. The sand should be slightly damp. The mixture is distributed in one of the strips, and then thoroughly compacted.

The pipe is adjusted so that it is in the gap 1 cm above the thread. The height of the pipes must match the threads.

The tiles are laid out in stacks near the place of work, because it is more convenient to lay them this way. If you come across a defective material, it is better not to use it. The success of the subsequent placement of others depends on the placement of the first slab.

It is important to tap the material thoroughly with a rubber hammer so that it is well absorbed into the soil. This continues until the last slab.


Photo ideas for beautiful laying of paving slabs


