Ease of installation, reliability and durability have made diode lighting strips very popular.
If an LED strip is chosen for installation as a lighting source, how to install it on the ceiling with your own hands and operate such a device are the main questions that concern the consumer.
LED lighting strips are represented by a standard dielectric, equipped with conductive tracks, and having contact pads for SMD components in the form of LEDs and resistors. Standard device includes individual modules 2.5-10 cm long. Each such module has several diodes and resistors responsible for limiting current consumption.
When choosing, you need to pay attention to the product labeling, which consists of several symbols:
- type of device;
- voltage indicators;
- glow color;
- type of installation of elements;
- diode chip sizes;
- number of diodes in one meter of tape;
- product protection class.
Modern diode strip lights have a white (W), blue (B), red (R) or green (G) glow. Multi-color RGB strips are also sold. Single-row tapes have a diode density that is a multiple of 30, and double-row tapes have a diode density that is a multiple of 60.
Particular attention should be paid to the dimensions of the diode chips. These are the parameters that characterize the amount of luminous flux:
- SMD-3528 with a power of 4.8-19.2 W/m;
- SMD-5050 with a power of 7.2-14.4 W/m;
- SMD-5060 tapes;
- SMD-5630 tapes;
- SMD-5730 tapes.
When choosing a diode lighting strip, you cannot ignore the IP protection level. Optimal performance guarantees safe and long-lasting operation of the light source.
LED strip lights of class IP-65 - IP-68 have a better moisture-proof degree, but are often characterized by an insufficient level of heat dissipation, which is due to the presence of a silicone shell.
Therefore, it is advisable to install such devices only in rooms with excess humidity.
Connectors
 The factory equipment of the tape, completely ready for installation, assumes the presence of connectors connected to the electrical power source.
However, there are no ready-made contacts in the cut elements, so the use of connectors with connectors is the only correct option for connecting a lighting device.
The cost of the connector varies greatly depending on functional purpose.
Connector devices can be not only connecting, but also connecting and feeding devices, designed for connection to devices such as a power source, controller or dimmer.
Insulation
 For the purpose of insulation, a heat-shrinkable tube is most often used, which is capable of shrinking in size as a result of heating, shrinking and tightly fitting the contacts.
Thanks to these properties, it is possible not only to obtain electrical insulation, but also to increase the level of mechanical strength.
To insulate yourself, you need to place a 20mm long piece on the contact group of the diode strip and heat it with a regular household lighter or construction hairdryer with a special narrow nozzle.
Connecting two strips together
Connectors with connectors are a convenient and simple alternative to traditional connections, allowing you to reconnect sections of LED strip lights, or combine several diode strips into a single system.
Currently, connectors are sold that have one or more connectors, so when choosing, you need to take into account the type of diode strip and the type of connection, which can be rigid or flexible.

Connecting two or more LED strips
It is important to remember that the possibility of using a controller with connectors in rooms with high humidity is completely excluded, due to the risk of contact oxidation and device failure.
Calculation of LED strip and power supply
LED strip lights operate from direct current, and the connection is made to a voltage source of 12 V or 24 V. For this reason, converting switching power supplies are used for power supply from a regular electrical network, which must correspond to the power of the lighting device. The power level can be determined from the tabular data.
Selecting a power supply

Today, several versions of power supplies in different designs are produced and sold:
- Compact and sealed device with a plastic housing, characterized by small in size and weight, as well as a sufficient level of protection from moisture. Maximum power indicators do not exceed 75W. The device is designed for powering diode strips for interior lighting.
- Sealed device with aluminum housing, average power 100W. This version of the device is characterized by quite noticeable weight and dimensions, therefore it is widely used when making lighting in street devices. It is characterized by increased reliability and good protection from adverse external factors such as wind, precipitation and ultraviolet.
- Device open type with an average power of 100W. Device large sizes, designed for installation in a hardware compartment or special cabinet. The main advantage of this option is its affordable cost.
Thus, in order to choose the right power supply, you need to determine not only the type of lighting strip, but also its power.
To independently determine the power level for which the power supply is designed, you need a diode lighting device power of 1 m.p. multiply by the length of the tape and add approximately 10% of the margin to the result. The standard safety factor is 1.15.
Required Tools
To install an LED strip lighting device, you need a standard set of materials and tools, presented:

- directly with diode strip;
- power supply;
- installation tool in the form of a knife and scissors;
- electric soldering iron 25-40W;
- rosin and low-melting solder type "POS-61";
- electrical wires with a minimum cross-section of 0.75 mm 2;
- heat shrink tube;
- a special hairdryer or a gas household lighter;
- lugs for electrical wires;
- special crimping tool.
As practice shows, the optimal flux for soldering can be represented by ordinary rosin, which should first be dissolved in small quantity alcohol
To avoid labor-intensive soldering, it is advisable to purchase detachable connectors designed for mounting a strip diode lamp. Such devices have a system of clamping contacts, and allow for easy connection.
Backlight installation
So, let's look at how to install LED strips for ceiling lighting. Installing an LED strip yourself is absolutely not difficult. You should first try on the tape at the installation site and mark the locations for the holes for fasteners.
Further installation is carried out in accordance with the following step-by-step, intuitive instructions:
- Preparatory activities with wires or cables include stripping the ends by 3-5mm and then twisting them. Apply a drop of alcohol flux to the twist and tin it using a soldering iron. You can press the section of twisted wires using the hot tip of a soldering iron into rosin, and then immerse it in molten solder.
- The connection of the wires is carried out in accordance with the color marking, and the loop conductors are brought to the contact pad on the tape. The standard soldering time should not exceed 7-8 seconds.
- A heat-shrink tube is placed over the soldering and wire group and fixed by heating. Before you begin crimping the insulator tube, it is recommended to seal all soldering areas with silicone sealant.

Installation diagram LED strip
On final stage installation, you should connect a diode strip lighting fixture to the terminals of devices such as a power supply, controller or amplifier, and then carefully check the correctness of the entire circuit. Controllers are used only when it is necessary to smoothly control the brightness level and color of LED strips.
If the self-connection is correctly performed, after turning on the voltage, the diodes of the tape light up. Otherwise, you will have to dismantle the lighting device or check the functionality of all elements of the connection circuit.
How to install LED strip in the kitchen?
In wet areas and the kitchen, sealed tapes are installed, for mounting them on the wall or ceiling surface Most often, special plastic clamps or clips are used:
- connect the contacts of the diode strip to the wires by soldering or special connectors;
- insulate the joints with insulating tape or heat shrink tubing;
- when installing the tape on the profile using double-sided tape, the surface must be dry, clean and grease-free;
- stick the LED strip, gradually removing the top film protection and pressing the lighting device;
- install a transformer in a pre-designated location.
When creating a backlight from several diode elements, their combination into a single system must be strictly parallel, and the connection areas are removed in special plastic cases.
Recently, consumers have given preference not to traditional switches, but to modern dimmers, which are installed together with the power supply. At the final stage, the functionality of the installed lighting is checked.
Video on the topic
It is a fact that they open up enormous possibilities when creating decorative lighting. But sometimes to realize the most complex systems lighting with complex transitions and designs, designers have to cut LED strips into pieces of the required length, and then reconnect and connect to a power source. Previously, individual sections were connected into one working system by soldering, but this method has too many disadvantages for a more convenient replacement not to be found.
Connectors |
|||
| № | Photo | Description | Price |
| 1 |
|
20 rub. | |
| 2 |
|
20 rub. | |
| 3 |
|
20 rub. | |
| 4 |  |
|
40 rub. |
| 5 | 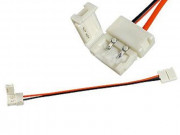 |
|
35 rub. |
| 6 |
|
35 rub. | |
| 7 |
|
23 rub. | |
| 8 |
|
23 rub. | |
| 9 |
|
27 rub. | |
| 11 |  |
|
23 rub. |
| 12 | 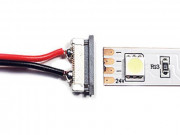 |
|
20 rub. |
| 13 | 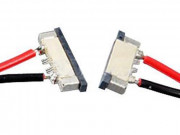 |
|
23 rub. |
| 14 | 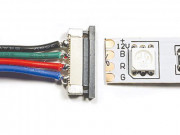 |
|
20 rub. |
| 15 |
|
24 rub. | |
| 16 |  |
|
19 rub. |
| 17 |
|
19 rub. | |
| 18 |  |
|
19 rub. |
Purpose of connectors
It is the connectors for LED strips that have become a more convenient and simpler alternative for reconnecting sections of LED strips, or for combining several LED strips into one large system.
Types of connectors
You can buy connectors for an LED strip with either one or several connectors - the choice depends on the type of LED strip and determines what the connection will be: flexible or rigid. In the factory configuration, ready-made tapes have contacts already prepared on one or both sides, which simply need to be connected to a power source. But in a cut strip there are no such ready-made contacts, and in this case, connectors for the LED strip become indispensable.
Technical features of connectors
The price of connectors for an LED strip may depend on what specific function the connector will perform - only connecting or connecting and feeding. Connecting-type devices are only suitable for connecting separate periods of time, but connecting-feeding devices are needed to connect the tape to a foreign device - a power source, controller or dimmer.
The main advantage of connectors for LED strip is their lightness and high speed installation The only reason precluding their use is high humidity during operation - under such conditions, the contacts oxidize and the connectors fail.
Very often used as decorative lighting for various objects. This light source can be installed on any surface and create excellent lighting. Due to its small size relative to the width of the tape itself, it can be installed in cornices, shop windows, and can also emphasize the smallest contours of various buildings and objects.
Many manufacturers provide users big choice LED strips, which may vary in color. LED strips can solve many problems complex tasks in lighting, thanks to its design.
Despite the wide range of applications for LED strips, it is worth considering that installation and installation must be clearly designed. In such problems, special solutions are often used to solve them. connectors, which allow the user to invent and implement a variety of lighting schemes of any complexity.
The user is always faced with the task of how to cut the tape and then connect it in a certain sequence, which is necessary for decorative lighting or other types of lighting. IN in this case special help very well connectors, which allow you to connect cut diode strips.
Connectors for LED strips can be various shapes, and have some classification due to the fact that diode strips may differ in terms of the degree of protection and emitted luminous flux. For LED strips in silicone design, which have a high degree of protection against external influence, completely different connectors are used compared to those installed on a regular tape. There is also a difference between connectors, used for diode strips that shine in one color or have a varied range of luminous flux. During installation LED lighting When using this connecting equipment, the user must have a very clear understanding of the entire communication chain between the lighting modules.
Connectors They are not only standard, for joining straight sections of LED strips, but also branched, which can be designed in the form of a cross or a tee. This type of mounting modules allows the user to rotate the tape 90° in different directions. This is very important factor, since the LED strip cannot be bent too much, much less made these turns when installed on a surface, as this will lead to a break in the electronic communications between the LEDs on the device itself. Connectors are very often used in installations of various levels of complexity, and thanks to their variety, users can reproduce all their lighting ideas.
To connect the parts of the LED strip with the most convenient solution are connectors. They are easy to use and involve connecting several parts into one common network.
Their types
These elements are sold in different configurations, that is, they have from one to three or more connectors. Each type is designed for a specific LED equipment, and is determined by the method of connecting the parts. There are two types of methods - hard and flexible. Manufacturers of LED strips in their configuration are already introducing special contacts at both ends, which allow you to immediately connect the lighting equipment to an energy source. But if you cut the tape, then the contacts installed by the manufacturer are not enough; high-quality connectors come to the aid of designers, which are irreplaceable elements under these circumstances.
Technical properties
The cost of this type of connection of lighting equipment depends on its functional purpose. The connector can not only connect parts of the tape, it is also designed to power them. You can power the tape to several devices. For example, a power supply, controller, or dimmer.
Their main feature may be the easy and quick installation of connectors and connectors for LED strips. The only drawback to their use may be that these parts cannot function properly in conditions high humidity. Under aggressive conditions environment their contacts are subject to oxidation, and all equipment may fail.
It is worth noting separately that before starting the equipment, you must carefully ensure that the installation of the structure is completed correctly. Otherwise, all equipment will become faulty at the first start. If this happens, services providing warranty repairs, they will refuse you free repairs.


