Multi-colored ice balls can serve as an excellent material for any art object. You can simply scatter them in the garden or yard, around the territory kindergarten, or build or decorate some kind of structure, make snowmen (especially if you freeze water while wearing rubber gloves), etc. We settled on building a multi-colored pyramid of 400 ice balls.
This is my second and I hope not my last post in this community. In the fall, with volunteers from the city of Glazov (Udmurtia), we added bright colors gray city everyday life, now we've taken on winter street art.
We chose a city park as the location for our winter art object. Firstly, there are more children here, and secondly, there is a Sports House nearby where you can get water for the balloons. We talked with the heads of the organizations - they happily agreed to help us.
Where did the idea come from? Surely, many have more than once come across a guide to making ice balls with the addition of food coloring. 
According to the “recipe” everything turns out easy and simple. In reality it turned out to be much more complicated. But as always. Firstly, it is not indicated anywhere how long it takes for the ball to freeze? How much water should I pour, what is better to tint? It turned out, no matter how funny and banal it may sound, but the balloon is filled with water only under pressure - you won’t be able to go outside with a funnel and a “one and a half”. All that remains is a tap or hose with water. Well, a whole series of subtleties that we encountered in the process.
For example, the size - it’s impossible to freeze a large-volume ball (3-4 liters). At t -20, only a layer of 5-6 centimeters freezes overnight. There is water inside. It also begins to freeze, but later, and the ice “shell” bursts open - the ball cracks. It was also a mistake to bury the ball under the snow - in such a “house” it almost does not freeze.
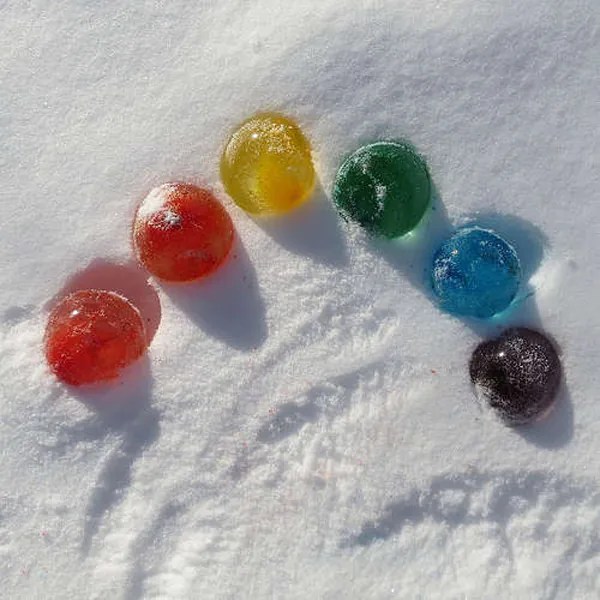
Here is an example of a 3-liter ball that spent the whole night under the snow. In principle, the hemispheres turned out to be very “working” - you can use them as a vase for Christmas tree branches, or turn them upside down and place a lamp under it - it will be beautiful.
Through trial and error, we decided to settle on balls measuring 10*10 - 15*15 centimeters. These froze overnight in the freezer.
So, we are sharing our method of making ice balls.
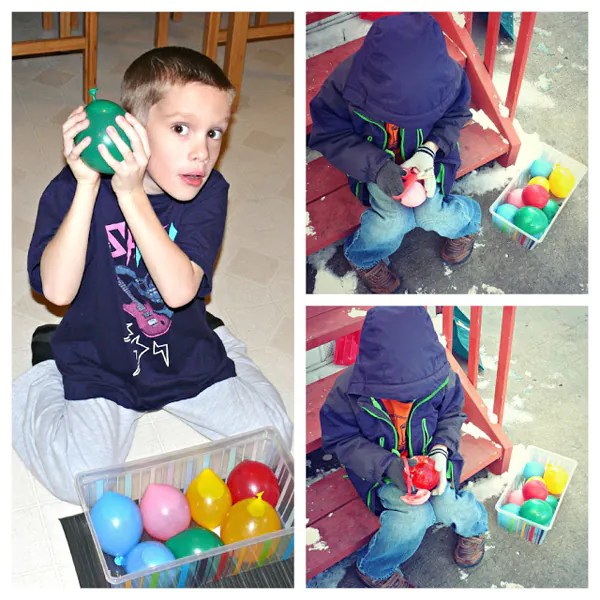
1. First of all, we prepared a concentrate from gouache - 1 jar per 1.5 liters.
2. Pour the concentrate into the ball “to the brim” through a funnel. You can use food coloring in case there is a high chance that someone will decide to taste the giant candies. We took ordinary balls. You can freeze balls in the shape of Mickey Mouse, various animals, or rubber gloves (I personally froze a glove from a package of hair dye - it turned out to be a funny hand that can be attached to a snowman in wet snow).
3. Then we put it on the tap and “inflate”. It’s more convenient for two people: one holds the ball to the tap, the second turns the water on/off. They tied the ball without ropes and other things - with a loop from the neck itself (or whatever it’s called)
4. At first we wanted to fill the balloons directly on the street, connecting to the tap of the Sports House and leading the hose outside - but the hose froze, we steamed it for an hour and a half, then we decided to fill it directly in the toilet and transport it to the place with a wheelbarrow. It’s more economical in terms of water consumption, and it’s also more comfortable in the warmth than in the cold of -25.
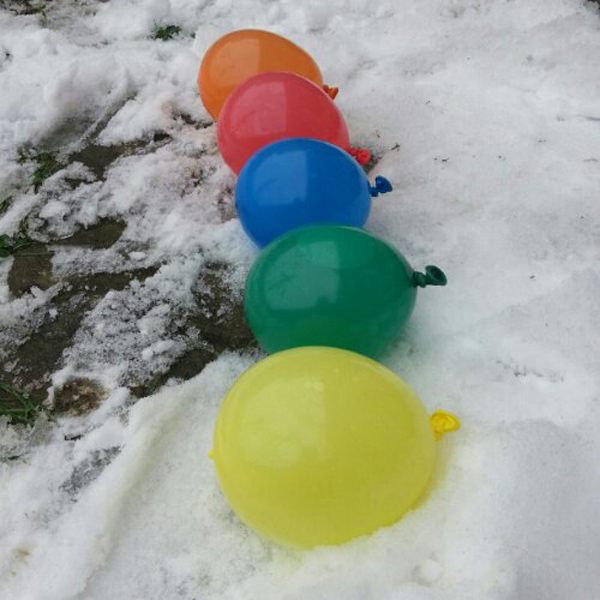
6. Therefore, we froze them right in the park, placing the balls in the snow. We tried not to deepen it too much and place it so that the balls did not touch each other.
7. It took two hours to fill the balloons. During this time, the first batch became crusty. Left for another 2 hours. When they arrived, they discovered that the balls froze perfectly on top, but below, where they came into contact with the snow, there was water. Conclusion - in order for the balls to freeze faster and better, they need to be turned over after a couple of hours, and even better, reduce the area of contact with the snow as much as possible.
Having turned all the balls over, we decided to leave them overnight, covering them with snow from the kids.
However, this did not help - several young vandals remembered where they saw a multi-colored carpet during the day and, having unearthed the balls, began throwing them. Fortunately, the park workers drove them away in time.
8. Most of the balls still survived. The next day they began to dig them out and, after holding them a little longer in the cold, took off their “clothes.” The rubber can be removed very easily - just tear it with a knife, keys or a stick. Some balls never froze completely - they just took off their “clothes” and water poured out of them.
9. You can do whatever you want with the resulting balls. These are both wonderful self-sufficient decorations and an excellent building material. Our choice fell on the construction of a pyramid.
We secure the first level with snow so that it does not move apart.
We water each level with water - otherwise the structure will move apart due to the unevenness of the balls.
It’s a pity that we didn’t have a normal camera at hand - we filmed it on a phone. But not every camera, or rather photographer, will convey the magical play of reflections of lanterns and garlands on the edges of ice balls. And what a beauty it is during the day.
It was only later that the idea dawned on us that the frame of the pyramid could be made of snow, only by placing balls on the outside. So the pyramid would be 5 times larger. Well, that's for next year.
There is still a week until the New Year, followed by the Christmas holidays - we hope you will take into account our experience and our mistakes, adding your own ideas!
Happy creativity!
Western countries have long been practicing decoration for the New Year not only interior spaces houses, as well as streets, paying Special attention decor of the garden area. For example, ice Christmas decorations for the street are very popular among them, but such decor is quite suitable for our latitudes. Moreover, making street decorations from ice is very easy, as well as fun, entertaining and completely inexpensive. Essentially, to make ice outdoor decorations you will need water, a couple of decorative elements (we will talk about this in more detail below), a suitable shape, and a spacious freezer or severe frost outside.
How to make outdoor decorations from ice.
How to make an ice wreath.
Festive wreaths You can decorate the branches of trees or bushes.
Method number 1. Take a prepared pudding mold with a vertical insert in the center. Place bright berries and green twigs (spruce, fir or thuja) along the bottom of the mold and fill the mold with water. Send the form with water to freezer until the water completely hardens. After the water turns into ice, pour it into a basin hot water and immerse the form with ice in it, with a sharp change in temperature, the ice inside the form will melt at the edges, and you can easily pull out the wreath. It's retarded just to hang the wreath on a satin ribbon.

Method number 2. We take ready-made small molds for puddings, put a composition of berries and thuja branches on the bottom, fill each mold cold water and put it in the freezer. After the water turns into ice, you can immerse the mold in hot water for literally one minute, take out the miniature wreaths and hang them on the trees using ribbons.

Method No. 3. Place a glass or jar in the center of a deep round shape, lay out twigs, berries, leaves, citrus peels around it, and pour in water. To prevent the jar in the center from floating, you can pour water or sprinkle stones into it. All that remains is to expose the mold to the cold, wait for the ice to harden, take out the wreath and hang it on a ribbon.

Method number 4. Place acrylic snowflakes and Christmas tree balls into a baking dish with a vertical insert in the center, pour in a little water, and place the product in the freezer. When the first layer of water freezes, place a few more balls in a circle, add water again and put it in the freezer, after freezing, add more balls and last time We put the mold in the freezer, take out the wreath, tie a ribbon and hang the product on a street tree.


Photo of ice wreaths.


How to make ice balls.
Method number 1. Let's prepare required amount balloons, pour water into them and pour out food coloring, mix the water inside by shaking the balloons. We tie the balls and put them in the freezer or in the cold outside. When the water inside the balls hardens, cut the shell with a knife and take out the colored ice balls.


Method number 2. You will need a special mold for making ice balls (for drinks), you can put berries or spruce branches on the bottom of this mold, and also put in strings of pendants, pour in water and put it in the freezer until it hardens completely.


How to make an ice candle holder.
Method number 1. Place a glass of stones in the center of the food container (for weighting). Pour in water and lay spruce or thuja sprigs on top, and also add viburnum, lingonberry or dogwood berries. Place the mold in the freezer, after the water has hardened, take out the candlestick and place a lit candle in the center.


Method number 2. We take two bottles of different sizes with a volume of 1.5 liters and 0.5 liters, cut each bottle in half, put the smaller bottle into the larger one, secure them with tape, put berries, leaves and tree branches between the walls, pour in water, and send the product into the freezer. After turning the water into ice, remove the future candlestick from the mold and place a lit candle inside.

Photos of various ice candle holders.


Ice tree pendants.
Round flat pendants are made as follows: various berries, twigs or flowers are laid out on the bottom of a flat round plate, everything is filled with water, a thread pendant is placed on top, the composition is placed in the freezer, then pulled out, separated from the plate and hung on trees.


Ice stars.
- To make stars, you can use star-shaped ice molds or baking molds; to create regular stars, the molds should be filled with water and frozen in the freezer.
- To create colored stars, you must first add food coloring to the water.
- For bright compositions, you can put berries, various twigs, leaves in the molds, or add sparkles.

Ice cubes.
In ice trays square shape We lay out various flowers or slices of fruit, pour in water and freeze. Then take out the ice cubes and decorate with them. street flowerpots, tree branches and other yard elements.

Ice shards.
Paint the water blue and pour it into a rectangular shape. thin layer, send the form to the freezer, after hardening, hit the ice surface with a kitchen hammer, select beautiful fragments and place them somewhere outside.

Frozen heart.
Method number 1. Place heart-shaped pebbles on the bottom of a round plate, fill with water and place in the freezer, then take out the product and place it edge-on on a flat surface.

Method number 2. We put berries and pine needles into a heart-shaped baking dish, put the mold in the freezer, then remove the product from the mold and place it somewhere in a visible place in the yard.


How to make garlands from ice.
In a mold for ice, lay out a thick woolen thread in a circle, pour in water, and put the mold in the freezer. After the water has hardened, carefully pull the tip of the string, followed by all the pieces of ice that should pop out of the mold. To obtain a colored garland, the water must first be tinted with food coloring.
Instead of an ice tray, you can use the base of a box of chocolates.


How to effectively decorate your home for the New Year:
New Year decoration made from ice will help you quickly, simply and inexpensively decorate your area for the upcoming holiday. If you have not yet tried to create street decorations from ice, then we recommend urgently rectifying the situation; we assure you that you will definitely enjoy this pastime.
The Decorol website reminds its readers that you now have the opportunity to receive notifications regarding the release of new reviews by email (fill out the subscription form in the sidebar).
Instructions for making ice balls and compositions from them.
If you are lucky enough to become the owner of a private house, then on the eve of the New Year you strive to decorate not only your home, but also the area around the building itself. To do this, you can use standard Christmas tree decorations, tinsel, and also use more interesting options decor. One of them is ice balls.
How to pour water into a balloon?
There are quite a lot of options for making such jewelry. It all depends on your imagination and desire to experiment. The fact is that water does not flow into the balls just like that, that is, from an ordinary plastic bottle you cannot pour water into the ball and fill it to the extent you need. Therefore, the only option to fill the balloon is to supply liquid under pressure. To do this you can use:
- Crane. To pour water into the ball, you need to put the neck of the ball on the faucet and turn on the water. After this, you need to tie the ball. There are some subtleties here too. The fact is that if you tie the balls with a thread, under pressure the water will still begin to flow out in small drops and sooner or later it will flow out completely. The best option is tying the ball. That is, you need to pull the neck up and make a knot out of it.
- With a hose. The manipulation is identical to the tap. The neck of the ball is pulled onto the hose.
How to make beautiful colored ice balls from balloons with your own hands: ideas, instructions, photos
Ice balls look very nice different colors. In order to paint over water, you can use a variety of paints. An excellent option would be gouache, a concentrated solution and food coloring. Egg dyes that are used at Easter have proven themselves well.
Instructions:
- Place some dye inside the balloon and fill it with water.
- After the ball is tied, shake it a little so that the dye is evenly distributed throughout the entire volume of water. In this position you can freeze the balls.
- Please note that the ball small size approximately 10-15 cm in diameter should be frozen overnight. To do this, put the balls in the freezer. Try not to stack one on top of the other, as they will be deformed and the shape will hardly resemble a spherical one.
- If it is very cold outside, you can take the balls outside to freeze. Do not bury them in snow, as it warms and the temperature inside the water, which is surrounded by snow, will be above zero. It won't freeze, so keep it in the cold for a while.
- Then turn them over so they are frozen on all sides. After this, proceed to remove the balls from the rubber. It holds up very well against frozen balls. You will need to pry the rubber a little with a wrench or knife and just remove it.
- Now you can lay out these balls in an order convenient for you and decorate them at your discretion.

 colored ice balls
 colored ice balls
 How to make an ice ball with fresh flowers ideas, instructions, photos
A very unusual and cute option is to make balloons with flowers and various decorative elements inside. To do this, place a small flower bud inside the ball, then fill it with water. Please note that when filling the ball with water, a flower or any decorative element, will rise up. Therefore, the composition will turn out mainly from above. It is best to use small flowers. Ideal option will become rosebuds. Try to use flowers without thorns or sharp tips so as not to puncture the ball when filling it with water.
After this the ball is tied in a standard way. Often, instead of flowers, use thuja twigs, rowan seeds and citrus slices. Such compositions look very impressive and unusual. Ice balls with flowers and various decor It is used not only to decorate the area near the house. This is a great option to decorate the New Year's table. Place these balls in several places New Year's table.


 ice ball with fresh flowers
 How to make an illuminated ice ball ideas, instructions, photos
If you wish, you can make christmas balls made of ice with backlight. To do this, you will have to purchase LED light bulbs, as well as tablet batteries. You need to attach the battery between the antennae of the LEDs and tie them together. This can be done using tape. Next, this luminous element is placed in a plastic bag or in a spare parts bag, which is placed inside the ball. Next, the ball is filled with water and frozen.
In this state, the LED can burn for quite a long time. You will receive and additional lighting your his personal plot, also cheer up everyone around you and your guests.
 illuminated ice ball
 illuminated ice ball
 How to make a Christmas tree from multi-colored ice balls?
A variety of sculptures and products can be made from ice balls. Very often they are used to build a Christmas tree or make snowmen. To do this, you need to use green dyes. Fill a small amount of of dye into balls and fill them with water, tie and mix. Freeze a few of these ice balls. After you remove the rubber from the surface of the balls, form them into a Christmas tree. This can be a pyramid-shaped tree or a flat Christmas tree that is laid out along the perimeter of the snow.
Add christmas tree from green balls you can multi-colored balls. This will be an imitation of Christmas tree decorations. This decor looks very organic and unusual. It will be an excellent addition to decorating the area near the house.


How to make a snowman from ice balls?
You can make snowmen from ice balls. To do this, use balls different sizes and fill them with different amounts of water. You will need three balls: large, medium, small. Once filled, freeze. Set the balls one by one.
If you want a transparent snowman, then do not paint over the water. If you want a snowman white, add a small amount of white dye to the water. These snowmen look very cute. They will be able to complement the festive New Year's table or area near the house.
 snowman made of ice balls
 How and what kind of figures can be made from ice balls?
Possible shapes:
- Pyramid
- Lock
- New Year's balls on trees
- Turtle
- Snowman

 ice ball figures
 ice ball figures
 How and what kind of buildings can be made from multi-colored ice balls?
It all depends on the number of balls and their size. Build large buildings from huge balls. This will save you time. If desired, you can create huge castles.

 buildings made from colorful ice balls
 How to decorate your yard with multi-colored ice balls: ideas, tips, photos
Decoration options:
- Place along the steps
- Make a separate ice area with sculptures
- Place along the porch
- Decorate flower beds


Decorating the street with multi-colored ice balls: ideas, tips, photos
To decorate the street you will need a huge number of balloons. There are several options:
- Decor of the droshky
- Decor of park areas
- Decoration of children's playgrounds


Decorating a kindergarten with ice balls: ideas, tips, photos
Ice balls are often used to decorate areas near kindergartens. Get the kids involved in making ice balls. To do this, give the children a balloon and show them how to put the balloon on the water tap. Tell me the volume of water that needs to be poured into the ball. Help the children tie the balloons and put them in the freezer or take them outside if it is very cold. Once the balloons are frozen, take the kids outside and decorate the area where you usually play.
Decor with ice balls
Ice balls are an excellent option for decorating the area of a private home, as well as a way to decorate your New Year's table. Ice balls are often used to decorate the New Year's table and serve it. The balls are placed on a plate and candles are lit around them. This composition looks quite impressive and beautiful.
VIDEO: Ice balls
With the onset of cold and snowy winter, everything around is transformed. Coming out of the house onto the street, everything around evokes admiration, because there are fluffy snowdrifts all around that create a fabulous landscape.
If you are the owner country house, then you should definitely be concerned about the question - How to decorate the yard in winter, especially on the eve of the New Year and Christmas holidays.
 To make something like this unusual jewelry you will need following materials: water, any coloring (food coloring or regular paints) and balloons.
As you may have noticed, very few materials are required to make such a wonderful decoration.
To make something like this unusual jewelry you will need following materials: water, any coloring (food coloring or regular paints) and balloons.
As you may have noticed, very few materials are required to make such a wonderful decoration.
So let's get started...
In a separate container (this can be a regular three-liter glass jar or bucket) you dilute water with any dye you like. Depending on how much dye you add to the water, the color saturation of the future ice balls will depend.
 So, colored water ready! Now use the help of your family, loved ones or children and use a watering can or straw to fill the balloons with colored water. If you plan to make huge colored ice balls, then it is better to fill Balloons right on the spot, since a balloon filled to capacity will be difficult to move from place to place.
 Tie a balloon filled with colored water tightly and leave it outside (in the cold, of course) until it freezes completely.
 When the colorful water balloons freezes, you use scissors to release the colored ice balls from the rubber shell.

 You can decorate the paths with such bright unusual ice balls, playground, railings and steps.
Ice balls are multifunctional, easy to make, do not require serious material costs and are very beautiful.
The area around a private house can be decorated with entire compositions of such balls, decorate the paths to the house with them, and even laid out in random order in the snow, ice balls completely transform the yard, giving it festive look.
Such balls look very beautiful as candlesticks - small “tablet” candles heat the surface of the ball while burning and a natural depression is created that does not allow the candles to slide.
To decorate the courtyard of a multi-story city house, ice balls are suitable as unusually beautiful tree pendants.

Creating ice balls begins with preparing the dye - it can be gouache diluted in water, culinary food coloring, or pigments for interior paint.
The dye is diluted in water poured into plastic bottles, or poured directly into the mold for making balls.
The most common inflatable balls are used as a form. Using a household funnel, pour a small amount of dye into the ball or add it dry, then add water from the tap until the ball inflates to the desired size.
It’s best to carry out the procedure of filling the balls with water over a bathtub - if the “mold” breaks, you won’t have to clean it up floor coverings colorful puddles.
If ice balls are going to be used as hanging decorations, then before tying it, it is recommended to insert a long, strong thread into the mold.
The last step in making ice decorations is freezing. The blanks are laid out on the snow, trying to avoid the balls touching, and left until the water in the mold completely freezes.

If possible, after one and a half to two hours, it is recommended to turn the balls over to the other side - this way they freeze faster.
If jewelry is made in a city apartment, then the blanks are placed in the freezer.
A day later on ice balls lightly cut the rubber shell and completely release the jewelry from the mold.

Alternatively, you can use rubber gloves rather than inflatable balls as a form - you get very original and funny ice “palms”.

For the production of colored ice blanks of square or rectangular shape You can use 5 liter plastic bottles.
If you don’t have any dye on hand, don’t be upset - you can put spruce branches, flower petals, rowan berries or leaves of indoor plants into the mold.


