Made with your own hands, it will become a great gift under the Christmas tree, besides, such an accessory is always useful in the kitchen. And even when the cockerel ceases to be the symbol of the year, its image on the potholder will not lose its relevance, because the rooster is a domestic bird, and this image is often used for drawings on kitchen utensils (just remember painted cutting boards and wooden spoons!). Therefore, in this material we will tell you how to make such a potholder yourself.
We knit a potholder with a cockerel with our own hands
Of course, there are several options for how to make a cockerel pot holder yourself; this accessory can be sewn, but this will take time and a large amount of material. Therefore, we offer a simpler and less expensive option - to tie a potholder. For these purposes, you will need only three components, without which the work will not work:
- Knitting threads, the density of which is 125 meters per 40 grams in four colors: brown, white, red and yellow (can be changed color scheme crafts depending on your personal preferences);
- Four black buttons;
- Crochet hook with a diameter of two and a half millimeters.
Step-by-step instructions on how to take a cockerel potholder:
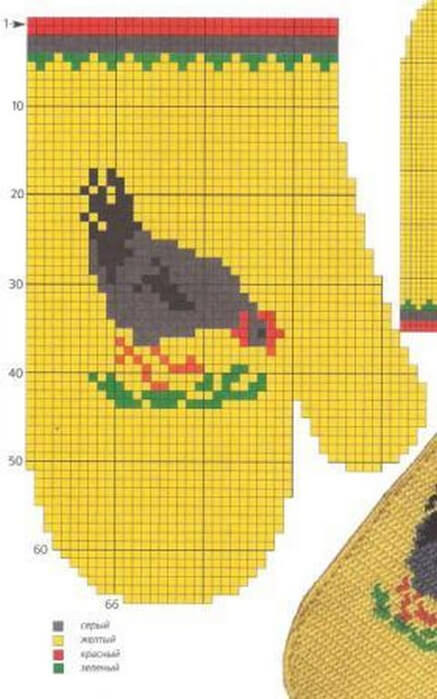
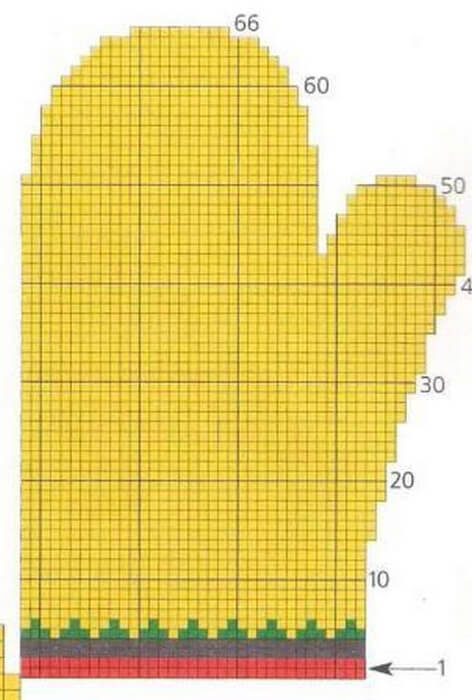
Attention! IN step by step instructions The main nuances of the work are spelled out, and in order not to miss any detail, be sure to refer to the knitting pattern!

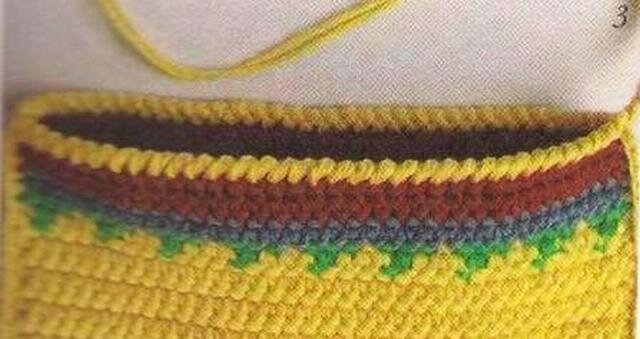
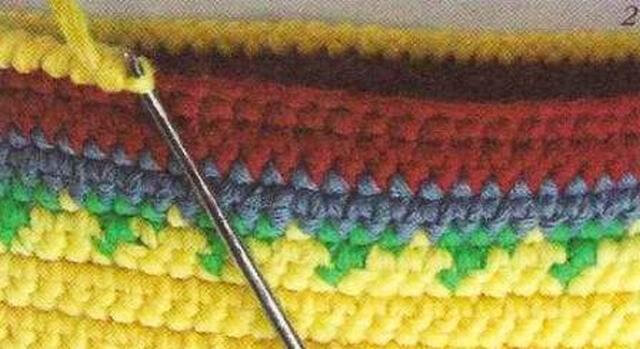
You need to continue knitting with brown threads until the 25th row, and then, according to the diagram, introduce threads into the process white to tie a cockerel collar. Thread Brown no need to interrupt, just lead her along. Using white threads, knitting potholders continues until the 45th row.
Starting from the 45th row, work will begin on the rooster's comb, which will be red. From the 59th row, the left and right parts of the bird are knitted separately. It is best to tie the outline of the scallop with half-columns: make a loop of 10 chains of air loops, which are tied with half-columns.
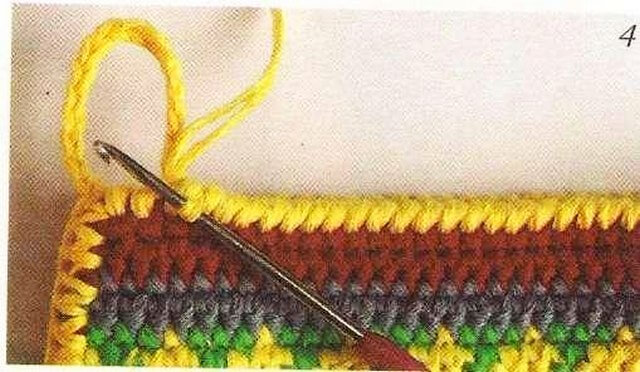
In exactly the same way, that is, with half-columns, you should make the edges of the potholder, mark the wings and collar.
The cockerel's legs are knitted separately, you should get two parts:
The two legs are sewn to the body separately using regular threads that match the color of the craft.
Also, the cockerel needs to be knitted with a beak and beard, but the eyes will already be made from buttons. To knit a beak, you should take yellow threads and make eight air loops, skip one loop, and from the remaining seven, knit one single crochet and one half double crochet, then two single crochets and one double crochet. Next, the three loops must be returned to the beginning of the set of loops, closed with one half double crochet. The beak is tied with single crochets.
The cockerel's beard consists of two separately connected parts. Using red threads you need to cast on 12 chain stitches, from the eighth stitch from the beginning of the cast on, knit two half double crochets, 4 double crochets and one half double crochet, finish the work with a single crochet.
The beak and beard are sewn on in the same way as the paws, and the button eyes can either be sewn on or glued on. 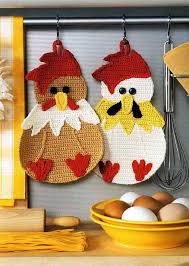
Another option on how to tie a cockerel potholder
We offer one more option, but we will only knit a chicken, the girlfriend of the symbol of the year, which can become a gift for Easter. You can get acquainted with this option by looking at detailed video:
A potholder made by yourself will last a very long time, especially, even if it gets damaged, it can always be easily corrected!
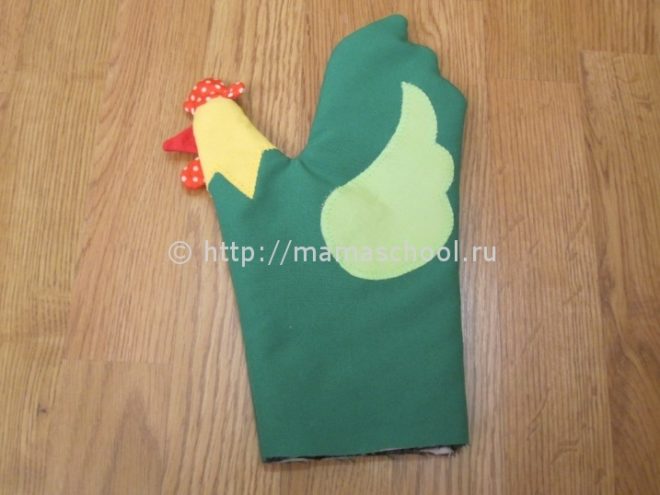
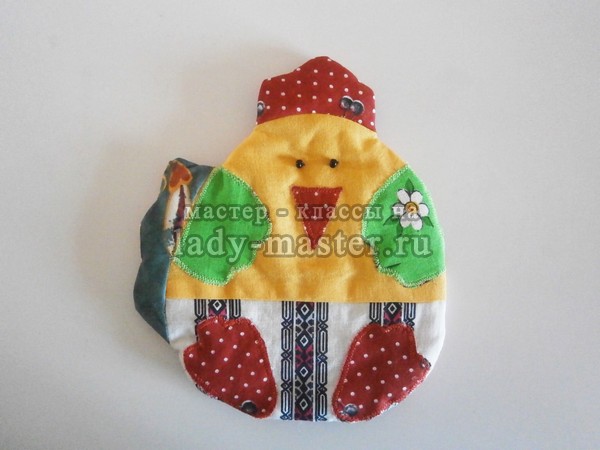
A kitchen oven mitten in the shape of a cockerel can be an excellent handmade gift for the New Year 2029 to your mother, grandmother, aunt or teacher. It is easy and simple to sew, especially since the master class has a pattern and a detailed description. A step by step photos will do more available job even for beginner needlewomen, so if you don’t know what to give to a loved one on New Year rooster is exactly what you need!
Just select the necessary fabric, make a pattern from it and sew all the details and an excellent textile potholder is ready.
How to sew an oven mitt in the shape of a cockerel as a gift for the New Year 2029
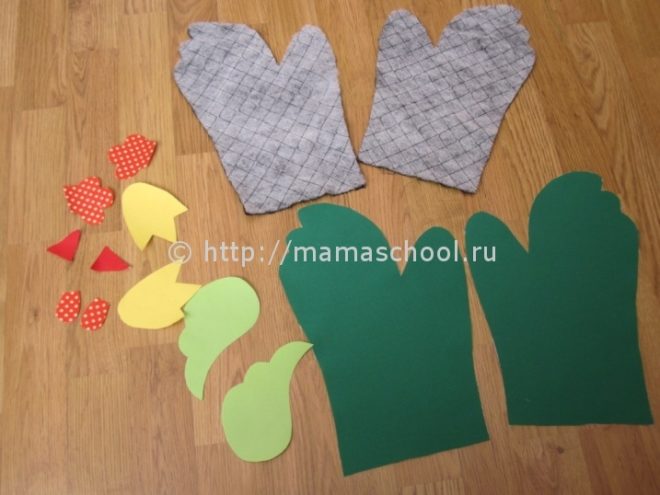
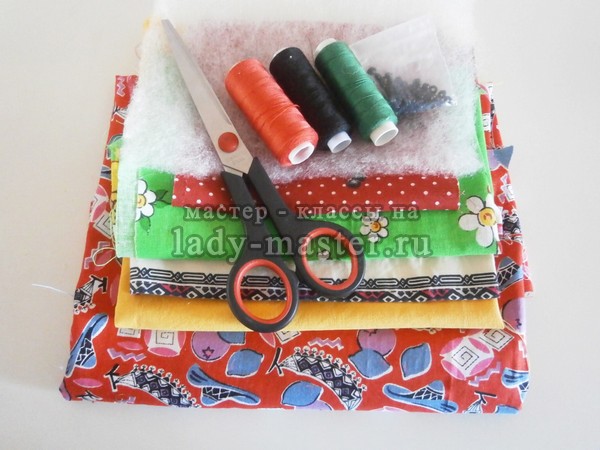
To sew oven mitts in the shape of a cockerel, we need:
- green fabric
- some fabric in yellow, light green and red
- white chintz or calico
- sewing thread
- tailor's needle
- scissors
- tailor's chalk
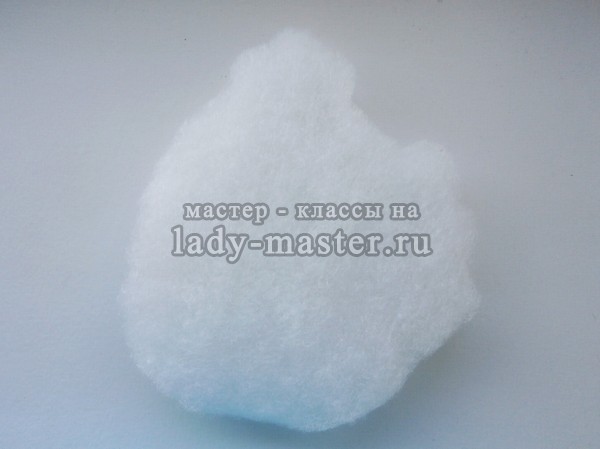
- padding polyester
- non-woven adhesive
- cotton bias tape
- tailor's pins
- black buttons 2 pcs.
For future tack.
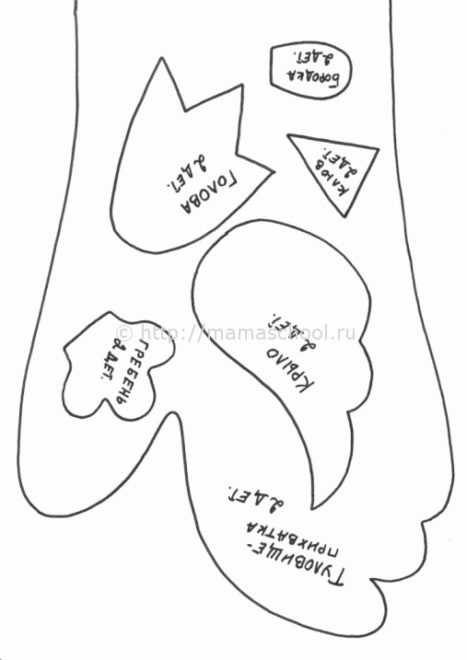
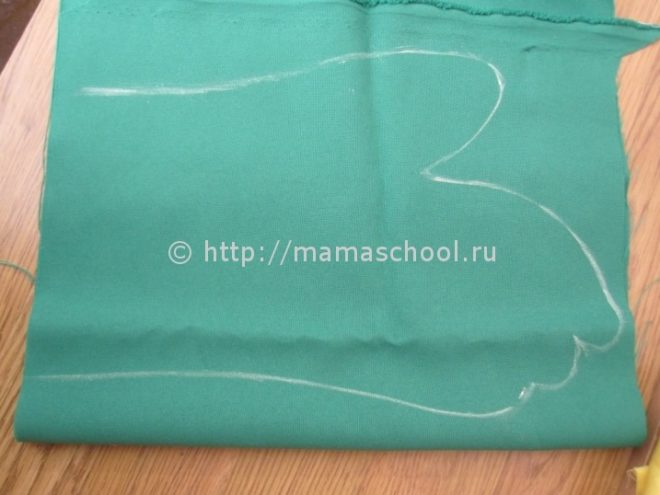
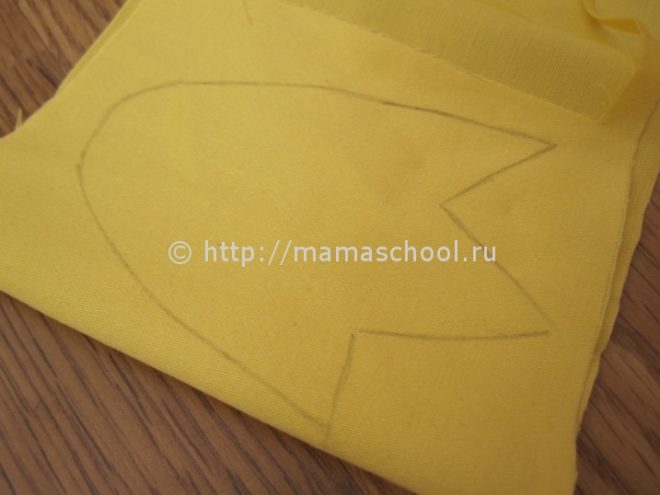
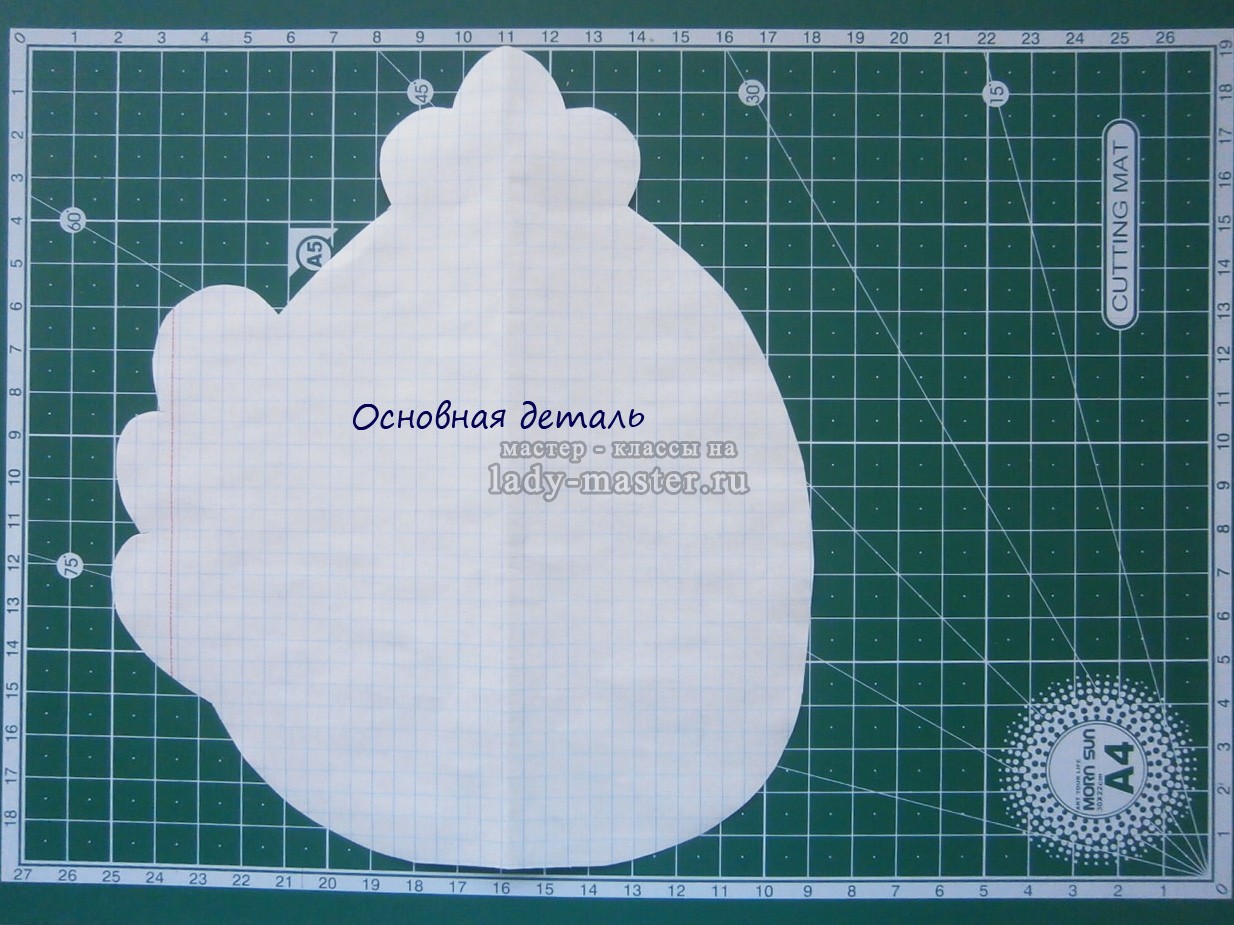
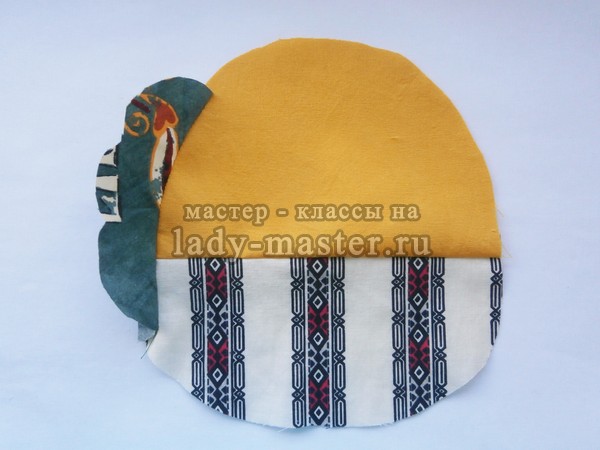
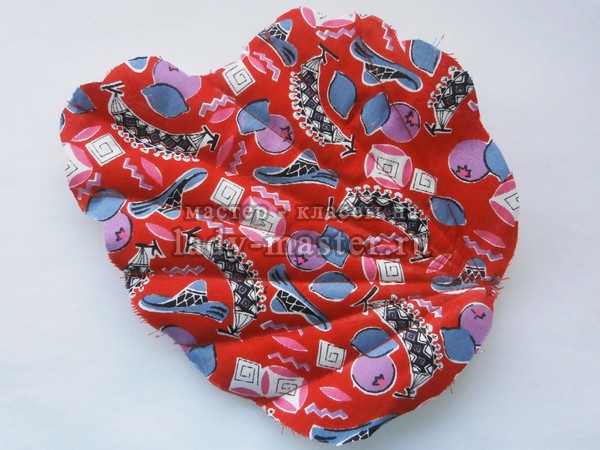
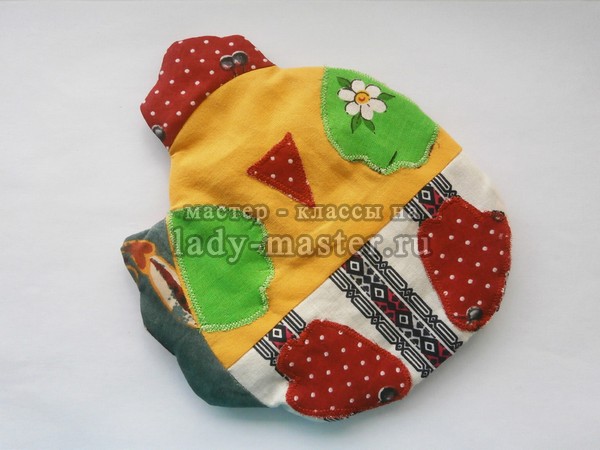
We cut out all the details from the pattern for further work. We transfer the detail of the mitten onto the green fabric, using chalk to trace the outline. I note that the pattern is given taking into account seam allowances.
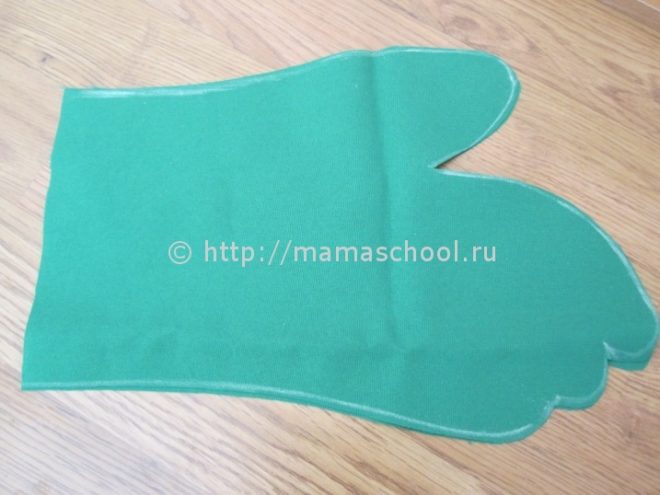
Cut out the mitten with scissors.
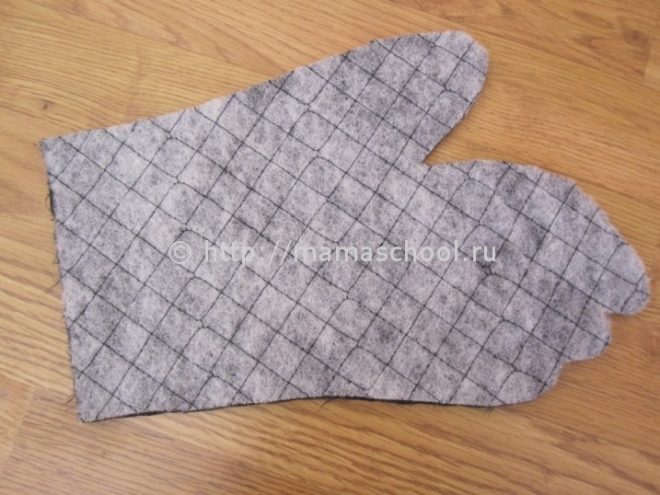
For the padding polyester mitten, we cut out two more parts.
We also cut out two of these parts from chintz or white calico.

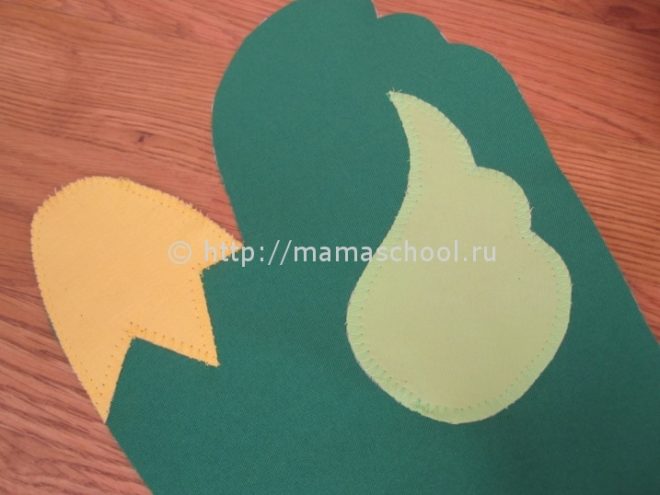
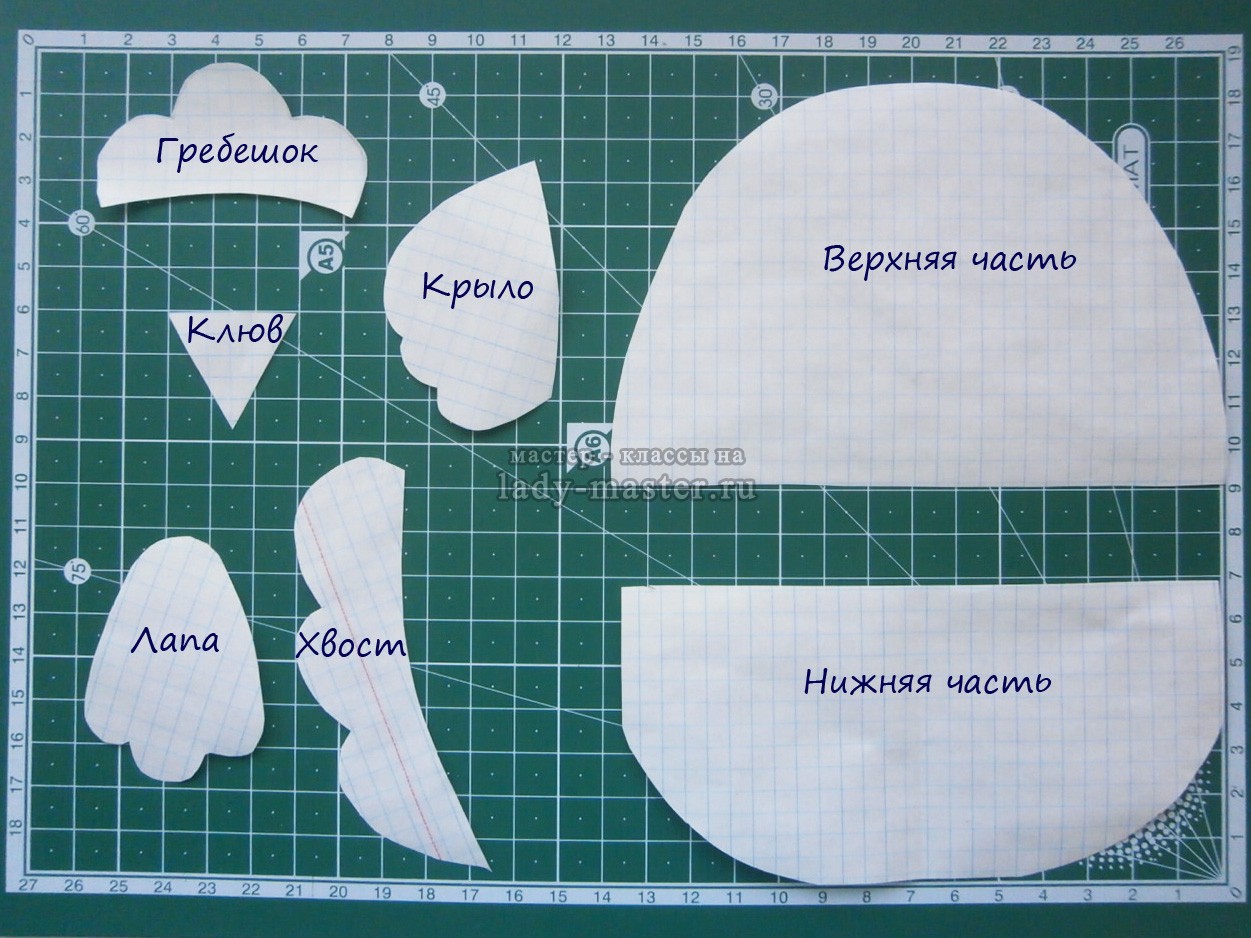
We transfer the details of the head onto the yellow fabric.
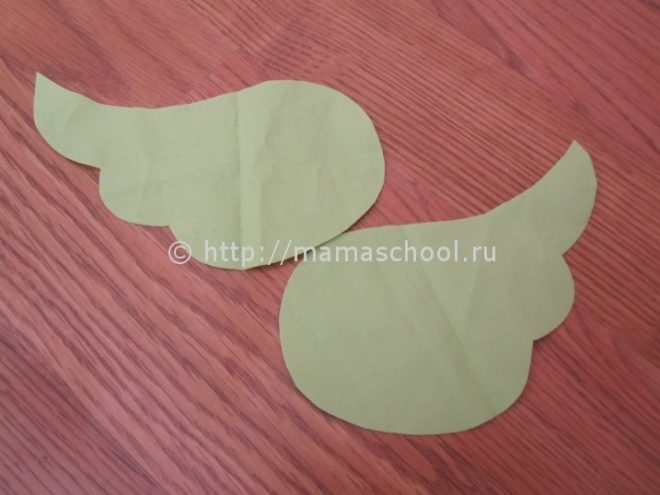
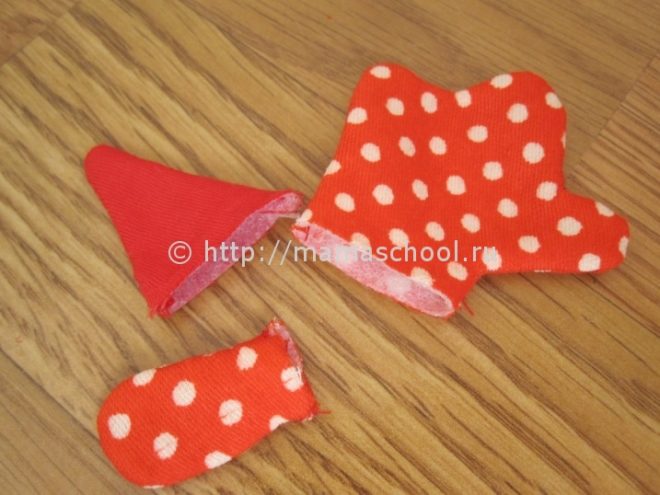
We cut out the wings, comb, beard and beak.
We will duplicate all the details, except those made of padding polyester, with adhesive interlining (in this work we will use an iron) so that the fabric does not fray and holds its shape.
Cut out the parts along the contour. We get this set of parts for our tack.
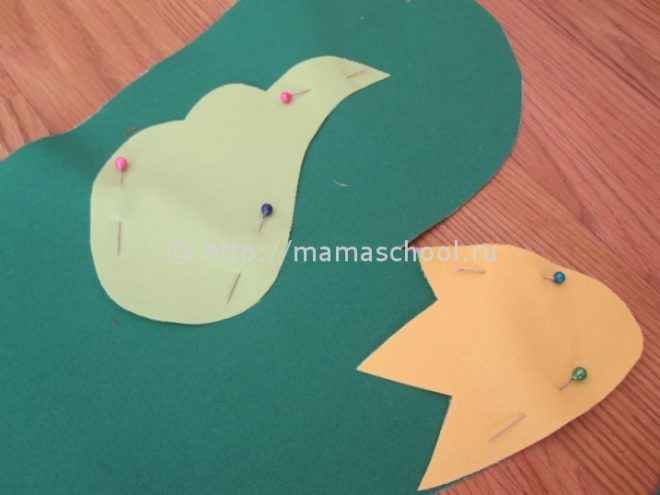
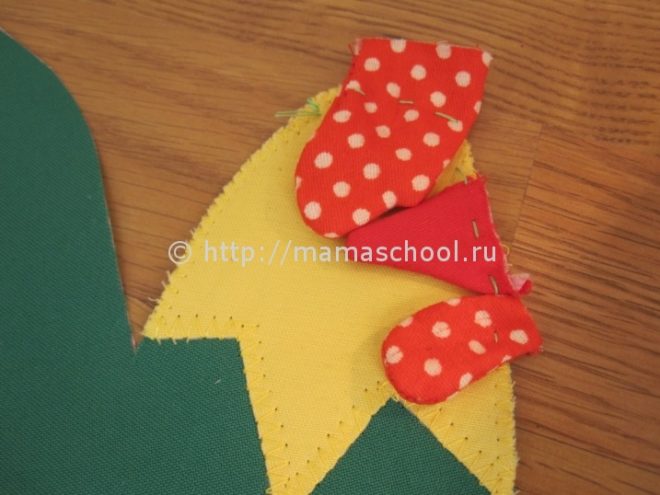
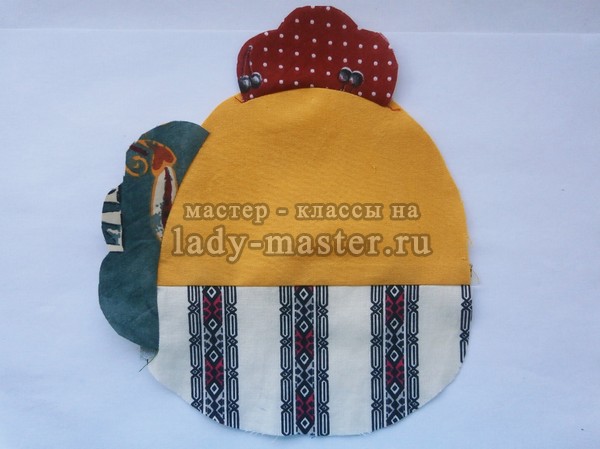
Use tailor's pins to pin the cockerel's head at the location of the thumb. We pin the wing as it was drawn on the pattern template.
Sew on the head using a zigzag stitch.
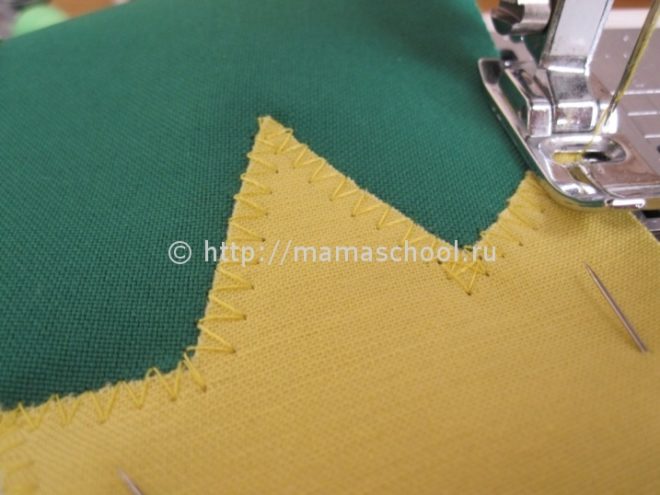
We sew the wing in the same way.
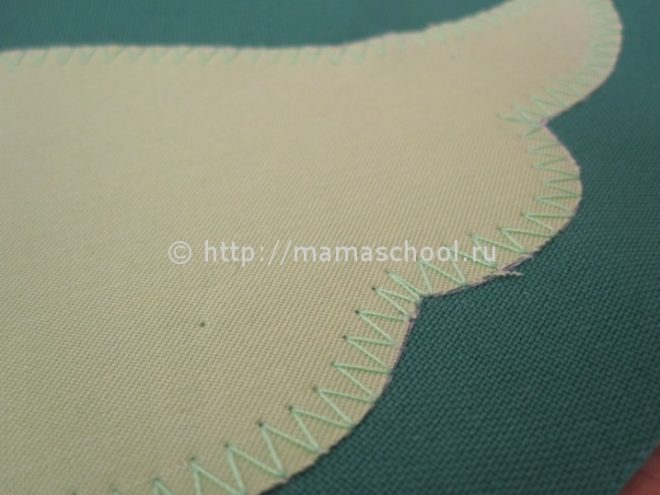
As a result, we get something like this.
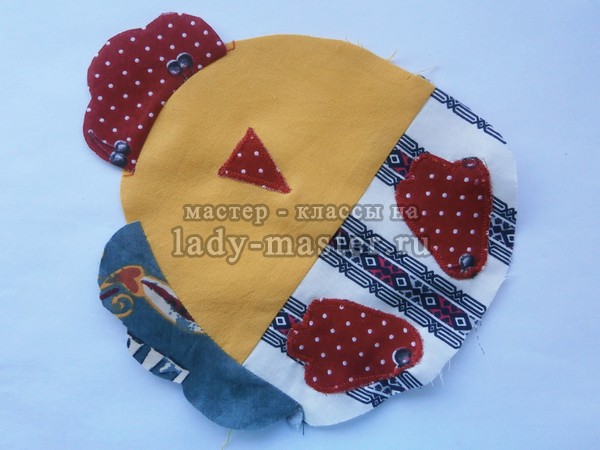
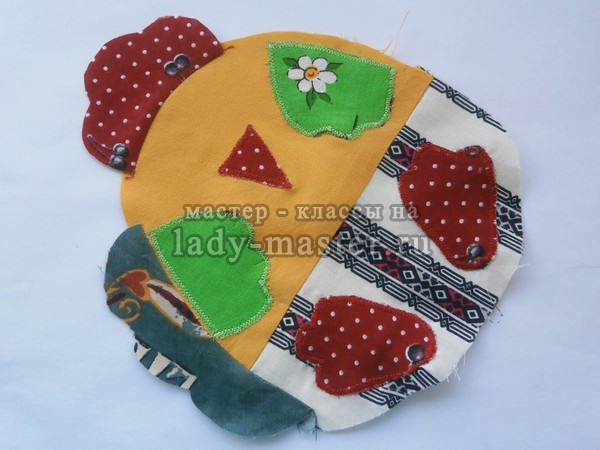
We sew the beak, beard and comb, turning the parts right side out.
We place the comb, beard and beak on the head as indicated in the photo below and lightly baste so that the parts do not move.
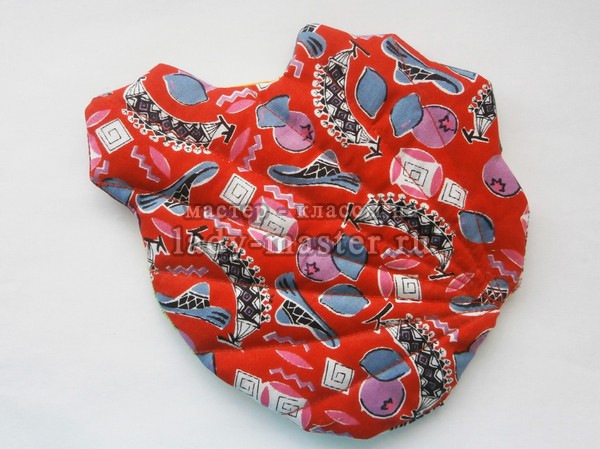
Now we fold the mitten into such a kind of “sandwich”. Place the second half of the potholder face down on the scalloped mitten. Next, on each side we apply one piece of padding polyester. And on top of one side we put two pieces of a white chintz mitten. We baste with a needle and thread so that they do not fall apart, and then we sew on sewing machine straight stitch.
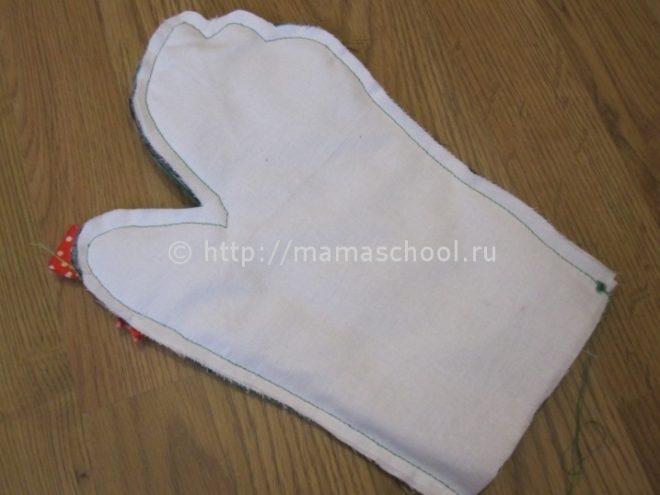
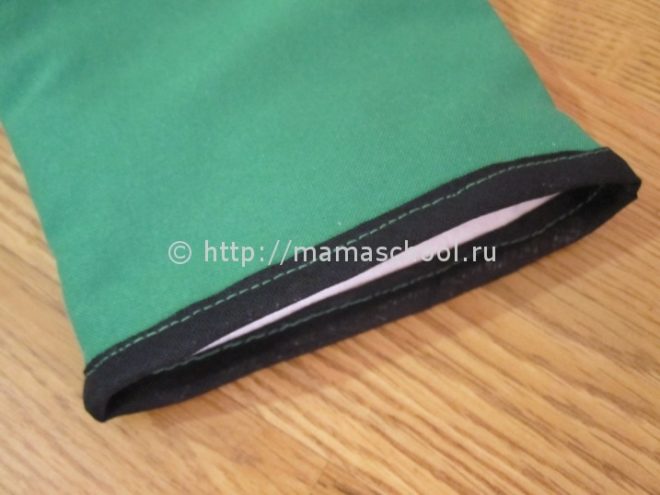
We turn the potholder right side out so that we have white chintz inside and there is no protruding seam inside the potholder. We straighten the details of the beak, comb and beard.
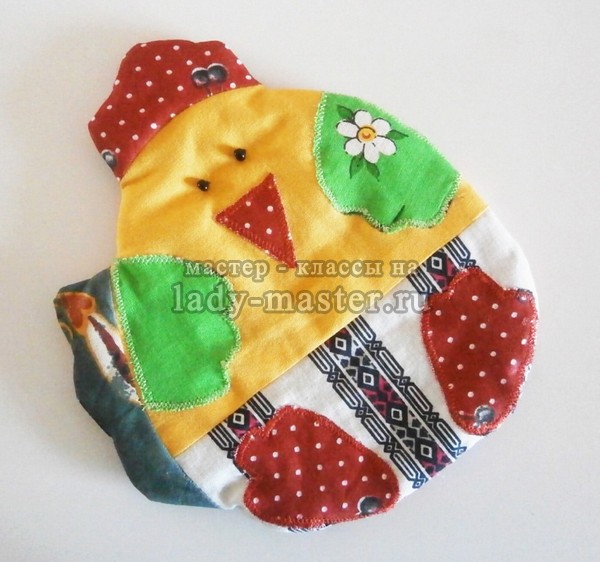
We sew bias tape along the bottom.
For a loop of bias tape we sew a strip like this.
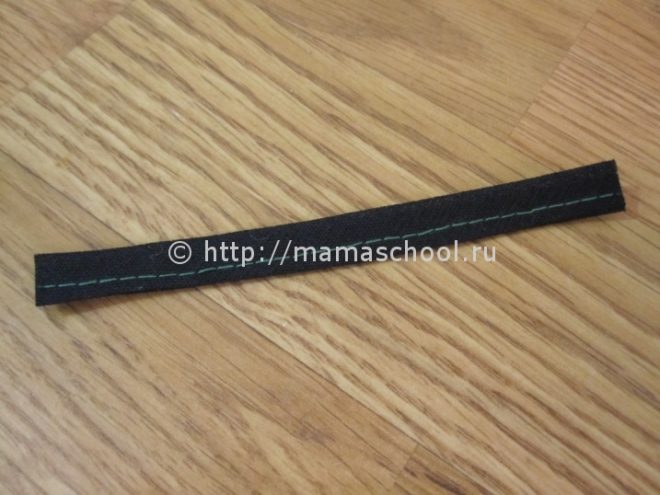
We sew a loop on the side of the potholder.

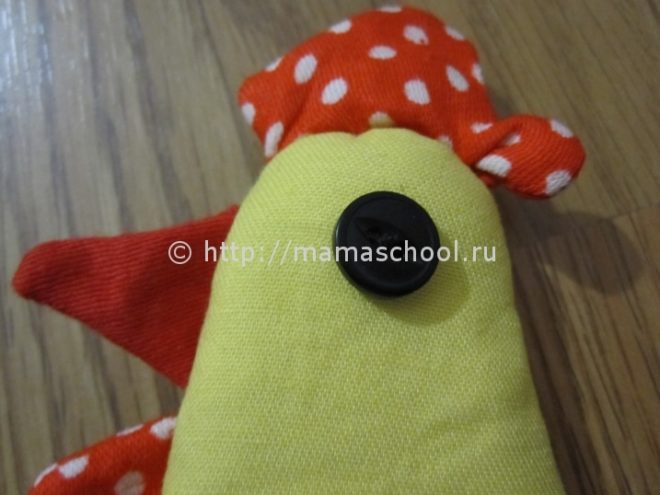
In place of the eye we sew a black button on both sides.
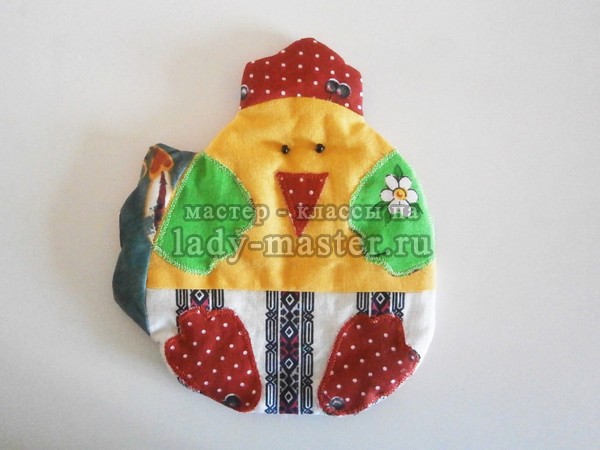
The cockerel potholder is ready to help you in the kitchen.
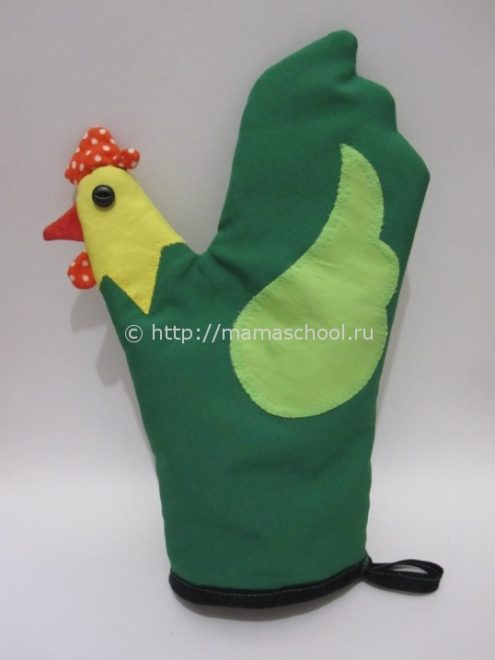
A kitchen pot holder in the shape of a cockerel is a convenient, practical thing and unusual decoration for kitchen. You can sew a cockerel potholder for yourself, or as a gift to family and friends - after all, Eastern calendar The rooster will be the owner of next year.
To make potholders, it is advisable to choose cotton fabric bright colors, since natural fabrics are more heat-resistant.
To make a potholder we will need:
- - paper;
- - padding polyester;
- - threads;
- - scissors;
- - black beads;
- - cotton fabric in the following colors: dark green, light green, light striped, red with polka dots, red with a pattern.
Progress
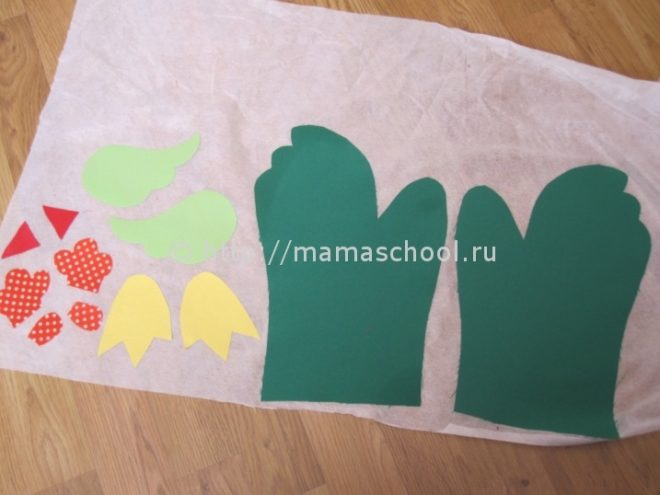
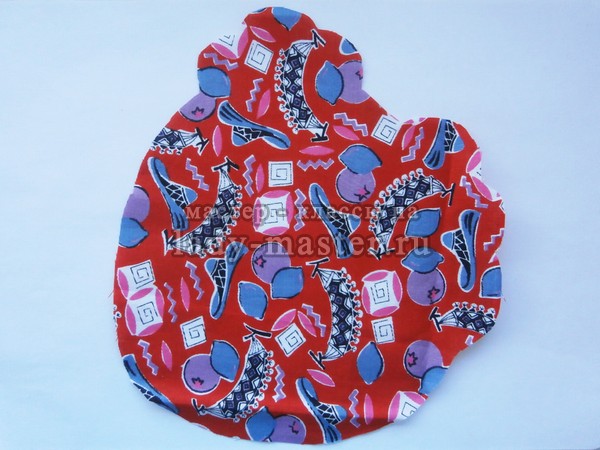
1. First, cut out the main part of the potholder from paper - it represents the silhouette of a cockerel with both tail and comb. Using this part we will cut out the back part of the potholder and the padding polyester part.
2. Let's cut out another exactly the same piece from paper. Let's divide it into two parts - upper and lower, draw a tail, beak, paws, scallop. Let's cut out these parts.
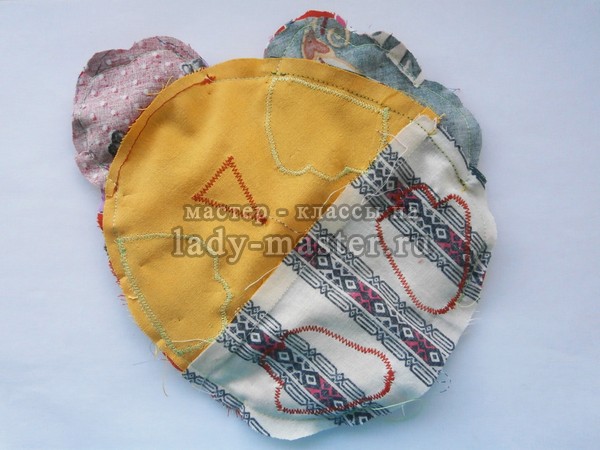
3. Take a red cotton fabric with a pattern and attach a paper pattern of the main part to it. We outline it with chalk and cut it out with seam allowances.
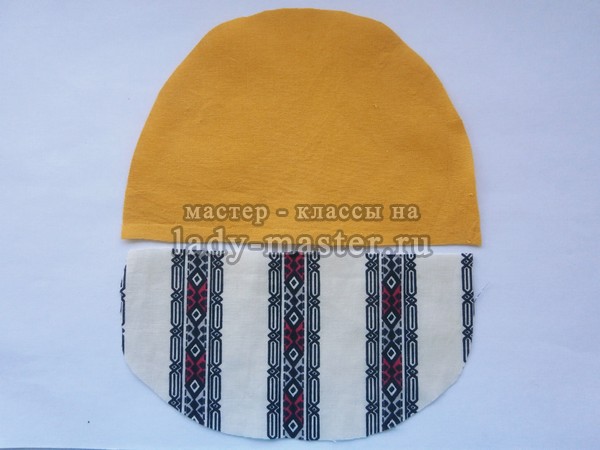
4. Now take the yellow fabric and cut out the top part of the potholder. We will cut out the lower part of the potholder from light striped fabric.
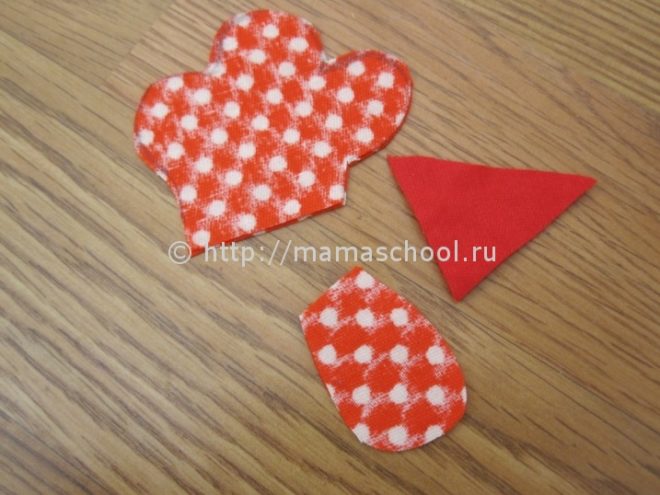
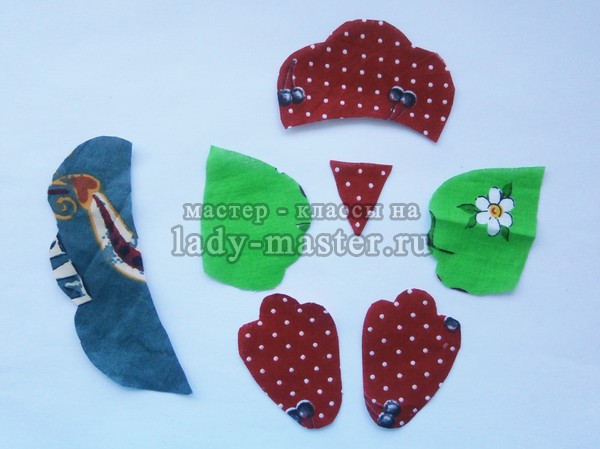
5. It remains to cut out additional decorative details. From red polka dot cotton fabric we will cut out a comb, beak and paws. We will cut out the comb with seam allowances, and the paws and beak without seam allowances. From dark green fabric we will cut out a tail - with allowances, and from light green fabric we will cut out two wings, without adding seam allowances.
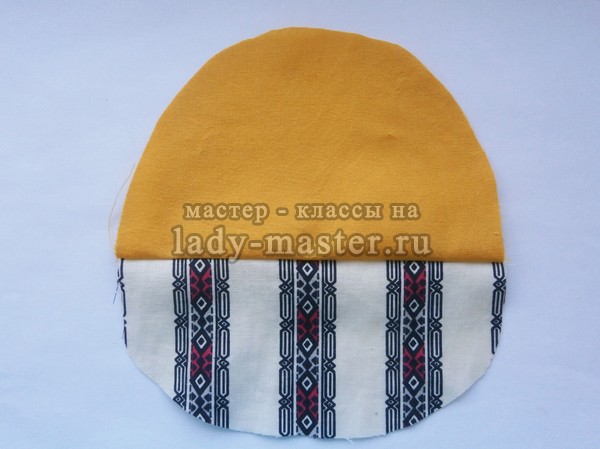
6. Let's start sewing together the parts of the front part of the potholder. First we sew the top and bottom parts. Then we straighten and smooth them out. We will sew to this part decorative elements– tail, comb, beak and paws.
7. Sew the tail detail on the left side and straighten it, you can additionally smooth it with an iron.
8. Sew a red comb to the top of the yellow part of the potholder and straighten it.
9. In the center of the yellow part of the potholder we will sew a beak, and to the striped part of the potholder we will sew two red paws. Both the beak and paws need to be sewn on with a zigzag stitch and red thread.
10. Sew wings to the yellow part of the potholder, and place the right wing slightly to the left of the edge at a distance of the width of the seam.
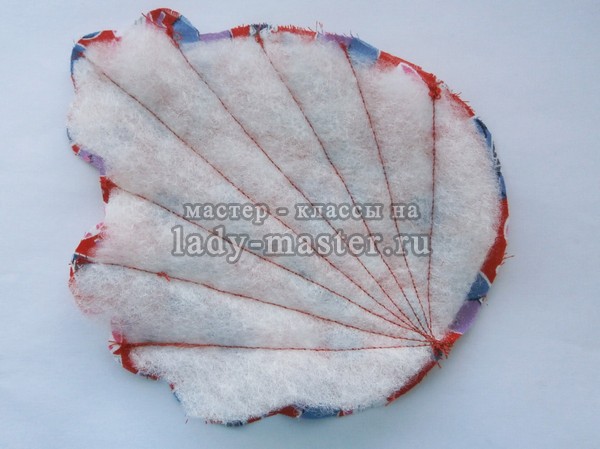
11. Cut out the main part of the potholder from thick padding polyester.
12. Let’s place the potholder piece that we cut out of padding polyester on the table, and place the back part of the potholder on it, face up. Let's make several lines diverging to the sides from the bottom of the potholder. To make the lines even, you can first draw them with chalk on the red part of the potholder.
13. This is what the quilted part of the potholder looks like from the inside out.
14. Place the back of the potholder with the red side up, and place the front of the potholder on top of it, wrong side out. We will sew the potholder along the edge, and leave a hole at the bottom, which is necessary so that the potholder can be turned out.
15. Turn the potholder inside out, straightening the comb and tail. Sew the hole in the bottom of the potholder by hand.
16. A sewn and turned out potholder has this look on the other side.
17. Let’s make the cockerel’s eyes by sewing black beads into the upper part of the potholder.
The potholder is ready. Such a gift will be very relevant in next year, and any housewife will appreciate it. Each cockerel can be made in a single copy using fabrics of different colors.
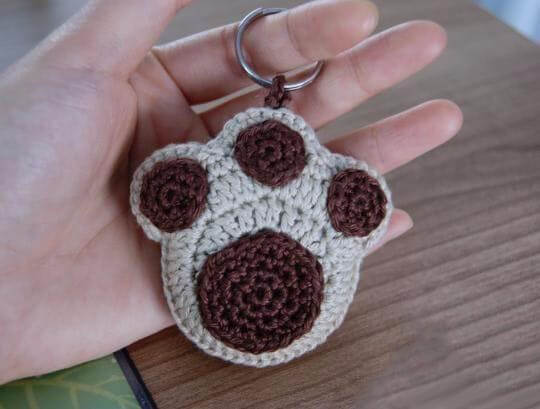
How to make your kitchen cozy and unique? Each housewife has her own methods and secrets. We suggest crocheting cool oven mitts for the kitchen. Such cozy little things, made with your own hands, always please the eye and lift your spirits. You can knit crocheted potholders with patterns both for yourself and for friends and loved ones. , and diagrams for them - good opportunity Decorate your home and the homes of loved ones with figurines of Cats, Cat's Paws, Cockerel, or Hen.
First, we will have the simplest master class with a description; even a beginner in knitting can handle it. Crochet potholders - good idea for kitchen decoration, or for a gift.
To work you will need:
- Yarn 100% acrylic, 250 m./50 g. - 1 skein.
- Some dark yarn for tying.
- Hook 2 mm thick.
In order to crochet a potholder, you need to cast on a chain of 5 air loops and close the chain into a ring. Next, we knit 12 double crochets - 5 rows in total, adding 12 double crochets in each row. At the end, we knit ears according to pattern 1 with a single crochet. Next, we tie the round head of the cat 1 next to the single crochet with dark yarn. We knit the body of the cat the same way as the head, with the only difference being that instead of 5 rows we knit 9 rows with a double crochet.
The paws need to be crocheted like this: we hook the thread to the cat’s body, and knit the paw according to pattern number 2. Then, on the other side, we knit the cat’s second paw. The tail is knitted according to pattern number 3. At the end of the work it is necessary to sew on the head. Embroider the muzzle the way you like. You can simply sew on 2 buttons instead of eyes. We finish crocheting for beginners with a loop of air loops. Knit the second cat in the same way as the first.
Cat Paw Potholders - diagrams and explanations
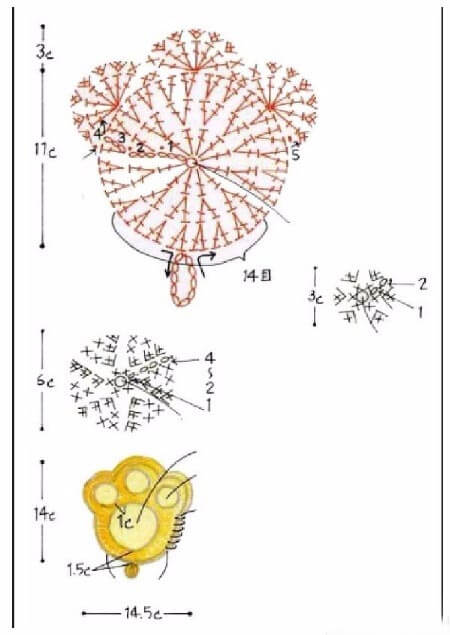
You can knit interesting potholders if you study our master class. The diagram is given for a small foot, but the size can be increased if desired. The kitchen potholder Cat's Paw is crocheted from light acrylic, with the addition of brown yarn, 2 mm thick.
![]()
Start knitting
In order to knit 2 large potholders, we will need to make for each: 2 large details- paws, 1 smaller piece - a pad, and 3 small pads. Let's start with the biggest detail. It is knitted from double crochets (dc) + we knit 3 semicircles from dc and a double crochet from a double crochet. base loop threads (SBnp).
Large detail
- 1st row: first we knit a sliding loop, and 2 air loops (VP), now we knit 11 double crochets (CH) around the ring. When 11 dc are knitted, we tighten the sliding loop into the ring. We thread the hook into the base of the VP column and knit a connecting loop. 1st row is ready.
- 2nd row: knit 3 VP, and knit 2 DC into each base loop. We knit the 1st DC where the chain comes from. Next we knit 2 dc in each loop of the base of the row. We knit this way until the end of the circle (2 dc per base loop). The 2nd row is knitted, connect it using the connection. loops (SP).
- 3rd row: again 3 VP for lifting, then into the same CH loop. Next p. knit 1 dc, then knit 2 dc into the base loop. And so we knit until the end of the row: we knit in every 2nd column. 2 CH.
- 4th row: if in the third row we made an increase in every 2nd loop, then in the 4th - in every third.
- 5th row: increase in every fourth loop.
- 6th row: increase in every 5th loop.
Thus, in each row we add 12 loops. We knit this way until the circle reaches the required diameter. We knit the main part, then we make 3 semicircles according to the pattern. For one potholder you will need 2 such parts.
Small parts
How to knit small parts? All small details are knitted from RLS. We start with a sliding loop, then sc, then 2 single crochets, knitted from one. We knit according to the patterns.
Assembly
We sew 2 large parts together (1 foot), sew on the middle pad, and 3 small ones. You can tie a large paw with contrasting yarn. Sew on a loop from VP.
This interesting, funny pot holder can be knitted in one or two evenings. You can make a mitten in black, or you can make it in two colors, a tabby cat - everything is in your hands. The length of each potholder mitten is 23-24 cm - this depends on the thickness of your yarn. These crochet potholders are easy to wash in washing machine, and keep their shape well.
To work you will need:
- Yarn - (acrylic 100%, 300 m./100 g.) - 70 grams of black.
- White yarn - 20 g.
- Hook 3.5 mm.
- Toy eyes (can be made from empty pill packaging and beads).
- 2 nose buttons.
Knitting a pot mitten
Using a thread of the main color, cast on 30 VPs, close the ring of loops.
- Then knit in the round with a single crochet (SC) - 22 rows. After 22 rows we begin to knit thumb our oven mitts.
- For the finger, we cast 9 VP on the side, skip the 9th column. the previous p, fasten the chain RLS to the next st.
- Next, we knit another 22 rows in the round, then decrease evenly in each row until 6 stitches remain. Pull the top of the mitten together and secure the thread.
- In order to shape the thumb, you need to knit 19 sc along the edge, knit sc 12 rows straight. Next rows, gradually reduce 4 tbsp. Pull the top, trim, and secure the thread
Ears
In order to knit an eyelet, you need to cast on 3 VPs with the main thread and close them into a ring.
- 1st row: knit 6 sc in the center.
- 2nd row: knit RLS, adding 3 RLS to every second column.
Muzzle
We cast on 6 VP for the cat's face with white yarn. We knit 3 rows of sc around the chain, it is necessary to add 3 sc when turning.
Assembly
Glue or sew everything small parts to the base of the mitten. Embroider the mustache using a chain stitch. We make a loop from 16 VP, sew the loop to the top of the mitten. We knit the other pot mitten in the same way, observing the dimensions.
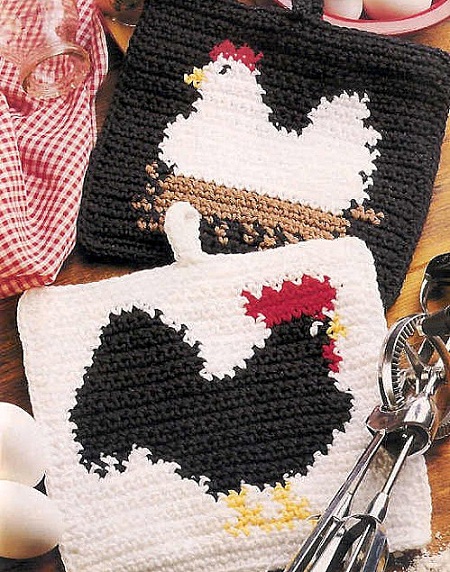
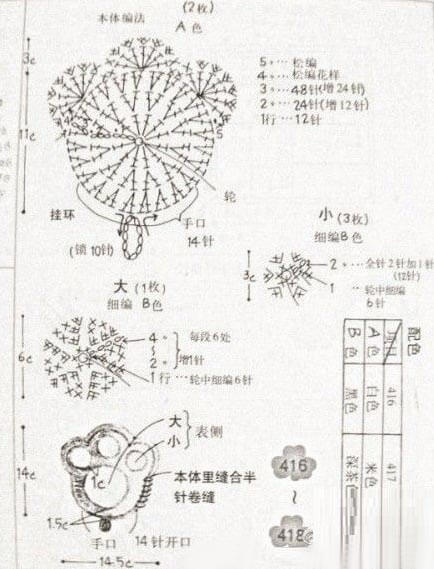
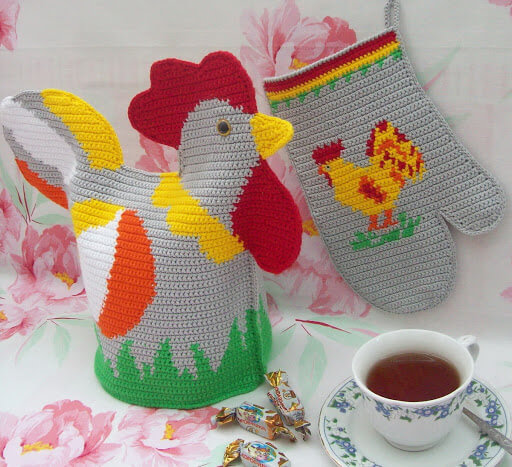
Despite the many master classes, I want to do something special with my own hands. Potholder Cockerel and Chicken - two bright, cheerful ones. On the eve of the Year of the Rooster, a crocheted rooster potholder and a crocheted chicken potholder will be a good gift for family and friends. The height of such a mitten is 24.5 cm, width is 13.5 cm. The width of the mitt in the finger area is 17.5 cm. A simple master class will help you in your work.
To work you will need:
- Cotton yarn (55 g/100 m) - 75-80 g each. gray and yellow.
- Remains of yarn in red, green, black, orange colors.
- Hook 2 mm thick.
Knitted from two parts: top and bottom. To start working, you need to cast on 36 VP (chain loops) with red yarn and knit, according to the diagram, an RLS potholder (single crochet). You will get that 1 cell of the pattern is equal to 1 RLS. We look at the diagram and draw according to it. In order to move to the next row, we dial 1 VP of lifting at the beginning.
We knit the cockerel with gray yarn according to the pattern. After completing the work, fold both parts of the mitten with the right sides inward, and connect both parts, tying them with sc. Next, you need to tie the top of the Cockerel with yellow yarn “crawfish step”.
We carefully design our pot mitten. We attach a loop.
This pot holder will decorate any kitchen interior. The morning in the kitchen should start with roosters.
The chicken potholder is knitted from two halves: upper and lower.
Both finished parts fold with right sides inward, you need to connect them along the outer edge of the RLS (single crochet). We tie the upper open edge of the potholder with yellow thread.
After you have finished tying, cast on 17-19 VP for the loop and make a loop. Using a CC, connect the pot holder to the loop. We have finished crocheting potholders. To make the potholder look better, you need to iron the knitted fabric through a damp cloth.
Good afternoon, dear needlewomen!
Today I decided to talk not about new ideas, but about the well-known knitted potholder.
Analyzing the blog traffic statistics, I noticed that some readers are interested in crochet chicken pot holders.
Based on this request, they go to my blog and see only how to knit and different ones, but they don’t find potholders.
I decided to fill this gap and knit such a chicken for the kitchen.
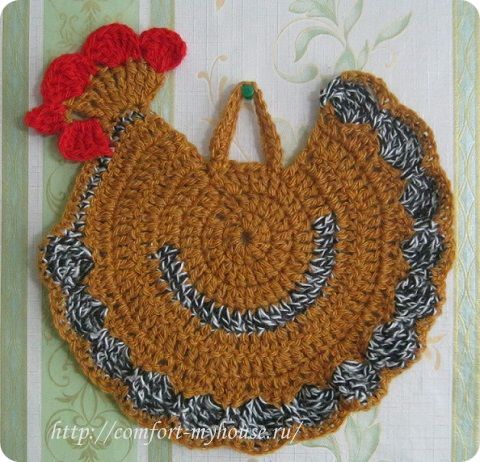
How to crochet a potholder - a chicken
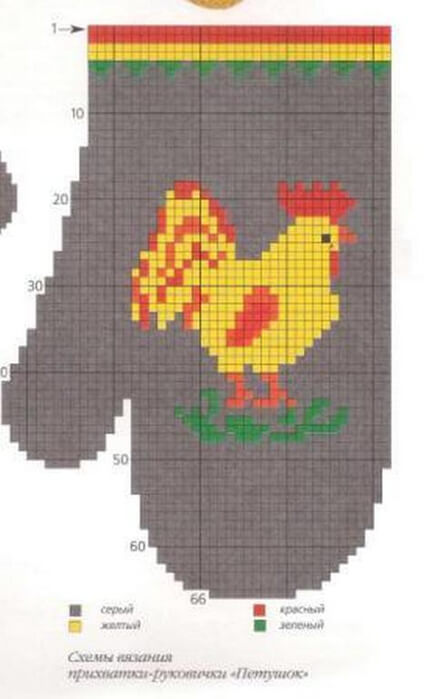
We use leftover yarn. I took more or less suitable mustard-colored yarn and melange yarn in gray and white tones. For the comb, beak and beard I used red. Yarn of medium thickness, crocheted No. 2.5.
Chicken potholder body
First, we knit a regular circle with single crochet stitches.
I deviated a little from the diagram; the number of columns in the rows and the number of rows themselves are somewhat different. It depends on the thickness of the yarn and is not important. We need to see how it works out better.

In the 4th row, I knitted part of the circle with melange yarn, thus creating an imitation of a wing.
From the 4th row I knitted in reverse rows, i.e. I left the last 6 stitches of the circle of the 3rd row unknitted, turned the knitting and continued knitting the 5th row and so on. This is how the tail and breast of the chicken were formed.
In the diagram, the beginning of knitting the tail and breast is already in the second row. Moreover, at the end of the row, a loop of 3 VP is knitted, connected to the beginning of the row, then the transition is made to the third row. But such a loop seemed too small and thin to me, so I knitted a longer chain and tied it with single crochets.
In total I got 7 rows, knitted with single crochet stitches.
8th row: attach a melange-colored thread from the breast side and tie it with single crochets, then knit a wavy edge - *6 double crochets from one base loop, single crochet in the second stitch of the previous row*.
Since my yarn is thick, the edge turned out very wavy.
Chicken Potholder Head
In the last row, we attach a mustard-colored thread again from the breast side and knit the chicken’s head: 4VP, 9C3H in the first three columns of the base.
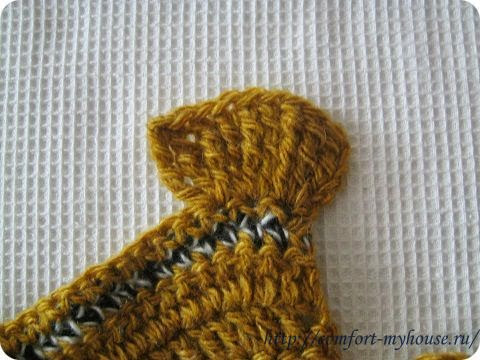
Attach red yarn to the head and knit a comb, beak and beard.
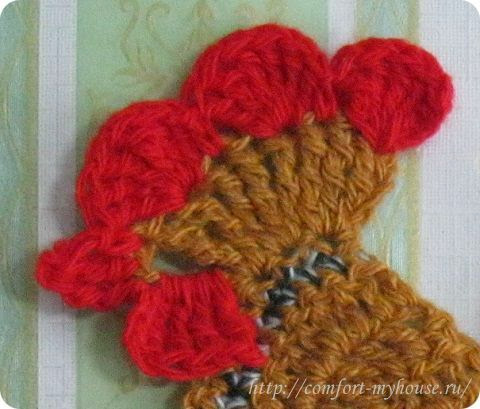
Scallop - 3VP, 5S2N, 1СБН, 6С2Н, 1СБН, 6 С2Н, 1СБН.
Beak - in the last column of the head - 2-3 columns with 2 yarn overs, knitted together.
Goatee - 5 C2H, insert the hook under the leg of the last column of the head.
I thought that the potholder would not hang beautifully on the hook; I thought that the head and wing would fall off. But this is only if she is in “free flight”. Leaning against a wall, especially one covered with wallpaper, or a closet, the chicken potholder feels quite comfortable and is not going to run away anywhere.
By the way, I also wanted to say: from my statistics it follows that people have already begun to prepare for the New Year! Interested. This is justified, time flies quickly, and there are a lot of gifts and decorations that need to be knitted and made.
So, I have already started collecting new ideas for you,