Do you really love flowers and want to decorate your entire apartment with them, but you don’t have enough space? Eat great way to solve this problem.
Only a small amount of time, you can make an excellent wall shelf yourself. On it, your flowers will finally find their long-awaited place to be placed.

Materials needed for work
To create shelves can be perfect different materials. The main thing is that they can easily withstand the weight of the flowers and harmonize with the overall interior of the apartment.

Let's look at some possible materials:

- Drywall. Not the best good option, but is sometimes still used.
- Tree. Great choice, which has always been considered a classic. You can last quite a long time if you maintain acceptable humidity in the room.
- Chipboard. Very convenient due to easy tolerance to adverse factors. You can also highlight the low cost of this material.

- Metal. Quite difficult to use, but very strong and laconic.
- Plastic. Characterized by low price. A good option for any shelf.
- Glass. Thanks to this material, some plants will receive the amount of light they need.
- Plywood. Easy to use and allows you to show real design imagination.


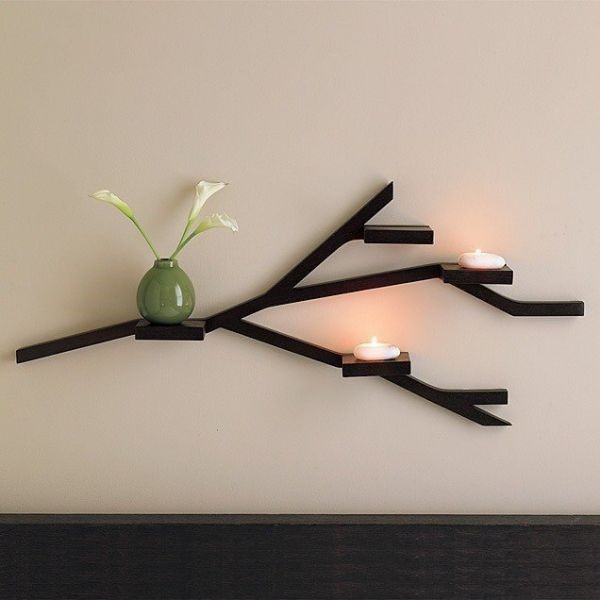
Plywood rack
If you suddenly have several pieces of plywood lying around somewhere, then this is an excellent reason to make a good shelving unit.

In a short time you can transform your apartment with a new decorative element. In addition to plywood, you need to have:

- several galvanized pipes;
- special fasteners;
- material for dyeing;
- jigsaw;
- sandpaper;
- ruler and pencil;
- drill.

Now you can start the work itself:
- We measure the space we want to use for the shelf location.
- Let's make a small sketch.
- We transfer all the drawings onto plywood.

- Using a jigsaw we cut out the part.
- We sand the resulting product using sandpaper.
- Using a jigsaw and a drill, we cut out a place for the pipes..
- We put pipes through the holes made in the shelf.
- We screw the rack to the wall.

Plastic rack
Flowers are often placed in the place near the windows. But why use space so irrationally?

It’s better to make a shelf yourself based on the window sill. To create a rack, in addition to it, you need to have:
- 3 galvanized pipes;
- 9 flanges to secure the material;
- 2 brackets.

Now let's get down to work:
- We divide our window sill into three equal parts.
- In each of them we make 3 holes through which a pipe can be passed. They can be placed arbitrarily.

- We cut the pipes so that their length is equal to the height of the shelf.
- We fasten all the parts with flanges.
- We put brackets on the pipes and fasten them to the wall.

Glass shelves
Working with glass is quite difficult process, which requires some skill. If you do not have them, then it is advisable to contact special workshops.

Remember that the work requires glass with good thickness. It shouldn't break if something goes wrong.

To work you will need:
- glass cutting tool;
- hacksaw;
- large glass that is divided into 6 parts;
- 8 iron corners;
- 2 wooden planks.


Progress:
- Cut the large glass into 6 small pieces.
- In the slats we cut a groove 0.5 deep from the width of the future rack.
- We place the boards on the corners, which are attached to the wall from the bottom and top.
- We insert the ready-made rack into the grooves.

Wooden shelf
Wood is an excellent material that is quite easy to work with.

To make a shelf using wood you will need:
- 2 boards 200 cm long with a cross section of 20×20 millimeters;
- 6 small boards 200 cm each and with a cross section of 35×5 mm;
- sandpaper;
- hammer and nails;
- jigsaw;

Let's get started:
- We cut the strips into 60 cm pieces.
- We cut the boards: 4 pieces of 70 centimeters each and 6 pieces of 20 centimeters each.
- We sand the whole thing with sandpaper.

- We make racks from the longest boards.
- We nail small boards to the edges of the rack.
- We lay planks on the boards and hammer in nails to improve the fastening of the structure.

If you put in just a little time, you can get an excellent flower shelf that will delight you for a long time.


Don't be lazy and decorate your home with excellent decorative elements.

Photo of shelves for flowers


If a man wants to give a gift to the woman he loves, it is not necessary to always buy jewelry or some clothes. As you know, women love to grow flowers, and building flower shelves for her will always be appropriate. Next we will talk about how to make a shelf for flowers.
Plywood shelves

If the owner has a sheet of plywood of a considerable area and there is a desire to find a use for it, you can use it to create shelves on which flowerpots with flowers will be displayed. Plywood of a certain thickness, which must be used when constructing the rack, from inexpensive material can turn into an elegant design.
To build flower shelves with your own hands, you will need: plywood, the area or quantity of which will allow you to cut out the required number of parts for the shelves, two nickel-plated or galvanized pipes, at the rate of 2 fasteners for each shelf, paint or varnish. Among the tools you will need is a jigsaw, a drill with an attachment that will help make holes for pipes, a tape measure, and sandpaper.
- Based on the location where the rack will be installed, you need to decide on the overall dimensions of the shelves.
- Based on the dimensions of the future shelves, the contours of future products are drawn on plywood. A flower shelf does not have to be rectangular. From the front side, you can cut out an arbitrary profile configuration according to the outlined contours, which would aesthetically fit into the appearance designs. The front part can be wavy, with the depth and shape of the waves selected individually.
- Using a jigsaw, the shelving elements are cut out using the completed markings.

- On the workpiece that will be on top, marks are made for future holes for pipes.
- Plywood plates are placed on top of each other, after which holes are drilled required diameter for nickel-plated or galvanized pipes.
- The wooden elements of the future shelving are processed sandpaper. The ends of the shelves should be especially sanded.
- Plywood blanks are coated with several layers of furniture varnish or paint.
- Next you need to secure the structure to the wall. Special brackets are attached to the lower and upper shelves on the back side. After this, appropriate marks are made on the wall, in which holes are drilled. Plywood shelves for flowers are fixed through the holes of the brackets with self-tapping screws. The strength of the structure must be at a high level.
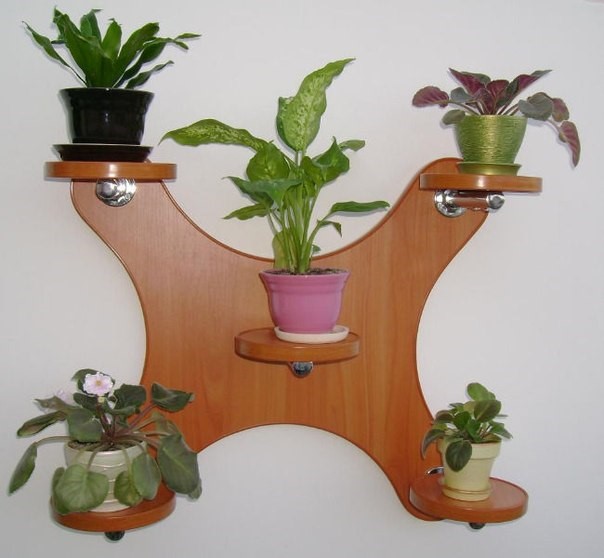
Wooden rack

Wooden shelves for flowers can have the following dimensions: length – 0.6 m, width – 0.23 m, height – 0.7 m. Number of shelves – 3 pieces.
To work you will need: 6 wooden planks 2.0 m long and 35×5 mm in cross-section, as well as 2 wooden blocks 2.0 m long and 20×20 mm in cross-section. Nails 40 and 25 mm long will be required. The tools you will need are a hammer, a saw, and a tape measure.
- Shelves will be made from thin planks. The bars will be used to produce racks for wooden rack. Thin strips should make 18 elements. Therefore, blanks are taken, measured 60 cm in length and future fragments of the shelves are cut.
- Bars with a cross section of 20×20 mm are measured in lengths of 0.7 m and cut according to the markings. As a result, there are 4 racks.
- From the bars that remained as scraps, elements 0.23 m long are cut out.
- Two racks rest on work surface parallel to each other and marks are made with a pencil in the places where the shelves will be future fixed. First you need to decide what height the plants will be placed on the rack, and then create distances between them.
- Then 3 shelves are built, which will have 6 slats each. The shelves are connected at their ends with bars 0.23 m long. Fastening is done with nails 25 mm long. All sharp edges are smoothed with sandpaper.
- During installation, you need to adapt to simultaneously hold the structure and hammer in nails.
- Finished shelves are varnished or painted.
Shelves for flowers made of wood and metal

Since the racks of the structure will be metal and welded, they will be quite strong. A shelf for flowers on the wall will be made of wooden blocks.
- To work, you will need metal rods with a diameter of 1 cm. If the rack is floor-mounted, then corners are used. Having previously chosen a place to install the shelves and decided on their dimensions, the structure is welded. If the contours on the side are 0.9 m long and 0.2 m wide, then you can build 4 shelves, and the distance between them will be 30 cm. This distance is convenient for installing flower pots small height. Tall flowers can be placed on the top shelf.
- The racks must be connected to each other by welding crossbars of a certain size. In addition to the connecting function, they will play the role of a stand for wooden planks.
- The strapping elements should be designed for 4 tiers. Once ready, the welded structure can be painted with paint, the color of which should fit into the interior.
- Then, elements 0.6 m long are cut out of wooden planks with a cross-sectional area of 25×15 mm. After this, the planks are laid on the work surface parallel to each other and knocked together with bars 0.2 m long.
- To fix a structure consisting of metal and wood to the wall, you need to use self-tapping screws. In addition to the fact that the fasteners must be located at a distance of 0.5 m from each other, you need to ensure that metal elements the contours were fixed parallel to the floor. In this case, the shelves made of wooden planks will lay flat. Finally, the wooden structural elements are painted with a suitable paint.
Flower rack made of plastic window sill

To work, you need to prepare a plastic window sill of standard length: 3.9 m, 3 nickel-plated or galvanized pipes, 9 flange-type fasteners and 2 brackets.
- The plastic window sill needs to be cut into 3 equal parts. Each piece will be 1.3 m long.
- In the resulting shelves you need to make 3 holes for pipes, which will act as racks. Two holes should be on the back side at the edges, one in the middle in the front. If you place the blanks on top of each other, the holes should match.
- 3 pipes are cut, which should be the same height. The structure is fastened using screws that tighten the flanges.
- The floor shelf for flowers is fixed to the floor with the same parts. The pipes are secured from below with flanges and screws. For greater strength and stability, brackets are stretched onto the top of the 2 pipes, which are fixed to the wall with screws.
Corner shelves

To work, you will need a sheet of chipboard, 3 nickel-plated or galvanized pipes, the required number of flanges and screws.
- The assembly is similar to the previous version. From a chipboard sheet, a wood saw is used to cut the required number of blanks for triangular-shaped shelves.
- Holes for pipes are cut in three places. The same operation is repeated with other workpieces.
- Everything is attached to the floor and in the body of the structure with flanges and screws. The upper parts of the pipes are fixed to the walls with brackets.
- The shelves are painted in the color you like.

Glass shelves for flowers together with flowers look very beautiful if you also provide lighting for them. The light will penetrate through the glass and beautifully spill over the flowerpots. To build such a rack, you will need to prepare 6 glass shelves and 2 wooden slats.
- For shelves, glass with a thickness of 5 mm or more is used, and it must be tempered.
- The planks on which the shelves with the flowers placed on them will be held must be wooden. Depending on width and thickness wooden elements The size of the grooves in their body is determined. You will need to install glass shelves in these grooves. You need to pay attention to making grooves Special attention, since the strength and reliability of the entire structure depends on them. Much depends on the weight of flowerpots.
- Of course, the proportions can be smaller, but then instead of flowers it is advisable to place light souvenirs and other small accessories there. For variety and practicality, the bottom shelf can be made of wood.
- Glass is most often used to make a flower rack for a window sill, since it does not absorb much sunlight.
The photo shows in detail what do-it-yourself flower shelves can look like.
Photo


Video
We invite you to see how to make a hanging flower shelf.
Here's another one great idea for the shelf.
If you don’t want to make shelves for flowers yourself, you can buy them in an online store. Nowadays, many stores offer flower stands with free shipping.
Indoor flowers are a spectacular addition to the interior. Shelves will allow you to place flowerpots and pots with plants in a compact and aesthetically pleasing way. Designs must be ergonomic, spacious, and wear-resistant. The choice of configuration depends on the design of the room and the required functionality. Models are made wall-mounted, floor-mounted, suspended, etc. You can create shelves for flowers with your own hands according to a standard or original design. 
Similar articles:
Variety of solutions and materials
The plan for placing shelves in the interior is determined by the dimensions, dimensions, and decoration options for the products. The configuration of the model is influenced by the number of plants, type of room (bedroom, kitchen, living room), interior design, type of flower (liana, shrub, etc.).
Based on their location, models are divided into wall-mounted, floor-mounted, hanging-type products, etc.
Floor products are designed for flowerpots with shrubs and small trees. Stationary structures can be standard or multi-tiered to design a green area in the house. Models are selected in accordance with the dimensions of the room. IN small rooms are installed simple coasters for 1-2 pots. You can make a budget floor shelf for flowers with your own hands from available materials (plasterboard, chipboard sheets).
Wall structures are compact and optimal for small apartments. Shelves can be standard or corner, designed for several plants or a set of flower pots.
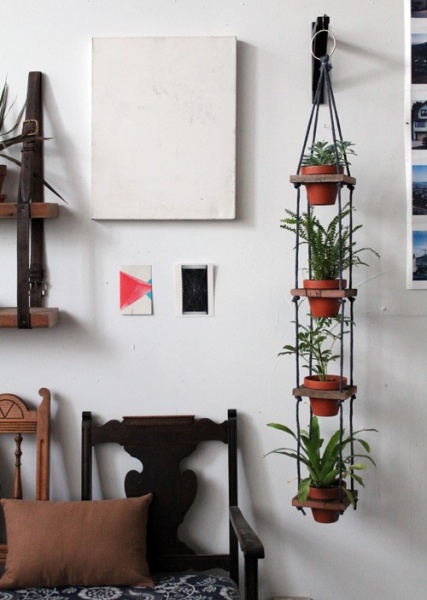
Hanging models are also ergonomic and compact. Products are attached using cornices to wall panel, ceiling or window sill. As hanging elements Metal chains, strong belts and intertwined ropes are optimal.
Depending on the number of plants, the designs are designed for 1-2 pots or 8-10 containers. The length of the shelf depends on the number of vessels.
Compact single models are used as wall-mounted and suspended. The designs are optimal for small flowers or climbing vines.
Multi-seat designs are optimal in spacious rooms. Space is allocated for shelving near the wall panel or in the corner of the room. Up to 10 pots can be placed on floor racks. It is not recommended to install light-loving plants and massive flowerpots on the upper surfaces.
Shelves for flowers are made from different raw materials. The choice is determined by the design of the room and the volume of flower containers. Lightweight flowerpots do not require reinforced construction. Massive pots are installed only on stable and spacious shelves.
The most common materials for making flower shelves are chipboard sheets, wood, glass and metal. Forged products are popular as floor and wall products. For self-made Available materials (plywood, cardboard, pallets, iron pipes) are suitable for construction. Combining materials with different textures is common.
From plywood
Wall shelves made of plywood are budget-friendly, practical, and easy to make. The raw materials are easily processed, products are cut out in different configurations and sizes. When creating a model, standard or original drawings are used. To make your own diagram, you need measurements that are displayed in the project and transferred to the surface of the plywood.
Plywood elements are cut out with a jigsaw. The edges are sanded with sandpaper. Parts of the structure are attached with screws. The surfaces of the hanging flower shelf are treated with a moisture-resistant compound and covered with tint varnish or paint. If necessary, the product is decorated with painting. Wall options They are attached to the wall panel with metal brackets and corners.
Plastic rack
Inexpensive wall and floor shelving products made of plastic are used for decoration country houses or apartments in Art Deco, Art Nouveau, Neoclassical styles. The material can be tinted, transparent, smooth or textured.
Plastic wall flower racks are durable, moisture resistant, and easy to clean. The products are easy to move and comfortable to use.
The raw materials are plastic, so shelves can be of non-standard configurations and sizes. You can make furniture yourself from plastic fabric, metal pipes and brackets.
Corner
A large variety of wall design options relate to corner type. The products are functional and ergonomic, because... allow you to effectively use the space of your apartment or house.
Corner shelves for flowers are made in the form of a rack, tapering towards the top. The model allows you to place flower pots different sizes. On the sides of the rack there is space for attaching climbing vines.
For light-loving plants it is necessary to arrange additional lighting fixtures on the frame. Self-made structures are treated with impregnations and varnishes.
Wall shelf made of wood and metal
A popular solution is to create a shelf from scrap materials - wood and metal alloys. Steel is used to create the frame, wood is used for decking. Welded frames are budget-friendly, practical, durable and versatile in any interior style. Decorating the product with forged elements looks impressive.
To prepare the structure, it is necessary to create drawings and fastening diagrams. Wall shelves are created in one layer or constructed in several tiers. Their size and shape depend on the functionality and dimensions of the room.
Metal rods become the basis for the shelf. For long-term operation, steel surfaces are treated with anti-corrosion compounds and varnishes. It is recommended to match the shade to the main color of the room.
The boards are sanded with sheets of sandpaper, painted with tint varnish, and installed on metal carcass and fastened with screws. The finished model is attached to the wall with self-tapping screws and steel corners.
When selecting plants for wall shelves Several nuances need to be taken into account. For designs, flowers that do not require intense lighting and are small in size are optimal. For large pots, you can make a multi-tier flower shelf supported on the floor surface.
Glass
You can make shelves for flowers from glass. The models are aesthetic, light, elegant and allow you to visually expand the space.
Designs for indoor flowers They are made from glass in compact sizes, so they are optimal for window openings and as wall blocks. The designs are suitable for light-loving plants. When selecting a model, it is important to calculate its dimensions; glass with a thickness of about 0.5 cm is optimal. The products are complemented with steel inserts (brackets, corners).
Suitable for glass wall shelves climbing vines. Experts do not recommend installing massive pots with shrubs on fragile shelves. The lower block of the structure can be strengthened wooden blocks. The reinforced model can be used as a floor model and will allow you to install up to 10 compact pots.
For living rooms in country and loft styles, the surfaces of the structures require minimal processing. In Provence and Art Deco areas, the use of aging and decoupage techniques is recommended. Pipe racks installed in children's rooms and kitchens require mandatory decoration with varnish and paint.
Floor structures made of gas pipes created with your own hands are the best option For country houses, summer kitchens. Before installation, the frame must be cleaned with brake fluid and soap. The assembled structures are painted with aerosol paints.
Made of wood
Flower shelves made of wood are among the most durable constructive solutions for pots with plants and seedlings. For long-term use, it is necessary to select high-quality fasteners and fittings.
Designs can be multi-level and transformable, or simple, designed for 1-2 plants. Laconic models are created from bars coated with paint or varnish. Wall products are attached with metal corners and screws.
Large tubs with shrub-type plants are placed on floor racks made of wood, because structures must withstand large masses.
Not used for suspended structures solid boards, because The plates are held on tapes or belts. Mounted model is one of the original design solutions and is optimal for rooms in loft, country, and Provence styles.
During operation, it is necessary to take into account the instability of wood to moisture. During watering, water gets on the surface, the boards become deformed and become moldy. That's why wooden structures Before use, they are treated with moisture-resistant impregnations and covered with several layers of paint and varnish.
Glowing shelf made of wood
Glowing designs will add originality to the room. It is possible to make illuminated shelves with your own hands from available materials. To construct a luminous shelf, pieces of wood with cracks and chips are optimal. Uneven surfaces filled with a mixture of fluorescent pigments and polyester resins.
The composition is poured into the cracks, then the surfaces are sealed with paper tape. When processing, the shelf must be in a horizontal position. After drying, the product must be sanded. The shelf is covered with several layers of fixing varnish.
Shelves with luminous surfaces allow you to effectively zone space and create a space for relaxation.
What do you do with old furniture?
Indoor plants are a harmonious addition to any interior. They simultaneously improve the atmosphere of the room, are pleasantly pleasing to the eye and allow you to enjoy the contemplation of fresh greenery at any time of the year. Once, having bought or received a gift of a flower in a pot, many continue to regularly replenish the collection. The time comes, and the space on the windowsill is no longer enough, so you have to look for new areas to place flowers. Various floor and wall structures shelves allow you to compactly arrange pots, transforming the room. Having a equipped balcony is another opportunity to grow flowers.
Variety of design solutions
Depending on quantity indoor plants, shelf designs are selected single or to accommodate a large number of pots. Based on their location, the shelves are:
- For window sills, including hanging models. Belts, ropes, chains are suitable for fastening.
- Floor-standing;
- Wall shelves, including corner ones;
- To the balcony. All previous types of shelves can be used here.
For their production they are used various materials. The choice depends on the surrounding design of the room and the size of the flowers themselves: the insignificant weight of small plants does not impose serious demands on the strength of the structure, large representatives of the flora need a reliable shelf that can withstand a significant weight. Most often flower shelves are made from the following materials:
- Wood and its derivatives (chipboard, gypsum fiber board, MDF).
- Glass is often combined with chrome elements.
- Forged metal structures.
When choosing a material, take into account the likelihood of water getting on the shelf as a result of watering flowers, so you should take care of the moisture-resistant properties of the product.
Advice ! In a small space it is better to refuse placement floor stands. In this situation, wall and hanging shelves.
Wall flower stands
Wall shelves for flowers have a variety of design solutions: single and multi-tiered stands made of wood, glass or metal. Their size and shape depends on creative approach lover of indoor flowers and surrounding room design. It is better to fill wall shelves with plants that do not require a large number sun rays. Light-loving flowers will require the installation of additional lighting, especially if the shelf design is angular.
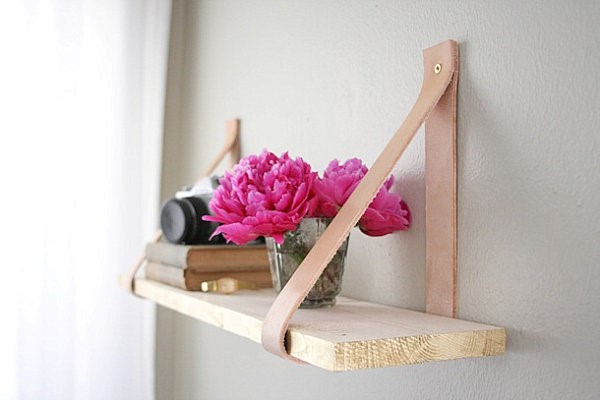
The wall shelf with straps is distinguished by its ease of manufacture and originality. To make a simple stand you will need a wooden board, two strips of leather straps and fasteners. The work includes the following steps:
- A shelf is cut out of a board required sizes. The larger width guarantees better stability. The sections are processed with coarse sandpaper.
- The future wall shelf is treated with stain, and after drying, the surface is coated with waterproof varnish. This will prevent the stand from swelling during watering and moisture ingress.
- Two strips are formed from the skin. Their length depends on the width of the shelf itself, and at what distance from the fastenings it is planned to be located. With a board width of 15 cm and a gap from the holes on the wall of 25 cm, the length of the leather strip is 70 cm. Unneeded belts will be just right for these purposes.
- Folding each piece in half and stepping back 3-4 cm from the edge, holes are prepared in the product using a drill. The same operation can be done using a nail and a hammer.
- To attach the flower shelf, two marks are made on the wall. The distance between them is equal to the length of the flower shelf minus 2 cm. After preparing the holes, dowels are inserted into them.
- Leather strips folded in half are brought to the place where the flower shelf is attached to align the holes, and then secured by screwing in the screws using a screwdriver.
- All that remains is to insert a wooden board into the fixed leather loops and the wall shelf for flowers is ready.
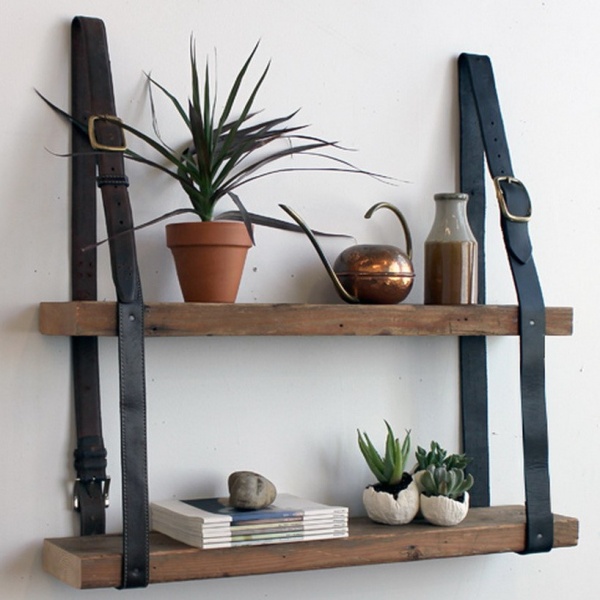
In a similar way, you can make a two-tier shelf for flowers. To do this, you will need to increase the length of the leather holders and secure the top shelf to the straps using nails.
Advice ! Wall shelves are best used for small flowers. Large plants It is better to place it in floor structures.
The selection of photographs below represents a small part of the possible models of wall shelves designed for indoor plants.


Floor models
It is practical to use floor shelves for arranging large indoor plants. Their range is also distinguished by the abundance of models and materials used for production. Single structures and multi-tiered stands, which allow you to immediately form an entire green corner, are selected depending on the free space and the size of the flowers. If you want to decorate the room with floor structures, consider the following recommendations:
- By purchasing a floor shelf with big amount places, take care to place plants that can coexist next to each other.
- For lovers of bouquets from field or decorative flowers You will like floor designs with a large tabletop. When purchasing single stands, it is better to purchase models whose height does not reach half the height of the room, otherwise the proportions of the room are disrupted and the ceilings become visually lower.
- Decorating a kind of shelf with flowers is carried out in compliance with the following rule: voluminous plants are installed on the lower sections, higher shelves are filled with compact pots.
- Pay attention to the stability of the legs of the floor shelf, especially if there are animals and small children in the house. Massive plants need a strong structure.
- If you want to focus attention on the flower stand, it is recommended to purchase an extravagant model. Sufficient free space can be filled with a metal product that imitates a bicycle or carriage. Original driftwood with fastenings for flowers in pots is another interesting idea for a floor shelf.
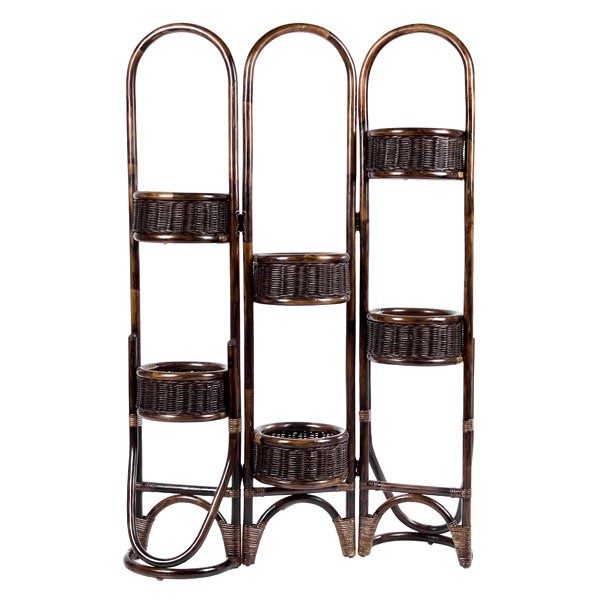
For adherents of the classics, traditional shelves made of wood materials. For lovers of minimalism or owners small rooms It is appropriate to pay attention to glass floor structures. The respectability of the interior is emphasized by forged flooring. Country style wicker shelves will harmoniously complement.


Let's look at how to make a kind of tiered shelf with your own hands:
- The material you will need is timber, slats, wide boards, and fasteners.
- For supports, 4 beams are taken, its length depends on the desired height of the shelf. Then two letters L are formed from the parts, which are connected at the top by another beam.
- The slats are attached to the formed frame in the places where the flower shelves are installed.
- From wide board Blanks for the shelf of the required length are cut out. Each subsequent shelf will be smaller than the stand below.
- Then all the parts are secured to the slats using screws.
- On final stage The flower shelf is being decorated: it can be primed and painted or covered with stain and varnish.
As a result, you will get a similar design for flowers:

Creative people can show their imagination and make an original copy of the floor shelf with their own hands. In the absence of creative talents, manufacturers offer a wide range of the lineup floor stands for flowers, some representatives of which are shown in the photo below:


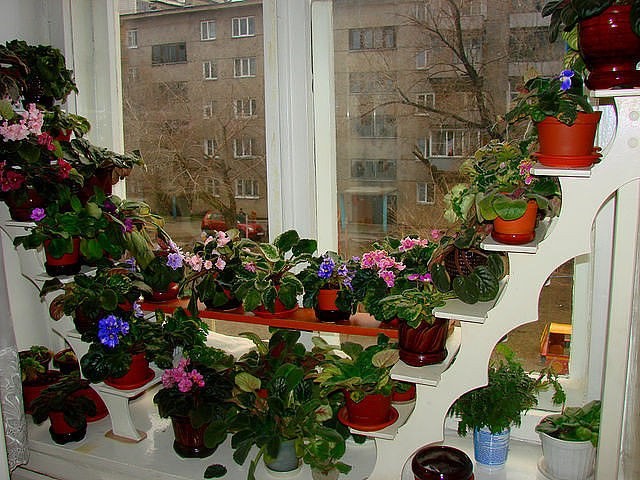
Window sill design options
The windowsill is the first place where indoor plant lovers place flowers. The main reason is abundance natural light. But big wide window sills Not everyone has it, so you have to resort to various tricks. The following devices will allow you to install as many flowers as possible in the window:
- Flower stand made in the shape of a ladder.
- Flowerpot.
- Hanging shelves. As a rule, they are made of glass.
Working with glass requires certain skills, so it is easier to buy a ready-made flower stand. We will look at a similar example of a hanging shelf made of boards and strong ropes. The manufacturing process consists of the following stages:
- The boards are sawn into equal parts. The number of elements depends on the desired overall dimensions of the shelf and the size of the colors to be installed.
- Stepping back 2-3 cm from the edge of the board, mark the locations for drilling holes. Their diameter should correspond to the thickness of the rope, ensuring a tight fit.
- Two marks are placed at the top of the window opening. The gap between them is determined based on the length of the shelf, reduced by 2 cm.
- Two holes are drilled and then the anchor hooks are screwed in.
- The ropes are pulled through the holes in the shelves. A reliable knot is formed from the bottom of the first plank; subsequent strung flower shelves are subjected to similar actions. The knots provide the boards with a stable position.
- On each side, the ends of the ropes are connected together, the gap to the top shelf is 15-20 cm, after which they are put on hooks.
Options for decorating a window sill with various shelves with flowers are shown in the following photos:


Decorating the balcony
The balcony has long ceased to be a place for collecting unnecessary things. IN modern apartment- this is a cozy corner for relaxation, and the flowers on the shelves here look very harmonious. The size of the balcony, its shape and the degree of arrangement influence the choice of flower shelf design. Let's look at a few interesting ideas design of additional space:
- Mobile boxes. On a spacious open balcony It is appropriate to place flowers in boxes on stands equipped with rollers. This allows you to change the position of the structure for flowers depending on the direction of the sun's rays. Such shelves can be easily moved to the side if you need to add additional furniture for evening tea drinking.
- Limited space is not an obstacle to decorating a balcony with shelves of flowers. They'll come to the rescue suspended structures. These can be flowerpots or hanging shelves, the manufacture of which is described in the previous section. Separate flower pots fixed with hooks on the parapet also look organic. Another shelf option is a container made of wood or cut plastic pipes installed behind the fence.
- Balcony equipped with heating and maintaining comfortable conditions in cold period, can be equipped with multi-tier flower racks or traditional wall shelves.
- Shelves for flowers on a bay window balcony look very attractive. Here you can combine flowerpots and hanging structures.
Note! For stationary shelves filled with flowers all year round, should be provided additional lighting V winter period, otherwise the plants will experience a lack of light radiation.


When it comes to choosing a gift for the woman he loves, the first thing a man associates with jewelry or various elements women's clothing. But for some reason, the fact that many representatives of the fair sex really like to plant indoor flowers and take care of them in every possible way. Therefore the idea with original shelves It would be quite appropriate for flowers. The information below will tell you about simple ways Make your own flower shelves.
Plywood flower shelves
If you have a large piece of plywood lying around in your workshop and you want to please your significant other, you can easily make shelves for flowers with your own hands from the material. Ordinary inexpensive plywood with a certain thickness will become a quite convenient structure on which you can display flower pots. A little imagination will turn such a shelf into an original design solution.
Tools
To create a flower shelf, you should prepare the following tools:
- a sheet of plywood of such a size that it is convenient to cut out all the necessary elements;
- a pair of nickel-plated or galvanized pipes of small diameter (the quantity is calculated as 2 pieces per shelf);
- paint or any type of wood varnish; electric jigsaw;
- drill with a convenient attachment for drilling holes for mounting pipes;
- construction tape and sanding sheet of paper.
Manufacturing
Shelf manufacturing process:
- After carefully examining the installation location of the flower rack, you need to choose the appropriate size for the shelves.
- Based on the established measurements, make drawings of the shelves on a sheet of plywood. When choosing the shape of the shelf, you can move away from standard straight lines and complement the image of the structure with interesting curves of different depths. The main thing that general form The shelf fit organically into the interior of the room.
- When cutting out the intended parts with an electric jigsaw, you need to carefully monitor all the contours of the elements.
- Holes for pipe installation are marked on the topmost workpiece.
- The cut shelf blanks are placed on top of each other and holes of a certain diameter are carefully drilled for installing pipe supports.
- Plywood blanks are cleaned with an emery sheet. It is necessary to carefully process the end parts of the shelves.
- Next comes the stage of coating the finished shelving elements with paint or varnish. This procedure must be repeated several times to form an even and dense layer of the applied substance.
- Installation of the finished rack to the wall is carried out as follows. Specially designed brackets are attached to the backs of the top and bottom shelves. Holes are drilled in the wall according to the marks made. Rack shelves are fixed to the wall with self-tapping screws inserted into the holes of the brackets. It is necessary to thoroughly check the suspended structure for strength.
Wooden rack
The dimensions of wooden flower shelves can be 60 cm in length, 23 cm in width, 70 cm in height. In this model, 3 shelves for flowers are selected.
- Thin strips are quite suitable for making shelves. Since each shelf will consist of certain elements, it is necessary to cut 18 such thin blanks. The length of each element should be 60 cm. And from the bars you can make stands for a flower rack.
- Wooden blocks measuring 20x20 mm are selected and cut every 70 cm in the amount of 4 pieces.
- Elements of the future structure, 23 cm in length, are cut out of the cut bars using an electric jigsaw.
- Two racks are laid parallel to each other on the work table and marks are made in the places where the shelves will be future fastened. Here important point will determine the required distance between the shelves, as this will affect the ability to install flowers of different heights there.
- At the next stage, 3 wooden shelves for flowers are installed, each of which consists of 6 planks. The shelves are connected to the end part with nails driven into bars 23 cm long. The length of each nail is 2.5 cm. When installation is complete, all uneven edges must be sanded.
- When installing the shelves, you need to position the entire structure so that the master can comfortably hold the rack and hammer in nails at the same time.
- The finished product is treated with paint or furniture varnish in several layers.

Shelves for flowers made of wood and metal
The entire structure is held together using metal posts connected to each other by a welded jumper. This gives extra strength to the entire wall flower shelf. Wooden blocks will serve as stands.
- If the entire structure will be attached to the wall, then it is necessary to acquire metal rods with a cross section of 1 cm. And to install the finished structure, corners are mounted on the floor. Based on the chosen location for installing the rack, the dimensions of the shelves themselves are determined. After this, the metal racks are welded. With the length and width of the side contours being 90 and 20 cm, respectively, it is possible to install 4 shelves with a distance of 30 cm from each other. These dimensions are suitable for compact flower pots with small leaves of plants planted there. And the location of the top shelf allows you to install flowerpots with flowers of any height.
- The metal struts of the structure are connected using welded rods. This method of fastening will provide an additional metal base for the plane of the shelves themselves and will make the entire rack more reliable.
- Metal strapping is used in 4 tiers. Paint is applied to the finished welded elements to match the interior.
- Wooden planks 25x15 mm are sawn along the length of the shelves 60 cm. Ready elements laid parallel on a flat surface and connected to each other with wooden blocks 20 cm long.
- The wood-metal shelf is mounted to the wall using self-tapping screws. The distance between the fastening marks should not be less than 50 cm. To ensure that the metal frame is located on the wall parallel to the floor, a building level is used.
This will make it possible to lay the shelf strips evenly. The final stage will be painting the wooden elements of the finished flower shelf.

Flower rack made of plastic window sill
Based on the very name of the design, the main component of such a creation will be plastic window sill 3 m 90 cm long. You will also need 3 nickel-plated or galvanized pipes, 9 flange fastenings and 2 brackets.
- Each window sill is cut crosswise into three pieces, each 1.3 m long. Thus, we get our shelves.
- In each shelf, 3 holes are drilled for future metal racks. The location of the holes will be the vertices of an isosceles triangle, that is, one at each end closer to the back side and one in the middle near the front edge. The locations of the holes in all shelves should not be aligned.
- Measure and cut 3 pipes of the same length. The structure is fastened with tightening screws for the flanges.
- Fixed to the floor using the same elements. Role lower mounts For metal racks, flanges and screws are used. And with the help of brackets mounted into the wall, the upper ends of the two pipes are fixed.
Corner shelves
Necessary supplies and materials to complete the work:
- Chipboard sheet.
- Metal pipes with nickel or galvanized coating.
- There are sufficient screws and flanges.
Manufacturing process of corner shelves:
- The design is assembled in complete analogy with previous work. Electric jigsaw All planned elements for the manufacture of triangular shelves are cut out.
- Marks are applied to each workpiece for cutting holes for metal racks. Such holes are drilled in three places. This process is duplicated for each shelf.
- All elements are connected to each other using flanges and screws. The position of the rack is fixed using brackets built into the wall, which are placed on the upper parts of the pipes.
- And at the last stage of work, all that remains is to choose the one that suits your needs. general interior color for painting the structure.

Glass flower rack
Very original design such a rack is achieved through the use of different glass and application LED backlight. Rays of light penetrating between the flowerpots magically illuminate the flowers from below, creating an overall radiant picture. To make such a rack you need 6 glass shelves and a pair of wooden slats.
- The thickness of the glass must be at least 5 mm. The glass selected is tempered type.
- The supporting strips for the shelves are made in wooden style. Based cross section of such planks, grooves are selected. Glass shelves are fixed in them. The grooves must be as strong and reliable as possible, since they hold all the elements of the glass flower rack.
- When choosing much smaller sizes of structural elements, it is better to use such a device not for flowerpots, but for the exhibition of various figurines and souvenirs small sizes. It will be more reliable to make the bottom shelf in wood.
- Glass structures are used for growing flowers on the windowsill. The rack does not absorb much light and is compactly placed in the window opening.

Video
In this video, the master will show you how to make a shelf for flowers on the windowsill from an old cabinet. Simple, convenient, looks beautiful.


