Decorating walls with material such as wallpaper is the most in the usual way when the question arises about updating the interior. Inviting specialists to wallpaper a room is convenient, but not necessary. It is enough to be willing to carry out such repairs yourself.

Process Features
If you don’t have the extra money to pay professional finishers, you can handle the wall covering yourself. But there are problems with how to carefully glue the wallpaper in the corners. Before you get started, it's best to know some building codes.
It doesn’t matter in principle where to start wallpapering a room, as long as all the corners are even. If this is not the case, it is better to choose the angle at which, after pasting the wallpaper, you can avoid skewing the stripes on a flat surface. In any case, it is better to start work from a corner that is not striking or at least will be blocked by furniture in the future. There is certainly no need to choose a protruding corner for pasting with the first canvas.


The whole should not be used at the junction of two walls. wallpaper cloth, especially considering that some are very wide. Even on the most even and neat-looking turn, the wallpaper wrinkles and warps slightly, shrinking after drying.
If there are switches or sockets near the corners, it is better to interrupt the electricity supply and remove the covers of these devices before starting work. The protruding parts of the electrical system can simply be covered with wallpaper, and after the work is completed, the places for sockets and switches can be carefully cut out. This will make your work easier and the result will be of better quality.


Surface preparation
To prevent wallpapering the walls from turning into torture at the first turn, you need to carefully prepare the walls for decoration in advance.
Upon closer inspection, the corners may appear crooked, rounded, and sometimes have noticeable depressions and bumps. Therefore, experts advise not to spare time and effort in puttingtying the uneven surface, and maybe even plastering it. A good helper In this case there will be plaster corners.


They are leveled and glued with the same plaster or putty. There are corners for internal and external corners. Once the fresh putty has dried, it should be rubbed with sandpaper to make the surface smooth. Then the corners should be carefully primed and wait until excess moisture will also leave the primer.


All these measures will make the process of pasting corners easier, and you will be satisfied with the result.
If it is not possible to achieve absolute evenness or there is no time to do this, you need to be especially careful when choosing the wallpaper itself. For gluing curved surfaces, loose finishing materials are suitable, since they will have to be glued overlapping, and from the side where the canvas is applied to the canvas should not be noticeable.
A good choice in in this case There will be non-woven wallpaper with small patterns or plain ones. Also, the curvature of the angle can be hidden by non-smooth decorative materials, or even fiberglass for painting.


Pasting step by step:
- Before you start pasting, you need to prepare all the tools and materials.
- Calculate the area that needs to be covered and buy required amount rolls of wallpaper.
- Select the appropriate wallpaper glue and dilute it according to the instructions.
- Stock up on a tape measure, a plumb line, a pencil, and a long metal ruler.

- Prepare a construction knife, roller, brush, sponge or clean rag.
- Bring a stool or stepladder so you can reach the top edge of the wall while working.
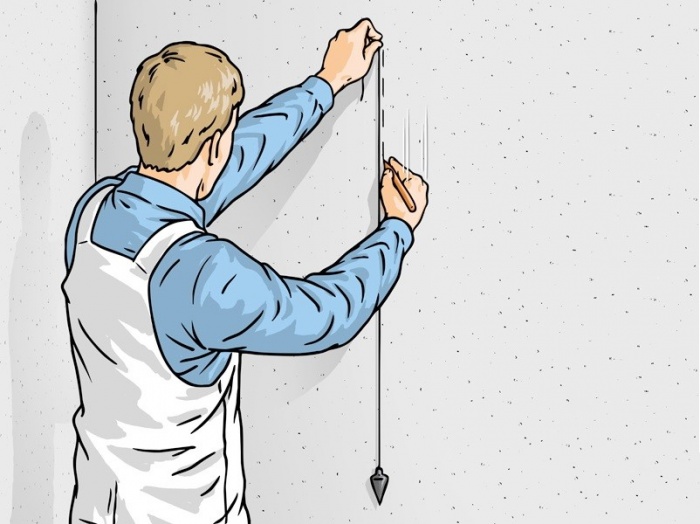
Stepping back four or five centimeters from the joint, draw a line along the wall with a pencil, perpendicular to the floor, focusing on a plumb line. Most modern wallpapers are glued end to end. Therefore, it depends on how correctly you draw this line and paste the first strip, whether the subsequent strips will lie strictly vertically or skewed.
To be sure, it is better to make pencil guidelines for each of them.

Wallpaper strips are cut with a margin of 2 centimeters, since they become shorter after drying. Since wallpaper is sold in round rolls, which are also quite wide and heavy, it is inconvenient to apply them to the wall every time. So it’s better to cut the decorative fabric on the floor on a surface prepared for rolling out wallpaper.


The wall must be carefully glued with glue. Particular attention should be paid to the corners, because it is in these places that the probability of the decorative layer falling off is greatest. The rule for treating walls with glue applies to all cases: when you decorate walls with paper, non-woven, and vinyl wallpaper. And in case of using heavy vinyl wallpaper You need to coat them with glue too. During the process, if you hesitate and the glue in the corners has time to dry, be sure to repeat the gluing again.


The technique for gluing corners has long been worked out. There are techniques for gluing both external and internal corners.
External
When finishing walls, convex surfaces are especially striking, so the quality of the outer corners will largely determine the perception of the room as a whole. If the corners are even, it is enough to wrap the wallpaper around the corner three to four centimeters from the protrusions and glue it. If the wallpaper begins to wrinkle, you will have to carefully trim it at the folds. The next strip can be glued to the wall as it is done on a plane.
If the outer corners are crooked, the problem cannot be solved so easily. When you decorate walls with materials that practically do not shrink after drying and fit together end to end, the canvas on the corner must be glued so that it protrudes about five centimeters beyond the turn. When gluing, the other canvas should slightly overlap the previous one. A neat cut is made along the ruler in the middle.


Excess material from above and below remains to be removed. Smooth the canvas thoroughly and press it as tightly as possible to the surface.
If you are dealing with paper wallpaper, there is no need to rush to trim the overlap. Double-check the correctness of the sticker using a plumb line. If the deviations are very large, obviously excess wallpaper can be carefully cut off along the intended line.
To complete the design of the outer corner and to prevent the wallpaper on the ledge from fraying over time, it is better to use plastic corners for wallpaper, matched to it in color. You need to calculate in advance how many of them will be needed for the job. Glue the corners using liquid nails or using silicone sealant.


The outer corner approach is also used on ledges around doors and windows. Beams and other similar elements with external corners are glued separately in a similar way using scraps of wallpaper that remain after gluing the canvases on the walls.
Interior
To properly dispose of the next canvas in the corner, you need to measure the distance from the outermost glued strip to the joint and add another two centimeters to the resulting figure. The wallpaper strip must be cut taking this into account and applied to the wall, previously coated with glue. At correct pruning a narrow strip of wallpaper should be on the adjacent strip behind the joint line. Smooth the canvas with a roller and a rag to release all the air between the wall and the future decorative covering.

If such a bubble does not want to disappear, experienced people recommend piercing it to release the air, and using a syringe, pour a little glue under the wallpaper, and then smooth it with a roller.


If the corner is uneven and wrinkles appear on the strip during gluing, use scissors, as in the case of the outer corner, to make neat cuts towards the fold and glue the canvas.
The neighboring strip needs to be glued on the second wall with an overlap of a couple of centimeters on the previous one. Check the quality of your work using a plumb line. When smoothing the second sheet, you must not press the edge of the required allowance against the wall.
Then, using a ruler, you need to cut through the layers construction knife, remove the extra one upper layer, and then the lower segments. Coat the wallpaper in the corner with glue again and press it against the wall so that there are no air bubbles left.

If everything is done carefully, you will get an even seam.
Subtleties of working with drawings
There are certain difficulties in beautifully gluing patterned wallpaper in protruding and internal corners. Using decorative coating with a clear, pronounced pattern, you will have to try not to distort it at the junction. It is necessary to foresee this task in advance when selecting materials in the store.


Distortion is especially noticeable on wallpaper with vertical stripes. If the design is horizontal, it may appear skewed relative to the ceiling and floor.

This can only be avoided if the corners are overlapped. The edge of the canvas must be glued strictly plumb. The adjacent strip must be carefully trimmed along the edge of the corner. Moreover, when covering a wall with paper wallpaper, all these manipulations must be carried out not only carefully, but also with maximum speed. Otherwise, the coating itself will spread and you will ruin more than one strip of wallpaper.
To make the unevenness less noticeable, it is recommended to hide the resulting joint in the upper part of the corner. It is unlikely that it will be possible to avoid a certain shift in the pattern, but with a competent approach it will be so unnoticeable that the eye will only cling to the joints of those who have carried out this repair themselves.
Wallpapering the walls of an apartment is a common procedure for most residents of our country. This is the most affordable and easy way interior renovations, but not many owners understand how to properly glue wallpaper in the corners of the room. This seemingly simple task encounters a lot of difficulties when it is necessary to paste over the corners with uneven surface. There are especially many problems with wallpaper that requires adjustment to the pattern. It will not be possible to achieve an exact match of the image in a crooked corner, and the overall picture will be hopelessly spoiled. You can endlessly join individual canvases on the wall, but without carefully leveling the surface in the corner and preliminary preparation, it will be impossible to achieve an acceptable result.
To avoid difficulties in the process of gluing wallpaper, you should pay attention Special attention preliminary preparation walls and corners. Even minimal protrusions or depressions in the corner can cause serious distortion over a meter length, and several such errors make adjustment impossible - creases and tears appear, as a result of which it is impossible to match wallpaper with different patterns.
To prepare the surface for wallpapering in the corners, you will need to do the following:
- The first step is to clean the surface of old coatings, dust and dirt.
- If small depressions are found, they are eliminated using putty.
- If the wall is uneven, you need to find the point of maximum protrusion at the inner corner. Using the guide rail ( metallic profile), installed on a plumb line or level to next wall, apply a mark along which the corner is leveled with special building mixtures.
- If it is impossible to align the internal corner mortars, it is recommended to install a special corner from metal mesh, after which it is necessary to plaster the corrected area. In the same way you can prepare external corner.
- Leveled and dried surfaces must be sanded until a smooth surface appears.
- After obtaining an ideal surface, it needs to be treated with a primer. This point in preparing the corner for gluing is mandatory, although many owners who carry out repairs with their own hands ignore this procedure. The surface treated with primer allows for a higher degree of adhesion of materials, which is especially important when working with corners.
The preparation carried out will allow you to solve the question of how to paste wallpaper in the corners of a room with high quality. In the same way, it is recommended to prepare complex surfaces where doors are placed, heating batteries and windows.
How to tape corners
To successfully overcome the problem of corners, both external and internal, it is necessary to prepare a set of tools that will allow you to complete this work with less effort. The following tools will be needed for gluing paper, non-woven and vinyl wallpaper:
- a plumb line or level to determine the vertical mark;
- a wide spatula as a basis for evenly cutting wallpaper;
- stationery knife;
- brush 150 mm wide;
- roller, preferably with a long handle;
- pencil;
- scissors;
- rubber roller for rolling wallpaper;
- container for diluting glue and primer;
- bath with a cuvette for working with a roller.
The technology for gluing internal and external corners in a room, proposed below, is valid only for plain products without a pattern, which do not require matching the image.
Domestic
It is best to seal internal corners using overlapping technology. To do this, you need to prepare a sheet with a width exceeding the width of the wall at the junction with the corner by 3-4 cm. This piece is intended for gluing the corner and slightly extending onto the adjacent wall.
After gluing the sheet, it is necessary to draw a strictly vertical line along this strip at a distance of 0.5 cm from the corner. This mark will serve as a guide for sticking the second sheet on the adjacent wall. To obtain a vertical line, use a plumb line or a laser level.

The second sheet is glued so that its edge coincides with the vertical mark. If the seam is invisible, you can proceed to further pasting of the walls; if it protrudes noticeably, you will have to make a leveling cut, for which you use a utility knife and a wide metal spatula as a guide surface for the knife.
After trimming, the excess strips are removed, the wallpaper is slightly spread at the joint and additionally coated with glue, after which it is joined again.

External
Modern projects practically do not provide for external corners in the apartment space, but in previous series such corners exist, so you should consider step by step instructions pasting of such walls:
- As in the case of the internal corner, it is necessary to prepare a trellis with a width exceeding the wall space up to the corner by 4-5 cm;
- The wallpaper sheet and the surface that is planned to be pasted over are coated with glue;
- The trellis is glued to the main place and carefully leveled, removing air pockets;
- After strengthening the sheet on the main wall, begin to fold the wallpaper along the corner. If necessary, small incisions can be made to smooth out wrinkles that form when the surface is uneven;
- The next step is to make markings on the strip, departing from an angle of 0.5 cm. The markings must be strictly vertical, for which it is recommended to use a plumb line or a laser level;
- Apply glue to the second sheet and the wall, after which, aligning the edge of the sheet along the line, stick it on;
- Using a guide (a wide spatula, a long metal ruler or profile), a vertical cut is made in the middle part of the connected parts;
- The cut strips are removed, and the joint is additionally coated with glue and rolled with a rubber roller.

Every master who deals finishing works, there is a set optimal solutions questions arising during the pasting process. Below are tips from professionals to help you understand how to properly glue wallpaper in corners and avoid mistakes:
- For pasting walls with dense roll materials, you should use the most durable types of glue, and you need to choose glue with a transparent structure;
- Applying primer to the entire surface of the walls, and especially at the joints, is mandatory;
- Often, adjusting the pattern at the joint takes a lot of time, which leads to the glue drying out; therefore, it is necessary to add the adhesive in time in places where it has dried out;
- In old panel houses Significant deviations may be found in the corners. In this case, it is difficult to achieve effective alignment, so to make the work easier, you should purchase wallpaper without a pattern to avoid adjustment;
- If special primer mixture no, it is recommended to use wallpaper glue to treat the surface before pasting. It is enough to apply it 5 hours before the start of the main work, as a result of which the setting of the materials will be much more reliable;
- Coat the corners with a brush. The roller will not be able to cope with the complete processing of the entire surface of this unit, which will negatively affect the setting of the material;
- In complex joints with large deviations, it is recommended to glue a strip of small (up to 15 cm) width before gluing the main panels end-to-end. This precaution will protect the connection when joining the wallpaper and mask flaws in the event of an inaccurate fit. This method is used only for plain wallpaper without a pattern;
- For those who still have difficulty imagining how to hang wallpaper in the corners without defects, it is recommended to use non-woven wallpaper. They best mask flaws on problem surfaces;
- If folds form when smoothing the canvas, they can be carefully trimmed at an angle of 45 degrees, which will eliminate the unevenness and continue working;
- Smoothing of the panel is carried out until complete elimination air jams. Otherwise, these places will not stick and over time will lead to peeling of the entire trellis;
- When using the overlap method of joining wallpaper, followed by trimming the extra centimeters along the length, it is necessary to carefully move the joints away from the wall with a wide metal spatula and apply glue again, since when removing excess strips, the glue is also removed from the wall. It is better to trim off the excess with a utility knife, using a wide spatula as a guide.
Data practical advice will allow any beginner home handyman cope with difficulties and understand how to glue wallpaper in the corners of a room without mistakes.
Matching wallpaper with a pattern
Particularly difficult is the work of wallpapering with a pattern. With minimal vertical wall errors, the joining is usually successful. The pattern may shift, but this drawback does not affect the overall picture.
To better fit the two sheets according to the pattern, it is necessary to spread both trellises on a flat surface with the front part facing up. Next, you should take measurements from the last glued sheet to the corner at the top and bottom. These distances must be set aside on the first sheet, and another 5 cm should be retreated from the received marks.

By connecting the points vertically, we get a fold line (first measurement) and a cutting line (second measurement). Along the second line, excess wallpaper is cut off.
The resulting sheet is superimposed on the second sheet intended for joining, and adjusted according to the pattern so that the minimum point along the width of the first sheet overlaps by 3-4 cm, after which the second sheet is cut to the required height.
When both sheets are ready, adhesive is applied to them and to the walls and the finished parts are applied, carefully joining them according to the pattern. The process of smoothing trellises is described in previous methods for gluing corners.
The overlap is trimmed using stationery knife and a guide base (trowel), the cut strips are removed, and the joint is additionally coated with glue and rolled with a rubber roller.
Glue modern wallpaper- it’s not a difficult matter. Even a novice repairman can handle this. But, if installing canvases on smooth walls is easy and simple, then you will have to tinker with the corners. It is the corners that become the stumbling block that slows down the entire process and requires a lot of effort. More often than others, non-woven wallpaper or vinyl sheets on a non-woven basis are used in repairs.
Features of the material
Wallpaper consisting entirely of non-woven fabric is easy to install and durable. They are made of non-woven cellulose with the addition of synthetic components. The cellulose component gives the wallpaper elasticity and breathability, while synthetics add strength. Such wallpaper is much more difficult to tear than paper-based vinyl, for example. In addition, they do not wrinkle at all and there are no folds left on the surface.
Non-woven vinyl wallpaper has the same properties. The only difference is that the canvases do not “breathe”, since vinyl does not allow air to pass through. Therefore, before gluing them to the walls, it is necessary to treat the surfaces with antibacterial primer or use glue with fungicidal additives. These measures will prevent the appearance of mold and mildew.
Non-woven wallpaper has a number of advantages over other coatings:
- Their feature is good adhesion to glue and to any wall material. Such canvases do not need to be treated with an adhesive; it is applied only to the walls. The same applies to non-woven vinyl.
- A useful quality of non-woven fabric is its resistance to stretching. The material does not shrink after the glue dries, and the dimensions of the canvas do not change. Thanks to this, the joints do not diverge, and the seams between the strips remain invisible. This feature is especially useful for wallpaper intended for painting, since painting makes all wall defects even more noticeable.
- Non-woven fabric cannot be washed, but can be dyed. But cellulose-based vinyl can even be cleaned detergents, it also lends itself well to coloring.
- Due to the bulk of cellulose fibers, such wallpapers level the walls and hide small unevenness. Durable synthetic components are resistant to tearing, which allows non-woven wallpaper to reinforce walls. They prevent cracking by holding the plaster in place.
- Non-woven wallpaper is easy to remove; its two-layer nature allows you to leave the backing on the surface and use it as a base for new coatings.
Installation of wallpaper on walls
There are several ways to glue wallpaper (you can easily see them from photos or videos). One of them involves initially gluing all smooth walls, and then the corners. Other artists advise starting from the most visible corner in the room. There is no consensus on this issue - everyone can glue at their own discretion.
Wall preparation is mandatory for any method. The old coating must be carefully removed and cracks filled with putty. Then the walls are covered with a special primer or wallpaper glue. Only after the primers have completely dried do they proceed to pasting the walls.

At the location of the reference point, draw a vertical line; this must be done with a plumb line or a building level. The first strip is cut from the roll, the length of which is equal to the height of the wall plus 5-7 cm. The wall is carefully coated with glue and wallpaper is applied. Level the canvas with a plastic spatula or wallpaper roller, focusing on the vertical.
Advice! It is better to use a special glue with a color indicator - in liquid form this composition has a pink tint, and after drying it becomes colorless. This allows the adhesive to be applied evenly to the wall without leaving any “gaps.”

At the baseboard and under the ceiling, the wallpaper is cut with sharp scissors or a construction knife. Move on to the next lane.

How to glue wallpaper in corners
In order to properly cover corners, you first need to understand their types. The angles are:
- Internal - each room has at least several such corners (in the standard layout there are four). Very important factor is the correctness of these areas. If the angle is uneven, has differences, or “sinks,” the wallpapering method will differ from the standard one.
- External corners in apartments began to appear more often with the advent of drywall - these are various niches, arches, columns and others decorative elements. This also includes door and window slopes, if, of course, it is planned to apply wallpaper to these areas.
Easy way
It is easiest to paste over a completely flat corner. Unfortunately, these are quite rare. These are either plasterboard structures or walls prepared for painting (plastered perfectly smooth and even).

In this case, the wallpaper is glued in the same way both in the inner and outer corners - they are simply wrapped in a single piece of wallpaper. The main thing is not to stretch the coating; after drying, it can return to its original size and shape. If there are small wrinkles on the wallpaper, you can make several horizontal cuts in the corner. This will help to even out the coating, and the cuts will not be noticeable after drying.
Important! No matter how even the corner is, it is better not to use the method of covering it with a solid canvas if it is joined to external wall. In corners located near external walls, condensation appears more often - the wallpaper can peel off and become deformed.

Standard method for gluing corners
It is safer to glue wallpaper in the corners using the “overlapping” method. Its essence is as follows:
- After pasting the adjacent wall, measure the distance to the corner at three points.
- Based on the largest of the three values obtained, the strip is cut off - its width is equal to the largest number plus 2-3 cm for overlap.
- The wall is coated well with glue, especially paying attention to the corner (it is better to use a brush).
- The prepared piece of wallpaper is applied to the corner, aligning the joint with the previous sheet.
- The overlap formed on the adjacent wall is carefully pressed, tucking the wallpaper into the corner with a plastic spatula.
- For a tighter fit, the edge of the wallpaper can be trimmed - make short horizontal cuts every 5 cm.
- Trim the bottom and top edges of the wallpaper using a metal spatula and sharp knife.
- From the narrowest point of the overlap, retreat about one centimeter towards the corner and make a mark.
- Focusing on the mark, draw a vertical line in this place using a plumb line or level.
- Prepare the next strip (if necessary, select a pattern).
- A strip is applied to the wall coated with glue, aligning its edge with the previously drawn line in the corner.
- Level the strip, expelling air and excess glue. Cut under the ceiling and near the floor.

Corner processed! Moving on to pasting flat wall until the next corner - the procedure is repeated. In this way you can glue external corners with different types of wallpaper.
Advice! Considering the considerable thickness of non-woven wallpaper, the overlap may be too noticeable.
In this way, you can paste over those corners that will be hidden by furniture or curtains, and choose another method for finishing the rest. You can also try cutting off only the top layer of wallpaper.

It is not necessary to glue the slopes with wallpaper; the video shows how they can be beautifully trimmed at the corners:

Corner cutting method
If the walls are to be painted, there should be no overlaps on them. Paint will make the thickening of the wallpaper too noticeable; another method will be needed here. This method is suitable for both internal and external corners.

The work is performed in the following sequence:
- Repeat the first seven points from the previous instructions - glue the strip with an overlap next wall. Only in this case the overlap is made larger - 5-7 cm.
- A distance equal to the width of the roll minus one centimeter is retreated from the corner.
- Using a plumb line or level, draw a vertical line at this point.
- Cut a strip from the roll and apply it to the wall coated with glue, aligning the edge with the drawn strip.
- The second edge is placed on the previous strip with an overlap, the wallpaper is pressed and leveled.
- Carefully push the wallpaper into the corner with a spatula, leveling everything again.
- In the middle of the overlap, apply a metal ruler vertically, take a very sharp knife and, without breaking it, draw a line along the edge of the ruler. It is very important that the line is drawn in one motion.
- Remove the trim top sheet, bend the edge of the lower one and also remove the excess.
- Both edges are coated with glue and folded end to end. You can pull the canvas a little in the right direction so that there is no gap or overlap.
- Roll with a roller for joints.

This method helps to make the connection of the canvases invisible. It also works well on external corners, in niches and on slopes.
Advice! It is better to use a small metal spatula 10-15 cm instead of a ruler
Due to the unevenness of the corners, the ruler may not fit tightly to the wall, and the cut will turn out crooked. The spatula must be moved along with the knife, avoiding breaks in the cutting line. How to properly trim wallpaper in the corners can be seen in the video:
The technology of wallpapering corners is complicated only at first glance. Wallpapering walls will help create a cozy homely atmosphere in the kitchen. Thanks to modern developments this finishing material, and in particular non-woven wallpaper, can compete with plastic in strength and durability. At the same time, they are more environmentally friendly, allow air to circulate and are easier to work with. The only thing you will have to tinker with is to figure out how to glue the wallpaper in the corners.
Choosing suitable wallpaper for the kitchen
Correctly selected wallpaper is already half the success. By saving on quality, you can greatly lose in durability, and in a year or two you will have to do repairs again.

Non-woven wallpaper is one of the best options for kitchen
Non-woven bases are more convenient when it becomes necessary to change the wallpaper. To do this, you just need to remove the vinyl layer, and the new canvas can be glued to the old finish.
Let's look at what types of wallpaper there are, and whether they can be used to cover the kitchen:
- Paper wallpaper- not a suitable option for the kitchen. In conditions of temperature changes, high humidity or dryness, the paper deteriorates and the design fades. Having decorated the kitchen with paper wallpaper, in such a microclimate you can’t count on them long term services.
- Paper backed vinyl– more durable material. They can be washed and glued for painting. Such wallpapers do not fade in the sun and are resistant to moisture. The gluing technology is the same as for paper ones. But since vinyl makes the canvas heavier, glue is chosen for heavy wallpaper. You should also keep in mind that not all vinyl flooring is breathable.
- Vinyl on non-woven base– are highly durable thanks to non-woven fabric as a lining. There is no need to be afraid that they will tear or shrink. This type of wallpaper is glued end to end. Due to the fact that the glue is applied only to the wall, energy and time are saved during the repair process.
- Non-woven wallpaper– thanks to their dense structure, they perfectly mask unevenness and cracks. They allow air to pass through well, without turning the kitchen into a “greenhouse”. Perfectly suitable as a base for painting. During the gluing process they do not stretch or tear. Easy to care for, they can be washed and vacuumed.
Required materials and tools
To properly hang wallpaper and not be caught off guard by the lack of necessary tools, before repairing, check that you have everything you need.
You will need:
- wallpaper,
- glue,
- assembly knife,
- scissors,
- putty knife,
- plaster,
- building level,
- plumb line,
- sponge,
- rubber roller,
- ruler,
- pencil,
- brush.

Pencil – essential auxiliary tool for wallpapering corners
Subtleties of wallpapering corners
Wallpapering is a simple matter, but it also has its own subtleties. As a rule, difficulties arise if you do not know how to glue wallpaper in the corners. When at least one corner turns out to be crooked, as it is glued along the wall, an increasing distortion of the canvas will be observed relative to the surface of the floor and kitchen windows or ceiling.
You should not rely on the doorway as the starting point for wallpapering the walls. Check with a plumb line that it is truly perpendicular to the floor. There is a high probability that the frames are also installed with an error, which will lead to misalignment and the corner will be swollen.
The tradition is to start decorating walls with wallpaper from door and window openings originates from the need to glue overlapping paper wallpaper so that the latter is less noticeable. With the advent of vinyl and non-woven materials, such a need has disappeared, since the fabric is glued end-to-end.

Smooth corners are much easier to paste than curved corners.

For large irregularities, some tricks will help
Before starting to work with wallpaper, it would be correct to level each corner with plaster using a building level. Minor unevenness can be dealt with by slightly overlapping or cutting off an extra piece of fabric.
Trimming wallpaper in corners (video)
Wallpapering interior corners
A corner properly wallpapered does not wrinkle, the edges of the canvases do not diverge, forming a gap. To achieve such an accurate repair, they resort to some tricks.
For this:
- A layer of glue is applied to the wall. If the wallpaper is non-woven, you do not need to apply glue to the back side.
- The edge of the canvas is placed on the adjacent wall with an allowance of 1-2 cm.
- The wallpaper is pressed tightly against the wall using a sponge. If the canvas wrinkles, make cuts with scissors towards the swellings and straighten the material.
- After this, they begin to cut the canvas, which will lie in the corner from above. Using a ruler and a pencil, on the reverse side, lay out in a mirror image the overlap that went onto the adjacent wall, and cut off this excess.
- The cut fabric is glued so that the cut edge ends up exactly in the corner.

Detailed instructions for wallpapering internal corners
Wallpapering external corners
Often the kitchen design is designed in such a way that doorways It is necessary to paste over the protruding outer corner as well.

Wallpapering corners - not an easy task with large curvature of walls
For this:
- Take measurements from the top and bottom starting points for the wallpaper to the corner plus 3 cm to wrap it.
- Cut the wallpaper to the required dimensions.
- Apply glue to the walls with a brush.
- The edges are pressed tightly against the wall, making cuts where wrinkles form.
- If the pasting is done with non-woven material, the top layer is cut along the corner and a narrow strip is carefully removed.
- A new sheet on the adjacent wall on the other side of the corner is glued over the non-woven edge.
- Go over the joints with a rubber roller.
That's all the tricks on how to glue wallpaper in corners. Knowing these subtleties, there should be no difficulties with kitchen design. Such simple solutions will help create cozy interior kitchens.
How to glue wallpaper in corners (video)
Using a rule or a metal profile and a plumb line, find the most protruding point of the adjacent wall. It is important that the profile fits closely to the wall and must be kept strictly vertical.
The corner spatula must be applied to the found point, and the profile must be attached to the spatula. Use a plumb line to check that the profile is strictly in a vertical position, then notches are made on the wall for the dowels.
Then use a hammer drill to drill holes in the wall, install dowels and secure the profile with self-tapping screws.
The next step is to apply putty to a corner that has been previously moistened with water. Using an angle spatula, putty is applied and an even angle is formed; excess gypsum must be removed.
When the putty layer has dried, it is sanded using sandpaper zeros.
Method number 2.
A special metal or plastic perforated corner is installed in the corner, with a mesh attached to the edges. The counter-shultz is mounted strictly vertically and fixed with putty applied to the mesh. When the putty dries, it must be sanded.
Using these leveling methods will help prepare a perfectly flat surface for wallpapering corners.
How to glue wallpaper in corners
When hanging wallpaper, you will inevitably face the need to paste internal and, possibly, external corners. The choice of pasting method is influenced by the type of corner, and not the type of wallpaper. It is worth noting that the methods below apply only to plain wallpaper.
Let's find out how to stick wallpaper in the corners of the room.
External corners
Modern interiors rarely have external corners, but mostly internal ones. But if you still have to paste the outer corner, then recommendations on how to wallpaper the outer corner will certainly be useful.
Sequence for gluing the outer corner:
- Prepare a canvas of such width that it goes around the corner a few centimeters.
- Apply glue to the strip of wallpaper and the surface to be covered.
- Glue the trellis to the wall and carefully align it. This is necessary to remove air gaps.
- Fold the strip over to the other side of the corner. If wrinkles form on the surface, a small incision can be made.
- Step back 0.5 cm from the edge of the corner and make strictly vertical markings using a plumb line and a pencil.
- Apply glue to the next sheet and overlap it, first aligning it along the line.
- Using a guide, cut through the middle of the joined panels with one cut.
- Remove the cut strips and roll the seam with a rubber roller.
Internal corners
Most in a suitable way For gluing internal corners, overlapping gluing is considered. The width of the sheet should exceed the width of the wall at the junction with an angle by 2-4 cm. Then the sheet is glued and a vertical strip is drawn on the strip at a distance of 5 mm.
The edge of the next sheet should coincide with the vertical line when gluing. If the seam is invisible, you can proceed to further pasting of the walls. If the seam protrudes, make a cut and butt it, removing excess strips.
How to glue wallpaper with a pattern in the corners
The joint of the wallpaper in the corner can be almost invisible if the canvas has a clear geometric pattern or the wall collapse does not exceed 2 cm vertically.
However, you need to try to keep the pattern shift to a minimum. Below are tips from professionals on how to achieve this:
- Cut and joined according to the pattern with the outermost glued canvas, place the trellis on the floor with the side with the pattern facing up.
- Measure the distance from the edge of the last sheet to the corner at the top and bottom.
- The difference can reach several centimeters.
Mark points on the spread sheet using a pencil or small cuts. It is important to make a note of where the top or bottom is. - Add 5 cm to the resulting dimensions and cut a piece of wallpaper of the required width.
- Join the wallpaper sheet with the cut sheet and lay it overlapping, overlapping the minimum point from our measurement.
- The part that overlaps the mark must be cut off. Cut the sheet to length.
- Coat the sheet with wallpaper glue and glue it end-to-end with the last sheet, glue the overlap onto final stage. It is necessary to prevent the formation of folds by working the corner and seam.
- Using a plumb line, draw several vertical lines at a distance from the corner to the edge of the sheet. The pitch between the lines is 5 mm.
- Coat the next sheet with glue and fold it for impregnation.
- Glue the canvas so that the central pattern matches perfectly. We glue the wallpaper, smoothing it towards the corner, focusing on the vertical lines.
- Using the resulting overlap, cut the connected parts using a metal profile and a sharp knife.
- Remove excess strips and roll the joint with a rubber roller.
How to glue non-woven wallpaper in corners
The technology for gluing non-woven wallpaper in the corners is quite simple and the methods described earlier are applicable in this case. However, it is necessary to take into account a number of nuances when covering walls with this type of wallpaper.
- Do not try to cover both sides of a corner with one sheet. There is a possibility of wrinkles.
- Non-woven wallpaper is always glued end-to-end.
- When gluing non-woven wallpaper, glue is applied only to the wall.
How to fix joints in corners
Quite often there are situations when, after gluing wallpaper, the joints between them become visible. Let's find out how to seal the corners of the walls after wallpapering so that the joints are not visible.
A checkered or striped pattern will easily hide the joints, even if they are visible. The joints will be noticeably visible on plain wallpaper.
If you plan to paint the wallpaper, then the joint at the corners can be masked with a special sealant that can be painted to match the color of the wallpaper.
Often, joints occur at paper wallpaper. To avoid this, they need to be glued immediately after applying the glue. Otherwise, shrinkage of the canvas will occur and tears cannot be avoided.
You can apply tile grout of the same color to the joints between the wallpaper at the corners. You can also use a marker or pencil.
Moldings or special panels, more a budget option- paper borders.
Technology for working with uneven corners
- Buy wallpaper with a neutral pattern that does not require joining at the edges of the panel. The drawing probably does not match, which will look very unaesthetic.
- Give preference to non-woven wallpaper, because... they stretch perfectly, do not get wet, do not tear and are able to hide minor defects walls
- Use a little trick - glue the uneven corner in two layers. Glue a strip 8-12 cm wide under the main trellis. This is necessary in order to fill the gaps formed when trimming the outer layer.
- You can use painter's mesh to reinforce the corner and disguise small depressions.
- To level the spade, it can be trimmed in a herringbone pattern. An overlapped strip of glue will hide the cuts.
Other features of gluing corners
Pasting corners with wallpaper will not work challenging task, if you take note of advice from masters involved in finishing work.
- Carefully prime the corners. Instead of a special primer, you can use wallpaper glue applied a few hours before starting work.
- Apply glue in the corners only with a brush, this will help avoid unwanted gaps.
- Heavy and thick wallpaper is glued with a special transparent glue.
- Smooth the wallpaper in the corners until all air gaps disappear.
- Carefully move the edges of the sheets after cutting the seam and coat them with glue, because the adhesive mass will be removed along with the removed trimmings.


