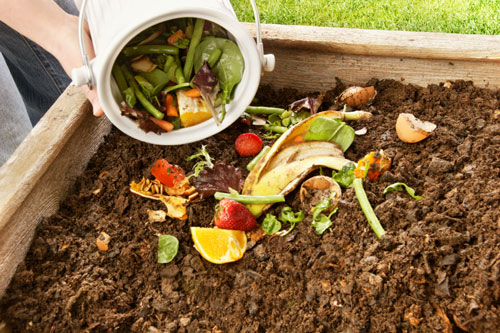
Any owner of a summer cottage is faced with the need to fertilize his garden and vegetable garden. To do this, you can use chemical fertilizers, or you can use natural ones. The best solution in this case is the use of a compost pit. Another benefit of building a garden composter is that you care about the environment, as all organic waste can be turned into usable compost rather than landfilled.
Where to set up a compost heap
First of all, you should take care of the purity of drinking water, so the well or well should be removed at a distance of about 25 m from the heap and preferably be higher (if there is a slope on the site).

Of course, the composter can smell bad, so it is important to place it further from the kitchen, gazebo or porch (your own and your neighbors), given the most common wind direction. It is ideal to locate the compost pit close to the vegetable garden or garden in the shade of trees, while providing easy access to it for a garden wheelbarrow or a walkway with a trash can.


Every summer resident and owner of a private household, who has been growing vegetables in his own garden for more than a year, knows that the land tends to be depleted, while the yield and quality of garden products are reduced. Naturally, the limited area of the land plot does not make it possible to carry out a full-fledged crop rotation, leaving some part of it unused for a year or two: in this case, the soil is, as they say, “fallow” and has the opportunity to restore its fertile potential. We have to solve the issue by fertilizing the soil, and here many people have all sorts of problems.
All (or almost all) issues related to soil improvement can be solved with the help of such a wonderful substance as compost.

This is a very effective natural fertilizer that can be produced without any financial costs in natural conditions literally from nothing, more precisely, from garbage that is usually burned or thrown away.

It is only necessary to make a little effort to create optimal production conditions - to make compost pit. Next, we'll show you how.
In simple terms, compost is the result of the process of decomposition of organic waste with the help of microorganisms and the obligatory access of oxygen in conditions of sufficient humidity and biological heat. An important role in the formation of high-quality compost is played by earthworms and dung worms.

Immediately make a reservation that the process of formation (ripening) of compost is quite long and without the use of special auxiliary compounds lasts from one and a half to two years. In rare cases, when creating the best natural conditions, it is possible to get good compost in a year, but this process does not tolerate haste, especially since, if the process is properly organized, it will be possible to receive a portion of fertilizer almost annually in the future.
 The multilayer structure of the compost mass. Below - a drainage layer of large branches, above - a fresh layer of household waste
 So, we mentioned that ordinary garbage and organic waste are used to create compost. This is true, and the arrangement of the compost pit will allow you to solve two pressing issues at once - to dispose of most of the household waste and to get a quality soil conditioner.

In the compost pit you will throw:
- fallen leaves;
- cut grass;
- dry branches from trees and shrubs, roots, wood waste;
- withered tops from the garden;
- potato (beetroot, carrot, etc.) peels, banana peels, apple peels, etc. bits, half-eaten salads, tea leaves, coffee grounds and other waste from the kitchen and dining table;
- paper and cardboard waste.

At the same time, you must remember that everything placed in the compost pit must be shredded (especially wood, paper, cardboard), free of paint and varnish coatings and any fats.

You should not place such items as meat, bones, animal intestines, cabbage leaves and dairy products (they rot and form a very bad smell), vegetable stalks affected by late blight and other diseases, as well as weeds - it is still better to burn them in order to there were no problems in the future. Many experts do not recommend throwing pet excrement into a compost pit, since they may contain helminth eggs (worms), which, although they should die from the heat generated inside the compost mass (from 40 ° C to 70 ° C), no one will give such a guarantee, so better beware. Naturally, plastic, rubber, metal and objects made of synthetic materials will not decompose in any way in the compost, which will remain garbage and then end up in your garden.
Making a compost pit with your own hands

For our purposes, it makes sense to talk about three types of compost pits that you can equip yourself, as well as get acquainted with some production samples from the large assortment available for sale in specialty stores and "gardening" departments of hypermarkets.
You can make your own:
- the pit itself, the “working” part of which is below ground level;
- a completely outdoor structure, generally representing a box or enclosed space;
- a rare “universal” type that combines the two previous ones in its design.
In fact, making a compost pit with your own hands is not at all difficult, then we will consider the available designs and you will see for yourself.
Location of the compost pit
Before you start arranging a compost pit in your backyard or summer cottage, you should pay attention to some of the nuances of its correct location.

Considering the peculiarities of the waste composting process, the pit should be located at a distance from sources of drinking water - springs, wells, wells. The optimal distance is 25 meters: further is possible (if the territory allows), closer is not desirable.
An important point: if the terrain on your site is heterogeneous, with slopes, always choose the location of the compost pit below the level of the well, preferably at the lowest point of the site. This is done so that during rains (snow melting) decomposition products do not enter the source along with water flows. You can determine the lowest point if you follow the direction of streams during heavy rain.

Another problem is unpleasant odors, which may well come from the compost pit. This should be taken into account so as not to spoil relations with neighbors and your own mood. Therefore, find out in advance the predominant direction of the wind, which should become your assistant in this matter.
Usually, a compost pit is located somewhere away from the eyes - behind outbuildings, at the end of the garden, etc. However, you can still equip some suitable fence like a screen with climbing plants. In addition to the decorative function, such a fence should provide the pit with two extremely important conditions:
- protect from the sun, providing reliable shade;
- do not interfere with the free blowing of it by the wind.

Well, now, in fact, about the pit itself.
The first option can be considered the oldest, which gave the name to all other designs. This is a pit in its purest form, no more than 1 meter deep, 3 meters long and about 1.5 meters wide. Such calculations are due to practical expediency: it will be more difficult to fill a larger volume, and the resulting compost is quite enough for a garden of 8-10 acres.

However, everything is not so simple: the formation of compost is an aerobic process, requiring free access of air to the entire mass, which dense soil is not able to provide. To solve this problem, the walls of the pit should be sheathed from the inside with wooden boards at a certain distance (about 20 cm) from the earthen walls. To do this, columns are dug in at the corners of the pit, to which the boards are nailed. The boards themselves do not fit tightly to each other, they leave a distance of 4-5 cm between them. Such measures are necessary for better ventilation of the compost mass, as well as for earthworms to access it.
 A drainage layer of pieces of wood and branches is thrown at the bottom of the pit for better ventilation.
 Now you need to build a wooden shield and block the hole exactly in the middle, dividing it into two equal parts. Waste will be placed in one, and the other is needed for periodic shifting (several times per season) of the mass in order to better saturate it with oxygen.


Some people prefer to line the walls of the compost pit with bricks (as in the photo above), cinder blocks, or concrete. Such "thoroughness" is completely useless for the reasons outlined above.
Compost bin design

The overhead structure is considered more popular - the so-called. compost box.
 For its construction, special skills and calculations are not needed: the main thing is to provide a certain volume for the mass of waste in which they can be and gradually overheat into a nutrient substrate, as well as supplying a sufficient amount of air.
 Compost bin made of wooden pallets
 A compost bin can be made both portable and stationary by digging columns of the desired height (1 m above the ground) into the ground at the corners from a thick wooden beam or metal pipe. These posts are then sheathed with narrow (10-12 cm) wooden planks, maintaining an interval of 1-2 cm, sufficient to ensure drainage functions.

Good so-called. “Finnish” type of compost bin, the main part of which is a cube with a side of 1 m. Such dimensions are calculated in order to ensure that the mass is overheated, and not dried out (with a smaller volume) or burned out from excess internal heat in a significantly larger volume.

A gable roof is being built on top, one slope of which is used for laying waste in a box and is a lid with a convenient handle that leans back on the door hinges. In the lower part of one of the surfaces, it is necessary to place a door 30-40 cm high on the same hinges, through which it will be convenient to take out the finished (mature) compost located in the lower conditional third of the mass (mature, ripening compost and fresh waste on top).


One wall of the box facing the courtyard can be made deaf. As in the case of the pit, the box can be built into two compartments, but this is not so important here.

As you know, demand creates supply, and therefore various manufacturers offer to purchase ready-made compost boxes - composters, made of high-strength plastic or metal (sometimes wood), with a modern design and designed in such a way as to create the most favorable conditions for mass composting.


Composters vary greatly in their cost, manufacturability (some models are equipped with temperature sensors and electromechanical mass rippers), dimensions and design features, which can be both solid and collapsible.


In the presented photos you can see some samples, but it is better to choose in consultation with the seller.


Compost care
Having acquired your own compost pit (or box), you will have to take care of the mass gradually turning into fertilizer. It is not difficult, all care consists in periodically moistening the mass and ventilating it.

It is convenient to moisten with a garden watering can, wetting, but not filling the mass with water. They ventilate the ripening compost with the help of garden forks, piercing and turning the mass to the maximum depth in several places or shifting it from compartment to compartment.

For better maturation and quality of the future compost, you can add a small amount of overripe (two-year-old) manure to the mass.
It is possible to significantly accelerate the maturation of compost with the help of commercially available special compound preparations: in some cases, the result is obtained in one month, although the consistency of the compost will be different, and it will have to ripen in the soil, which, according to many experts, is even good for plants.

In the country there is always a lot of waste that can be easily turned into fertilizer. All that is required is a compost heap or a do-it-yourself compost pit in which you need to regularly collect plants and organic waste. After two seasons, they will rot and turn into compost, suitable for fertilizing all garden plants and the garden. Detailed instructions on how to properly build a compost pit and heap can be found in the article below.
Benefits of using compost in your backyard
Although composting is time consuming, the effort is always worth it. The advantages of making compost in a compost pit with your own hands are as follows:
- Environmental friendliness. Compost is a natural fertilizer for plants.
- Soil improvement. Thanks to the use of compost, clay soils become looser and allow more air to pass through. If there is a lot of sand in the summer cottage, thanks to the compost, it will retain more moisture, which will increase its fertility.
- No need to pay money. Compost can be obtained free of charge from food waste and plants that grow in a summer cottage. But you will have to pay for manure and mineral fertilizers.
- The ability to usefully dispose of organic waste and keep the site clean. Grass, weeds and leaves in any case will grow in the summer cottage and to maintain cleanliness they must be taken out or burned somewhere. If you dump them in a compost pit or on a compost heap, useful compost is formed without any extra effort, and it will turn into an attractive place for relaxing and growing vegetables.
How to make a compost pit and a pile with your own hands?
First of all, it should be noted that a compost pit and a compost heap are not very good ideas for making compost. If you create a waste pit directly in the soil, it will take a very long time to create compost, as the rotting process will slow down due to the presence of moisture and lack of ventilation. If you simply pour organic waste in the form of a heap, the decay process will proceed unevenly, a lot of heat will go into the atmosphere.
A proper compost pit or heap is a structure (box) made of wooden boards, 50 cm deep into the soil, and 1 meter raised above the ground. Inside such a box, it is necessary to throw organic waste and garbage from the summer cottage. Under the influence of heat, it will gradually begin to rot and after six months, nutritious compost is formed from the garbage.
But before you make a compost pit, you need to remember a few rules:
- To enhance the rotting process, the compost bin must be built in a shady place away from the house (it is worth remembering that a very unpleasant smell is released during rotting). You should not organize a compost pit next to trees - an excess of nutrients in the soil can provoke their death.
- The compost pit should be located at a distance of 25 meters from the well so that the substances formed during the decay process do not enter the drinking water. But it can draw water from a well located in close proximity to the compost pit.
- Do not make a compost heap at the place where water is collected. This will slow down the composting process.
- The ideal dimensions of the pit are 1.5 by 2 meters. If you make the pit small, the waste in it will not warm up, and the process of decay will be slow. A very large hole will require a lot of waste.
- The compost pit is recommended to be divided into 2 sections. The first section can be used immediately after construction, and the second should begin to throw away waste only from next year.
- Polyethylene should not be laid at the bottom of the pit. It is better to throw hay or small branches there.
- Above the compost pit, it is necessary to build a cover or cover it with a piece of roofing material. Can be used for mulching.
- Approximately twice a month, the contents of the pit must be mixed so that the rotting process proceeds evenly.
You can use compost from a do-it-yourself compost pit in the new season. But to make it as nutritious as possible, rotting should last at least 2 years.
What kind of waste can be sent to the compost pit and compost heap?
A do-it-yourself compost pit is intended only for plant waste. You can drop it there:
- leaves and thin branches that are raked from under the trees;
- sawdust, shavings and bark;
- cotton rags;
- cardboard and paper;
- plant roots;
- ash;
- cut grass;
- flower stems;
- all food waste of plant origin, including tea bags and eggshells;
- scraps of pet hair.
The compost heap should not contain animal products and animal feces, mineral fertilizers, weeds on which seeds have already ripened. Plants with a long period of decay should not be present in the compost (these include potato and tomato tops). Also, do not throw bushes of plants affected by diseases into the compost pit - it is better to dry them and burn them right on the beds.
Compost is an indispensable component of fertile soil in your garden and the most affordable fertilizer, obtained literally from waste. Properly prepared compost will not only fill the need of plants for nutrients, but also improve the structure of the soil, its friability and the ability to absorb and retain moisture.
The “correct” compost is not just a rotten heap in the corner of the garden, where you can dump everything you need. In order for compost to be useful and safe, some rules must be followed.
Compost may include:
- cut grass, hay and straw;
- green parts of healthy plants and some weeds;
- branches, wood residues and sawdust;
- food residues of plant origin;
- herbivore manure and bird droppings;
- chalk, ash, coal, eggshell;
- composting accelerators.

You can not use the compost heap as a garbage pit by adding the following components to it:
- food residues of animal origin - they cause rotting and a persistent unpleasant odor;
- faeces of humans and carnivorous domestic animals - they may contain eggs of worms;
- rags, coated glossy paper, rubber, stones, bones - these components do not decompose during the composting process;
- chemicals and disinfectants;
- weeds with seeds with a long germination period, as well as creeping roots - in the process of composting, these plants do not lose their germination;
- diseased plants affected by pests and fungal diseases, such as late blight. They need to be burned.
Store the components in a compost bin. It can be made in the form of a pit or a fenced compartment, located in a secluded corner of the garden. According to the rules, the laid compost heap does not emit strong odors and does not have a harmful effect on the soil.
Compost device
The correct arrangement of the compost heap is one of the keys to quickly obtaining high-quality compost. It is not difficult to perform it, it is important to follow the recommendations.

Compost maturation
The process of fermentation and composting lasts from several months to two or three years, the maturation time of the compost depends on the size of the components and the mode of fermentation. It is important to achieve an increase in the temperature inside the pyramid to 55-60 degrees and above, while not only the processes of decomposition of the components with the help of bacteria are accelerated, but also weed seeds lose their germination, pests and insects die. For the correct mode, it is important to ensure a good supply of moisture and air to the composter. This is achieved through simple operations.

You can use compost when it acquires an almost homogeneous structure, becomes free-flowing and loose. Ripe compost smells pleasantly of damp earth and rotten leaves, it should not contain traces of fungus and mold. Ready compost is brought into the holes when planting bushes and trees or planting seedlings, mulching the soil under perennial plants or adding it to greenhouses and greenhouses. You can also scatter it over the beds before planting the seeds and slightly loosen the surface of the soil.
Good mature compost does not require organic or mineral fertilizers during planting and allows you to get a rich and environmentally friendly crop.
Compost can significantly improve the soil, regardless of its type. If it is clayey, it will become more crumbly, but if it is sandy, it will be better to retain moisture. But the price for it is quite high, there will also be costs for the delivery of compost to the site, so people began to make compost pits themselves to fertilize the soil, but at the same time save money. Any home accumulates a large amount of organic waste, so why throw it away if you can equip a hole, and this waste will benefit the soil. In the article, we will consider how to make a compost pit with your own hands in the country and how to properly operate it.
- The size of the pit should be made based on the approximate amount of garbage that can accumulate in a year, and then it will rot for at least one year.
- The process of removing humus and mixing it should not be difficult, so the height of the walls has its limitations.
- The pit can be made both open and closed, one or two sections.

- Weeds and their seeds should not get into the compost.
- Worms should freely penetrate the contents of the compost pit.
- It is necessary to equip a convenient approach so that there are no difficulties with the removal of humus.
- You can put iron on the bottom, which will also benefit the compost over time.
- The smell from the closed compost pit should not seep out.
- The compost pit should not be located in direct sunlight.
Compost pit technology
How to make a simple compost pit

The device of a compost pit depends on its future purpose, if it is equipped simply for the release of organic waste, then it can be done according to the simplest scheme.
- A hole is dug about 40-60 cm deep and 60-70 cm wide;
- a layer of dry grass, straw is laid on the bottom;
- after each ejection of waste, a layer of grass is again laid on the garbage. This is necessary so that the flies do not get divorced, and there is no unpleasant odor;
- What kind of hole should be made somewhere in a remote part of the site, but not near the neighbors' fences.
Do-it-yourself concreted compost pit

- This is a more labor intensive building. It consists of two equal compartments, one of which is intended for old compost, and the second is used for regular replenishment. This design has a lid that lifts up when necessary to collect fertilizer or discard waste.
- In order for the compost to turn out to be of high quality, it is better not to use weeds for its preparation, they can leave behind harmful seeds in the soil.
- It is necessary to provide access to the closed earthworm composter, otherwise the compost will take much longer to mature.
- In addition, it must be equipped in such a way that it looks like decoration on the site and has a neat appearance. But at the same time, ventilation must be present, so it is not recommended to plant climbing plants with dense foliage.
Stages of work

The process of building such a compost pit is quite laborious.
- It is necessary to completely level and remove the topsoil;
- then a hole breaks out, about 60-80 cm deep. The optimal length is 3m, and the width is 2m;
- then the formwork is built, and the walls are poured with cement mortar or concrete, the thickness of which should be about ten centimeters.
Tip: for the proper construction of a closed-type compost pit, it is necessary to prepare a concrete solution, following all the rules. It seems that there is nothing complicated in this, but in practice it often turns out the opposite. So that there are no problems, and then you do not have to spend a lot of time correcting errors, it is better to do everything right right away.
A concreted compost pit will have all the necessary properties for the timely processing of compost if the proportions of all the components from which the concrete is made for its base are exactly observed.
To create a solution, you will need:
- river sand,
- Gravel,
- Cement,
- Water.
Sequencing:
- first, gravel should be poured into a twenty-liter bucket and shaken very well;
- after that, water is slowly added using a measuring container. If this bucket contains ten liters of water, then the gravel component is 50%, and a ratio of two to one is required. This means that another 10 liters of river sand should be added to a twenty-liter bucket of gravel;

- such a solution should contain as little water as possible in order to avoid the appearance of bubbles in the future. If the composition has a high water content, then after it dries, a large number of voids form.
Tip: Another important point in preparing the mixture for the pit is that you need to mix the solution very thoroughly. This is probably even more important than the exact observance of all proportions, so it is recommended to do this with a concrete mixer, and not manually.
A closed-type compost pit can have one section, but it is better to immediately make it with a two-section one. In the second case, it is more convenient to use, especially if it is decided not to use drugs to increase the rate of compost maturation.
If the rotting process takes place naturally, it will take about two years. Then it is very convenient to use each section separately. The first year you can use one, and when the second year comes, throw away waste in the second part. As long as one compost reaches the desired state, another is used.
Do-it-yourself high compost heap construction

A wooden compost heap is easy to build even without experience in construction. At the same time, it can be made in such a way that it will not interfere with either the summer residents themselves or their neighbors.
- Racks should be installed at the corners of the pit. The base for them is made of pipes, and the part that is above the ground can be made of a bar with a cross section of 10 cm;
- One edge of each bar is sharpened to fit the pipes. It is first recommended to soak all the wooden parts of the structure in a special solution so that they do not succumb to the processes of decomposition and decay;
- Next, the bars are driven into the cut pipes and transverse boards are stuffed onto their above-ground part, which will serve as the walls of the pit;

- fastening boards is best done with self-tapping screws or metal corners, which will provide a more reliable grip;
- finished walls are covered with paint, preferably acrylic.
Of the nuances in this work, it is necessary to take into account:
- the diameter of the pipes must fit the size of the bars;
- the height of the walls usually does not exceed a meter, this is due to the fact that large and tall structures ultimately turn out to be inconvenient to use, as it makes it difficult to dig and extract compost;
- the simplest version of a removable cover is an ordinary sheet of plywood, which is attached to the back wall of the structure with hinges. The compost matures best when the lid is closed, but you still need to open it occasionally to ventilate the fertilizer.
What is suitable for composting and what cannot be put in a pit
So that the fertilizer can ripen in a timely manner and at the same time not lose its beneficial properties for the soil, you should know exactly what is suitable for the compost pit.
You can put:
- raw vegetables, fruits, berries, cereals, straw, grass, hay, ash, foliage, needles, bark, twigs, plant roots, sawdust, shredded paper, herbivore manure.
You cannot put:
- bones, excrement of carnivorous domestic animals, potato and tomato leaves, any greens after treatment with pesticides, weed seeds, any synthetic waste, as well as the leaves of infected plants.
Proper compost bin

In order for compost to form successfully, it needs certain conditions:
- moisture;
- warm;
- oxygen.
To create a greenhouse effect, the still unripe compost must be watered (especially in hot and dry summers), and if necessary, covered with a film. For a good reaction, oxygen is also needed, its access is provided by loosening the waste with a pitchfork.
If it is not possible to equip a pit, water it, and so on, then you can simply put organic waste in one place, where compost will form over time. This, of course, is not the best way in terms of aesthetics, but it has a right to exist.
- In order for such a heap to be equal in functionality to a compost pit, special preparations must be added to it.
- You will also need to periodically cover with dark material to speed up the compost ripening process. In a covered pit, compost will be processed within 3-4 months, but if you keep it open, the process will take about six months to a year.
- It is impossible to put polyethylene at the base of the heap, which will block the free access of water and oxygen. If the ground under the compost is covered with synthetic material, then the moisture from the heap will evaporate very quickly, but it will not be able to rise from the ground.
- When laying out the contents for the compost in a pile, it is recommended, if possible, to alternate manure, grass, waste and earth. During extreme heat, you need to water the pile so that the right amount of moisture comes in and the composting processes are not disturbed.
- It is convenient to make two piles side by side or one large one, but on two sides, this is a simplified version of a two-section box. When the compost is ready on one side and can be regularly laid out on beds, waste is thrown out on the other side of the pile.
- When the compost pile reaches a size of about one meter in height, it is advisable to use fertilizers. To do this, several deep holes are made and the solution is poured into them. In the warm season, Californian worms can be added to replace them.

The correct location of the compost pit
Before you equip a compost pit in the country, you need to choose the right site for it:
- From sources of drinking water (wells, wells, etc.), the pit should be located at a distance of at least twenty-five meters;
- If the site is located on a slope, then the pit is equipped below the source of drinking water, this is necessary so that the rotting runoff through the soil could not get into clean water;
- It is necessary to take into account the most frequent wind direction in order not to cause significant inconvenience to neighbors, especially if the pit is not covered with a lid and exudes strong unpleasant odors;
- There should always be free access to the pit, which will provide convenient removal of garbage using buckets or removal of humus using a wheelbarrow.

- The compost pit is made as far as possible from residential buildings. It should be in partial shade, since under the sun's rays all processes occurring in it will slow down.
- The site for the location of such a pit must be flat.
- Do not allow water to stagnate in it - this will interfere with the access of oxygen.
Plastic compost bins

- This method is good for those who can allocate funds for its purchase and want the appearance of their site to be more presentable. It installs absolutely anywhere. But you will have to take into account the presence of an unpleasant odor, because you will need to regularly open the lid to ventilate the contents of the container.
- The constant access of oxygen to the compost is provided by special holes, which are also necessary so that excess moisture does not stagnate.
- The peculiarity of using a plastic container for a compost heap is that it is necessary to use special preparations to speed up the composting process. Earthworms can provide a replacement for drugs if they are specially planted in this container.
To save money and benefit the yard, a compost pit is a great fertilizer solution. It is very simple to equip and operate it, you just need to know a few rules. But at the same time, you will always have ready-made fertilizer for the soil on the site.
Photo of a compost pit