ADB stands for Android Debug Bridge, that is, a debug bridge for Android. The program is developed for the Android operating system and works in conjunction with a computer. It makes it possible to change files, use root rights, and restore the system.
ADB run, in turn, is an application that allows the user flash a device running on Android. It includes ADB and Fastboot. These applications are familiar to everyone who has encountered flashing their gadget.
ADB, ADB run and Fastboot
Android Debug Bridge allows you to manage Android using a PC. This application is installed directly on a laptop or computer, which is connected to a mobile device via a USB cable in debugging mode. Then after launch It is possible to execute special commands that allow you to initiate any actions with the gadget.
The utility allows perform such actions, How:
Most often, the application is installed together with the Fastboot utility. This mode allows you to reset all settings to factory settings, which is why it is sometimes called Recovery - a recovery function. In addition, you can install firmware using Fastboot, but in this case only work via a PC is possible.
These two programs are better install together, allowing you to access more options.
In turn, ADB run simplifies work and automates common commands and actions most often used by users. Although it has a console, it has a visualized appearance and consists of 14 points.
This program is much simpler, it is suitable for those who find it difficult to understand the command line, who do not know how to work with it. It already provides a menu and items that you can select. She's different simple interface, great functionality, without requiring additional software installations.
All utilities can be downloaded, installed to operate and update your mobile device.
How to use ADB run
To understand how to use the utility, you need to become familiar with the installation and basic commands. Connection to the gadget is carried out using a computer and a USB cable or via a wireless network.
You can understand that the connection has taken place by entering adb devices. The message should then appear: " List of devices attached“, indicating that the connection has occurred. Connection via Wi-Fi occurs using adb wireless. The mobile device must be rooted.
To work, you need to enable USB debugging on your gadget. Usually this item is located in the settings. If it is not there, you can look for it in the developer options. This menu is hidden; to enable it, you should find the line with the build number in the Android settings and click on it several times (5 to 10 times). After about half of the clicks, a notification will appear that you are doing everything correctly, and then you will be provided developer rights. Then you can return to the settings, where the “developer options” item will appear. This is where debugging is enabled.
The utility has a number of positive qualities:
- Easy to install.
- Simple controls.
- Easy check for updates.
Installation
Before installing ADB, you need to download it, this can be done for free. You can download ADB on the website 4pda. The official resource does not allow you to download the utility separately, but only with the entire Android SDK package. The program is installed using the standard installation wizard. 
The whole process is simple and intuitive. The installer himself offers hints, directing all actions.
After this, you need to install drivers for your mobile device, otherwise the application will not see the device. The easiest way is to use the automatic installation utility Adbdrivers. But you can also download drivers for Windows 7, 8 or 10 from the manufacturer’s official website.
If there is no installer or driver, you can install manually, for this:

Overview of the ADB run interface and command
Let's look at all the menu items offered by the program and how they work:
- Device attached? - responsible for connection between PC and smartphone, but you must enable USB debugging.

- Move – is responsible for moving files from a laptop to a smartphone. There is both automatic and manual movement available here.

- Install Android App to Device – allows you to install applications, with options for saving and moving to a memory card.

- Reboot Device – various reboot modes Android:

- Fastboot – firmware, system flashing. All settings are set automatically.

- Unlock Gesture Key – unlocker graphic key, also copes with PIN codes and face codes.

- Manual – allows you to enter commands manually.

- Check Update – checking a new version of the program.
- Intsall Bootanimation – installs and changes animation when turning on the device.

- Memory and Partitio – introduces blocks and sections Android.

- Run Script - working with scripts.
- Backup – create a backup copy.
- Odex – odex-ing of the firmware, taking into account various parameters.

- Screenshot/Record screenshots, video recording capability.

- Exit – accordingly exit from the program.
Flashing your phone using ADB run
The program allows you to change the gadget's firmware. To do this, just install it, connect to your PC and use the Fastboot utility. The files that need to be flashed must be in the same folder as the utility.
First you need translate device into bootloader mode using the menu. 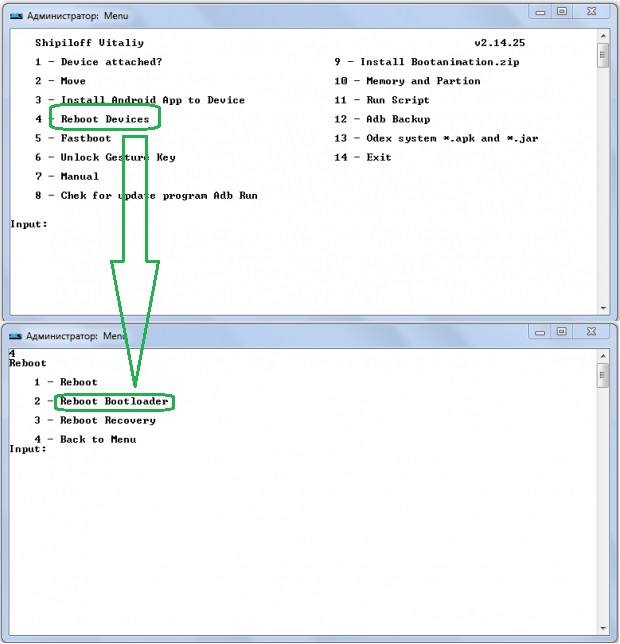
Then you need to unzip the pre-downloaded firmware files. After this, select the item Run SCRIPT and place the firmware files in the window that opens and close it. Click on Enter. The firmware has started. While the process is in progress, you cannot remove the cable from your phone or computer.
The program makes it possible to reflash all partitions step by step or only some:
- system;
- cache;
- data;
- recovery.
Using ADB
Using the utility allows you to:
- reboot gadget using various modes;
- carry files, folders from phone to PC or vice versa;
- work with applications by installing or removing them;
- work with firmware;
- perform various scripts;
- remove the lock graphic key.
The utility is usually installed and used together with the Fastboot application. 
Installation
You can install the application by visiting the official website. Necessary download archive SDK tools for Windows, having previously agreed to the terms of use.
After this it is required unpack the archive, go to the tools directory, select the bin folder there and access the sdkmanager. It just allows you to install the program. 
The next step is to work on the Windows command line. Let's run it as administrator. After that, open the sdkmanager folder, prescribing the path to it C:\sdk-tools-windows-3859397\tools\bin. 
During installation, read license agreement, press the Y key. 
If the whole process went correctly, then the platform-tools directory with the files adb.exe and fastboot.exe will appear in the root folder. 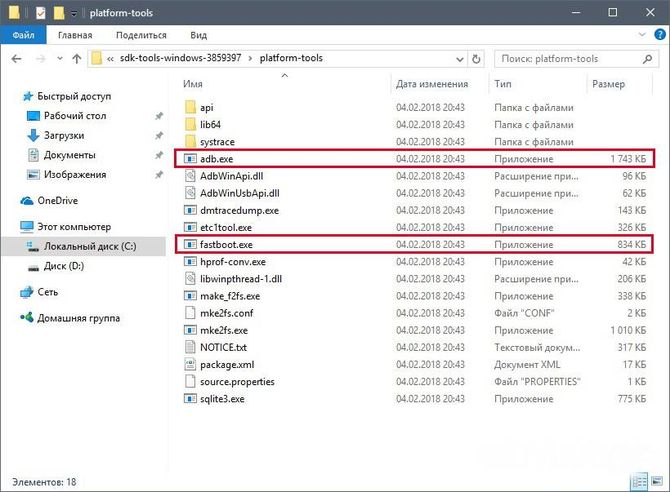
How does ADB work?
Once you install the program, you can work with it. To make sure that everything is functioning correctly and normally, you should use the command line to open the folder with the adb and fastboot files and run the adb.help program. What you get should look like the screenshot below: 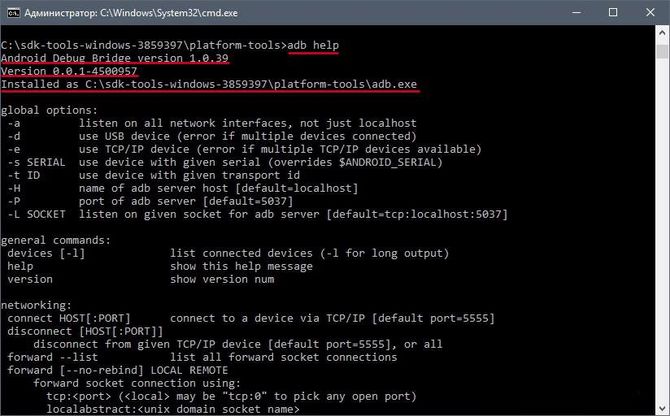
Now you need to connect the device to the PC and check whether the application can see it. The connection is made using a USB cable. Should select mode MTP – file manager, and then the “for developers” option. If such an item does not appear, then you should go to the “ about the phone", click 7-10 times on the build number. After that, in the “for developers” item that appears, you need to select “usb debugging”.
Then enter adb devices in the system command line. This will allow you to see information about the device. It looks like the screenshot. 
Afterwards, the fastboot program is checked, the fastboot reboot task is written in the console, and press enter.
After checking the functioning of the task, you can safely work with the program.
ADB Commands
The utility involves working with a smartphone and performing various actions. There are only 10 basic ADB commands:

It is enough to specify the path to the folder from which the information is copied and into which it is copied. 

It is also possible to access the “recovery” menu.

But it is worth remembering that after running this program, all data on the phone is deleted. 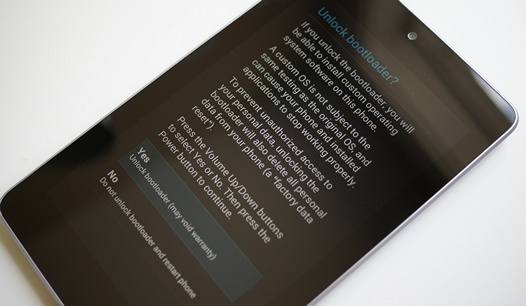
- Shell – it can be used in two ways. The first is to enter it into the command line, followed by typing. This will allow you to enter terminal mode, where it is possible to execute any Android shell commands. But you should use it carefully, as the device can be seriously damaged.
Second option - single input actions. Thus, you can, for example, change the access rights to some folders.

Bonus utility – Sideload. It is suitable for Nexus device owners, allowing you to update official firmware on all company devices.
FAQ
What to do if ADB does not see the device
If suddenly ADB does not see the smartphone, then you need to check first USB debugging or check for ADB drivers on your PC.
It is also worth paying attention to other reasons:
- check the usb cable, it performance;
- check installation Android SDK, availability of its latest version;
- costs try switching mode from MTP to camera and back;
- Can try reconnecting device or restart the computer.
After all these steps, the program should work and the device should be detected. This problem often happens with unknown Chinese brands that are not familiar to the program.
ADB or fastboot is not an internal or external command
Sometimes when you enter a number of commands in the console, you may encounter a system refusal to perform the entered action. A message appears that the command is not internal or external. This is often due to the fact that the path to the file is not specified, who serves the team.
The reason for this message may be that the system does not have information about the location of the files. It is possible that the required component is not in the system, then it needs to be installed.
In order to get rid of this error, you need to give the program the path to the required files. You should copy it to the clipboard.
- On the desktop you need to select " My computer", click on the right mouse button, select the column " properties»;
- now select " additional system parameters" and then "environment variables";
- there you need to find " system variables"and the Path parameter, to which you need to add the copied path and confirm the changes;
- then we open the console and enter the required action, after which the error disappears.
Alternatively, after all the manipulations it’s worth to restart a computer.
Many of you have more than once encountered a situation where, in order to get root rights on an Android tablet or smartphone, install new firmware, restore the system and other things, you had to connect it to your computer and run a number of commands adb or fastboot, through the command line (terminal) window.

Most people enter these commands without understanding what they mean, simply following instructions found on the Internet. And if you want to get a more complete understanding of what happens when they are executed, then today we will get acquainted with a dozen basic commands that every advanced Android user should know.
But before you start getting acquainted with these commands, let me remind you that before your tablet or smartphone can execute them, you must make sure that your computer has Android SDK, and on the tablet or smartphone itself, the option “ USB Debugging».
How to install the Android SDK, which contains the adb and fastboot programs, read. Let me also remind you that in Android 4.2 and higher, the “USB Debugging” item is hidden, and you can read how to access it.
For those who have forgotten how to launch a command line window in Windows, let me remind you that the easiest way to do this is by clicking on “Start”, after which you will need to type cmd in the search window and press the “Enter” key.
After all the preparatory work is completed, you can connect the device to the computer using a USB cable and start learning the commands.
1 adb devices command
This is probably the most important of all ten teams that will be discussed. Using it, we can find out whether the computer sees your Android device, and if it does, then whether it can communicate with it through terminal commands.
If everything is fine, then after entering the adb devices command in a Windows command line window or Linux terminal, you should see a line with the text List of devices attached, after which there will be a line consisting of the serial number of your device and its status - offline or online:

The offline state means that the device is in sleep mode. The online state signals that the tablet or smartphone is ready to carry out your commands.
2 adb push command
Using the adb push command, you can copy files to your tablet or smartphone. In this case, you must specify the path to the folder where you want to place the file on the device and the folder on the computer from where the file will be copied. The second path is not necessary if the file is located in the same folder where the adb program is located.
Here is an example of copying a video file superfreak.mp4 from a computer to a device, to the /sdcard/Movies folder using the adb push superfreak.mp4 /sdcard/Movies/ command

For Windows users, I would like to remind you that in Android, when specifying the path to files and folders, a forward slash - / is used, and not a backslash, as you are used to.
3 adb pull command
If the adb push command is used to transfer files to an Android device, then adb pull is used to copy files from the device to the computer. Just as in the previous case, you must indicate the path where you want to get the file on the device and the path where you want to place this file on the computer. The second path is not necessary if you want the file to go to the folder from which you ran the adb program.
Here is an example of copying the superfreak.mp4 file from the /sdcard/Movies/ folder of your tablet or smartphone to the Windows 8 desktop of user Jerry, C:\Users\Jerry\Desktop

Learning Android. Ten basic ADB and fastboot commands you should know
If you want the file to go to the folder you ran adb from, just enter the command adb pull /sdcard/Movies/superfreak.mp4
4 adb reboot command
This command is often used during the process of rooting or installing new software, when we need to accept the changes that we have made on our device. After you enter the adb reboot command, your tablet or phone will reboot.

This command is also important because it can be placed inside scripts, which allows you to reboot the device automatically after completing all the necessary operations.
5 Commands adb reboot-bootloader and adb reboot recovery
Using adb, you can not only reboot your Android device, but also reboot it into the bootloader. This mode is needed so that we can unlock the bootloader, which is necessary to obtain root rights and further install alternative firmware.

Some devices can be bootloaded using a specific key combination when they are turned on, but often the adb reboot-bootloader command is the only way to access the bootloader.
Similarly, the adb program can be used to access the recovery menu of a tablet or smartphone or recovery. This can be done using the adb reboot recovery command
6 Fastboot devices command
If you rebooted your tablet into bootloader mode, it will stop accepting adb commands. In this mode, we can communicate with the device using the fastboot program.
Using the fastboot devices command, you can find out if your device can accept commands from this program in bootloader mode. Since fastboot is a very powerful tool, some Android device manufacturers do not provide access to this program in bootloader mode.
Just like with adb, after entering the fastboot devices command you should see the serial number of your device.

Often the reason fastboot does not work is the lack of the necessary Windows drivers for your device.
7 Fastboot oem unlock command
Some manufacturers (for example, HTC or Asus) release special utilities that allow you to unlock the bootloader of their tablets and smartphones, after which it will be possible to install alternative recoveries on them, such as ClockworkMod or TWRP and firmware from independent developers (custom firmware).
However, in many cases, you can unlock the bootloader of an Android device using the fastboot program. This is very easy to do - when your tablet or phone is in bootloader mode (step 5), just enter the following command in the command line window: fastboot oem unlock.
After this, you will need to follow the instructions that will be displayed on the screen of your tablet or smartphone.

Attention! After executing the fastboot oem unlock command, your device will be completely cleared of any programs you have installed and your personal data will also be deleted.
8 adb shell command
The adb shell command often confuses some novice users.
There are two ways to use this command. If you simply type adb shell in the command line window and press the Enter key, you will be taken to terminal mode, or the command shell of your Android device, where you can execute any Android shell commands.
Below you can see the result of running ls command in Android shell

This mode is well known to Linux and Mac computer users. If you are familiar with bash shell commands, you will have no problems working in this mode. Otherwise, I do not recommend using the adb shell mode until you understand the purpose of all its commands, since in this mode you have full access to the files on your device and can accidentally cause irreparable changes to the operating system.
The second way to use adb shell is to execute a single Android shell command using this construct: adb shell<команда>. For example, you can change file permissions using a command like “adb shell chmod 666 /data/filename”
9 adb install command
With the adb program, you can do more than just copy files to and from your device. This program also allows you to install applications on Android devices in the form of apk files. There is an adb install command for this. It's a bit like the push command: you have to specify the path where the file with the application you want to install is located. Therefore, the easiest way is to first copy the apk file to the folder with the adb program, after which you can install the program using the command adb install ApplicationFileName.apk

If you need to update the application, then in this case you need to use the -r switch and the command will look like this: adb install -r ApplicationFileName.apk.
Using the -s switch you can install applications on the memory card (if your firmware allows this). The -l switch allows you to lock the application during installation (by installing it in the /data/app-private folder). There are other keys for more advanced functions, but their description is the topic of a separate article.
10 adb uninstall command
Lastly, you can remove apps from your tablet or phone. To do this, use the command adb uninstall ApplicationFileName.apk
This command has the -k switch, which allows you, when deleting an application, not to delete its data and cache, but to leave them on the device.
If you want to learn how to use Adb Run, then most likely you are already familiar with the main program - Adb. If not, then consider these two tools for Android users. What are utilities needed for, how to configure and use them?
Program
So what is Adb? This is a program that gets its name from its acronym. ADB is an Android debug bridge. A tool for debugging, troubleshooting utilities, and unlocking gadgets on this operating system. These are the main features of the program, but if you are well versed in this topic, you will learn about a dozen more hidden options.
Installation
To understand how to use Adb Run, you need to install ADB on your PC. To do this, you need to download it from the official website of the developer. In principle, many sites make it possible to download this utility to your computer, so there will be no problems with the search.
Connection
To understand why ADB, and therefore Adb Run, is needed, let’s look at the basic commands. For example, if you are not sure that the computer sees the phone correctly and will work with it correctly, you can enter the adb devices command. This way you can make sure that the connection is stable.
After you use the command, the program will display a message stating that List of devices attached. If you don’t see a similar phrase, then most likely the problem is either with the cable or with the drivers. You will have to double-check the functionality of the device and find out the reasons why the PC does not see the smartphone.
If you find out that the cable is not working, you can try connecting the gadget via a wireless network. Wi-Fi connection is made using ADB Wireless. In addition, the device must have Root permissions.

Then enter the adb connect ip:port command. Instead of ip:port, enter the value that is set for your network address.
Possibilities
Since the question of how to use Adb Run is related to the use of ADB, it is worth understanding what capabilities the main utility hides. For example, thanks to the code, you can install an application that is located on your PC. To do this, you need to write adb install, and then specify the path where it is
In the same way, you can transfer a regular document from a computer to a phone. The algorithm is the same, only the command has changed. We enter adb push, and then indicate the address of the location of the file that should be transferred to the gadget. If you need to do the opposite operation, enter adb pull. Only the first address indicates the folder on the phone, and the second is the place where you want to save the transferred document on your PC.
Adb Run
This is a tool that makes your work easier. It is especially convenient for those who understand how to use the Adb Run program. The utility is designed to simplify working with ADB and makes the functionality of the latter program clearer. The essence of the additional tool is that it automates common user commands and greatly simplifies actions with the console. Adb Run can also reset the pattern.

The program looks like a console. It consists of 14 items, and navigation through menus and sections occurs by selecting the desired number and the Enter confirmation button.
Preparation
Before learning how to use Adb Run this program, it is important to remember about USB debugging. This step is often forgotten, after which the program simply does not see the phone. To do this, you need to go to settings, find the “About phone” option there.
In the latest versions of the operating system, you need to find the line with the serial number and click on it several times. A notification appears at the bottom, first that you are on the right track, then that you have become a developer. When you see such a message, you can return to the settings, the “Developer Options” item should appear there. You can enable deferring there.
Review
A short overview of the utility and how to use Adb Run for Android. The first point right away is to check that the gadget is connected correctly. If you forgot about deferring, the program will immediately detect this. The first item is called Device attached. By selecting it, you will find out whether the phone is connected to the system.

Next - point Move. Instead of entering the commands that were described earlier, it will be enough to choose between two items. The first one is responsible for transferring files from the computer to the phone, the second one is responsible for the reverse process.
Third point Install is responsible for downloading applications to the gadget. There are five options available here. Among them are copying the program, installing it normally or on a memory card. It is possible to remove utilities from your phone via a PC or move them.
Paragraph Reboot reboots the device. It does this in three options, including a normal reboot, switching to bootloader mode or going to the Recovery menu. The next line under the fifth number is responsible for the firmware of the device. Fastboot is a menu that has 10 items. Moreover, they are all highly specialized; if you do not know what to choose, you will have to consider each sub-item.
In the next paragraph - Unlock Gesture Key- you can learn how to use Adb Run with Windows 10 if you need to unlock the pattern. Often users, using this protection method, forget it, but when failures occur, this utility comes to the rescue. The sixth menu contains items with different graphic key options. You need to choose the one you forgot.

Point seven - Manual- needed by those who want to enter commands themselves. There may be directives that are not in the list presented. This is what this menu item is for. There is also a special menu for owners of HTC smartphones. In it you can unlock Bootloader, change CID and get S-OFF.
The eighth item checks for utility updates. The ninth is a creative option for those who are tired of the animation when turning on the device. If you want to replace it or disable it, then you need to go to the Intsall Bootanimation menu.
The tenth paragraph provides information about all existing blocks of the device. There are sections here, perhaps hidden, or those that are difficult to reach. Run Script is the eleventh menu for using scripts. Backup is the twelfth point, which creates a backup copy of the entire gadget. Convenient if you need to do a Reboot.
The next menu is responsible for odexing the firmware. If you are unfamiliar with this process, it is better not to experiment on your own. The fourteenth point is working on screenshots. The last menu is needed to exit the utility.

conclusions
How to use Adb Run on Windows XP is clear. There is no difference at all with how this program works on Windows 7 or 10. Therefore, no problems should arise. The above instructions are suitable for all occasions.
For Linux owners there is also an option that is easy to use. You just need to install a special version.
How to update if Recovery does not have the required item (for example, apply update). The update can then be done using ADB Sideload. Let us recall that there are several trivial ways to obtain the update and apply it:
- Over-the-air (OTA) update, if the manufacturer took care of releasing and distributing the update file in such a convenient way
- Update via Recovery, when you download the update file and select it via Recovery (for example, using the “apply update” item).
What to do?

First, install the basic drivers so you can get started with Sideload. Next, unpack the archive with ADB to the root of drive C, and place the update there.
Note: you do not need to unpack the update archive.
How to update via Sideload?

First, boot your device into Recovery mode (usually, you need to turn off the device and hold down the Vol (-) + Power or Vol (+) + Power keys).
Select "Apply update from sideload". Wait for the “Now send the package adb” item to appear, and then connect the USB cable to the PC.
On your computer, launch the command line to run the necessary commands:
- cd c:/adb - after cd, enter the location of the folder with ADB (specify the path to it)
- adb sideload filename.zip - instead of filename, enter the name of your update archive
After applying these commands, the update file will be downloaded and installed on your Android. Thus, you can flash not only OTA updates, but also full-fledged firmware (official ones, of course, which are intended for stock recovery).
In this article we will look at the standard ADB utility for managing devices withAndroid mobile operating system .
Introduction to ADB
Manage all aspects of Android mobile devices - memory, file system, installing and uninstalling programs, etc. - you can not only on the mobile device itself, but also from a personal computer by connecting a smartphone or tablet to it via a USB cable. For this purpose, special proprietary software is often included with the mobile device.
The adb program establishes a connection between the device and the computer, allows you to send commands to the device via a USB connection and perform various manipulations with the Android system. Advanced users encountered it when obtaining root rights and installing ClockworkMod Recovery.
The utility is part of the Android SDK intended for developers. Also, the smartphone manufacturer can supply this utility along with the drivers for a specific mobile device. But more details about installing the utility are below.
Key features of the ADB interface:
- View Android devices connected to your PC;
- viewing the Android system log;
- copying files from/to an Android device;
- installing and uninstalling applications on an Android device;
- clear data partition on Android device;
- run various Android device management scripts.
Preparing for work
First you need to install the adb console utility itself. There are several options for obtaining it.
1. Usually on Windows systems it can be installed along with proprietary smartphone or tablet drivers. You should usually look for it in the Program Files folder in a directory with the name of the smartphone brand.
2. A universal way to obtain adb for users of all operating systems is to install the utility through the Android SDK manager.
For Linux users, there is no need to install drivers, but you need to write a rule for udev. Below is the sequence for creating a rule for Ubuntu.
To do this, you first need to find out the values of the idVendor and idProduct variables of your mobile device. This can be done using the lsusb command in the terminal, connecting the device via a USB cable, as a result of which information similar to this should be displayed:
Bus 002 Device 006: ID 12d1:1038 Huawei Technologies Co., Ltd.
Here idVendor is the hexadecimal digits after the ID and before the colon. IdProduct is the next four digits after the colon.
After this, create the file /etc/udev/rules.d/51-android.rules with chmod 644 rights and with the following content (substitute your ID and user values):
SUBSYSTEMS=="usb", ATTRS(idVendor)=="12d1", ATTRS(idProduct) =="1038", MODE="0666", OWNER="user"
$ sudo /etc/init.d/udev reload
In the first and second cases of receiving adb, it is very advisable to set up environment variables so as not to enter the full path to the installed utility in the console when starting. How to do this has been written more than once on the pages of KV, so we will not go into detail on this issue.
Setting up your personal computer is now complete. USB debugging must be enabled on your mobile device: "Settings - Applications - Development - USB Debugging". Connect your phone via USB cable and DO NOT MOUNT as SD!
To get absolutely all adb capabilities, the mobile device must already be rooted, and the Busybox package (available on Google Play) must also be installed. But you should always remember that installing root rights in some cases may void the warranty on your device.
Now you can start working with adb.
Working with adb
Let's look at some adb commands. Open the console and run the command
$ adb devices
This command will display a list of devices connected to the PC. Something like this should appear
List of devices attached
4CA94Dxxxxx device
$ adb reboot
$ adb reboot recovery
Installing an apk package from a computer
$ adb install<путь_к_apk>
Removing a package
$ adb uninstall
View the device operation log
$ adb logcat
After which you will see dynamic output of Android system messages. If you perform any manipulations with the device, this will be immediately displayed through the output of corresponding messages. Exit debugging mode using the Ctrl+C key combination.
And with the help of ADB, you can run a real Unix shell on your mobile device.
$ adb shell
By launching the shell, you can use all UNIX commands available on the device - cat, ls, df and others, as well as run scripts.

If you have root and Busybox, then you can generally do whatever you want with your mobile device. So, you should be careful when using ADB.
A complete list of all ADB commands can be obtained by running adb without parameters.
The adb utility may seem complicated to many. In future articles we will look at different shell programs that make working with this utility easier.
Mikhail ASTAPCHIK


