Every day, on the way to work, we dream of long-awaited holidays, weekends to go to your favorite summer cottage, enjoy spending time with family and friends, and merge with nature.
A wooden chair in a country house is an excellent element of the interior, allowing you to relax comfortably and drink tea on the terrace.
Today, a cozy, well-equipped dacha should not be an unattainable luxury that requires exorbitant expenses. Schemes, drawings, technologies, Internet resources offer hundreds of ideas for creating garden furniture.

We invite you to create a chair with your own hands for your home or cottage.
Throughout our lives we are surrounded by furniture. Furniture production technology is evolving and improving. Garden furniture, designer, author's- it's everywhere, we're surrounded by furniture! It’s natural to want to purchase a high-quality, practical, stylish item for your garden at an affordable price.

Assemble a chair with your own hands for summer cottage or a private house can be owned by any owner.
Innovative furniture showrooms and designer garden furniture stores provide a range of services, selling stylish wooden chairs, for children and adults, with or without armrests, but not every average family can afford this kind of pleasure.

Your favorite area will be significantly transformed if it is decorated with luxurious, reliable chair, made with your own hands.
It is not necessary to resort to enormous expenses to purchase a fashionable piece of country furniture. A handmade product will provide comfort and will harmoniously “fit” into the design of your favorite garden. Flight of fancy, list necessary tools– everything you need to make your dreams come true in everyday life!

Wooden furniture has been and remains a classic that accompanies us everywhere.
In order for hand-made furniture to serve you for a long time, the design must meet certain parameters.

This chair is ideal for relaxing in the country and looks great in the garden.
| Transportability | As a rule, wooden chairs are used for relaxing on fresh air, under open air. In case of sudden change weather conditions, it is convenient to move the chair under a canopy if it is transportable. |
| Selection of quality raw materials | One of important conditions In making a chair yourself, hardwood plays a role. Despite the high pricing policy, design result thanks to quality material, will be excellent. These species include: aspen, oak, pine, cedar. |
| Maximum weather protection | Keeping the chair straight for a long time sun rays, heavy rain, leads to deterioration external state. Preparation for protecting the finished chair begins at the earliest stages of design. High-quality, dry lumber is the key to success. If you initially purchased low-quality raw materials, dry the boards while working. Sand, saturate the workpieces with an antiseptic, and apply hot drying oil. At the final stage, after the finished product has completely dried, it must be opened with varnish. The material to get started is ready. |

Making a garden chair is not difficult; there are no complex connections or parts.
A set of standard questions for a self-taught furniture maker
How to make a chair out of wood with your own hands? Is it possible to build a garden chair with armrests yourself? How to make Baby chair and where to find correctly drawn up drawings and diagrams? A number of similar questions will certainly flash through the mind of a beginner. home handyman. There are various models of wooden chairs for summer cottages: folding and standard metal constructions, wooden rocking chairs, comfortable chairs for two, children's and adults with durable armrests and comfortable seating.

Such furniture can be used without worrying about scratches and annual painting.
Not always, each of the above structures contributes to proper rest. Let's consider the process of making a simple model- wooden garden chair.
Preparing for work
The main components in preparatory stage is the presence of a list of tools and materials that should be in the master’s arsenal.
Necessary materials:

Required tools:
- Saw (disc);
- R ubank;
- Manual frezer;
- N wood saw;
- screwdriver;
- D rel;
- From the tube;
- L frost, tape measure, pencil.

Tools for work.
A preliminary calculation of measurements for the components of a cedar wooden chair is as follows. Dimensions are indicated in millimeters.
- Legs 4 pcs. (rear 2 pcs., front 2 pcs.)
- Two front legs – 20x254x787;
- Two hind legs - 20x76x533.
- The back of the chair is 20x279x914.
- Chair armrest:
- ABOUT it's time - 2 pcs., (20x127x406);
- Z rear support – 1 pc., (20x76x610).
- Jumper – 1 pc., (20x51x589).
- Insert strips – 2 pcs., (12x20x254).

The parts that make up a garden chair.
The process of making a chair with your own hands: step-by-step instructions
Creating Basic Parts
As a rule, work begins with a preliminary stage- preparation of basic elements. Having a drawing with detailed tips will facilitate the further process of making a wooden chair with your own hands.

Scheme for creating a garden chair with your own hands.
The most complex and time-consuming process is the manufacture of the side supports of the seat. You need to make a full-size template of the side support on cardboard.

Drawing of the side support of a garden chair.
1) Draw the first side of the part, lifting the segment on the left, then the next two at the appropriate angle.
2) Mark a perpendicular segment, heading towards point A.
3) Mark point C, draw a cutout under the transverse tie.
4) Extend the bottom side with a line, marking an angle of 75 degrees, with the vertex C.
5) Draw an arc, measuring the angle at point D. The radius of the arc is 116 mm. Connect the points with a segment.
6) Using a square grid, we draw roundings between points A and B.
7) Place the resulting template on a wooden board. We outline the parts and prepare for cutting.
To cut straight sections, you need to use a saw; for cutting out shaped sections, a jigsaw is perfect.

Drawings of garden chair parts.
IMPORTANT! In order for the cedar board to chip less, the cutting blade of the tool must be carried out in the direction of the grain!
After transferring the finished drawing to the board, we will mark a similar one according to the first diagram, using the already cut out part.
If you don’t have a ready-made armrest pattern, no problem! The circumference is not important.
1) It is necessary to make wedge-shaped supports for the armrests using a saw, bevelling the top edges by 6 degrees.

To make it easier to connect parts, use a clamp.
2)
Carefully screw the supports to the front legs. For fastening we use glue and screws.
3) We cut out the armrests and rear support.
4) By using sandpaper We clean the ends of the finished part.
5) Cut off the ends of the support.
6) We press the rear support part to the back.
7)
We mill the edges of the surfaces.

Attaching the armrests to the wedge-shaped support.
IMPORTANT! Glue plays an important role when making your own garden chair. Heat-resistant wood glue, unlike the common and frequently used PVA glue, will not lose its properties when exposed to high temperatures, moisture, does not dry out and will not crumble. For this reason, to create wooden product, we recommend using heat-resistant glue.
Assembly of parts
Before assembly, it is necessary to carefully coat each of the parts with a triple layer of antiseptic to preserve internal surfaces. After processing the material, you can proceed to the next steps.
- Align finished parts, having previously marked the drilling points.

We cut out the parts exactly along the marked contour.
- We make holes for the bolts andcarefully fasten the parts together.

Please note that the strength of the seat will depend on the placement of the boards.
- We install the rear leg perpendicular to the bevel of the support (similar to the first one, we assemble the second side of the frame), withWe connect the side parts of the wooden chair with the lower back cross member and the first seat bar.

The ends of the planks and the opposite ends of the legs must coincide, which will mean correct position backrests
- We install supports. We fix the supports with clamps.

The joint will be tight, which is what we need.
- We fix the upper backrest guide with screws, trying to align it with the lower cross member. We draw a line on all the cross boards, as well as on the bar of the back of the chair, then drill a pilot hole, holding the bar.

Afterwards, we secure the top with slats and evenly fix all the slats in turn.
- We draw the radius of curvature, cutting the strips according to the markings.

Having chosen the correct width of the final slats, we place it in place of the seat.
- We carefully sand the edges, upper surfaces of the backrest and seats. We close the screws with wooden plugs and sand them. Using hot drying oil or oil impregnation processing the finished product wooden chair.

Drying and varnishing the product is the final stage of production.
Making wooden garden furniture with your own hands
Decor is one of the important components. With the help of unnecessary things, pillows, bright rags, vine branches and painstaking work, you can achieve phenomenal results.

As you can see, making a garden wooden chair with armrests with your own hands is not at all difficult.
Fantasy, imagination, positive charge, basic knowledge, diagrams and drawings - this is the entire list of necessary components for creating a wooden chair with your own hands. Desire and a little work are the key to success!

A wooden chair made by yourself will last for many years.
While maintaining its original appearance, such a chair will perfectly “fit” into the natural atmosphere and allow you to enjoy a comfortable rest.
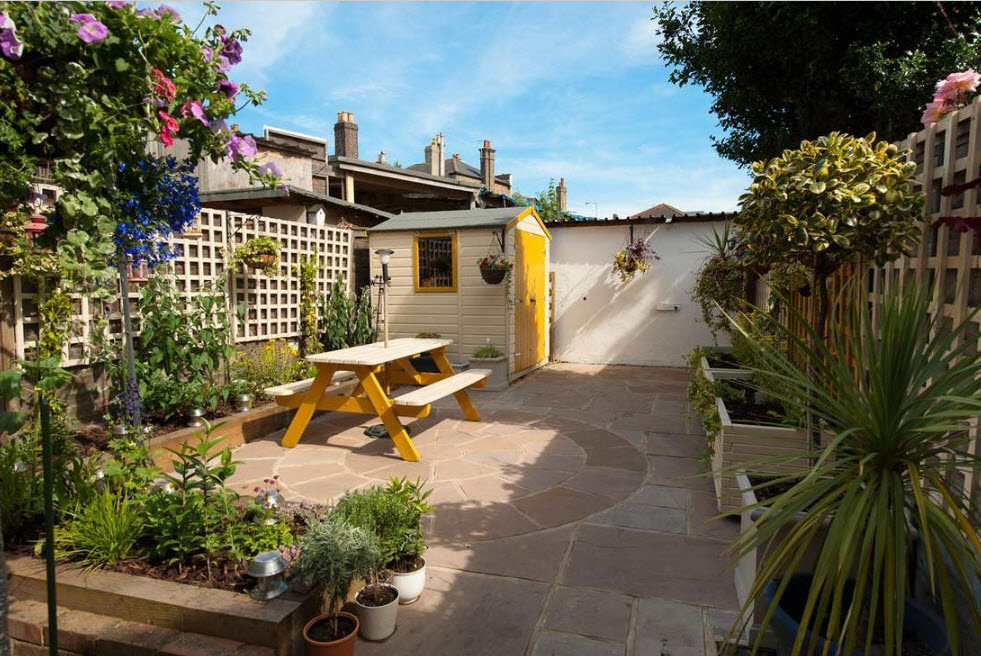
Every owner of a private house of urban or country type, country house or personal plot sooner or later faces the need to improve its territory. AND we're talking about not about creating beds and flower beds, planting trees and shrubs, but about arranging comfortable, but at the same time practical areas for relaxation, cooking and eating food in the fresh air. Imagine landscaped area It’s difficult without garden furniture, but not everyone can afford to buy one, and it’s much more pleasant to sit on a bench you made yourself or dine in the fresh air at a table that didn’t cost you a penny to make. In this publication, we have collected many options for garden furniture that you can make with your own hands. Possessing only available materials, a small set of tools and a great desire to make your site landscaped, comfortable and aesthetically pleasing.
In order for garden furniture to appear on your site, capable of becoming not only a reliable piece of exterior furniture, but also a reason for the pride of the owners and the envy of neighbors and guests, not much is needed - waste material, perseverance, a little imagination, work and effort. In this article you will find examples of making garden furniture from wood, construction pallets, and used household items.


Choosing material for making country furniture
In order for hand-made furniture to fit organically into the existing image of a summer cottage or private yard, it is necessary to take a responsible approach not only to the manufacturing process itself, but also to the choice of material. The most versatile and at the same time very malleable material from the point of view of processing is natural wood. The advantage of wood is that it can fit perfectly into any stylistic direction in landscape design. And this can be achieved through a variety of design options - from massive furniture made from logs to light and elegant products woven from wicker or twigs.


The advantage of wood for creating furniture with your own hands is that it has many manifestations. You can create a piece of furniture with minimal processing of the material in the shortest possible time. For example, ordinary hemp can be turned into stools or small stand tables. You just need to make sure that the surface of the new pieces of garden furniture is perfectly hewn and becomes safe for use.


You can create garden furniture from branches and twigs...

Or logs and large timber...

Benches and benches are an integral attribute of country life
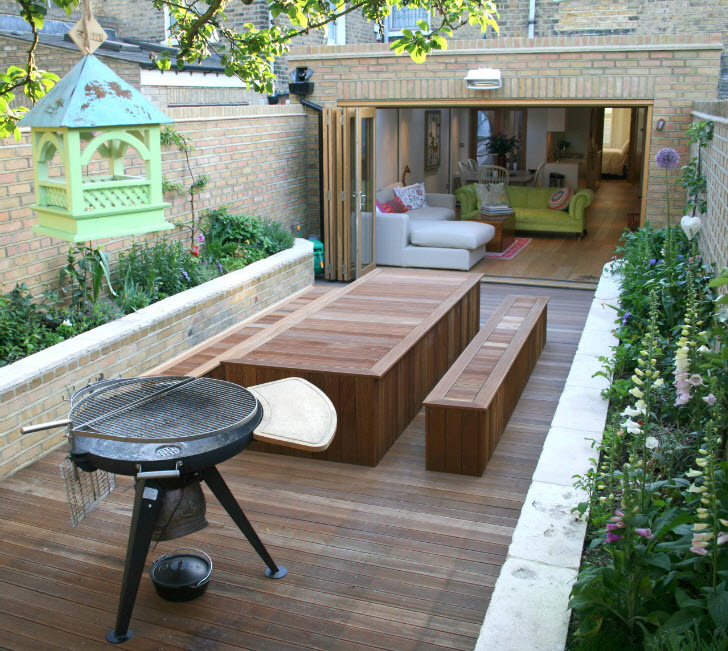
Even a very small backyard needs outdoor furniture to sit on to enjoy the fresh air, watch the sunset or watch the sunrise. Well, at the site big family or in the courtyard of hospitable hosts, where companies gather, it is absolutely necessary to take into account the possibility of seating several people.


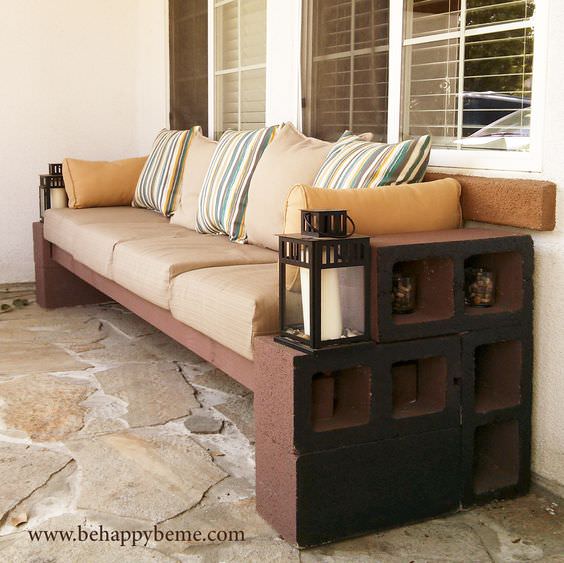
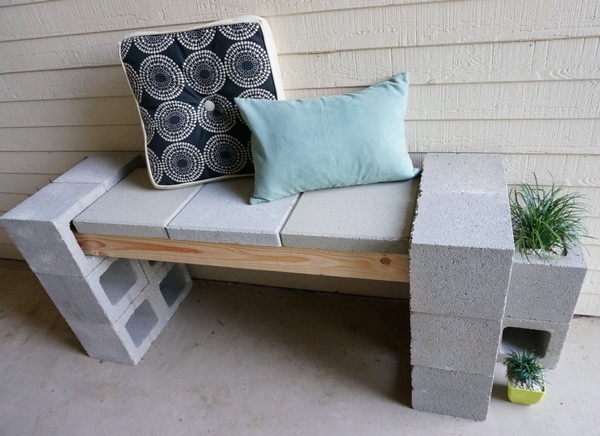
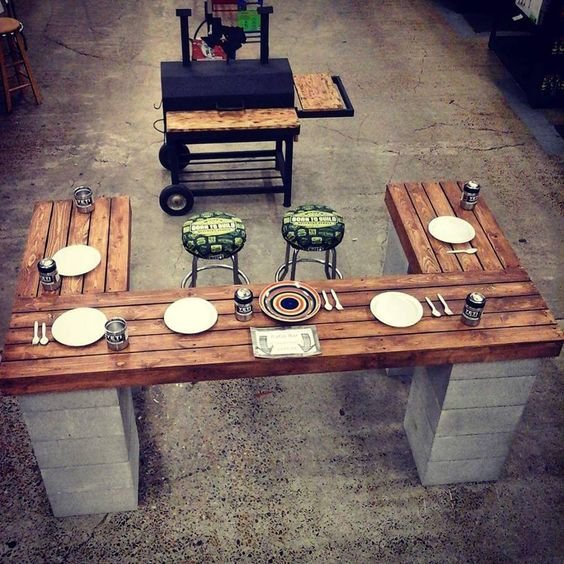
One of the most simple ways creating benches and benches - use wooden beam and cinder block with square holes. A bench or bench can be assembled like a construction set; you don’t even need to use any tools or fastening mortar or construction adhesive. The advantage of such structures is not only ease of installation, but also portability - you can easily disassemble your piece of garden furniture and move it to another place or put its parts in the shed until the new warm season.


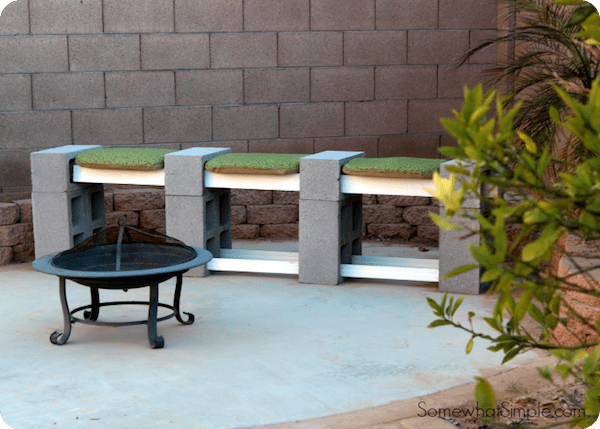
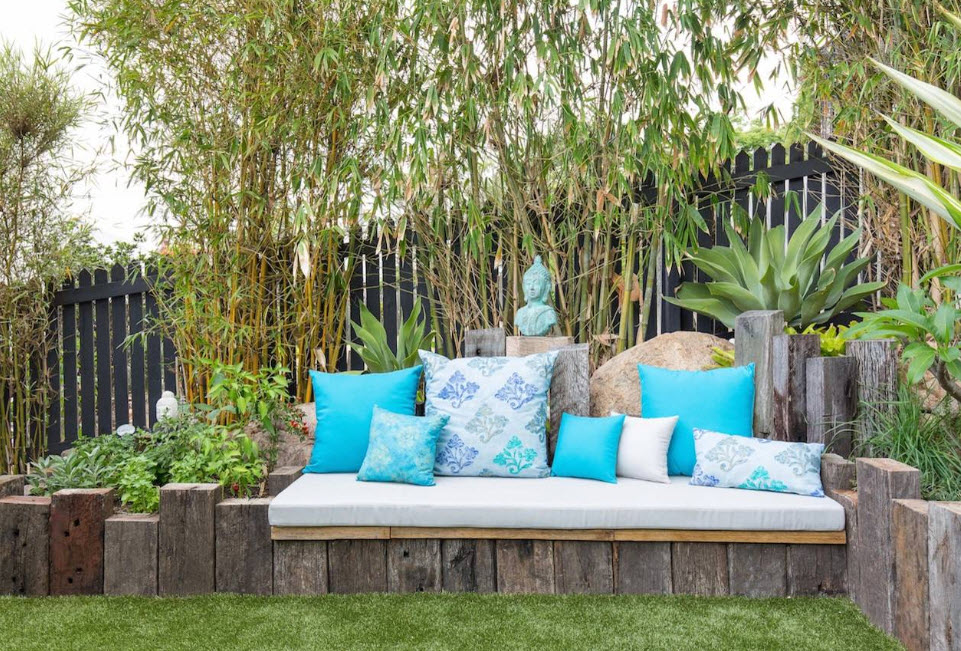
If you put it on a bench made of cinder block and timber soft seats And sofa cushions, then ordinary solid garden bench turns into a comfortable, comfortable sofa.
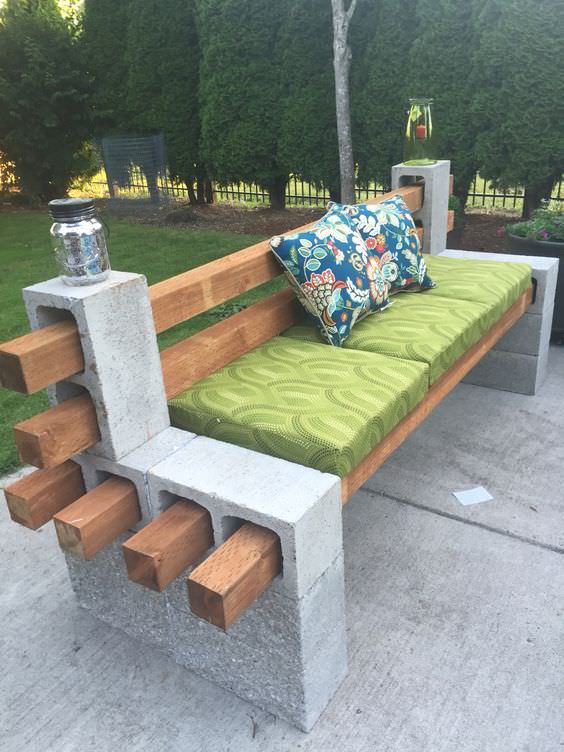


By combining materials for garden furniture, you can increase the strength and improve the appearance of the products. For example, together with wood in one modification or another, you can use metal structures, for example, parts of beds (backs, legs).

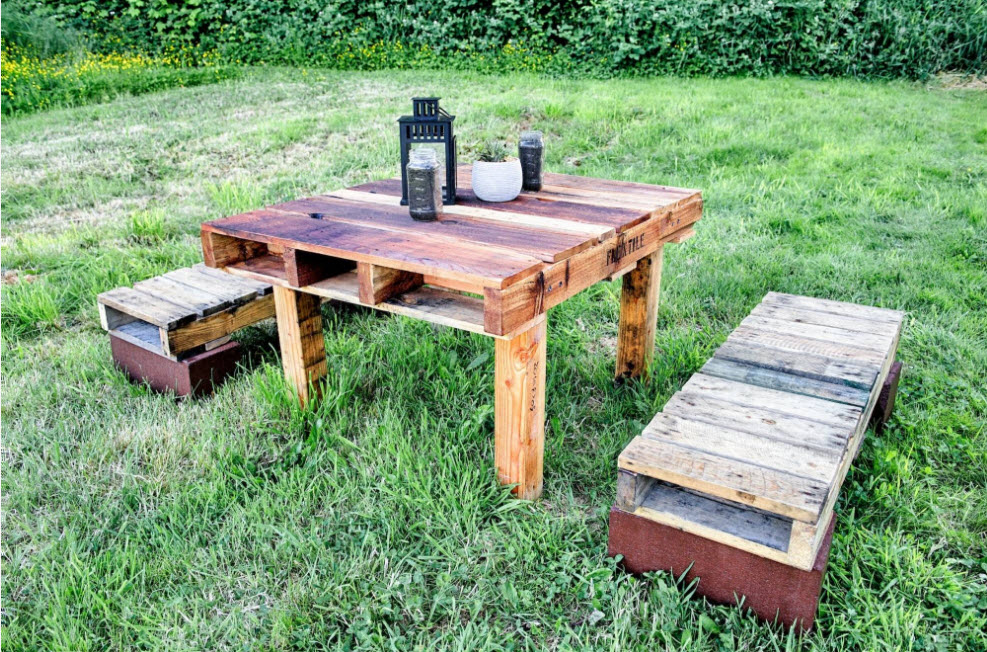
Outdoor dining area
Any dish tastes better in the fresh air. Every owner of even a tiny backyard tries to create an environment in which they can have meals outdoors. outdoors, even if we are talking about short breakfasts. Depending on the needs and size of your family, you can arrange either a small area for short meals or a spacious dinner table for receiving guests in the fresh air. It is noteworthy that both options can be implemented on your own.
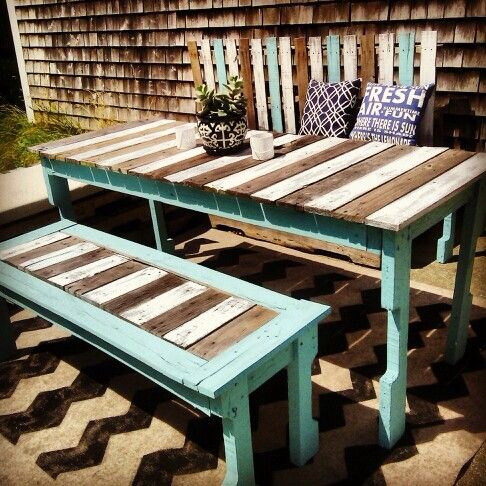


One of the simplest, but at the same time practical ways to organize a dining group in the fresh air is to make a table together with benches. The model shown in the photo will require a minimal amount of material, but will be quite spacious. The only drawback such a dining group - if you need to increase the number of people sitting at the table, then you can do this with only 2 seats (you will need chairs or stools).
Equip dining area or a segment for short meals (breakfasts and afternoon snacks) can be like a bar counter. This is easy to do using building blocks and wooden beams or boards. The only thing that needs to be selected for such a tabletop is bar stools with the appropriate height.
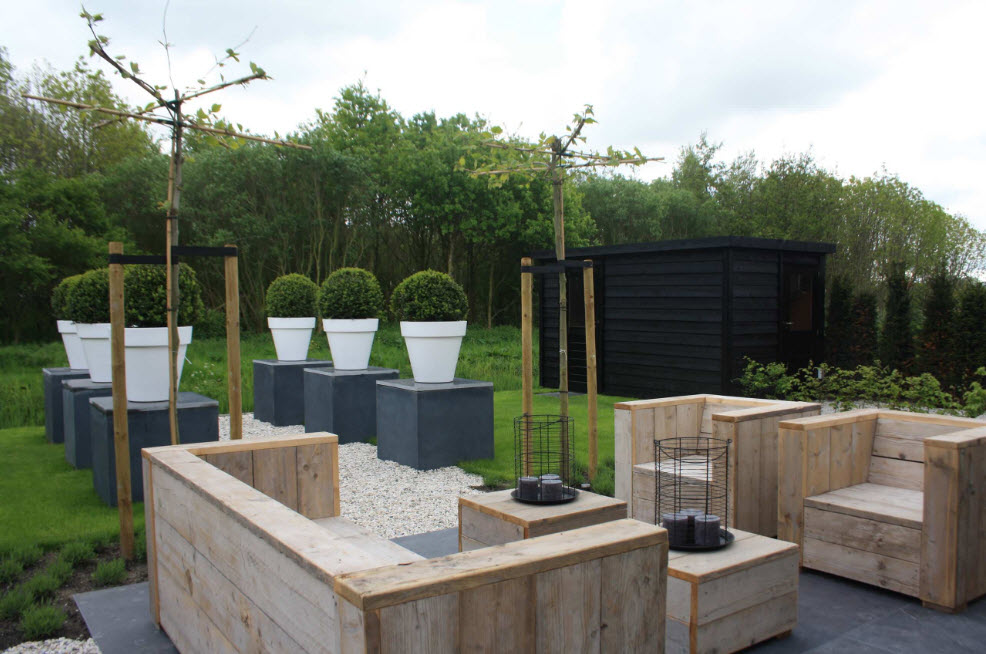
Relaxation area in a summer cottage or garden plot
Everyone associates the outdoors with different things. For some, it’s gatherings with friends and neighbors, for others, it’s reading on a slightly swaying swing, while for others, sun loungers are absolutely necessary for air baths. For all options for active and not so active recreation, you can make furniture with your own hands, and even from improvised means at minimal cost.


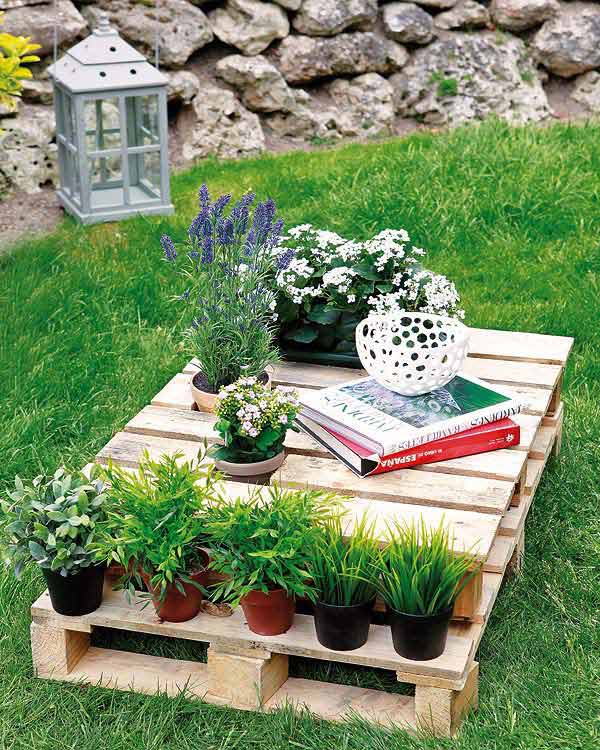
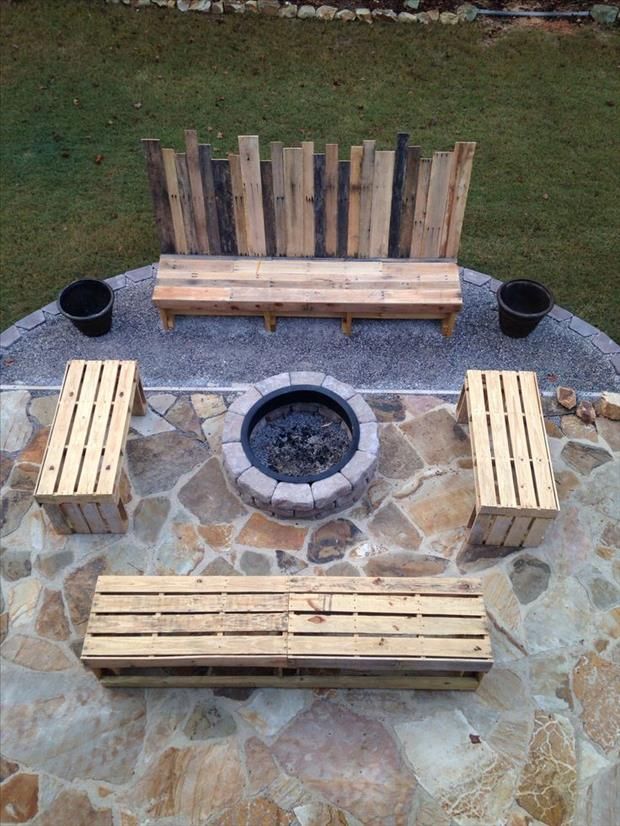
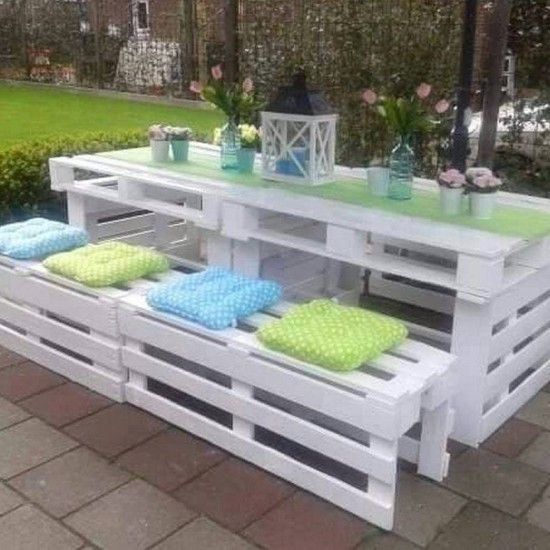
One of the most common ways to create garden furniture for a recreation area is to use construction pallets or pallets. The advantage of such an assembly is its simplicity - wooden blocks have already been formed in terms of future armchairs and sofas. Well, build coffee table even the owner of a dacha or any other land plot who had never held a hammer in his hands before. You can even use construction glue to hold the elements together.


Another advantage of using construction flights for the manufacture of garden furniture is that you can get the material at a very low price or completely free, because we are talking about used products. You just need to take care of thoroughly cleaning the surfaces, leveling and lightly polishing, and impregnating the material with antiseptics against rotting.
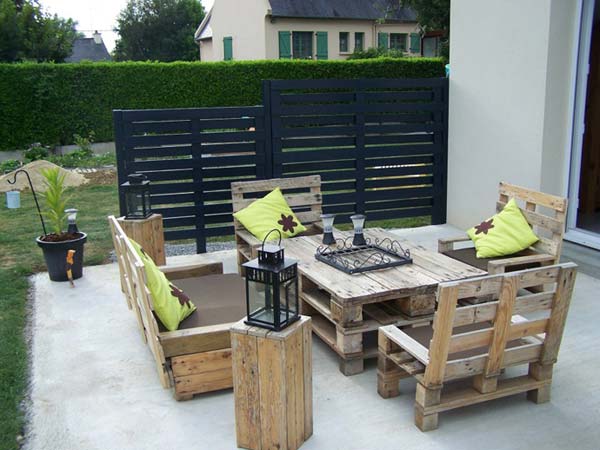

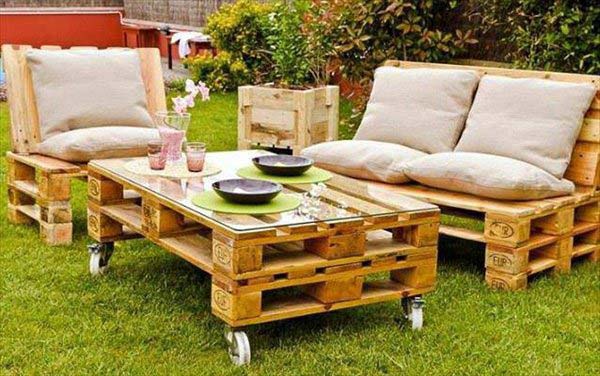


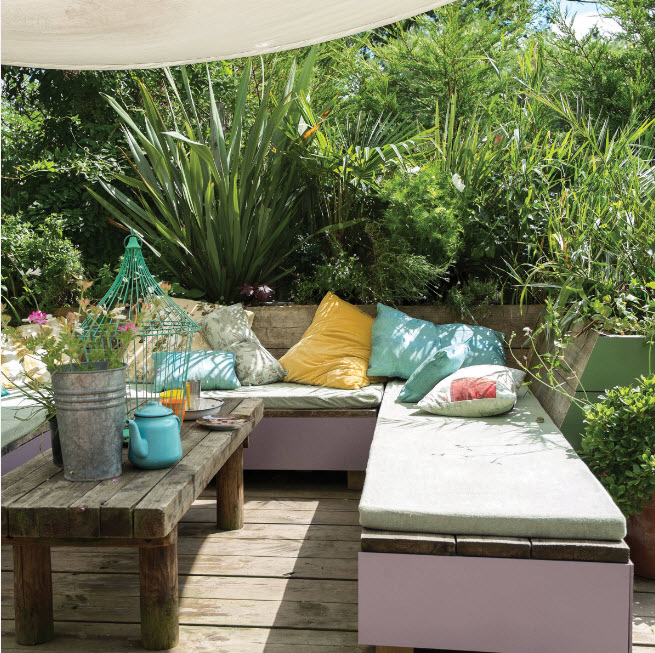
From construction pallets you can create entire compositions for outdoor recreation areas. This can be a spacious corner complex, designed like a sofa, comfortable armchairs and coffee table. Enough to put soft pillows and seats into armchairs and sofas to create a living room setting right in your summer cottage or garden plot...


With help wooden pallets you can arrange an area not only for relaxation, but also for sleep. A summer bed or just a layer of construction pallets with a mattress is an excellent opportunity to create a bedroom in the fresh air - just take care of a canopy over the sleeping area to protect from the sun.


It’s easy to build a comfortable swing from old pallets. You can tie them on ropes or chains to the roof of a canopy or gazebo, on a terrace, or simply under a tall, spreading tree with thick branches.


A slightly less popular, but at the same time practical way of arranging a summer cottage with garden furniture is the use of construction wooden reels. Chairs can be made from them...

6732 1 2
How to make a garden chair: drawing and detailed description assemblies
Have you decided to buy a plastic chair or a wicker rattan lounger for your country house? Don’t rush to spend money, because it’s simple and at the same time comfortable furniture You can make it from wood with your own hands. I suggest a simple step by step instructions self-assembly armchairs from wooden planks. But first, let’s decide what kind of furniture you would like to see in your summer cottage.
Requirements for country wooden furniture

In order to decide what country chairs should be like, let’s imagine under what conditions and for what purpose this furniture is used.
A country chair is a design with a seat, back and armrests. If you attach runners to the supports, you can swing on the chair. Country chairs are used for short rest, both in the country house, and near it.
The operating conditions can be described as difficult, since most of the time the furniture is used outdoors.
So, what qualities should distinguish country furniture?
- Durability. Furniture should last as long as possible, despite precipitation, direct rays of sunlight and other environmental factors.
- Simplicity and ease of use. Furniture should be easy to carry so that, if necessary, it can be taken out of the house and then brought back. Ideally, furniture should be foldable.
- Low cost. The chair should be inexpensive, and preferably made with your own hands from available materials.
- Aesthetic appeal. A chair that will be used in a country house should decorate the interior and exterior with its appearance. country house.
How to prepare for work
First, select a drawing. If furniture is being made for the first time, the simpler the drawing, the better. In our case, the drawing is simple, but the finished furniture will be beautiful, stable and durable.

After the drawing is ready, we calculate the amount of materials and purchase everything necessary. In our case, a board with a cross section of 30×150 mm will be used to assemble the frame. To cover the seat and back, we use a board with a cross-section of 25×100 mm. Wood screws 40 mm long will be used as fastening elements.
Preliminary stage - cutting out the main elements

In accordance with the drawing, we calculate the configuration structural elements and cut from the board required amount details. For longitudinal and transverse cutting we use circular saw. For a curved cut we use a jigsaw.

After cutting, small chips or, on the contrary, protruding fibers will be visible along the cut line. In order not to remove these defects on the finished furniture upon completion of assembly, immediately after finishing cutting, go along the edge of the cut with sandpaper.
Manufacturing process
| Illustrations | Step-by-step assembly description |
 |
How to screw in a self-tapping screw? Almost all connections in the chair will be made using self-tapping screws, so you need to know how to screw them in correctly. We fasten the self-tapping screws by pre-drilling holes with a diameter of 2 mm. If you twist a self-tapping screw without first drilling holes, there is a risk of cracks appearing. Under the head of the self-tapping screw, we drill a countersunk hole to the diameter of the head and a depth of 3 mm. We recess the self-tapping screw into the recess below the surface of the board. |
 |
Front legs. We make two parts shown in the diagram. The lower part of the part will be the front leg of the chair, and the crossbar will be attached to the central recess. The upper part of the part will be the armrest holder. |
 |
We combine the front supports into a single unit. We install a 70 cm long crossbar into the central recesses on the front supports. All connections are made using wood glue and reinforced with self-tapping screws, 2 pieces on each side of the crossbar. |
 |
Attaching the armrest holders. We attach the upper parts of the sidewalls, 60 cm long, to the front supports. We maintain a right angle between these two parts. We fasten using wood glue and 4 self-tapping screws for each connection. |
 |
Hind legs. We cut two parts from the board, like those shown in the diagram. The length of the legs is 63 cm. The end of the legs is cut at an angle of 75° and 115°, respectively. |
 |
Attaching the rear legs. We place the rear supports on the outside of the armrest holders so that the cutting line coincides with their surface. The extreme point of the bottom of the rear legs should be flush with the rear edge of the armrest holder. |
 |
Strengthening the hind legs. To prevent the rear supports from moving apart during operation, we install a transverse spacer between them and tighten the entire assembly with self-tapping screws, 2 pieces on each side. |
 |
Seat holder. The seat trim will be attached to the horizontal holders. The horizontal holders will be attached with a straight edge to the front cross brace, and with a beveled end to the previously installed cross brace of the rear supports. |
 |
How to install seat holders. The diagram shows the location of the three seat holders and their distance from each other. We fasten the parts as usual with self-tapping screws. |
 |
Back and hind legs. 61 cm long pieces of board are attached to the outer seat holders. The fastening must be made so that the end of the backrest holder is flush with the bottom edge of the seat holders. |
 |
Back trim. On top of earlier established holders We fill the backrests with planks with a gap of 20 mm between adjacent planks. |
 |
Seat. The seat strips are attached in the same way as the back trim strips. |
 |
Armrests. We attach pieces of boards 64 cm long to the sidewalls, as shown in the diagram. Fastening is carried out using wood glue and self-tapping screws. We use at least 2-3 screws for each armrest. We round the edges of the armrests at the front of the chair. |
We continue to work
After the assembly is completed and the chair is ready, all that remains is to complete Finishing work, as a result of which the furniture will become not only reliable, but also beautiful.

Since the assembly was carried out using self-tapping screws, there were recesses made for their heads on the surface of the wood. We fill the recesses with wood putty, matched to the tone of the boards. Apply the putty with a spatula and immediately level it.
When working with putty, remember that such compounds are applied in a layer no thicker than 1-2 mm.

After the putty has completely dried, the surface of the wood is carefully sanded. For sanding we use a sanding machine with replaceable sandpapers. We use sandpaper alternately, changing the abrasiveness from 400 to 800.

After the chair has been sanded, we clean it from dust and soak it in two layers of drying oil, with a break for the previous layer to dry. Impregnation is needed, firstly, in order to reduce paint consumption and secondly, in order to make the wood more resistant to rotting. After the drying oil has completely dried, apply a couple of layers of paint.
Can I use varnish? Since putty was used when working with lumber, stains will show through the varnish, so in our case, using a continuous layer of paint is preferable.

The photo shows the finished result, which will look exactly the same if all the listed assembly steps were completed correctly in the sequence in which they are given in the instructions.
Let's sum it up
It’s not at all difficult to assemble a comfortable chair for a country house or summer cottage, and now you can definitely cope with this task. If you have questions while assembling furniture, ask them in the comments to the article.
November 10, 2018If you want to express gratitude, add a clarification or objection, or ask the author something - add a comment or say thank you!
Currently, the furniture industry has literally flooded the corresponding sector of the market with a variety of products made from all kinds of materials and all existing styles, ranging from retro and ending with techno. Many people are attracted to wooden ones, but they are now too expensive for most who want to buy them.
But why not try to make it yourself, at least the simplest in design, not difficult to manufacture, and requiring ordinary tools? Undoubtedly, this type of furniture is a country or garden chair made of wooden beams with a cross-section of 8×8 cm or better 10×10 cm.
In order to make this type of furniture, it is enough to have minimal skills in working with carpentry tools and have a general understanding of the properties of wood as a material for machining.
The most suitable materials for making a country chair are oak, beech, pine, walnut, birch, and ash. Their wood, which has undergone high-quality drying, is quite hard and therefore durable, is not afraid of moisture, is well processed and, most importantly, has a beautiful texture. Linden and alder can be used to make light-duty parts.
Marking and preparing workpieces
Having decided on the dimensions of the chair, we measure the required length on the selected beam, taking into account the processing, and mark it using a construction tape, a metal triangle, a suitable pencil or marker.Using a pendulum saw, we cut the timber into pieces, while simultaneously trimming their ends. For the design of the chair we have chosen, we will need 16 large-section blanks square shape and 2 bars with sides half the size of the main blanks.
To give a neat appearance and improve the quality of future assembly, we subject each workpiece to a milling process on all sides, including the end parts.


In the blanks that are intended to form the seat frame, in three we select grooves into the floor of the wood at the ends, using a circular saw or hand saw, and in two - a quarter of a tree, for which we need an electric scraper and a hand chisel to fine-tune the geometry of the grooves.


Assembling a country chair
We assemble the sides of the product with glue, lubricating it with a brush, the ends and mating parts of the mating parts, and tighten them using clamps adjustable in length, preferably on a flat horizontal surface.


To mechanically strengthen the connections in their centers, use an electric drill and a suitable drill to prepare blind holes for the heads of the coupling screws. Then, using a smaller drill, we set the direction of the coupling screws, which we screw in using a screwdriver.


Next, we rigidly glue the side panels together using the upper back cross member at the level of the armrests in height and flush with the rear legs and the rear cross member of the seat frame at a certain height using pre-prepared templates from multi-layer plywood. To prevent them from moving, we secure them with clamps.


We set the crossbars according to the templates, having previously lubricated the ends and the corresponding places on the legs with glue. Using a metal triangle, we check compliance right angle and, if necessary, we upset the crossbars.

We tighten the structure in the direction of the crossbars with length-adjustable clamps and strengthen the crosshairs with tension screws.

We close all the holes for the screw heads with wooden glue plugs, sawing off the excess flush with the side surfaces.


Now we install the longitudinal side elements of the seat frame with grooves in a quarter of the wood at the level of its transverse elements.
We fix timber of a smaller cross-section into the grooves with glue, fix it with a clamp and screw them with two or three screws each cross members seat frame.


On them we lay three longitudinal beams with glue on them with grooves in half the wood, using templates that set the same distance between them, and temporarily secured with clamps.
Each of the three middle bars of the seat frame is fastened on both sides from below to the small bars with two screws screwed in flush (to do this, we pre-drill sockets for the screw heads using a drill).
Since the outer bars of this element of the garden chair were not completely secured, we remove them, coat the grooves with glue and put them in place, securing them with clamps until the glue dries completely. The frame of our product is fully assembled, and all its elements are securely fastened with glue and screws, forming a strong and rigid power structure.
We finally process all the edges of the frame grinder to obtain even and smooth surfaces.

We carefully wipe them with a slightly damp cloth to remove small particles and wood dust and let the wood dry completely.
The last operation is coating with varnish, which will protect the surface of the wood from moisture, make it easier to care for the furniture and emphasize the natural texture of the wood.

All that remains is to install the cushions for the back and seat after the varnish has dried.
The chair is designed for both a child and an adult, and even for a father or mother with a daughter or son on their lap.
Concluding remarks
When working on a country chair, we must not forget about the presence and serviceability of shields and protective elements above cutting tools. You should also wear clothes with long sleeves with a tight clasp at the wrists. You should wear gloves on your hands and safety glasses on your eyes. A respirator will also help to protect yourself from fine wood dust and varnish fumes, which are not harmless to the human body.For safety and greater aesthetics, it would not hurt to smooth out the sharp corners, especially if there are small children in the family, and the clothes will also serve a purpose. And under the legs it is worth stuffing rubber or plastic material so that moisture does not penetrate the wood and cause it to rot.
In order for the chair to serve as long as possible and not lose its operational and aesthetic qualities, during precipitation and for the winter it is advisable to put it under a roof and cover it at least plastic film so that dust and other pollutants floating in the atmosphere do not settle.

"From the material presented you will learn how to make it with your own hands" Garden chair"and install it on your site, for example, in the shade of a fruit tree (apple tree). On a chair, relaxing after working in the beds will be much more convenient and enjoyable, because the inclined back takes the load off the spine.
To make a chair, you do not need serious knowledge of carpentry and carpentry; everything is extremely simple and practical. The material is also the simplest - a 25-30 mm board and screws.
Let's look at the entire process of creating the "Garden Chair", and also look at what exactly the author needed?
Material
1. board 25-30 mm (soft wood)
2. screws (for wood)
3. stain
4. varnish
Tools
1. hacksaw
2. screwdriver or screwdriver
3. ruler and pencil
4. brush
5. sandpaper
The process of creating a "Garden Chair" with your own hands.
Getting your own country furniture is not so difficult, especially if you have the material (pallets or boards), the boards must first be planed and sanded with sandpaper, and then just follow the author’s photo instructions.
First of all, armrests are made from the board (in the shape of the letter P) and everything is twisted using wood screws.


The rear legs are screwed at an angle to the front ones.

A seat made from the same board is sewn onto the plane of the rear legs, and a cross member is also added to strengthen the structure and provide greater rigidity.

The backrest is made in the same way, the boards are screwed to the lower and upper crossbars.


To give garden furniture a more noble look, it can be covered with stain and varnish, or painted in any color of your choice)
As you can see, there is nothing complicated in creating a garden chair, everything is extremely simple and clear.
So, don’t throw away pallets and planks after construction or renovation, they can be used to make cool furniture.
This concludes the article. Thank you for your attention!
Come visit more often. Don't miss out on the latest in the world of DIY!
The article is presented for informational purposes only!


