Do you want to take advantage of short breaks from work and do beautiful product? Saw and glue one or two pieces each day to slowly assemble this beautiful floral locket.
At first glance, it may seem that you need to immediately cut out all the parts and glue them together, but there is an easier (and more accurate) way to make mosaic miniatures from small parts. You can use this method to decorate your pieces with inlays and create unique designs. We made our medallion from the four types of wood shown in the photo. You can choose other breeds that should contrast with each other to make the design expressive.
Glue the templates onto the blanks
1. Make four copies of the outline template (if you want to make a larger diameter disk, for example for a wall panel or dish stand, simply enlarge the template).
2. Prepare planks from four types of wood, cutting them to a thickness of 6 mm. For the medallion shown in our project, you will need one piece measuring 25x200 mm for the middle, two 25x200 for the petals, two 25x200 for the leaves and three 50x200 for the background. It is useful to have several extra blanks of each type for making new parts to replace damaged ones.
3. Using a sharp knife, cut out all the details from the paper templates, as shown in Photo A. Separating each element, mark the edge located closer to the center of the drawing. Cut out the background parts (items 8, 11, 12, 15, 18, 19, 20, 23 and 24) along the outer dotted line. Place the part templates on the corresponding blanks.
4. Attach the paper templates to the blanks using spray adhesive (photos B and C). To make sawing and assembly easier, place templates for adjacent parts (for example, 1 and 3 or 4 and 5) on separate pieces.
Start cutting out the medallion
Note. Alya sawing out ornament details is perfect universal file No. 5 (12.5 tpi).
1. Based on the design of the medallion, cut out the middle and first petal (parts 1 and 2) only along the top edge and the joint lines of these parts, leaving excess material on the blanks for now. Check how the parts fit together, adjust them to each other sandpaper, if required, and then glue together (photo D) and secure until the glue is completely dry. Quick tip! We glued the mosaic pieces together with regular yellow PVA glue, but you can use Titebond No-Run, No-Drip, which sets faster, or cyanoacrylate (“second”) glue, which is also suitable for this purpose.
2. When the glue has dried, finally cut out the middle along the contour (part 2) and saw off the petal (part 1) from the workpiece in a straight line, as shown in photo D.
3. Cut out the next petal (part 3) along the joining lines with parts 1 and 2. Fit the petal to the two glued parts, glue it in place and fix it until the glue dries. Make sure that all gluing parts are located in the same plane (photo E).
4. Continue to add petals sequentially in the order indicated by the numbers (the work usually goes slowly, and we sawed, adjusted and glued one or two parts each day, allowing the glue to gain strength). As you work on the flower, you may find that it is easier and more accurate to fit the pieces together by tracing the outlines rather than sawing them along the lines of the template (photo F). After sawing the edge, check the fit of the parts again and adjust if necessary (photo G).
5 Glue into a flower, add leaves and background details in the order indicated by numbers. Convenience and accuracy of fit are ensured by drawing the edge of the part after cutting according to the template (photos H and I).
Completing the build
1. Fit and glue parts 9-24 in the order shown. The outer edges of all background details are first cut out along the dotted lines of the so-called working diameter. Fix each glued connection until the glue is completely dry (photo J).
2. Having glued all the parts, file the ornament
to final diameter if necessary. Move the file close to the line and then sand the edges of the medallion smooth.
3. Remove templates.
Sand the finished medallion on both sides, gradually decreasing the grit of sandpaper from No. 150 to No. 320. Make sure both sides are smooth and parallel.
4. Apply a finishing coat to both sides (we sprayed a semi-matte nitro varnish three times from an aerosol can, sanding the first two coats in between after they were completely dry. Finally, drill a hole in the edge and screw in a small screw with a ring so the ornament can be hung.
Scheme of a medallion for gluing parts with your own hands
 2018 New Anonymity Carved Wooden Handle Zelda Music Box Children/Friends…
This project requires only three tools - a hacksaw, drill, and pliers.
Materials: , adhesive tape, sandpaper, colored pencils, epoxy resin, pencil eraser, to process our decoration you will need tung oil, mineral oil or beeswax. Cord or chain for hanging, ring.
Select a drill bit that roughly matches the diameter of the pencil.

Drill holes in the block, in which places you drill holes depends only on your imagination.

Using a hacksaw, cut the pencils into pieces.

Turn the block over and cover with duct tape.

Flip back, prepare epoxy resin and pour it into the drilled holes.


Hold the block tightly so that the epoxy resin does not seep back, insert pencils into the holes, arrange the colors as you wish. If the pencils get stuck, tap them gently with a hammer. When finished, let the product dry (I left it overnight).

Saw off any sticking pencils.

Clear duct tape from the block, make sure the resin is dry before continuing. It's time to saw our block into thin strips for making jewelry. Draw a line with a pencil and carefully cut the leaf following this line.

Treat the product with sandpaper until it becomes smooth; when sanded, the lead will be smeared and can be easily removed with an eraser.

Determine the location of your future product, mark and saw off.

Using sandpaper, round off the edges so that the product takes on a more rounded shape.

Drill a hole

apply a protective coating


or earrings.

Translation: Anastasia Dolzhnikova
Having a good selection of jewelry in stock so that you can really choose it to suit your mood and any wardrobe is the dream of every girl and woman. One unique option you can make it yourself - for yourself or as a gift.
To you will be required:
- 2 wooden planks (10x10 cm, 0.32 cm thick; birch and hazel are used here);
- outlines of small images that you want to cut out into medallions;
- wood glue;
- drill and thin drill;
- vice;
- mechanical or regular jigsaw;
- wax coating for wood;
- sandpaper;
- round rasp;
- needle nose pliers;
- strong wire - silver or any other;
- a non-standard chain, for example, made of metal balls (such a simple, but at the same time unusual and elegant medallion will look bad on an ordinary, even wide, chain) - can be replaced, for example, with a leather cord.

1. Develop an image or find one online. Reduce on the computer and print out the image design for the pendant. Cut it out and stick the paper onto one of the two wooden boards. You can dilute the glue with a small amount of water - this will make it easier to remove the paper from the pendant later. Let the glue dry.


3. Prepare a mechanical or regular jigsaw. Insert the blade into the drilled hole and cut out the design along the outline. Take your time and work carefully: a neat image - key moment of this design.


4. Remove the entire graphic paper from the tree. Using a rasp, process the edges of the sawn contours from the inside to make them smoother.

5. Paint the second - still untouched - board in dark color or waste it. Let the coating dry.
6. Take wood glue and glue the sawn plank with the dark one together. Use a vice to clamp the planks together. Between the vice and the boards, top and bottom, place a dense material like felt, felt or baize (a baize in several layers) so that the metal does not leave marks on the wood. Let the glue dry.

7. Cut out the outer contours of the pendant from glued boards. Circle, rectangle, heart, star, etc. To mark a circle, it is convenient to use a school ruler.

8. Drill a hole in the top of the pendant for the connecting ring.
9. Sand the outer edges and surface of the pendant until completely smooth. For rectangles, it is better to first round off the corners with medium-grit sandpaper.
10. Cover the pendant with wax. Let the composition dry.

11. Using thin-nose pliers, make a ring of the appropriate size from the selected wire. Or take ready-made ones. Insert the ring into the top hole of the pendant, hook it onto the chain, and close the ring. Ready!

.jpg)
WOOD JEWELRY
Wood is a very decorative and widely respected ornamental material. It is known, for example, how furniture and products from natural wood. Tom is more pleased with handmade crafts. The women's jewelry offered here is accessible to any beginner; even women or high school students can make them. And issues of product quality will be decided mainly by the nature of the wood itself, as well as by the patience and accuracy of the manufacturer. The crafts, the manufacturing technology of which is described below, are elegant and original, and their implementation does not require a lot of working time or special tools.
Shown in Fig. 10, a pendant(or a combination of such pendants in a pendant) can be easily made from a bevel cut of certain types of wood. You just need to choose a suitable pattern for the workpiece. A cherry, bird cherry or juniper knot is best suited for this purpose. Among the thickets of bird cherry trees there are often broken, bent, and sometimes even branches rooted in the ground. It is in such branches that changes are often found: in the texture of the wood, the color and pattern of its core part. If the cherry has a beautiful pattern of an oblique cut of the branch forming stripes of different colors, then the bird cherry has a dark core on a light background of sapwood.
Rice. 6. Fish and octopus

Fig 7. Prefabricated frame made of carved parts sculptural composition
The burl of any tree or the whorl of a pine tree can be very beautiful. Certainly, we're talking about about the harvesting of branches of bird cherry, cherry or apple trees not specifically for pendants, but as a result of sanitary cleaning caused by damage to trees, cutting down of game trees, shading trees, etc. As for juniper or pine, you can only use dead wood for the forest.

Rice. 8. Carved table from a whole section of tree trunk
Here are some tips for making a pendant. In places of thickening, growth, knot, fork, the branch is cut obliquely, at an angle of 45°. The resulting cut must be leveled with a sharp knife and lubricated sunflower oil or nitro varnish. Then the texture of the wood will clearly emerge, and if the cut pattern satisfies the author of the upcoming craft, you can begin work. It is better to saw off several plates at once to choose the most impressive ones. If the pattern on the plate is shifted to the side, try changing the direction of the cut. The plates are cut down with a fine-toothed saw, clamped in a vice or secured in some other way on a workbench.

Rice. 9. Carved stand for a table from a whole cut of a pine trunk (monkeys and stand are separate parts)
The bark should not be removed from either the workpiece or the sawn plate, especially if we are talking about raw wood. The ring of bark on the sawn plate will be, firstly, a dark decorative frame, only it needs to be trimmed to remove irregularities. Secondly, and this is the main thing, sanding raw wood when it dries without bark will crack and the work will be ruined. The sawn-off plates should be straightened immediately with a knife. This is done in a standing position, the plate is placed vertically on its edge on a table or workbench. A layer of wood is cut from the middle to the bottom edge of the plate so that the surface is slightly convex. The knife blade is directed downwards with some forward movement.
If processing the surface of the record seems difficult and dangerous, you can level the records after they have dried using files. In this case, grinding will take longer, but will be safe.
Dry the records on outdoors, but always in a dark place, since under the influence of the sun various stains can form on the wood. To prevent the plates from cracking during drying, after a day they must be wiped on both sides with sunflower oil. Of course, not all wood needs to be oiled when drying, but cherry and bird cherry (and we use them to make a pendant) are very prone to cracking when drying, so it’s better to use oil here.


Rice. 10. Pendants and pendants made of decorative wood knot cuts in a natural bark frame ( A); constructing an oval in proportion to the golden ratio ( b); the construction sequence is indicated in the drawing by numbers
After 7-10 days of drying, the plates need to be scraped on both sides with a new razor blade to refresh the tone, remove dirt and top layers of oil, and also remove thickenings along the edges with a knife and sandpaper, since as a result of the drying of the wood, the edge of the bark began to protrude above the plate . In this case, it is better to slightly curve the edges of the pendant so that its surface becomes convex.
Having leveled the surfaces of the pendant as smoothly as possible, you can begin to coat them with nitro varnish. It is necessary to apply the varnish in 8–10 layers and it is better to do it with your finger (for this craft). Grab a drop of varnish with your finger and begin to rub it over the surface with quick circular movements. It is necessary to evenly distribute the varnish on the surface in 10–12 movements, since the varnish thickens quickly.
First, 3 layers of varnish are applied with a break of 10–15 minutes, after which the varnish is allowed to dry for 1–2 hours. Then, uneven spots and streaks are removed with a razor blade. It may turn out that after the first scraping, in some places there will be depressions and pits, which more often happens on the loose core of the craft or due to the curliness of the knot. In such a place, apply a small drop of thickened varnish with the tip of a match, for which the varnish (3-4 drops) is first left to dry for several hours. The applied drop should be left to dry until next day. Then it will be possible to level (remove) the varnish bump and continue further building up the varnish layer, as described.
The last layer of varnish dries for about a day, after which its surface is scraped (preferably with a new razor blade) and polished woolen fabric first with pressure, then with light and quick movements. If there are still streaks on the surface, you need to repeat sanding and polishing. Sometimes, as a result of polishing, the varnish layer is rubbed off and matte spots appear on the surface. In this case, you will have to apply 2-3 layers of varnish again to the entire surface and repeat the finishing. We also note that it is impossible to coat the pendant plates by dipping into varnish, since in this case, during drying, streaking and swelling of the varnish cannot be avoided.
The edges of the pendant, bordered with bark, are smoothed with sandpaper and coated with varnish. You can remove the bark, give the pendant a strictly elliptical shape (or oval) and cover the edges with a strip of “gold” foil or paper for contrast. Or you can make an inclined chamfer along an elliptical contour even before coating the pendant with varnish. But then it is better to give the craft a shape that has the proportions of the golden section (Fig. 10, b). To frame the pendant, a backing is sometimes used, cut along the contour of the pendant from brass foil. Corner toes are cut out along the contour of such a backing, which, when attaching the backing to the pendant, are folded and woven to the edges of the craft. Before fastening, the substrate must be polished and varnished. By the way, it is not difficult to make an eyelet or two holes in the backing through which a chain is passed to hang the pendant.
What to do with the pendant pendant in other cases? If only one side of the pendant is polished, then it is convenient to make an arched recess (groove) in the upper part of the back side of the plate for the ends of the chain, and then fasten the entire back side together with the chain placed in the groove with veneer, for example, from Karelian birch. Moreover, if the veneer is decorative enough, the reverse side will also become the “second” front side of the pendant. You can use other materials (leather, velvet, etc.) to cover the reverse side.
If the thickness of the pendant allows, then a small hole is drilled in its end (in the upper part), into which either a wire eye or a cut pin with a glass or plastic head is glued. Before attaching it to a pendant, a pin or eye must be threaded into a chain link.
When the plate is thin, it is more convenient to drill a hole in the pendant and insert a polished bronze ring into it. You can use a regular sewing needle as a drill, sharpening its sharp triangular-shaped end with a diamond needle file or an emery block. For convenience, it is better to hold the needle with pliers when drilling.
Pendants are assembled from several pendants, of course, selected according to the size and texture of the material. From smaller plates with original drawing beautiful earrings will come out.
Bracelet. It is not always possible to find wood whose pattern is suitable for chest decoration. When such plates are combined into an ensemble, for example in a bracelet (Fig. 11), they look more interesting. Making plates for a bracelet is similar to making a pendant. However, when choosing a workpiece, you will have to take into account the size of the bracelet and the number of links in it (usually 7–8 links). The links of the bracelet are connected using two thin rubber cords, for example aircraft model rubber, which are threaded through the holes made in the links. Of course, if the thickness of the links allows, then such holes can be drilled in the plates. However, more often they do it differently: they cut grooves into the bracelet links (on the back side of the plates), and then turn them into holes by gluing a piece of veneer or other material to the surface of the link.


Rice. eleven. A bracelet made from slanted cherry knot slices. Grooves for tightening cords on the back of the bracelet (before facing)
Before sawing the grooves, the bracelet links are selected according to the pattern, their sides are trimmed so that the links fit tightly to each other, and the links must be numbered. How to arrange the records must be decided by the master himself. So, you can orient the plates in one direction. In this case, the identity of the shape of the color of the links is realized. If neighboring links are oriented in different directions, then when looking at the bracelet it will seem that some plates are lighter and others are darker. The cutting lines are drawn along a ruler along the entire row of fitted plates at once. Of course, it’s good if you can cut the grooves with a fine-toothed hacksaw, which does not tear the wood and the width of its teeth just fits the groove for the rubber cord. It’s worse if you first have to make a cut using, for example, a hacksaw blade for metal, and then widen it with a knife or needle files. Therefore, it makes sense to use any weapon home saw In a section 5–6 cm long, cut yourself using a triangular needle file, using a triangular file, to cut a row of teeth for cutting grooves.
Before gluing the veneer overlays, you must remember to number them, so that later you can mix up the fitted parts of the bracelet. It is better to use walnut or beech veneers - they are soft, fit tightly to the surface, and are easy to cut with scissors. But you shouldn’t bother specifically looking for such veneer; in extreme cases, veneer removed from regular plywood. You just need to scrape off the old glue from it. The veneer coated with wood glue should be immediately moistened on the opposite side (outer) so that it does not warp, and pressed in some way to the plate. Of course, it is better not to apply glue to the place where the cord will pass.
When the glue dries, all that remains is to correct and clean the edges, and also coat the bottom of the fold with veneer varnish. In order to hide the knots of the rubber cord that tightens the bracelet, the holes at the entrance are widened in one of the plates. You can widen the grooves in the middle of one of the plates and, having assembled the bracelet, place a knot there, and then glue the veneer.
Concluding the topic of making crafts from sections, we note that the pattern of wood on such sections often resembles some kind of plot: the sea with a horizon, only a boat is missing for the full impression; boat on the waves, but I would like to shade more in one place the outline of the boat, etc. Such corrections can be made either with a colored pencil or oil paint, which is rubbed into the cut with a pointed stick. Corrections should be made on the finally prepared and lightly rubbed vegetable oil surfaces, without leaving the tone and character of the wood texture.
You can also make adjustments based on the applied varnish. For example, if a “summer” needs to make his eyes in the form of two small dots, then in these places pricks are made with the point of a needle and either mascara or any paint is smeared there desired color. Excess paint can be removed with a cloth; it comes off easily from the varnish.
Chains. Round ring chain good both as a feminine adornment and as a decorative detail of the interior (Fig. 12). Making them is not difficult, although it requires patience and time. The easiest way to turn rings is on a lathe. And for those who do not have the opportunity to use such a machine, we advise you to make or purchase a simple device with which the drill can be turned into a small, unique lathe. Its structure is well understood from Fig. 13.
Let us first explain how the chain is assembled. First of all, wooden rings are turned for it. Then half of the rings are broken in half (they are actually broken, not cut or sawn), after which each broken ring is glued together, connecting the bottoms of the other rings. The wood in the crack is glued together with wood glue, which is most suitable for this purpose: when joining dark-colored wood, the glued seam is not visible at all, but on light wood such a mark is noticeable, but is perceived as a natural layer and does not interfere with the overall appearance of the chain (that’s why the ring needs to be broken rather than cutting).
When gluing the halves of the ring, you can tighten it with a thread or simply hold it a little with your fingers first and let go, leaving the three connected rings alone. It is even better to use clothespins for pressing if the ring fits into the throat or tail part of the clothespin (Fig. 14, a). Then the triplets are glued together into seven rings or immediately into a chain. It is convenient to make a device for gluing rings, shown in Fig. 14, b.
Rings cut from raw wood must first be dried, otherwise they will be deformed both when splitting and when pulled together with thread.

Rice. 12. Decorative chains: a - from a whole block of wood; b - typesetting from turned rings; c - from twisted links; g - from figured links

Rice. 13. Attachment to an electric drill for turning rings. Positions of the support bar when boring a hole in the ring and when machining the end surface
When arranging a chain, the rings should be connected in a certain sequence, for example, in order of increasing sizes or alternating dark with light, large with small.

Rice. 14. Methods for clamping a glued ring when assembling a chain: a - in the throat of a clothespin; b - in the tail part of the clothespin; c - between 3–4 nails in a special machine
Before you start turning rings, you need to select a suitable blank - a round stick or a knot of wood of any length, and it is better to choose raw blanks. Let us list the most suitable types of wood for turning, starting with the best: black walnut, beech, black plum, red alder, chestnut, birch, maple, ash. Aspen, linden and poplar do not sharpen well. Working with different breeds trees, the author is convinced that lemon wood is perfectly processed, and fresh apple trees are also well sharpened. Dry apple wood is often loose, with cracks, it is worse to sharpen when wet, the cutter leaves a torn mark on it (to get a clean surface, it is better to wet the wood when turning). Apple trees make very beautiful rings. Sloes are also good in this sense, especially if you can make rings from dark sapwood (the core of the thorn is light and loose). Such rings turn out dark brown, sometimes with yellowish-red spots and streaks. Surprisingly beautiful in color, dark, with streaks, as if made of stone, rings are obtained from the core of the rowan tree. But this wood is very difficult to turn. In its raw form, it is so soft and flexible that the turned ring wrinkles and breaks. You can only work with well-dried workpieces, and be careful. But it sharpens and polishes very well.
Lilac sharpens beautifully, even dry. It is very hard, does not give any flaws when turned and polished, and its color is interesting - deep dark ocher.
Well, beech is one of the best woods for turning. As you know, round sticks are made from beech (for cribs and playpens)? excellent blanks for rings.
When the blanks have been selected, you can begin making the rings. First of all, we will make a mandrel (holder) that is attached to the drill and in which the rings will be processed. A wooden cylinder with a diameter of 35 mm and a length of about 45 mm is suitable for the mandrel. The mandrel should be fixed on the conical shank of the drill spindle, for which purpose it is drilled through hole such a diameter that the mandrel can be tightly fitted onto the spindle (you can bore the hole into a cone with a knife and a round file). Now you need to grind the mandrel, but to do this you will first have to make a stop stand for the cutting tool.
The height of the thrust stand together with the bar (see Fig. 13) is adjusted so that the person resting on them sharpening tool was at the level of the spindle axis.
Using a small round cutter with a diameter of about 6 mm, we cut a hole in the mandrel along the diameter of flat circles-blanks for rings with a depth of about 16 mm. In this case, the cutter must be fed little by little so that the mandrel does not slip on the spindle. Using the tip of the knife, holding it in a horizontal plane, we will clean the walls of the resulting hole into a cone, but so that the taper is very small. Into this conical hole, with a little force, insert (1–2 mm) the workpiece and cut a circle about 5 mm thick from it. Having prepared the necessary pure circles, we will proceed to their further processing.
Having secured the circle in the mandrel, and it is held in it due to the taper of the hole, we align it along the plane of the end of the mandrel, lightly hitting the circle with a hammer. If the diameter of the hole in the mandrel is larger than the diameter of the circle, wrap the latter with a piece of paper gasket in one or two layers. Using a small cutter, drill a hole in the circle and bore it to the size of the hole in the ring of the future chain, and then use a small knife to remove the internal chamfer.
Don't be discouraged if you don't succeed right away. Experience comes with time, and very soon you will figure out how best to hold the tool while turning a workpiece, with what force to press it against the support, etc. It is better to turn on the drill in short bursts with your left hand only for the period of turning.
We clean the ring with sandpaper and, turning it over in the mandrel, process the other side of the ring. And so we will grind the entire set of rings.
To round outside rings, you will have to make another mandrel - a round stick on which the resulting rings are mounted. In turn, the mandrel is attached to the drill chuck. The workpiece for the mandrel must be taken with a margin of thickness and ground to the required diameter, already fixed in the chuck, then there will be no runout of the part on the mandrel. Dimensions of the workpiece for the mandrel: length - 50 mm, diameter - about 18 mm. Of course, a mandrel of this diameter will not fit into a drill chuck. Therefore, the end of the mandrel will have to be planed to the required diameter, driven into a completely open chuck with a hammer, and then pressed with fists.

Rice. 15. Machining the outer surface of the ring using a mandrel and a locking cap
Since it is difficult to obtain chain rings with absolutely identical holes, the mandrel will have to be made with a small cone. And in order to prevent the rings from turning or even jumping off the mandrel during processing, they are usually held on the mandrel using a wooden cap. Such a cap is secured to the mandrel with a screw, which passes through the bottom of the cap and is screwed into the end of the mandrel (Fig. 15). In order not to split the mandrel when screwing a screw into it, a through hole with a diameter of 2 mm is drilled along its central axis. It is convenient to use this same hole for screwing a screw into it from the back side of the mandrel, that is, through the hole in the bottom of the cartridge. Some electric drill designs have such a hole; it is intended for connecting the chuck with a screw to the conical shank of the spindle. If there is no such hole, then it is not difficult to drill it. This will provide greater reliability of fastening the mandrel in the chuck.
The fastening cap is first roughly cut out by hand (including the recess in it).
It is then attached “backwards” with a screw to the mandrel and finally turned on our “lathe”.
Now all that remains is to secure the ring on the mandrel using a cap and use a small knife and a file to process first one side of the ring (farthest from the cap), and then, turning the ring over, the other.
Considering the significant number of rings that will have to be processed (preferably at least 60 rings in one chain), it is convenient to strengthen the screw in the cap so that, when clamping or removing the ring, you rotate not the screw with a screwdriver, but the cap itself with your hands. As you understand, the dimensions of the mandrel and cap depend on the sizes of the rings and are adjusted to the location.
To assemble the chain, half of its rings will have to be split by hammering a conical mandrel on a support with a hole into them with light blows of a hammer. The ring usually breaks in one place, and in the case of springy wood, as a rule, it is possible to insert two whole links of the chain into this break. To glue the ring, smear the gap with hot glue, wait 1-2 minutes for the glue to be absorbed, and tighten the ring with thread or a clothespin. After 1–2 hours, the fastening can be removed and the seam can be cleaned. You should use fresh glue, as it is more transparent, which makes the seam less noticeable, and it glues more firmly.
It is better to varnish the rings before gluing, since it is difficult to process rings connected in a chain. The varnish is applied in two stages: first on the outside of the ring, then on the hole side. For the first operation, you need to plan a stick with a conical tip, onto which you should put a ring and varnish it with a soft brush. Then the ring is removed from the stick and hung on a long nail to dry. After the first operation, the brush is immediately wiped with a rag and washed several times in sunflower oil.
When applying oil from the hole side (second operation), the ring is clamped in a clothespin and then left in this form to dry. This time, after rinsing in oil, the brush should be washed with soap and water.
After cleaning up the glued places, the assembled chain will, of course, have to be corrected with varnish.
Spectacular flat ring chains, decorated with carvings. In this case, you do not need to process the rings on a conical mandrel with a cap, but you will have to apply a pattern to them using a small knife, a triangular file, and an awl.
At the first stage, a flat ring is cut out from a circle and turned in the same way as the round ring already described. Only it is better to make the socket in the mandrel not conical, but cylindrical, and provide a side (ledge) in the mandrel, where the ring inserted into the mandrel would rest (the depth of the socket to the side should be equal to half the thickness of the ring).
Of course, with this shape of the nest, all the workpieces must have the same, standard diameter, but if there is a side, they fit into the nest tightly and without distortion. Ready-made turned sticks, for example, from a crib or playpen, are best suited as blanks. Possible deviations in the dimensions of the workpieces to a smaller extent are easily eliminated with the help of paper gaskets.
Having bored a hole in the circle, that is, having received a ring, we subsequently do not round off either the inner or outer surface of the ring, but only remove small chamfers from the edges and process the rings with fine sandpaper.
Now all that remains is, armed with a triangular needle file, an awl, a scratch (it’s better not to use a small knife - the work is less productive with it), to start finishing the rings, for example, using the edge of the file to make parallel marks on the outer cylindrical surface of the ring, and cut out crosses or notches on the end sides. By the way, when turning rings on the end sides or on the outer cylindrical surface, you can apply decorative grooves with the tip of a knife.
Tsarazik is convenient for making round holes (recesses).
As a result of such processing, interesting and funny rings are obtained, and the finer and more intricate the carving, the more variety in the carving of the rings, the more original they look (Fig. 16).

Figure 16. Flat carved rings in a chain
Let us add that the finishing of the rings can also be done in color. To do this, you need to cover the ring with varnish, and then apply additional marks and punctures on it, and then smear paint into them (excess paint can be easily removed from the varnish). Then the ring is varnished again, preferably by dipping.
We recommend using light wood as a material for carved rings; the carving relief looks more clearly on it. Raw wood of apple, cherry, and bird cherry knots is convenient for this (raw wood is easier to process, the finished ring dries in one or two days, and decreases in size by 1–2 mm, which increases the expressiveness of the chain).
Let us also note that working with such rings will be a good and enjoyable school for a beginning carver, both in terms of mastering tools and wood, and in terms of gaining experience in drawing up designs and ornaments.
To use carved rings as earrings, you need to make a small hole in them and insert hooks from inexpensive store-bought earrings into them. By the way, it’s a good idea to think about this option at the same time: buy earrings for which the made rings will be an original frame. Of course, this is a matter of initiative and invention of the master (Fig. 17).
Original decorative chains are made by hand, without using rings. electric drill or lathe. Moreover, it is possible to cut it out manually collected chains, that is, chains whose links are connected during their manufacturing process (see Fig. 12, a). Of course, it is better to make large links in such chains to make it easier to work with them. As can be seen from the figure, you will first have to prepare a blank with a cross-section for the chain. The quarters in such a workpiece are selected either with a special plane (zenzubel, folding plane), or manually using a semicircular and straight chisel.
Then chain links are drawn on the workpiece, which are subsequently drilled along inner contour drill and final finishing with a knife. Note that the link is separated from the workpiece only when the rest of the link has already been processed. This is understandable, since as long as the link is connected to the workpiece, it is more convenient to sharpen and grind.

Rice. 17. Earrings made of wood by hand, as well as with turning on a drill attachment
For such chains with large links, wood with a clear texture, such as larch, pine, spruce, and cherry, is most suitable.
Looks unusual twisted link chain, similar in shape to a propeller. When assembled, the chain looks flat. Each link is turned at the end of a round rod-blank and is cut off from the workpiece only when it is, if possible, completely processed and polished (see Fig. 12, c).
A chain of twisted links is mounted in the same way as a chain of round links, that is, by breaking one of the links. Of course, if the chain is made of damp, springy wood, it is better to limit yourself to splitting the link in only one place, since it is very difficult to somehow tighten the two halves of the twisted link when gluing and usually you have to press them together with your hands.
As a material for such a chain, you can take a beech stick or a curved juniper knot. It is good to work with a twisted chain while relaxing in nature, since everything can be done with knives and sandpaper.
Figured links(see Fig. 12, d) are usually cut out with a jigsaw from flat blanks: planks, slats, multi-layer plywood. In addition to connecting the chain using a break, large links can also be sawed, and for plywood the latter method is mandatory. It is not necessary in all cases to saw the connecting links into two parts. You can, for example, cut out a piece on one side of a link for the passage of other links, and then glue it in. Thin cuts with a jigsaw will not create any noticeable interference when tightening the ring with an elastic band or cord.
Hedgehog star crystal and star ball. Shown in Fig. 18, and the polyhedron is a small stellated dodecahedron. The unusually beautiful symmetrical shape of the polyhedron makes it unique decorative decoration. The originality of the crystal polyhedron lies in the fact that its five-pointed stars have common ends with the same neighboring stars. That is, looking at the end of the star, we can mentally associate it with one or a second star, and so on evenly over the entire surface of the crystal.


Figure 18. A star-shaped crystal (dodecahedron) and a star-shaped ball, made from blanks of the same size. Star crystal - women's jewelry

Rice. 19. Constructing the vertices of a stellated dodecahedron on the surface of a ball
At first, the complexity of making such a polyhedron, or rather, the complexity of the upcoming marking of the vertices and faces of five-pointed stars, is frightening. However, marking is not so difficult if you use the correct ball as the initial blank when making a crystal in wood. Then the breakdown of 12 vertices of five-pointed stars can be represented as follows (Fig. 19): 2 vertices of the pole on opposite sides of the ball and 5 vertices on two belts - parallels of the ball It is the level of these two belts, and therefore their diameter, that determines the success of the business: if divide each parallel into 5 parts in order to obtain the position of the 5 vertices of the stars, then the distances between them should be the same as the distances of each of them to the first vertex of the star located at the pole. Note that the tops of the stars on the parallel in the lower part of the ball should not be located on the same meridians with the tops of the stars on the upper belt, but strictly between them.
First, measure the length of the equator on a ball blank, wrapping it around a strip of paper. If you divide the resulting length by a factor of 5.86, you will get the required distance between the tops of the stars on the ball. Now, taking this distance with a compass, we will draw a circle anywhere on its surface, which will be the first belt - a parallel, and with the same size of the compass we will divide the resulting circle into 5 parts (the center of the circle will become the “north pole”).
Having determined the tops of stars in the “northern hemisphere”, you can use the same method to find the position of the tops in the “southern hemisphere”. However, we don't know the place south pole. Of course, it can also be constructed, but it is easier to make a cut from each division point on the first belt with the same compass size towards the second belt, that is, thereby obtaining the position of the vertices of the stars on the second belt. And by plotting all the same distances from the obtained points, you can find the other pole of the ball. Probably, due to the inaccuracy of the coefficient and the spherical surface itself, we will get not one, but several points, in the center of which the desired pole will be. Now, building in the opposite direction, it is easy to correct the mistakes made.
Further making the star crystal will be simple: you need to cut triangular recesses between every three adjacent vertices. These indentations form the voluminous ends of five-pointed stars.
But there could be two here technical solutions. One of them is to make the walls of the triangular recess flat and the edges straight. This means that following this solution, it is better to first make flat cuts of the ball between the tops of the stars. Straight lines - the upper edges of the ends of the stars - will lie in these planes. Thus we turn the ball into a polyhedron.
When making triangular recesses, we will be guided by the fact that the top of each such recess (pyramid) is located in the middle between the tops of the stars, that is, all faces are the same. And the depth of the notch is made such that after all five notches are made, a common single plane should form around the top of the star on which the star lies.
You can also save the shower of each end of the star as an arc lying on the surface of the ball. To do this, the walls of the recesses will have to be made convex rather than flat. Such a craft can rather be called a star ball (see Figure 18) than a crystal. The star ball looks more compact and holds general shape and is more suitable as an integral part of a composition for such products as a pendant to a chandelier, the lower part of a lamp stand, etc. It is also beneficial to use shaped balls with stars to decorate the tops of the side columns of the entrance arch, for example, in a pioneer camp.
It is easier for a beginning carver to handle a star ball than a crystal; straight lines and planes in a crystal require greater precision. The general progress of work on making a star ball will be as follows. First, a cylindrical blank is cut off, equal in height to its diameter. Plan the workpiece, giving it the shape of a ball. Then measure (with a compass or caliper) the diameter of the resulting ball at the narrowest point in order to cut out a template to check the correct shape of the ball of this diameter. Using a template, correct the shape of the ball with a knife and mark 12 star vertices on its surface. The vertex points are pricked with an awl in order to “lose” them. The places where the ridges of the rays of the stars will pass are processed with a file and the lines of the ridges are drawn with a pencil. Having determined the centers of the resulting triangles, use a round cutter (chisel) to make preliminary indentations in the center of the triangles to the required depth (by eye) and cut out the corresponding indentations with convex edges.
When making a star crystal, of course, it is necessary to first convert the ball into a polyhedron.
The appearance of any product is determined not only by its shape, but also by the surface finish. IN in this case it consists of grinding and polishing the surface of the entire craft using sandpaper, and in the corners - with the edge of a triangular file, the tip of a small knife (as a scraper) and coating the product with varnish. The preliminary first coating with varnish will reveal irregularities on the crystal that were not visible on its matte surface. Using a file and a knife, they need to be eliminated, peeling off along with the varnish. Now you can use a soft brush to apply 2-3 layers of varnish, observing intervals of 10-15 minutes between them for drying. Drying the last layer lasts several hours, after which it is necessary to once again treat the surface with a razor blade or the tip of a sharp knife. Considering the great work put into the craft, and our desire to make it as good as possible, it would be reasonable to correct not only the unevenness of the varnish, but also the entire surface of the crystal. It is necessary to scrape the varnished surface until the shine of the varnish disappears, but so as not to scrape down to the wood. The tip of a knife will help in the ribs and corners. Immediately after cleaning, wipe the scraped areas with a woolen cloth - a pleasant matte shine will appear. A craft processed in this way does not seem to be varnished; it seems as if the wood itself was polished in this way. After sanding, you can polish with a cloth to the desired level of gloss.
The work of sanding the varnish surface should not be postponed until later, since dried and hardened varnish will be more difficult to clean.
As a material for making small crafts, it is better to take solid, monotonous wood: birch, beech, hornbeam, ash; maple, juniper, seasoned aspen, eucalyptus, walnut, rosewood. For crafts large sizes Striped wood of pine, larch, spruce, and cherry is more suitable.
A small craft from beautiful wood It will be very good as a chest decoration. In this case, it is advisable to insert the broken ends of pins with glass heads into the tops of the five-pointed stars (see Figure 18).

Rice. 20.“Cube” pendant made of polished wood with hammered bronze overlays (enlarged). Examples of ornaments on the faces of a cube made of chiseled bronze nails (a bunch of grapes with leaves, initials, etc.)
An easy-to-make chest piece? ordinary wooden cube with removed flat chamfers on his ribs in the corners. It is best to take rosewood for this purpose, especially from that part of the wood where there is a transition from dark red tones to completely black. But a whorl of pine and juniper will also work. Dense rosewood wood is polished very well, and the end plane is processed no worse than other planes. The main difficulty in working with rosewood is that it must be cut with a hacksaw or any other fine-toothed saw along all six edges, since rosewood wood does not split along the grain. You have to work with rosewood like metal. But appearance The crafts turn out to be very elegant.
The tops of the rosewood cube can be decorated with glass hairpin or pin heads. Another interesting thing is to place small embossed brass foil plates on its polished edges (Fig. 20). Making them using a hammer (a nail with a rounded end or other device) on the end of a wooden block, and then cutting out the figure with scissors is not at all difficult. The difficulty in casting lies in attaching the brass plates to the faces of the cube. You can, for example, when cutting out a figure, leave sharp tips along the edges, which, when bent, are sunk into the wood. You can solder a piece of wire on the back side and strengthen it in the wood. But such a detail as the moon next to an owl, which creates a whole landscape with a mood, and not just a bird on a branch, is better to carve from a piece of bronze - it requires a strict form. Give it volume so that it glows, reflecting light. Then it can be carefully cut into the socket on the cube and placed on Moment-1 glue or secured with a soldered wire. You can find another method of fastening, for example using epoxy resin, but to do this you will have to first level the back side of the embossed overlay with the same epoxy or oil putty. Here it is important to be able to carefully spread the surface of the cube without going beyond the contours of the lining, otherwise you will get a noticeable mark.
In extreme cases, you will have to replace the embossed foil ornament with some other one, using, for example, shortened shoe nails, the heads of which must be turned and polished in the chuck of an electric drill or made in the form of stars. Then fastening the nails in drilled holes won't be difficult.
The eyelet for connecting to the chain can be easily made as in the picture, or you can choose a ready-made one.
From book Cozy home without special costs author Kriksunova Inna AbramovnaHow to frame paintings, engravings and wall decorations Now there are many framing workshops where you can order a frame for any painting or engraving (the coordinates of these workshops are usually available in the Yellow Pages telephone directories). In these
From the book Decorating and Repairing for the Thrifty Owner author Blaze Joseph SamuilovichCrafts and decorations Mirror ball You can make it for the New Year interesting decoration– a mirror ball that creates a special light effect of “dancing snowflakes.” You can use a rubber or plastic ball as a base for it. If you don't have them at hand, you can
From the book Modern work on the construction of roofs and roofing author Nazarova Valentina Ivanovna From the book Repair and restoration of furniture and antiques author Khorev Valery NikolaevichWood restoration Do we buy old things? – Ostap asked menacingly. - Chairs? Offal? Polishing boxes? I. Ilf, E. Petrov. Twelve chairs Our houses are filled with wood. Although now it often appears under the guise of faceless particle boards, laminate and other products
From the book DIY Home Decoration. Handmade. Fashionable solutions for interiors, gifts and accessories author Dobrova Elena VladimirovnaTable decorations An unusual table setting will help create an atmosphere of solemnity or comfort. You can simply place plates for guests and vases with salads on the table, or you can show your imagination and decorate the table, guided by a specific theme.
From the book Original DIY leather goods [Secrets of making] author Klyushina Alexandra S.Decoration rings The basis for the decoration rings are wooden flat rings 15 mm wide or rings cut from cardboard of the same width. Cover each ring around the entire perimeter with mother-of-pearl mosaic squares and let the glue dry well, especially if
From the book Crafts from Straw author Preobrazhenskaya Vera Nikolaevna From the book Sew Stuffed Toys, pillows and bean bags author Ivanovskaya Tatyana VladimirovnaChristmas tree decorations From straws of cultivated or wild cereals: rye, wheat, timothy, bluegrass, you can make a variety of elegant decorations for the New Year tree. Christmas tree toy “Round straw lantern”You will need Straw strips on paper based,
From book Exterior finishing country house and dachas. Siding, stone, plaster author Zhmakin Maxim SergeevichMATERIALS FOR DESIGN AND DECORATION Of course, to make your product “come to life”, it is not enough just to sew a few pieces of fabric. Both toys and bean bag cushions need to be styled and decorated. This is especially important for toys. The cushion and bean bag can
From the book Do-it-yourself stained glass windows author Kaminskaya Elena Anatolyevna From the book Stairs. Design and installation author Kochetkov Dmitry Anatolievich From the book Dacha Encyclopedia of Experienced Advice author Kashkarov Andrey PetrovichWood finishing Wooden elements of stairs and doors are similar in terms of finishing requirements. The finishing process involves both mechanical manipulation (such as sanding) and coating special compounds. The wood is covered with varnish, paint, enamel or stain. Doors and
From the book Weaving from newspapers author Egorova Irina Vladimirovna From the author's bookDecoration with ribbons or fabrics The wicker product is decorated with beads, beads, paper flowers, satin ribbons, applique - the choice of decor is great. In order to decorate a wicker craft with a satin ribbon, during the weaving process a space is left for this purpose. Weaving
From the author's bookWall decorations Wall decoration “Wreath with cones” A wreath with cones is perfect for decorating your home for the New Year. You can make several of these products and hang them in each room. You will need Newspapers, PVA glue and “Moment”, green acrylic paint
From the author's bookJewelry Headband This headband is comfortable and beautiful and will suit almost any girl or woman. You will need Newspapers, wire, colorless varnish, PVA glue, tassels, knitting needles, scissors. Procedure: 1. Cut strips of newspapers into 25? 8 cm, roll them into tubes using
Wood is a natural and easy-to-work material, which is why craftsmen often use it in their crafts. For wooden pendants, they try to choose unusual species with a beautiful pattern of annual rings and structure. Walnut and boxwood, mahogany and cherry are in demand, although a lot of work is also done from oak. It is better to choose hard wood for crafts so that when wearing the pendant you do not accidentally break off a piece.
In this article we will look at how you can make a wooden pendant yourself at home. You will learn what tools the craftsmen use, how to clean the surface so that the pendant is smooth and shiny, what varnish is recommended for coating so that the jewelry remains beautiful for a long time.
You will also learn how to make a pendant from wood and epoxy resin. These are crafts of incredible beauty that can be complemented natural material or add polymer clay figures. This resin is very toxic, so before working with this material, be sure to wear a protective mask and ventilate the room well. It is advisable to do the pouring into the mold not in the room, but on the balcony or in the garage.
heart
The easiest way is to cut out a certain shape from beautiful wood; in our sample it is a small heart. The required shape is cut out of a thin strip using a jigsaw along the drawn contours. Then the edges are rounded off with an emery stone. Next, the wooden pendant is processed manually with sandpaper. First take No. 100, and then grind No. 80.
A hole with a diameter of 2 or 3 mm is drilled on top with a drill for threading the lace. The product can be coated acrylic varnish. If it raises the pile, then go over the surface with fine sandpaper again. All that remains is to finally open it with varnish and after drying you can wear it around your neck. Some craftsmen do not use varnish, but simply rub the wooden pendant with wax.
Stacked pendant
The decoration, assembled from several types of wood with a bright contrasting combination of colors, looks beautiful. Glue together small pieces of wood with D-3 wood glue and clamp the workpiece in a clamp. After some time, they take it out and cut out any shape.

Then the craft is processed in exactly the same way as in the first described option. In the photo above, the master took a simpler route and made a pendant from three identical blocks of different lengths and colors. If you don't have any leftovers various woods, then you can paint one in different colors using stains.
Pendant "Tree of Life"
Carving designs into wood requires sharp cutters, both plain and triangular. The “Tree of Life” is considered an ancient Slavic amulet, a symbol of wisdom and immortality, which is why many people wear such jewelry in our time, although they do not put any sacred meaning into it.

Anyone can cut out the contours of the trunk and branched crown. The craft made on the cut of a large branch looks beautiful. Leave the bark in place; it gives the pendant a natural and finished look. The recesses can be processed with a small milling cutter using a hand drill.
Combination of wood and epoxy resin
In order to create a unique pendant made of wood and epoxy resin, you will need a plexiglass container, a piece of wood with bark, or a broken lamella that still has sharp edges. The more natural the shape looks, the better the pendant will look when finished.
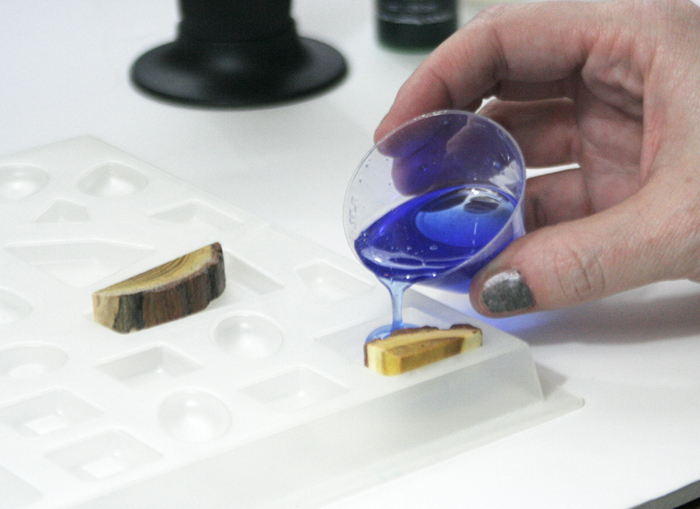
In a separate container, mix epoxy resin with dye to obtain a rich blue tint. Then everything is poured into a mold with a piece of wood and left to harden. All that remains is to polish the workpiece well and give it the required configuration, removing all that is unnecessary. You can make a hole for a chain or cord with a drill. You can finally polish the craft with a piece of felt.

If you want to complement the decoration with a Christmas tree, snowman or flower, then buy polymer clay the required color and mold the figure with your hands. Place the small craft in the oven for 15 minutes. Then place it on a piece of wood and fill it all with epoxy resin.
As you can see, making a pendant by hand from wood is not difficult, all you need is to have necessary tools and a small piece of wood with a beautiful grain. The rest is a matter of technique! It is advisable to sand the craft well so that the surface is smooth and does not scratch the body of the girl for whom the gift is intended.


