Modern kitchen equipment makes the cooking process less cumbersome. Correct lighting rooms and LED lighting for the kitchen under the cabinets creates a comfortable environment for the home chef.
About the benefits LED lighting in comparison with both traditional incandescent lamps and energy-saving lamps, everyone knows. This is extremely high efficiency and durability. It is also important that the LEDs light up at full power instantly, without requiring time to warm up, and their service life does not depend on the number of on-off switches. The only drawback- relatively high cost. But the costs are justified: LED lighting in the kitchen will last for several decades, saving a lot of money due to low energy consumption.
If you already have a different type of kitchen lighting, do not rush to change it to a new one. Manufacturers produce LED bulbs for almost any type of base and, most likely, you can only replace the lamp itself, without changing anything in the lamp or limiting yourself to minor alterations.
Where to place the backlight
Correct lighting the kitchen should be multi-zone. This general lighting, light above dining table and of course, LED lighting for working area kitchens.
A sophisticated consumer, technically savvy and familiar with the latest in interior design, often does not limit himself to functional lighting alone.
Where should and can kitchen lighting be located?
- Work area - lighting under cabinets.

The lighting level in the work area should be as high as possible
- The hood above the stove has built-in lighting.
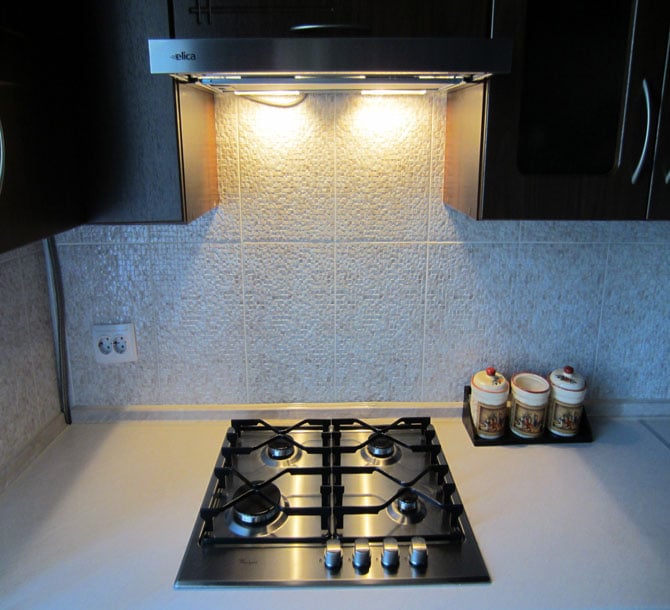
If the hood light seems insufficient to you, standard lamps can be replaced with brighter and more economical diode lamps
Adds convenience or simply decorates the interior additional lighting in the following places:
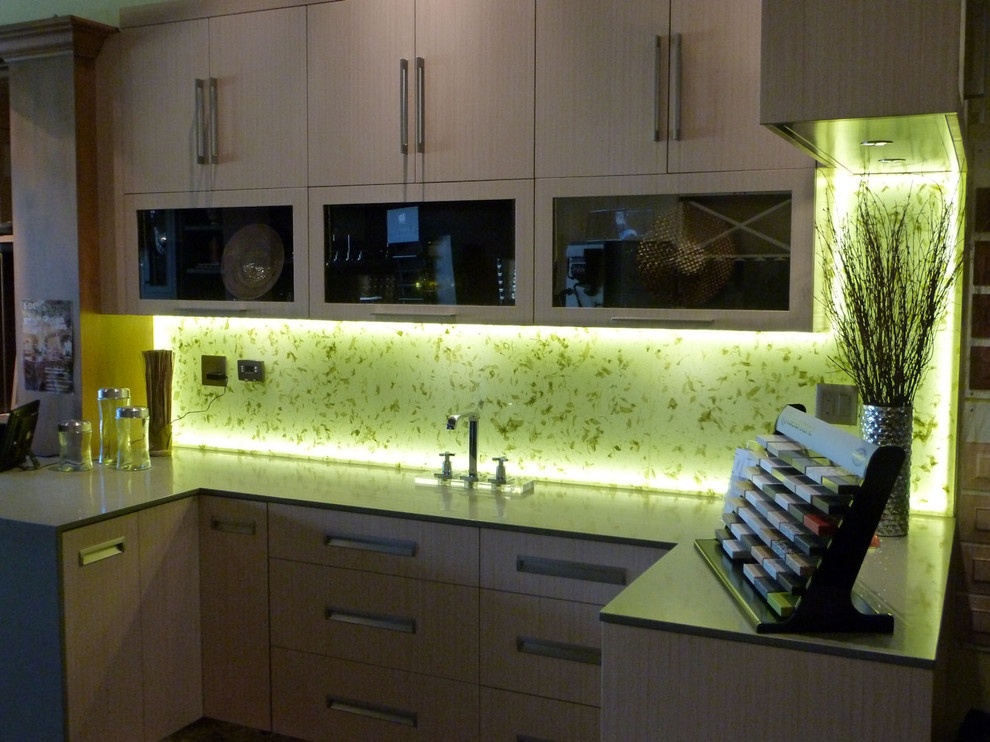
- Illuminated glass cabinets. If you don't have collectible dishes, put frosted glass at the door, it’s no less beautiful.
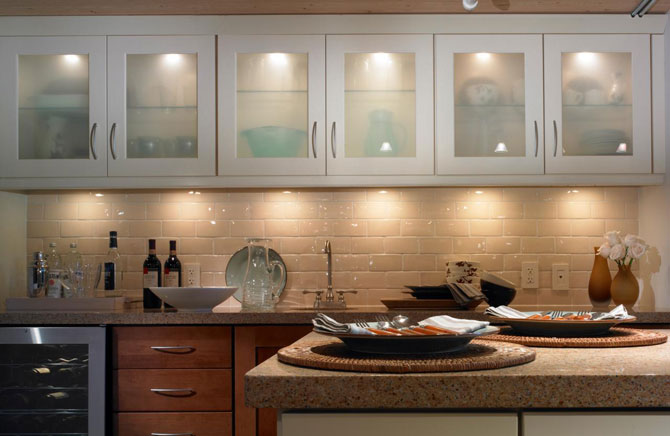
The soft light emanating from the glazed cabinets visually lightens the kitchen set
- Above upper cabinets, if the room has sufficient height. Light directed to the ceiling will make the room visually higher
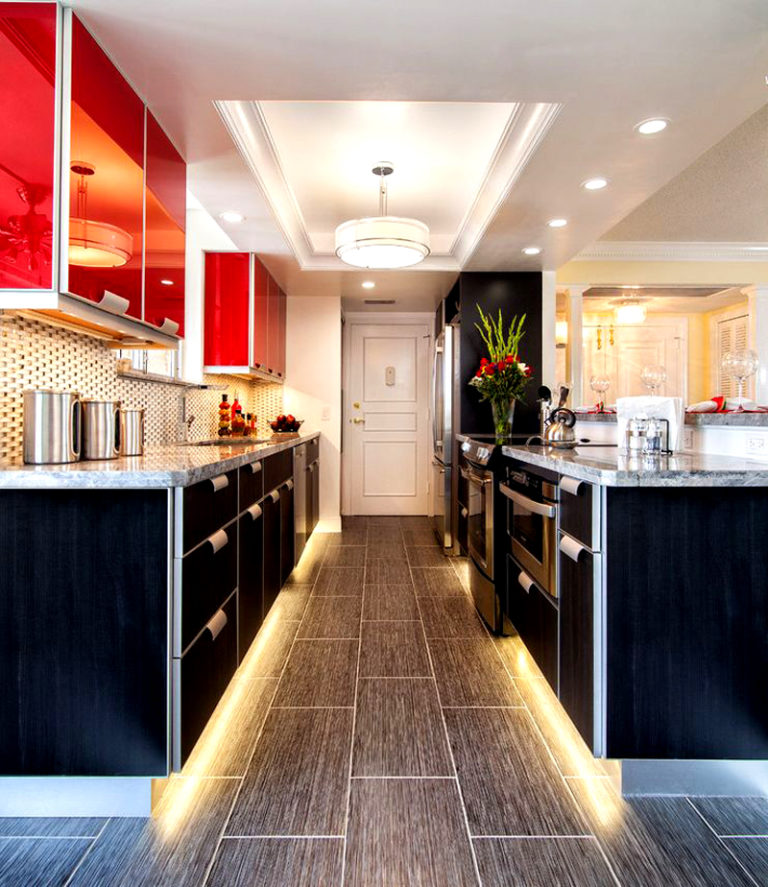
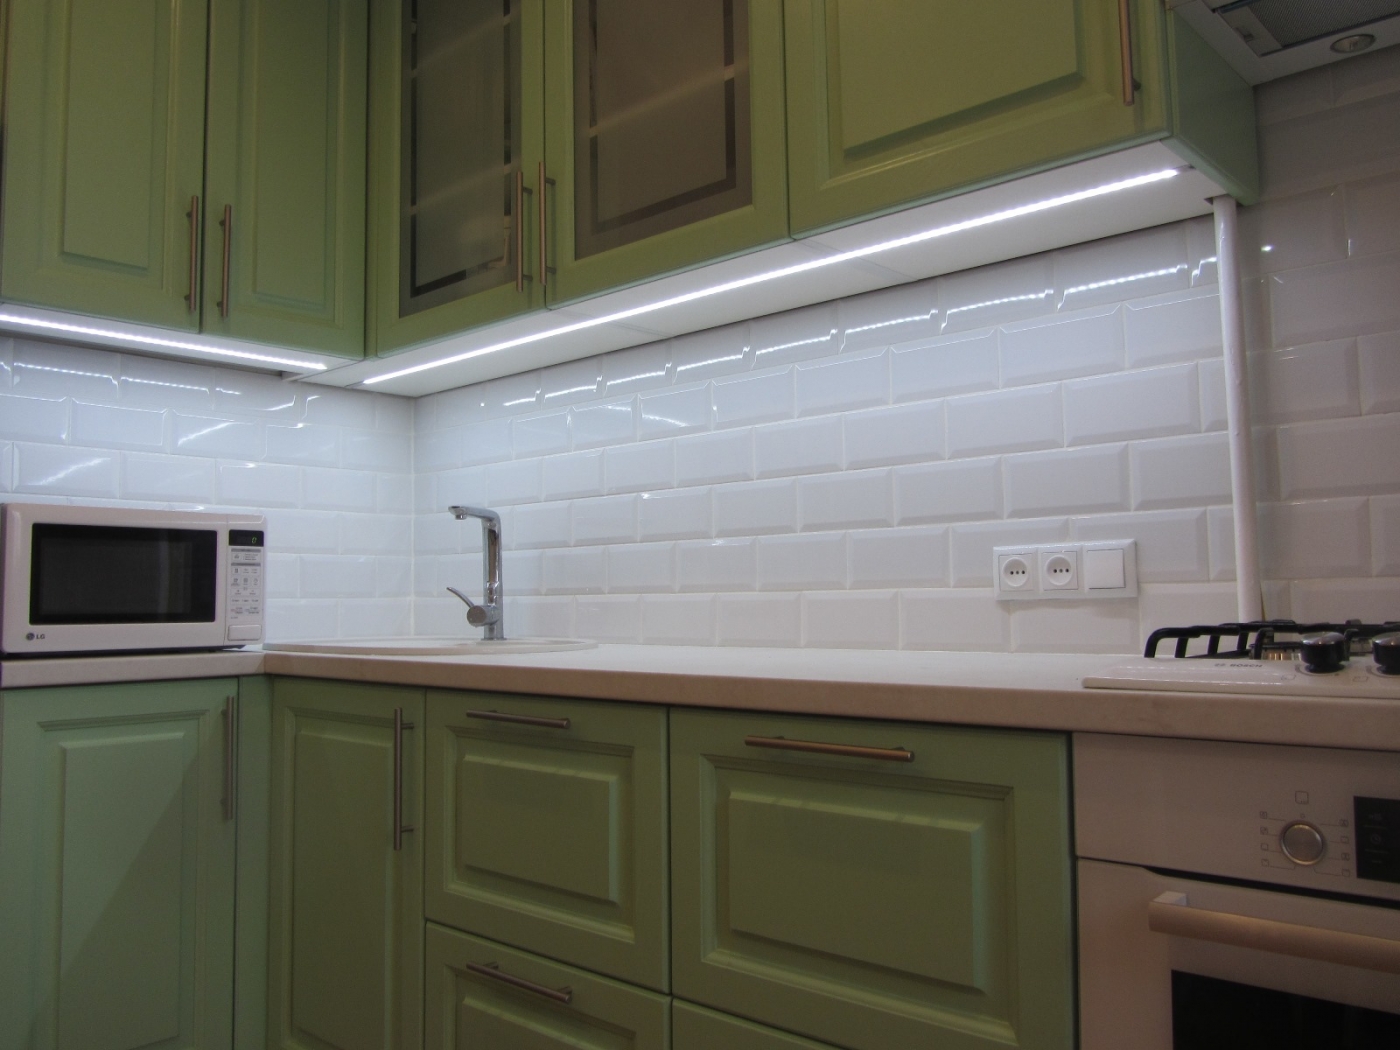
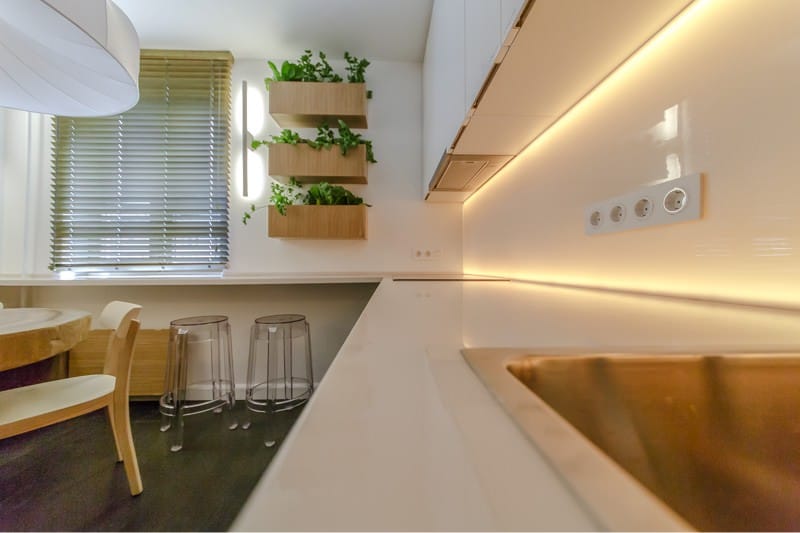
- Under the lower tier of cabinets. The light source should not be visible, so a thin and inconspicuous LED strip for the kitchen is best.
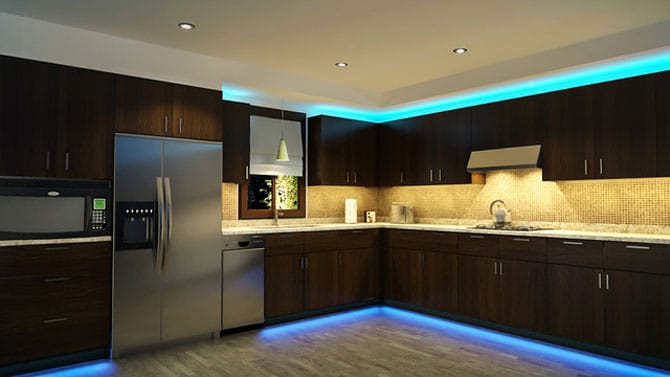
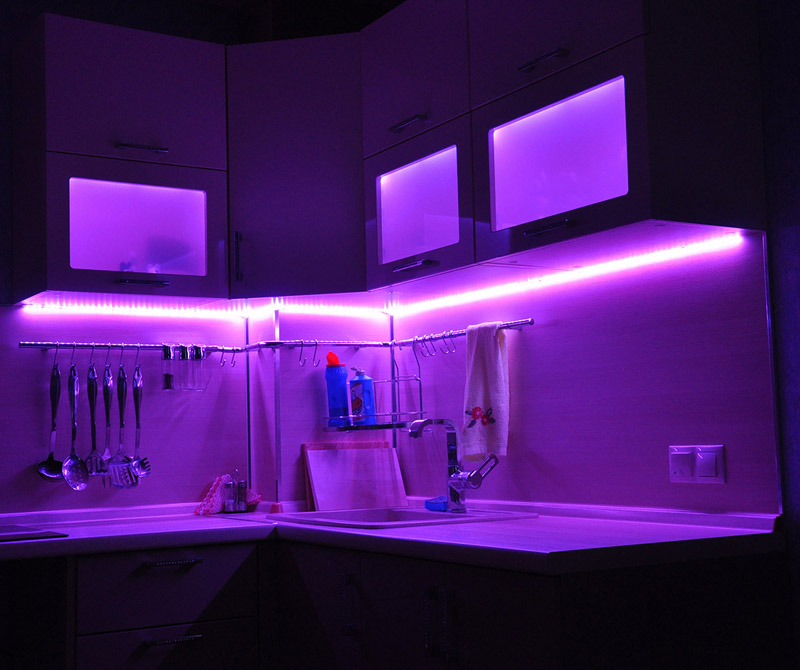
LED lighting directed at the ceiling and floor in the kitchen above and below the cabinets is not intended for work, so it may not be white, but colored. The upper light can be bright, and the lower light should be dimmed, noticeably softer than in the work area
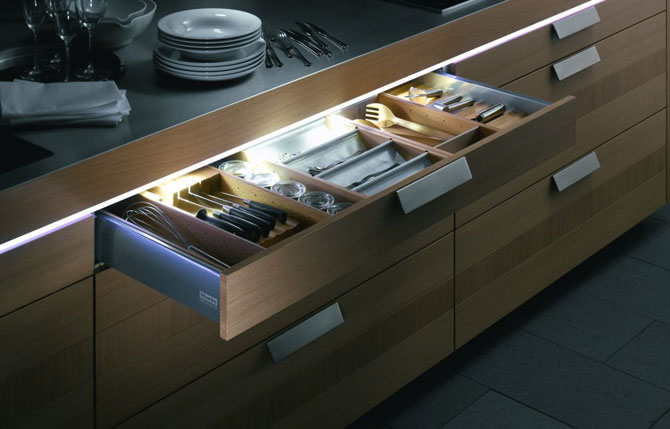
- An LED strip in the kitchen can be installed under the countertop and directed along the fronts of the lower cabinets, highlighting their contents.
The tape is fixed directly under the tabletop. The tabletop itself should protrude relative to the furniture front at a distance no less than the width of the light element
- You can also illuminate the tabletop itself from the inside; for this it must be transparent. They are made from several layers of glass and transparent polymer.

An LED strip is installed along the contour of the translucent tabletop

Another option is hidden LED lighting for the glass tabletop. The light source is directed from the end. To maximize the effect, the tabletop is made of transparent quartz glass with matte details applied to the surface. They are the ones who will glow
- Bar counter lighting, if available.
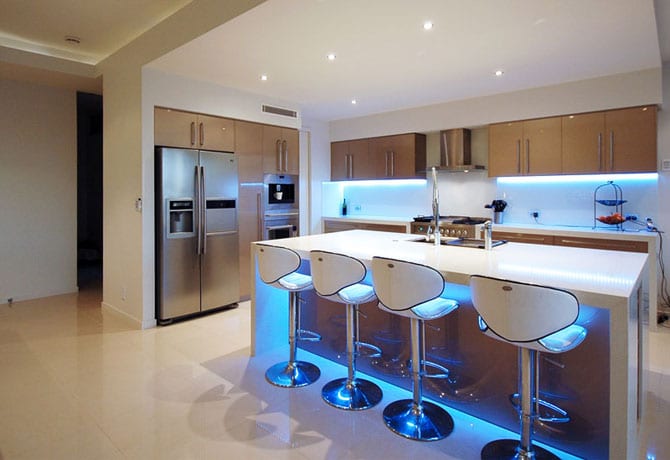
LED lighting for the kitchen in the bar area is usually directed downwards
- The luminous skin is the latest fashion. The light does not fall on it from the outside, but comes from within.

The luminous skin came into the kitchen interior from advertising lighting. This is a flat diode panel with an image printed on milky glass.
Actually, LED lighting in the kitchen can be placed almost anywhere. Only financial considerations can limit your imagination.
What types of LED kitchen lights are there?
Do-it-yourself LED lighting can be made using ready-made lamps, or you can actually assemble the lighting system yourself from individual elements. We list the main types of devices used:
- Surface-mounted linear luminaires. They are sold both individually and in sets, where several modules are connected in series into one block using a special adapter.
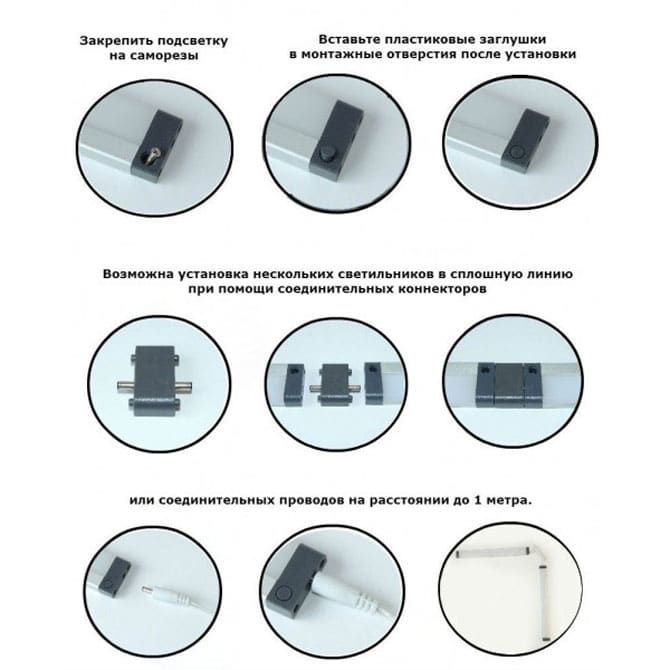
LED lights for the kitchen work area with your own hands from ready-made linear modules
- Surface mounted spotlights.
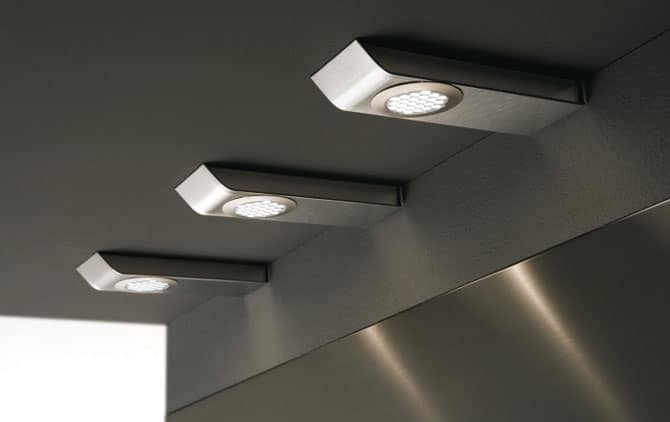
LED illumination of the work area, made of corner lamps
Lamps, both linear and spot, equipped with touch switches, have appeared on sale. It is enough to touch their body in a certain place to turn the light on or off.
![]()
The touch switch is usually indicated by a constantly lit blue LED
- Recessed lamps, linear and spot. Being very thin, they are mounted in the bottom shelf of the cabinet flush with the bottom surface.
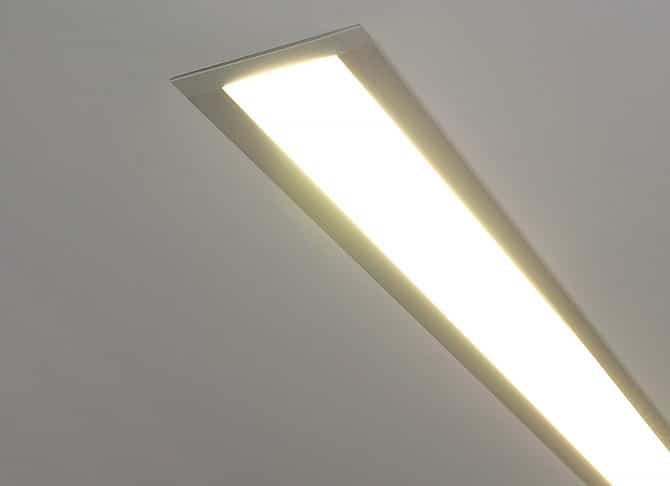
The recessed LED lighting for the kitchen is completely hidden in the bottom shelf. This is convenient, but installation of such a lamp requires certain qualifications
- LED strips for kitchen lighting are used no less widely than ready-made lamps. The reason for this popularity is wide choice in brightness and color and, which is very convenient, the tape can be cut exactly to the required length. It is cheaper than ready-made lamps.
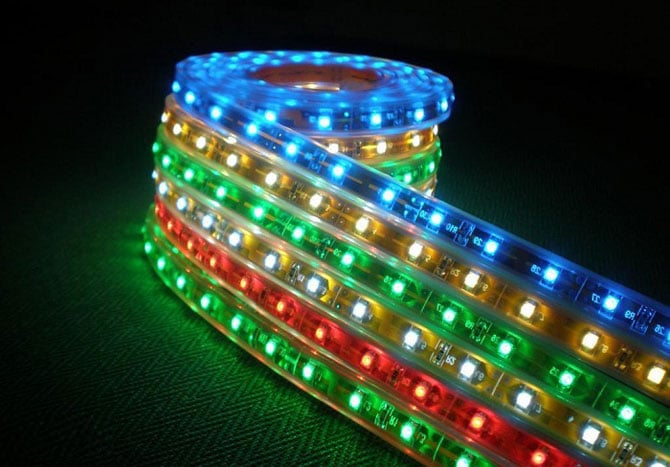
The choice of brightness and color is very diverse
DIY LED strip installation
With ready-made lamps everything is more or less clear, but how to make lighting on kitchen set with your own hands from light diode strip?
What will the strip-based LED backlight consist of?
To assemble a working lamp you will need following materials:
- Diode strip of the required length.
- If necessary, aluminum guide profile.
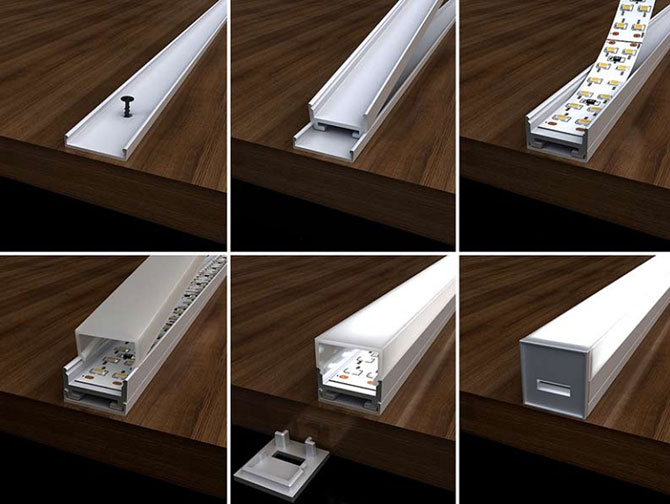
Kitchen lighting will look neater if you place it in a special aluminum profile. This solution makes lighting installation easier
- Power supply 12 W.
- Switch.
- Electrical cable and plug or terminal block, depending on the type of connection. We recommend using a double-braided stranded copper cable with a cross-section of at least 2x0.75 mm2.
- Heat shrink tubing for sealing connections.
LED strip is often sold complete with power supply and control
How to choose LED strip
The LED strip in the kitchen must be protected from water; this is one of the conditions for safe operation. The minimum level of moisture protection is IP44 (withstands individual drops of water), better than IP65 (water jet). Voltage - 12 W, as the safest.
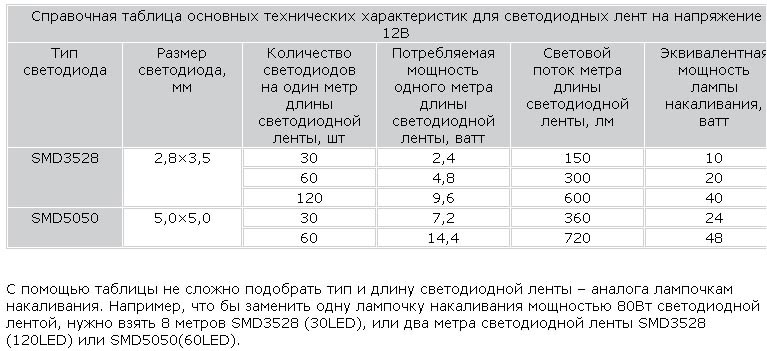
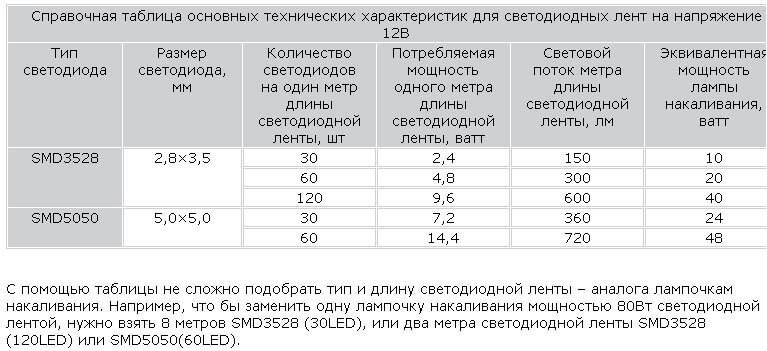
LED lighting for the kitchen work area should be bright, with a spectrum close to natural daylight. We recommend using a strip with three-crystal LEDs of the SMD 50x50 type, consisting of 30 diodes of 12 lumens each per meter of length. If you want to have brighter light, especially when equipping the backlight with a dimmer, it is better to choose a product with 60 diodes. Color temperature ranges from 3300 to 500 K.
Additional lighting for the kitchen, as a rule, should not be bright. Often, the luminous flux of SMD 35x28 from 30 diodes of 5 lumens per meter is enough. Color meaningful practical role does not play and depends more on the design idea.
How to choose a power supply and switch for an LED strip in the kitchen
To ensure stable LED lighting in the kitchen, we recommend choosing a power supply with a power reserve of about 25%. The power of the tape depends on the model, specifications can be obtained from the seller. So, SMD 50x50 from 30 diodes “takes” 7.2 W per meter of length. Thus, if the length is, for example, 4 m, the total power will be 28.8 W. Accordingly, a power supply with a 25% margin is 36 W. Choose a compact model, it will be easier to hide.
As for the switch, it is possible the following options:
- Simple push-button.
- Sensory by touch.
- Infrared, responds to hand waves.
- Dimmer that regulates the luminous flux. The control can be mechanical, in the form of a rotating handle, or touch.
- A control unit that makes the light flash or shimmer with multi-colored lights if a multi-color RGB strip is selected. Although, such effects are used infrequently.
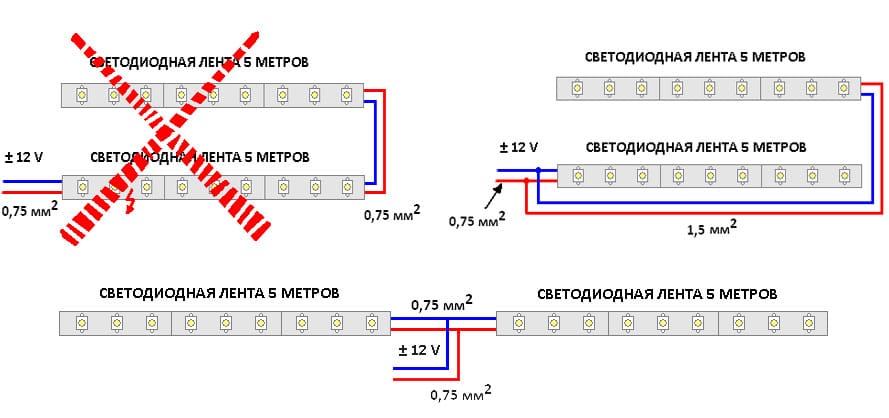
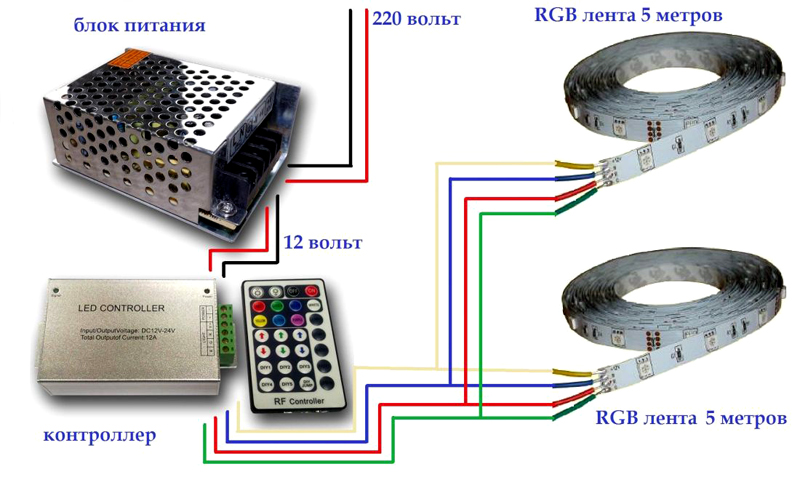
LED lighting for the kitchen based on several strips should only be carried out using a parallel connection diagram
DIY LED strip installation in the kitchen
LED backlight must be assembled in accordance with the following rules:
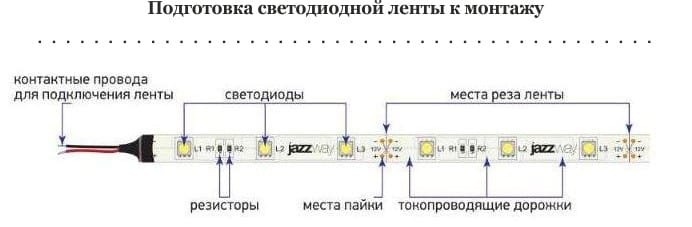
- The tape cannot be cut to length arbitrarily, only in certain places. For this purpose, special marks are applied to it.
- If it is necessary to use several tapes, they are connected to the power supply in parallel.
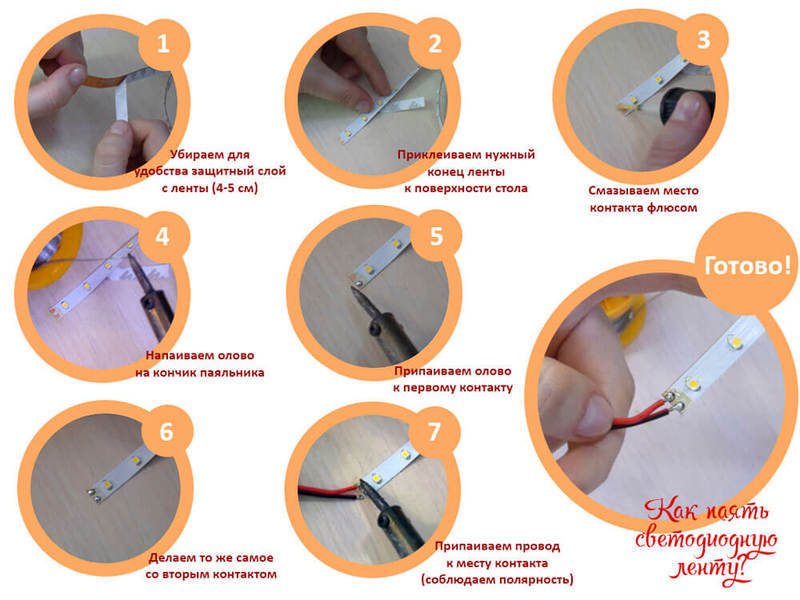
- Electrical cable, coming from the power supply, should be connected to the tape not by connectors, but by soldering, this is more reliable. The connection should be sealed using heat shrink tubing. You can also use electrical tape, but it is more difficult to do and will not look as neat.

- A regular key or push-button switch is placed before the power supply.
Connection diagram with a conventional switch
Dimmer or RGB block - after the power supply.
LED strip in the kitchen: photo of the connection diagram with adjustable luminous flux dimmer
- LED kitchen lighting is attached under cabinets using double-sided adhesive tape. First, you should only lightly secure the tape in several places and, making sure that it is on in the right place and lay flat, press firmly along the entire length.
If you do not have sufficient knowledge and skills to work with electricity and electronics, entrust the installation of lighting to specialists.
To ensure a comfortable environment these days, LED lighting for kitchens under cabinets is often used. Detailed introduction to technical means and installation techniques will be useful in practice. In some cases, it is quite acceptable to perform the entire complex of work with your own hands, without involving third-party specialists, extra costs and hassle.
First, we need to note the reasons why this particular type was chosen. lighting fixtures.
Their short service life is accompanied by increased energy costs. Such devices have impressive dimensions and are difficult to hide in furniture elements.
But these fragile flasks contain chemical compounds harmful to humans. Care must be taken when replacing. Large sizes determine limited opportunities applications in confined spaces.
Halogen lamps also consume quite a lot of electricity. These are point light sources.

With these disadvantages in mind, here are the advantages of LED under cabinet lighting:
- These devices, with the same luminous flux, consume less electricity than energy-saving models of fluorescent lamps.
- They are characterized by an increased service life. Standard modern devices perform their functions for 25 thousand hours when switched on and more.
- LEDs turn on quickly, without delay. During operation, they shine evenly and do not make any extraneous sounds.
- They do not contain mercury vapor or other dangerous chemical compounds.
- Such devices do not emit waves in the infrared range of the spectrum.
- They are equipped with effective electronic circuits that compensate for large voltage drops in the power supply network.
- LED lamps are created in the form of strips, point and volumetric sources. With a wide range of models, it is not difficult to find an option that ideally matches the needs of users.
- It should be emphasized that LED light sources are well compatible with the latest systems remote and program control. They do not create network congestion.
The only drawback is the high cost. But for an accurate comparison, you need to calculate how long the LED lighting for the kitchen under the cabinets will work. When summing up the final result, taking into account the costs of paying electricity bills, it is not difficult to draw the correct conclusion.
This advantage Designers especially appreciate it. They often use LEDs to create exclusive interiors, effectively illuminate elements, and eliminate some architectural defects.
Why do you need LED lighting for the kitchen under cabinets?
The list of benefits partially answers this question. But for accuracy, it is necessary to study in more detail the functionality of such kitchen lighting. First of all, it is necessary to create conditions that are comfortable for the human eye. Here we're talking about not so much about the strength of light, but about its quality.
All residents use the kitchen every day, quite a lot of the time. Here it is necessary to ensure even light, without flickering or delays when turned on. Selecting a pleasant spectrum range will come in handy.
This room has several zones: for working with products, washing, hob, table for eating. They do not necessarily need to be used at the same time, so local installation of devices is suitable.

Various equipment works here, and ventilation is often used. Vibrations are possible high humidity, temperature changes. These unfavorable factors will not damage the LEDs. Other devices will fail faster in such conditions.

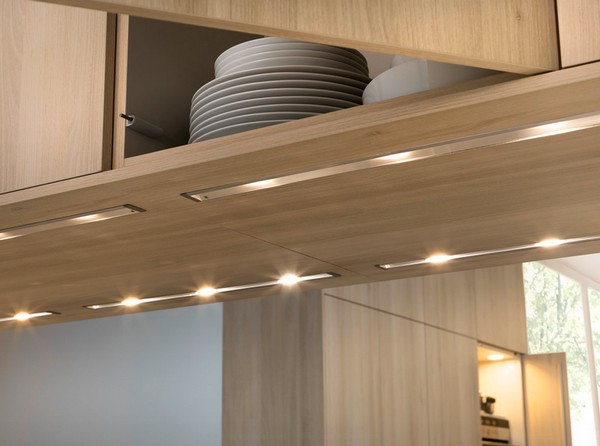
Review of overhead LED kitchen lights under cabinets
The following illustrations demonstrate the potential capabilities and different variants use of devices of this group.
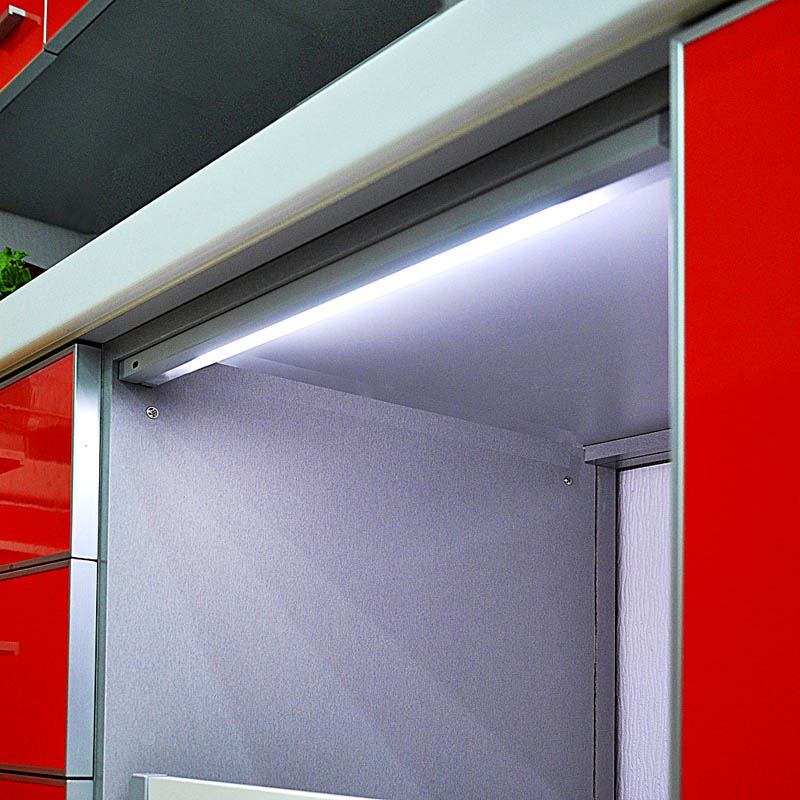
Similar products are produced in standard sizes. They are suitable for completing cabinet furniture. This example shows the installation of the product in a cabinet niche.
This schematic drawing shows the housing. It is created from aluminum and metal alloys. It is intended not only to create the necessary rigidity of the frame. With its help, excess heat that is emitted by semiconductor devices when turned on is removed. The lid is made of translucent matte polymer. It scatters radiation. By maintaining a small distance between the diodes, it appears as if a solid strip is lighting up inside.
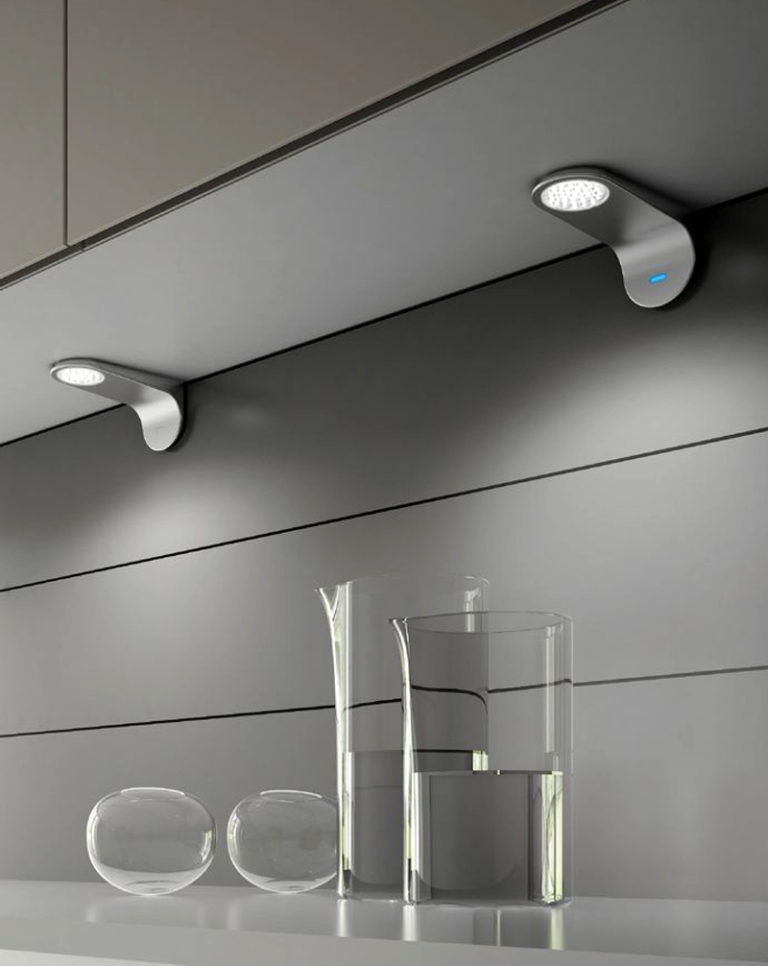
Such devices look like special supports for cabinets, made in high-tech style. In reality, these are economical light sources. They are placed above individual functional areas.

This lamp model is attached with screws to the bottom wall of the cabinet. It is connected to a standard 220 V power supply, so the necessary hole is created in the furniture for hidden wiring. Touch control is used here. To turn it on, just touch the marked spot on the device body.
Related article:
How to choose the right device, what lighting intensity is required, where to install it, review original models– about this and much more in a special material.
Recessed furniture LED lamps
This kitchen set lighting is installed in the furniture design.

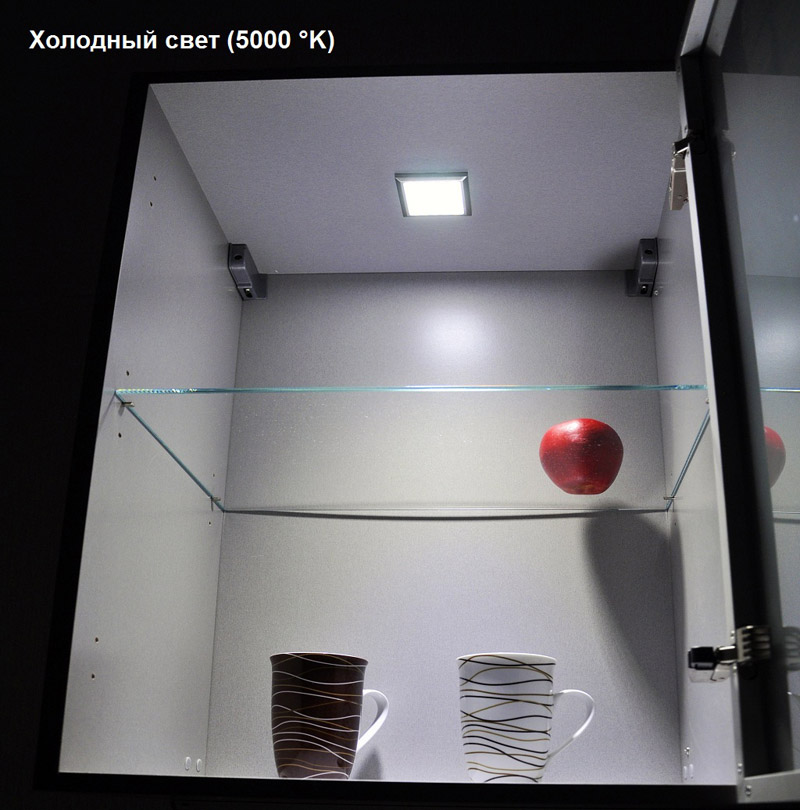
For your information! Figure No. 15 shows the color temperature value. The range from 4000 °K to 6000 °K, as in the image, is a “cool” light, suitable for the design of ultra-modern interiors. Soft shades are created by a source with a temperature of 2000 °K to 3000 °K.
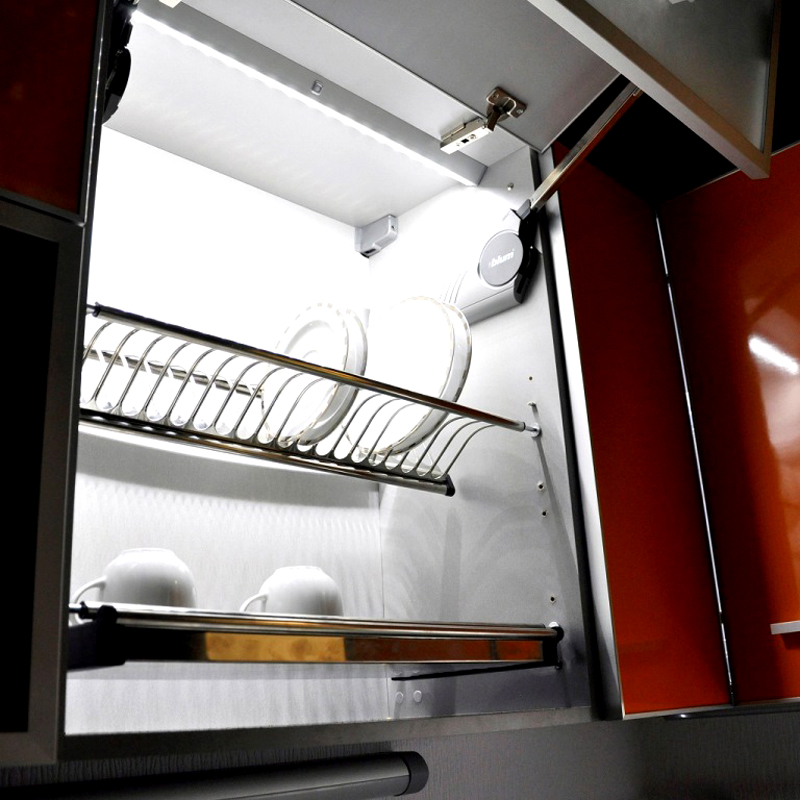
This model is equipped with a push-type connector. When the cabinet door is pulled out, voltage is applied to electronic circuit. No additional user action is required to turn off the device.
Other placements of LED devices
The following figure demonstrates the possibilities for eliminating individual deficiencies in the interior.
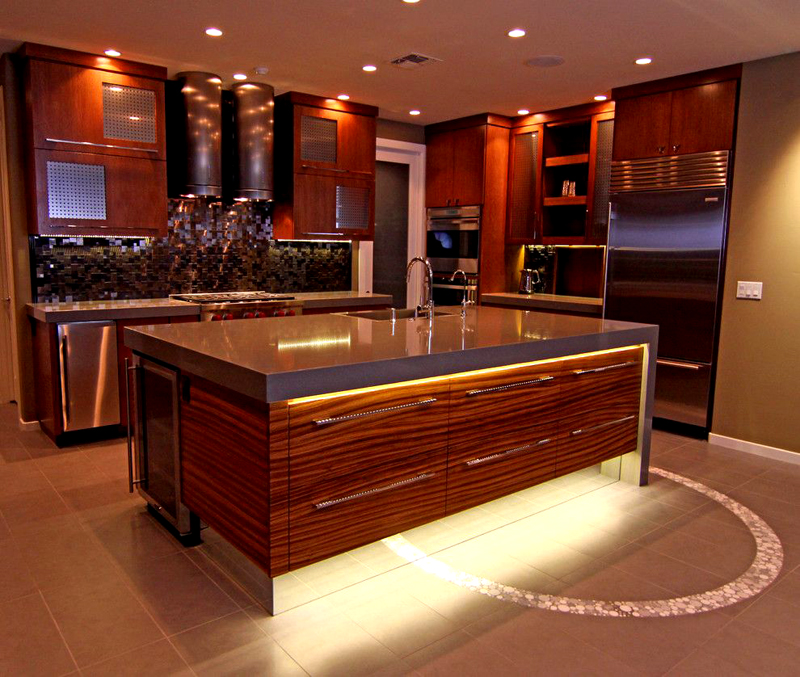
Installation of such invoices LED lamps for the kitchen under cabinets is designed to facilitate the visual perception of large heavy objects. This creates the illusion of “floating” objects that do not rest on the floor. Please note the unlit areas for comparison. They look less harmonious.

Control devices
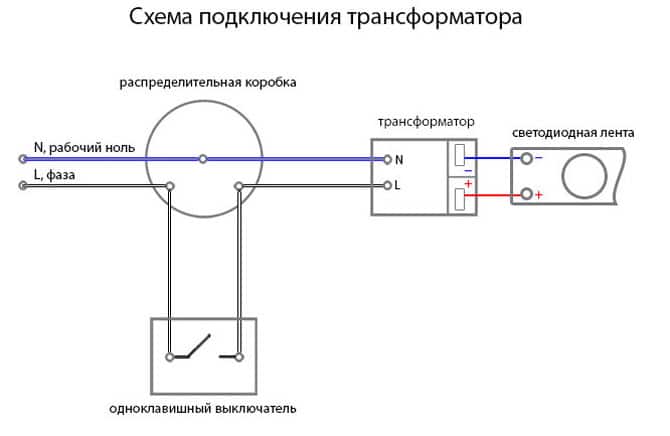
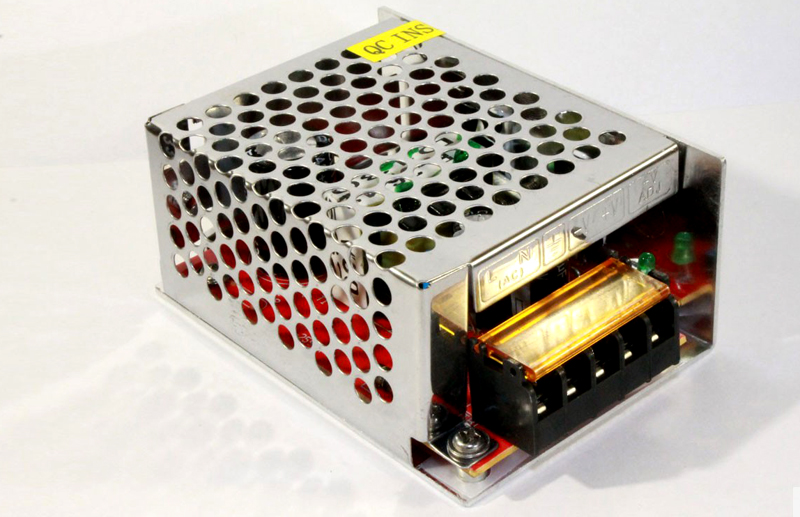
LED semiconductor devices operate when connected to a constant voltage of 12-24 V. Therefore, it is necessary to equip the system with a specialized device. It converts the standard 220 V alternating voltage. In some models, the corresponding unit is installed inside the lamp body.

Article
The kitchen is one of the places that are subject to increased demands in terms of ergonomics and design. Also not last place This is where illumination of the workplace and interior comes into play, since not only the quality of food preparation depends on this, but also the desire to do it again and again. All this is due to the fact that the quality of light, its color and intensity directly affect well-being and performance. It has long been noted that flickering light and poor lighting negatively affect performance and well-being, so you should pay close attention to this fact, and perhaps your loved ones will please you with something tasty. Next, we will tell you how to make an apron backlight in the kitchen. LED strip.
Overview of lighting options
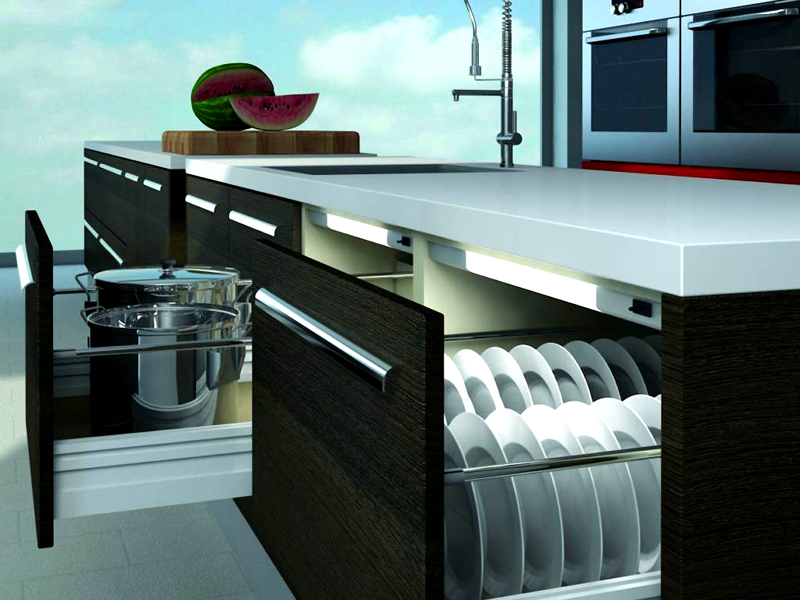
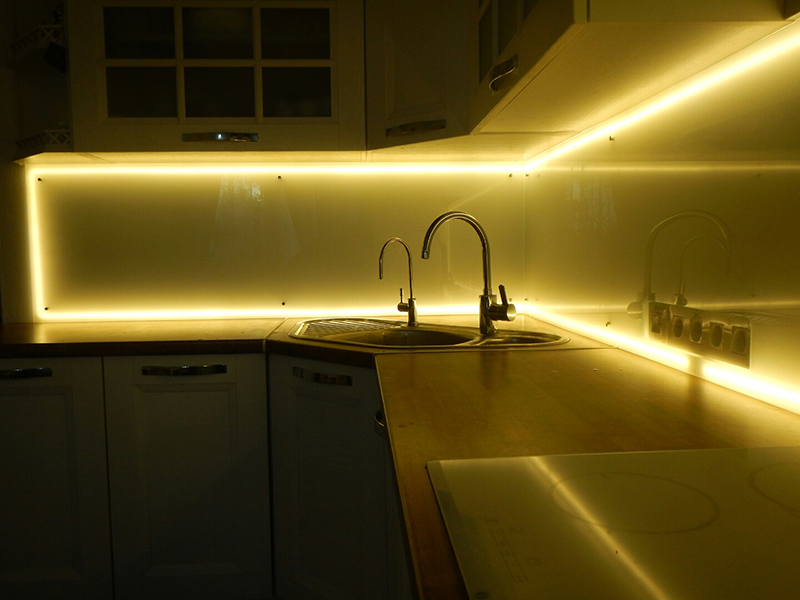
The usual placement of a chandelier in the kitchen in the center is not the most optimal position, since standing at the table, the housewife blocks out the light and a shadow falls on the place of production. The way out of this situation is to install a light source above the workplace, under the wall cabinet.
Now that LED light sources have ceased to be exotic and have become consumer goods, it is possible to independently install the backlight on kitchen apron and above the workplace. we have already discussed in one of our articles. 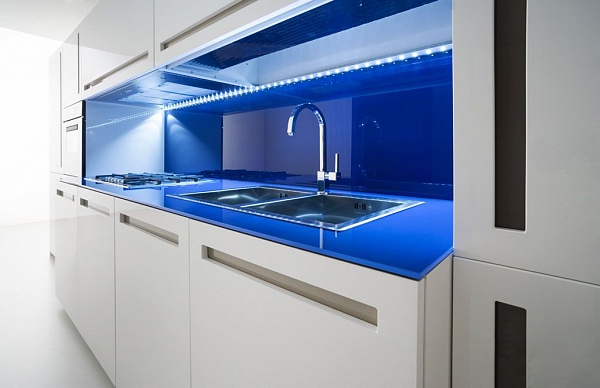
In this article, we will not consider incandescent lamps and fluorescent lamps. So, to install incandescent or halogen lamps, you need to take measures to prevent fire and eliminate thermal contact, and fluorescent lamps are quite large in size.
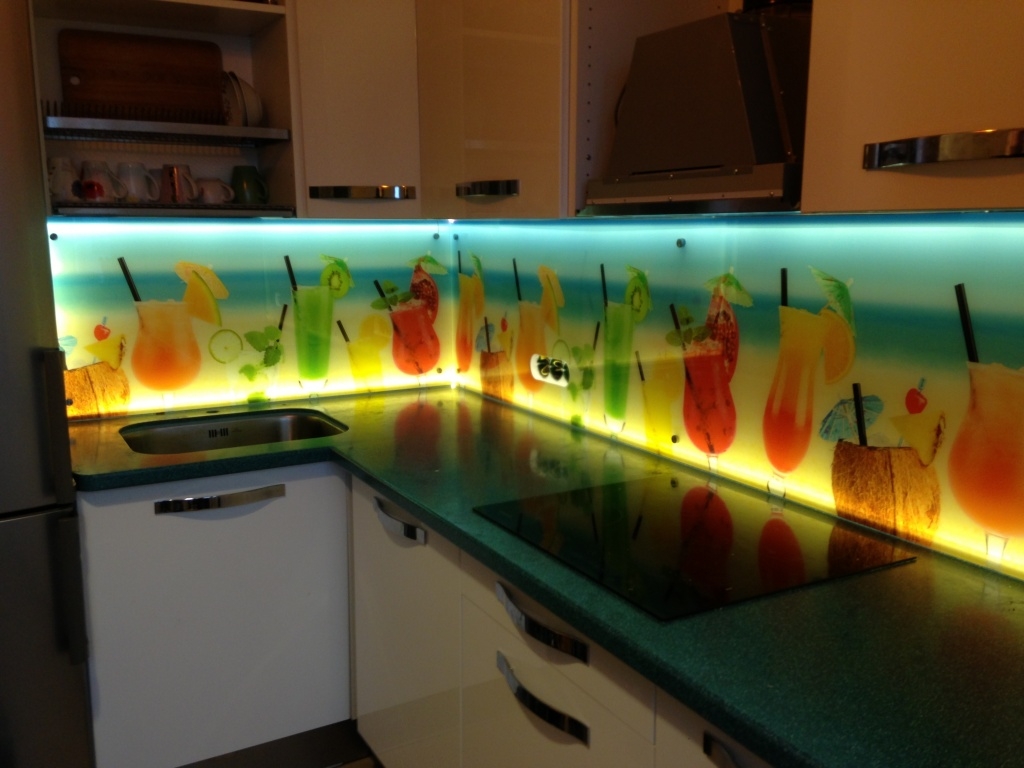
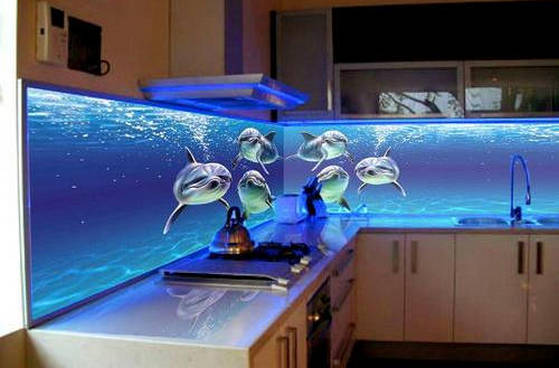
LED lamps do not have such disadvantages, and with the help of LED strips you can illuminate the most complex interior. Besides, in design solutions They make an apron from glass with a printed pattern, which is illuminated using RGB colored tape or by illuminating the niches above and below the shelves. Such illumination of the apron in the kitchen gives a unique charm to the room, conducive to emotional relaxation and mood.
Installation instructions
To install the tape, you need to follow the instructions, and you will succeed. Provided below simple rules will help you make your own kitchen apron lighting with LED strip:

These 10 rules will help you make your own kitchen backsplash lighting. We also recommend watching videos that discuss 2 installation options: single-color and RGB LED strip.
Photo examples of finished works


The design of any room includes high-quality lighting. The kitchen is no exception. If you distribute the light fluxes correctly and conveniently, then cooking in such a kitchen will be a joy. To achieve this, lighting must be designed and calculated. Modern kitchen interiors have increasingly recently included the insertion of diode strips.
LEDs are semiconductors that emit light when electrical energy passes through them. They come in different varieties chemical composition, due to which they have different degrees of brightness. LED strip in the kitchen is never mounted directly, as this may cause overheating and breakdown. Stabilizer - required condition connecting diodes.
Advantages and disadvantages of LED backlight (table)
| + | - |
| First of all, it is worth noting the service life. On average this is 50 thousand hours | The cost of good LED lamps will be quite high |
| If we compare LED backlighting with other light sources, the former consume much less energy | Lamps with warm white light can disrupt color reproduction. in addition, such lighting can make your eyes very tired |
| They are not afraid of mechanical damage and temperature changes because they do not contain an incandescent filament or a glass bulb. | LED lighting is most often not used as the main one, but only as an application, decorative element, adjacent to the main one |
| LEDs can be manufactured for any voltage; there is no need to use ballast reserves | To install such lighting, you need a power source (LED driver), which, by the way, has a strong impact on the cost of such lighting. In addition to the fact that its acquisition is simply necessary, it also needs to be hidden from view. |
| Features high luminous efficiency | The chemical and physical parameters of reflective crystals degrade over time, and the lamp begins to dim |
| Wide range of colors. LEDs can be, for example, white, red, orange, green, blue, purple or yellow flowers. There are also ultraviolet and infrared spectra of LEDs. There is cold and warm light transmission | |
| Brightness can be adjusted | |
| They work no matter what temperature regime in room. LEDs are compact and flexible modules that can be used to bring almost any lighting idea to life | |
| LEDs can be installed at different radiation angles | |
| They are safe and environmentally friendly | |
| Work no matter what the room temperature is |
Why are diodes convenient in the kitchen?
- Diodes can be zoned various elements rooms, highlight cabinets, niches and shelves.
- Highlight decorative elements.
- If you use them to illuminate a kitchen apron, especially a glass one, it will look very impressive.
- They can be distinguished by stained glass.
- If you illuminate the bottom of the bedside tables with them, then the effect of furniture will be created, as if frozen in the air.
- If your ceiling is made in several levels, then each of these levels can also be illuminated, which will create a beautiful view.
- If you illuminate the bar counter, you will create the effect of a real bar.
Thus, it turns out that using LED lighting in the kitchen will create a cozy and attractive atmosphere in the kitchen area. Despite the fact that the cost of such lighting can cost a pretty penny, it will soon pay off in the fact that there will be big savings on electricity.
Classic interiors are most often illuminated warm shades, and the high-tech style involves the use of cool lighting.
Photo gallery: Kitchen lighting with LEDs
Illumination of cabinets from above Illumination of the work area Illumination of shelves Illuminated bar counter “Floating” furniture  Color options for LED backlighting
How to choose LED strip
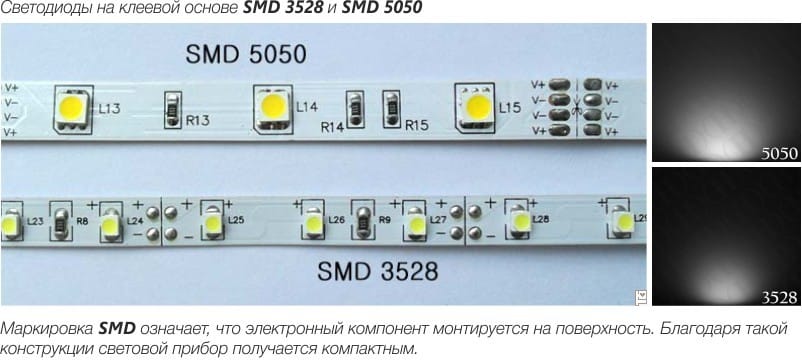
SMD LEDs are used when installing diode lighting. They are divided into types:
To purchase the LED strip you need, you need to clearly understand what kind of lighting you would like to see as a result. There are a couple of recommendations for this:
- To illuminate the area where you cook or dine and create a fairly bright and uniform light there, it is recommended to use an SMD strip with three 50x50 crystals.
- To provide decorative lighting for a headset, all you need is a strip with diodes in one crystal measuring 35x28
Selecting a power supply
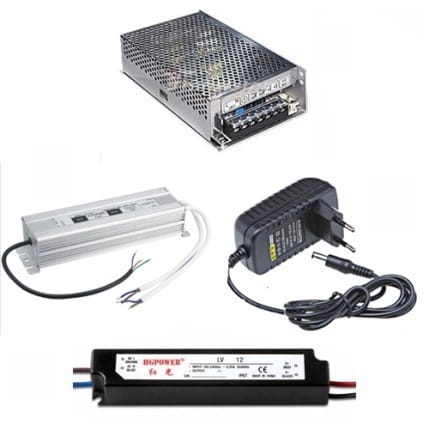 Power supply option
Power supplies can have different powers, and therefore sizes. The main thing when choosing a unit is to determine the power of the transformer, which should work with a reserve, but not very large. Let's look at an example calculation with certain parameters, to make it easier for you to calculate the power that you need. It is necessary to calculate the power of the unit for SMD 5050 tape 5 meters long, the power of which is 12 W:
- 12(W) * 5(m) = 60W
- 1.25 (required headroom factor) * 60 = 75 W.
- 75 W is the power of the transformer that is needed in this case.
How to highlight a tabletop, dining area
In order to illuminate the work area, as mentioned earlier, you can use LEDs with an average level of moisture protection. This is enough to protect the elements from exposure to steam, dirt, and other things. Such lamps can even be subjected to wet cleaning.
A special aluminum profile is attached to the table, thus securing the tape to the table surface. The profile is necessary to hide the wires and give the light elasticity. The tapes are also self-adhesive.
Using additional accessories, you can make a backlight that changes brightness and/or color.
To illuminate your desktop, it is ideal to use a warm white. Such lighting conveys the true color of the food as accurately as possible.
Using LEDs as additional lighting also requires protection from moisture. An average level is enough. The tapes are installed using double-sided tape.
Installation tools
- LED strip 12 W
- Electric cable with a cross-section of 0.74 mm 2
- Transformer
- Soldering iron with solder and rosin
- Insulating tape
- In some cases it is necessary to use a drill
- Scissors
- PVC corner or aluminum profile, which is used to mount LEDs
- 2-sided tape
- Sometimes the use of electrical installation brackets is provided
How to install the tape yourself
Before attaching the tape, the surface must be thoroughly cleaned and degreased!
Do not press the tape too tightly at once so that you can later straighten it in case of uneven gluing.
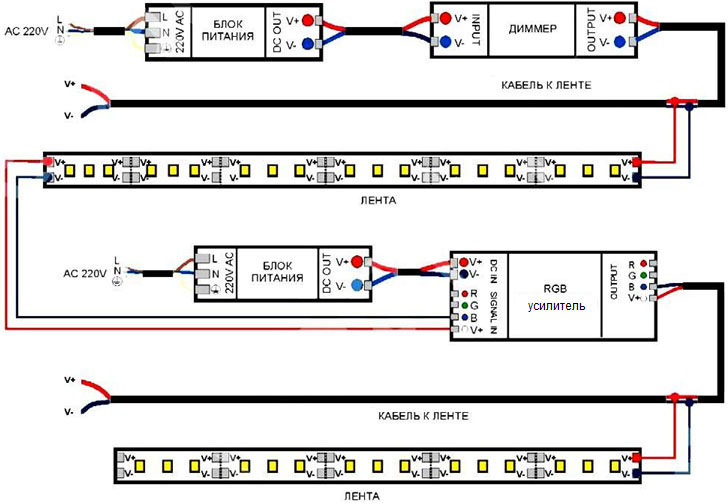
Connecting a diode strip of the same color with a dimmer
The dimmer regulates, i.e. reduces or increases the brightness of the diode strip. In addition, he turns this diode strip on and off.
There are currently two types of dimmers:
- The tape with one color is controlled from the remote control.
- The tape with one color is controlled using a potentiometer (switch, a regular knob for incandescent lamps)
Both of the above options are connected according to the same circuit
Video: How to make LED lighting for the kitchen work area yourself
LED lighting is a big breakthrough in area lighting. They will perfectly complement your interior and serve you well. Their variety will allow you to choose exactly the one you would like. Durability will give you a chance to save more money than you spend on purchasing them. And it won’t be difficult to fix them yourself, and they will delight you for a very long time. Lights to you and good luck!
Everyone knows about the advantages of LED lighting compared to both traditional incandescent lamps and energy-saving lamps. This is extremely high efficiency and durability. It is also important that the LEDs light up at full power instantly, without requiring time to warm up, and their service life does not depend on the number of on-off switches. The only drawback is the relatively high cost. But the costs are justified: LED lighting in the kitchen will last for several decades, saving a lot of money due to low energy consumption.
If you already have a different type of kitchen lighting, do not rush to change it to a new one. Manufacturers produce LED lamps for almost any type of base and, most likely, you can only replace the lamp itself without changing anything in the lamp or limiting yourself to minor alterations.
WHERE TO POSITION THE LIGHT
Proper lighting in the kitchen should be multi-zone. This includes general lighting, light above the dining table and, of course, LED lighting for the kitchen work area.
A sophisticated consumer, technically savvy and familiar with the latest in interior design, often does not limit himself to functional lighting alone.
Where should and can kitchen lighting be located?
- Work area - lighting under cabinets.
The lighting level in the work area should be as high as possible
- The hood above the stove has built-in lighting.
If the hood light seems insufficient to you, standard lamps can be replaced with brighter and more economical diode lamps
Additional lighting in the following places adds convenience or simply decorates the interior:
- Illuminated glass cabinets. If you don't have collectible dishes, put frosted glass in the door, it's no less beautiful.
The soft light emanating from the glazed cabinets visually lightens the kitchen set
- Above the upper cabinets, if the room has sufficient height. Light directed to the ceiling will make the room visually higher
- Under the lower tier of cabinets. The light source should not be visible, so a thin and inconspicuous LED strip for the kitchen is best.
LED lighting directed at the ceiling and floor in the kitchen above and below the cabinets is not intended for work, so it may not be white, but colored. The upper light can be bright, and the lower light should be dimmed, noticeably softer than in the work area
- An LED strip in the kitchen can be installed under the countertop and directed along the fronts of the lower cabinets, highlighting their contents.
The tape is fixed directly under the tabletop. The tabletop itself should protrude relative to the furniture front at a distance no less than the width of the light element
- You can also illuminate the tabletop itself from the inside; for this it must be transparent. They are made from several layers of glass and transparent polymer.
An LED strip is installed along the contour of the translucent tabletop
Another option is hidden LED lighting for the glass tabletop. The light source is directed from the end. To maximize the effect, the tabletop is made of transparent quartz glass with matte details applied to the surface. They are the ones who will glow
- Bar counter lighting, if available.
LED lighting for the kitchen in the bar area is usually directed downwards
- The luminous skin is the latest fashion. The light does not fall on it from the outside, but comes from within.
The luminous skin came into the kitchen interior from advertising lighting. This is a flat diode panel with an image printed on milky glass.
Actually, LED lighting in the kitchen can be placed almost anywhere. Only financial considerations can limit your imagination.
WHAT ARE THERE ARE LED LIGHTS FOR KITCHENS?
Do-it-yourself LED lighting can be made using ready-made lamps, or the lighting system can actually be assembled independently from individual elements. We list the main types of devices used:
- Surface-mounted linear luminaires. They are sold both individually and in sets, where several modules are connected in series into one block using a special adapter.
DIY LED lighting for the kitchen work area from ready-made linear modules
- Surface mounted spotlights.
LED illumination of the work area, made of corner lamps
Lamps, both linear and spot, equipped with touch switches, have appeared on sale. It is enough to touch their body in a certain place to turn the light on or off.
The touch switch is usually indicated by a constantly lit blue LED
- Recessed lamps, linear and spot. Being very thin, they are mounted in the bottom shelf of the cabinet flush with the bottom surface.
The recessed LED lighting for the kitchen is completely hidden in the bottom shelf. This is convenient, but installation of such a lamp requires certain qualifications
- LED strips for kitchen lighting are used no less widely than ready-made lamps. The reason for such popularity is the wide choice of brightness and color and, which is very convenient, the tape can be cut exactly to the required length. It is cheaper than ready-made lamps.
The choice of brightness and color is very diverse
INSTALLATION OF LED STRIP WITH YOUR HANDS
With ready-made lamps, everything is more or less clear, but how to make lighting on a kitchen set with your own hands from an LED strip?
WHAT WILL THE LED LIGHTING BASED ON RIBBON BE CONSISTED OF?
To assemble a working lamp you will need the following materials:
- Diode strip of the required length.
- If necessary, aluminum guide profile.
Kitchen lighting will look neater if placed in a special aluminum profile. This solution makes lighting installation easier
- Power supply 12 W.
- Switch.
- Electrical cable and plug or terminal block, depending on the type of connection. We recommend using a double-braided stranded copper cable with a cross-section of at least 2x0.75 mm2.
- Heat shrink tubing for sealing connections.
LED strip is often sold complete with power supply and control
HOW TO CHOOSE AN LED STRIP
The LED strip in the kitchen must be protected from water; this is one of the conditions for safe operation. The minimum level of moisture protection is IP44 (withstands individual drops of water), better than IP65 (water jet). Voltage - 12 W, as the safest.
LED lighting for the kitchen work area should be bright, with a spectrum close to natural daylight. We recommend using a strip with three-crystal LEDs of the SMD 50x50 type, consisting of 30 diodes of 12 lumens each per meter of length. If you want to have brighter light, especially when equipping the backlight with a dimmer, it is better to choose a product with 60 diodes. Color temperature ranges from 3300 to 500 K.
Additional lighting for the kitchen, as a rule, should not be bright. Often, the luminous flux of SMD 35x28 from 30 diodes of 5 lumens per meter is enough. Color does not play a significant practical role and depends more on the design idea.
Specifications for Recommended Tapes
HOW TO CHOOSE A POWER SUPPLY AND SWITCH FOR AN LED STRIP IN THE KITCHEN
To ensure stable LED lighting in the kitchen, we recommend choosing a power supply with a power reserve of about 25%. The power of the tape depends on the model; technical specifications can be obtained from the seller. So, SMD 50x50 from 30 diodes “takes” 7.2 W per meter of length. Thus, if the length is, for example, 4 m, the total power will be 28.8 W. Accordingly, a power supply with a 25% margin is 36 W. Choose a compact model, it will be easier to hide.
As for the switch, the following options are possible:
- Simple push-button.
- Sensory by touch.
- Infrared, responds to hand waves.
- Dimmer that regulates the luminous flux. The control can be mechanical, in the form of a rotating handle, or touch.
- A control unit that makes the light flash or shimmer with multi-colored lights if a multi-color RGB strip is selected. Although, such effects are used infrequently.

LED lighting for the kitchen based on several strips should only be carried out using a parallel connection diagram
INSTALLATION OF LED STRIP IN THE KITCHEN WITH YOUR HANDS
LED backlight must be assembled in accordance with the following rules:
- The tape cannot be cut to length arbitrarily, only in certain places. For this purpose, special marks are applied to it.
- If it is necessary to use several tapes, they are connected to the power supply in parallel.
- The electrical cable coming from the power supply should be connected to the tape not by connectors, but by soldering, this is more reliable. The connection should be sealed using heat shrink tubing. You can also use electrical tape, but it is more difficult to do and will not look as neat.
LED strip in the kitchen: photo of the connection diagram with adjustable luminous flux dimmer
- LED kitchen lighting is attached under cabinets using double-sided adhesive tape. First, you should only lightly secure the tape in several places and, making sure that it is in the right place and lies flat, press firmly along its entire length.
If you do not have sufficient knowledge and skills to work with electricity and electronics, entrust the installation of lighting to specialists. published


